目录
[Spring Cloud](#Spring Cloud)
[什么是 Spring Cloud](#什么是 Spring Cloud)
[Spring Cloud 版本](#Spring Cloud 版本)
[Spring Cloud 实现方案](#Spring Cloud 实现方案)
在学习 Spring Cloud 之前,我们先来了解一下什么是微服务,以及微服务的发展历史。架构发展的过程中,遇到了哪些问题?是如何解决的?Spring Cloud 解决了其中的什么问题?
微服务
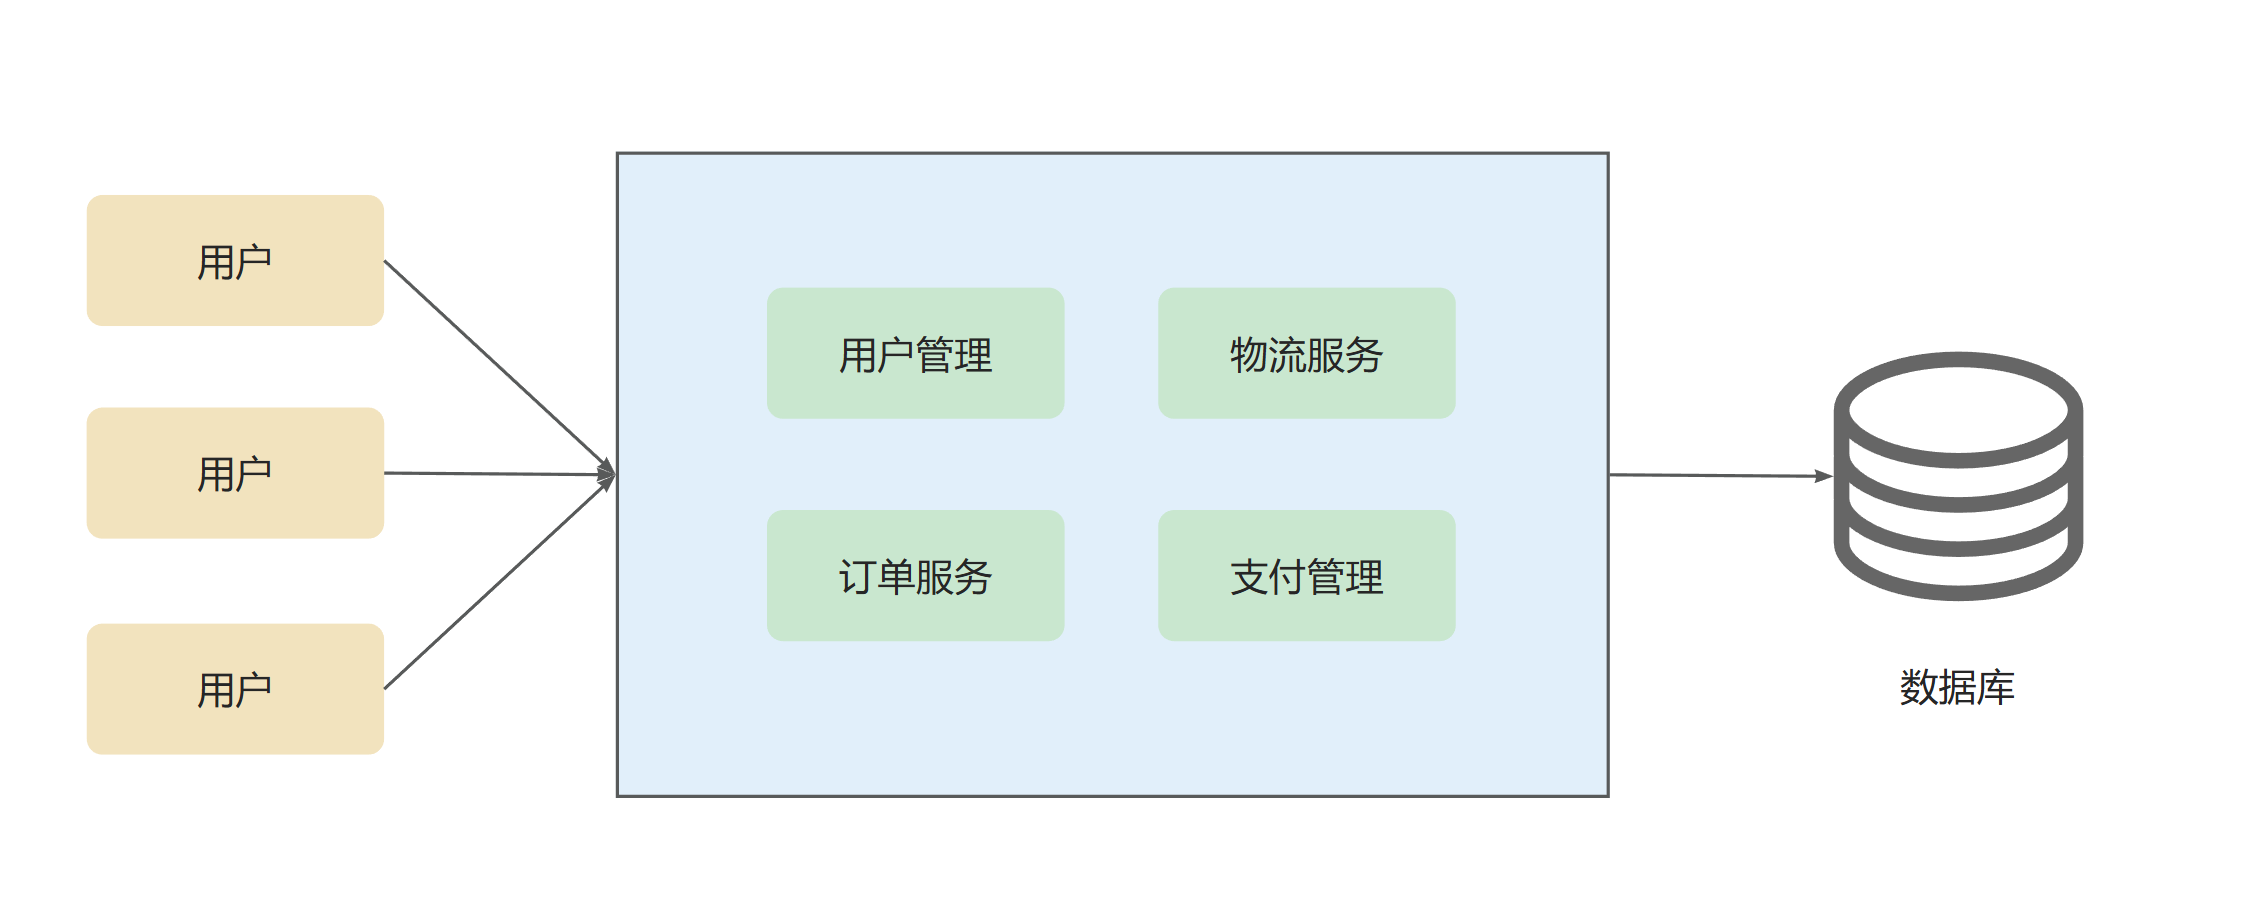
单体架构
所有功能模块(如用户管理、订单处理)打包在一个应用中,共享同一数据库 ,模块间通过函数调用直接通信,开发、测试、部署简单,通常使用同一编程语言和框架
优点:
1. 开发简单:适合小型项目或初创团队
2. 部署便捷:只需部署一个应用(如单个WAR/JAR文件)
3. 性能高:模块间调用无网络开销(本地调用)
缺点:
1. 难以扩展:只能整体扩展(如复制整个应用),无法针对模块单独扩展
2.维护困难:代码库膨胀后难以修改,牵一发而动全身
3. 技术僵化:难以引入新语言或框架
4. 可靠性差:单点故障可能导致整个系统崩溃
然而,当用户量越来越大时,需求也会越来越多,流量也会越来越大,服务就可能会面临如下问题:
服务器压力越来越大,负载越来越高,甚至出现无法访问的情况
业务场景逐渐复杂,为了满足用户的需求,单体应用越来越大,各个业务代码之间的耦合度越来越高,任何一个问题都需要正确项目重新构建、发布
一个微小的问题也可能会导致整个应用挂掉
接下来,我们就来看集群和分布式架构是如何解决上述问题的
集群和分布式架构
对于上述问题,我们可以考虑从 两个方面进行解决和优化:
横向扩展
纵向扩展
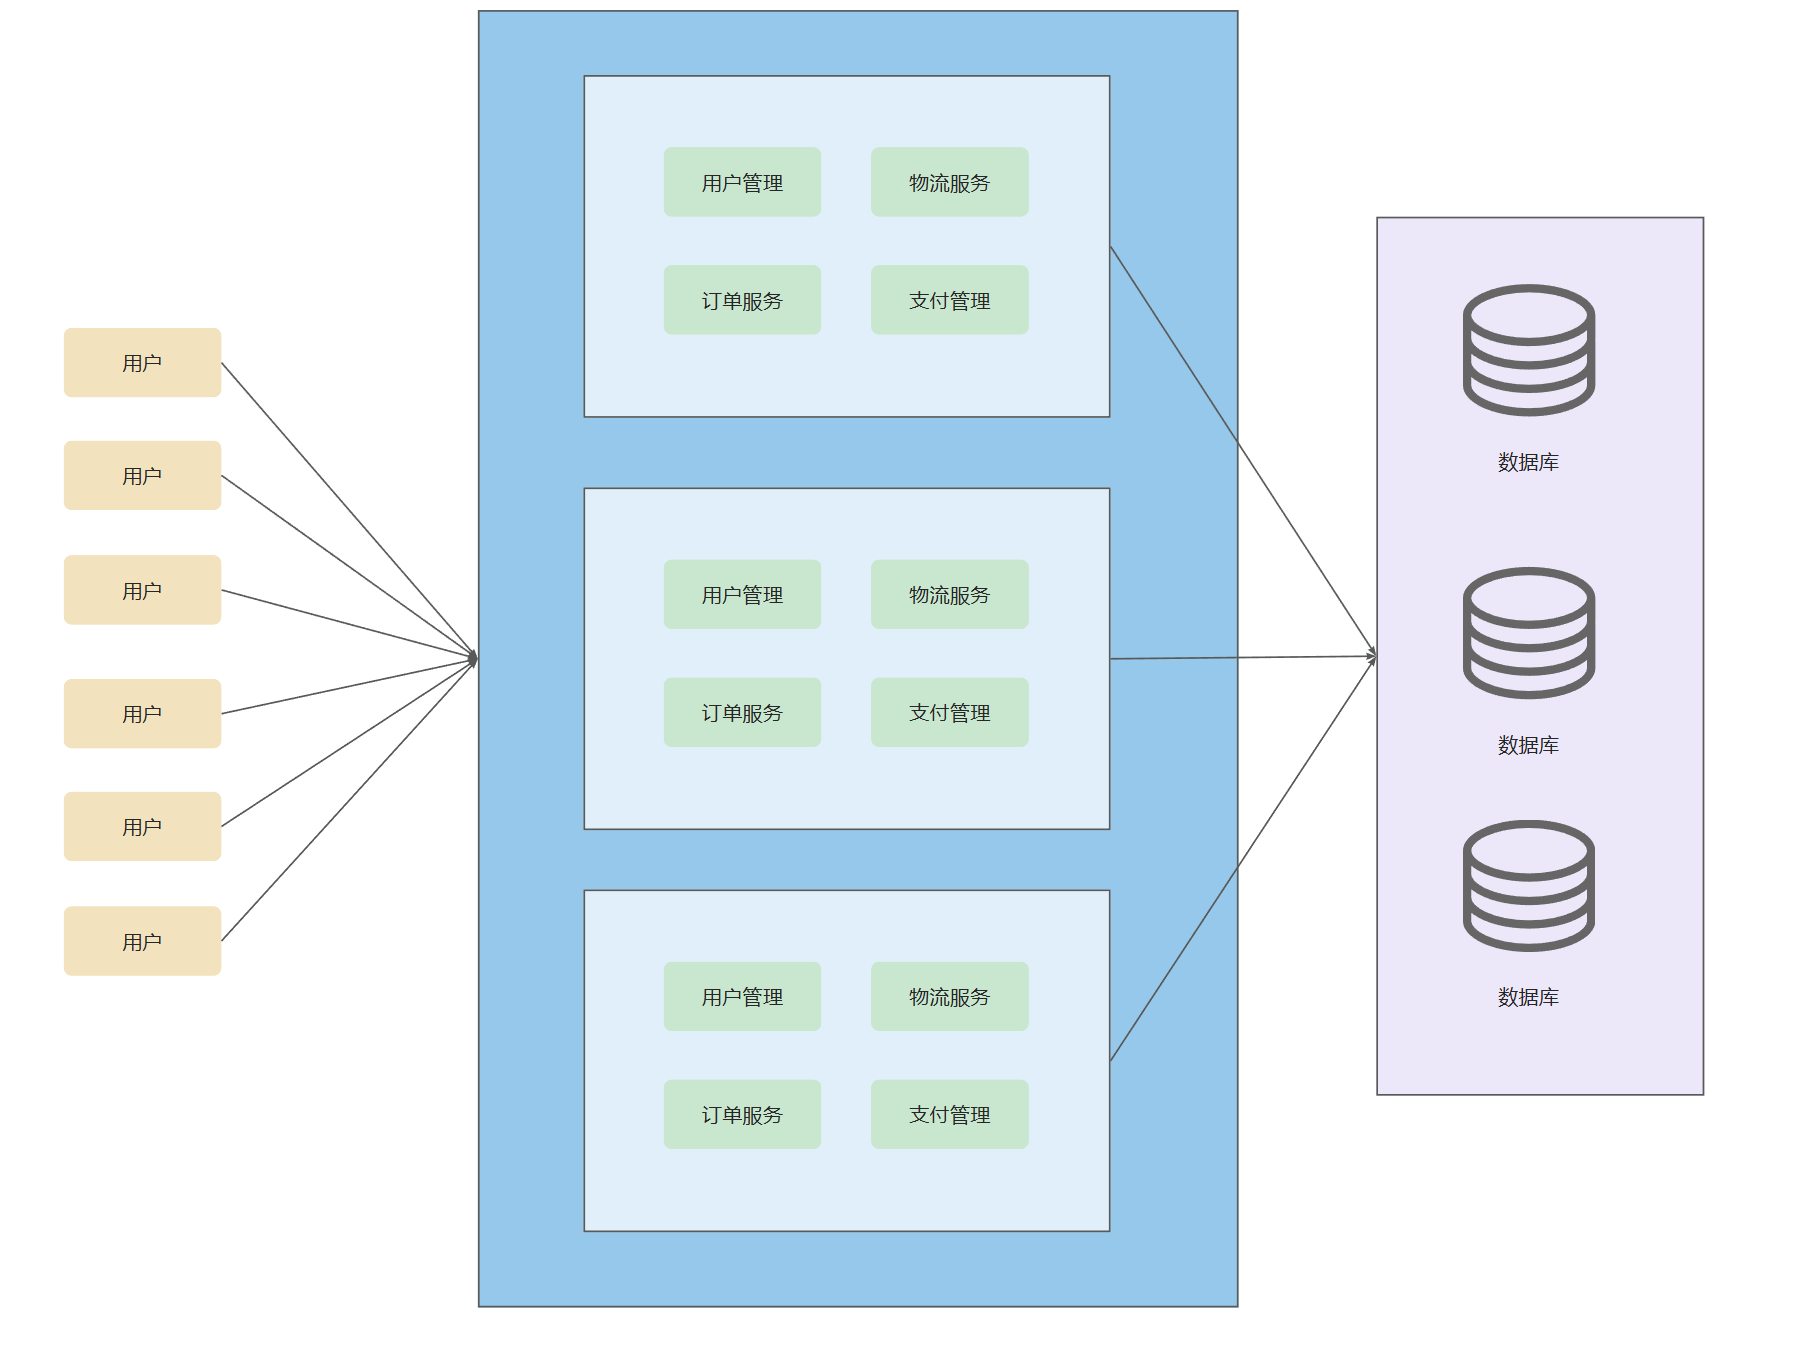
横向扩展
横向扩展 :添加服务器,把单台机器变成多台机器的集群,也就是集群架构
集群架构: 通过多台服务器部署相同应用(如负载均衡的Web服务器),提高并发能力和可用性
纵向扩展
纵向扩展 :将应用按照业务进行拆分 ,分为多个项目的分布式架构,也就是分布式架构
分布式架构: 将系统拆分为不同服务(如订单服务、支付服务),部署在不同节点上,服务间通过RPC/HTTP通信
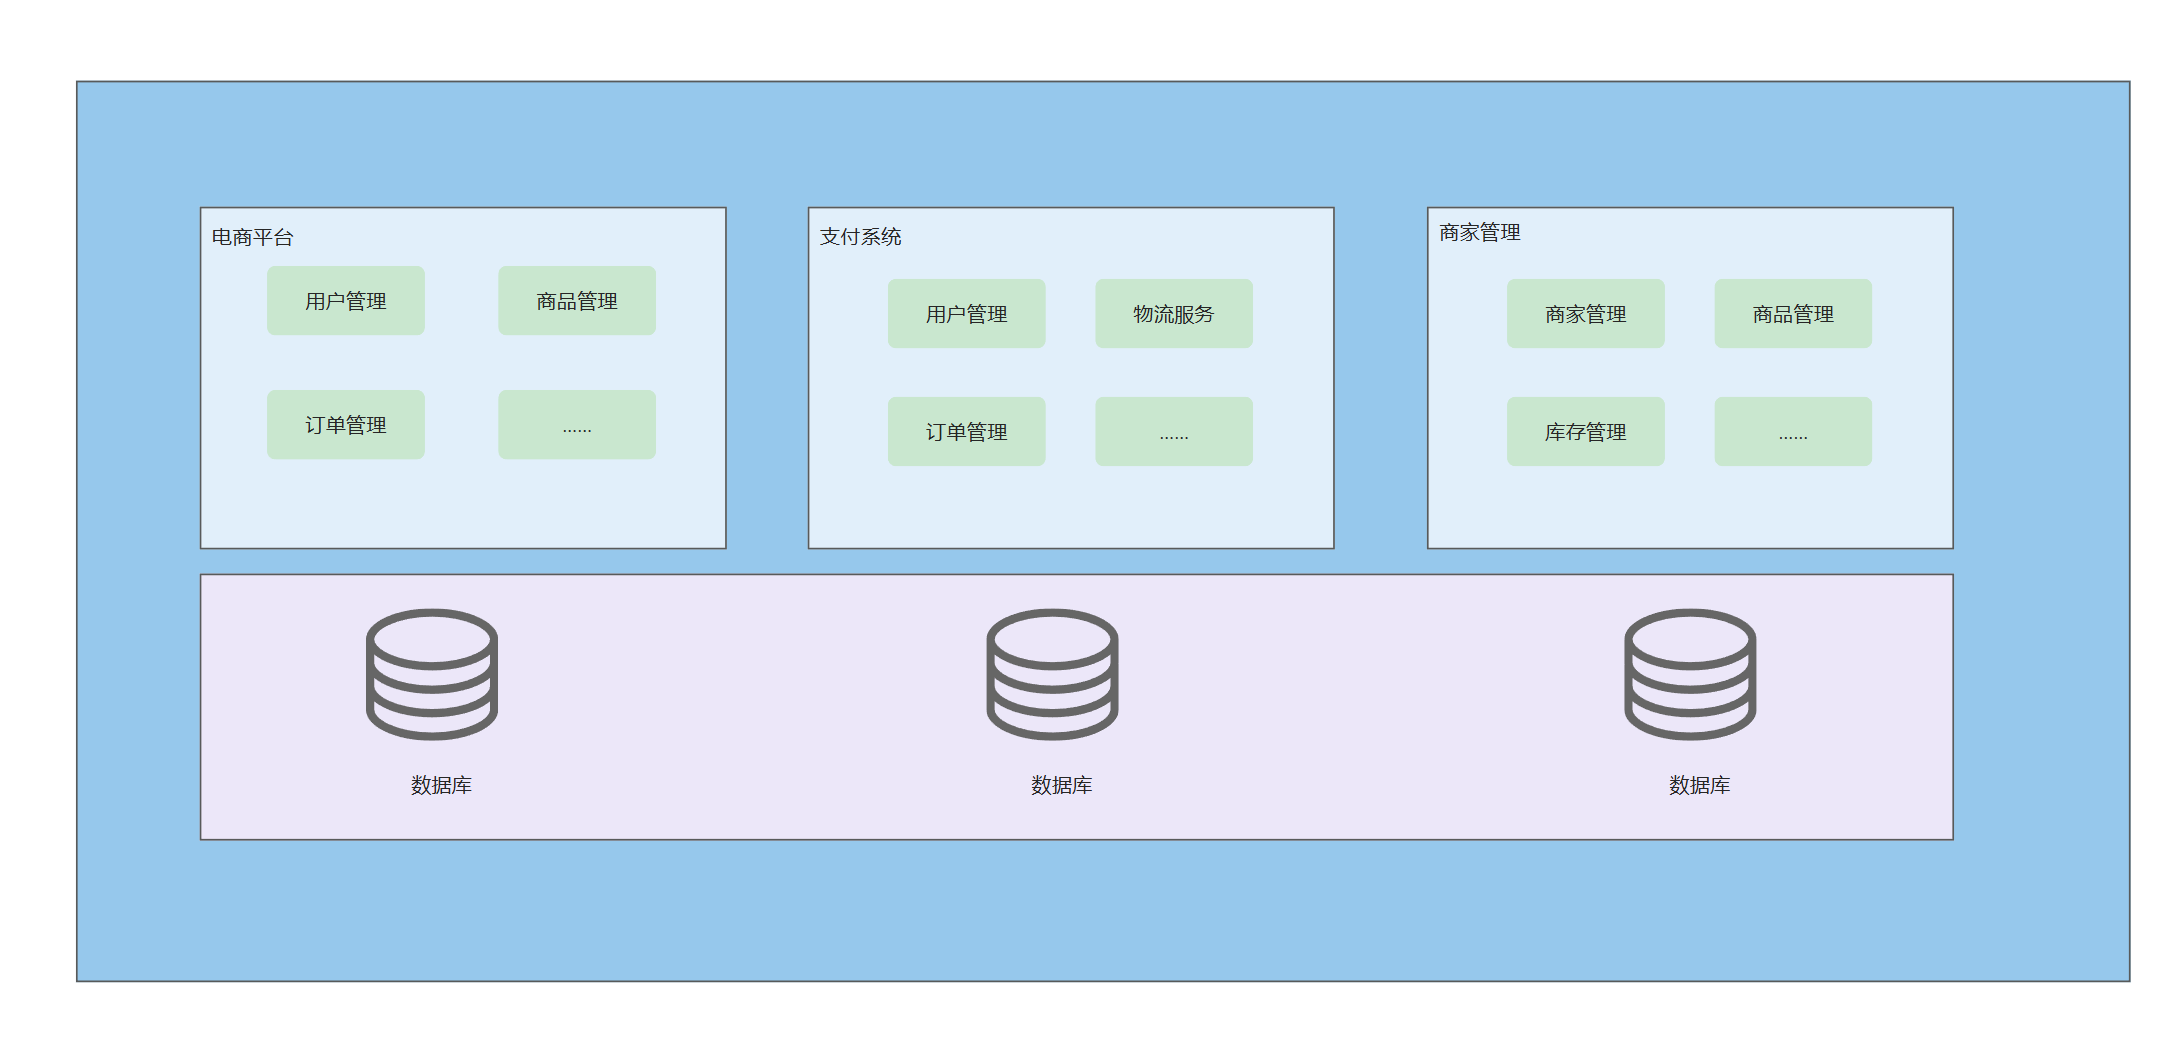
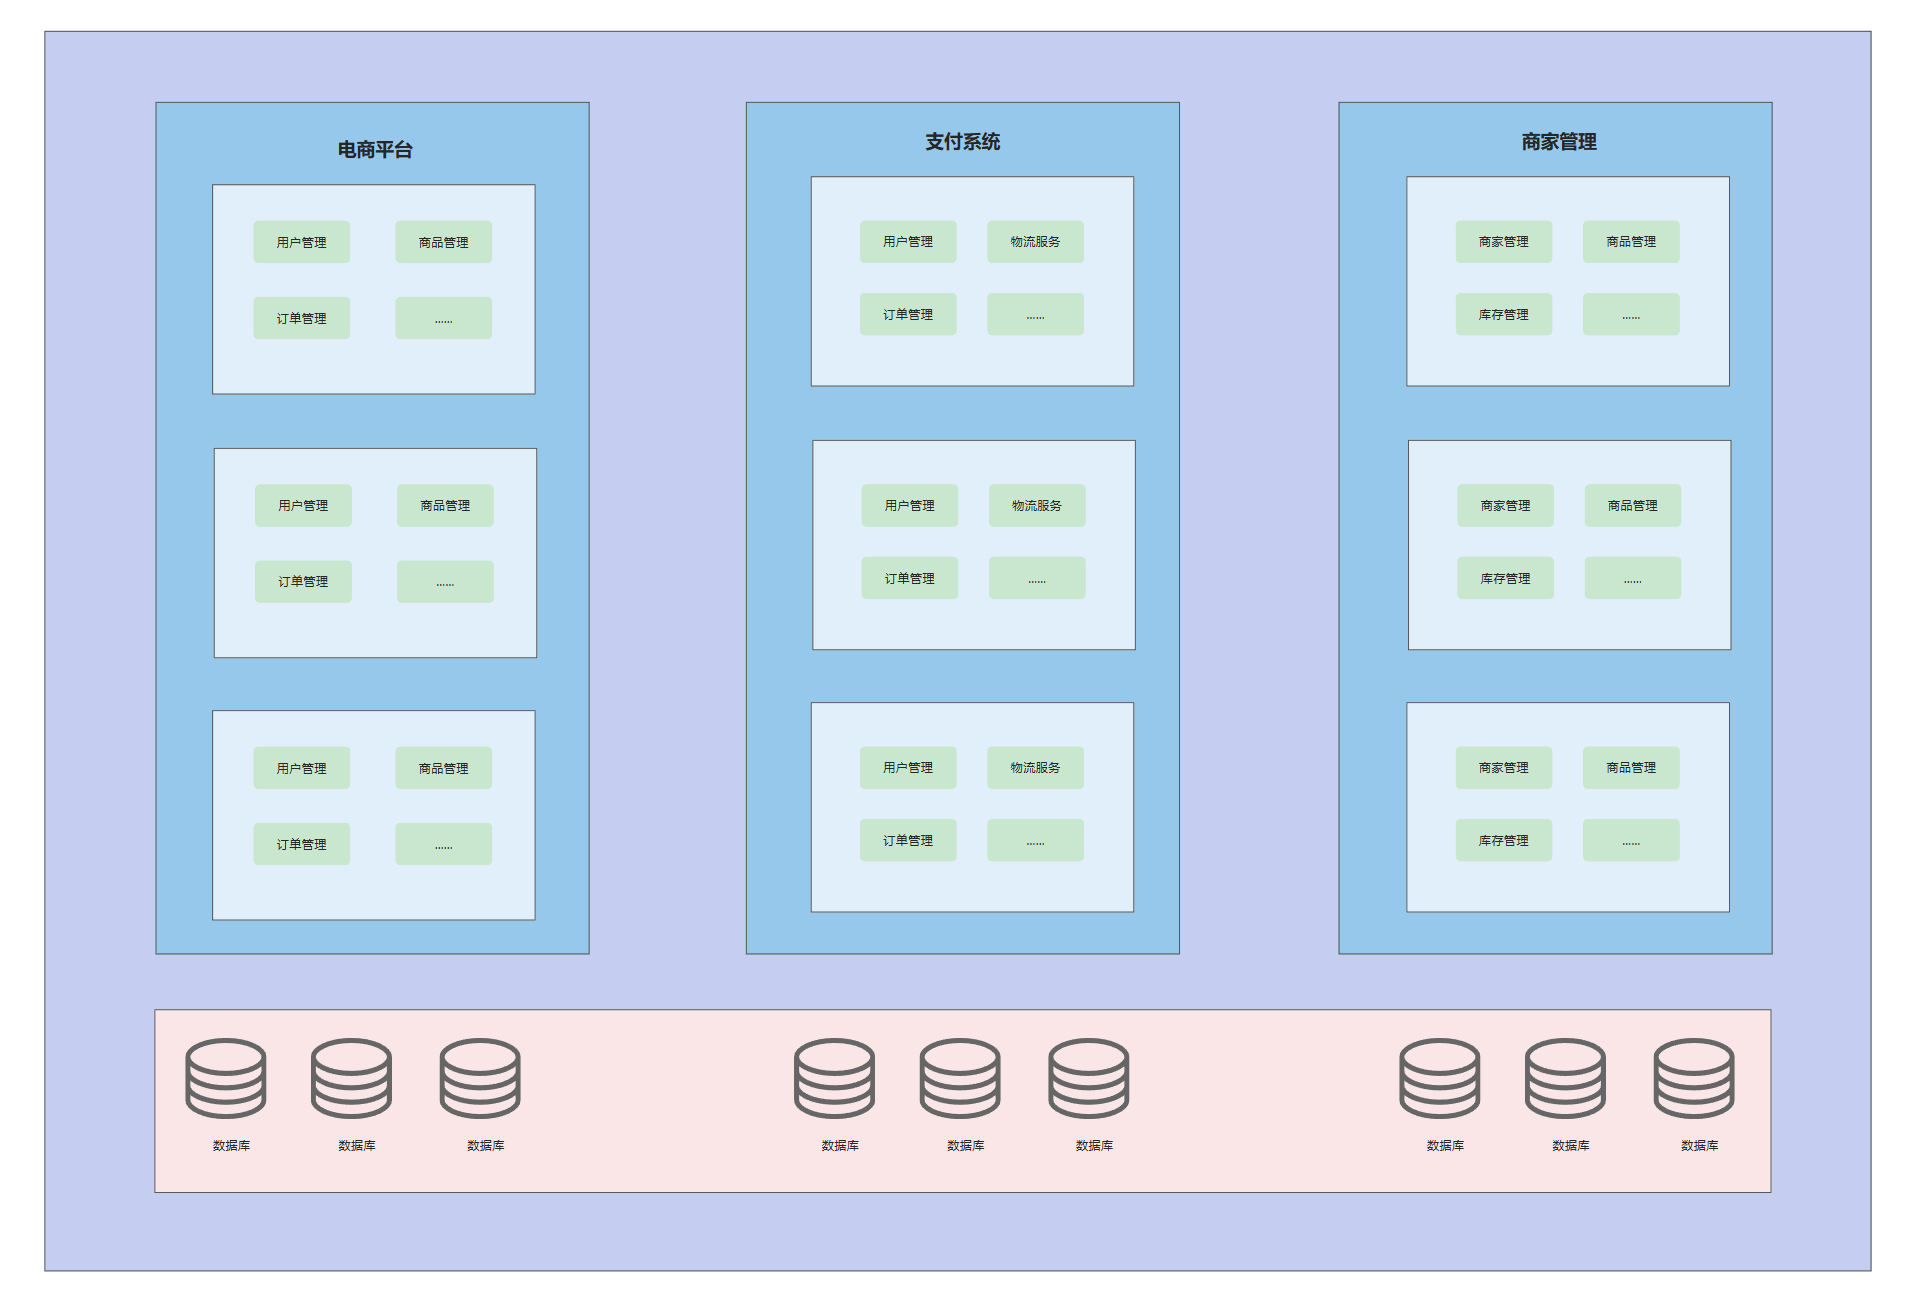
也可以结合使用 ,先以单体架构规模的项目为单位进行垂直划分 (即,将一个大项目拆分为一个一个的单体结构项目),项目之间相对比较独立,每个项目部署多台服务器:
集群和分布式的区别和联系:
从概念 上来说,集群 是多个计算机处理相同的任务 ;分布式 是多个计算机完成不同的任务
从功能 上来说,集群 的每个节点功能相同 ,且相互可替代;分布式 的每个节点业务功能不同,一个节点出现问题,这个节点则不可访问
从关系 上来说,集群 和分布式 很多时候是相互配合使用 的,如分布式的某一个节点,可能是一个集群。且分布式架构大多是建立在集群上的,因此,实际的分布式架构设计不会将集群和分布式分开,而是统称为:分布式架构
优点:
1. 高可用性:集群避免单点故障;分布式允许部分服务故障不影响整体
2. 可扩展性:可水平扩展(如增加订单服务实例)
3. 性能提升:分布式可并行处理任务(如MapReduce)
缺点:
1. 复杂度高:需处理网络通信、数据一致性、分布式事务(如CAP定理)
2. 运维成本:需要服务发现(如Nacos)、负载均衡(如NGINX)、监控等基础设施
从上述拆分情况来看,当按照业务进行拆分后,可能会有一些重复的功能,在不同的业务(如电商平台、支付系统)中都会涉及
在分布式架构下,当部署的服务越来越多时,重复的代码也就会越来越多,服务的调用关系也会越来越复杂
因此,我们可以将一些通用的、被多个上层服务调用的共享服务,提取成独立的基础服务 ,组成一个个微小的服务,这也就是微服务
微服务架构
微服务 :按业务边界划分独立服务( 如用户服务、商品服务),每个服务拥有自己的数据库,服务可独立开发、部署、扩展,技术栈异构(如Python服务调用Go服务),通常通过REST/gRPC 通信,或**消息队列(如Kafka)**解耦
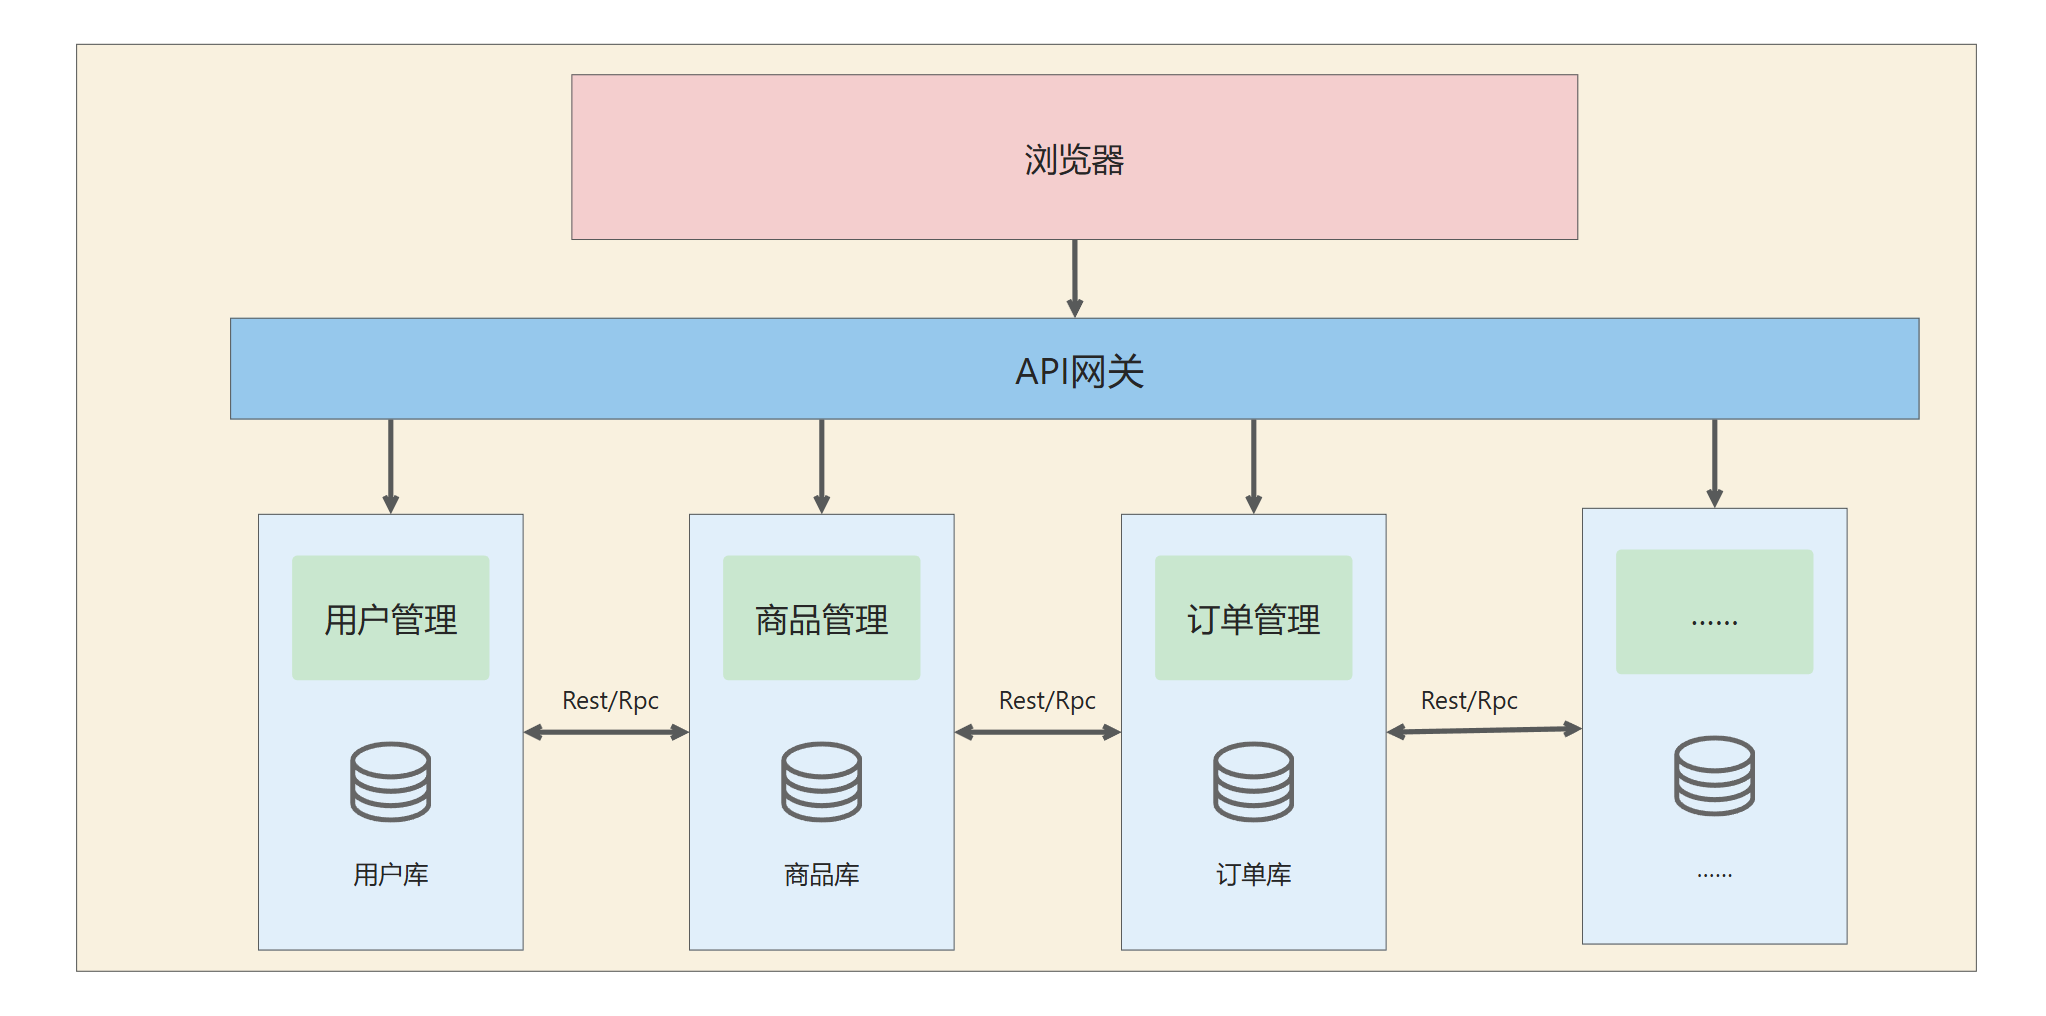
简而言之,微服务就是很小的服务,小到一个服务仅对应一个单一的功能 ,只做一件事,且这个服务可以单独部署运行
相比于分布式架构,它拆分的粒度更小,服务更独立。分布式架构 侧重于压力的分散 ,强调服务的分散化 ;而微服务 侧重于能力的分散 ,强调的是服务的专业化和精细分工
优点:
1. 敏捷开发:小团队专注单个服务,迭代更快。
2. 弹性扩展:可针对热点服务单独扩容(如秒杀服务)。
3. 容错性:服务隔离,故障不易扩散(熔断机制如Hystrix)。
4. 技术多样性:不同服务可用不同技术实现。
缺点:
1. 运维复杂:需容器化(如Docker)、编排(如Kubernetes)、日志聚合(如ELK)。
2. 分布式难题:需处理最终一致性、跨服务查询、链路追踪(如Zipkin)。
3. 网络开销:服务间调用延迟高于本地调用。
上述演化过程 :单体架构(快速上线) → 集群(应对用户增长) → 微服务(业务复杂化)
在这个过程中,逐步将单体拆分为微服务,但是,虽然微服务具备很多优势,可由于服务数量增加,我们也需要解决更多的问题,那么,这些问题该如何去解决?我们自行解决还是选择已有的成熟技术?
对于 Java 技术栈的微服务项目,Spring Cloud 是目前最成熟的解决方案之一,它是一套基于 Spring Boot 的分布式系统开发工具集,简化了微服务架构中的常见问题,提供了一系列开箱即用的组件,帮助开发者快速构建健壮的云原生应用
接下来,我们就来进一步了解什么是Spring Cloud
Spring Cloud
什么是 Spring Cloud
在微服务架构中,系统被拆分为多个独立服务,但随之带来了一系列分布式环境下的挑战。Spring Cloud针对这些问题提供了标准化解决方案:
| 分布式系统问题 | Spring Cloud 的解决方案 | 对应组件/技术 |
|---|---|---|
| 服务发现与注册 | 动态管理服务实例的上下线,避免硬编码IP | Eureka、Nacos、Consul、Zookeeper |
| 服务间调用 | 简化远程调用,支持负载均衡和容错 | OpenFeign、Ribbon、RestTemplate |
| 配置中心 | 统一管理分布式配置,支持动态更新 | Spring Cloud Config、Nacos、Apollo |
| 熔断与容错 | 防止服务雪崩,提升系统弹性 | Hystrix、Sentinel |
| API 网关 | 统一入口、路由、鉴权、限流 | Spring Cloud Gateway、Zuul |
| 分布式事务 | 解决跨服务数据一致性问题(部分支持) | Seata |
| 消息驱动 | 解耦服务,实现异步通信 | Spring Cloud Stream(集成Kafka/RabbitMQ) |
| 链路追踪 | 监控请求链路,定位性能瓶颈 | Sleuth + Zipkin |
Spring Cloud 将一些解决微服务架构中常见问题的开源框架基于 Spring Cloud 规范进行了整合 ,并基于 Spring Boot 风格 ,对这些组件进行了封装 ,屏蔽掉复杂的配置和实现原理,为开发者提供了开箱即用的微服务开发体验。也就是说,Spring Cloud提供了一系列可以让开发人员快速构建分布式服务的工具,如配置管理、服务发现、熔断、路由等。
Spring Cloud 版本
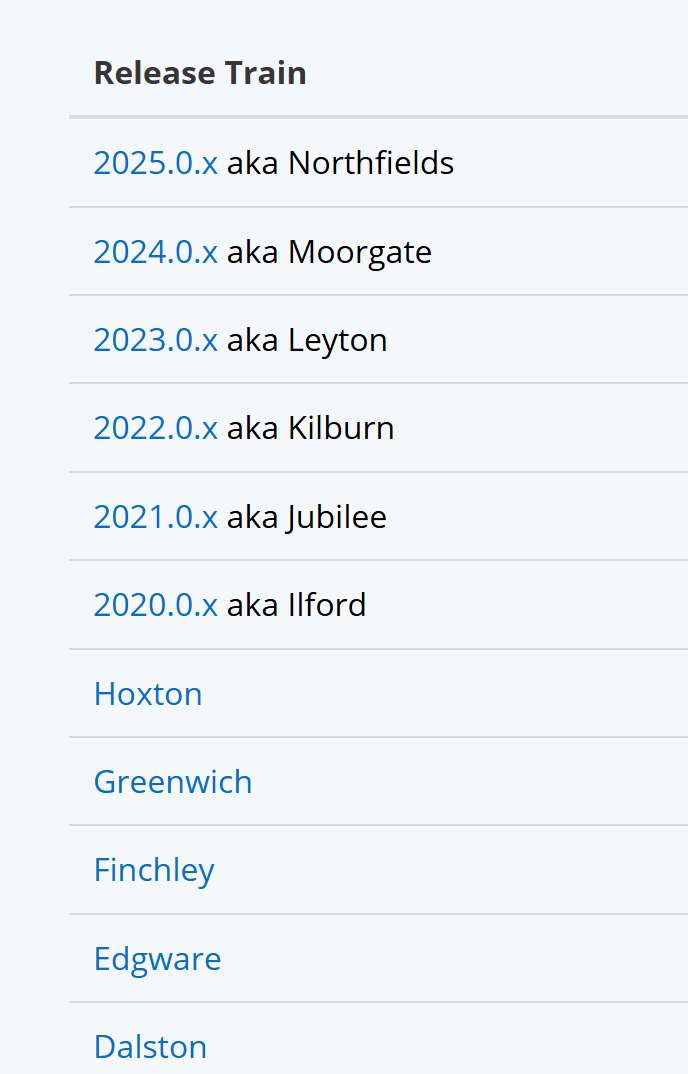
Spring Cloud 是一个由很多子项目组成 的庞大项目,这些子项目由各个公司来维护 ,因此发布阶段也不同,也就是说Spring Cloud 版本 是一个"大版本",包含多个子组件的兼容版本
为了管理主项目和子项目的依赖关系 ,以及为了避免和子项目版本的冲突 ,主项目版本命名并没有采用和子项目数字版本化的形式,而是采用了伦敦地铁站名称(如Hoxton、Greenwich)作为版本代号,但由于英文版本号太复杂了,从 Hoxton 版本之后,Spring Cloud 的版本就变成了 2020.0.0 这样的日期版本号了
由于 Spring Cloud 中的所有子项目都依赖 Spring Boot,因此Spring Boot 和 Spring Cloud 之间的版本也存在一定的对应关系:
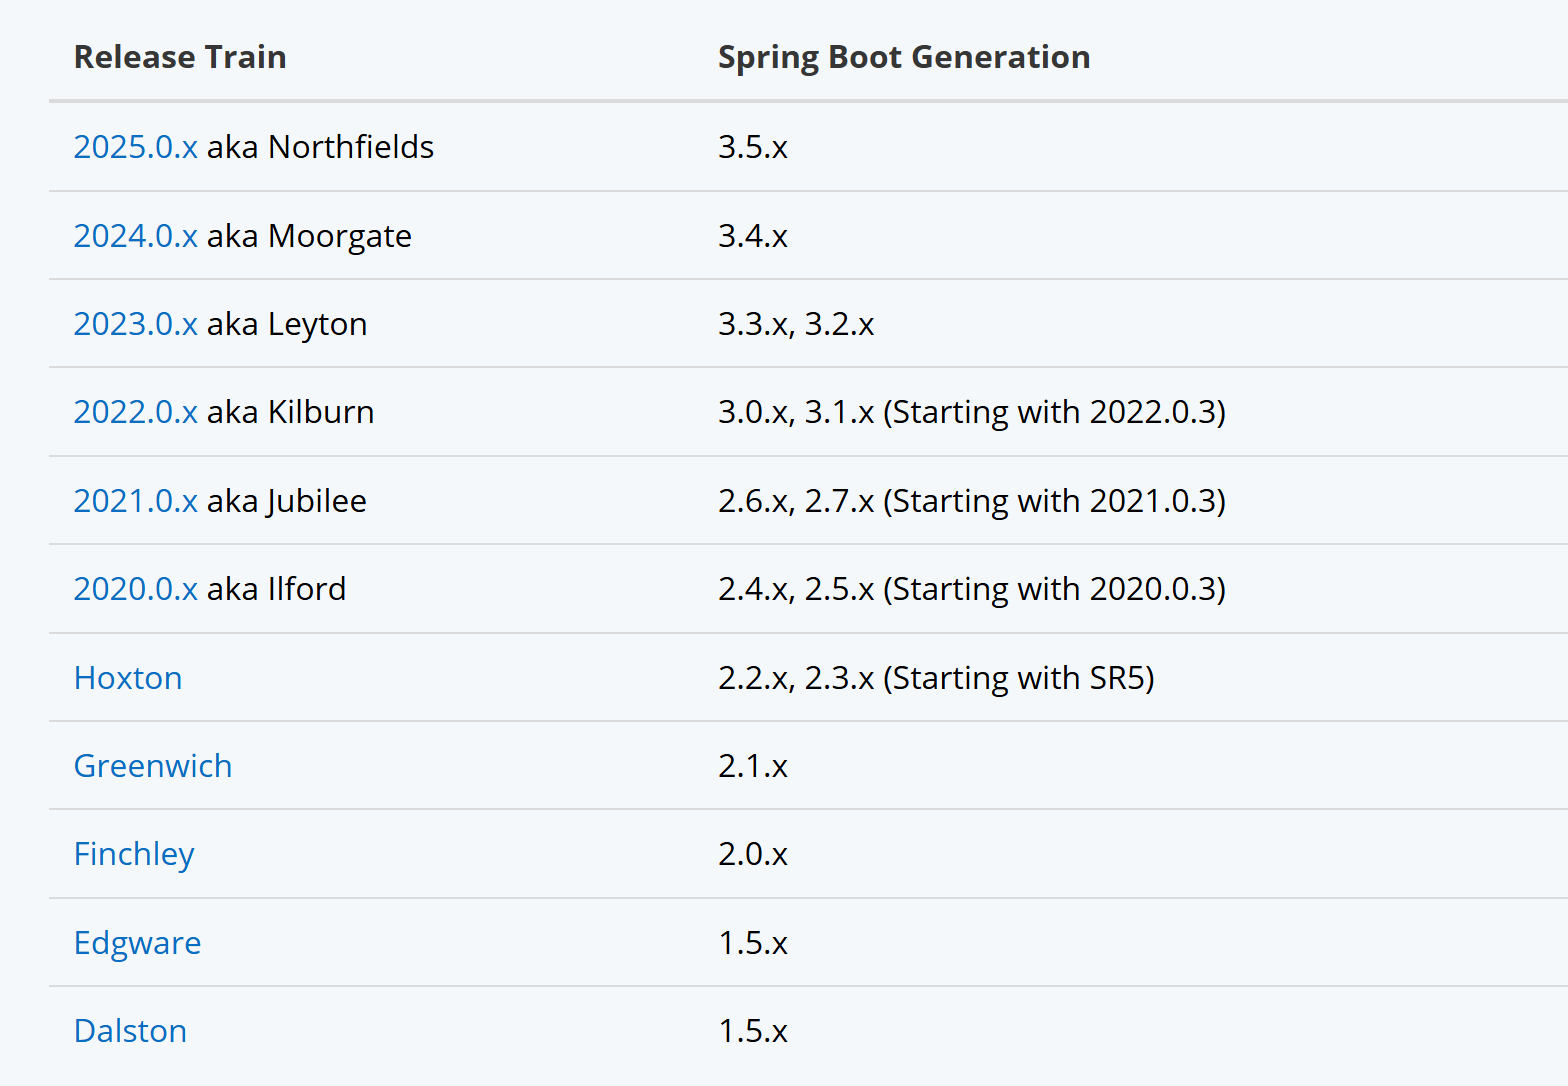
例如 Spring Boot 3.2.X 对应的 Spring Cloud 版本是 2023.0.X
若有一个 Spring Boot 项目,我们希望在这个项目中添加一些 Spring Cloud 的组件,需要根据当前项目的 Spring Boot 版本,选择 Spring Cloud 版本,保证与 Spring Boot 版本匹配,否则可能出现兼容性问题
Spring Cloud 实现方案
Spring Cloud 提供了多种实现方案来构建分布式系统,主要包括 Spring Cloud Netflix 方案 、Spring Cloud Alibaba 方案
Spring Cloud Netflix 是 Netflix OSS在 Spring Cloud 规范下的实现,核心组件包括:
| 组件 | 作用 |
|---|---|
| Eureka | 服务注册与发现 |
| Ribbon | 客户端负载均衡 |
| Hystrix | 熔断降级 |
| Zuul 1.x | API网关(阻塞式) |
| Feign | 声明式HTTP客户端 |
但 Netflix 公司在 2018 年左右宣布其核心组件 Hystrix、Ribbon、Zuul等进入维护阶段,Spring Cloud 也被迫宣布删除这些维护模块,并提供了一些替换建议,例如:
| Netflix 组件 | 替代方案 | 特点 |
|---|---|---|
| Ribbon | Spring Cloud LoadBalancer | 1. 支持响应式编程(Reactive) 2. 与 Spring 生态深度集成 |
| Hystrix | Resilience4J | 轻量级,支持函数式编程 |
| Zuul 1.x | Spring Cloud Gateway | 1. 基于 WebFlux 的非阻塞IO 2. 性能更高,支持动态路由 |
更多可参考:Spring Cloud Greenwich.RC1 available now
Spring Cloud Alibaba 是阿里的开源组件和云产品在Spring Cloud 规范下的实现,核心组件包括:
| 组件 | 作用 | 特点 |
|---|---|---|
| Nacos | 服务发现 + 配置中心 | 支持AP/CP模式 |
| Sentinel | 熔断降级 + 流量控制 | 可视化控制台 |
| RocketMQ | 消息队列 | 高吞吐分布式消息中间件 |
| Seata | 分布式事务 | AT/TCC/SAGA模式 |
| Dubbo | RPC调用 | 高性能,与Spring Cloud整合 |
更多可参考:https://sca.aliyun.com/docs/2022/overview/what-is-sca/
在了解了 Spring Cloud的基本概念之后,我们继续进一步学习如何进行微服务应用开发
微服务应用开发的第一步,是进行服务拆分,接下来,我们就来看如何进行服务拆分
服务拆分
拆分多小的服务才算微服务,这个并没有明确的标准。微服务并不是越小越好,服务越小,微服务架构的优点和缺点都会越来越明显
服务越小,微服务的独立性会越高,但同时,微服务的数量也会越多,管理这些微服务的难度也会提高
微服务拆分一般遵循如下原则
服务拆分原则
单一职责原则(SRP) :在微服务架构中,每个服务只负责一个明确的业务能力 ,每个服务都有清晰的定义和边界,只关注自己的特定业务领域,例如:订单服务只处理订单生命周期(创建、支付、取消)
服务自治 :每个微服务应该具备高度自治的能力 ,即每个服务都能独立开发、独立测试、独立构建、独立部署、独立运行,例如:订单服务由自己的存储、配置,在进行开发、构建、部署、运行和测试时,并不需要过多关注其他微服务的状态和数据
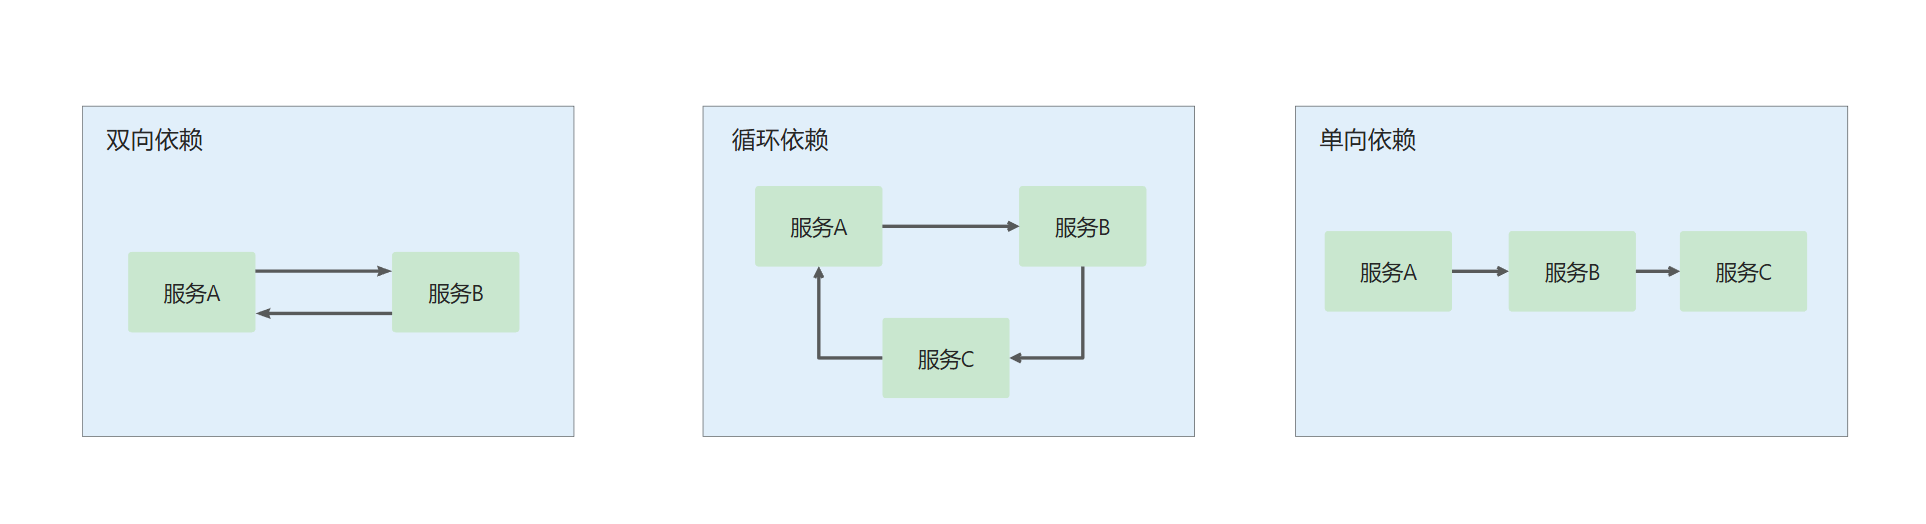
单向依赖 :微服务之间需要做到单向依赖 ,严禁循环依赖,双向依赖 ,若一些场景确实无法避免循环依赖或双向依赖,可以考虑使用消息队列或其他方式来实现
依赖关系:
简单示例
服务拆分
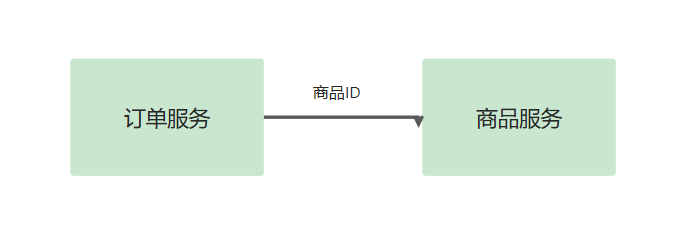
我们以一个简单的订单系统进行演示,将其拆分为两个服务:订单服务 和 商品服务
订单服务:提供订单 ID,获取订单的详细信息
商品服务:根据商品 ID,返回商品的详细信息
数据准备
根据服务自治原则,每个服务都应该有自己独立的数据库
订单服务:
sql
-- 订单服务
-- 建库
create database if not exists cloud_order charset utf8mb4;

use cloud_order;
-- 订单表
DROP TABLE IF EXISTS order_detail;
CREATE TABLE order_detail (
                              `id` INT NOT NULL AUTO_INCREMENT COMMENT '订单id',
                              `user_id` BIGINT ( 20 ) NOT NULL COMMENT '用户ID',
                              `product_id` BIGINT ( 20 ) NULL COMMENT '产品id',
                              `num` INT ( 10 ) NULL DEFAULT 0 COMMENT '下单数量',
                              `price` BIGINT ( 20 ) NOT NULL COMMENT '实付款',
                              `delete_flag` TINYINT ( 4 ) NULL DEFAULT 0,
                              `create_time` DATETIME DEFAULT now(),
                              `update_time` DATETIME DEFAULT now(),
                              PRIMARY KEY ( id )) ENGINE = INNODB DEFAULT CHARACTER
SET = utf8mb4 COMMENT = '订单表';

-- 数据初始化
insert into order_detail (user_id,product_id,num,price)
values
    (2001, 1001,1,99), (2002, 1002,1,30), (2001, 1003,1,40),
    (2003, 1004,3,58), (2004, 1005,7,85), (2005, 1006,7,94);
商品服务:
sql
-- 产品服务
create database if not exists cloud_product charset utf8mb4;
-- 产品表
use cloud_product;
DROP TABLE IF EXISTS product_detail;
CREATE TABLE product_detail (
                                `id` INT NOT NULL AUTO_INCREMENT COMMENT '产品id',
                                `product_name` varchar ( 128 ) NULL COMMENT '产品名称',
                                `product_price` BIGINT ( 20 ) NOT NULL COMMENT '产品价格',
                                `state` TINYINT ( 4 ) NULL DEFAULT 0 COMMENT '产品状态 0-有效 1-下架',
                                `create_time` DATETIME DEFAULT now(),
                                `update_time` DATETIME DEFAULT now(),
                                PRIMARY KEY ( id )) ENGINE = INNODB DEFAULT CHARACTER
SET = utf8mb4 COMMENT = '产品表';

-- 数据初始化
insert into product_detail (id, product_name,product_price,state)
values
    (1001,"T恤", 101, 0), (1002, "短袖",30, 0), (1003, "短裤",44, 0),
    (1004, "卫衣",58, 0), (1005, "马甲",98, 0),(1006,"羽绒服", 101, 0),
    (1007, "冲锋衣",30, 0), (1008, "袜子",44, 0), (1009, "鞋子",58, 0),
    (10010, "毛衣",98, 0);
工程搭建
在这里,我们创建父子工程,从而实现统一管理
父工程创建
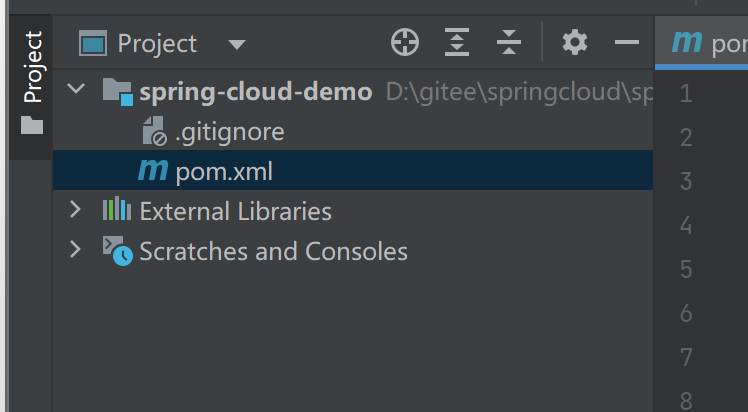
创建一个空的 Maven 项目,并只保留 pom.xml:
完善 pom 文件 :声明父工程打包方式为 pom ,使用 properites 进行版本号统一管理,通过 dependencyManagement管理依赖
XML
<?xml version="1.0" encoding="UTF-8"?>
<project xmlns="http://maven.apache.org/POM/4.0.0"
         xmlns:xsi="http://www.w3.org/2001/XMLSchema-instance"
         xsi:schemaLocation="http://maven.apache.org/POM/4.0.0 http://maven.apache.org/xsd/maven-4.0.0.xsd">
    <modelVersion>4.0.0</modelVersion>

    <groupId>org.example</groupId>
    <artifactId>spring-cloud-demo</artifactId>
    <version>1.0-SNAPSHOT</version>

    <parent>
        <groupId>org.springframework.boot</groupId>
        <artifactId>spring-boot-starter-parent</artifactId>
        <version>3.1.6</version>
        <relativePath/> <!-- lookup parent from repository -->
    </parent>
    <properties>
        <maven.compiler.source>17</maven.compiler.source>
        <maven.compiler.target>17</maven.compiler.target>
        <java.version>17</java.version>
        <mybatis.version>3.0.3</mybatis.version>
        <mysql.version>8.0.33</mysql.version>
        <spring-cloud.version>2022.0.3</spring-cloud.version>
    </properties>
    <dependencies>
        <dependency>
            <groupId>org.projectlombok</groupId>
            <artifactId>lombok</artifactId>
            <optional>true</optional>
        </dependency>
    </dependencies>

    <dependencyManagement>
        <dependencies>
            <dependency>
                <groupId>org.springframework.cloud</groupId>
                <artifactId>spring-cloud-dependencies</artifactId>
                <version>${spring-cloud.version}</version>
                <type>pom</type>
                <scope>import</scope>
            </dependency>
            <dependency>
                <groupId>org.mybatis.spring.boot</groupId>
                <artifactId>mybatis-spring-boot-starter</artifactId>
                <version>${mybatis.version}</version>
            </dependency>
            <dependency>
                <groupId>com.mysql</groupId>
                <artifactId>mysql-connector-j</artifactId>
                <version>${mysql.version}</version>
            </dependency>
            <dependency>
                <groupId>org.mybatis.spring.boot</groupId>
                <artifactId>mybatis-spring-boot-starter-test</artifactId>
                <version>${mybatis.version}</version>
                <scope>test</scope>
            </dependency>
        </dependencies>
    </dependencyManagement>

</project>其中,dependencyManagement 和 dependencies是两种不同的依赖声明方式
dependencyManagemen: 声明依赖的版本和范围 (不实际引入依赖),子模块可继承并省略版本号,主要用于统一管理多模块项目的依赖版本
**dependencies:**直接引入依赖到当前模块,子模块必须显式声明依赖才会引入,用于定义模块实际需要的依赖
接下来,我们继续创建子项目
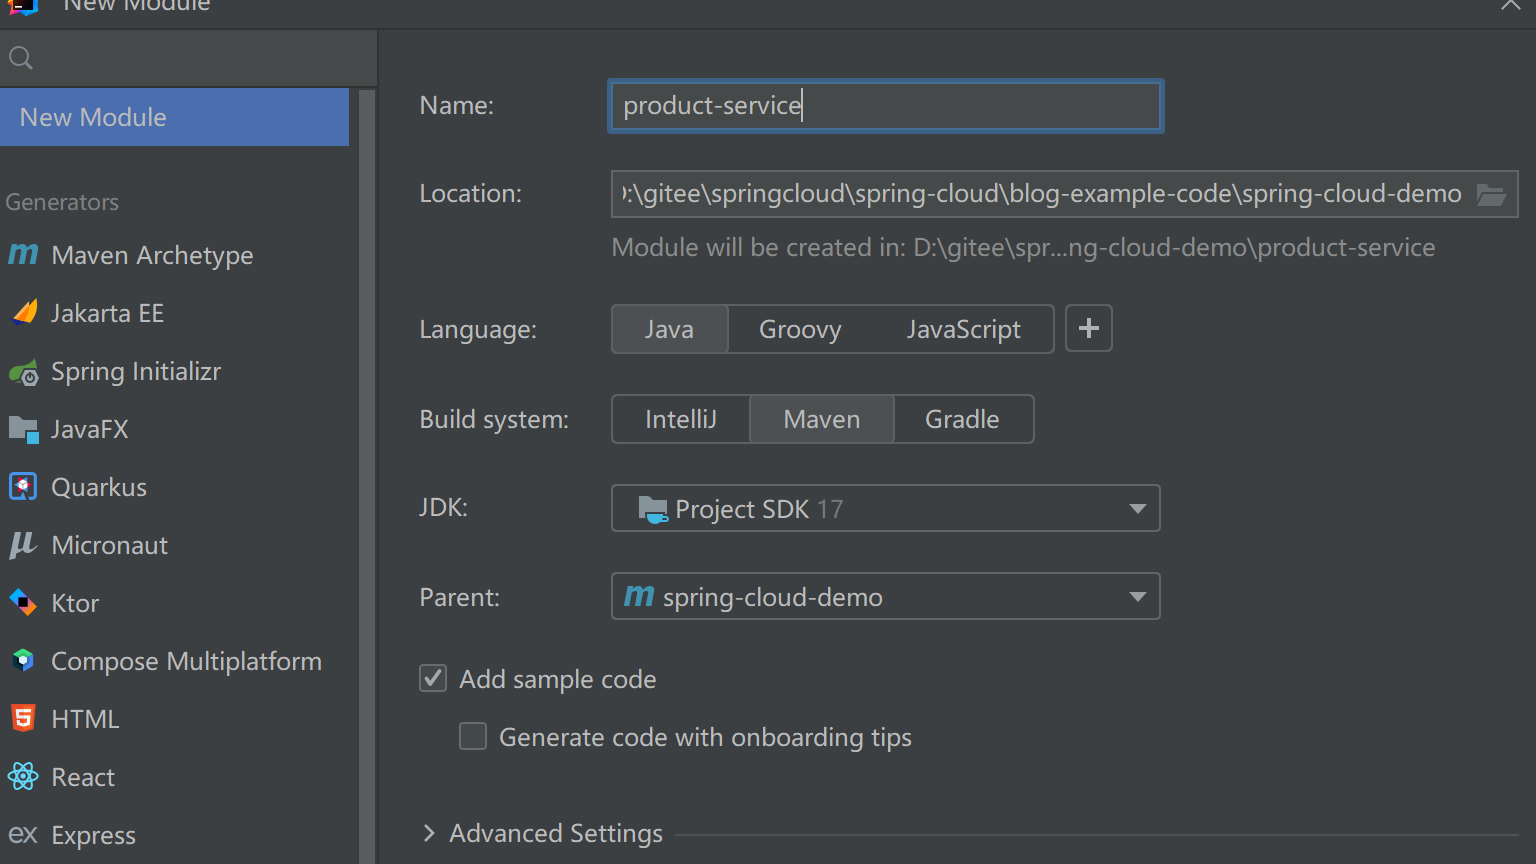
子项目创建-商品服务
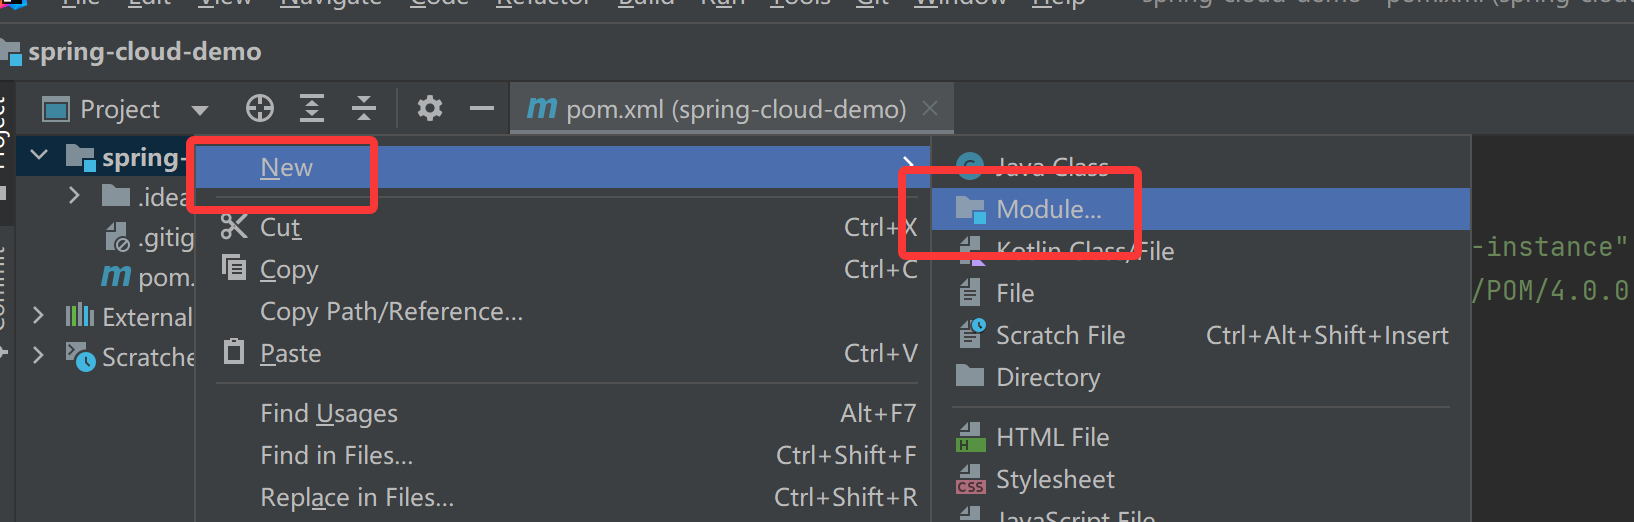
在父项目下创建子项目:
完善 pom 文件:
XML
<?xml version="1.0" encoding="UTF-8"?>
<project xmlns="http://maven.apache.org/POM/4.0.0"
         xmlns:xsi="http://www.w3.org/2001/XMLSchema-instance"
         xsi:schemaLocation="http://maven.apache.org/POM/4.0.0 http://maven.apache.org/xsd/maven-4.0.0.xsd">
    <modelVersion>4.0.0</modelVersion>
    <parent>
        <groupId>org.example</groupId>
        <artifactId>spring-cloud-demo</artifactId>
        <version>1.0-SNAPSHOT</version>
    </parent>

    <artifactId>product-service</artifactId>

    <properties>
        <maven.compiler.source>17</maven.compiler.source>
        <maven.compiler.target>17</maven.compiler.target>
        <project.build.sourceEncoding>UTF-8</project.build.sourceEncoding>
    </properties>
    <dependencies>
        <dependency>
            <groupId>org.springframework.boot</groupId>
            <artifactId>spring-boot-starter-web</artifactId>
        </dependency>
        <dependency>
            <groupId>com.mysql</groupId>
            <artifactId>mysql-connector-j</artifactId>
        </dependency>
        <!--mybatis-->
        <dependency>
            <groupId>org.mybatis.spring.boot</groupId>
            <artifactId>mybatis-spring-boot-starter</artifactId>
        </dependency>
    </dependencies>

    <build>
        <plugins>
            <plugin>
                <groupId>org.springframework.boot</groupId>
                <artifactId>spring-boot-maven-plugin</artifactId>
            </plugin>
        </plugins>
    </build>
</project>
完善启动类:
java
@SpringBootApplication
public class ProductServiceApplication {
    public static void main(String[] args) {
        SpringApplication.run(ProductServiceApplication.class, args);
    }
}
完善配置文件:
java
server:
  port: 9090
spring:
  application:
    name: product-service
  datasource:
    url: jdbc:mysql://127.0.0.1:3306/cloud_product?characterEncoding=utf8&useSSL=false
    username: root
    password: MySQL密码
    driver-class-name: com.mysql.cj.jdbc.Driver
# 设置 Mybatis 的 xml 保存路径
mybatis:
  configuration: # 配置打印 MyBatis 执行的 SQL
    log-impl: org.apache.ibatis.logging.stdout.StdOutImpl
    map-underscore-to-camel-case: true  #自动驼峰转换
创建实体类:
java
@Data
public class ProductInfo {
    private Integer id;
    private String productName;
    private Integer productPrice;
    private Integer state;
    private Date createTime;
    private Date updateTime;
}
Controller:
java
@RestController
@RequestMapping("/product")
public class ProductController {
    @Autowired
    private ProductService productService;

    @RequestMapping("/{productId}")
    public ProductInfo getProductById(@PathVariable("productId") Integer productId) {
        return productService.findProductInfo(productId);
    }
}
Service:
java
@Slf4j
@Service
public class ProductService {
    @Autowired
    private ProductMapper productMapper;

    public ProductInfo findProductInfo(Integer id) {
        log.info("收到请求, id: " + id);
        return productMapper.selectProductById(id);
    }
}
Mapper:
java
@Mapper
public interface ProductMapper {
    @Select("select * from product_detail where id = #{id}")
    ProductInfo selectProductById(Integer id);
}
运行,访问 127.0.0.1:9090/product/1001 进行测试:

同样的步骤,我们创建订单服务
子项目创建-订单服务
同样创建子项目:
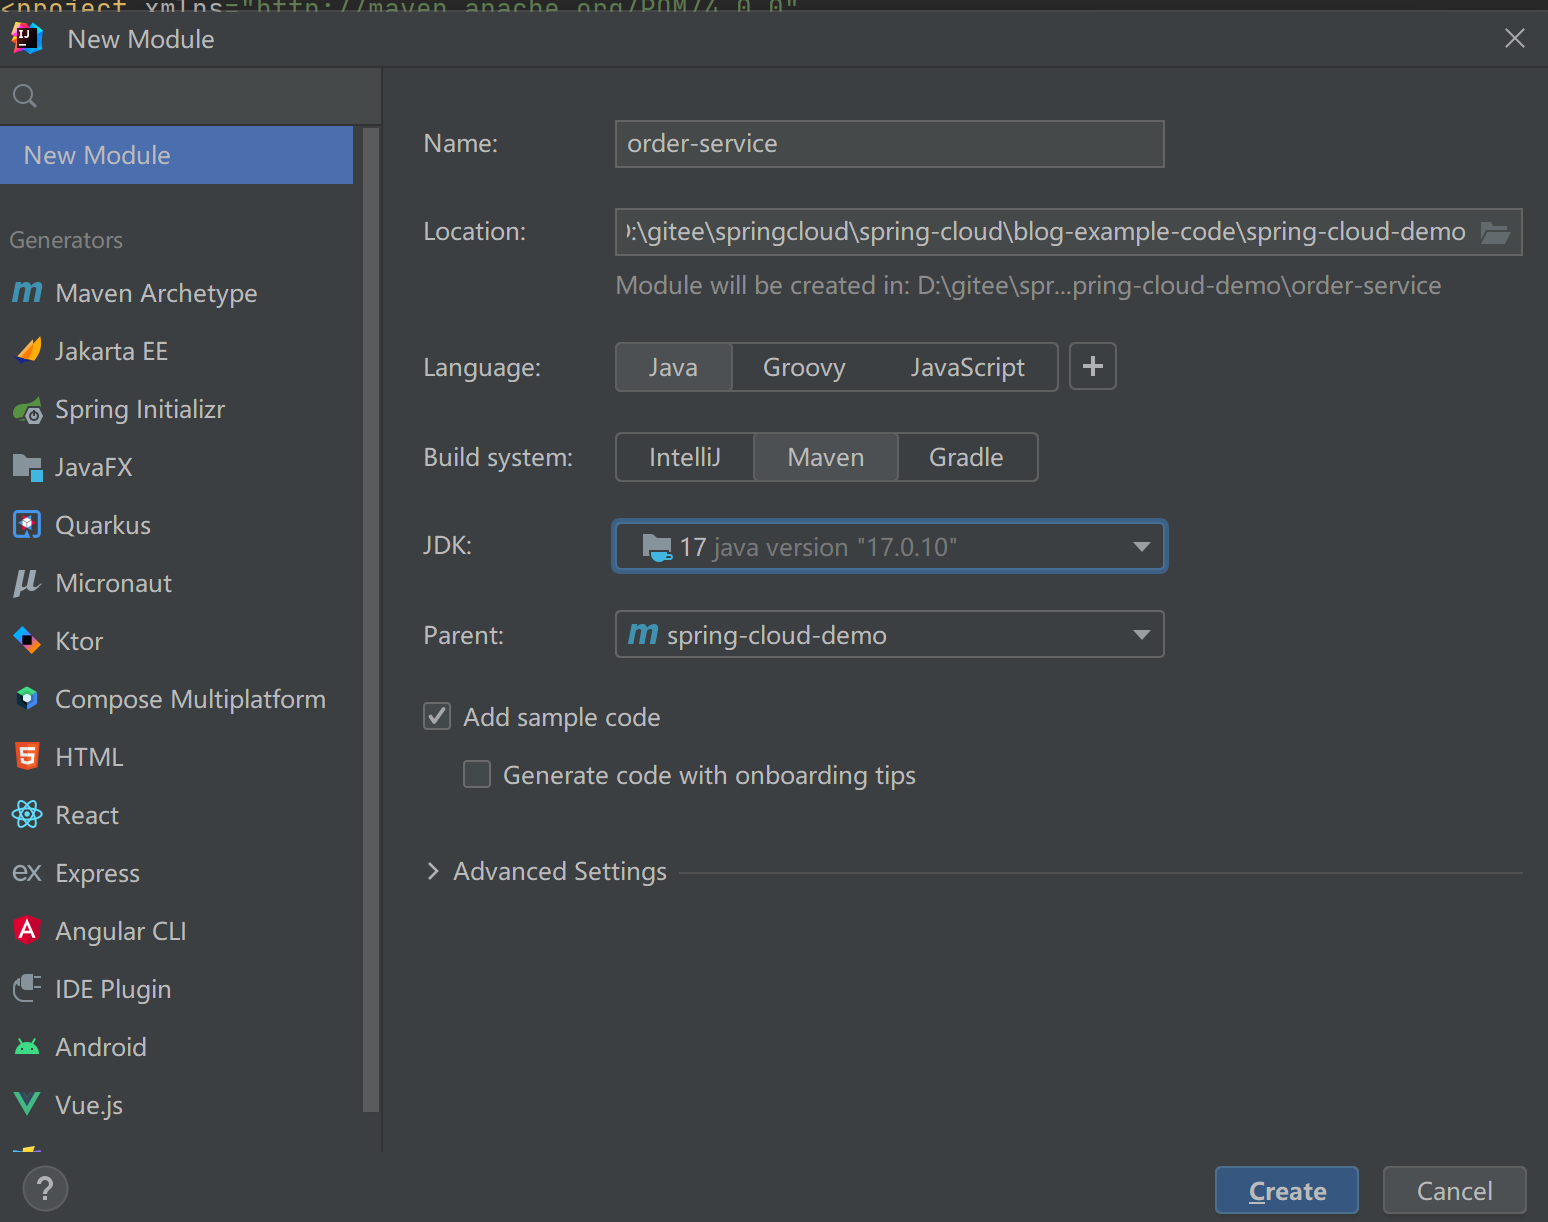
完善 pom 文件:
XML
<?xml version="1.0" encoding="UTF-8"?>
<project xmlns="http://maven.apache.org/POM/4.0.0"
         xmlns:xsi="http://www.w3.org/2001/XMLSchema-instance"
         xsi:schemaLocation="http://maven.apache.org/POM/4.0.0 http://maven.apache.org/xsd/maven-4.0.0.xsd">
    <modelVersion>4.0.0</modelVersion>
    <parent>
        <groupId>org.example</groupId>
        <artifactId>spring-cloud-demo</artifactId>
        <version>1.0-SNAPSHOT</version>
    </parent>

    <artifactId>order-service</artifactId>

    <properties>
        <maven.compiler.source>17</maven.compiler.source>
        <maven.compiler.target>17</maven.compiler.target>
        <project.build.sourceEncoding>UTF-8</project.build.sourceEncoding>
    </properties>

    <dependencies>
        <dependency>
            <groupId>org.springframework.boot</groupId>
            <artifactId>spring-boot-starter-web</artifactId>
        </dependency>
        <dependency>
            <groupId>com.mysql</groupId>
            <artifactId>mysql-connector-j</artifactId>
        </dependency>
        <!--mybatis-->
        <dependency>
            <groupId>org.mybatis.spring.boot</groupId>
            <artifactId>mybatis-spring-boot-starter</artifactId>
        </dependency>
    </dependencies>

    <build>
        <plugins>
            <plugin>
                <groupId>org.springframework.boot</groupId>
                <artifactId>spring-boot-maven-plugin</artifactId>
            </plugin>
        </plugins>
    </build>
</project>
完善启动类:
java
@SpringBootApplication
public class OrderServiceApplication {
    public static void main(String[] args) {
        SpringApplication.run(OrderServiceApplication.class, args);
    }
}
完善配置文件:
java
server:
  port: 8080
spring:
  application:
    name: order-service
  datasource:
    url: jdbc:mysql://127.0.0.1:3306/cloud_order?characterEncoding=utf8&useSSL=false&allowPublicKeyRetrieval=true
    username: root
    password: MySQL密码
    driver-class-name: com.mysql.cj.jdbc.Driver
# 设置 Mybatis 的 xml 保存路径
mybatis:
  configuration: # 配置打印 MyBatis 执行的 SQL
    log-impl: org.apache.ibatis.logging.stdout.StdOutImpl
    map-underscore-to-camel-case: true  #自动驼峰转换
创建实体类:
java
@Data
public class OrderInfo {
    private Integer id;
    private Integer userId;
    private Integer productId;
    private Integer num;
    private Integer price;
    private Integer deleteFlag;
    private Date createTime;
    private Date updateTime;
}
Controller:
java
@RequestMapping("/order")
@RestController
public class OrderController {
    @Autowired
    private OrderService orderService;
    @RequestMapping("/{orderId}")
    public OrderInfo getOrderById(@PathVariable("orderId") Integer orderId) {
        return orderService.findOrderInfoById(orderId);
    }
}
service:
java
@Service
public class OrderService {
    @Autowired
    private OrderMapper orderMapper;
    public OrderInfo findOrderInfoById(Integer orderId) {
        OrderInfo orderInfo = orderMapper.selectOrderById(orderId);
        return orderInfo;
    }
}
mapper:
java
@Mapper
public interface OrderMapper {
    @Select("select * from order_detail where id = #{orderId}")
    OrderInfo selectOrderById(Integer orderId);
}
运行,访问 127.0.0.1:8080/order/1 测试:

商品服务和订单服初步实现完成,接下来我们来看两个模块之间如何进行调用
远程调用
在查询订单信息时,其中包括商品信息,因此,我们需要根据订单里的商品 ID 获取商品的详细信息:
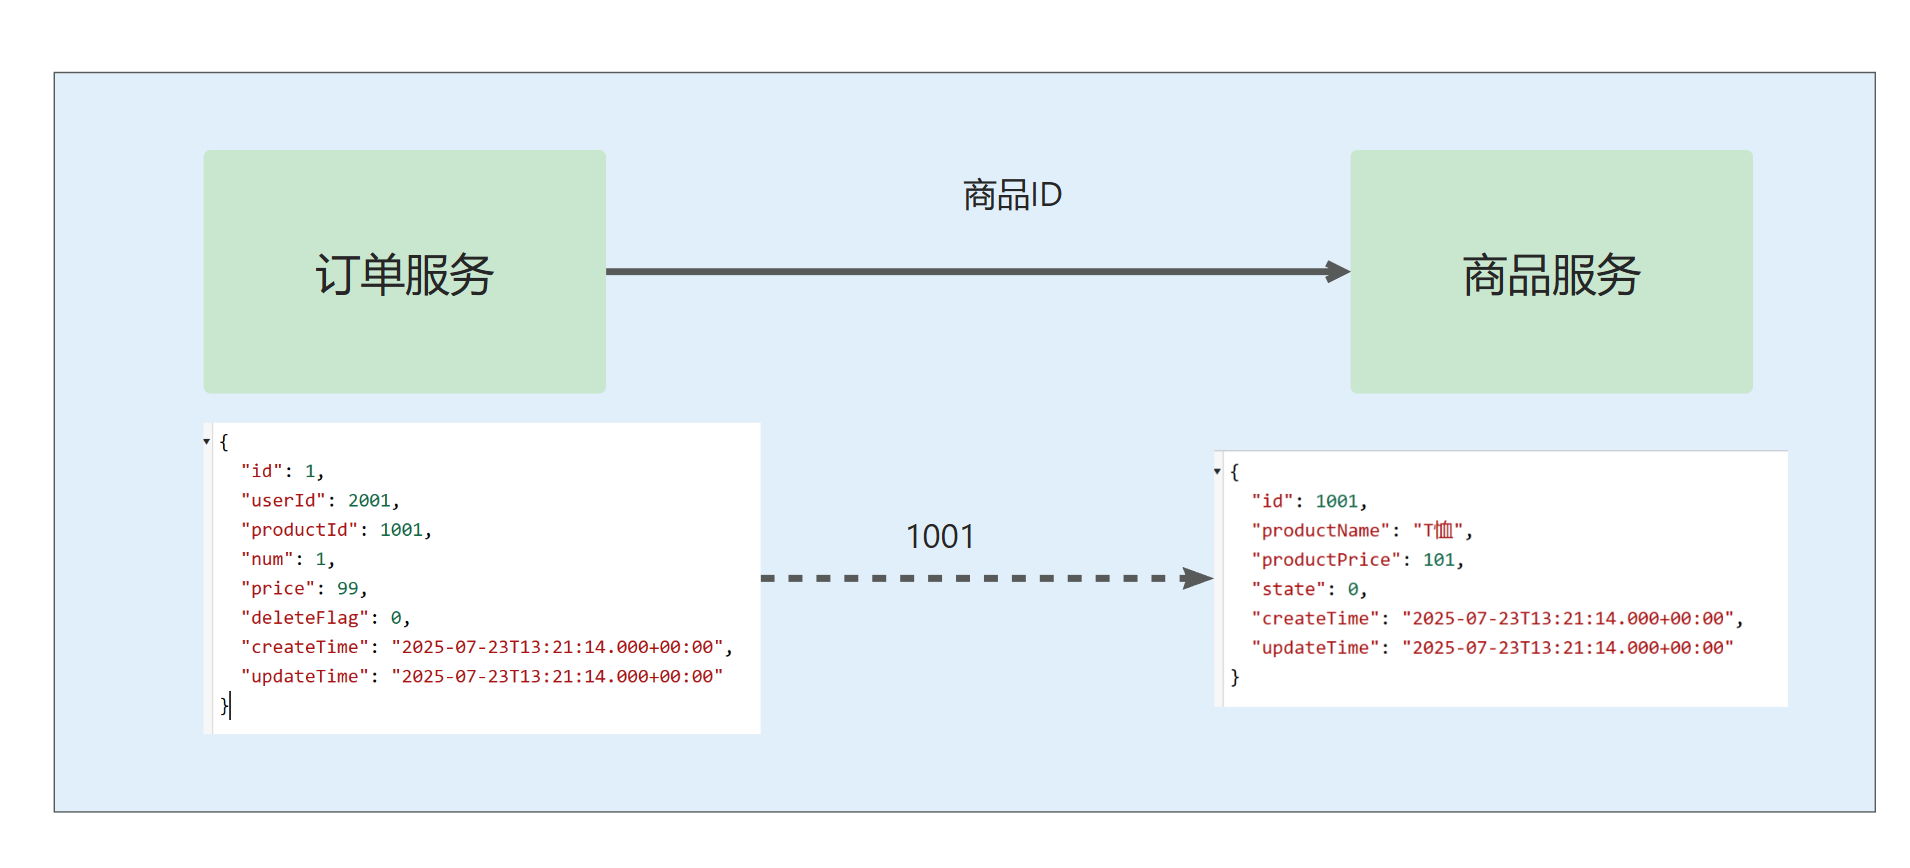
那么,订单服务如何访问商品服务呢?
之前我们在访问商品服务时,使用浏览器发送 HTTP 请求 获取商品详细信息,那么,同样的,也可以在 order-service 服务中向 product-service 服务发送一个 HTTP 请求,获取返回结果,并与订单信息整合,最后一起返回
Spring 框架提供了 RestTemplate 来帮助我们发送 HTTP 请求,因此,我们定义 RestTemplate:
java
@Configuration
public class BeanConfig {
    @Bean
    public RestTemplate restTemplate() {
        return new RestTemplate();
    }
}对于接收的ProductInfo ,需要 order-service中创建商品信息:
java
@Data
public class ProductInfo {
    private Integer id;
    private String productName;
    private Integer productPrice;
    private Integer state;
    private Date createTime;
    private Date updateTime;
}在订单信息OrderInfo中添加商品信息:
java
@Data
public class OrderInfo {
    private Integer id;
    private Integer userId;
    private Integer productId;
    private Integer num;
    private Integer price;
    private Integer deleteFlag;
    private Date createTime;
    private Date updateTime;
    private ProductInfo productInfo;
}
修改 OrderService:
java
@Service
public class OrderService {
    @Autowired
    private OrderMapper orderMapper;
    @Autowired
    private RestTemplate restTemplate;
    public OrderInfo findOrderInfoById(Integer orderId) {
        OrderInfo orderInfo = orderMapper.selectOrderById(orderId);
        String url = "http://127.0.0.1:9090/product/" + orderInfo.getProductId();
        ProductInfo productInfo = restTemplate.getForObject(url, ProductInfo.class);
        orderInfo.setProductInfo(productInfo);
        return orderInfo;
    }
}
再次访问 127.0.0.1:8080/order/1 验证是否包含商品信息:

此时,虽然成功完成两个模块之间的远程通信,但项目中还存在着不少问题:
远程调用时,URL 的 IP 和 端口号是写死的(127.0.0.1:9090),如果需要更换 IP,需要修改代码,是否可以实现让调用方不依赖服务提供方的 IP?
多机部署时,如何实现压力分摊?
商品信息代码重复编写,是否可以实现不同模块重复代码共用?
......
在之后的文章中,我们就来进一步学习如何使用 Spring Cloud 中的组件来解决这些问题