1 通过APT仓库安装
1.1 自动化仓库配置
bash
sudo apt install -y postgresql-common
sudo /usr/share/postgresql-common/pgdg/apt.postgresql.org.sh
1.1.1 sudo apt install -y postgresql-common
安装postgresql依赖的相关项,创建相关的连接
bash
Reading package lists... Done
Building dependency tree... Done
Reading state information... Done
The following additional packages will be installed:
  libcommon-sense-perl libjson-perl libjson-xs-perl libtypes-serialiser-perl postgresql-client-common ssl-cert
The following NEW packages will be installed:
  libcommon-sense-perl libjson-perl libjson-xs-perl libtypes-serialiser-perl postgresql-client-common postgresql-common ssl-cert
0 upgraded, 7 newly installed, 0 to remove and 0 not upgraded.
Need to get 413 kB of archives.
After this operation, 1394 kB of additional disk space will be used.
Get:1 https://mirrors.tuna.tsinghua.edu.cn/ubuntu noble/main amd64 libjson-perl all 4.10000-1 [81.9 kB]
Get:2 https://mirrors.tuna.tsinghua.edu.cn/ubuntu noble-updates/main amd64 postgresql-client-common all 257build1.1 [36.4 kB]
Get:3 https://mirrors.tuna.tsinghua.edu.cn/ubuntu noble/main amd64 ssl-cert all 1.1.2ubuntu1 [17.8 kB]
Get:4 https://mirrors.tuna.tsinghua.edu.cn/ubuntu noble-updates/main amd64 postgresql-common all 257build1.1 [161 kB]
Get:5 https://mirrors.tuna.tsinghua.edu.cn/ubuntu noble/main amd64 libcommon-sense-perl amd64 3.75-3build3 [20.4 kB]
Get:6 https://mirrors.tuna.tsinghua.edu.cn/ubuntu noble/main amd64 libtypes-serialiser-perl all 1.01-1 [11.6 kB]
Get:7 https://mirrors.tuna.tsinghua.edu.cn/ubuntu noble-updates/main amd64 libjson-xs-perl amd64 4.040-0ubuntu0.24.04.1 [83.7 kB]
Fetched 413 kB in 1s (420 kB/s)
Preconfiguring packages ...
Selecting previously unselected package libjson-perl.
(Reading database ... 40764 files and directories currently installed.)
Preparing to unpack .../0-libjson-perl_4.10000-1_all.deb ...
Unpacking libjson-perl (4.10000-1) ...
Selecting previously unselected package postgresql-client-common.
Preparing to unpack .../1-postgresql-client-common_257build1.1_all.deb ...
Unpacking postgresql-client-common (257build1.1) ...
Selecting previously unselected package ssl-cert.
Preparing to unpack .../2-ssl-cert_1.1.2ubuntu1_all.deb ...
Unpacking ssl-cert (1.1.2ubuntu1) ...
Selecting previously unselected package postgresql-common.
Preparing to unpack .../3-postgresql-common_257build1.1_all.deb ...
Adding 'diversion of /usr/bin/pg_config to /usr/bin/pg_config.libpq-dev by postgresql-common'
Unpacking postgresql-common (257build1.1) ...
Selecting previously unselected package libcommon-sense-perl:amd64.
Preparing to unpack .../4-libcommon-sense-perl_3.75-3build3_amd64.deb ...
Unpacking libcommon-sense-perl:amd64 (3.75-3build3) ...
Selecting previously unselected package libtypes-serialiser-perl.
Preparing to unpack .../5-libtypes-serialiser-perl_1.01-1_all.deb ...
Unpacking libtypes-serialiser-perl (1.01-1) ...
Selecting previously unselected package libjson-xs-perl.
Preparing to unpack .../6-libjson-xs-perl_4.040-0ubuntu0.24.04.1_amd64.deb ...
Unpacking libjson-xs-perl (4.040-0ubuntu0.24.04.1) ...
Setting up postgresql-client-common (257build1.1) ...
Setting up libcommon-sense-perl:amd64 (3.75-3build3) ...
Setting up ssl-cert (1.1.2ubuntu1) ...
Created symlink /etc/systemd/system/multi-user.target.wants/ssl-cert.service → /usr/lib/systemd/system/ssl-cert.service.
Setting up libtypes-serialiser-perl (1.01-1) ...
Setting up libjson-perl (4.10000-1) ...
Setting up libjson-xs-perl (4.040-0ubuntu0.24.04.1) ...
Setting up postgresql-common (257build1.1) ...

Creating config file /etc/postgresql-common/createcluster.conf with new version
Building PostgreSQL dictionaries from installed myspell/hunspell packages...
Removing obsolete dictionary files:
Created symlink /etc/systemd/system/multi-user.target.wants/postgresql.service → /usr/lib/systemd/system/postgresql.service.
Processing triggers for man-db (2.12.0-4build2) ...
1.1.2 查看sudo /usr/share/postgresql-common/pgdg/apt.postgresql.org.sh
该命令会在/etc/apt/sources.list.d/目录下创建pgdg.sources,用于定义PostgreSQL软件安装源。pgdg.sources文件内容如下:
bash
# Ubuntu24.04及以上版本
Types: deb
URIs: https://apt.postgresql.org/pub/repos/apt
Suites: noble-pgdg
Components: main
Signed-By: /usr/share/postgresql-common/pgdg/apt.postgresql.org.gpg
Ubuntu操作系统版本为24.04(Noble Numbat)。从 Ubuntu 24.04 开始,Ubuntu 的软件源配置文件变更为 DEB822 格式,路径为 /etc/apt/sources.list.d/ubuntu.sources。因此PostgreSQL的软件安装源也为DEB222格式,完整文件地址:/etc/apt/sources.list.d/pgdg.sources。
注意:DEB格式只适用于Ubuntu24.04及以上版本,如果Ubuntu版本低于24.04,此配置文件为Ubuntu原先传统的One-Line-Style,文件位置为/etc/apt/sources.list.d/pgdg.list
bash
# Ubuntu24.04以下版本
deb [signed-by=/usr/share/postgresql-common/pgdg/apt.postgresql.org.asc]
https://apt.postgresql.org/pub/repos/apt/ noble-pgdg main
1.1.3 更换软件安装源为国内源(选做,适用于Ubuntu24.04及以上版本)
由于/etc/apt/sources.list.d/pgdg.sources文件中软件安装源为官方源:https://apt.postgresql.org/pub/repos/apt,服务器位于国外,为了方便使用,可以将软件安装源更改为国内源(以清华大学开源镜像站为例)。
利用vim命令编辑pgdg.sources文件,更换国内安装源。
bash
Types: deb
URIs: https://mirrors.tuna.tsinghua.edu.cn/postgresql/repos/apt
Suites: noble-pgdg
Components: main
Signed-By: /usr/share/postgresql-common/pgdg/apt.postgresql.org.gpg
或者使用以下命令替换相应的软件安装源地址即可。
bash
sudo sh -c 'echo "Types: deb
URIs: https://mirrors.tuna.tsinghua.edu.cn/postgresql/repos/apt/
Suites: $(lsb_release -cs)-pgdg
Components: main
Signed-By: /usr/share/postgresql-common/pgdg/apt.postgresql.org.gpg
" > /etc/apt/sources.list.d/pgdg.sources'
bash
# 恢复默认设置命令
sudo sh -c 'echo "Types: deb
URIs: https://apt.postgresql.org/pub/repos/apt
Suites: $(lsb_release -cs)-pgdg
Components: main
Signed-By: /usr/share/postgresql-common/pgdg/apt.postgresql.org.gpg
" > /etc/apt/sources.list.d/pgdg.sources'
1.1.4 更换软件安装源为国内源(选做,适用于Ubuntu24.04以下版本)
由于/etc/apt/sources.list.d/pgdg.list文件中软件安装源为官方源:https://apt.postgresql.org/pub/repos/apt,服务器位于国外,为了方便使用,可以将软件安装源更改为国内源(以清华大学开源镜像站为例)。
利用vim命令编辑pgdg.list文件,更换国内安装源。
bash
deb [signed-by=/usr/share/postgresql-common/pgdg/apt.postgresql.org.asc]
https://mirrors.tuna.tsinghua.edu.cn/postgresql/repos/apt/ noble-pgdg main
或者使用以下命令替换相应的软件安装源地址即可。
bash
sudo sh -c 'echo "deb [signed-by=/usr/share/postgresql-common/pgdg/apt.postgresql.org.asc] https://mirrors.tuna.tsinghua.edu.cn/postgresql/repos/apt/ $(lsb_release -cs)-pgdg main" > /etc/apt/sources.list.d/pgdg.list'
bash
# 恢复默认设置命令
 sudo sh -c 'echo "deb [signed-by=/usr/share/postgresql-common/pgdg/apt.postgresql.org.asc] https://apt.postgresql.org/pub/repos/apt $(lsb_release -cs)-pgdg main" > /etc/apt/sources.list.d/pgdg.list'
1.1.5 更新本地包缓存
bash
# 必要操作,必做
sudo apt update
1.2 手动仓库配置
1.2.1 配置依赖项和签名秘钥
bash
# Import the repository signing key
# 导入APT仓库签名秘钥
sudo apt install curl ca-certificates
sudo install -d /usr/share/postgresql-common/pgdg
# 官方签名秘钥文件位置
#sudo curl -o /usr/share/postgresql-common/pgdg/apt.postgresql.org.asc --fail https://postgresql.ac.cn/media/keys/ACCC4CF8.asc
# 清华大学开源镜像站文件位置
sudo curl -o /usr/share/postgresql-common/pgdg/apt.postgresql.org.asc --fail https://mirrors.tuna.tsinghua.edu.cn/postgresql/repos/apt/ACCC4CF8.asc
1.2.2 配置软件安装源(Ubuntu24.04及以上)
文件位置/etc/apt/sources.list.d/pgdg.sources
bash
# Create the repository configuration file:
# 官方软件安装源源和国内软件安装源源,二者选其一即可,国内源下载速度会快一些

# 官方软件安装源
sudo sh -c 'echo "Types: deb
URIs: https://apt.postgresql.org/pub/repos/apt
Suites: $(lsb_release -cs)-pgdg
Components: main
Signed-By: /usr/share/postgresql-common/pgdg/apt.postgresql.org.gpg
" > /etc/apt/sources.list.d/pgdg.sources'

# 国内软件安装源(清华大学开源镜像站)
sudo sh -c 'echo "Types: deb
URIs: https://mirrors.tuna.tsinghua.edu.cn/postgresql/repos/apt/
Suites: $(lsb_release -cs)-pgdg
Components: main
Signed-By: /usr/share/postgresql-common/pgdg/apt.postgresql.org.gpg
" > /etc/apt/sources.list.d/pgdg.sources'
1.2.3 配置软件安装源(Ubuntu24.04以下)
文件位置:/etc/apt/sources.list.d/pgdg.list
bash
# Create the repository configuration file:
# 官方软件安装源源和国内软件安装源源,二者选其一即可,国内源下载速度会快一些

# 官方软件安装源
sudo sh -c "echo 'deb [signed-by=/usr/share/postgresql-common/pgdg/apt.postgresql.org.asc] https://apt.postgresql.org/pub/repos/apt $VERSION_CODENAME-pgdg main' > /etc/apt/sources.list.d/pgdg.list"

# 国内软件安装源(清华大学开源镜像站)
sudo sh -c 'echo "deb [signed-by=/usr/share/postgresql-common/pgdg/apt.postgresql.org.asc] https://mirrors.tuna.tsinghua.edu.cn/postgresql/repos/apt/ $(lsb_release -cs)-pgdg main" > /etc/apt/sources.list.d/pgdg.list'
1.2.4 更新本地包缓存
bash
# 必要操作,必做
sudo apt update
2 安装PostgreSQL
2.1 利用命令安装PostgreSQL
bash
# 最后的版本号可以替换为想要安装的版本
sudo apt install postgresql-18
2.2 查看PostgreSQL是否安装成功
2.2.1 查看PostgreSQL版本号
bash
psql --version

psql (PostgreSQL) 18.0 (Ubuntu 18.0-1.pgdg24.04+3)
bash
pg_config  |grep VERSION

VERSION = PostgreSQL 18.0 (Ubuntu 18.0-1.pgdg24.04+3)
bash
# 此命令未成功
postgres --version
2.2.2 查看PostgreSQL服务
bash
sudo systemctl status postgresql

● postgresql.service - PostgreSQL RDBMS
     Loaded: loaded (/usr/lib/systemd/system/postgresql.service; enabled; preset: enabled)
     Active: active (exited) since Sun 2025-10-26 16:58:16 CST; 3h 21min ago
   Main PID: 1109 (code=exited, status=0/SUCCESS)
        CPU: 1ms

Oct 26 16:58:16 ZHOU-PC systemd[1]: Starting postgresql.service - PostgreSQL RDBMS...
Oct 26 16:58:16 ZHOU-PC systemd[1]: Finished postgresql.service - PostgreSQL RDBMS.
bash
sudo systemctl start postgresql    # 启动postgresql服务
sudo systemctl stop postgresql     # 终止postgresql服务
sudo systemctl restart postgresql  # 重启postgresql服务
sudo systemctl reload postgresql   # 重新加载postgresql服务(不重启)
sudo systemctl status postgresql   # 查询postgresql服务状态
sudo systemctl enable postgresql   # 启用postgresql服务(设置开机自启)
sudo systemctl disable postgresql  # 禁用postgresql服务(取消开机自启)
bash
# 查看所有运行中的服务
systemctl list-units --type=service --state=running

 UNIT                        LOAD   ACTIVE SUB     DESCRIPTION
  console-getty.service       loaded active running Console Getty
  cron.service                loaded active running Regular background program processing daemon
  dbus.service                loaded active running D-Bus System Message Bus
  getty@tty1.service          loaded active running Getty on tty1
  polkit.service              loaded active running Authorization Manager
  postgresql@18-main.service  loaded active running PostgreSQL Cluster 18-main
  rsyslog.service             loaded active running System Logging Service
  systemd-journald.service    loaded active running Journal Service
  systemd-logind.service      loaded active running User Login Management
  systemd-resolved.service    loaded active running Network Name Resolution
  systemd-timesyncd.service   loaded active running Network Time Synchronization
  systemd-udevd.service       loaded active running Rule-based Manager for Device Events and Files
  unattended-upgrades.service loaded active running Unattended Upgrades Shutdown
  user@1001.service           loaded active running User Manager for UID 1001

Legend: LOAD   → Reflects whether the unit definition was properly loaded.
        ACTIVE → The high-level unit activation state, i.e. generalization of SUB.
        SUB    → The low-level unit activation state, values depend on unit type.
3 登录PostgreSQL
PostgreSQL安装完成后自动创创建一个默认的postgres超级管理员用户,且密码为空。
bash
cat /etc/passwd

postgres:x:105:109:PostgreSQL administrator,,,:/var/lib/postgresql:/bin/bash
初始数据库文件位置:/var/lib/postgresql/18,配置文件位置:/etc/postgresql/18
3.1 第一次登录PostgreSQL(使用临时命令无密码登录)
第一次登录时,不能以root用户进入PostgreSQL,只能以默认的postgres超级管理员用户登录,postgres默认无密码。
bash
# 方法一:此命令在本地使用时无需输入密码即可直接登录Postgresql
sudo -u postgres psql

psql (18.0 (Ubuntu 18.0-1.pgdg24.04+3))
Type "help" for help.尺度

postgres=#


#方法二:先切换到postgres用户,然后以postgres用户登录Postgresql
zhou@ZHOU-PC:~$ sudo su - postgres
postgres@ZHOU-PC:~$ psql
Password for user postgres:
psql (18.0 (Ubuntu 18.0-1.pgdg24.04+3))
Type "help" for help.

postgres=#
3.2 设置PostgreSQL用户的登录密码
在postgres命令符提示下,执行以下命令设置密码
sql
# 方法一
ALTER USER postgres WITH PASSWORD 'password'; --单引号内输入要设置的密码
# 第二种方法
# 基本语法:\password username,如果不指定用户名,默认为当前登录用户添加或修改密码,密码需要输入两次
\password
Enter new password for user "postgres":
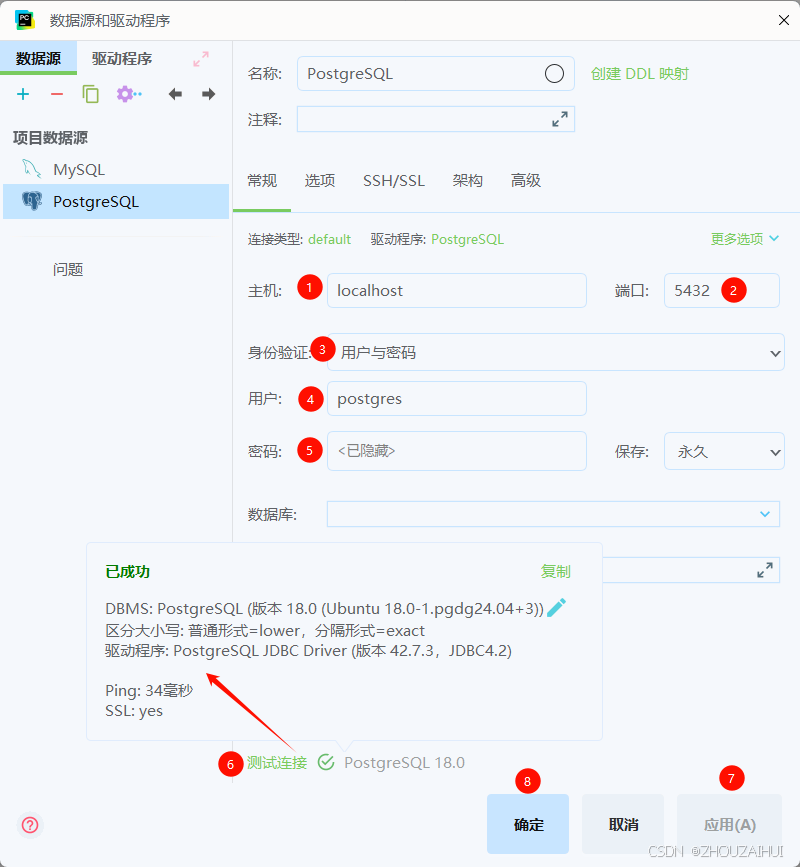
Enter it again:添加密码之后,就可以在DataGrip软件中连接Postgresql数据库了
3.3 配置PostgreSQL登录条件
登录设置相关文件位于/etc/postgresql/18/main/pg_hba.conf文件中
bash
# Database administrative login by Unix domain socket
local   all             postgres                                peer

# TYPE  DATABASE        USER            ADDRESS                 METHOD

# "local" is for Unix domain socket connections only
local   all             all                                     peer
# IPv4 local connections:
host    all             all             127.0.0.1/32            scram-sha-256
# IPv6 local connections:
host    all             all             ::1/128                 scram-sha-256
# Allow replication connections from localhost, by a user with the
# replication privilege.
local   replication     all                                     peer
host    replication     all             127.0.0.1/32            scram-sha-256
host    replication     all             ::1/128                 scram-sha-256
将其中的METHOD选项中的peer,修改为scram-sha-256(PostgreSQL18默认认证方式)或者md5(PostgreSQL已淘汰认证方式)
bash
# Database administrative login by Unix domain socket
local   all             postgres                                scram-sha-256

# TYPE  DATABASE        USER            ADDRESS                 METHOD

# "local" is for Unix domain socket connections only
local   all             all                                     scram-sha-256
# IPv4 local connections:
# 只允许本地连接
host    all             all             127.0.0.1/32            scram-sha-256
# 允许所有IPV4远程连接
host    all             all             0.0.0.0/32              scram-sha-256

# IPv6 local connections:
# 只允许本地连接
host    all             all             ::1/128                 scram-sha-256
# 允许所有IPV6远程连接
host    all             all             ::0/0                   scram-sha-256

# Allow replication connections from localhost, by a user with the
# replication privilege.
local   replication     all                                     scram-sha-256
host    replication     all             127.0.0.1/32            scram-sha-256
host    replication     all             ::1/128                 scram-sha-256
重启postgresql服务
bash
sudo systemctl restart postgresql3.4 以psql命令重新登录Postgresql,后续再次登录Postgresql可以直接使用psql命令
bash
# 方法一:此方法需要输入密码,但不需要以明文方式输入密码
psql -U postgres  # 另一种写法 psql --username=postgres

Password for user postgres:
psql (18.0 (Ubuntu 18.0-1.pgdg24.04+3))
Type "help" for help.

postgres=#
3.5 默认登录命令sudo -u postgres psql 再次登录需要录入密码
再次以sudo -u postgres psql 命令登录PostgreSQL后会提示输入密码
bash
sudo -u postgres psql
Password for user postgres:
psql (18.0 (Ubuntu 18.0-1.pgdg24.04+3))
Type "help" for help.

postgres=#
4 查看帮助
4.1 查看数据库操作的命令
bash
# 在psql命令行模式下输入
  \? [commands]          #显示某个具体命令的帮助
  \? options             show help on psql command-line options
  \? variables           show help on special variables
  \h [NAME]              help on syntax of SQL commands, * for all commands
5 PostgreSQL核心配置文件
PostgreSQL核心配置文件位置:/etc/postgresql/18/main
bash
ls -la /etc/postgresql/18/main
total 68
drwxr-xr-x 3 postgres postgres  4096 Oct 26 21:52 .
drwxr-xr-x 3 postgres postgres  4096 Oct 26 19:28 ..
drwxr-xr-x 2 postgres postgres  4096 Oct 26 19:28 conf.d
-rw-r--r-- 1 postgres postgres   315 Oct 26 19:28 environment
-rw-r--r-- 1 postgres postgres   143 Oct 26 19:28 pg_ctl.conf
-rw-r----- 1 postgres postgres  5934 Oct 26 19:28 pg_hba.conf
-rw-r----- 1 postgres postgres  2681 Oct 26 19:28 pg_ident.conf
-rw-r--r-- 1 postgres postgres 32504 Oct 26 19:28 postgresql.conf
-rw-r--r-- 1 postgres postgres   317 Oct 26 19:28 start.conf
5.1 pg_hba.conf(基于主机的身份验证配置文件)
主要作用:定义客户端连接时的认证方式,按行匹配规则,第一条匹配的规则生效。
bash
# Database administrative login by Unix domain socket
local   all             postgres                                peer

# TYPE  DATABASE        USER            ADDRESS                 METHOD

# "local" is for Unix domain socket connections only
local   all             all                                     peer
# IPv4 local connections:
host    all             all             127.0.0.1/32            scram-sha-256
# IPv6 local connections:
host    all             all             ::1/128                 scram-sha-256
# Allow replication connections from localhost, by a user with the
# replication privilege.
local   replication     all                                     peer
host    replication     all             127.0.0.1/32            scram-sha-256
host    replication     all             ::1/128                 scram-sha-256
pg_hba.conf 文件的通用格式是一组记录,每行一条。每个认证记录指定一种连接类型、一个客户端 IP 地址范围(如果与连接类型相关)、一个数据库名称、一个用户名以及用于匹配这些参数的连接的认证方法。格式可以有以下形式:
bash
local               databaseuser  auth-method [auth-options]
host                database  user  address     auth-method  [auth-options]
hostssl             database  user  address     auth-method  [auth-options]
hostnossl           database  user  address     auth-method  [auth-options]
hostgssenc          database  user  address     auth-method  [auth-options]
hostnogssenc        database  user  address     auth-method  [auth-options]
host                database  user  IP-address  IP-mask      auth-method  [auth-options]
hostssl             database  user  IP-address  IP-mask      auth-method  [auth-options]
hostnossl           database  user  IP-address  IP-mask      auth-method  [auth-options]
hostgssenc          database  user  IP-address  IP-mask      auth-method  [auth-options]
hostnogssenc        database  user  IP-address  IP-mask      auth-method  [auth-options]
include             file
include_if_exists   file
include_dir directory| 字段类型 | 说明 |
|---|---|
| TYPE | 连接类型 |
| DATABASE | 指定此记录匹配的数据库名称 |
| USER | 指定此记录匹配的数据库用户名称 |
| ADDRESS | 指定此记录匹配的客户端机器地址 |
| AUTH-METHOD | 指定在连接匹配此记录时使用的认证方法 |
| AUTH-OPTION | 在AUTH-METHOD字段之后,可以有NAME=VALUE 形式的字段,用于指定认证方法的选项 |
5.1.1 TYPE连接类型
| 值 | 说明 |
|---|---|
| local | 匹配使用 Unix 域套接字的连接尝试。如果没有此类记录,则不允许使用 Unix 域套接字连接 |
| host | 匹配使用 TCP/IP 进行的连接尝试。host 记录匹配SSL或非SSL连接尝试,以及GSSAPI加密或非GSSAPI加密连接尝试。默认只能使用本地连接,如果要使用远程连接,需将host后面的IP地址设置为IP格式,同时设置postgresql.conf文件参数listen_addresses = '*' |
| hostssl | 匹配使用 TCP/IP 进行的连接尝试,但仅当连接使用SSL加密时(服务器必须使用SSL支持进行编译) |
| hostnossl | 该类型的行为与 hostssl 相反;它仅匹配通过 TCP/IP 进行的、未使用SSL |
| hostgssenc | 匹配使用 TCP/IP 进行的连接尝试,但仅当连接使用GSSAPI加密时(服务器必须使用GSSAPI支持) |
| hostnogssenc | 该类型的行为与 hostgssenc 相反;它仅匹配通过 TCP/IP 进行的、未使用GSSAPI加密时 |
5.1.2 DATABASE数据库名称
| 值 | 说明 |
|---|---|
| all | 指定匹配所有数据库 |
| sameuser | 指定如果请求的数据库与请求的用户具有相同的名称,则记录匹配 |
| samerole | 指定请求的用户必须是与请求的数据库同名的角色的成员(samegroup 是 samerole 的过时但仍然接受的拼写) |
| replication | 指定如果请求的是物理复制连接,则记录匹配,但它不匹配逻辑复制连接 |
| a database name | 指定一个数据库名称 |
| a regular expression | 如果数据库名称以斜杠 (/) 开头,则名称的其余部分被视为正则表达式 |
| a separate file | 通过在文件名前面加上 @ 来指定包含数据库名称和/或正则表达式的单独文件 |
5.1.3 USER数据库用户名称
| 值 | 说明 |
|---|---|
| all | 指定匹配所有用户 |
| a user name | 特定数据库用户的名称 |
| a group name prefixed with "+" | 以 + 开头的组名 |
| a regular expression | 如果用户名以斜杠 (/) 开头,则名称的其余部分被视为正则表达式) |
| a separate file | 通过在文件名前面加上 @ 来指定包含数据库名称和/或正则表达式的单独文件 |
5.1.4 ADDRESS匹配的客户端机器地址
| 值 | 说明 |
|---|---|
| a host name | 以点 (.) 开头的主机名规范匹配实际主机名(例如www.baidu.com) |
| IP | 指定IP地址(采用CIDR方法表示IP范围,将网络地址和子网掩码组合在一起表示为x.x/y的形式。x.x是网络地址,y表示网络地址的长度(即网络部分和主机部分的分界线),例如:IPV4中192.168.1.0/24表示网络地址:192.168.1.0,子网掩码:255.255.255.0,前24位为网络部分,后8位为主机部分。IPV6中fe80::7a31:c1ff:0000:0000/96表示前96位是网络地址,后32表示主机标识。0.0.0.0/0(IPV4)、::0/0(IPV6)表示任意来源或者所有IP地址,127.0.0.1/32(IPV4)、::1/128(IPV6)表示只有本机 |
| a group name prefixed with "+" | 以 + 开头的组名 |
| a regular expression | 如果用户名以斜杠 (/) 开头,则名称的其余部分被视为正则表达式) |
| a separate file | 通过在文件名前面加上 @ 来指定包含数据库名称和/或正则表达式的单独文件 |
5.1.5 AUTH-METHOD连接匹配此记录时使用的认证方法
| 值 | 说明 |
|---|---|
| trust | 无条件允许连接。此方法允许任何能够连接到 PostgreSQL 数据库服务器的人以任何他们想要的 PostgreSQL 用户身份登录,而无需密码或其他认证 |
| reject | 无条件拒绝连接 |
| scram-sha-256 | 执行 SCRAM-SHA-256 认证以验证用户的密码,相比传统的MD5认证更安全,能够防止密码嗅探,并以加密形式存储密码,避免明文泄露的风险。 |
| md5 | 执行 SCRAM-SHA-256 或 MD5 认证以验证用户的密码,MD5 加密密码的支持已弃用 |
| password | 要求客户端提供未加密的密码进行认证。由于密码以明文形式在网络上传输,因此不应在不受信任的网络上使用此方法 |
| gss | 使用 GSSAPI 认证用户,仅适用于 TCP/IP 连接 |
| sspi | 使用 SSPI 认证用户,仅在 Windows 上可用 |
| ident | 通过联系客户端上的 ident 服务器获取客户端的操作系统用户名,并检查其是否与请求的数据库用户名匹配,Ident 认证只能用于 TCP/IP 连接,当为本地连接指定时,将使用 peer 认证 |
| peer | 从操作系统获取客户端的操作系统用户名,并检查其是否与请求的数据库用户名匹配,仅适用于本地连接 |
| ldap | 使用LDAP服务器进行认证 |
| radius | 使用 RADIUS 服务器进行认证 |
| cert | 使用 SSL 客户端证书进行认证 |
| pam | 使用操作系统提供的可插拔认证模块 (PAM) 服务进行认证 |
| bsd | 使用操作系统提供的 BSD 认证服务进行认证 |
| oauth | 使用第三方 OAuth 2.0 身份提供商进行授权和可选认证 |
5.1.6 AUTH-OPTION指定认证方法的选项
| 值 | 说明 |
|---|---|
| include | 此行将被给定文件的内容替换 |
| include_if_exists | 如果文件存在,此行将被给定文件的内容替换 |
| include_dir | 此行将被目录中找到的所有文件替换,按文件名顺序处理 |
5.2 postgresql.conf(主服务器配置文件)
5.2.1 连接设置
| 值 | 说明 |
|---|---|
| listen_addresses(string) | 指定服务器监听客户端连接的 TCP/IP 地址(CID格式),默认listen_addresses = 'localhost'代表只有本机,listen_addresses = '*'代表所有IP地址 |
| port (integer) | 服务器监听的 TCP 端口,默认是 5432,port = 5432 |
| max_connections(integer) | 确定到数据库服务器的最大并发连接数,默认值通常是 100 个连接,默认:max_connections = 100 |
| password_encryption (enum) | 当在 CREATE ROLE 或 ALTER ROLE 中指定密码时,此参数决定用于加密密码的算法,值有scram-sha-256和md5两种,默认:password_encryption = scram-sha-256, |
5.2.2 认证设置
| 值 | 说明 |
|---|---|
| password_encryption (enum) | 当在 CREATE ROLE 或 ALTER ROLE 中指定密码时,此参数决定用于加密密码的算法,值有scram-sha-256和md5两种,默认:password_encryption = scram-sha-256 |
5.2.3 内存设置
| 值 | 说明 |
|---|---|
| shared_buffers (integer) | 设置数据库服务器用于共享内存缓冲区的内存量,默认:shared_buffers = 128MB,如果要设置较大的共享内存,同时还需要相应增加max_wal_size和min_wal_size值,默认:max_wal_size = 1GB, min_wal_size = 80MB |
5.3 pg_ident.conf(用户名映射的配置文件)
5.4 配置示例
5.4.1 生产环境安全配置
bash
# 本地管理用户(Peer 认证)
local     all     postgres     peer
# 允许内网应用服务器通过 SCRAM-SHA-256 连接
 host     all     app_user     192.168.100.0/24     scram-sha-256
 # 仅允许 SSL 加密的复制连接
 hostssl      replication     replicator     10.0.0.0/8      scram-sha-256
 # 拒绝其他所有连接
 host     all     all     0.0.0.0/0     reject
5.4.2 开发环境便携配置
bash
# 本地所有用户免密(仅限开发!)
local     all    all    trust
# 允许本地 IPv4/IPv6 通过 MD5 连接(不推荐生产使用)
host     all     all     127.0.0.1/32 md5
host     all     all     ::1/128 md5