前言
上一篇【QT opencv】使用创建副本.clone()的场景展示了如何给图片网格化。本篇讲解的是在固定背景环境下(比如高拍仪的黑色底板),查找轮廓之后,把轮廓和网格全部显示出来,通过指定区域把固定背景中的噪点轮廓去除的方法。
效果图
手动区域去噪之前

手动区域去噪之后
由上图可看到受左侧光线的影响,左侧第一列和底部一行有明显的边缘轮廓,另外第五行第四列、第五列有一个"┏━",去掉之后的效果如下
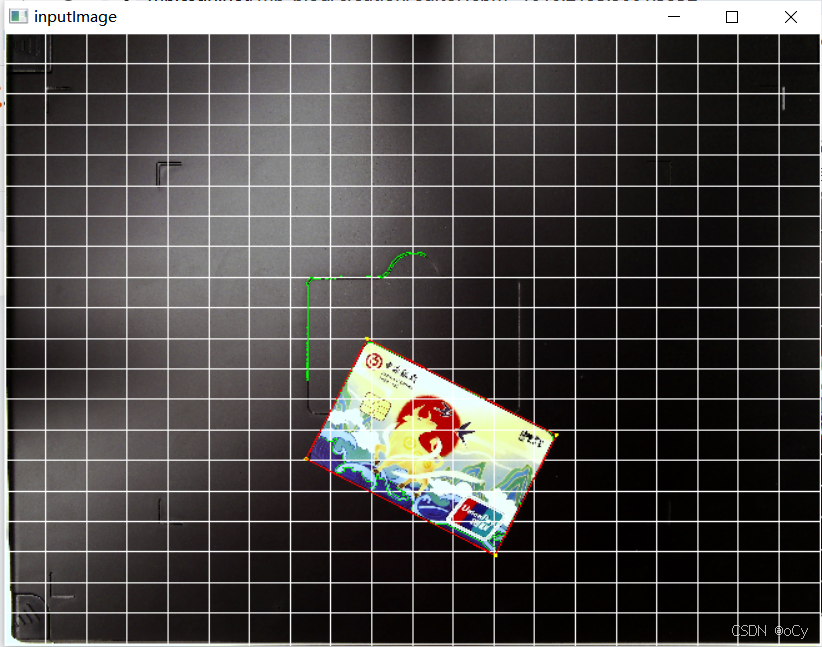
注:不去掉正中间绿色的轮廓的原因是这个轮廓占了7格区域,容易导致错误
功能讲解
1、获取边缘4条边缘行/列区域
上一篇【QT opencv】使用创建副本.clone()的场景 的划网格函数是void类型,因为4条边缘行/列区域都是需要去噪的区域,所以以下改造下划网格的函数,并返回改造的区域,代码如下:
// 绘制网格函数并返回排除区域 - 添加绘制开关
vector<cv::Rect> drawGrid(Mat& image, int gridSize = 36, bool drawGridLines = true) {
    int rows = image.rows;
    int cols = image.cols;

    // 计算网格步长
    int gridWidth = cols / gridSize;
    int gridHeight = rows / gridSize;

    // 定义排除区域向量
    vector<cv::Rect> exclusionAreas;

    // 添加四个边缘区域
    exclusionAreas.push_back(cv::Rect(0, 0, cols, gridHeight)); // 第一行区域
    exclusionAreas.push_back(cv::Rect(0, (gridSize-1)*gridHeight, cols,
                                     rows - (gridSize-1)*gridHeight)); // 最后一行区域
    exclusionAreas.push_back(cv::Rect(0, 0, gridWidth, rows)); // 第一列区域
    exclusionAreas.push_back(cv::Rect((gridSize-1)*gridWidth, 0,
                                     cols - (gridSize-1)*gridWidth, rows)); // 最后一列区域

    // 只在需要时绘制网格线
    if (drawGridLines) {
        // 使用较粗的线条,以便在压缩后仍可见
        int lineThickness = 3;
        // 绘制网格线
        for (int i = 0; i <= gridSize; i++) {
            // 垂直线
            int x = i * gridWidth;
            line(image, Point(x, 0), Point(x, rows), Scalar(255, 255, 255), lineThickness);

            // 水平线
            int y = i * gridHeight;
            line(image, Point(0, y), Point(cols, y), Scalar(255, 255, 255), lineThickness);
        }
    }

    // 打印关键网格坐标(基于原始图像尺寸)
    for (size_t i = 0; i < exclusionAreas.size(); i++) {
        const auto& area = exclusionAreas[i];
        string areaName;
        switch (i) {
            case 0: areaName = "topRow"; break;
            case 1: areaName = "bottomRow"; break;
            case 2: areaName = "leftCol"; break;
            case 3: areaName = "rightCol"; break;
        }
        cout << areaName << " area: leftuppos(" << area.x << "," << area.y
             << "), rightdownpos(" << area.x + area.width << ","
             << area.y + area.height << ")" << endl;
    }

    return exclusionAreas;
}
此时的检测函数如下:
void detectContour(cv::Mat& inputImage) {
    cv::Mat getImagecontours = inputImage.clone();
    //1.在原始图像上绘制gridsizexgridsize网格并获取排除区域
    int gridsize = 20;
    // 控制是否绘制网格线--用于调试
    bool drawGridLines = true;
    vector<cv::Rect> exclusionAreas;
    //drawGrid的行和列的索引
    {//四条边界
        exclusionAreas=drawGrid(inputImage, gridsize, drawGridLines);
    }
}
2、获取第五行第四列、第五列区域
增加第五行第四列、第五列去掉"┏━",需要增加一个通过行/列位置提取区域的函数,代码如下:
// 获取指定网格区域的函数(使用从1开始的索引)
cv::Rect getGridCell(const cv::Mat& image, int gridSize, int row, int col) {
    int rows = image.rows;
    int cols = image.cols;
    if(row<1)row=1;
    if(col<1)col=1;
    // 将1-based索引转换为0-based索引
    int rowIndex = row - 1;
    int colIndex = col - 1;

    // 确保转换后的索引在有效范围内
    rowIndex = max(0, min(rowIndex, gridSize - 1));
    colIndex = max(0, min(colIndex, gridSize - 1));

    // 计算网格步长
    int gridWidth = cols / gridSize;
    int gridHeight = rows / gridSize;

    // 计算网格位置和尺寸
    int x = colIndex * gridWidth;
    int y = rowIndex * gridHeight;
    int width = gridWidth;
    int height = gridHeight;

    // 处理边界情况,确保不超出图像范围
    if (colIndex == gridSize - 1) width = cols - x;
    if (rowIndex == gridSize - 1) height = rows - y;

//    cout << "Grid cell (row=" << row << ", col=" << col << "): "
//         << "(" << x << "," << y << "),(" << x+width << "," << y+height << ")" << endl;

    return cv::Rect(x, y, width, height);
}

void detectContour(cv::Mat& inputImage) {
    cv::Mat getImagecontours = inputImage.clone();
    //1.在原始图像上绘制gridsizexgridsize网格并获取排除区域
    int gridsize = 20;
    // 控制是否绘制网格线--用于调试
    bool drawGridLines = true;
    vector<cv::Rect> exclusionAreas;
    //drawGrid的行和列的索引
    {//四条边界
        exclusionAreas=drawGrid(inputImage, gridsize, drawGridLines);
    }
    {//第5行的第4和第5列网格需要排除
        cv::Rect pos;
        pos=getGridCell(inputImage,gridsize,5,4);
        exclusionAreas.push_back(pos);
        pos=getGridCell(inputImage,gridsize,5,5);
        exclusionAreas.push_back(pos);
    }
}
3、获取图片的所有轮廓
这里做了简要的封装,代码如下
void getallContours(const cv::Mat& inputImage, vector<vector<cv::Point>>& contours) {
    cv::Mat gray, blurred, edges;
    cv::cvtColor(inputImage, gray, cv::COLOR_BGR2GRAY);
    GaussianBlur(gray, blurred, Size(9, 9), 3.0);
    Canny(blurred, edges, 50, 150);
    // 增强形态学操作,更好地连接边缘
    cv::Mat kernel = cv::getStructuringElement(cv::MORPH_RECT, cv::Size(7, 7));
    cv::morphologyEx(edges, edges, cv::MORPH_CLOSE, kernel);
    cv::dilate(edges, edges, kernel); // 添加膨胀操作
    // 查找轮廓
    cv::findContours(edges, contours, cv::RETR_EXTERNAL, cv::CHAIN_APPROX_SIMPLE);
    cout << "find " << contours.size() << " Contours" << endl;
}

void detectContour(cv::Mat& inputImage) {
    cv::Mat getImagecontours = inputImage.clone();
    //1.在原始图像上绘制gridsizexgridsize网格并获取排除区域
    int gridsize = 20;
    // 控制是否绘制网格线--用于调试
    bool drawGridLines = true;
    vector<cv::Rect> exclusionAreas;
    //drawGrid的行和列的索引
    {//四条边界
        exclusionAreas=drawGrid(inputImage, gridsize, drawGridLines);
    }
    {//2.第5行的第4和第5列网格需要排除
        cv::Rect pos;
        pos=getGridCell(inputImage,gridsize,5,4);
        exclusionAreas.push_back(pos);
        pos=getGridCell(inputImage,gridsize,5,5);
        exclusionAreas.push_back(pos);
    }

    //3. 查找所有轮廓并用绿色绘制
    vector<vector<cv::Point>> contours;
    getallContours(getImagecontours, contours);
}
4、过滤待排除轮廓
通过遍历contours,提取坐标点,判断在排除区域中的占比是否超过指定的阈值(0.75),只返回不超过阈值的轮廓,代码如下:
//检查轮廓是否在排除区域内
bool isContourInExclusionArea(const vector<Point>& contour,
                             const vector<cv::Rect>& exclusionAreas,
                             double threshold = 0.75) {
    int pointsInArea = 0;
    int totalPoints = contour.size();

    // 手动检查每个点是否在排除区域内
    for (const auto& point : contour) {
        bool inArea = false;

        // 手动检查点是否在任何一个排除区域内
        for (size_t i = 0; i < exclusionAreas.size(); i++) {
            const auto& area = exclusionAreas[i];

            // 手动实现点是否在矩形内的检查
            if (point.x >= area.x && point.x < area.x + area.width &&
                point.y >= area.y && point.y < area.y + area.height) {
                pointsInArea++;
                inArea = true;
                break;
            }
        }

    }

    double ratio = (double)pointsInArea / totalPoints;

    // 如果超过阈值比例的点在排除区域内,则返回true
    return ratio > threshold;
}


int filterContours(const vector<vector<cv::Point>>& contours,
                   vector<vector<cv::Point>>& filteredContours,
                   const vector<cv::Rect>& exclusionAreas) {
    int excludedCount = 0;

    for (const auto& contour : contours) {
        if (isContourInExclusionArea(contour, exclusionAreas, 0.75)) {
            excludedCount++;
            continue; // 跳过这个轮廓
        }
        filteredContours.push_back(contour);
    }

    cout << "filter " << excludedCount << " edge Contours" << endl;
    return excludedCount;
}

void detectContour(cv::Mat& inputImage) {
    cv::Mat getImagecontours = inputImage.clone();
    //1.在原始图像上绘制gridsizexgridsize网格并获取排除区域
    int gridsize = 20;
    // 控制是否绘制网格线--用于调试
    bool drawGridLines = true;
    vector<cv::Rect> exclusionAreas;
    //drawGrid的行和列的索引
    {//四条边界
        exclusionAreas=drawGrid(inputImage, gridsize, drawGridLines);
    }
    {//2.第5行的第4和第5列网格需要排除
        cv::Rect pos;
        pos=getGridCell(inputImage,gridsize,5,4);
        exclusionAreas.push_back(pos);
        pos=getGridCell(inputImage,gridsize,5,5);
        exclusionAreas.push_back(pos);
    }

    //3. 查找所有轮廓并用绿色绘制
    vector<vector<cv::Point>> contours;
    getallContours(getImagecontours, contours);
    //filterContours(contours, contours, exclusionAreas);//未过滤之前的所有轮廓

    //4.过滤待排除轮廓
    vector<vector<cv::Point>> filteredContours;
    filterContours(contours, filteredContours, exclusionAreas);//过滤之后的轮廓
    cout << "filteredContours " << filteredContours.size() << " Contours" << endl;
}
全部代码
#include <opencv2/opencv.hpp>
#include <iostream>
#include <vector>
#include <string>

using namespace cv;
using namespace std;

// 显示函数 - 保持20%压缩比例
void showimg(const string& name, const Mat& curImage) {
    Mat resizedImage;
    double scale = 0.2; // 固定压缩到20%
    resize(curImage, resizedImage, Size(), scale, scale);
    imshow(name, resizedImage);
}

// 获取指定网格区域的函数(使用从1开始的索引)
cv::Rect getGridCell(const cv::Mat& image, int gridSize, int row, int col) {
    int rows = image.rows;
    int cols = image.cols;
    if(row<1)row=1;
    if(col<1)col=1;
    // 将1-based索引转换为0-based索引
    int rowIndex = row - 1;
    int colIndex = col - 1;

    // 确保转换后的索引在有效范围内
    rowIndex = max(0, min(rowIndex, gridSize - 1));
    colIndex = max(0, min(colIndex, gridSize - 1));

    // 计算网格步长
    int gridWidth = cols / gridSize;
    int gridHeight = rows / gridSize;

    // 计算网格位置和尺寸
    int x = colIndex * gridWidth;
    int y = rowIndex * gridHeight;
    int width = gridWidth;
    int height = gridHeight;

    // 处理边界情况,确保不超出图像范围
    if (colIndex == gridSize - 1) width = cols - x;
    if (rowIndex == gridSize - 1) height = rows - y;

//    cout << "Grid cell (row=" << row << ", col=" << col << "): "
//         << "(" << x << "," << y << "),(" << x+width << "," << y+height << ")" << endl;

    return cv::Rect(x, y, width, height);
}

// 绘制网格函数并返回排除区域 - 添加绘制开关
vector<cv::Rect> drawGrid(Mat& image, int gridSize = 36, bool drawGridLines = true) {
    int rows = image.rows;
    int cols = image.cols;

    // 计算网格步长
    int gridWidth = cols / gridSize;
    int gridHeight = rows / gridSize;

    // 定义排除区域向量
    vector<cv::Rect> exclusionAreas;

    // 添加四个边缘区域
    exclusionAreas.push_back(cv::Rect(0, 0, cols, gridHeight)); // 第一行区域
    exclusionAreas.push_back(cv::Rect(0, (gridSize-1)*gridHeight, cols,
                                     rows - (gridSize-1)*gridHeight)); // 最后一行区域
    exclusionAreas.push_back(cv::Rect(0, 0, gridWidth, rows)); // 第一列区域
    exclusionAreas.push_back(cv::Rect((gridSize-1)*gridWidth, 0,
                                     cols - (gridSize-1)*gridWidth, rows)); // 最后一列区域

    // 只在需要时绘制网格线
    if (drawGridLines) {
        // 使用较粗的线条,以便在压缩后仍可见
        int lineThickness = 3;
        // 绘制网格线
        for (int i = 0; i <= gridSize; i++) {
            // 垂直线
            int x = i * gridWidth;
            line(image, Point(x, 0), Point(x, rows), Scalar(255, 255, 255), lineThickness);

            // 水平线
            int y = i * gridHeight;
            line(image, Point(0, y), Point(cols, y), Scalar(255, 255, 255), lineThickness);
        }
    }

    // 打印关键网格坐标(基于原始图像尺寸)
    for (size_t i = 0; i < exclusionAreas.size(); i++) {
        const auto& area = exclusionAreas[i];
        string areaName;
        switch (i) {
            case 0: areaName = "topRow"; break;
            case 1: areaName = "bottomRow"; break;
            case 2: areaName = "leftCol"; break;
            case 3: areaName = "rightCol"; break;
        }
//        cout << areaName << " area: leftuppos(" << area.x << "," << area.y
//             << "), rightdownpos(" << area.x + area.width << ","
//             << area.y + area.height << ")" << endl;
    }

    return exclusionAreas;
}

//检查轮廓是否在排除区域内
bool isContourInExclusionArea(const vector<Point>& contour,
                             const vector<cv::Rect>& exclusionAreas,
                             double threshold = 0.75) {
    int pointsInArea = 0;
    int totalPoints = contour.size();

    //std::cout << __FUNCTION__ << ": Checking contour with " << totalPoints << " points" << std::endl;

    // 打印所有排除区域
//    for (size_t i = 0; i < exclusionAreas.size(); i++) {
//        const auto& area = exclusionAreas[i];
//        std::cout << "Exclusion area " << i << ": (" << area.x << ", " << area.y
//                  << ", " << area.width << ", " << area.height << ")" << std::endl;
//    }

    // 手动检查每个点是否在排除区域内
    for (const auto& point : contour) {
        bool inArea = false;

        // 手动检查点是否在任何一个排除区域内
        for (size_t i = 0; i < exclusionAreas.size(); i++) {
            const auto& area = exclusionAreas[i];

            // 手动实现点是否在矩形内的检查
            if (point.x >= area.x && point.x < area.x + area.width &&
                point.y >= area.y && point.y < area.y + area.height) {
                pointsInArea++;
                inArea = true;
//                std::cout << "Point " << point << " is in exclusion area " << i
//                          << ": (" << area.x << ", " << area.y
//                          << ", " << area.width << ", " << area.height << ")" << std::endl;
                break;
            }
        }

//        if (!inArea) {
//            std::cout << "Point " << point << " is NOT in any exclusion area" << std::endl;
//        }
    }

    double ratio = (double)pointsInArea / totalPoints;
//    std::cout << "Points in exclusion areas: " << pointsInArea << "/" << totalPoints
//              << " = " << ratio << " (threshold: " << threshold << ")" << std::endl;

    // 如果超过阈值比例的点在排除区域内,则返回true
    return ratio > threshold;
}

void getallContours(const cv::Mat& inputImage, vector<vector<cv::Point>>& contours) {
    cv::Mat gray, blurred, edges;
    cv::cvtColor(inputImage, gray, cv::COLOR_BGR2GRAY);
    GaussianBlur(gray, blurred, Size(9, 9), 3.0);
    Canny(blurred, edges, 50, 150);
    // 增强形态学操作,更好地连接边缘
    cv::Mat kernel = cv::getStructuringElement(cv::MORPH_RECT, cv::Size(7, 7));
    cv::morphologyEx(edges, edges, cv::MORPH_CLOSE, kernel);
    cv::dilate(edges, edges, kernel); // 添加膨胀操作
    // 查找轮廓
    cv::findContours(edges, contours, cv::RETR_EXTERNAL, cv::CHAIN_APPROX_SIMPLE);
    cout << "find " << contours.size() << " Contours" << endl;
}

void makerectContours(const vector<vector<cv::Point>>& contours, cv::Mat& inputImage) {
    //3.找到面积最大的轮廓
    auto maxContour = *max_element(contours.begin(), contours.end(),
        [](const vector<cv::Point>& a, const vector<cv::Point>& b) {
            return cv::contourArea(a) < cv::contourArea(b);
        });

    // 获取最小外接矩形
    cv::RotatedRect rotatedRect = cv::minAreaRect(maxContour);
    cv::Point2f vertices[4];
    rotatedRect.points(vertices);

    // 转换为整数点坐标
    vector<cv::Point> rectPoints;
    for (int i = 0; i < 4; i++) {
        rectPoints.push_back(cv::Point(
            static_cast<int>(vertices[i].x),
            static_cast<int>(vertices[i].y)
        ));
    }
    if (rectPoints.empty()) return;
    // 用红色绘制矩形轮廓
    for (int i = 0; i < 4; i++) {
        cout << "top" << i+1 << ": (" << rectPoints[i].x << ", " << rectPoints[i].y << ")" << endl;
        cv::line(inputImage, rectPoints[i], rectPoints[(i+1)%4], cv::Scalar(0, 0, 255), 3);//画矩形线
        cv::circle(inputImage, rectPoints[i], 8, cv::Scalar(0, 255, 255), -1);//顶点画一个原点
    }
    // 计算并显示面积
    double area = cv::contourArea(rectPoints);
    cout << "area: " << area << endl;
}

int filterContours(const vector<vector<cv::Point>>& contours,
                   vector<vector<cv::Point>>& filteredContours,
                   const vector<cv::Rect>& exclusionAreas) {
    int excludedCount = 0;

    for (const auto& contour : contours) {
        if (isContourInExclusionArea(contour, exclusionAreas, 0.75)) {
            excludedCount++;
            continue; // 跳过这个轮廓
        }
        filteredContours.push_back(contour);
    }

    cout << "filter " << excludedCount << " edge Contours" << endl;
    return excludedCount;
}

void detectContour(cv::Mat& inputImage) {
    cv::Mat getImagecontours = inputImage.clone();
    //1.在原始图像上绘制gridsizexgridsize网格并获取排除区域
    int gridsize = 20;
    // 控制是否绘制网格线--用于调试
    bool drawGridLines = true;
    vector<cv::Rect> exclusionAreas;
    //drawGrid的行和列的索引
    {//四条边界
        exclusionAreas=drawGrid(inputImage, gridsize, drawGridLines);
    }
    {//第2行和第3行的第2列网格需要排除
        cv::Rect pos;
        pos=getGridCell(inputImage,gridsize,2,2);
        exclusionAreas.push_back(pos);
        pos=getGridCell(inputImage,gridsize,3,2);
        exclusionAreas.push_back(pos);

        pos=getGridCell(inputImage,gridsize,2,19);
        exclusionAreas.push_back(pos);
    }
    {//2.第5行的第4和第5列网格需要排除
        cv::Rect pos;
        pos=getGridCell(inputImage,gridsize,5,4);
        exclusionAreas.push_back(pos);
        pos=getGridCell(inputImage,gridsize,5,5);
        exclusionAreas.push_back(pos);
    }
    {//第5行的第16和第17列网格需要排除
        cv::Rect pos;
        pos=getGridCell(inputImage,gridsize,5,16);
        exclusionAreas.push_back(pos);
        pos=getGridCell(inputImage,gridsize,5,17);
        exclusionAreas.push_back(pos);
    }

    //3. 查找所有轮廓并用绿色绘制
    vector<vector<cv::Point>> contours;
    getallContours(getImagecontours, contours);

    //4.过滤待排除轮廓
    vector<vector<cv::Point>> filteredContours;
    filterContours(contours, filteredContours, exclusionAreas);
    cout << "filteredContours " << filteredContours.size() << " Contours" << endl;

    // 用绿色绘制所有轮廓
    cv::drawContours(inputImage, filteredContours, -1, cv::Scalar(0, 255, 0), 2);

    makerectContours(contours, inputImage);
    // 显示结果
    showimg("inputImage", inputImage);
    cv::waitKey(0);
}


int main(int argc, char* argv[]) {
    string imagePath = "myimage.png";

    // 读取图片
    cv::Mat image = cv::imread(imagePath);
    if (image.empty()) {
        cout << "no can open: " << imagePath << endl;
        return -1;
    }
    cout << "size: " << image.cols << "x" << image.rows << endl;
    // 创建副本用于显示
    cv::Mat result = image.clone();
    detectContour(result);
    return 0;
}