[1.1 环境与工具准备](#1.1 环境与工具准备)
[1.2 项目初始化](#1.2 项目初始化)
[二、Spring Boot Starter SDK的详细实现步骤](#二、Spring Boot Starter SDK的详细实现步骤)
[2.1 创建项目与配置依赖](#2.1 创建项目与配置依赖)
[2.2 编写配置属性类](#2.2 编写配置属性类)
[2.3 实现核心客户端功能](#2.3 实现核心客户端功能)
[2.4 配置自动装配](#2.4 配置自动装配)
[2.5 完善配置元数据(可选)](#2.5 完善配置元数据(可选))
[2.6 本地打包与使用测试](#2.6 本地打包与使用测试)
[3.1 发包规范](#3.1 发包规范)
[3.2 版本管理](#3.2 版本管理)
[3.3 准备阿里云仓库](#3.3 准备阿里云仓库)
[3.4 配置setting.xml与pom.xml](#3.4 配置setting.xml与pom.xml)
[3.5 发布SDK到制品仓库中](#3.5 发布SDK到制品仓库中)
前言:SDK的概念与价值
在软件开发领域,SDK(Software Development Kit,软件开发工具包)是一个不可或缺的概念,它通常包含了一组工具、库、文档和示例代码,帮助开发者更高效地构建应用程序。
对于Java生态系统而言,Spring Boot Starter SDK是一种特殊形式的SDK,它通过自动配置和依赖管理机制,极大地简化了第三方服务的集成过程。通过开发自己的SDK,我们可以将常用功能封装成易于使用的组件,其他开发者只需引入依赖即可快速集成,而无需关心底层实现细节。
开发SDK不仅能提高代码的复用性和可维护性,还能促进团队协作和技术标准化。理想情况下,开发者引入SDK后,只需要在配置文件中填写必要参数,就可以直接使用客户端调用接口,就像调用自己写的代码一样简单。
本文将手把手教你如何从零开始创建一个Spring Boot Starter SDK,并在本地打包使用,以及上传到阿里云仓库中进行分发使用。无论你是想为团队内部工具提供统一接口,还是希望将公司服务开放给外部开发者,掌握SDK开发技能都将为你打开新世界的大门。接下来,让我们一步步深入SDK的开发之旅。
一、SDK开发的前期准备
在开始开发SDK之前,我们需要明确目标并准备好相应的开发环境。首先,应当明确SDK的目标平台、功能需求以及目标用户。例如,你的SDK是针对Web应用还是移动应用?需要提供哪些核心功能?主要使用者是内部开发团队还是外部开发者?清晰的目标将帮助你有针对性地进行开发规划。
1.1 环境与工具准备
SDK开发需要一些基本的开发工具和环境支持。以下是必备的工具列表:
| 工具类别 | 推荐选择 | 作用说明 |
|---|---|---|
| Java开发环境 | JDK 8+ | 编译和运行Java代码的基础环境 |
| 项目构建工具 | Maven 3.6+ | 管理项目依赖、构建和打包SDK |
| 集成开发环境 | IntelliJ IDEA | 提供高效的代码编写和调试体验 |
| 版本控制 | Git | 管理代码版本和协作开发 |
除了上述工具,还需要确保本地已安装并配置好Maven环境变量,以便在命令行中执行mvn相关命令。如果你计划使用阿里云仓库,还需要提前注册阿里云账号并获取相应的仓库地址和认证信息。
1.2 项目初始化
一切准备就绪后,我们就可以开始创建SDK项目了。使用Spring Initializr(可通过IDEA内置功能或访问start.spring.io)快速生成项目框架,在选择依赖时,需要添加以下两个核心依赖
Lombok:通过注解简化JavaBean的编写,减少getter/setter等样板代码
Spring Configuration Processor:用于生成配置元数据,在application.yml中填写配置时提供自动补全和提示功能
创建项目后,需要进行一些结构调整。由于SDK是作为依赖被其他项目引入,而不是独立运行的应用,因此需要删除Spring Boot启动类以及Maven构建配置中的部分内容。这些准备工作为后续的SDK核心功能开发奠定了坚实基础。
二、Spring Boot Starter SDK的详细实现步骤
2.1 创建项目与配置依赖
首先,我们需要创建一个新的Spring Boot项目作为我们SDK的基础框架。使用IntelliJ IDEA的Spring Initializr功能,选择Maven作为构建工具,并设置合适的GroupId和ArtifactId。例如,如果你的SDK名为"example-sdk",那么可以设置:
XML
<parent>
    <groupId>com.example</groupId>
    <artifactId>example-sdk-spring-boot-starter</artifactId>
    <version>1.0</version>
</parent>
在选择依赖时,添加Lombok和Spring Configuration Processor等依赖。Spring Configuration Processor的作用是在其他开发者使用你的SDK时,在application.yml中提供配置项的智能提示和自动补全功能,极大提升开发体验。
项目创建完成后,需要修改pom.xml文件,删除<build>标签中的内容。因为默认的build配置会将项目打包为可执行jar,但SDK应当作为依赖库使用。同时,确保packaging设置为jar:
XML
<packaging>jar</packaging>最终的pom.xml文件:
XML
<?xml version="1.0" encoding="UTF-8"?>
<project xmlns="http://maven.apache.org/POM/4.0.0"
         xmlns:xsi="http://www.w3.org/2001/XMLSchema-instance"
         xsi:schemaLocation="http://maven.apache.org/POM/4.0.0 http://maven.apache.org/xsd/maven-4.0.0.xsd">
    <modelVersion>4.0.0</modelVersion>

    <parent>
        <groupId>com.example</groupId>
        <artifactId>example-sdk-spring-boot-starter</artifactId>
        <version>1.0</version>
    </parent>

    <artifactId>example-sdk</artifactId>
    <!-- 打包为jar包 -->
    <packaging>jar</packaging>

    <properties>
        <maven.compiler.source>17</maven.compiler.source>
        <maven.compiler.target>17</maven.compiler.target>
        <project.build.sourceEncoding>UTF-8</project.build.sourceEncoding>
    </properties>

    <!-- 项目依赖配置 -->
    <dependencies>
        <!-- Spring Boot基础启动器,提供核心Spring Boot功能 -->
        <dependency>
            <groupId>org.springframework.boot</groupId>
            <artifactId>spring-boot-starter</artifactId>
            <version>2.7.12</version>
        </dependency>

        <!-- Spring Boot配置处理器,用于生成配置元数据 -->
        <dependency>
            <groupId>org.springframework.boot</groupId>
            <artifactId>spring-boot-configuration-processor</artifactId>
            <optional>true</optional>
            <version>2.7.12</version>
        </dependency>

        <!-- Spring Boot自动配置支持 -->
        <dependency>
            <groupId>org.springframework.boot</groupId>
            <artifactId>spring-boot-autoconfigure</artifactId>
            <version>2.7.12</version>
        </dependency>

        <!-- Lombok,用于简化Java代码编写 -->
        <dependency>
            <groupId>org.projectlombok</groupId>
            <artifactId>lombok</artifactId>
            <version>1.18.24</version>
        </dependency>

    </dependencies>

</project>
父pom文件:
javascript
<?xml version="1.0" encoding="UTF-8"?>
<project xmlns="http://maven.apache.org/POM/4.0.0"
         xmlns:xsi="http://www.w3.org/2001/XMLSchema-instance"
         xsi:schemaLocation="http://maven.apache.org/POM/4.0.0 http://maven.apache.org/xsd/maven-4.0.0.xsd">
    <modelVersion>4.0.0</modelVersion>

    <groupId>com.example</groupId>
    <artifactId>example-sdk-spring-boot-starter</artifactId>
    <version>1.0</version>
    <packaging>pom</packaging>
    <modules>
        <module>example-sdk</module>
    </modules>

    <properties>
        <maven.compiler.source>17</maven.compiler.source>
        <maven.compiler.target>17</maven.compiler.target>
        <project.build.sourceEncoding>UTF-8</project.build.sourceEncoding>
    </properties>

</project>
2.2 编写配置属性类
配置属性类是SDK自动配置的核心,它负责读取application.yml或application.properties中的配置信息。创建一个配置类,使用@ConfigurationProperties注解指定配置前缀:
java
package com.example.sdk.config;

/**
 * Created with IntelliJ IDEA.
 *
 * @Author: yang
 * @Description: SDK配置
 */
import lombok.Data;
import org.springframework.boot.context.properties.ConfigurationProperties;

@Data
@ConfigurationProperties(prefix = "example.api.client")
public class ExampleSDKProperties {
    /** 访问密钥 */
    private String accessKey;
    /** 密钥 */
    private String secretKey;
}
上述代码定义了一个配置类,它能够读取以shousi.api.client为前缀的配置项。@Data是Lombok注解,自动生成getter、setter等方法。这个类将配置信息集中管理,使其他组件可以方便地获取这些属性值。
2.3 实现核心客户端功能
SDK的核心价值在于封装复杂逻辑,提供简洁易用的API。接下来我们创建主要的客户端类,它包含了SDK提供的所有核心方法:
java
package com.example.sdk;

/**
 * Created with IntelliJ IDEA.
 *
 * @Author: yang
 * @Description: ApiClient
 */
import com.example.sdk.config.ExampleSDKProperties;
import lombok.extern.slf4j.Slf4j;

@Slf4j
public class ExampleApiClient {

    private final ExampleSDKProperties properties;

    public ExampleApiClient(ExampleSDKProperties properties) {
        this.properties = properties;
    }

    public String getUserInfo(String userId) {
        return properties.getAccessKey();
    }

    public String generateSignature() {
        return properties.getSecretKey();
    }
}
这个客户端类封装了与后端API的交互细节,使用者只需调用getUserInfo方法并传入userId,即可获取用户信息,而无需关心HTTP请求的构造、认证等复杂细节。
2.4 配置自动装配
自动装配是Spring Boot Starter的核心特性,它使得SDK在被引入时能够自动配置所需的Bean。我们需要创建一个配置类来定义这些Bean:
java
package com.example.sdk.config;

/**
 * Created with IntelliJ IDEA.
 *
 * @Author: yang
 * @Description: SDK自动配置
 */

import com.example.sdk.ExampleApiClient;
import org.springframework.boot.context.properties.EnableConfigurationProperties;
import org.springframework.context.annotation.Bean;
import org.springframework.context.annotation.Configuration;

@Configuration
@EnableConfigurationProperties(ExampleSDKProperties.class)
public class ExampleSDKAutoConfiguration {

    @Bean
    public ExampleApiClient exampleApiClient(ExampleSDKProperties properties) {
        return new ExampleApiClient(properties);
    }
}
为了让Spring Boot能够识别这个自动配置类,我们需要在src/main/resources目录下创建META-INF文件夹,并在其中创建spring.factories文件,内容如下:
javascript
org.springframework.boot.autoconfigure.EnableAutoConfiguration=com.example.sdk.config.ExampleSDKAutoConfigurationSPI(Service Provider Interface)是一种服务发现机制,允许框架在运行时动态加载实现类。
在Java中,SPI通常通过在META-INF/services或META-INF/spring.factories等配置文件中声明接口的实现类来实现。
Spring Boot利用SPI机制实现自动装配(AutoConfiguration)。开发人员只需在组件的META-INF/spring.factories文件中配置自动配置类,Spring Boot启动时便会自动加载并初始化这些类。
这样,当其他项目引入我们的SDK时,Spring Boot会自动加载ExampleSDKAutoConfiguration类,并创建其中定义的所有Bean。
2.5 完善配置元数据(可选)
为了在使用SDK时提供更好的开发体验(如在application.yml中输入配置时获得提示),我们可以创建额外的配置元数据文件。在src/main/resources/META-INF中创建additional-spring-configuration-metadata.json文件:
javascript
{
  "properties": [
    {
      "name": "example.api.client.access-key",
      "type": "java.lang.String",
      "description": "访问API所需的AccessKey",
      "sourceType": "com.example.sdk.config.ExampleSDKProperties"
    },
    {
      "name": "example.api.client.secret-key",
      "type": "java.lang.String",
      "description": "访问API所需的SecretKey",
      "sourceType": "com.example.sdk.config.ExampleSDKProperties"
    }
  ]
}
这个JSON文件为IDE提供了配置项的详细信息,当开发者在application.yml中输入配置时,IDE会显示相应的描述和默认值,大大提升开发体验。
2.6 本地打包与使用测试
请阅读:【Java开发SDK】从概念到实现,本地打包使用详解-CSDN博客
三、上传SDK到阿里云仓库(组织内共享)
你开发完的组件或者SDK,不只是你使用,还有其他很多人使用。但跨部门,跨组的别人又不一定都有你的代码库权限,这个时候就需要把本地微服务的 Jar 发包到公司或者第三方的 Maven 镜像库中。如:https://packages.aliyun.com/ 让公司的所有人 Maven setting 配置文件都配置这套制品库,这样就解决了一个人发包,其他人也能拉取到使用。
另外,如果你想你发的包,不只是你自己或公司里的人使用,那么就要把包发到 Maven 统一的中心仓库:https://central.sonatype.com/publishing 这个过程稍微有点漫长,会持续 4-12 个小时才能完全同步好。
3.1 发包规范
工程发包会分为开发阶段的 snapshot 包和正式上线使用的 release 包,snapshot 包同一个版本发包后可以被替代,release 包,只能每次更换版本号。
XML
<dependency>
    <groupId>com.example</groupId>
    <artifactId>example-sdk-spring-boot-starter</artifactId>
    <version>1.0.0-SNAPSHOT</version>
</dependency>

<dependency>
    <groupId>com.example</groupId>
    <artifactId>example-sdk-spring-boot-starter</artifactId>
    <version>1.0.0</version>
</dependency>
1.0.0-SNAPSHOT 以 SNAPSHOT 结尾是开发阶段包,都是 1.0.0-SNAPSHOT 命名。
RELEASE包,只需要命名版本号即可。
另外这样的微服务包的版本号,在一个工程中每个模块都需要在发包的时候一起操作修改。如果是手动的修改就容易遗漏导致问题,所以这里我们要使用 Maven 提供的插件管理包。如:
XML
<plugin>
    <groupId>org.codehaus.mojo</groupId>
    <artifactId>versions-maven-plugin</artifactId>
    <version>2.7</version>
</plugin>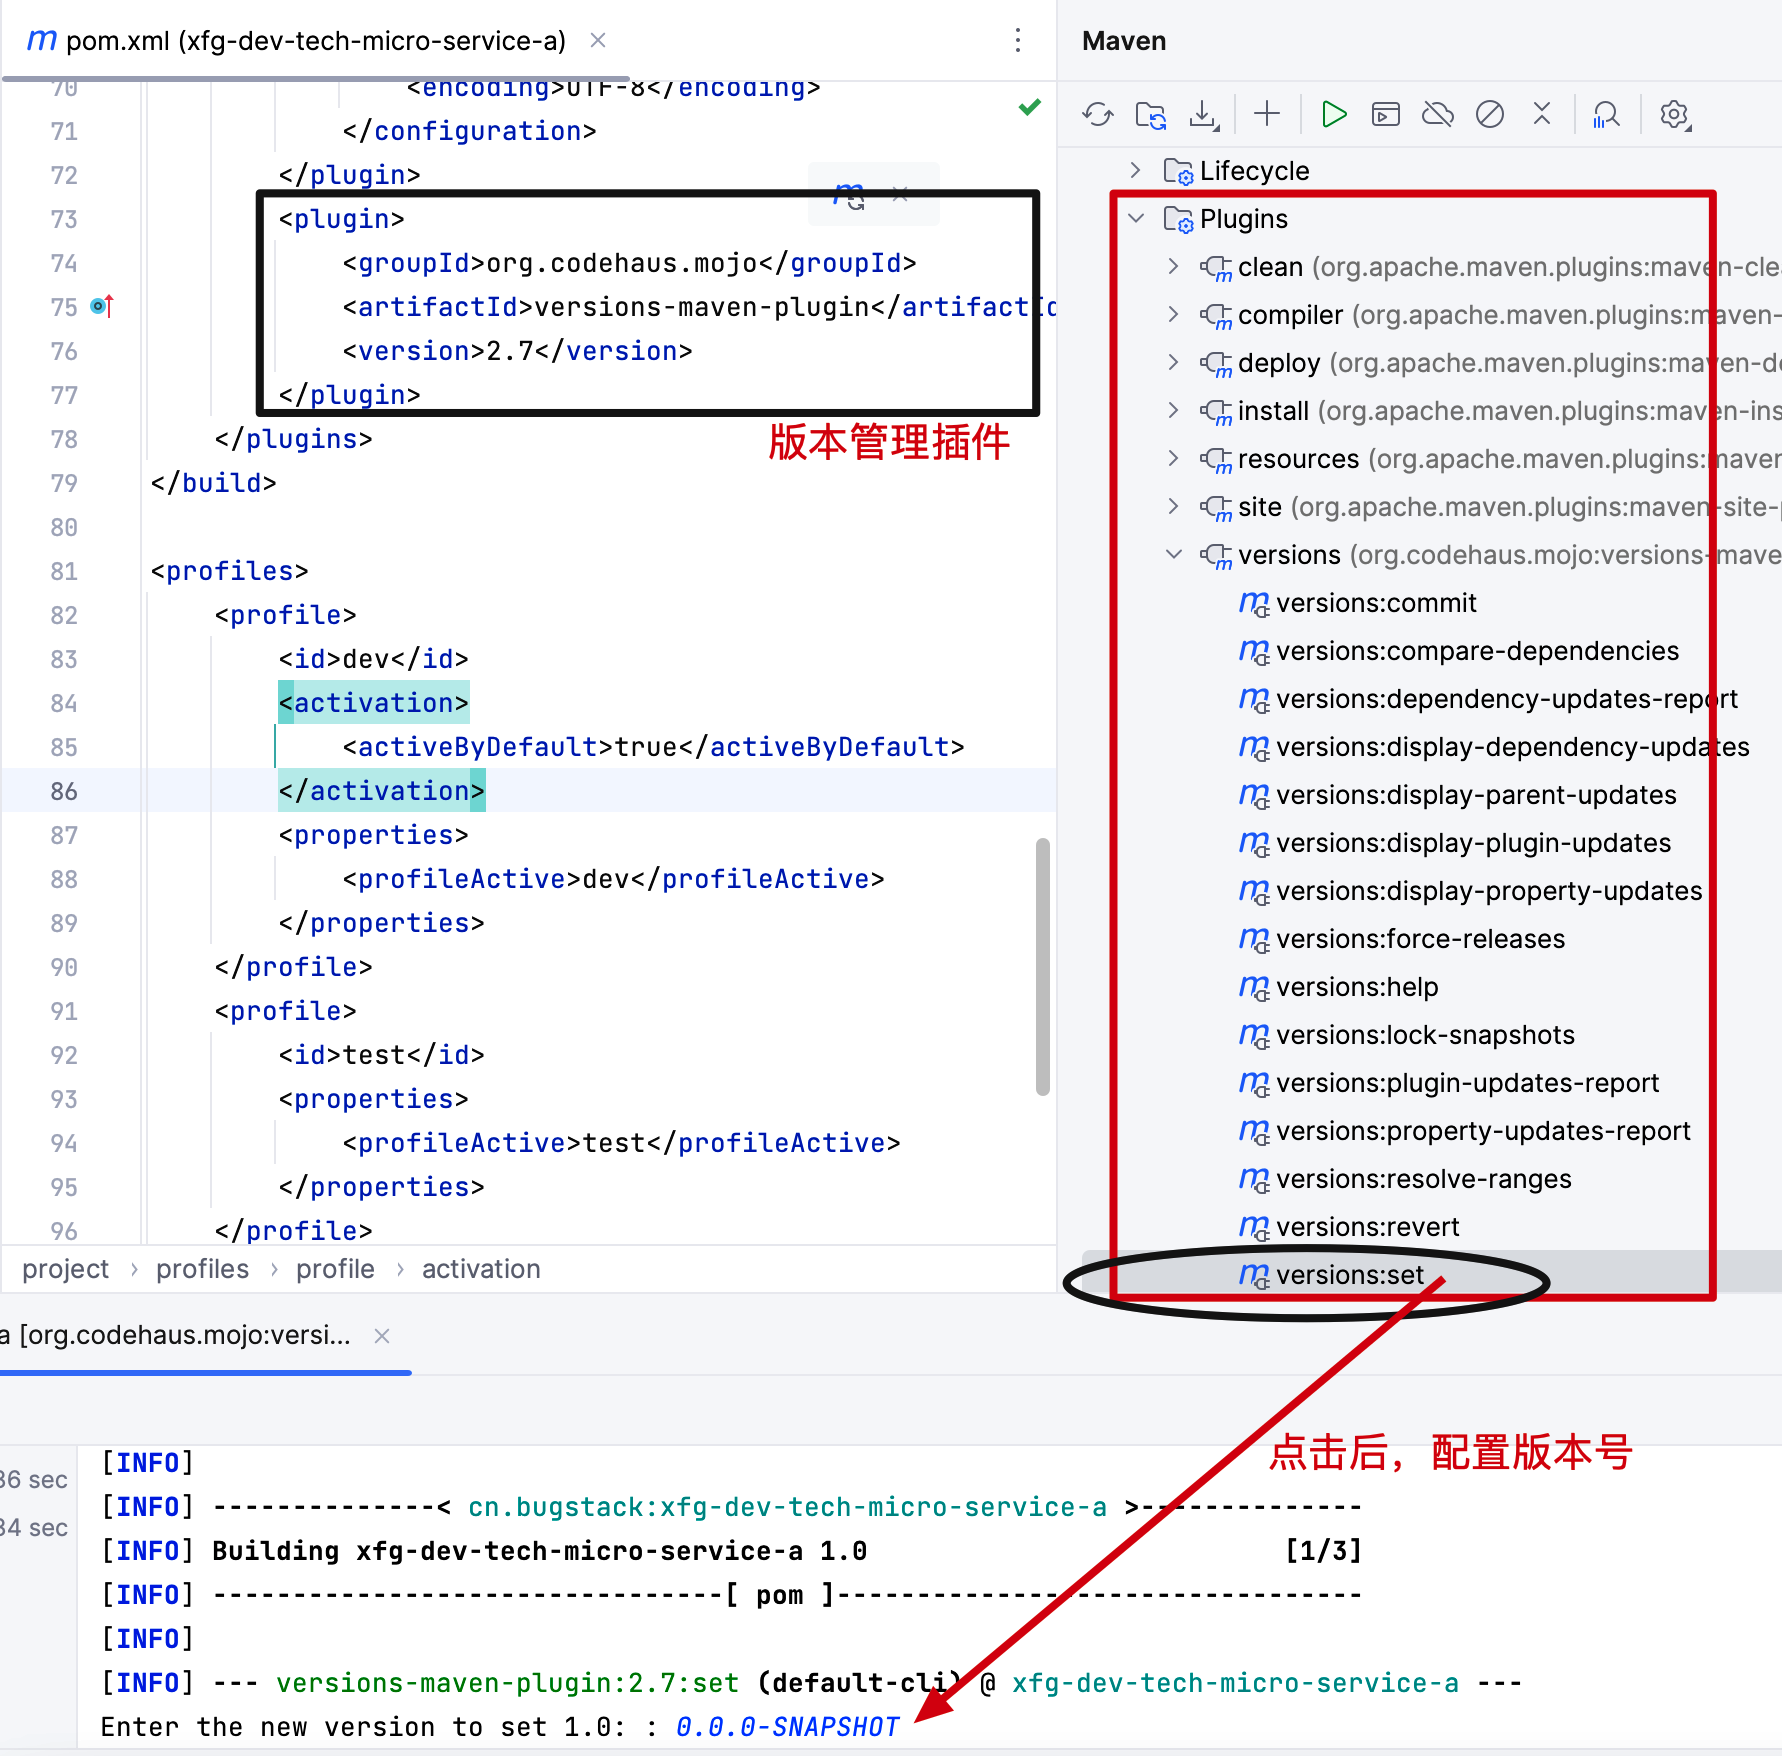
配置好 versions-maven-plugin 点击 version:set 就可以统一管理工程的版本号了。
3.2 版本管理
XML
<dependencyManagement>
    <dependencies>
        <dependency>
            <groupId>org.springframework.ai</groupId>
            <artifactId>spring-ai-bom</artifactId>
            <version>${spring-ai.version}</version>
            <type>pom</type>
            <scope>import</scope>
        </dependency>
    </dependencies>
</dependencyManagement>
首选,学东西我们可以先参考标准,看看 Spring 怎么玩的,MyBatis 怎么搞的。他们都是怎么定义包让我们引入的。
那么,如上面 spring-ai 的使用方式,会先让你引入一个 pom 文件,这个文件定义了 spring-ai 当前版本下各种包信息,每一个包匹配的版本都会给你定义好。也就是说这个 pom 是整个组件的规范定义。
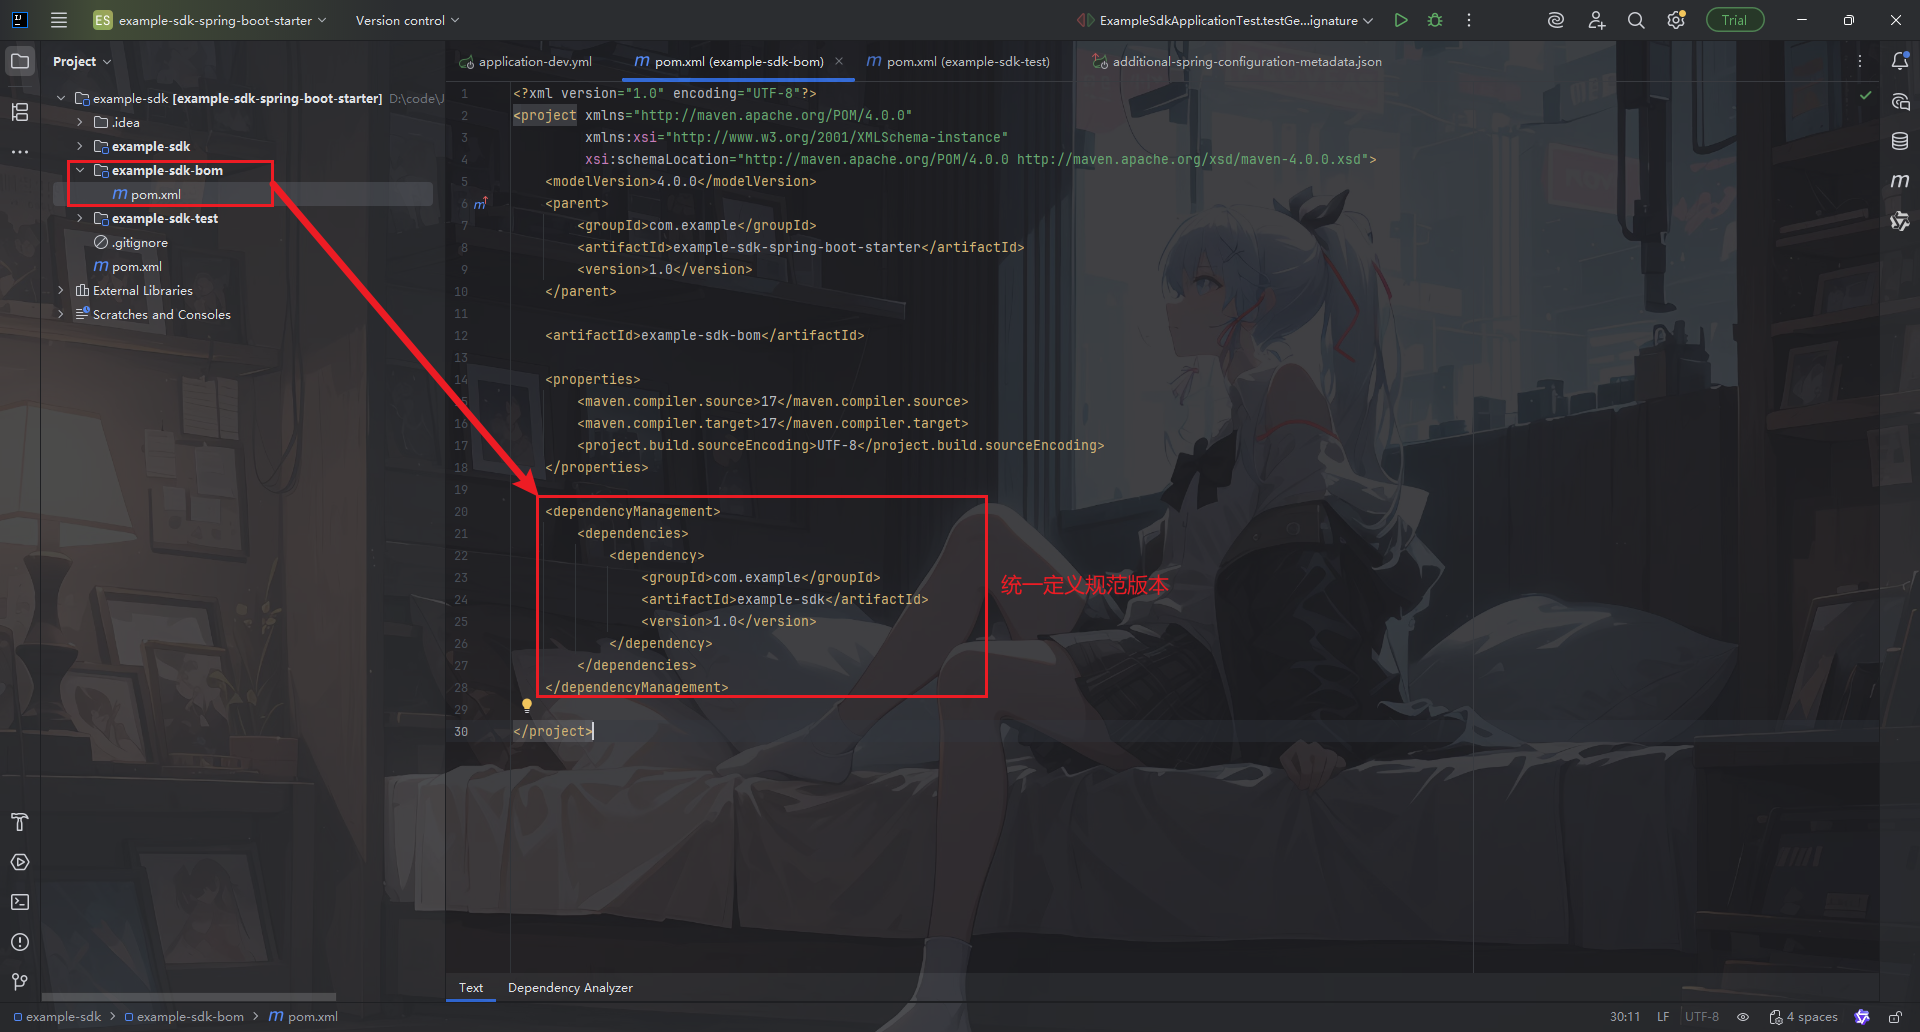
在 example-sdk 下,新增加一个 example-sdk-bom 来统一管理SDK工程下的组件引入。这样其他的业务项目,引入 example-sdk-bom 后,再引入其他的组件时,就不需要额外添加 version 版本号,需要什么直接引入就可以了。
3.3 准备阿里云仓库
登录阿里云账号,进入云效Packages:https://devops.aliyun.com/workbench
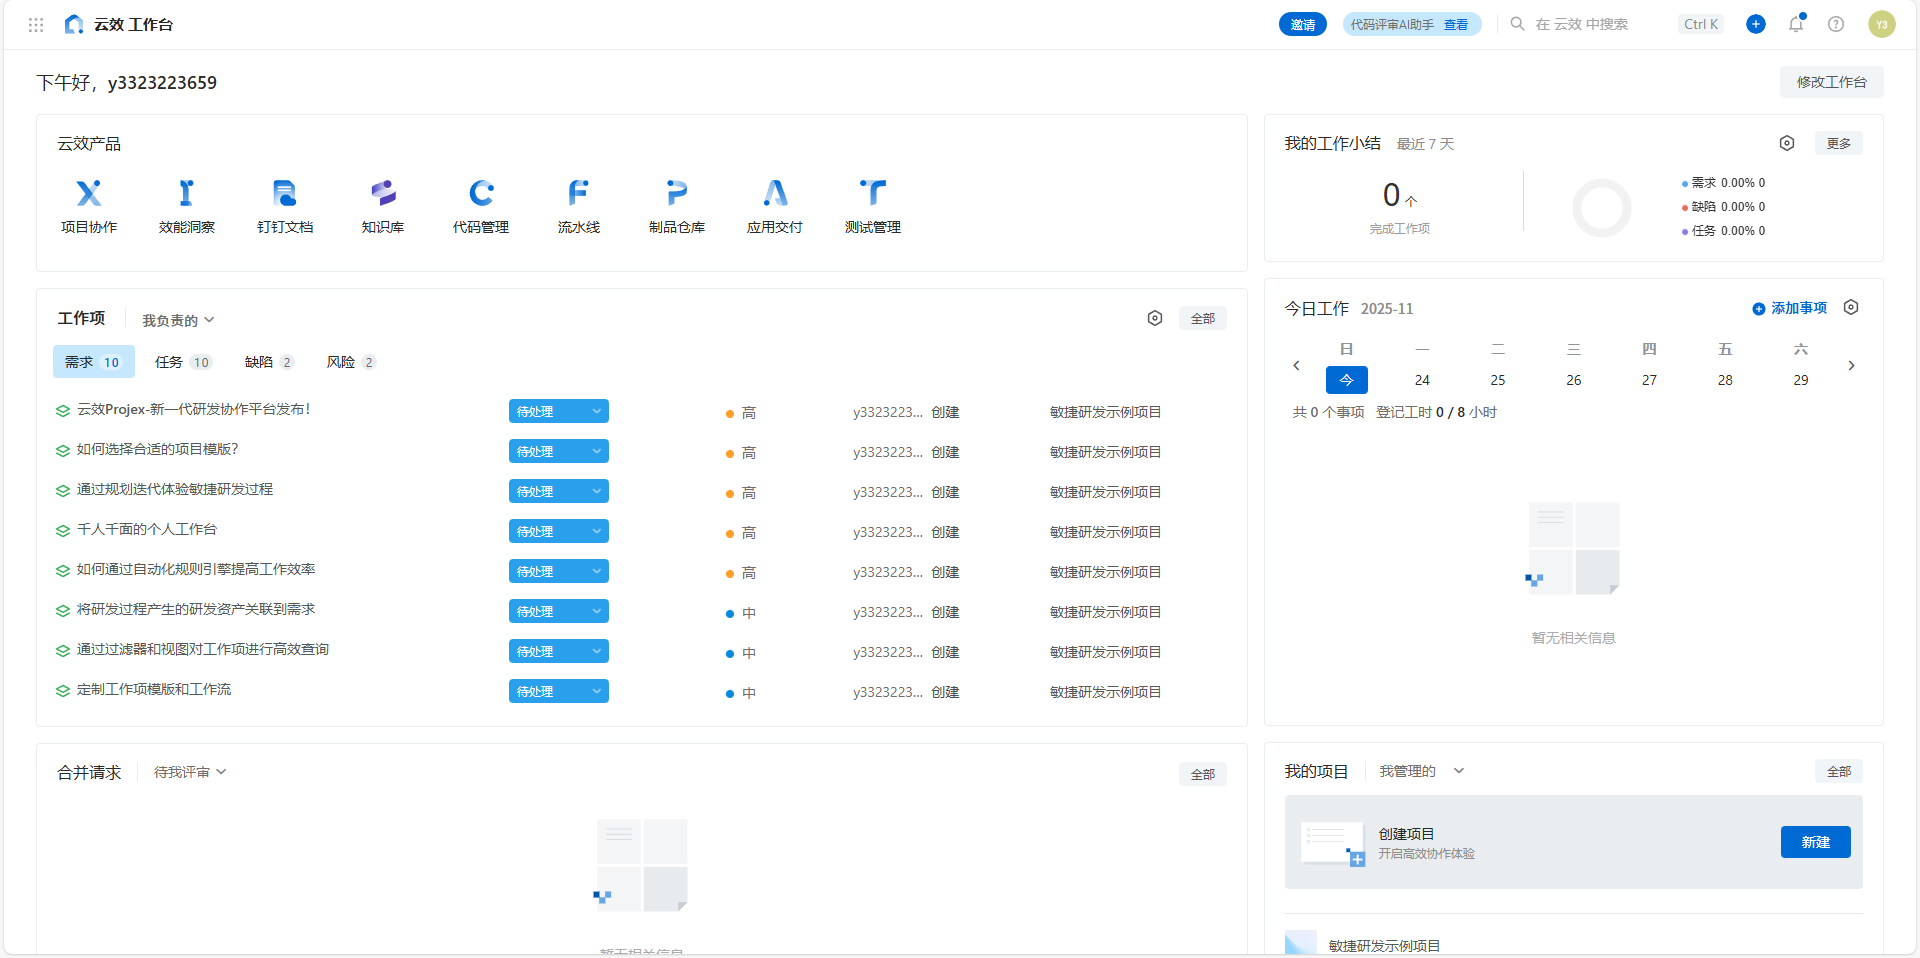
进入制品仓库:https://packages.aliyun.com/
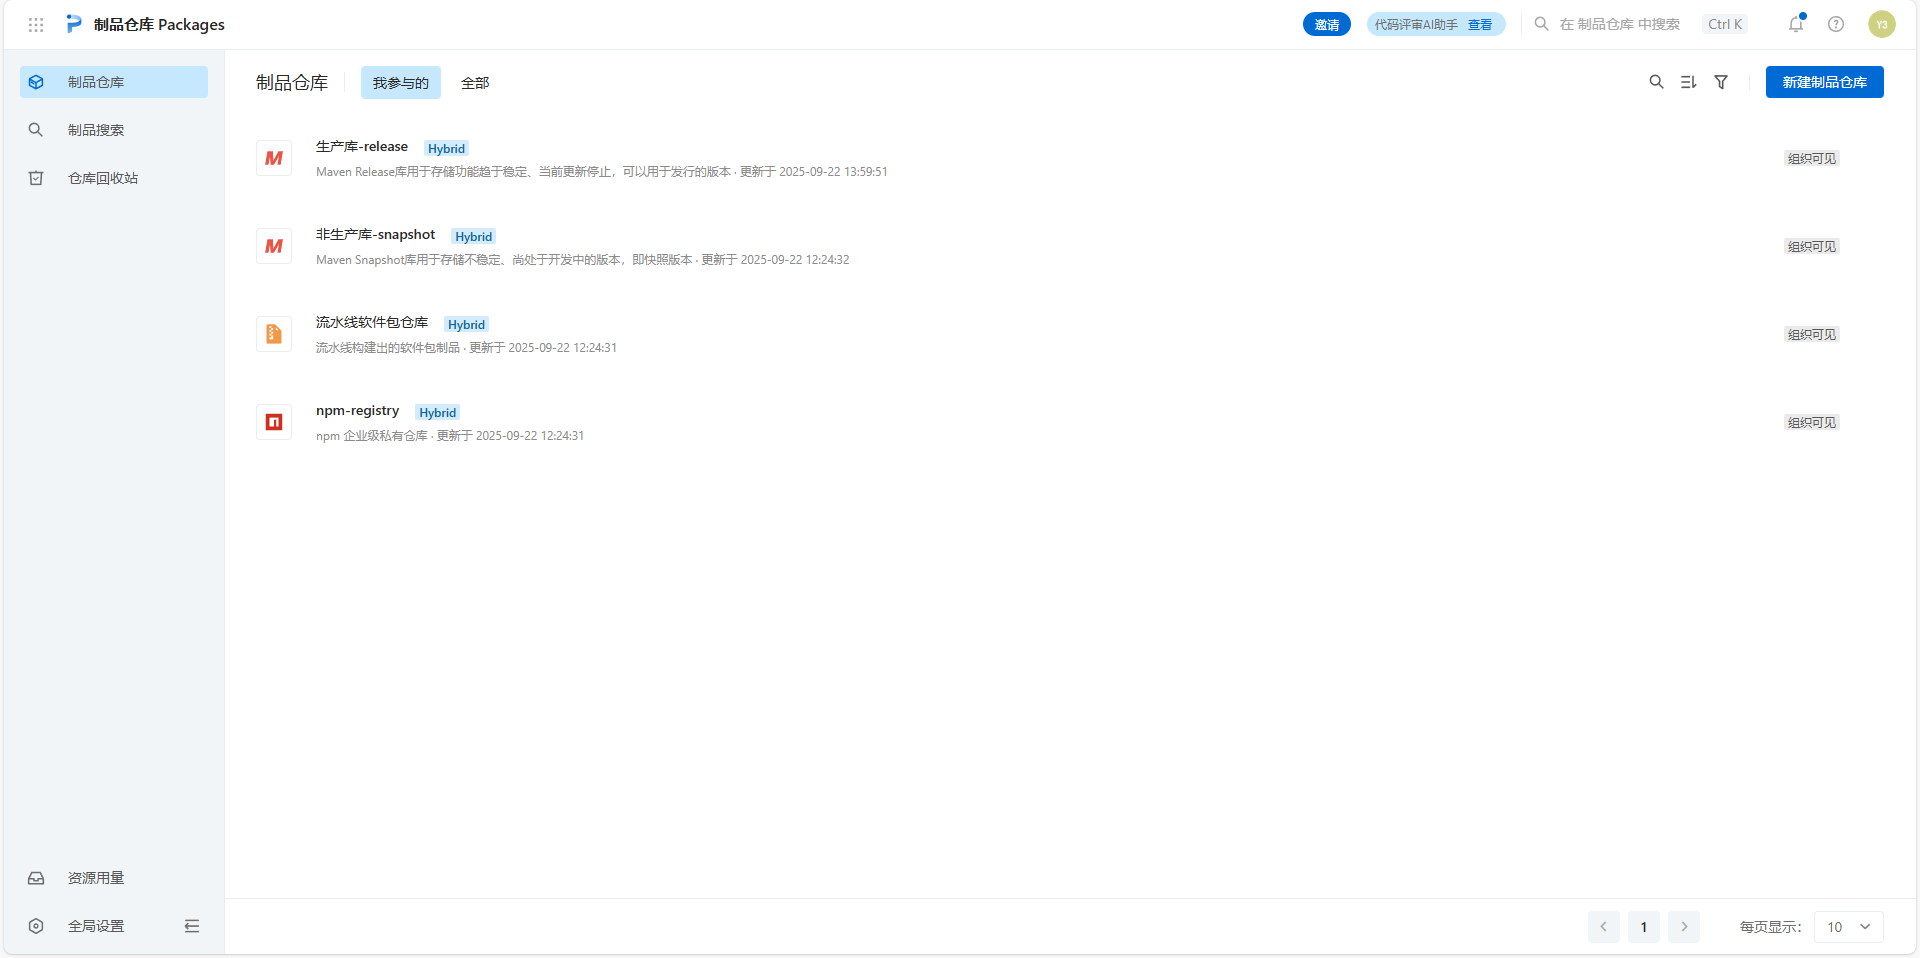
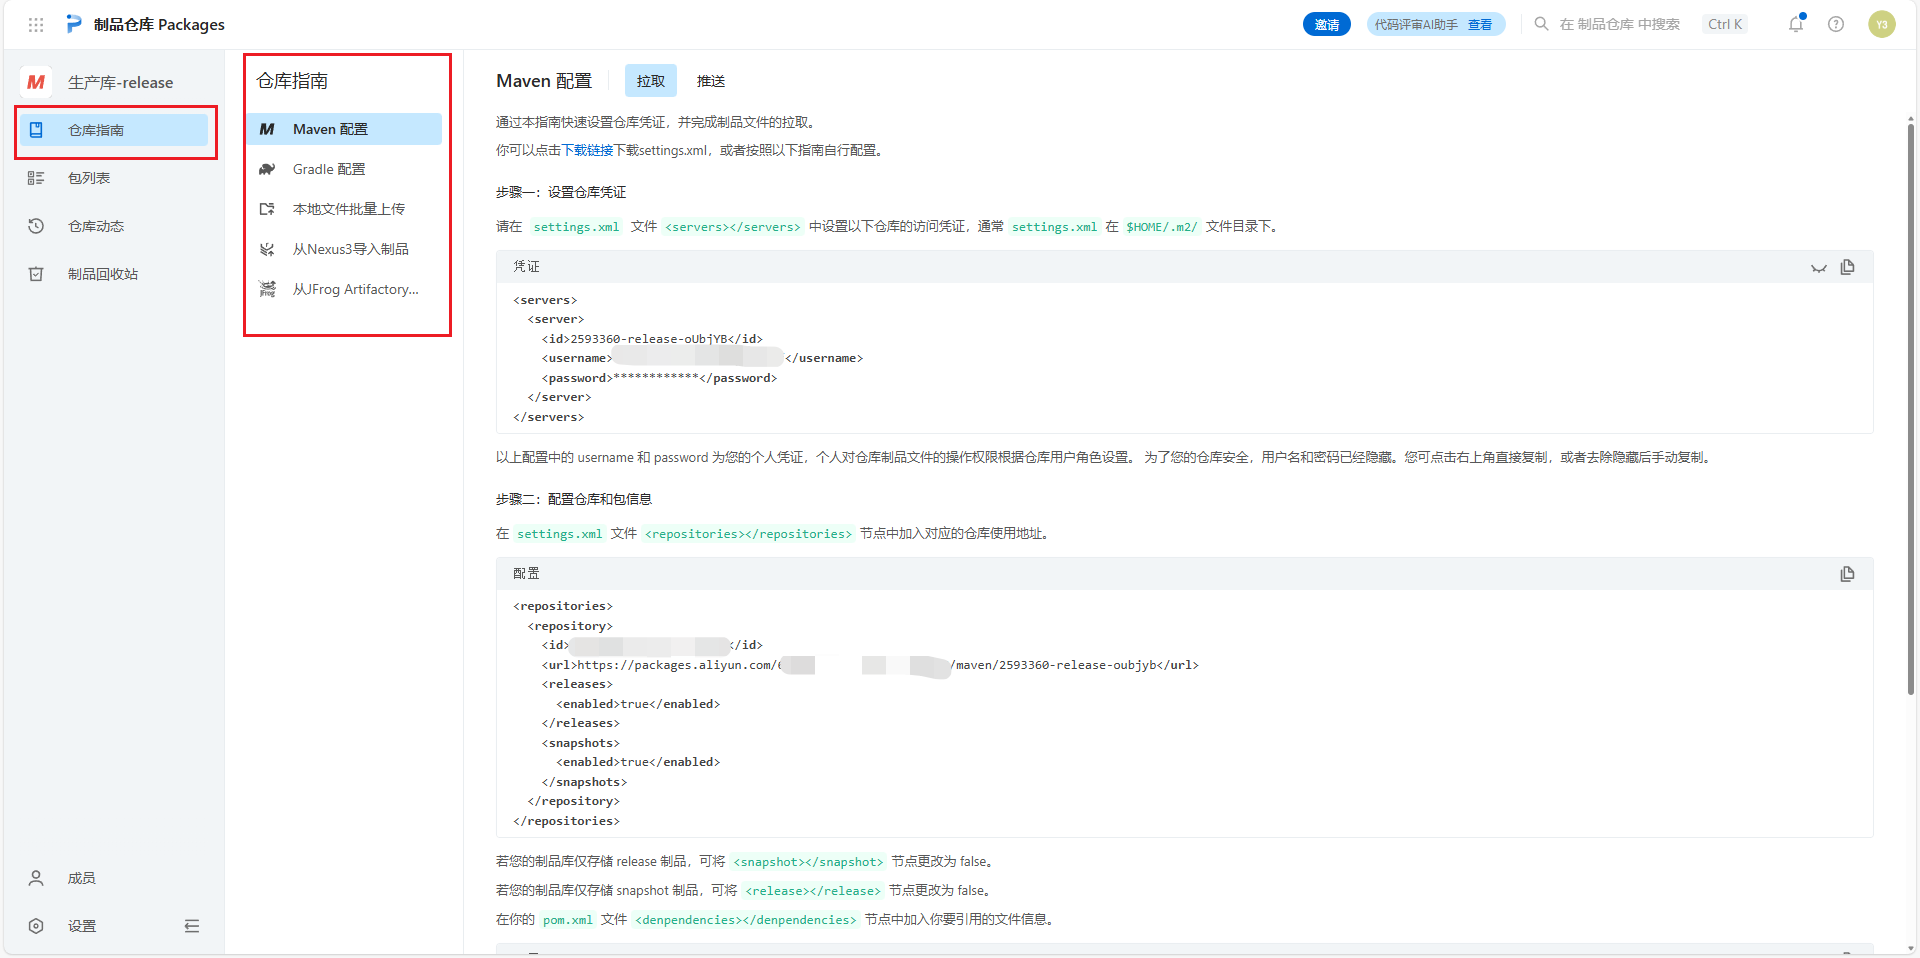
你会看到制品仓库配置,包括生产库和非生产库,他们主要负责给你提供 release、snapshot 发包和拉取。
分别进入 release、snapshot,都可以获得一份 Maven settings.xml 配置文件,把两份文件夹下载后可以找到 release、snapshot 的差异,合并成一份文件。这样你就可以在本地发 release、snapshot 包了。
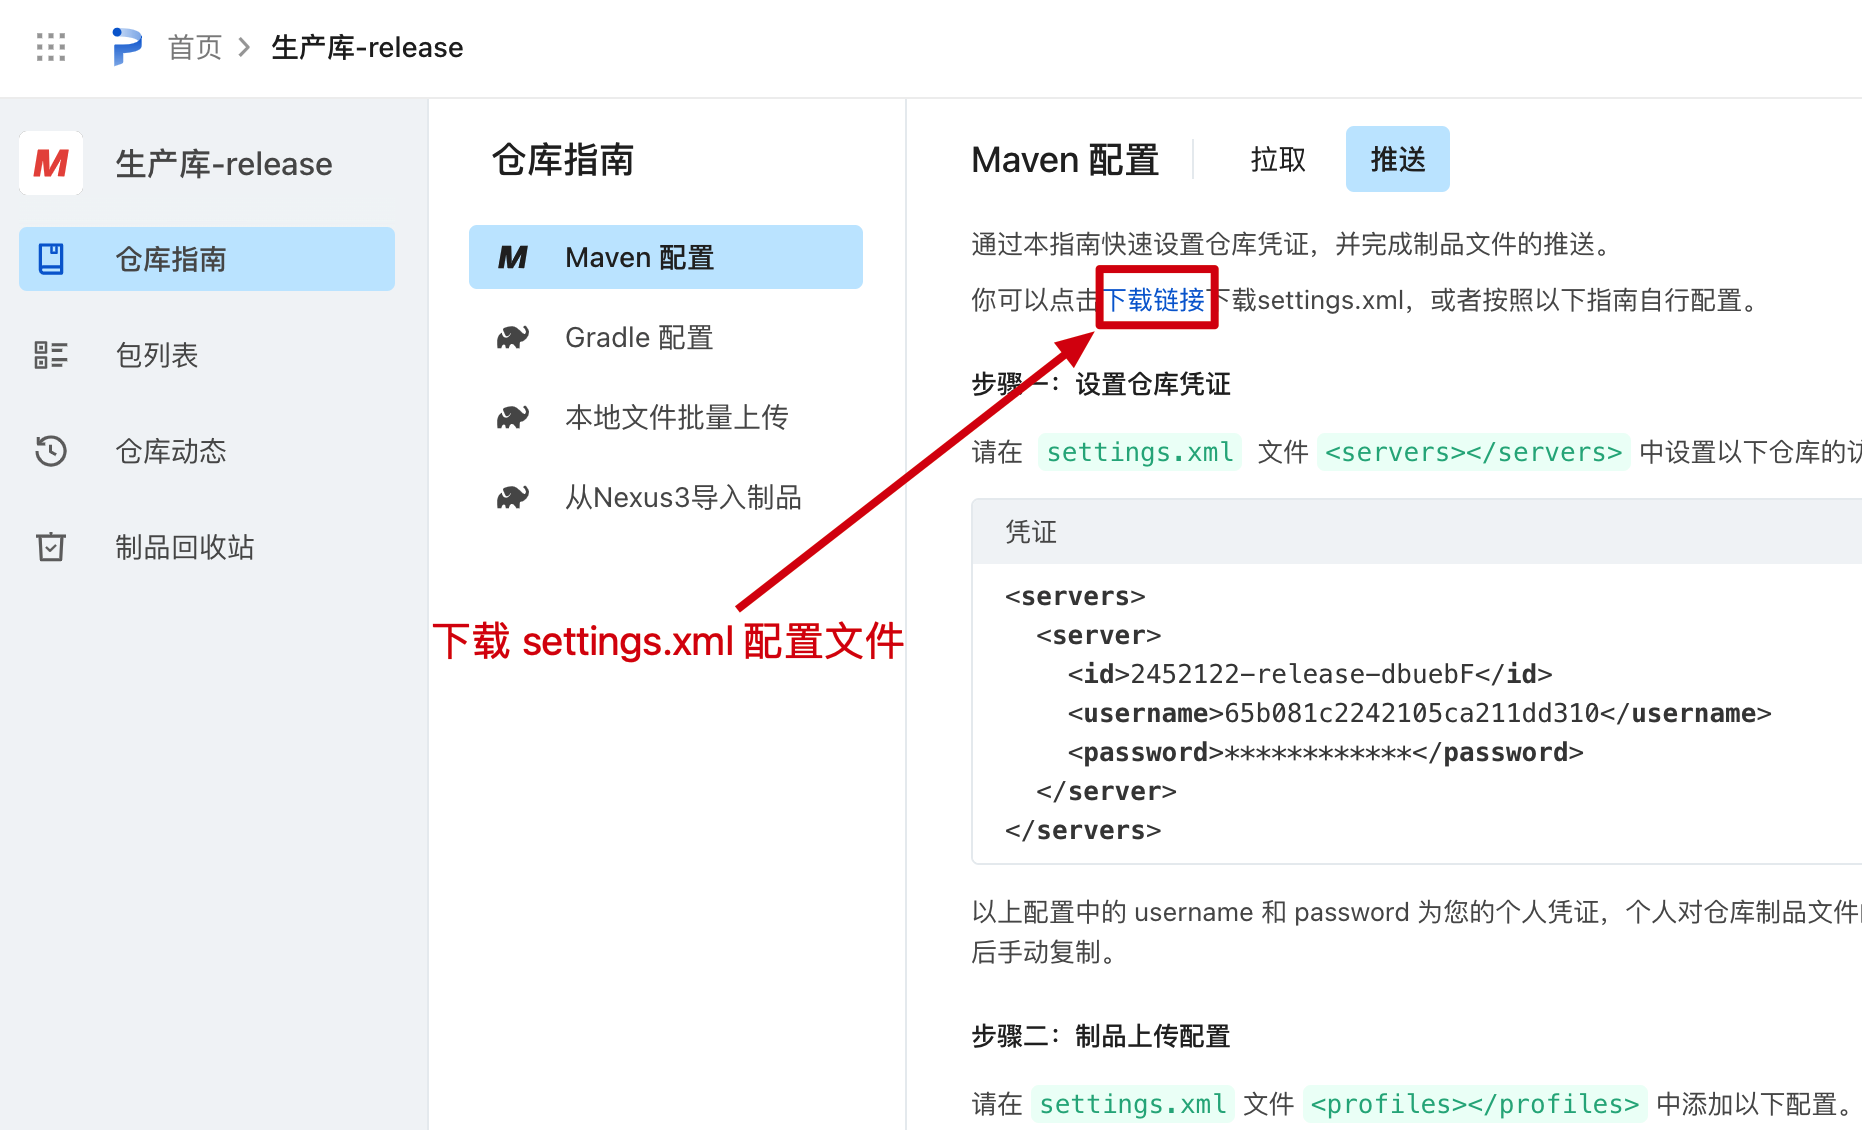
注意;下载的 setting.xml 自带账号密码。如果你将来要部署上线你的项目,使用的是云服务器构建,那么在云服务器的 Maven 配置上下载的 setting.xml 文件。
另外,这个仓库还可以手动上传一个jar进来,之后在本地的 IntelliJ IDEA 打开的 SpringBoot 工程,也可以拉取到你上传的 jar。其他人想使用你的 Jar 也要引入这个 setting.xml 但如果不需要对方上传jar,只是拉取,那么可以把server部分删掉在给对方。
具体操作详情请参考:
样例文件
XML
<?xml version="1.0" encoding="UTF-8"?>

<settings xmlns="http://maven.apache.org/SETTINGS/1.2.0"
          xmlns:xsi="http://www.w3.org/2001/XMLSchema-instance"
          xsi:schemaLocation="http://maven.apache.org/SETTINGS/1.2.0 https://maven.apache.org/xsd/settings-1.2.0.xsd">

  <localRepository>/Users/fuzhengwei/Applications/apache-maven-3.8.4/repository</localRepository>

  <mirrors>
    <mirror>
      <id>mirror</id>
      <mirrorOf>central,jcenter,!2452122-snapshot-XqjwfN</mirrorOf>
      <name>mirror</name>
      <url>https://maven.aliyun.com/nexus/content/groups/public</url>
    </mirror>
  </mirrors>
  <servers>
    <server>
      <id>2452122-snapshot-XqjwfN</id>
      <username>65b081c2242105ca211dd310</username>
      <password>每个人会有自己的密码</password>
    </server>
    <server>
      <id>2452122-release-dbuebF</id>
      <username>65b081c2242105ca211dd310</username>
      <password>每个人会有自己的密码</password>
    </server>
  </servers>
  <profiles>
    <profile>
      <id>rdc</id>
      <properties>


        <altSnapshotDeploymentRepository>
          2452122-snapshot-XqjwfN::default::https://packages.aliyun.com/65b081d4076e069afe3d2f50/maven/2452122-snapshot-xqjwfn
        </altSnapshotDeploymentRepository>

        <altReleaseDeploymentRepository>
          2452122-release-dbuebF::default::https://packages.aliyun.com/65b081d4076e069afe3d2f50/maven/2452122-release-dbuebf
        </altReleaseDeploymentRepository>

      </properties>
      <repositories>
        <repository>
          <id>central</id>
          <url>https://maven.aliyun.com/nexus/content/groups/public</url>
          <releases>
            <enabled>true</enabled>
          </releases>
          <snapshots>
            <enabled>false</enabled>
          </snapshots>
        </repository>
        <repository>
          <id>snapshots</id>
          <url>https://maven.aliyun.com/nexus/content/groups/public</url>
          <releases>
            <enabled>false</enabled>
          </releases>
          <snapshots>
            <enabled>true</enabled>
          </snapshots>
        </repository>
        <repository>
          <id>2452122-snapshot-XqjwfN</id>
          <url>https://packages.aliyun.com/65b081d4076e069afe3d2f50/maven/2452122-snapshot-xqjwfn</url>
          <releases>
            <enabled>false</enabled>
          </releases>
          <snapshots>
            <enabled>true</enabled>
          </snapshots>
        </repository>
        <repository>
          <id>2452122-release-dbuebF</id>
          <url>https://packages.aliyun.com/65b081d4076e069afe3d2f50/maven/2452122-release-dbuebf</url>
          <releases>
            <enabled>true</enabled>
          </releases>
          <snapshots>
            <enabled>false</enabled>
          </snapshots>
        </repository>
      </repositories>
      <pluginRepositories>
        <pluginRepository>
          <id>central</id>
          <url>https://maven.aliyun.com/nexus/content/groups/public</url>
          <releases>
            <enabled>true</enabled>
          </releases>
          <snapshots>
            <enabled>false</enabled>
          </snapshots>
        </pluginRepository>
        <pluginRepository>
          <id>snapshots</id>
          <url>https://maven.aliyun.com/nexus/content/groups/public</url>
          <releases>
            <enabled>false</enabled>
          </releases>
          <snapshots>
            <enabled>true</enabled>
          </snapshots>
        </pluginRepository>
        <pluginRepository>
          <id>2452122-snapshot-XqjwfN</id>
          <url>https://packages.aliyun.com/65b081d4076e069afe3d2f50/maven/2452122-snapshot-xqjwfn</url>
          <releases>
            <enabled>false</enabled>
          </releases>
          <snapshots>
            <enabled>true</enabled>
          </snapshots>
        </pluginRepository>
        <pluginRepository>
          <id>2452122-release-dbuebF</id>
          <url>https://packages.aliyun.com/65b081d4076e069afe3d2f50/maven/2452122-release-dbuebf</url>
          <releases>
            <enabled>true</enabled>
          </releases>
          <snapshots>
            <enabled>false</enabled>
          </snapshots>
        </pluginRepository>
      </pluginRepositories>
    </profile>
  </profiles>
  <activeProfiles>
    <activeProfile>rdc</activeProfile>
  </activeProfiles>

</settings>
3.4 配置setting.xml与pom.xml
推送步骤
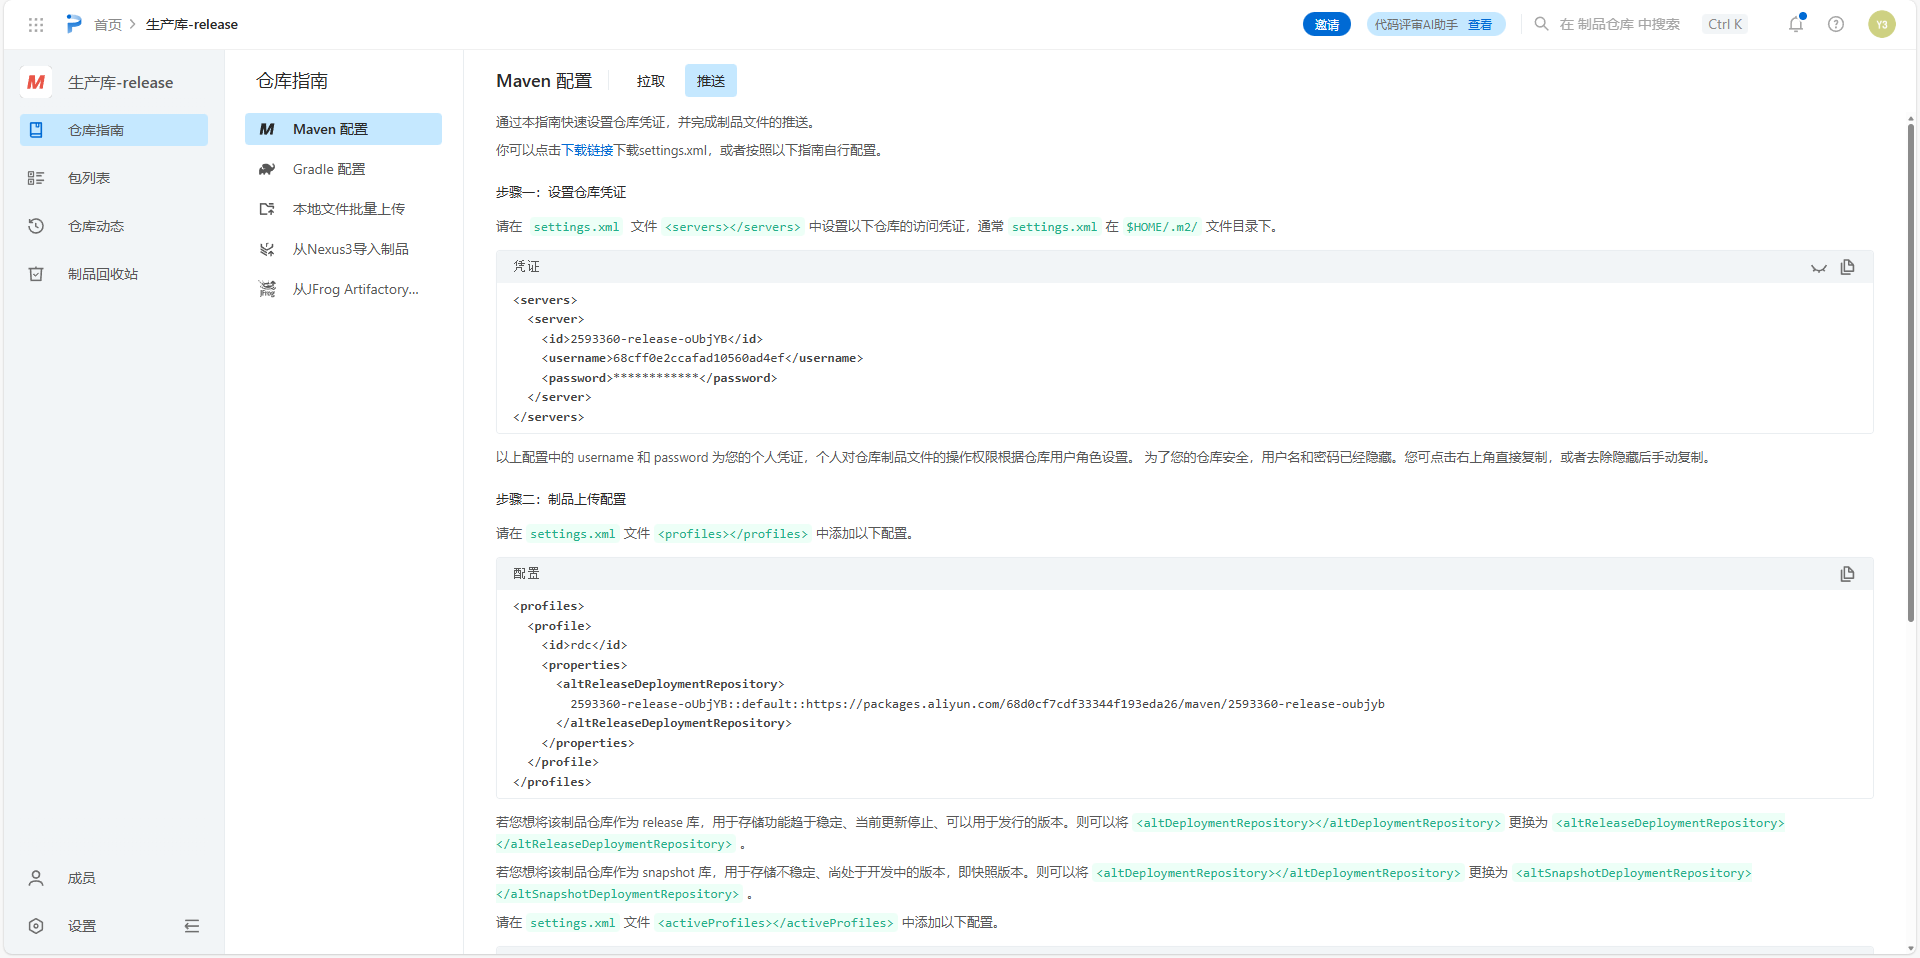
在项目的父pom.xml中添加distributionManagement仓库认证配置与插件配置:
XML
<?xml version="1.0" encoding="UTF-8"?>
<project xmlns="http://maven.apache.org/POM/4.0.0"
         xmlns:xsi="http://www.w3.org/2001/XMLSchema-instance"
         xsi:schemaLocation="http://maven.apache.org/POM/4.0.0 http://maven.apache.org/xsd/maven-4.0.0.xsd">
    <modelVersion>4.0.0</modelVersion>

    <groupId>com.example</groupId>
    <artifactId>example-sdk-spring-boot-starter</artifactId>
    <version>1.0</version>
    <packaging>pom</packaging>
    <modules>
        <module>example-sdk</module>
        <module>example-sdk-test</module>
        <module>example-sdk-bom</module>
    </modules>

    <!-- 发布管理配置,指定Maven仓库地址 -->
    <distributionManagement>
        <repository>
            <id>。。。</id>
            <!-- 阿里云Maven私有仓库地址 -->
            <url>https://packages.aliyun.com/。。。/maven/。。。-release-oubjyb</url>
        </repository>
    </distributionManagement>

    <properties>
        <maven.compiler.source>17</maven.compiler.source>
        <maven.compiler.target>17</maven.compiler.target>
        <project.build.sourceEncoding>UTF-8</project.build.sourceEncoding>
    </properties>

    <!-- 构建配置 -->
    <build>
        <finalName>${project.artifactId}</finalName>

        <plugins>
            <!-- Maven编译器插件配置,确保使用JDK17 -->
            <plugin>
                <groupId>org.apache.maven.plugins</groupId>
                <artifactId>maven-compiler-plugin</artifactId>
                <version>3.0</version>
                <configuration>
                    <source>${java.version}</source>
                    <target>${java.version}</target>
                    <encoding>${project.build.sourceEncoding}</encoding>
                    <!-- 显式设置编译器版本,确保兼容性 -->
                    <compilerVersion>17</compilerVersion>
                </configuration>
            </plugin>

            <!-- 资源处理插件,确保资源文件UTF-8编码 -->
            <plugin>
                <groupId>org.apache.maven.plugins</groupId>
                <artifactId>maven-resources-plugin</artifactId>
                <version>2.5</version>
                <configuration>
                    <encoding>UTF-8</encoding>
                </configuration>
            </plugin>

            <!-- 版本管理插件 -->
            <plugin>
                <groupId>org.codehaus.mojo</groupId>
                <artifactId>versions-maven-plugin</artifactId>
                <version>2.7</version>
            </plugin>
        </plugins>
    </build>

</project>
3.5 发布SDK到制品仓库中
配置好步骤中的setting.xml文件以及maven后,进行deploy发布。
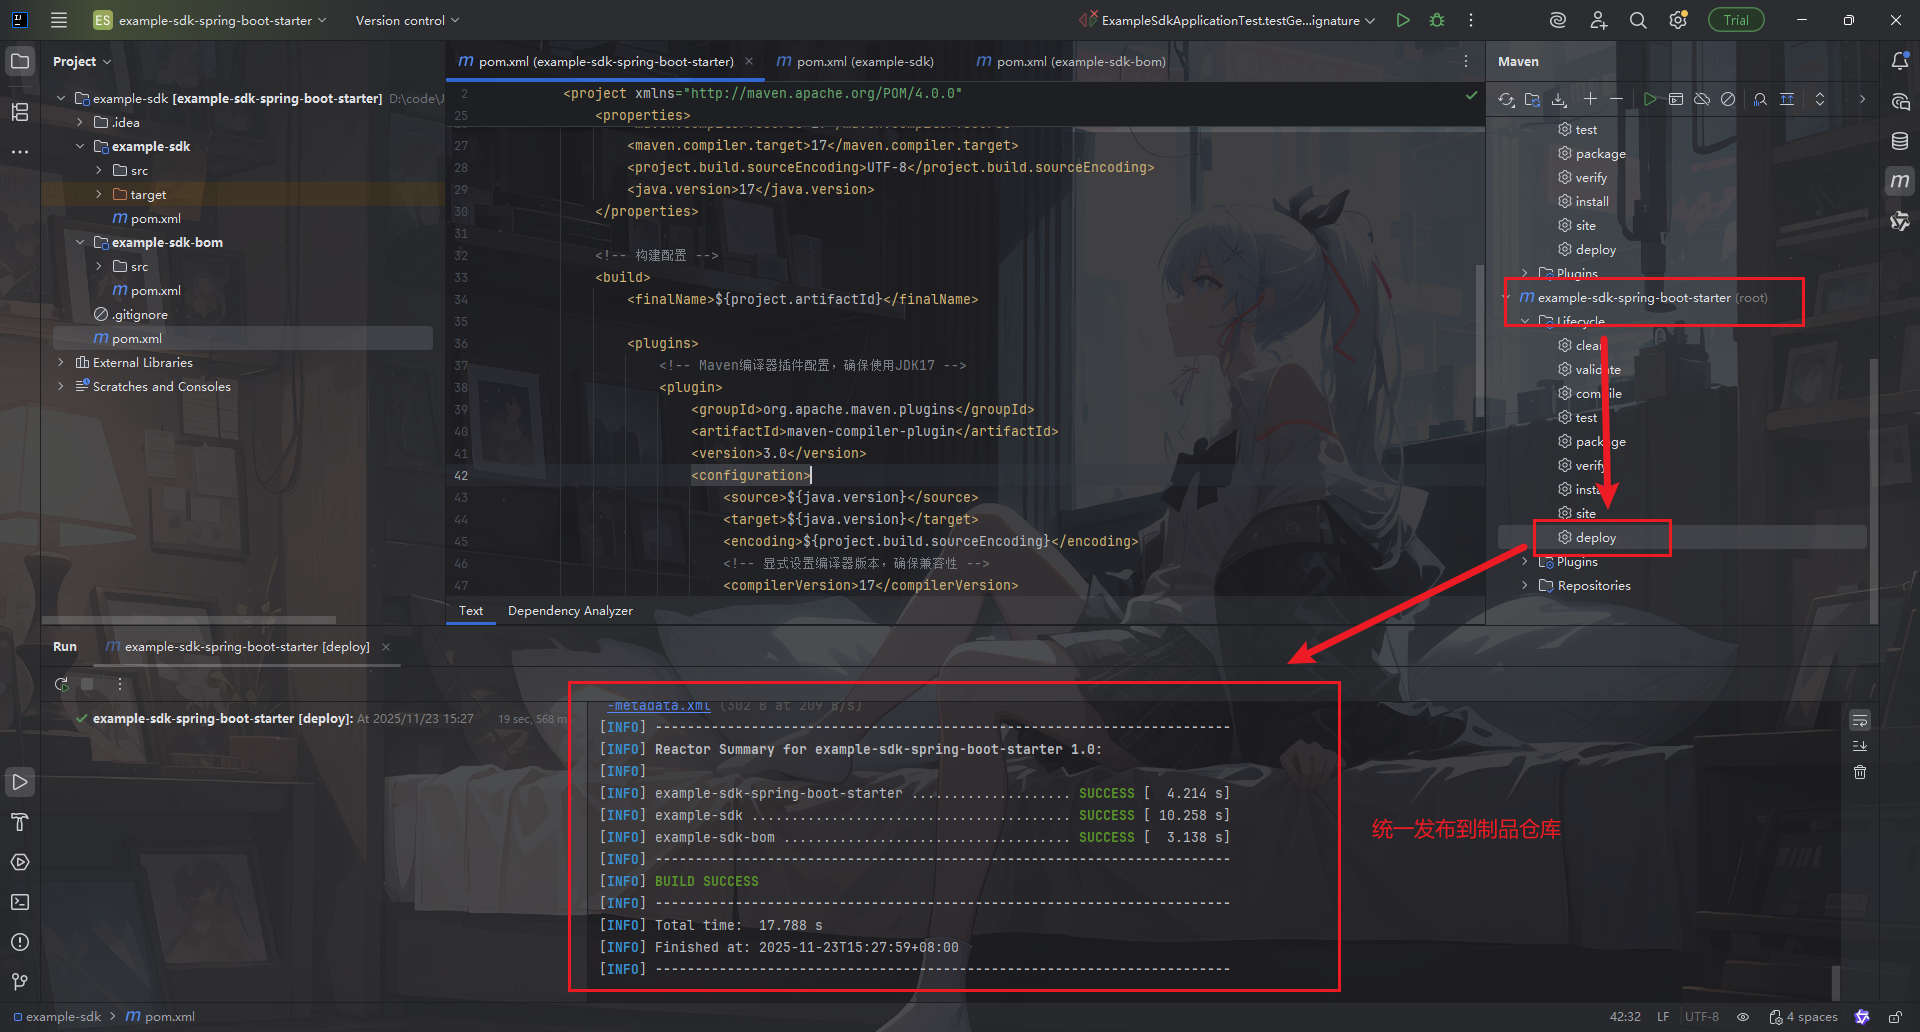
查看仓库
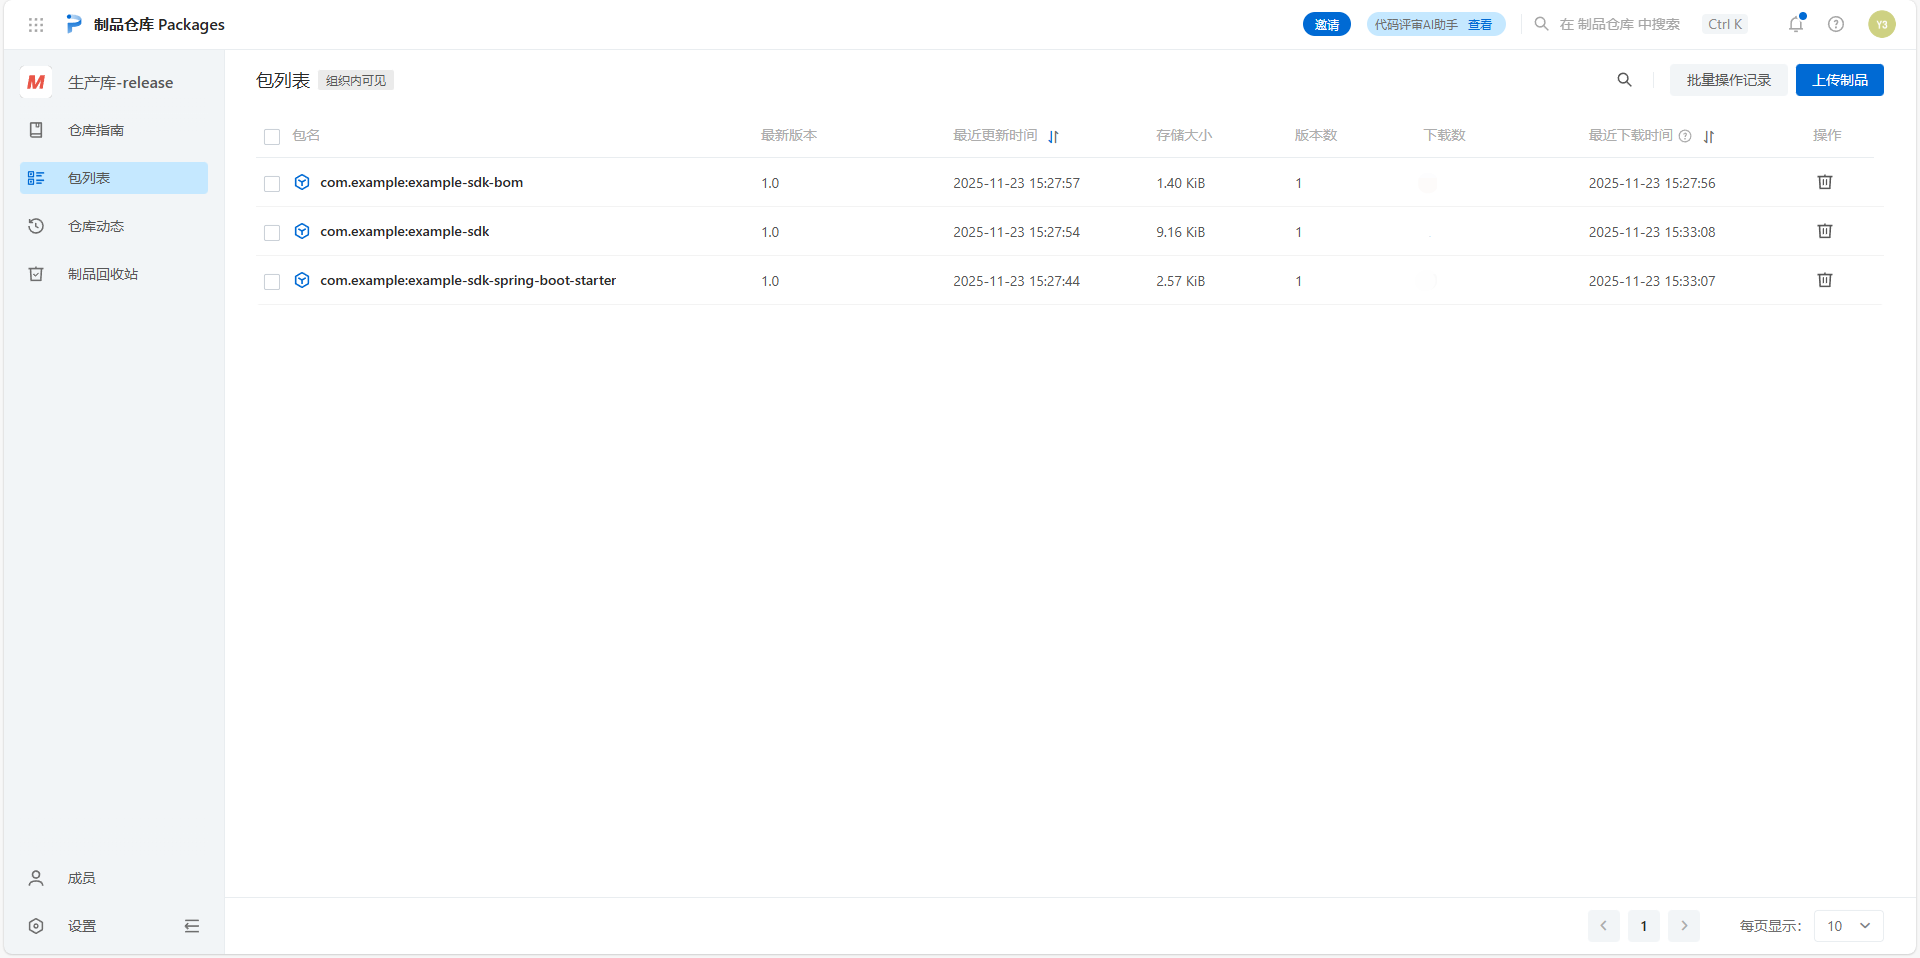
发包后,可以到你的仓库查看是否已经将本地包发到了仓库中。
到这里,你的整个研发组,都配置好来自 https://packages.aliyun.com/ Maven 配置下的下载链接,就可以统一使用这套包拉取到自己本来进行使用了。
四、SDK从仓库中拉取使用
拉取步骤
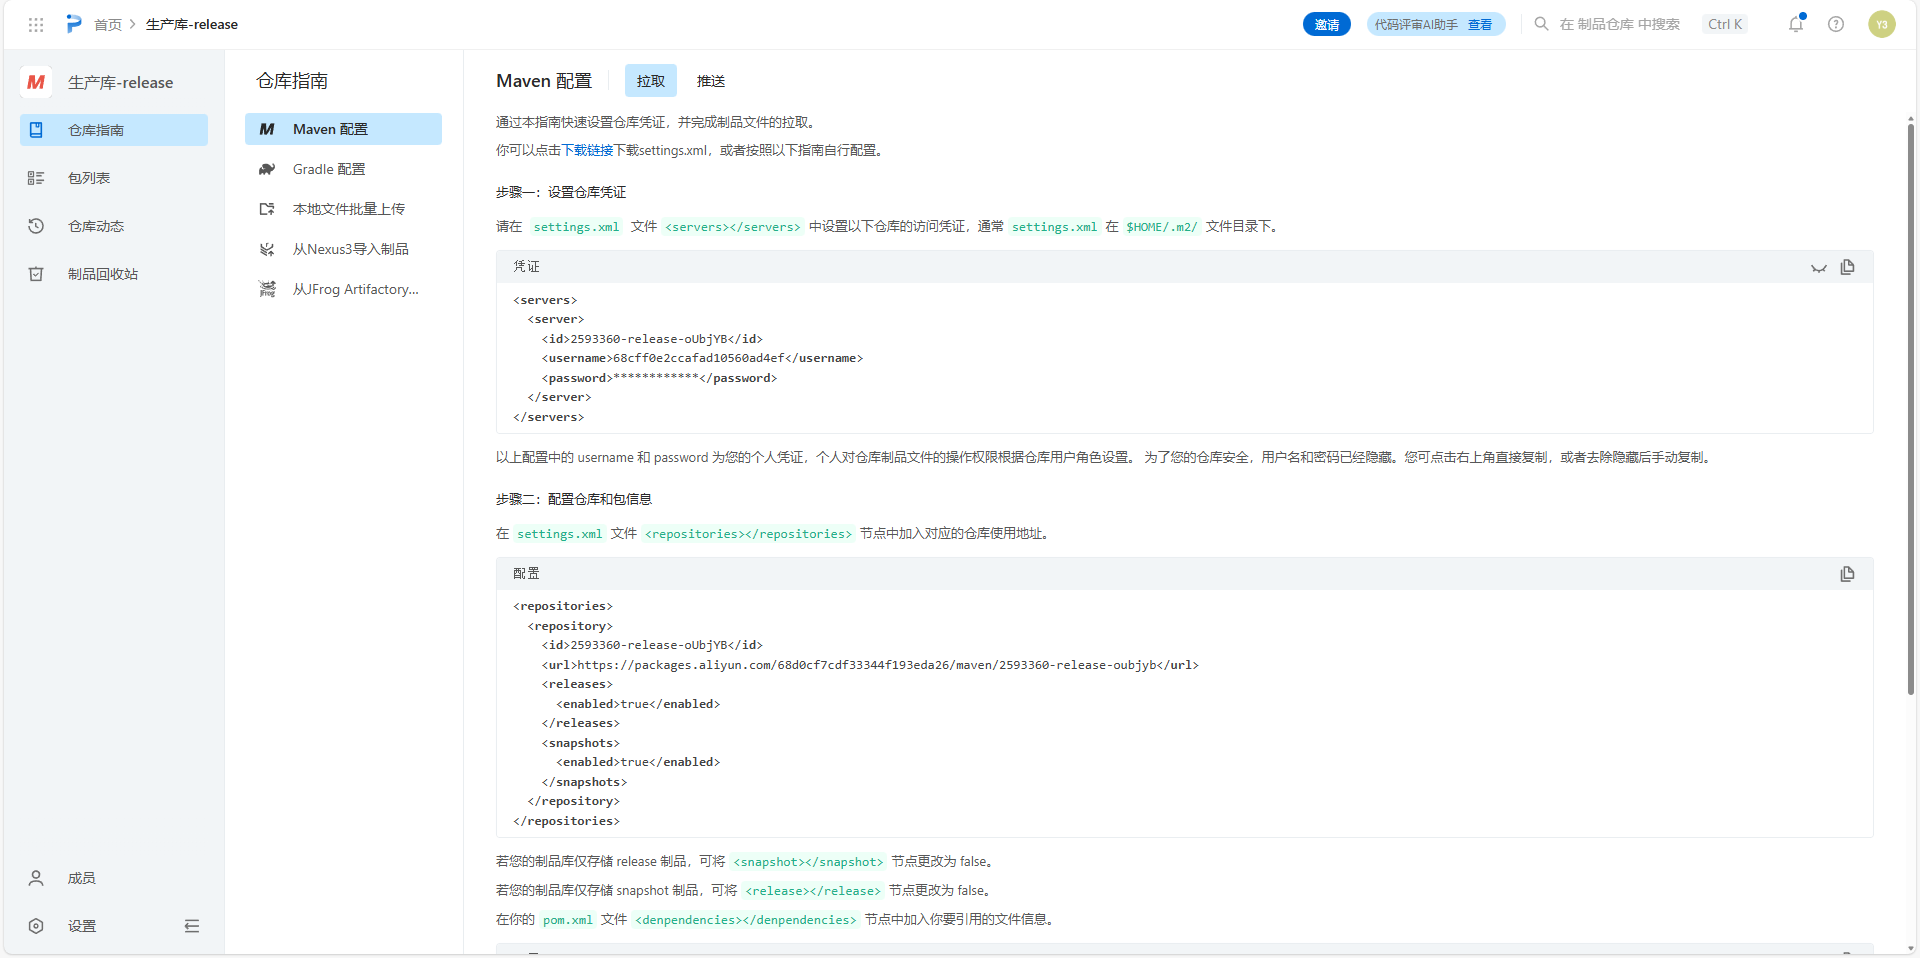
配置好setting.xml文件后新建测试工程
pom.xml 依赖文件
XML
<?xml version="1.0" encoding="UTF-8"?>
<project xmlns="http://maven.apache.org/POM/4.0.0"
         xmlns:xsi="http://www.w3.org/2001/XMLSchema-instance"
         xsi:schemaLocation="http://maven.apache.org/POM/4.0.0 http://maven.apache.org/xsd/maven-4.0.0.xsd">
    <modelVersion>4.0.0</modelVersion>

    <groupId>com.example</groupId>
    <artifactId>example-sdk-test</artifactId>
    <version>1.0</version>

    <properties>
        <maven.compiler.source>17</maven.compiler.source>
        <maven.compiler.target>17</maven.compiler.target>
        <project.build.sourceEncoding>UTF-8</project.build.sourceEncoding>
    </properties>

    <repositories>
        <repository>
            <id>。。。-release-oUbjYB</id>
            <url>https://packages.aliyun.com/。。。/maven/。。。-release-oubjyb</url>
            <releases>
                <enabled>true</enabled>
            </releases>
        </repository>
    </repositories>

    <dependencies>
        <dependency>
            <groupId>com.example</groupId>
            <artifactId>example-sdk</artifactId>
            <version>1.0</version>
        </dependency>

        <!-- Spring Boot测试依赖 -->
        <dependency>
            <groupId>org.springframework.boot</groupId>
            <artifactId>spring-boot-starter-test</artifactId>
            <version>2.7.12</version>
        </dependency>
    </dependencies>

</project>
执行命令
bash
mvn install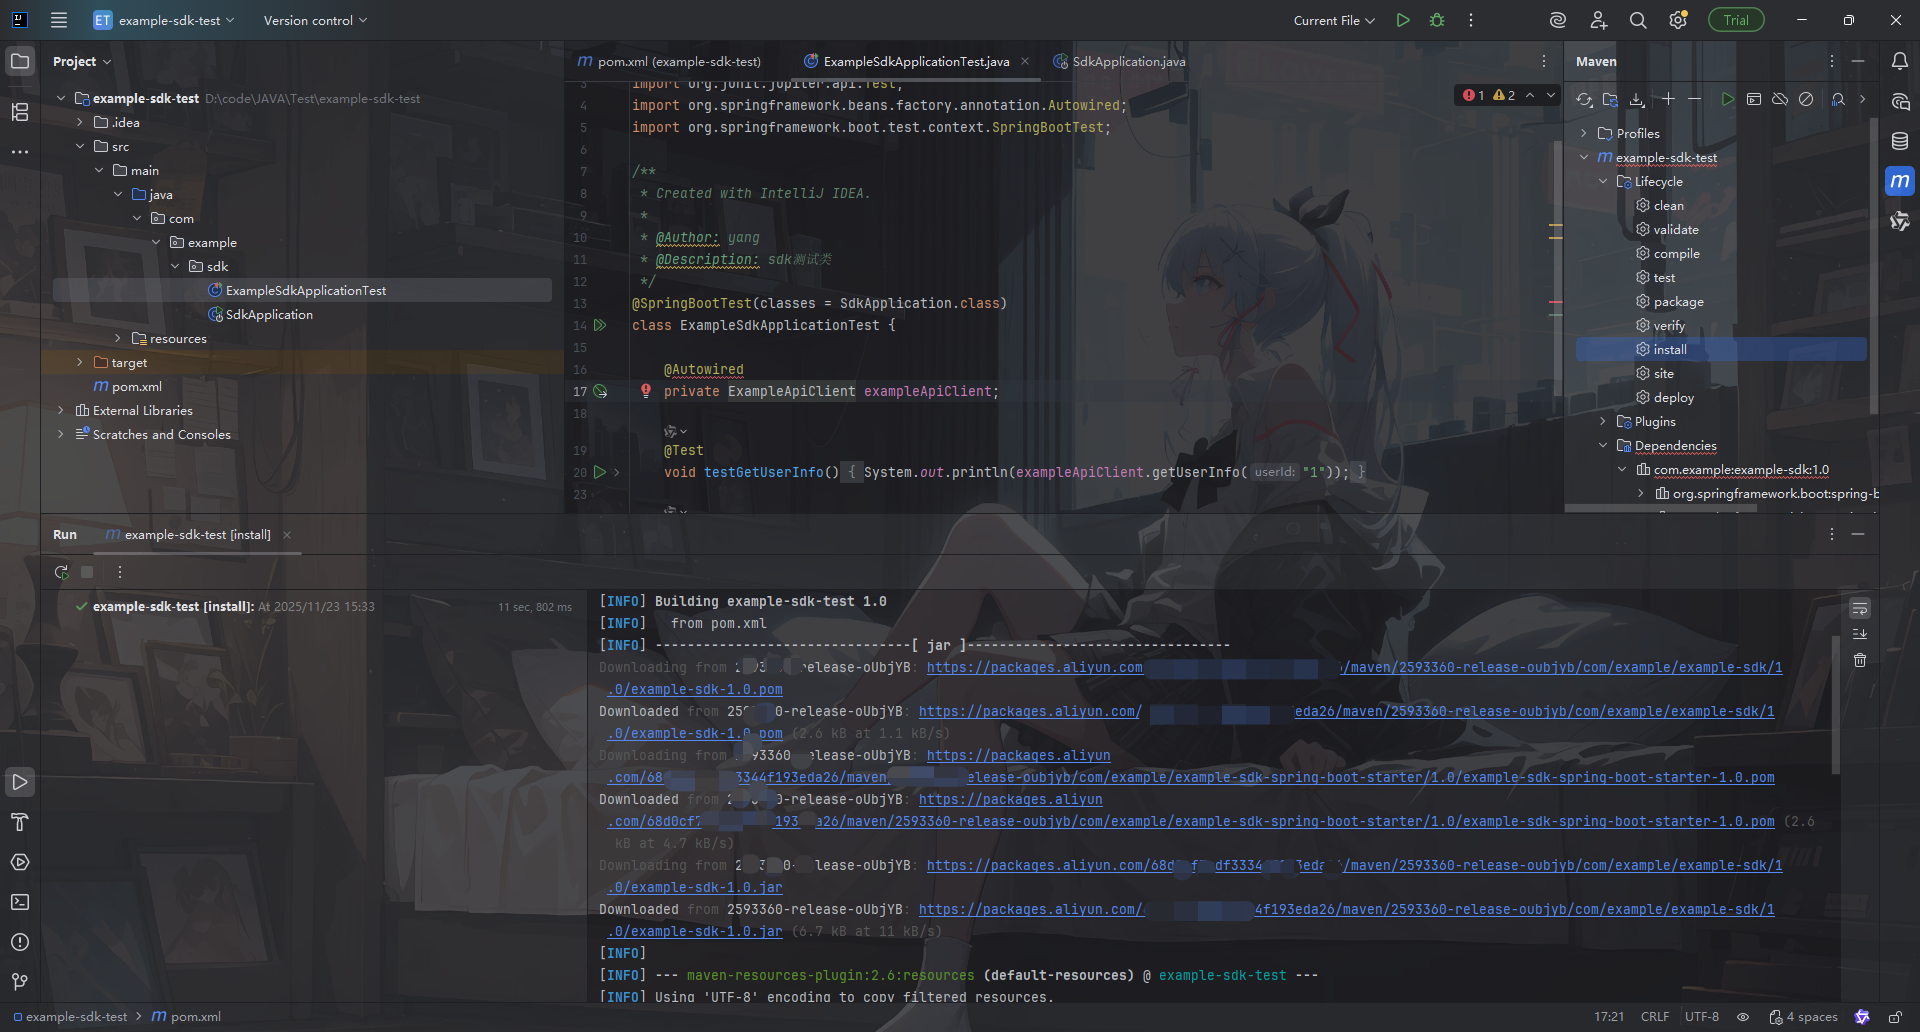

可以看到制品仓库中已经有下载量了,成功下载进我们的测试工程中。
application.yml 配置文件
将配置信息 example.api.client 放入配置文件中
javascript
server:
  port: 8080

example:
  api:
    client:
      access-key: test-access-key
      secret-key: test-secret-key
SdkApplication 主启动类
java
package com.example.sdk;

import org.springframework.boot.SpringApplication;
import org.springframework.boot.autoconfigure.SpringBootApplication;

/**
 * Created with IntelliJ IDEA.
 *
 * @Author: yang
 * @Description: sdk主启动类
 */

@SpringBootApplication
public class SdkApplication {
    public static void main(String[] args) {
        SpringApplication.run(SdkApplication.class, args);
    }
}
ExampleSdkApplicationTest SDK测试类
java
package com.example.sdk;

import org.junit.jupiter.api.Test;
import org.springframework.beans.factory.annotation.Autowired;
import org.springframework.boot.test.context.SpringBootTest;

/**
 * Created with IntelliJ IDEA.
 *
 * @Author: yang
 * @Description: sdk测试类
 */
@SpringBootTest(classes = SdkApplication.class)
class ExampleSdkApplicationTest {

    @Autowired
    private ExampleApiClient exampleApiClient;

    @Test
    void testGetUserInfo() {
        System.out.println(exampleApiClient.getUserInfo("1"));
    }

    @Test
    void testGenerateSignature() {
        System.out.println(exampleApiClient.generateSignature());
    }
}
测试结果
java
test-access-key
test-secret-key
这样就成功实现自己开发一个简单的测试SDK并且上传到阿里云制品仓库供组织内成员使用。
五、最佳实践与注意事项
版本管理:遵循语义化版本控制(versions-maven-plugin)
文档编写:提供清晰的README和使用示例
兼容性:考虑向后兼容性,避免破坏性变更
安全性:不要将敏感信息硬编码在SDK中
性能:优化关键路径的性能
六、总结
开发并发布自己的SDK是一个系统性的工程,从项目创建、代码编写到发布部署,每个环节都需要仔细考虑。通过本文的指导,你应该已经掌握了开发简单SDK并将其发布到阿里云仓库的完整流程。一个好的SDK不仅能提高开发效率,还能促进团队协作和代码复用。随着经验的积累,你可以进一步探索更复杂的SDK设计模式和架构
学习资源推荐