文章目录
- [Mybatis 简介](#Mybatis 简介)
-
- 简介
- [快速入门(基于 Mybatis3 方式)](#快速入门(基于 Mybatis3 方式))
- [MyBatis 基本使用](#MyBatis 基本使用)
- [MyBatis 多表映射](#MyBatis 多表映射)
- [MyBatis 动态语句](#MyBatis 动态语句)
-
- [if 和 where 标签](#if 和 where 标签)
- [set 标签](#set 标签)
- [trim 标签(了解)](#trim 标签(了解))
- choose/when/otherwise
- [froeach 标签](#froeach 标签)
- [sql 片段](#sql 片段)
- [MyBatis 高级扩展](#MyBatis 高级扩展)
-
- [Mapper 批量映射优化](#Mapper 批量映射优化)
- [插件和分布插件 PageHelper](#插件和分布插件 PageHelper)
-
- [插件机制和 PageHelper 插件介绍](#插件机制和 PageHelper 插件介绍)
- [PageHelper 插件使用](#PageHelper 插件使用)
- [逆向工程和 MybatisX 插件](#逆向工程和 MybatisX 插件)
-
- [ORM 思维介绍](#ORM 思维介绍)
- 逆向工程
- [MyBatis 总结](#MyBatis 总结)
Mybatis 简介
简介
MyBatis 是一款优秀的持久层框架。
快速入门(基于 Mybatis3 方式)
-
准备数据模型
mysqlCREATE DATABASE `mybatis-example`; USE `mybatis-example`; CREATE TABLE `t_emp`( emp_id INT AUTO_INCREMENT, emp_name CHAR(100), emp_salary DOUBLE(10,5), PRIMARY KEY(emp_id) ); INSERT INTO `t_emp`(emp_name,emp_salary) VALUES("tom",200.33); INSERT INTO `t_emp`(emp_name,emp_salary) VALUES("jerry",666.66); INSERT INTO `t_emp`(emp_name,emp_salary) VALUES("andy",777.77); -
项目搭建和准备
-
依赖导入
pom.xml
maven<dependencies> <!-- mybatis依赖 --> <dependency> <groupId>org.mybatis</groupId> <artifactId>mybatis</artifactId> <version>3.5.11</version> </dependency> <!-- MySQL驱动 mybatis底层依赖jdbc驱动实现,本次不需要导入连接池,mybatis自带! --> <dependency> <groupId>mysql</groupId> <artifactId>mysql-connector-java</artifactId> <version>8.0.25</version> </dependency> <!--junit5测试--> <dependency> <groupId>org.junit.jupiter</groupId> <artifactId>junit-jupiter-api</artifactId> <version>5.3.1</version> </dependency> </dependencies> -
实体类准备
javapublic class Employee { private Integer empId; private String empName; private Double empSalary; //getter | setter }
-
-
准备 Mapper 接口和 MapperXML 文件
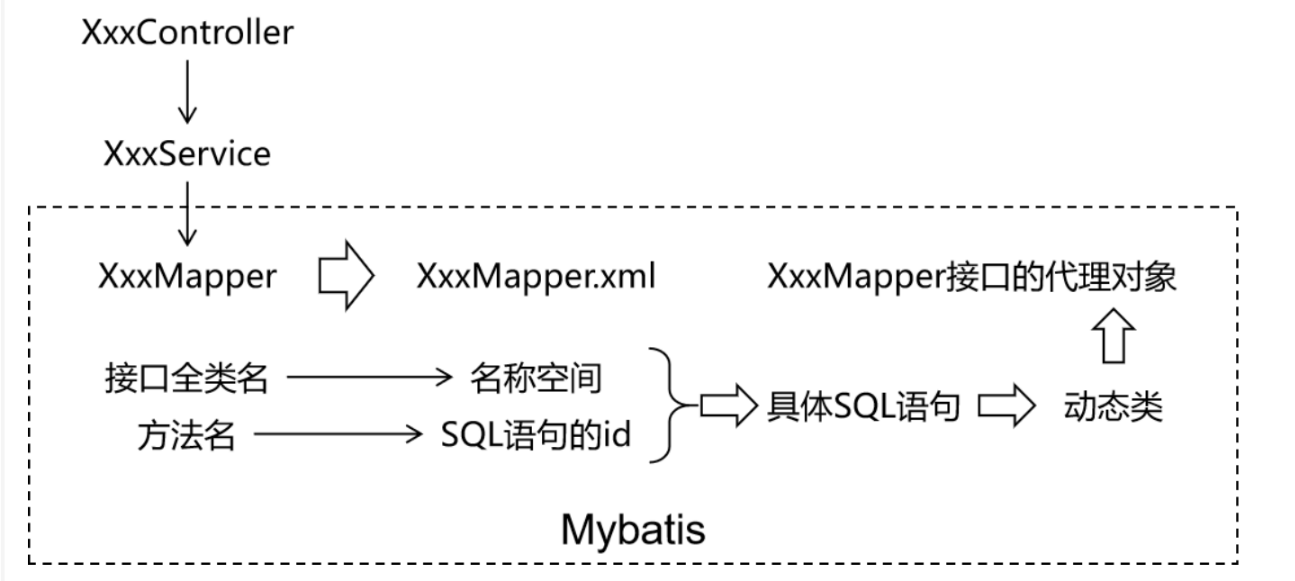
MyBatis 框架下,SQL 语句编写位置发生改变,从原来的 java类,改为 XML 或者注解定义!推荐在 XML 文件中编写 SQL 语句,让用户更专注于 SQL 代码,不用关注其他的 JDBC 代码
MyBatis 中的 Mapper 接口相当于以前的 Dao。但是区别在于,Mapper 仅仅只是建接口就可以了。不需要提供实现类。具体的SQL 写到对应的 MapperXML文件中。
-
定义 mapper 接口
包:com.jxnu.mapper
javapackage com.jxnu.mapper public interface EmployeeMapper{ Employee selectEmployee(Integer empId); } -
定义 mapper.xml
位置:resources/mappers/EmployeeMapper.xml
maven<?xml version="1.0" encoding="UTF-8" ?> <!DOCTYPE mapper PUBLIC "-//mybatis.org//DTD Mapper 3.0//EN" "https://mybatis.org/dtd/mybatis-3-mapper.dtd"> <!--namespace 等于mapper 接口类的全限定名--> <mapper namespace="com.jxnu.mapper.EmployeeMapper"> <!-- 查询使用 select 标签 id = 方法名 resultType = 返回值类型 标签内编写SQL语句 --> <select id="selectEmployee" resultType="com.jxnu.Enity.Employee"> select emp_id empId,emp_name empName,emp_salary empSalary from t_emp where emp_id=#{empId} </select> </mapper>在mapper 标签中 可以用crud: select delete insert update 等标签
-
-
准备 MyBatis 配置文件
mybatis 框架配置文件:数据库连接,mapper.xml配置等等
习惯上命名 mybatis-config.xml,在整合Spring 之后,这个配置文件可以省略
java<?xml version="1.0" encoding="UTF-8" ?> <!DOCTYPE configuration PUBLIC "-//mybatis.org//DTD Config 3.0//EN" "http://mybatis.org/dtd/mybatis-3-config.dtd"> <configuration> <!-- environments表示配置Mybatis的开发环境,可以配置多个环境,在众多具体环境中,使用default属性指定实际运行时使用的环境。default属性的取值是environment标签的id属性的值。 --> <environments default="development"> <!-- environment表示配置Mybatis的一个具体的环境 --> <environment id="development"> <!-- Mybatis的内置的事务管理器 --> <transactionManager type="JDBC"/> <!-- 配置数据源 --> <dataSource type="POOLED"> <!-- 建立数据库连接的具体信息 --> <property name="driver" value="com.mysql.cj.jdbc.Driver"/> <property name="url" value="jdbc:mysql://localhost:3306/mybatis-example"/> <property name="username" value="root"/> <property name="password" value="root"/> </dataSource> </environment> </environments> <mappers> <!-- Mapper注册:指定Mybatis映射文件的具体位置 --> <!-- mapper标签:配置一个具体的Mapper映射文件 --> <!-- resource属性:指定Mapper映射文件的实际存储位置,这里需要使用一个以类路径根目录为基准的相对路径 --> <!-- 对Maven工程的目录结构来说,resources目录下的内容会直接放入类路径,所以这里我们可以以resources目录为基准 --> <mapper resource="mappers/EmployeeMapper.xml"/> </mappers> </configuration> -
运行和测试
java@Test public void test throws Expection{ //以输入流的形式加载MyBatis配置文件 InputStream inputStream = Resources.getResourceAsStream("mybatis-config.xml"); //创建SqlSessionFactory对象 SqlSessionFactory sqlSessionFactory = new SqlSessionFactoryBuilder().build(inputStream); //使用SqlSessionFactory对象开启一个会话 SqlSession sqlSession = sqlSessionFactory.openSession(); //JDK动态代理。 EmployeeMapper employeeMapper = sqlSession.getMapper(EmployeeMapper.class); //可以调用代理类的方法了 Employee employee = employeeMapper.selectEmployee(1); //关闭SqlSession sqlSession.commit(); //提交事务 sqlSession.close(); //关闭会话 }
MyBatis 基本使用
向 SQL 语句传参
-
#{} 形式
Mybatis 会将SQL 语句中的#{} 转换为问号点位符。即" ?"
-
${} 形式
${} 形式传参,底层 Mybatis 做的是字符吕拼接操作。
通常情况下不会采用 KaTeX parse error: Expected 'EOF', got '#' at position 18: ... 的方式传值,实际开发中,能用#̲{} 实现的,不会用{},只有在特殊情况下,动态的不是值,是列名 或者是关键字,需要要 ${} 进行拼接。
java
//注解方式传入参数
@Select("select * from user where ${column} = #{value}")
User findByColumn(@Param("column") String column,@Param("value") String value);
数据输入
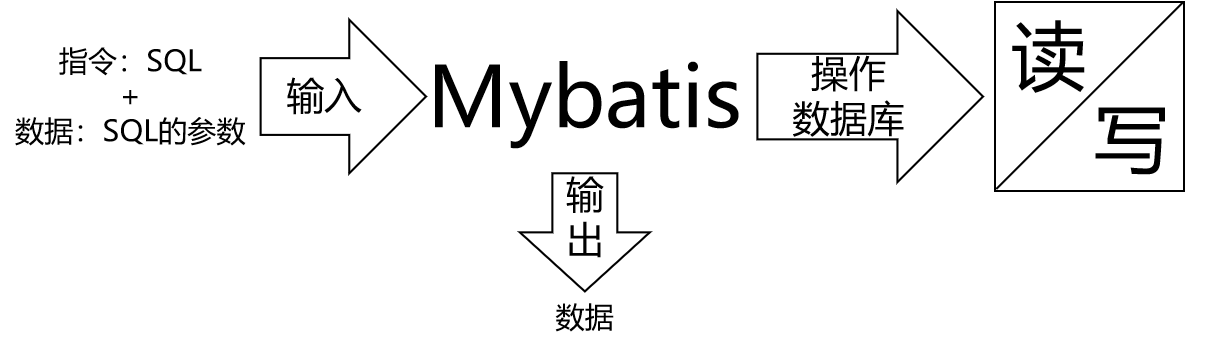
Mybatis 总体机制概括
单个简单类型参数
在 Mapper 接口中抽象方法的声明
java
Employee selectEmployee(Integer empId);SQL 语句
java
<select id ="selectEmployee" resultType="com.jxnu.enity.Employee">
	select emp_id empId,emp_name empName,emp_salary empSalary from t_emp where emp_id = #{empId}
</select>
单个简单类型参数,在#{} 中可以随意命名。但是通常使用和接口方法参数同样的命名方式。
实体类类型参数
Mapper 接口中抽象方法的声明
java
int insertEmployee(Employee employee);SQL 语句
java
<insert id="insertEmployee">
	insert into t_emp(emp_name,emp_salary) values(#{empName},#{empSalary})
</insert>
对应关系
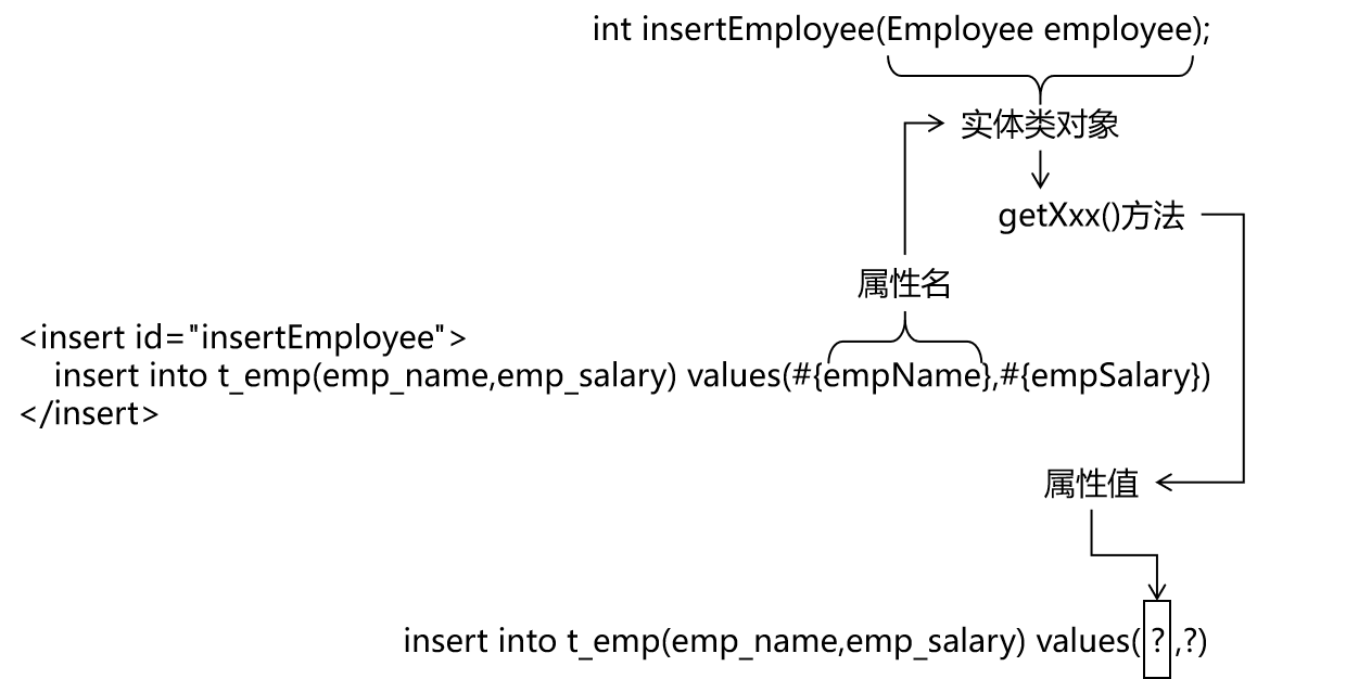
结论
Mybatis 会根据#{} 中传入的数据,加工成 getXxx() 方法,通过反射在实体类对象中调用这个方法,从而获取到对应的数据,填充到#{}解析后的占位符这个位置。
零散的简单类型数据
零散的多个简单类型参数,如果没有特殊处理,那么 Mybatis 无法识别自定义名称:
Mapper接口中抽象方法的声明:
java
int updateEmployee(@Param("empId") Integer empId,@Param("empSalary") Double empSalary);SQL 语句
java
<update id="updateEmployee">
	update t_emp set emp_salary=#{empSalary} where emp_id=#{empId};
</update>
结论
用@Param标签来规定#{}中的值。
Map 类型参数
Map 类型指的是类似于 python 中的字典类型 ,可以用 put(key,value) get(key) remove(key)等方法来传值,获取值,删除值。
Mapper 接口中抽象方法的声明
java
int updateEmployeeByMap(Map<String,Object> paramMap);SQL 语句
java
<update id="updateEmployeeByMap">
	update t_emp set emp_salary=#{empSalaryKey} where emp_id=#{empIdKey}
</update>
结论
在#{}中填写Map对应的key值即可。
数据输出
单个简单类型
Mapper 接口中的抽象方法
java
int selectEmpCount();SQL 语句
java
<select id="selectEmpCount" resultType="int">
	select count(*) from t_emp
</select>
Mybatis 内部给常用的数据类型设定了很多别名。例如:double,string,int等等
别名:
可以在mybatis-config.xml中通过配置给实体类起别名,这个别名默认为实体类名字首字母小写,例如Employee改为employee
java
<typeAliases> <package name="com.jxnu.enity" /> </typeAliases>那么在mapper.xml 中resultType="com.jxnu.enity.Employee"就可以改写为别名形式resultType="employee"
总结:
select 标签,通过 resultType 指定查询返回值类型
resultType = "全限定符 | 别名 | 如果是返回集合类型,写范型类型即可"
返回实体类对象
Mapper 接口的抽象方法
java
Employee selectEmployee(Integer empId);SQL 语句
java
<select id="selectEmployee" resultType="com.jxnu.enity.Employee">
	select emp_id empId,emp_name empName,emp_salary empSalary from t_emp where emp_id=#{empId}
</select>
通过给数据库表字段加别名,让查询结果的每一列都和 java 实体类中属性对应起来。
增加全局配置自动识别对应关系
在 Mybatis 全局配置文件中,做了下面的配置 ,select 语句中可以不给字段设置别名。
java
<settings>
	<setting name="mapUnderscoreToCamelCase" value="true"/>
</settings>
可以查看官网查看name和value。
那么SQL 语句可以这么写了
java
<select id="selectEmployee" resultType="int">
	select * from t_emp where emp_id=#{empId}
</select>
返回Map 类型
Mapper 接口的抽象方法
java
Map<String,Object> selectEmpNameAndMaxSalary();SQL 语句
java
<select id="selectEmpNameAndMaxSalary" resultType="map">
	SELECT
        emp_name empName,
        emp_salary empSalary,
        (SELECT AVG(emp_salary) FROM t_emp) avgSalary
    FROM t_emp
    WHERE emp_salary = (SELECT MAX(emp_salary) FROM t_emp)
</select>
返回的map中,key是列名,value是select根据列名得到的值。
返回List 类型
查询结果返回多个实体类对象,希望把多个实体类对象放在 List 集合中返回。此时不需要任何特殊处理,在 resultType 属性中还是设置实体类类型即可。
Mapper 接口中抽象方法
java
List<Employee> selectAll();SQL 语句
java
<select id="selectAll" resultType="com.jxnu.enity.Employee">
	select * from t_emp
</select>
返回主键值
-
自增长类型主键
Mapper 接口中的抽象方法
javaint insertEmployee(Employee employee);SQL 语句
java<insert id="insertEmployee" useGeneratedKeys="true" keyProperty="empId" keyColumn="emp_id"> insert into t_emp(emp_name,emp_salary) values(#{empName},#{empSalary}) </insert>keyProperty 代表实体属性名,keyColumn 代表数据库表属性名,useGeneratedKeys代表开启:自动将数据库中自增长的主键值放在实体类对应的属性中。
注意
Mybatis 是将自增主键的值设置到实体类对象中,而不是以 Mapper 接口方法返回值的形式返回。
-
非自增长类型主键
使用
selectKey帮助插入 UUID 作为字符串类型主键java<insert id="insertEmployee"> <selectKey order="before" keyProperty="empId" resultType="string" > select replace( uuid() as empId,"-"."") </selectKey> insert into t_emp(emp_id,emp_name,emp_salary) values(#{empId},#{empName},#{empSalary}) </insert>keyProperty 指的是在#{}中的名字取值,resultType指的是名字的类型是什么,order 指的是在插入之前,还是之后做。
实体类属性和数据库字段对应关系
-
别名对应
将字段的别名设置成和实体类属性一致
java<select id="selectEmployee" resultType="employee"> select emp_id empId,emp_name empName,emp_salary empSalary from t_emp where emp_id=#{empId} </select>关于实体类属性的约定:
getXxx()方法、setXxx()方法把方法名中的get 或 set 去掉,首字母小写。
-
全局配置自动识别驼峰式命名规则
在 Mybatis 全局配置文件加入如下配置:
java<setting> <setting name="mapUnderscoreToCamelCase" value="true"/> </setting>SQL 语句中就可以不使用别名了
java<select id="selectEmployee" resultType="employee"> select * from t_emp where emp_id=#{empId} </select> -
使用 resultMap
使用 resultMap 标签定义对应关系,再在后面的 SQL 语句中引用这个对应关系。
resultMap 和 resultType 两者二选一。
java<resultMap id="selectEmployeeByRMResultMap" type="employee"> //id 标签设置主键列和主键属性之间的对应关系 <id column="emp_id" property="empId"/> //普通列 <result column="emp_name" property="empName"/> <result column="emp_salary" property="empSalary"/> </resultMap> <select id="selectEmployeeByRM" resultMap="selectEmployeeByRMResultMap"> select emp_id,emp_name,emp_salary from emp_id=#{empId} </select>
mapperXML 标签总结
MyBatis 的真正强大在于它的语句映射,映射器的 XML 文件就显得相对简单,节省代码,MyBaits 致力于减少使用成本,让用户能更专注于 SQL 代码
MyBatis 多表映射
多表映射概念
我们的学习目标:
多表查询语句使用
多表结果承接实体类设计
使用 ResultMap 完成多表结果映射
实体类设计方案
实体类设计关系(查询):(单向查看)
-
对一:
一个订单和订单对应的客户信息
实体类设计:对一关系下,类中只要包含单个对方对象类型属性即可!
javapublic class Customer { private Integer customerId; private String customerName; } public class Order { private Integer orderId; private String orderName; private Customer customer;// 体现的是对一的关系 } -
对多:
一个客户和客户对应的一系列订单信息。
实体类设计:对多关系下,类中只要包含对方类型集合属性即可!
javapublic class Customer { private Integer customerId; private String customerName; private List<Order> orderList;// 体现的是对多的关系 } public class Order { private Integer orderId; private String orderName; private Customer customer;// 体现的是对一的关系 } -
多表结果实体类设计小技巧
- 在查询映射的时候只需要关注本次查询相关的属性!例如:查询订单和订单对应的客户时,就不需要关注客户中的订单集合!
- 无论多少张表联查,实体类设计都是两两考虑!
- 只有真实发生多表查询时,才需要设计和修改实体类,否则不需要提前设计和修改实体类!
对一映射
数据库:
mysql
CREATE TABLE `t_customer` (`customer_id` INT NOT NULL AUTO_INCREMENT, `customer_name` CHAR(100), PRIMARY KEY (`customer_id`) );

CREATE TABLE `t_order` ( `order_id` INT NOT NULL AUTO_INCREMENT, `order_name` CHAR(100), `customer_id` INT, PRIMARY KEY (`order_id`) );

INSERT INTO `t_customer` (`customer_name`) VALUES ('c01');

INSERT INTO `t_order` (`order_name`, `customer_id`) VALUES ('o1', '1');
INSERT INTO `t_order` (`order_name`, `customer_id`) VALUES ('o2', '1');
INSERT INTO `t_order` (`order_name`, `customer_id`) VALUES ('o3', '1');
实体类设计:
java
@Data
public class Customer {

  private Integer customerId;
  private String customerName;
  private List<Order> orderList;// 体现的是对多的关系

}

@Data
public class Order {
  private Integer orderId;
  private String orderName;
  private Customer customer;// 体现的是对一的关系

}
OrderMapper 接口
java
public interface OrderMapper {
  Order selectOrderWithCustomer(Integer orderId);
}
OrderMapper.xml 配置文件
java
<!-- 创建resultMap实现"对一"关联关系映射 -->
<!-- id属性:通常设置为这个resultMap所服务的那条SQL语句的id加上"ResultMap" -->
<!-- type属性:要设置为这个resultMap所服务的那条SQL语句最终要返回的类型 -->
<resultMap id="selectOrderWithCustomerResultMap" type="order">

  <!-- 先设置Order自身属性和字段的对应关系 -->
  <id column="order_id" property="orderId"/>

  <result column="order_name" property="orderName"/>

  <!-- 使用association标签配置"对一"关联关系 -->
  <!-- property属性:在Order类中对一的一端进行引用时使用的属性名 -->
  <!-- javaType属性:一的一端类的全类名 -->
  <association property="customer" javaType="customer">

    <!-- 配置Customer类的属性和字段名之间的对应关系 -->
    <id column="customer_id" property="customerId"/>
    <result column="customer_name" property="customerName"/>

  </association>

</resultMap>

<!-- Order selectOrderWithCustomer(Integer orderId); -->
<select id="selectOrderWithCustomer" resultMap="selectOrderWithCustomerResultMap">

  SELECT order_id,order_name,c.customer_id,customer_name
  FROM t_order o
  LEFT JOIN t_customer c
  ON o.customer_id=c.customer_id
  WHERE o.order_id=#{orderId}

</select>
对应关系可以参考下图:
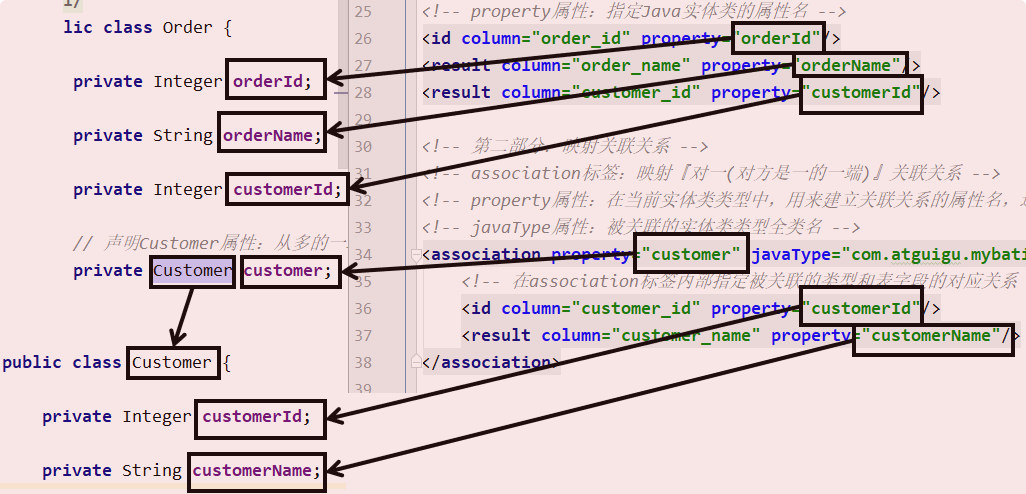
关键词
在"对一"关联关系中,我们的配置比较多,但是关键词就只有:association 和 javaType
对多映射
CustomerMapper 接口
java
public interface CustomerMapper {

  Customer selectCustomerWithOrderList(Integer customerId);

}
CustomerMapper.xml 文件
java
<!-- 配置resultMap实现从Customer到OrderList的"对多"关联关系 -->
<resultMap id="selectCustomerWithOrderListResultMap"

  type="customer">

  <!-- 映射Customer本身的属性 -->
  <id column="customer_id" property="customerId"/>

  <result column="customer_name" property="customerName"/>

  <!-- collection标签:映射"对多"的关联关系 -->
  <!-- property属性:在Customer类中,关联"多"的一端的属性名 -->
  <!-- ofType属性:集合属性中元素的类型 -->
  <collection property="orderList" ofType="order">

    <!-- 映射Order的属性 -->
    <id column="order_id" property="orderId"/>

    <result column="order_name" property="orderName"/>

  </collection>

</resultMap>

<!-- Customer selectCustomerWithOrderList(Integer customerId); -->
<select id="selectCustomerWithOrderList" resultMap="selectCustomerWithOrderListResultMap">
  SELECT c.customer_id,c.customer_name,o.order_id,o.order_name
  FROM t_customer c
  LEFT JOIN t_order o
  ON c.customer_id=o.customer_id
  WHERE c.customer_id=#{customerId}
</select>
对应关系可以参考下图:
关键词
在"对多" 关联关系中,同样有很多配置,但是提炼出来最关键的就是:"collection" 和 "ofType"
多表映射总结
多表映射优化
| setting属性 | 属性含义 | 可选值 | 默认值 |
|---|---|---|---|
| autoMappingBehavior | 指定 MyBatis 应如何自动映射列到字段或属性。 NONE 表示关闭自动映射;PARTIAL 只会自动映射没有定义嵌套结果映射的字段。 FULL 会自动映射任何复杂的结果集(无论是否嵌套)。 | NONE, PARTIAL, FULL | PARTIAL |
我们可以将autoMappingBehavior设置为full,进行多表resultMap映射的时候,可以省略符合列和属性命名映射规则(列名=属性名,或者开启驼峰映射也可以自定映射)的result标签!
修改 teacher-config.xml:
java
<!--开启resultMap自动映射 -->
<setting name="autoMappingBehavior" value="FULL"/>
修改 teacherMapper.xml
java
<resultMap id="teacherMap" type="teacher">
    <id property="tId" column="t_id" />
    <!-- 开启自动映射,并且开启驼峰式支持!可以省略 result!-->
<!--        <result property="tName" column="t_name" />-->
    <collection property="students" ofType="student" >
        <id property="sId" column="s_id" />
<!--            <result property="sName" column="s_name" />-->
    </collection>
</resultMap>
多表映射总结
| 关联关系 | 配置项关键词 | 所在配置文件和具体位置 |
|---|---|---|
| 对一 | association标签中有javaType属性和property属性 | Mapper配置文件中的resultMap标签内 |
| 对多 | collection标签中有ofType属性和property属性 | Mapper配置文件中的resultMap标签内 |
MyBatis 动态语句
if 和 where 标签
使用动态 SQL 最常见情景是根据条件包含 where / if 子句的一总分
java
<!-- List<Employee> selectEmployeeByCondition(Employee employee); -->
<select id="selectEmployeeByCondition" resultType="employee">
select emp_id,emp_name,emp_salary from t_emp
<!-- where标签会自动去掉"标签体内前面多余的and/or" -->
<where>
<!-- 使用if标签,让我们可以有选择的加入SQL语句的片段。这个SQL语句片段是否要加入整个SQL语句,就看if标签判断的结果是否为true -->
<!-- 在if标签的test属性中,可以访问实体类的属性,不可以访问数据库表的字段 -->
<if test="empName != null">
<!-- 在if标签内部,需要访问接口的参数时还是正常写#{} -->
or emp_name=#{empName}
</if>
<if test="empSalary > 2000">
or emp_salary>#{empSalary}
</if>
<!--
第一种情况:所有条件都满足 WHERE emp_name=? or emp_salary>?
第二种情况:部分条件满足 WHERE emp_salary>?
第三种情况:所有条件都不满足 没有where子句
-->
</where>
</select>set 标签
<!-- void updateEmployeeDynamic(Employee employee) -->
<update id="updateEmployeeDynamic">
update t_emp
<!-- set emp_name=#{empName},emp_salary=#{empSalary} -->
<!-- 使用set标签动态管理set子句,并且动态去掉两端多余的逗号 -->
<set>
<if test="empName != null">
emp_name=#{empName},
</if>
<if test="empSalary < 3000">
emp_salary=#{empSalary},
</if>
</set>
where emp_id=#{empId}
<!--
第一种情况:所有条件都满足 SET emp_name=?, emp_salary=?
第二种情况:部分条件满足 SET emp_salary=?
第三种情况:所有条件都不满足 update t_emp where emp_id=?
没有set子句的update语句会导致SQL语法错误
-->
</update>trim 标签(了解)
使用trim标签控制条件部分两端是否包含某些字符
-
prefix属性:指定要动态添加的前缀
-
suffix属性:指定要动态添加的后缀
-
prefixOverrides属性:指定要动态去掉的前缀,使用"|"分隔有可能的多个值
-
suffixOverrides属性:指定要动态去掉的后缀,使用"|"分隔有可能的多个值
choose/when/otherwise
在多个分支条件中,仅执行一个。
-
从上到下依次执行条件判断
-
遇到的第一个满足条件的分支会被采纳
-
被采纳分支后面的分支都将不被考虑
-
如果所有的when分支都不满足,那么就执行otherwise分支
<!-- List<Employee> selectEmployeeByConditionByChoose(Employee employee) --> <select id="selectEmployeeByConditionByChoose" resultType="com.atguigu.mybatis.entity.Employee"> select emp_id,emp_name,emp_salary from t_emp where <choose> <when test="empName != null">emp_name=#{empName}</when> <when test="empSalary < 3000">emp_salary < 3000</when> <otherwise>1=1</otherwise> </choose> <!-- 第一种情况:第一个when满足条件 where emp_name=? 第二种情况:第二个when满足条件 where emp_salary < 3000 第三种情况:两个when都不满足 where 1=1 执行了otherwise --> </select>
froeach 标签
基本用法
用批量插入举例
<!--
    collection属性:要遍历的集合
    item属性:遍历集合的过程中能得到每一个具体对象,在item属性中设置一个名字,将来通过这个名字引用遍历出来的对象
    separator属性:指定当foreach标签的标签体重复拼接字符串时,各个标签体字符串之间的分隔符
    open属性:指定整个循环把字符串拼好后,字符串整体的前面要添加的字符串
    close属性:指定整个循环把字符串拼好后,字符串整体的后面要添加的字符串
    index属性:这里起一个名字,便于后面引用
        遍历List集合,这里能够得到List集合的索引值
        遍历Map集合,这里能够得到Map集合的key
 -->
<foreach collection="empList" item="emp" separator="," open="values" index="myIndex">
    <!-- 在foreach标签内部如果需要引用遍历得到的具体的一个对象,需要使用item属性声明的名称 -->
    (#{emp.empName},#{myIndex},#{emp.empSalary},#{emp.empGender})
</foreach>
批量更新时需要注意
上面批量插入的例子本质上是一条SQL语句,而实现批量更新则需要多条SQL语句拼起来,用分号分开。也就是一次性发送多条SQL语句让数据库执行。此时需要在数据库连接信息的URL地址中设置:
atguigu.dev.url=jdbc:mysql:///mybatis-example?allowMultiQueries=true对应的foreach标签如下:
<!-- int updateEmployeeBatch(@Param("empList") List<Employee> empList) -->
<update id="updateEmployeeBatch">
    <foreach collection="empList" item="emp" separator=";">
        update t_emp set emp_name=#{emp.empName} where emp_id=#{emp.empId}
    </foreach>
</update>
关于foreach标签的collection属性
如果没有给接口中List类型的参数使用@Param注解指定一个具体的名字,那么在collection属性中默认可以使用collection或list来引用这个list集合。这一点可以通过异常信息看出来:
Parameter 'empList' not found. Available parameters are [arg0, collection, list]在实际开发中,为了避免隐晦的表达造成一定的误会,建议使用@Param注解明确声明变量的名称,然后在foreach标签的collection属性中按照@Param注解指定的名称来引用传入的参数
sql 片段
抽取重复的SQL片段
<!-- 使用sql标签抽取重复出现的SQL片段 -->
<sql id="mySelectSql">
    select emp_id,emp_name,emp_age,emp_salary,emp_gender from t_emp
</sql>
引用已抽取的SQL片段
<!-- 使用include标签引用声明的SQL片段 -->
<include refid="mySelectSql"/>
MyBatis 高级扩展
Mapper 批量映射优化
-
需求
Mapper 配置文件很多时,在全局配置文件中一个一个注册太麻烦,希望有一个办法能够一劳永逸。
-
配置方式
Mybatis 允许在指定 Mapper 映射文件时,只指定其所在的包:
XML
<mappers>
    <package name="com.atguigu.mapper"/>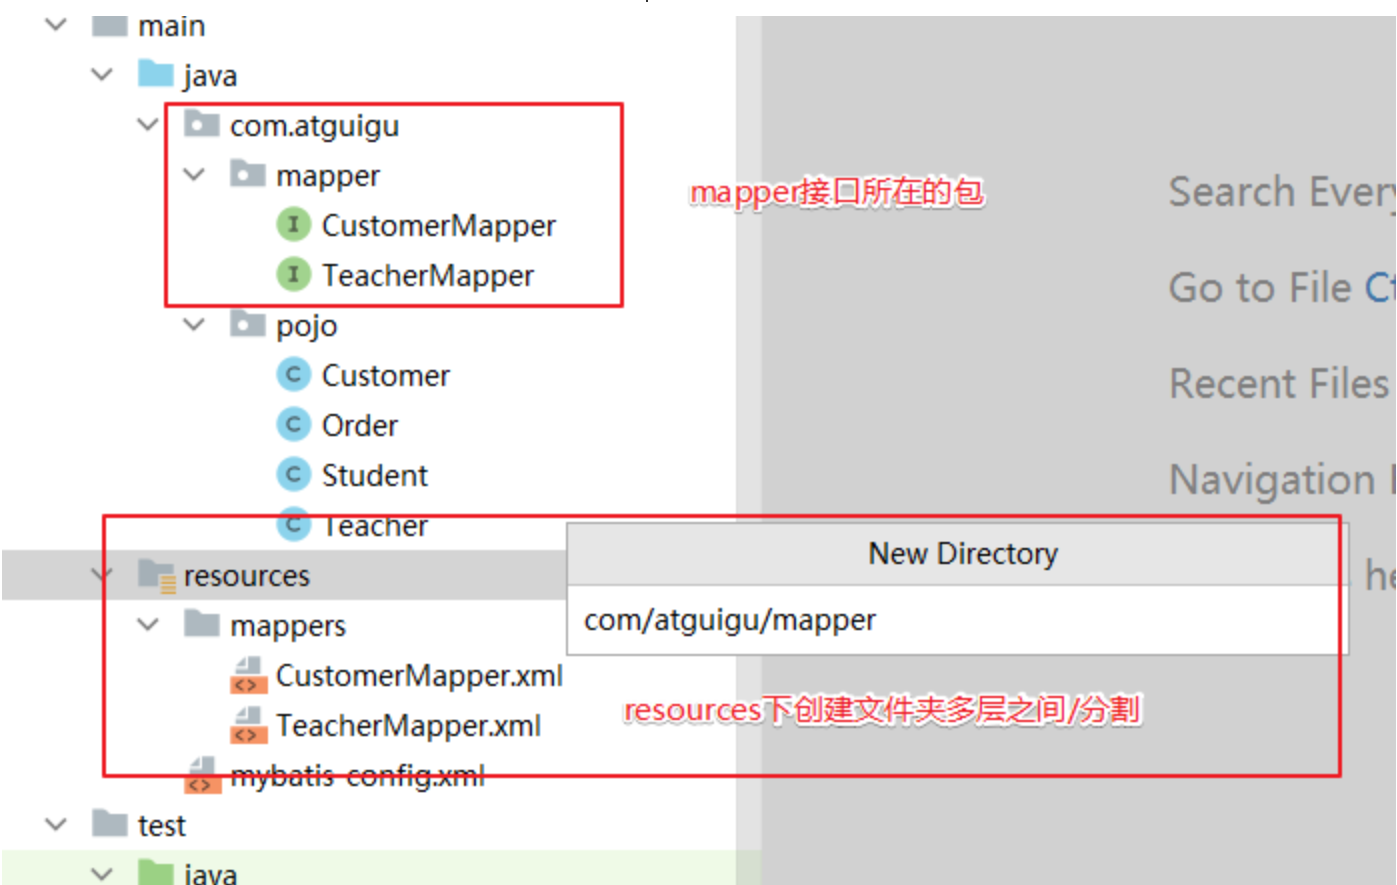
</mappers>此时这个包下的所有 Mapper 配置文件将被自动加载、注册,比较方便。- 资源创建要求
- Mapper 接口和 Mapper 配置文件名称一致
- Mapper 接口:EmployeeMapper.java
- Mapper 配置文件:EmployeeMapper.xml
- Mapper 配置文件放在 Mapper 接口所在的包内
-
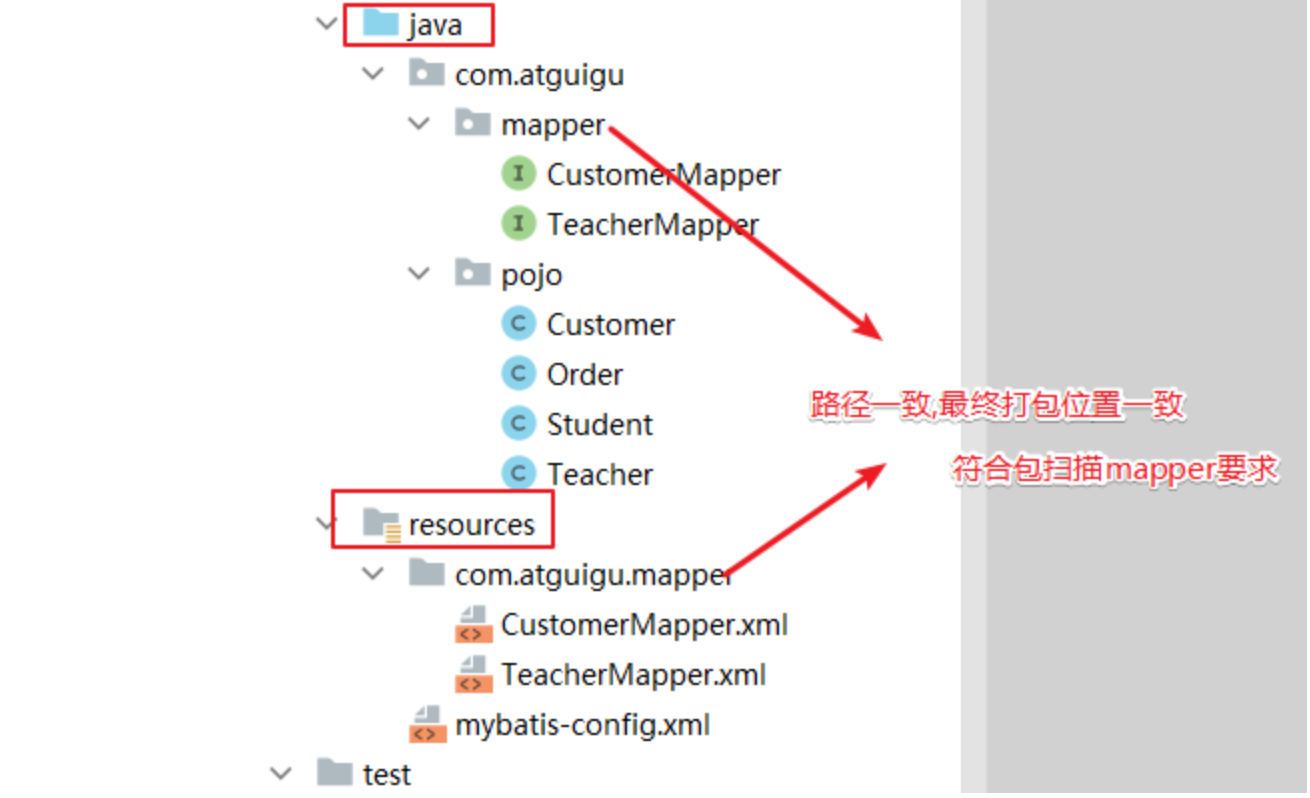
可以将mapperxml文件放在mapper接口所在的包!
-
可以在sources下创建mapper接口包一致的文件夹结构存放mapperxml文件
-
插件和分布插件 PageHelper
插件机制和 PageHelper 插件介绍
MyBatis 对插件进行了标准化的设计,并提供了一套可扩展的插件机制。插件可以在用于语句执行过程中进行拦截,并允许通过自定义处理程序来拦截和修改 SQL 语句、映射语句的结果等。
具体来说,MyBatis 的插件机制包括以下三个组件:
Interceptor(拦截器):定义一个拦截方法intercept,该方法在执行 SQL 语句、执行查询、查询结果的映射时会被调用。Invocation(调用):实际上是对被拦截的方法的封装,封装了Object target、Method method和Object[] args这三个字段。InterceptorChain(拦截器链):对所有的拦截器进行管理,包括将所有的 Interceptor 链接成一条链,并在执行 SQL 语句时按顺序调用。
插件的开发非常简单,只需要实现 Interceptor 接口,并使用注解 @Intercepts 来标注需要拦截的对象和方法,然后在 MyBatis 的配置文件中添加插件即可。
PageHelper 是 MyBatis 中比较著名的分页插件,它提供了多种分页方式(例如 MySQL 和 Oracle 分页方式),支持多种数据库,并且使用非常简单。下面就介绍一下 PageHelper 的使用方式。
PageHelper 插件使用
-
pom.xml 引入依赖
<dependency> <groupId>com.github.pagehelper</groupId> <artifactId>pagehelper</artifactId> <version>5.1.11</version> </dependency> -
mybatis-config.xml配置分页插件
在 MyBatis 的配置文件中添加 PageHelper 的插件:
<plugins>
    <plugin interceptor="com.github.pagehelper.PageInterceptor">
        <property name="helperDialect" value="mysql"/>
    </plugin>
</plugins>
其中,com.github.pagehelper.PageInterceptor 是 PageHelper 插件的名称,dialect 属性用于指定数据库类型(支持多种数据库)
-
面插件使用
在查询方法中使用分布:
@Test
public void testTeacherRelationshipToMulti() {

    TeacherMapper teacherMapper = session.getMapper(TeacherMapper.class);

    PageHelper.startPage(1,2);
    // 查询Customer对象同时将关联的Order集合查询出来
    List<Teacher> allTeachers = teacherMapper.findAllTeachers();
//
    PageInfo<Teacher> pageInfo = new PageInfo<>(allTeachers);

    System.out.println("pageInfo = " + pageInfo);
    long total = pageInfo.getTotal(); // 获取总记录数
    System.out.println("total = " + total);
    int pages = pageInfo.getPages();  // 获取总页数
    System.out.println("pages = " + pages);
    int pageNum = pageInfo.getPageNum(); // 获取当前页码
    System.out.println("pageNum = " + pageNum);
    int pageSize = pageInfo.getPageSize(); // 获取每页显示记录数
    System.out.println("pageSize = " + pageSize);
    List<Teacher> teachers = pageInfo.getList(); //获取查询页的数据集合
    System.out.println("teachers = " + teachers);
    teachers.forEach(System.out::println);

}
逆向工程和 MybatisX 插件
ORM 思维介绍
ORM(Object-Relational Mapping,对象-关系映射)是一种将数据库和面向对象编程语言中的对象之间进行转换的技术。它将对象和关系数据库的概念进行映射,最后我们就可以通过方法调用进行数据库操作!!
最终: 让我们可以使用面向对象思维进行数据库操作!!!
ORM 框架通常有半自动和全自动两种方式。
- 半自动 ORM 通常需要程序员手动编写 SQL 语句或者配置文件,将实体类和数据表进行映射,还需要手动将查询的结果集转换成实体对象。
- 全自动 ORM 则是将实体类和数据表进行自动映射,使用 API 进行数据库操作时,ORM 框架会自动执行 SQL 语句并将查询结果转换成实体对象,程序员无需再手动编写 SQL 语句和转换代码。
下面是半自动和全自动 ORM 框架的区别:
- 映射方式:半自动 ORM 框架需要程序员手动指定实体类和数据表之间的映射关系,通常使用 XML 文件或注解方式来指定;全自动 ORM 框架则可以自动进行实体类和数据表的映射,无需手动干预。
- 查询方式:半自动 ORM 框架通常需要程序员手动编写 SQL 语句并将查询结果集转换成实体对象;全自动 ORM 框架可以自动组装 SQL 语句、执行查询操作,并将查询结果转换成实体对象。
- 性能:由于半自动 ORM 框架需要手动编写 SQL 语句,因此程序员必须对 SQL 语句和数据库的底层知识有一定的了解,才能编写高效的 SQL 语句;而全自动 ORM 框架通过自动优化生成的 SQL 语句来提高性能,程序员无需进行优化。
- 学习成本:半自动 ORM 框架需要程序员手动编写 SQL 语句和映射配置,要求程序员具备较高的数据库和 SQL 知识;全自动 ORM 框架可以自动生成 SQL 语句和映射配置,程序员无需了解过多的数据库和 SQL 知识。
常见的半自动 ORM 框架包括 MyBatis 等;常见的全自动 ORM 框架包括 Hibernate、Spring Data JPA、MyBatis-Plus 等。
逆向工程
MyBatis 的逆向工程是一种自动化生成持久层代码和映射文件的工具,它可以根据数据库表结构和设置的参数生成对应的实体类、Mapper.xml 文件、Mapper 接口等代码文件,简化了开发者手动生成的过程。逆向工程使开发者可以快速地构建起 DAO 层,并快速上手进行业务开发。MyBatis 的逆向工程有两种方式:通过 MyBatis Generator 插件实现和通过 Maven 插件实现。无论是哪种方式,逆向工程一般需要指定一些配置参数,例如数据库连接 URL、用户名、密码、要生成的表名、生成的文件路径等等。
总的来说,MyBatis 的逆向工程为程序员提供了一种方便快捷的方式,能够快速地生成持久层代码和映射文件,是半自动 ORM 思维像全自动发展的过程,提高程序员的开发效率。
注意:逆向工程只能生成单表crud的操作,多表查询依然需要我们自己编写!
MyBatis 总结
| mybatis基础 | 使用流程, 参数输入,#{} ${},参数输出 |
| mybatis多表 | 实体类设计,resultMap多表结果映射 |
| mybatis动态语句 | Mybatis动态语句概念, where , if , foreach标签 |
| mybatis扩展 | Mapper批量处理,分页插件,逆向工程 |