🎯 告别重复造轮子!CesiumLite 实体管理模块让3D图形开发效率翻倍
本文深入介绍 CesiumLite 的实体管理模块,从开发痛点到封装原理,再到实战应用,带你全面了解如何优雅地管理 Cesium 三维实体。
📌 前言
在使用 Cesium.js 开发三维地图应用时,实体(Entity)的创建和管理是最常见的需求之一。无论是标注点位、绘制建筑轮廓,还是展示三维模型,都离不开实体的操作。
然而,Cesium 原生 API 虽然功能强大,但在实际开发中却存在不少痛点。本文将通过 CesiumLite 项目的实体管理模块,展示如何优雅地解决这些问题。
🎨 在线演示
项目提供了完整的功能演示页面,你可以访问以下链接查看实际效果:
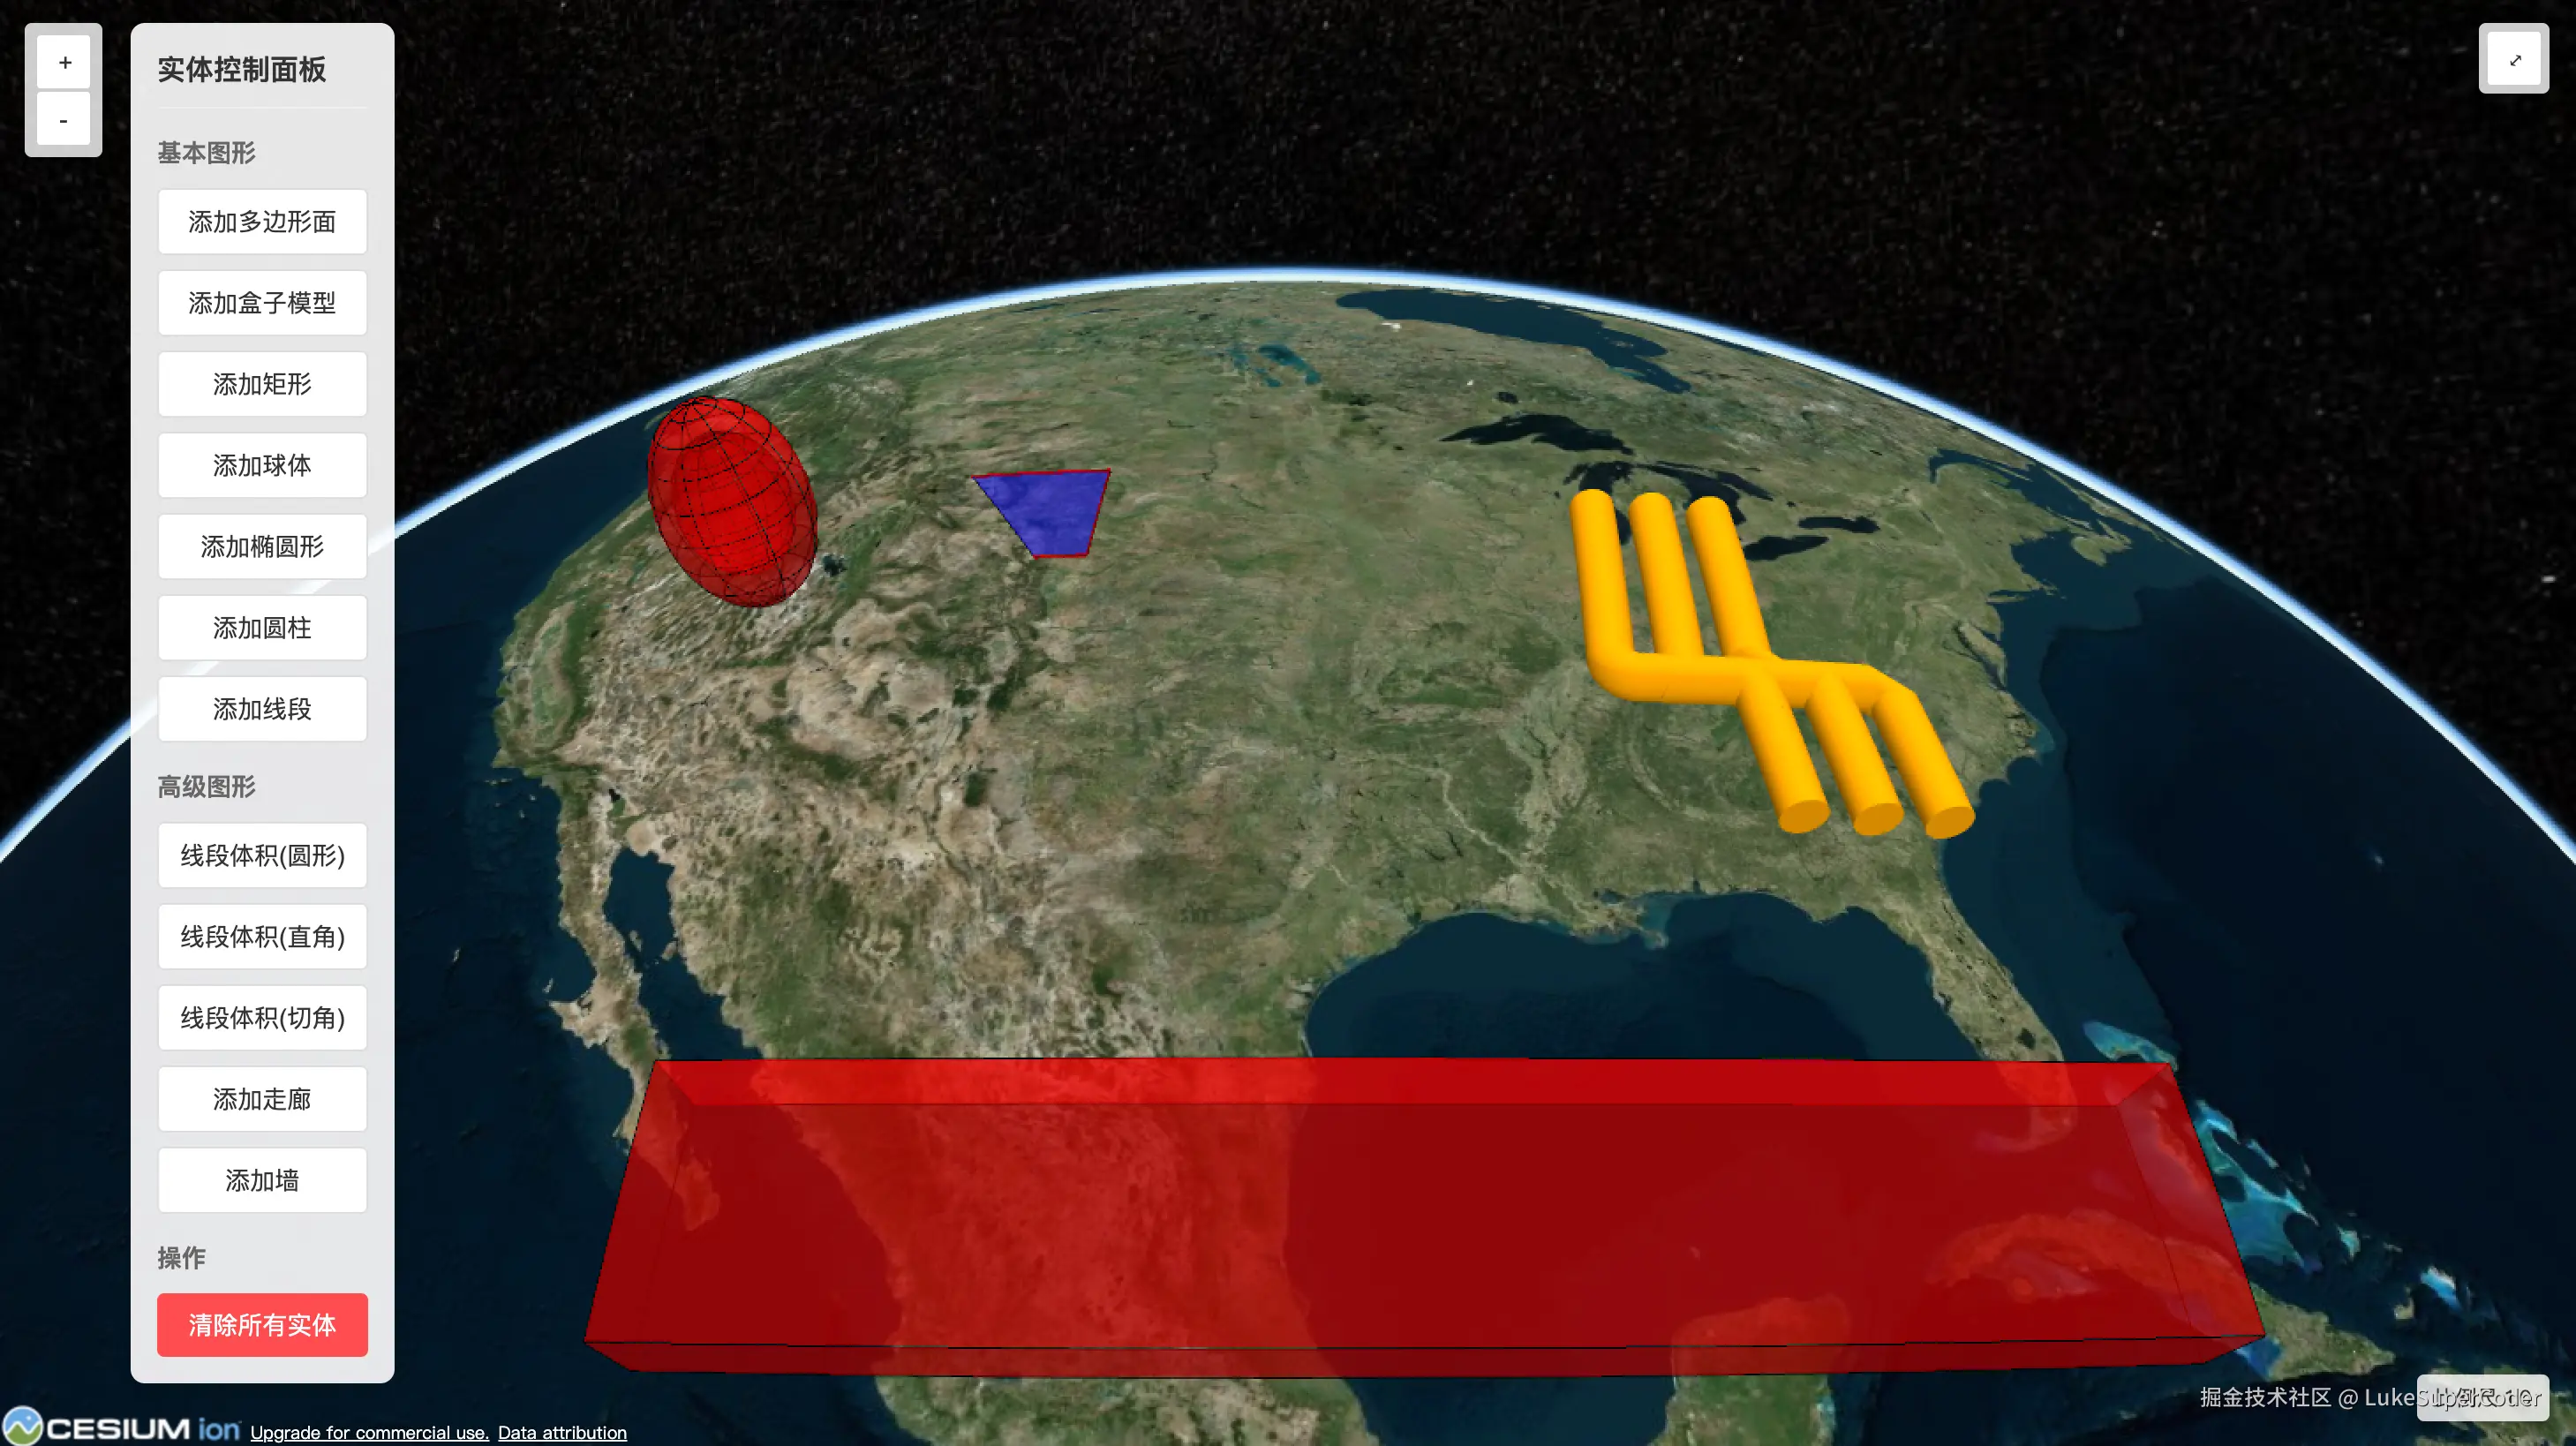
演示页面包含以下功能:
- 🔹 多边形面
- 🔹 盒子模型
- 🔹 矩形
- 🔹 球体
- 🔹 椭圆形
- 🔹 圆柱
- 🔹 线段
- 🔹 管道(PolylineVolume)
- 🔹 走廊
- 🔹 墙体
🚫 开发痛点分析
痛点 1:实体创建过于繁琐
使用 Cesium 原生 API 创建一个简单的多边形,需要这样写:
javascript
// 创建一个多边形实体
const entity = viewer.entities.add({
  polygon: {
    hierarchy: Cesium.Cartesian3.fromDegreesArray([
      -109.080842, 45.002073,
      -104.058488, 45.002073,
      -104.053011, 41.003906,
      -105.728954, 41.003906,
    ]),
    height: 5000,
    material: Cesium.Color.BLUE.withAlpha(0.5),
    outline: true,
    outlineColor: Cesium.Color.BLACK,
  }
});

// 如果需要定位到该实体
viewer.zoomTo(entity);
问题在于:
- 每次创建都要重复写
viewer.entities.add() - 没有统一的实体 ID 管理机制
- 定位功能需要单独调用
- 实体更新和删除操作分散
痛点 2:实体生命周期管理混乱
当项目中实体数量增多时,管理变得复杂:
javascript
// 需要手动维护实体引用
const entities = [];
entities.push(viewer.entities.add({ /* ... */ }));
entities.push(viewer.entities.add({ /* ... */ }));

// 更新某个实体?需要先找到它
const targetEntity = entities.find(e => e.id === 'someId');
if (targetEntity) {
  targetEntity.polygon.material = Cesium.Color.RED;
}

// 删除某个实体?
viewer.entities.remove(targetEntity);

// 清空所有?
viewer.entities.removeAll(); // 这会删除所有实体,包括其他模块创建的!
问题在于:
- 实体引用分散,难以统一管理
- 查找、更新、删除操作繁琐
- 清空操作会影响其他模块
- 缺乏命名空间隔离
痛点 3:代码复用性差
每个项目都要重新实现相似的功能:
javascript
// 项目 A
class ProjectAEntityManager {
  addPolygon(options) { /* ... */ }
  removePolygon(id) { /* ... */ }
}

// 项目 B
class ProjectBEntityController {
  createEntity(config) { /* ... */ }
  deleteEntity(entityId) { /* ... */ }
}

// 项目 C - 又要重新写一遍...
问题在于:
- 每个项目都在造轮子
- 没有统一的最佳实践
- 维护成本高,bug 重复出现
💡 CesiumLite 的解决方案
核心设计思路
CesiumLite 的实体管理模块采用了以下设计思路:
- 双层封装架构 :
EntityManager+EntityWrapper - 独立数据源隔离 :使用
CustomDataSource避免污染全局实体集合 - 统一 ID 管理:自动生成唯一 ID,支持自定义
- 链式操作支持:提供流畅的 API 调用体验
架构设计图
┌─────────────────────────────────────────┐
│          CesiumLite 核心类              │
│  ┌───────────────────────────────────┐  │
│  │      EntityManager 管理器         │  │
│  │  - 统一管理所有实体               │  │
│  │  - 独立 CustomDataSource          │  │
│  │  - 提供增删改查接口               │  │
│  │                                   │  │
│  │  ┌─────────────────────────────┐ │  │
│  │  │   EntityWrapper 实体包装器  │ │  │
│  │  │  - 封装单个实体             │ │  │
│  │  │  - 自动生成唯一 ID          │ │  │
│  │  │  - 提供更新方法             │ │  │
│  │  └─────────────────────────────┘ │  │
│  └───────────────────────────────────┘  │
│                  ↓                       │
│  ┌───────────────────────────────────┐  │
│  │      Cesium Viewer 实例           │  │
│  └───────────────────────────────────┘  │
└─────────────────────────────────────────┘
🔧 核心代码实现
1. EntityWrapper:实体包装器
EntityWrapper 负责封装单个实体,提供统一的操作接口:
javascript
import { Entity, createGuid } from 'cesium';

class EntityWrapper {
    constructor(options = {}) {
        // 自动生成唯一 ID,也支持自定义
        this.id = options.id || createGuid();
        this.options = Object.assign({}, options);
        this.entity = new Entity(this.options);
    }

    // 更新实体属性
    update(options) {
        Object.assign(this.options, options);
        this.entity.update(this.options);
    }

    // 获取原生 Cesium 实体
    getEntity() {
        return this.entity;
    }
}

export default EntityWrapper;
设计亮点:
- ✅ 自动生成唯一 ID,避免冲突
- ✅ 保存实体配置,方便后续更新
- ✅ 提供
getEntity()方法,保持原生 API 的兼容性
2. EntityManager:实体管理器
EntityManager 是实体管理的核心,提供完整的生命周期管理:
javascript
import { CustomDataSource } from 'cesium';
import EntityWrapper from './entityWrapper';

class EntityManager {
    constructor(viewer) {
        if (!viewer) throw new Error('Viewer instance is required');
        this.viewer = viewer;

        // 创建独立的数据源,实现命名空间隔离
        this.dataSource = new CustomDataSource('entityManager');
        this.viewer.dataSources.add(this.dataSource);

        // 使用 Map 管理所有实体,O(1) 查找性能
        this.entities = new Map();
    }

    // 添加实体
    addEntity(options, isLocate = false) {
        const entityWrapper = new EntityWrapper(options);
        this.entities.set(entityWrapper.id, entityWrapper);
        this.dataSource.entities.add(entityWrapper.getEntity());

        // 支持创建后自动定位
        if (isLocate) {
            this.locateEntity(entityWrapper.id);
        }

        return entityWrapper.id;
    }

    // 移除实体
    removeEntity(entityId) {
        if (this.entities.has(entityId)) {
            const entityWrapper = this.entities.get(entityId);
            this.dataSource.entities.remove(entityWrapper.getEntity());
            this.entities.delete(entityId);
        }
    }

    // 更新实体
    updateEntity(entityId, options) {
        if (this.entities.has(entityId)) {
            const entityWrapper = this.entities.get(entityId);
            entityWrapper.update(options);
        }
    }

    // 视角定位到实体
    locateEntity(entityId) {
        if (this.entities.has(entityId)) {
            const entityWrapper = this.entities.get(entityId);
            this.viewer.zoomTo(entityWrapper.getEntity());
        }
    }

    // 获取所有实体
    getAllEntities() {
        return Array.from(this.entities.values()).map(wrapper => wrapper.getEntity());
    }

    // 清除所有实体(只清除当前管理器的实体)
    clearEntities() {
        this.dataSource.entities.removeAll();
        this.entities.clear();
    }
}

export default EntityManager;
设计亮点:
- ✅ 独立数据源 :使用
CustomDataSource实现命名空间隔离,不会影响其他模块 - ✅ 高效查找 :使用
Map数据结构,提供 O(1) 的查找性能 - ✅ 自动定位:支持创建实体后自动飞行到目标位置
- ✅ 统一接口:增删改查操作命名规范,易于理解
🎯 使用教程
基础用法
1. 初始化 CesiumLite
javascript
const cesiumLite = new CesiumLite('cesiumContainer', {
  map: {
    baseMap: {
      id: 'imagery'
    },
    camera: {
      longitude: 116.397428,
      latitude: 39.90923,
      height: 1000000
    }
  }
});
2. 添加各种几何实体
添加多边形
javascript
const polygonId = cesiumLite.entityManager.addEntity({
  polygon: {
    hierarchy: Cesium.Cartesian3.fromDegreesArray([
      -109.080842, 45.002073,
      -104.058488, 45.002073,
      -104.053011, 41.003906,
      -105.728954, 41.003906,
    ]),
    height: 5000,
    material: Cesium.Color.BLUE.withAlpha(0.5),
    outline: true,
    outlineColor: Cesium.Color.BLACK,
  }
}, true); // 第二个参数 true 表示创建后自动定位
添加盒子模型
javascript
cesiumLite.entityManager.addEntity({
  position: Cesium.Cartesian3.fromDegrees(-109.080842, 45.002073),
  box: {
    dimensions: new Cesium.Cartesian3(5000, 5000, 5000),
    material: Cesium.Color.RED.withAlpha(0.5),
  }
}, true);
添加球体
javascript
cesiumLite.entityManager.addEntity({
  name: "Three-dimensional sphere",
  position: Cesium.Cartesian3.fromDegrees(-114.0, 40.0, 300000.0),
  ellipsoid: {
    radii: new Cesium.Cartesian3(200000.0, 200000.0, 300000.0),
    innerRadii: new Cesium.Cartesian3(150000.0, 150000.0, 200000.0),
    material: Cesium.Color.RED.withAlpha(0.5),
    outline: true
  }
}, true);
添加圆柱
javascript
cesiumLite.entityManager.addEntity({
  position: Cesium.Cartesian3.fromDegrees(-104.058488, 44.996596),
  cylinder: {
    length: 5000,
    topRadius: 500,
    bottomRadius: 500,
    material: Cesium.Color.RED.withAlpha(0.5),
    outline: true,
    numberOfVerticalLines: 20
  }
}, true);
添加走廊(Corridor)
javascript
cesiumLite.entityManager.addEntity({
  corridor: {
    positions: Cesium.Cartesian3.fromDegreesArray([
      -109.080842, 45.002073,
      -105.91517, 45.002073,
      -104.058488, 44.996596,
    ]),
    width: 5000,
    height: 1000,
    extrudedHeight: 10000,
    material: Cesium.Color.RED.withAlpha(0.5),
  }
}, true);
添加墙(Wall)
javascript
cesiumLite.entityManager.addEntity({
  name: "Vertical wall",
  wall: {
    positions: Cesium.Cartesian3.fromDegreesArrayHeights([
      -107.0, 43.0, 100000.0,
      -97.0, 43.0, 100000.0,
      -97.0, 40.0, 100000.0,
      -107.0, 40.0, 100000.0,
    ]),
    material: Cesium.Color.RED.withAlpha(0.5),
    outline: true
  }
}, true);
高级操作
更新实体
javascript
// 保存实体 ID
const entityId = cesiumLite.entityManager.addEntity({ /* ... */ });

// 更新实体属性
cesiumLite.entityManager.updateEntity(entityId, {
  polygon: {
    material: Cesium.Color.GREEN.withAlpha(0.7)
  }
});
定位到指定实体
javascript
cesiumLite.entityManager.locateEntity(entityId);删除指定实体
javascript
cesiumLite.entityManager.removeEntity(entityId);清空所有实体
javascript
cesiumLite.entityManager.clearEntities();获取所有实体
javascript
const allEntities = cesiumLite.entityManager.getAllEntities();
console.log('当前实体数量:', allEntities.length);
📊 对比传统开发方式
代码量对比
| 操作 | 传统方式 | CesiumLite | 减少代码量 |
|---|---|---|---|
| 创建实体 | 10+ 行 | 3 行 | 70% |
| 创建并定位 | 15+ 行 | 3 行 | 80% |
| 更新实体 | 8+ 行 | 1 行 | 87% |
| 删除实体 | 5+ 行 | 1 行 | 80% |
| 批量清空 | 10+ 行 | 1 行 | 90% |
功能对比
| 功能 | 传统方式 | CesiumLite |
|---|---|---|
| 实体创建 | ✅ | ✅ |
| 唯一 ID 管理 | ❌ 需手动实现 | ✅ 自动生成 |
| 命名空间隔离 | ❌ 需手动实现 | ✅ 内置支持 |
| 自动定位 | ❌ 需单独调用 | ✅ 参数控制 |
| 统一更新接口 | ❌ 分散操作 | ✅ 统一接口 |
| 批量操作 | ❌ 需手动循环 | ✅ 内置支持 |
🚀 快速开始
1. 安装
bash
# NPM 安装(推荐)
npm install cesium-lite

# 或者通过 GitHub 克隆
git clone https://github.com/lukeSuperCoder/cesium-lite.git
cd cesium-lite
npm install
2. 引入使用
方式一:NPM 方式
javascript
import CesiumLite from 'cesium-lite';
import 'cesium/Build/Cesium/Widgets/widgets.css';

const cesiumLite = new CesiumLite('cesiumContainer', {
  // 配置项
});
方式二:本地运行项目
bash
# 克隆项目
git clone https://github.com/lukeSuperCoder/cesium-lite.git
cd cesium-lite

# 安装依赖
npm install
3. 运行示例
bash
npm run dev访问 http://localhost:8020/entity.html 查看实体管理示例。
💡 最佳实践建议
1. 合理使用自动定位
javascript
// 对于重要的首个实体,启用自动定位
const mainEntityId = cesiumLite.entityManager.addEntity(options, true);

// 批量创建时,关闭自动定位以提升性能
entities.forEach(entity => {
  cesiumLite.entityManager.addEntity(entity, false);
});

// 批量创建完成后,手动定位到某个实体
cesiumLite.entityManager.locateEntity(mainEntityId);
2. 实体 ID 管理
javascript
// 为重要实体指定自定义 ID
const buildingId = cesiumLite.entityManager.addEntity({
  id: 'building_main_001',  // 自定义 ID
  polygon: { /* ... */ }
});

// 后续可以直接使用自定义 ID 操作
cesiumLite.entityManager.updateEntity('building_main_001', { /* ... */ });
3. 批量操作优化
javascript
// 批量创建实体
const entityIds = [];
const batchData = [ /* 大量数据 */ ];

batchData.forEach(data => {
  const id = cesiumLite.entityManager.addEntity(data, false);
  entityIds.push(id);
});

// 需要时再批量定位
entityIds.forEach(id => {
  cesiumLite.entityManager.locateEntity(id);
});
🔮 未来规划
实体管理模块后续将会支持:
- 实体分组管理
- 实体样式预设
- 实体动画支持
- 实体点击事件封装
- 实体序列化与反序列化
- 批量操作性能优化
📚 相关资源
- GitHub 仓库 :github.com/lukeSuperCo...
- 在线演示 :lukesupercoder.github.io/cesium-lite...
- NPM 包 :www.npmjs.com/package/ces...
- 问题反馈 :GitHub Issues
🙏 总结
CesiumLite 的实体管理模块通过双层封装架构,有效解决了 Cesium 原生开发中的诸多痛点:
- ✅ 简化 API:减少 70%-90% 的代码量
- ✅ 统一管理:自动 ID 生成 + 命名空间隔离
- ✅ 开箱即用:无需重复造轮子
- ✅ 性能优化:使用 Map 数据结构,高效查找
如果你正在使用 Cesium 开发三维地图应用,不妨试试 CesiumLite,让你的开发效率翻倍!
⭐ 如果这个项目对你有帮助,欢迎给个 Star 支持一下!
💬 有任何问题或建议,欢迎在评论区交流!
相关标签: #Cesium #三维地图 #WebGIS #前端开发 #JavaScript #开源项目 #地图可视化