- 矩形 (Rect):这是所有 UI 组件(按钮、卡片、背景)的基础。
- 文本 (Text):这是信息展示的核心。
相较于圆,文本的难点在于"包围盒计算"(为了支持点击检测),因为 Canvas 只有画图命令,没有直接告诉我们字有多高。
我们将分两步实现。
1. 实现矩形 (src/graphic/shape/Rect.ts)
矩形的逻辑比较标准,重点是实现 buildPath 和 containLocal。
typescript
// src/graphic/shape/Rect.ts
import { Displayable, DisplayableProps } from '../Displayable';

export interface RectShape {
    x?: number;
    y?: number;
    width?: number;
    height?: number;
    r?: number; // 圆角半径 (简单起见,暂只支持统一圆角)
}

interface RectProps extends DisplayableProps {
    shape?: RectShape;
}

export class Rect extends Displayable {
    shape: Required<RectShape>; // 确保内部使用时都有值

    constructor(opts?: RectProps) {
        super(opts);
        this.shape = {
            x: 0, y: 0, width: 0, height: 0, r: 0,
            ...opts?.shape
        };
    }

    buildPath(ctx: CanvasRenderingContext2D) {
        const shape = this.shape;
        const x = shape.x;
        const y = shape.y;
        const width = shape.width;
        const height = shape.height;
        const r = shape.r;

        if (!r) {
            // 普通矩形
            ctx.rect(x, y, width, height);
        } else {
            // 圆角矩形 (使用 arcTo 或者 roundRect)
            // 这里使用通用的 arcTo 模拟
            ctx.moveTo(x + r, y);
            ctx.lineTo(x + width - r, y);
            ctx.arcTo(x + width, y, x + width, y + r, r);
            ctx.lineTo(x + width, y + height - r);
            ctx.arcTo(x + width, y + height, x + width - r, y + height, r);
            ctx.lineTo(x + r, y + height);
            ctx.arcTo(x, y + height, x, y + height - r, r);
            ctx.lineTo(x, y + r);
            ctx.arcTo(x, y, x + r, y, r);
            ctx.closePath();
        }
    }

    /**
     * 矩形的包含检测
     */
    containLocal(x: number, y: number): boolean {
        const shape = this.shape;
        // 简单矩形检测
        // 如果要做圆角检测比较复杂,通常这里简化为矩形包围盒
        return x >= shape.x && x <= shape.x + shape.width &&
               y >= shape.y && y <= shape.y + shape.height;
    }
}
2. 实现文本 (src/graphic/Text.ts)
文本比较特殊。
- 绘制方式不同 :它不用
beginPath/fill流程,而是直接fillText。 - 样式属性多:字号、字体、对齐方式。
- 碰撞检测难 :需要用
measureText算宽度,用字号估算高度。
我们需要先在 Displayable 或 Style 中补充文本相关的样式定义。
更新 src/graphic/Style.ts:
typescript
export interface CommonStyle {
    // ... 原有属性 ...

    // 文本相关
    text?: string;
    fontSize?: number;
    fontFamily?: string;
    fontWeight?: string; // 'bold', 'normal'

    // 对齐
    textAlign?: CanvasTextAlign; // 'left' | 'right' | 'center' | 'start' | 'end'
    textBaseline?: CanvasTextBaseline; // 'top' | 'middle' | 'bottom' ...
}
创建 src/graphic/Text.ts:
注意:为了能在 brush 中使用特殊的绘制逻辑,我们这里覆盖 brush 方法,或者复用基类逻辑但重写 buildPath 实际上不太合适(因为 fillText 不是 path)。
ZRender 的做法是 Text 也是 Displayable,但绘制逻辑独立。为了 MiniRender 架构简单,我们重写 brush。
typescript
// src/graphic/Text.ts
import { Displayable, DisplayableProps } from './Displayable';

// 默认字体
const DEFAULT_FONT_FAMILY = 'sans-serif';

export class Text extends Displayable {

    constructor(opts?: DisplayableProps) {
        super(opts);
    }

    /**
     * 重写 brush,因为文本不是 Path
     */
    brush(ctx: CanvasRenderingContext2D) {
        const style = this.style;
        if (!style.text) return;

        ctx.save();

        // 1. 设置常规样式
        if (style.fill) ctx.fillStyle = style.fill;
        if (style.stroke) ctx.strokeStyle = style.stroke;
        if (style.opacity != null) ctx.globalAlpha = style.opacity;

        // 2. 设置字体样式
        const fontSize = style.fontSize || 12;
        const fontFamily = style.fontFamily || DEFAULT_FONT_FAMILY;
        const fontWeight = style.fontWeight || '';
        ctx.font = `${fontWeight} ${fontSize}px ${fontFamily}`.trim();

        ctx.textAlign = style.textAlign || 'left';
        ctx.textBaseline = style.textBaseline || 'alphabetic';

        // 3. 应用变换
        const m = this.globalTransform;
        ctx.setTransform(m[0], m[1], m[2], m[3], m[4], m[5]);

        // 4. 绘制文本
        // 这里的 0, 0 是相对于 Text 元素自身的原点
        if (style.stroke) ctx.strokeText(style.text, 0, 0);
        if (style.fill) ctx.fillText(style.text, 0, 0);

        ctx.restore();
    }

    // 文本不需要 buildPath,因为我们在 brush 里直接画了
    buildPath(ctx: CanvasRenderingContext2D) {}

    /**
     * 文本的碰撞检测
     * 难点:计算文本的包围盒
     */
    containLocal(x: number, y: number): boolean {
        const style = this.style;
        if (!style.text) return false;

        // 借用一个辅助 canvas 来测量文本宽度(或者用全局单一实例)
        // 在真实项目中,应该缓存 measureText 的结果
        const ctx = document.createElement('canvas').getContext('2d')!;
        const fontSize = style.fontSize || 12;
        const fontFamily = style.fontFamily || DEFAULT_FONT_FAMILY;
        const fontWeight = style.fontWeight || '';
        ctx.font = `${fontWeight} ${fontSize}px ${fontFamily}`.trim();

        // 1. 计算宽
        const width = ctx.measureText(style.text).width;
        // 2. 估算高 (Canvas API 不直接提供高度,通常用 fontSize 估算)
        const height = fontSize;

        // 3. 根据对齐方式计算左上角 (Bounding Box 的 x, y)
        // 默认原点在 (0,0)
        let bx = 0;
        let by = 0;

        // 水平对齐修正
        const align = style.textAlign || 'left';
        if (align === 'center') {
            bx -= width / 2;
        } else if (align === 'right' || align === 'end') {
            bx -= width;
        }

        // 垂直对齐修正
        const baseline = style.textBaseline || 'alphabetic';
        if (baseline === 'top') {
            by = 0;
        } else if (baseline === 'middle') {
            by -= height / 2;
        } else if (baseline === 'bottom') {
            by -= height;
        } else {
            // alphabetic (基线) 大概在 bottom 偏上一点,这里简单按 bottom 处理或忽略
            by -= height;
        }

        // 4. 判断点是否在矩形内
        return x >= bx && x <= bx + width &&
               y >= by && y <= by + height;
    }
}
3. 验证
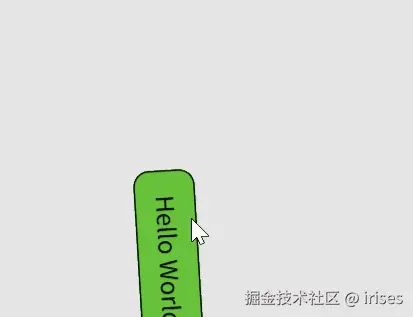
现在我们可以在 index.ts 中同时使用圆形、矩形和文本,构建一个简单的 UI 按钮。
index.ts (测试代码)
typescript
import { init } from './core/MiniRender';
import { Group } from './graphic/Group';
import { Circle } from './graphic/shape/Circle';
import { Rect } from './graphic/shape/Rect'; // 新增
import { Text } from './graphic/Text';       // 新增

const miniRender = init(document.getElementById('main')!);

// --- 示例 1: 创建一个简单的按钮 (Group + Rect + Text) ---

const button = new Group({
    position: [100, 100], // 按钮整体位置
    // scale: [1.5, 1.5]     // 测试父级缩放对文本点击是否有效
});

// 1. 按钮背景
const bg = new Rect({
    shape: {
        x: 0,
        y: 0,
        width: 120,
        height: 40,
        r: 10 // 圆角
    },
    style: {
        fill: '#409EFF',
        stroke: '#000',
        lineWidth: 1
    }
});

// 2. 按钮文字
const label = new Text({
    style: {
        text: 'Hello World',
        fill: '#fff',
        fontSize: 16,
        textAlign: 'center',       // 水平居中
        textBaseline: 'middle'     // 垂直居中
    },
    // 将文字放到按钮中心
    position: [60, 20], // 120/2, 40/2
    z: 1 // 确保文字在背景上面
});

button.add(bg);
button.add(label);
miniRender.add(button);

// --- 交互测试 ---

// 点击背景变色
bg.on('click', () => {
    console.log('Background clicked');
    bg.style.fill = bg.style.fill === '#409EFF' ? '#67C23A' : '#409EFF';
    miniRender.refresh();
});

// 点击文字变色
label.on('click', () => {
    console.log('Text clicked');
    label.style.fill = label.style.fill === '#fff' ? '#000' : '#fff';
    miniRender.refresh();
});

// --- 动画测试 ---
// 让按钮慢慢旋转,测试 Rect 和 Text 的点击区域是否跟着旋转
let angle = 0;
function loop() {
    angle += 0.01;
    button.rotation = angle;

    // 如果想要看旋转效果,取消下面注释
    miniRender.refresh();
    requestAnimationFrame(loop);
}
loop();