SpringBoot自定义场景启动器
-
- 核心目标与技术栈
- [步骤一:创建两个 Maven 模块](#步骤一:创建两个 Maven 模块)
-
- animal-spring-boot-autoconfigure项目结构预览
- [animal-spring-boot-starter 项目结构预览](#animal-spring-boot-starter 项目结构预览)
- 步骤二:实现自动配置模块 (`animal-spring-boot-autoconfigure`)
-
- [1. 配置 `pom.xml`](#1. 配置
pom.xml) - [2. 定义核心业务 Bean](#2. 定义核心业务 Bean)
- [3. 编写自动配置类 (核心!)](#3. 编写自动配置类 (核心!))
- [4. 创建 SpringBoot 3.x 清单文件](#4. 创建 SpringBoot 3.x 清单文件)
- [1. 配置 `pom.xml`](#1. 配置
- [步骤三:创建 Starter 聚合模块 (`animal-spring-boot-starter`)](#步骤三:创建 Starter 聚合模块 (
animal-spring-boot-starter)) -
- [配置 `pom.xml`](#配置
pom.xml)
- [配置 `pom.xml`](#配置
- [步骤四:发布和使用 Starter](#步骤四:发布和使用 Starter)
- 步骤五:在应用项目中验证
-
- 1.在你的应用项目中,引入依赖:
- [2. 在配置文件中开启,使配置类生效](#2. 在配置文件中开启,使配置类生效)
- [3. 在应用代码中直接自动注入并使用:](#3. 在应用代码中直接自动注入并使用:)
- [4. 输出组件信息](#4. 输出组件信息)
我们以 SpringBoot 3.x 版本(要求 Java 17+ 和 Jakarta EE)为例,详细拆解自定义 Starter 的过程。我们将创建一个名为 animal-spring-boot-starter 的场景启动器,用于提供动物相关的服务。
核心目标与技术栈
- 目标 :创建一个
AnimalService的默认实现,在用户项目中自动配置好。 - 技术栈:SpringBoot 3.x, Java 17+, Maven。
- 关键文件 :
META-INF/spring/org.springframework.boot.autoconfigure.AutoConfiguration.imports。
步骤一:创建两个 Maven 模块
我们需要两个模块:
animal-spring-boot-autoconfigure(核心配置逻辑)。animal-spring-boot-starter(用户依赖入口)。
项目结构概览:
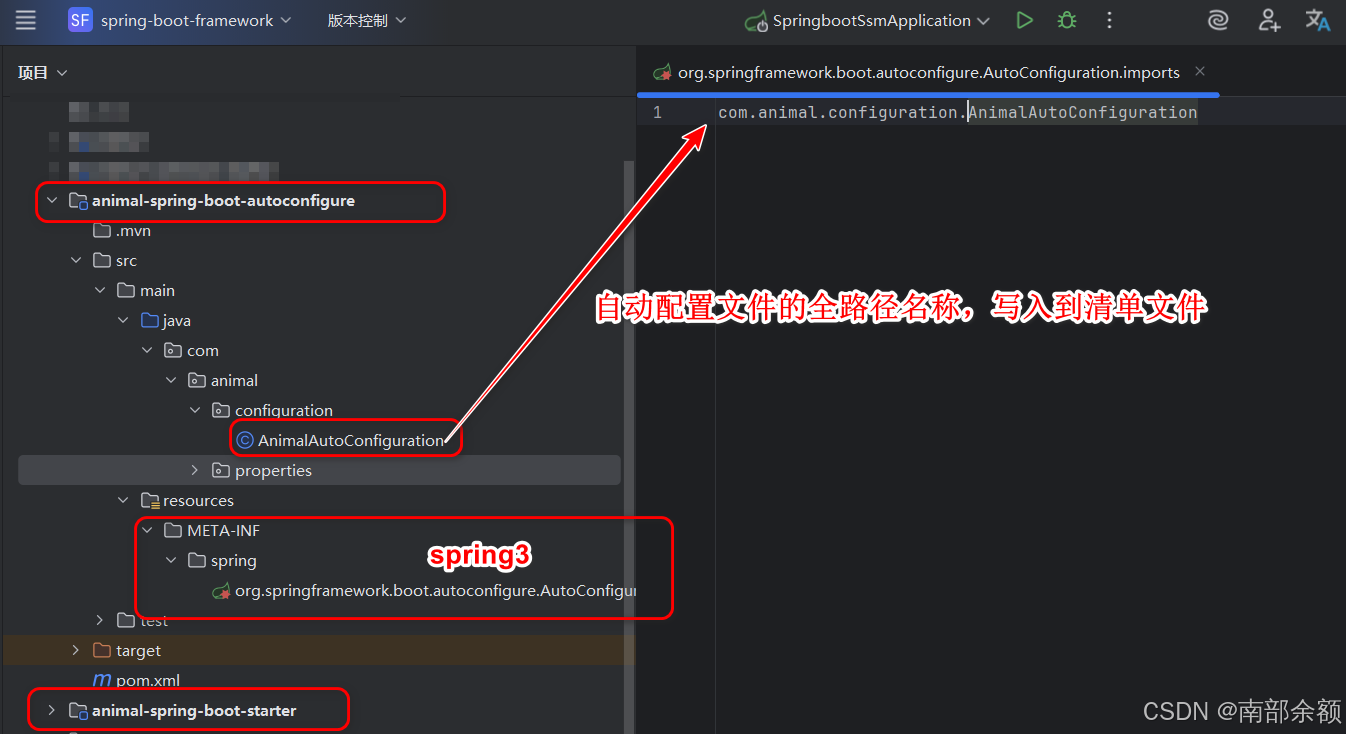
animal-spring-boot-autoconfigure项目结构预览
animal-spring-boot-autoconfigure/
   └── src/main/java/... (核心代码)
   └── src/main/resources/META-INF/spring/org.springframework.boot.autoconfigure.AutoConfiguration.imports
└── pom.xml- 在
animal-spring-boot-autoconfigureMaven项目中,编写自动化配置相关代码。 - 并且导入相关依赖jar包。
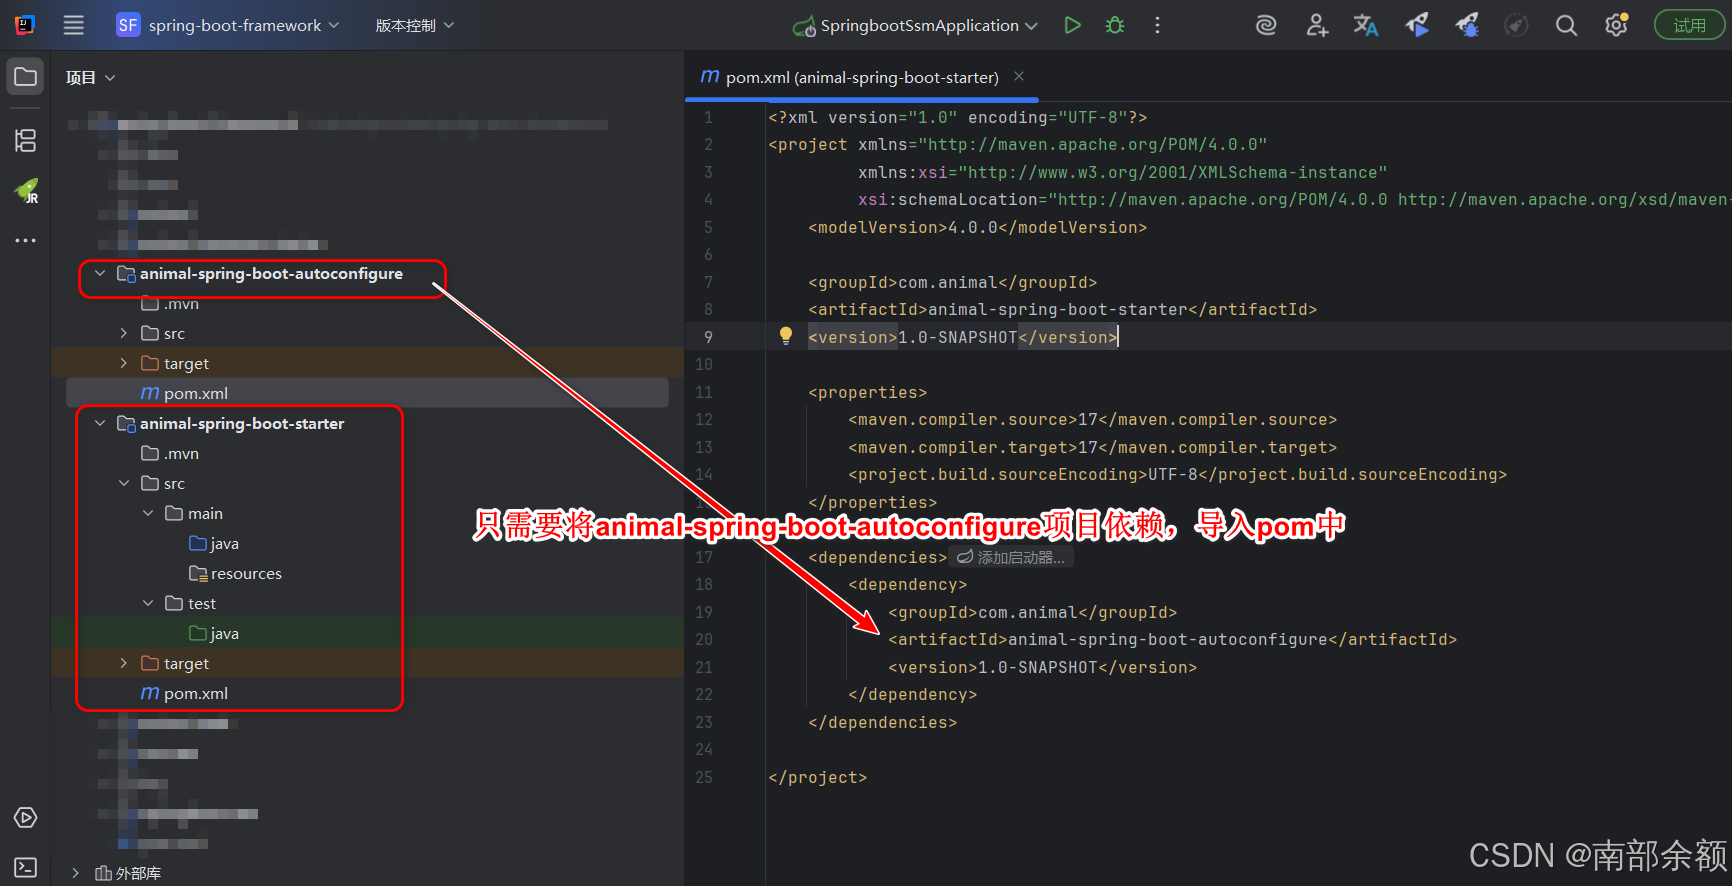
animal-spring-boot-starter 项目结构预览
animal-spring-boot-starter/
└── pom.xml- 在
animal-spring-boot-starterMaven项目中,只需要导入animal-spring-boot-autoconfigure项目即可。
步骤二:实现自动配置模块 (animal-spring-boot-autoconfigure)
这是实现核心业务逻辑和配置的地方。
1. 配置 pom.xml
确保依赖正确的 SpringBoot 3.x 依赖项,特别是用于注解和条件的依赖。
xml
<!-- animal-spring-boot-autoconfigure/pom.xml -->
<project ...>
    <artifactId>animal-spring-boot-autoconfigure</artifactId>

    <properties>
        <spring-boot.version>3.3.0</spring-boot.version>
        <java.version>17</java.version>
    </properties>

    <dependencies>
        <!-- 引入 SpringBoot 自动配置所需的依赖,不需要引入整个 starter -->
        <dependency>
            <groupId>org.springframework.boot</groupId>
            <artifactId>spring-boot-autoconfigure</artifactId>
            <version>${spring-boot.version}</version>
        </dependency>
        <!-- 可选:如果需要配置绑定,需要这个依赖 -->
        <dependency>
            <groupId>org.springframework.boot</groupId>
            <artifactId>spring-boot-configuration-processor</artifactId>
            <version>${spring-boot.version}</version>
            <scope>provided</scope>
        </dependency>
    </dependencies>
</project>
spring-boot-autoconfigure 模块包含了 Spring Boot 用于实现自动配置所需的所有注解、类和工具。
具体来说,它提供了以下关键功能:
- 条件注解(
@ConditionalOn...系列) :
这是实现智能配置的核心。@ConditionalOnClass、@ConditionalOnMissingBean、@ConditionalOnProperty等注解都定义在这个模块中。你的自动配置类需要使用这些注解来决定何时加载 Bean。 @ConfigurationProperties:
用于将配置文件(application.properties/application.yml)中的属性绑定到 Java 对象上的注解定义也在这个模块中。- 自动配置导入选择器 (
AutoConfigurationImportSelector) :
虽然你不需要直接使用它,但它是 Spring Boot 加载META-INF元数据文件的核心实现类,也位于此模块中。
2. 定义核心业务 Bean
定义一个服务接口和实现类:
java
public class AnimalDataInfo {

    private String name;
    private String type;

    public String getName() {
        return name;
    }

    public void setName(String name) {
        this.name = name;
    }

    public String getType() {
        return type;
    }

    public void setType(String type) {
        this.type = type;
    }

    @Override
    public String toString() {
        return "AnimalDataInfo{" +
                "name='" + name + '\'' +
                ", type='" + type + '\'' +
                '}';
    }

}
3. 编写自动配置类 (核心!)
这个类使用 @Configuration 和 @Conditional 注解来智能地加载 Bean。
java
package com.animal.configuration;

import com.animal.properties.AnimalDataInfo;
import org.springframework.boot.autoconfigure.condition.ConditionalOnMissingBean;
import org.springframework.boot.autoconfigure.condition.ConditionalOnProperty;
import org.springframework.context.annotation.Bean;
import org.springframework.context.annotation.Configuration;

// 配置类
@Configuration
// 只有当属性 animal.common.enabled=true 时才启用此配置
@ConditionalOnProperty(prefix = "animal.common",name = "enabled",havingValue = "true")
public class AnimalAutoConfiguration {

    @Bean
    // 容器中没有AnimalDataInfo类时,才会生效,加入到容器中
    @ConditionalOnMissingBean
    public AnimalDataInfo animalDataInfo(){
        AnimalDataInfo animalDataInfo = new AnimalDataInfo();
        animalDataInfo.setName("小黄");
        animalDataInfo.setType("狗");
        return animalDataInfo;
    }

}
4. 创建 SpringBoot 3.x 清单文件
在 src/main/resources/META-INF/spring/ 目录下创建文件 org.springframework.boot.autoconfigure.AutoConfiguration.imports。
文件内容(SpringBoot 3.x 专用):
com.animal.configuration.AnimalAutoConfiguration步骤三:创建 Starter 聚合模块 (animal-spring-boot-starter)
这个模块不包含任何代码,只负责依赖管理。
配置 pom.xml
核心:引入我们的自动配置模块,animal-spring-boot-autoconfigure。
xml
<!-- animal-spring-boot-starter/pom.xml -->
<?xml version="1.0" encoding="UTF-8"?>
<project xmlns="http://maven.apache.org/POM/4.0.0"
         xmlns:xsi="http://www.w3.org/2001/XMLSchema-instance"
         xsi:schemaLocation="http://maven.apache.org/POM/4.0.0 http://maven.apache.org/xsd/maven-4.0.0.xsd">
    <modelVersion>4.0.0</modelVersion>

    <groupId>com.animal</groupId>
    <artifactId>animal-spring-boot-starter</artifactId>
    <version>1.0-SNAPSHOT</version>

    <properties>
	    <maven.compiler.source>17</maven.compiler.source>
        <maven.compiler.target>17</maven.compiler.target>
        <project.build.sourceEncoding>UTF-8</project.build.sourceEncoding>
    </properties>

    <dependencies>

        <dependency>
            <groupId>com.animal</groupId>
            <artifactId>animal-spring-boot-autoconfigure</artifactId>
            <version>1.0-SNAPSHOT</version>
        </dependency>

    </dependencies>
</project>
步骤四:发布和使用 Starter
-
将这两个模块构建并发布到你的 Maven 仓库(
mvn clean install或deploy)。 -
在你的目标 Spring Boot 应用项目 中引入
animal-spring-boot-starter依赖。
步骤五:在应用项目中验证
1.在你的应用项目中,引入依赖:
xml
<!-- 在你的应用项目的 pom.xml 中 -->
<dependency>
    <groupId>com.animal</groupId>
    <artifactId>animal-spring-boot-starter</artifactId>
    <version>1.0-SNAPSHOT</version>
</dependency>
2. 在配置文件中开启,使配置类生效
properties
# 配置文件中,开启animal自动配置
animal.common.enabled=true
3. 在应用代码中直接自动注入并使用:
java
@SpringBootApplication
public class AnimalWebApplication {

    public static void main(String[] args) {
        ConfigurableApplicationContext context = SpringApplication.run(AnimalWebApplication.class, args);
        // 从容器中获取AnimalDataInfo组件信息
        AnimalDataInfo animalDataInfo = context.getBean(AnimalDataInfo.class);
        System.out.println("animalDataInfo = " + animalDataInfo);
    }
}
4. 输出组件信息
java
animalDataInfo = AnimalDataInfo{name='小黄', type='狗'}重点在于:用户不需要编写任何配置代码,只需要一个依赖,功能就自动生效了。