引言
海康威视的双光谱红外摄像头官方推荐使用 C 语言 SDK 来获取温度矩阵,但对于不熟悉底层开发的用户来说,上手门槛较高。其实,还有一种更简单、跨平台的方案:通过 ISAPI 提供的 HTTP 接口,结合 multipart 数据解析,就能轻松实现温度数据的读取。
本文将介绍:
- ISAPI接口示例
- multipart 介绍
- 如何使用 MultipartReader 解析流式返回的图像和温度数据
- 程序运行效果和输出展示
- 完整源码和使用方式
一、ISAPI:海康摄像头的接口协议
ISAPI(Internet Server Application Programming Interface)是海康威视提供的一套基于 HTTP 协议的 RESTful 风格接口,广泛应用于摄像头、录像机(NVR)、门禁等安防设备的远程控制与数据交互。
通过 ISAPI,开发者无需依赖官方 SDK,即可使用标准的 HTTP 请求对设备进行管理与数据访问,具备跨平台、上手快、集成灵活的优势。
官方帮助文档可参考:
https://open.ys7.com/help/1885
对于具备红外热成像能力的摄像头,ISAPI 提供了一个特别有价值的接口,用于获取图像和温度信息:
python
GET /ISAPI/Streaming/channels/1/picture?PictureType=JPEG&jpegPicWithAppendData=true该接口返回的是一个 multipart 格式的 HTTP 数据流,其中包含两部分内容:
- 一帧红外图像;
- 附加的温度数据(常见为 XML、十六进制或自定义格式);
- 一帧可见光图像
通过 Python 的 requests 库即可对该接口进行访问与数据拉取,为后续图像分析和温度处理打下基础。
python
    url = f'{URL}/ISAPI/Thermal/channels/2/thermometry/jpegPicWithAppendData?format=json'

    session = requests.Session()

    session.auth = HTTPDigestAuth(USR, PWD)

    response = session.get(url, stream=True)
其中USR和PWD为用户名以及密码 URL为摄像头ip地址
二、什么是 multipart 数据?
multipart 是一种常见的 HTTP 数据封装格式,最初用于邮件协议和表单上传,如 multipart/form-data。其特点是:在一个 HTTP 响应体中,封装多个结构独立的数据块(part),每块之间通过特定的边界标识符(--boundary)进行分隔。
在每个数据块中,通常包含:
- 一段 Header(如 Content-Type、Content-Disposition);
- 一段 Body(即具体的内容,如图片、文本等);
对于海康红外摄像头而言,当我们调用 jpegPicWithAppendData=true 接口时,设备返回的是一个包含多个部分的流式数据,格式如下:
--boundary
Content-Type: application/json; charset="UTF-8"
{
"jpegPicWidth": 256,
"jpegPicHeight": 192,
"p2pDataLen": 196608,
"visiblePicLen": 340279,
...
}
--boundary
Content-Type: image/pjpeg
Content-Length: 6817
红外图像 JPEG 数据
--boundary
Content-Type: application/octet-stream
Content-Length: 196608
温度矩阵二进制数据
--boundary
Content-Type: image/pjpeg
Content-Length: 340279
可见光图像 JPEG 数据
--boundary--
三、MultipartReader:流式解析工具
为了解析摄像头返回的 multipart 流,我们使用了第三方库 streaming_multipart。这是一个轻量级的 Python 实现,支持流式读取 multipart/form-data 内容,并逐块按 boundary 拆分每段数据。
相比一次性加载整个响应体(如 response.content),它:
- 支持从 response.raw 流中逐块读取数据;
- 不需要缓存到硬盘,也不会占满内存;
- 自动解析每一块的 Content-Type 和数据内容;
- 非常适用于摄像头持续推送数据或结构复杂的 multipart 响应场景。
我们封装了一个函数 parse_thermal_response(response),用于解析一次完整的 multipart 响应,提取其中三类关键数据:
python
thermal_img, visible_img, temp_matrix = parse_thermal_response(response)该函数的核心步骤包括:
- 自动提取 boundary;
- 按顺序读取 multipart 各部分(JSON 元信息、红外图、温度块、可见光图);
- 将温度块转为 NumPy 格式的摄氏度矩阵;
摄像头在第三个 part 中发送的是一块连续的二进制温度数据,大小为 p2pDataLen 字节,其含义需要结合元数据中的 temperatureDataLength 字段判断:
情况一:temperatureDataLength == 2(16位整数)
此时,温度数据是以 int16(有符号短整型) 编码的,表示为 温度的线性缩放值:
python
temp_raw = np.frombuffer(temp_data, dtype=np.int16).reshape((height, width))

temp_matrix = temp_raw.astype(np.float32) / scale + offset - 273.15
这是为了将硬件传感器输出的缩放整数值还原为物理单位(℃)。
情况二:temperatureDataLength == 4(32位浮点数)
此时,摄像头直接以 float32 编码每个像素温度,单位就是摄氏度,无需额外缩放:
python
temp_matrix = np.frombuffer(temp_data, dtype=np.float32).reshape((height, width))由于 streaming_multipart 是流式读取,有时需要循环多次 read(),直到 p2p_len 字节全部读完。这段逻辑确保我们完整拿到温度矩阵数据。
python
while len(temp_data) < p2p_len:

    chunk = temp_part.read(p2p_len - len(temp_data))

    if not chunk:

        break

temp_data += chunk
在 multipart 数据中,摄像头返回的图像数据以标准 JPEG 编码存储,分别对应红外图和可见光图。我们可以直接按顺序从 MultipartReader 中读取并保存这两张图。
python
# 红外 JPEG 图像

jpeg_part = reader.next_part()

thermal_img = jpeg_part.read(jpeg_len)


# 可见光 JPEG 图像

visible_part = reader.next_part()

visible_img = visible_part.read()
reader.next_part():从 multipart 流中获取下一段数据;这一段对应的 Content-Type 是 image/pjpeg,表示 JPEG 图像;
为确保读取完整图像,我们使用元数据中提供的 jpegPicLen(图像长度)作为读取长度。这比 read() 默认读到底更安全,可避免多余内容混入,尤其在高并发拉流场景下更稳定;
四、内容展示:图像与温度数据
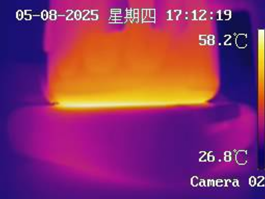
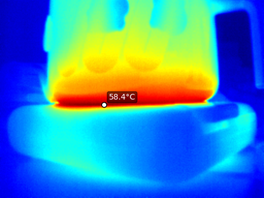
红外图像与可见光图像均为 JPEG 编码(base64 包装),可直接解码成 OpenCV 格式图像;
使用 cv2.imdecode 从字节流转为 NumPy 图像矩阵;
python
# 图像解码

thermal_img_bytes = base64.b64decode(thermal_img)

visible_img_bytes = base64.b64decode(visible_img)


thermal_cv = cv2.imdecode(np.frombuffer(thermal_img_bytes, np.uint8), cv2.IMREAD_COLOR)

visible_cv = cv2.imdecode(np.frombuffer(visible_img_bytes, np.uint8), cv2.IMREAD_COLOR)
结果展示如下:
🧩 本文完整源码已开源至 GitHub:
欢迎学习使用,如在科研或工程中用到,请保留引用。
python
# -*- coding: utf-8 -*-
import requests
import struct
import numpy as np
import matplotlib.pyplot as plt
import cv2
import json
from requests.auth import HTTPDigestAuth
from io import BufferedReader
from streaming_multipart import MultipartReader
import re
import io
from requests import Response
import base64

BOUNDARY = 'boundary'

def parse_thermal_response(response: Response):
    """
    解析 ISAPI 响应流,提取红外图像、可见光图像和温度矩阵

    参数:
        response: requests.get(..., stream=True) 的返回对象

    返回:
        thermal_img (bytes) 红外 JPEG 图像
        visible_img (bytes) 可见光 JPEG 图像
        temp_matrix (np.ndarray) 摄氏度温度矩阵
        width, height: 温度矩阵尺寸
    """
    # 提取 boundary
    content_type = response.headers.get("Content-Type", "")
    match = re.search(r'boundary=(.*)', content_type)
    if not match:
        raise ValueError("未在 Content-Type 中找到 boundary")
    boundary = match.group(1)

    # 读取整个 HTTP 响应体(多部分内容)
    raw_data = response.raw.read()

    # 可选:保存为调试用原始 http 数据
    with open("raw_multipart_dump.http", "wb") as f:
        f.write(raw_data)

    # 构建流式 multipart 解析器
    stream = BufferedReader(io.BytesIO(raw_data))
    reader = MultipartReader(stream, boundary)

    # 第一个 part 是 JSON 元数据
    json_part = reader.next_part()
    metadata = json.loads(json_part.read())
    meta = metadata['JpegPictureWithAppendData']

    width = meta['jpegPicWidth']
    height = meta['jpegPicHeight']
    jpeg_len = meta['jpegPicLen']
    temp_len = meta['temperatureDataLength']
    p2p_len = meta['p2pDataLen']

    # 16 位温度矩阵需要 scale 和 offset 参数
    if temp_len == 2:
        scale = float(meta['scale'])
        offset = float(meta['offset'])
    else:
        scale = offset = None

    # 第二个 part 是红外图像
    jpeg_part = reader.next_part()
    thermal_img = jpeg_part.read(jpeg_len)

    # 第三个 part 是温度数据(原始二进制)
    temp_part = reader.next_part()
    temp_data = b""
    while len(temp_data) < p2p_len:
        chunk = temp_part.read(p2p_len - len(temp_data))
        if not chunk:
            break
        temp_data += chunk

    # 转换为摄氏度温度矩阵
    if temp_len == 2:
        # int16 格式 + 缩放 + 偏移 + 开氏度转摄氏
        temp_raw = np.frombuffer(temp_data, dtype=np.int16).reshape((height, width))
        temp_matrix = temp_raw.astype(np.float32) / scale + offset - 273.15
    else:
        # float32,直接就是摄氏度
        temp_matrix = np.frombuffer(temp_data, dtype=np.float32).reshape((height, width))

    # 第四个 part 是可见光图像
    visible_part = reader.next_part()
    visible_img = visible_part.read()

    return thermal_img, visible_img, temp_matrix, width, height

def extract_global_thermal(USR, PWD, URL):
    """
    获取全图温度信息(红外图、可见光图、全局温度数据)

    参数:
        USR, PWD: 摄像头用户名密码
        URL: 摄像头 HTTP 地址(如 http://192.168.1.122)

    返回:
        thermal_b64: 红外图 base64 编码
        visible_b64: 可见光图 base64 编码
        global_temp: 最大/最小/平均温度与坐标
        temp_matrix: 摄氏度温度矩阵
    """
    url = f'{URL}/ISAPI/Thermal/channels/2/thermometry/jpegPicWithAppendData?format=json'
    session = requests.Session()
    session.auth = HTTPDigestAuth(USR, PWD)
    response = session.get(url, stream=True)

    thermal_img, visible_img, temp_matrix, temp_width, temp_height = parse_thermal_response(response)

    # 图像转 base64 编码
    thermal_b64 = base64.b64encode(thermal_img).decode('utf-8')
    visible_b64 = base64.b64encode(visible_img).decode('utf-8')

    # 温度统计
    max_temp = temp_matrix.max()
    min_temp = temp_matrix.min()
    mean_temp = temp_matrix.mean()

    max_pos = np.unravel_index(np.argmax(temp_matrix), temp_matrix.shape)
    min_pos = np.unravel_index(np.argmin(temp_matrix), temp_matrix.shape)

    global_temp = [max_temp, max_pos[1], max_pos[0], min_temp, min_pos[1], min_pos[0], mean_temp]

    return thermal_b64, visible_b64, global_temp, temp_matrix

def extract_region_thermal(USR, PWD, URL, region_list):
    """
    获取多个区域内的温度信息

    参数:
        region_list: [(x, y, w, h), ...] 格式的区域列表

    返回:
        同上,但是每个区域的 max/min/mean 信息
    """
    url = f'{URL}/ISAPI/Thermal/channels/2/thermometry/jpegPicWithAppendData?format=json'
    session = requests.Session()
    session.auth = HTTPDigestAuth(USR, PWD)
    response = session.get(url, stream=True)

    thermal_img, visible_img, temp_matrix, temp_width, temp_height = parse_thermal_response(response)

    thermal_b64 = base64.b64encode(thermal_img).decode('utf-8')
    visible_b64 = base64.b64encode(visible_img).decode('utf-8')

    region_temp_list = []

    for region in region_list:
        region_x1, region_y1, region_w, region_h = region
        if region_x1 >= temp_width or region_y1 >= temp_height:
            continue

        region_x2 = min(region_x1 + region_w, temp_width)
        region_y2 = min(region_y1 + region_h, temp_height)

        temp_region = temp_matrix[region_y1:region_y2, region_x1:region_x2]

        max_temp = temp_region.max()
        min_temp = temp_region.min()
        mean_temp = temp_region.mean()

        max_pos = np.unravel_index(np.argmax(temp_region), temp_region.shape)
        min_pos = np.unravel_index(np.argmin(temp_region), temp_region.shape)

        temp_result = [max_temp, max_pos[1], max_pos[0], min_temp, min_pos[1], min_pos[0], mean_temp]
        region_temp_list.append(temp_result)

    return thermal_b64, visible_b64, region_temp_list

def main():
    USR = 'admin'
    PWD = 'yourpassword'
    URL = 'http://xxx.xxx.x.xxx'

    # 获取图像和温度数据
    thermal_img, visible_img, temp_list, temp_matrix = extract_global_thermal(USR, PWD, URL)

    # 解码 base64 成 OpenCV 图像
    thermal_img_bytes = base64.b64decode(thermal_img)
    visible_img_bytes = base64.b64decode(visible_img)

    thermal_cv = cv2.imdecode(np.frombuffer(thermal_img_bytes, np.uint8), cv2.IMREAD_COLOR)
    visible_cv = cv2.imdecode(np.frombuffer(visible_img_bytes, np.uint8), cv2.IMREAD_COLOR)

    # 展示红外图与可见光图
    plt.figure(figsize=(10, 4))
    plt.subplot(1, 2, 1)
    plt.title("Thermal Image")
    plt.imshow(cv2.cvtColor(thermal_cv, cv2.COLOR_BGR2RGB))
    plt.axis("off")

    plt.subplot(1, 2, 2)
    plt.title("Visible Image")
    plt.imshow(cv2.cvtColor(visible_cv, cv2.COLOR_BGR2RGB))
    plt.axis("off")

    plt.tight_layout()
    plt.show()

    # 将温度矩阵归一化并上伪彩
    norm_temp = cv2.normalize(temp_matrix, None, 0, 255, cv2.NORM_MINMAX)
    norm_temp = norm_temp.astype(np.uint8)
    color_temp = cv2.applyColorMap(norm_temp, cv2.COLORMAP_JET)

    # 找出最热点
    max_val = np.max(temp_matrix)
    max_loc = np.unravel_index(np.argmax(temp_matrix), temp_matrix.shape)
    y, x = max_loc

    # 展示伪彩图,并标注最热点
    plt.figure(figsize=(5, 4))
    plt.title("Thermal Matrix (Pseudocolor)")
    plt.imshow(cv2.cvtColor(color_temp, cv2.COLOR_BGR2RGB))
    plt.scatter([x], [y], color='white', s=40, marker='o', edgecolors='black')
    plt.text(x + 5, y - 5, f"{max_val:.1f}°C", color='white', fontsize=10,
             bbox=dict(facecolor='black', alpha=0.5, boxstyle='round,pad=0.2'))
    plt.axis("off")
    plt.tight_layout()
    plt.show()

if __name__ == "__main__":
    main()