效果图
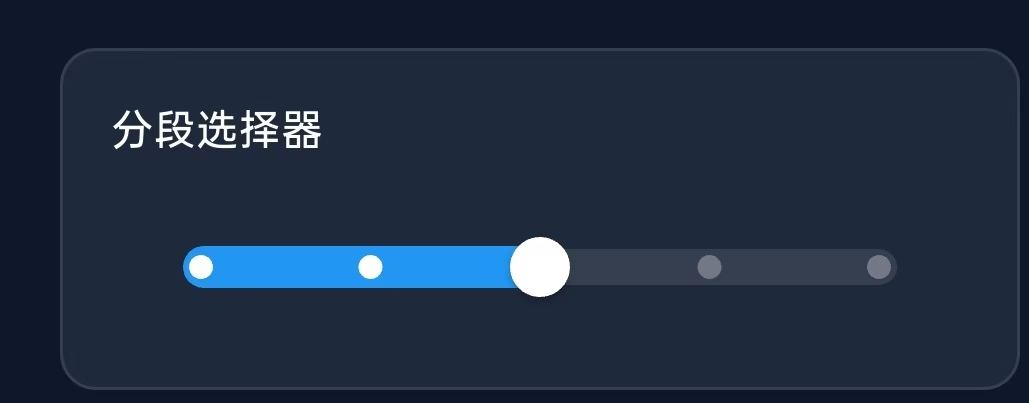
分段选择器进度条
点状进度条

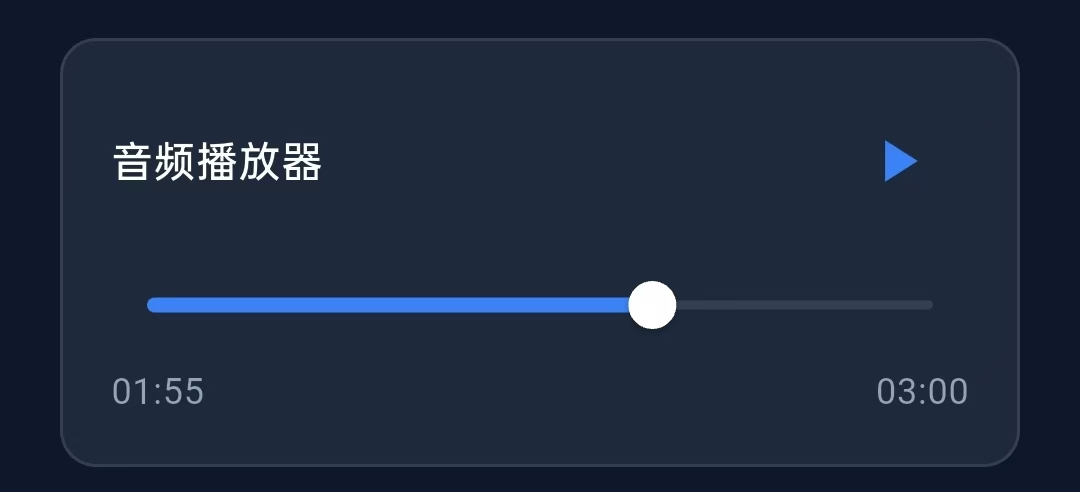
音频播放器进度条
分段选择器进度条的实现步骤
1.定义变量
Dart
double _sliderValue6 = 0.5;2.定义分段进度条
Dart
 Widget _buildSegmentedSliderCard({
    required String title, //标题
    required double value, //当前进度值
    required ValueChanged<double> onChanged, //值变化回调
    required int segments, //分段数量
  }) {
    return Container(
      padding: const EdgeInsets.all(16),
      decoration: BoxDecoration(
        color: const Color(0xFF1E293B),
        borderRadius: BorderRadius.circular(12),
        border: Border.all(color: Colors.white.withOpacity(0.1)),
      ),
      child: Column(
        crossAxisAlignment: CrossAxisAlignment.start,
        children: [
          //标题
          Text(
            title,
            style: const TextStyle(
              color: Colors.white,
              fontSize: 14,
              fontWeight: FontWeight.w500,
            ),
          ),
          const SizedBox(height: 12),
          //进度条的核心部分
          SliderTheme(
            data: SliderThemeData(
              trackHeight: 12, //轨道高度
              thumbShape: const RoundSliderThumbShape(
                enabledThumbRadius: 10, //滑块半径
              ),
              activeTrackColor: Colors.blue, //激活颜色
              inactiveTrackColor: Colors.white.withOpacity(0.1), //未激活颜色
              tickMarkShape: const RoundSliderTickMarkShape(tickMarkRadius: 4), //刻度形状
              activeTickMarkColor: Colors.white, //激活刻度颜色
              inactiveTickMarkColor: Colors.white.withOpacity(0.3), //未激活刻度颜色
              showValueIndicator: ShowValueIndicator.always, //总是显示值提示
            ),
            child: Slider( //滑动组件
              value: value,
              onChanged: onChanged,
              divisions: segments - 1, //设置分段点数量
              label: '${(value * 100).toInt()}%', //滑块上方显示的标签
              thumbColor: Colors.white, //滑块颜色
            ),
          ),

        ],
      ),
    );
  }
3.使用分段进度条
Dart
         _buildSegmentedSliderCard(
            title: '分段选择器',
            value: _sliderValue6,
            onChanged: (value) => setState(() => _sliderValue6 = value),
            segments: 5,
          ),
点状进度条的实现步骤
1.定义变量
Dart
double _sliderValue7 = 0.9;2.构造点状进度条
Dart
  Widget _buildDottedSliderCard({
    required String title, //卡片标题
    required double value, //当前进度值
    required ValueChanged<double> onChanged, //值变化回调
  }) {
    return Container(
      padding: const EdgeInsets.all(16),
      decoration: BoxDecoration(
        color: const Color(0xFF1E293B),
        borderRadius: BorderRadius.circular(12),
        border: Border.all(color: Colors.white.withOpacity(0.1)),
      ),
      child: Column(
        crossAxisAlignment: CrossAxisAlignment.start,
        children: [
          //标题
          Text(
            title,
            style: const TextStyle(
              color: Colors.white,
              fontSize: 14,
              fontWeight: FontWeight.w500,
            ),
          ),
          const SizedBox(height: 12),

          //进度条区域
          SizedBox(
            height: 40,
            child: Stack(
              alignment: Alignment.center, //居中对齐
              children: [
                // 点状轨道(底层)
                Container(
                  height: 12,//轨道区域高度
                  width: double.infinity,
                  child: LayoutBuilder(
                    builder: (context, constraints) { //动态计算点状布局
                      const dotCount = 20; //固定20个点
                      final dotSpacing = constraints.maxWidth / (dotCount - 1); //点间距
                      final activeDotCount = (value * dotCount).round();  //激活的点数

                      return Stack(
                        children: [

                          // 背景点:未激活
                          for (int i = 0; i < dotCount; i++)
                            Positioned(
                              left: i * dotSpacing, //X坐标
                              top: 4, // Y坐标
                              child: Container(
                                width: 4,
                                height: 4,
                                decoration: BoxDecoration(
                                  color: Colors.white.withOpacity(0.2),
                                  shape: BoxShape.circle,
                                ),
                              ),
                            ),

                          // 激活的点
                          for (int i = 0; i < activeDotCount; i++)
                            Positioned(
                              left: i * dotSpacing, // X坐标
                              top: 3, //Y坐标
                              child: Container(
                                width: 6,
                                height: 6,
                                decoration: const BoxDecoration(
                                  color: Color(0xFF3B82F6),
                                  shape: BoxShape.circle,
                                  boxShadow: [
                                    BoxShadow(
                                      color: Color(0xFF3B82F6),
                                      blurRadius: 4,
                                      spreadRadius: 1,
                                    ),
                                  ],
                                ),
                              ),
                            ),
                        ],
                      );
                    },
                  ),
                ),

                // Slider滑块(顶层,完全透明轨道)
                SliderTheme(
                  data: const SliderThemeData(
                    trackHeight: 0,  // 完全隐藏轨道
                    thumbShape: RoundSliderThumbShape(
                      enabledThumbRadius: 10, //滑块半径
                    ),
                    overlayShape: RoundSliderOverlayShape(overlayRadius: 20), //点击涟漪半径
                    activeTrackColor: Colors.transparent,
                    inactiveTrackColor: Colors.transparent,
                    thumbColor: Colors.white, //滑块颜色
                  ),
                  child: Slider(
                    value: value,
                    onChanged: onChanged,
                  ),
                ),
              ],
            ),
          ),
        ],
      ),
    );
  }
3.使用点状进度条
Dart
        _buildDottedSliderCard(
            title: '点状进度条',
            value: _sliderValue7,
            onChanged: (value) => setState(() => _sliderValue7 = value),
          ),
音频播放器的实现步骤
1.定义一些变量
Dart
  double _playbackProgress = 0.3;//当前播放进度
  bool _isPlaying = false; //播放状态标志
  Timer? _playbackTimer; //播放计时器
2.播放/暂停按钮的点击事件
Dart
  void _startPlayback() {
    _isPlaying = !_isPlaying; //切换播放状态

    if (_isPlaying) {
      //开始播放逻辑
      _playbackTimer = Timer.periodic(const Duration(milliseconds: 100), (timer) {
        setState(() {
          _playbackProgress += 0.01; //每100毫秒前进1%
          if (_playbackProgress >= 1.0) {
            _playbackProgress = 0.0; //播放完成后重置
          }
        });
      });
    } else {
      //暂停播放
      _playbackTimer?.cancel();
    }
    setState(() {});
  }
3.注销计时器
Dart
  @override
  void dispose() {
    _playbackTimer?.cancel(); //取消计时器
    super.dispose();
  }
4.构造播放器进度条
Dart
  Widget _buildPlayerProgressCard() {
    return Container(
      padding: const EdgeInsets.all(16),
      decoration: BoxDecoration(
        color: const Color(0xFF1E293B),
        borderRadius: BorderRadius.circular(12),
        border: Border.all(color: Colors.white.withOpacity(0.1)),
      ),
      child: Column(
        children: [
          Row(
            mainAxisAlignment: MainAxisAlignment.spaceBetween,
            children: [
              //标题
              const Text(
                '音频播放器',
                style: TextStyle(
                  color: Colors.white,
                  fontSize: 14,
                  fontWeight: FontWeight.w500,
                ),
              ),
              //播放/暂停按钮
              IconButton(
                icon: Icon(
                  _isPlaying ? Icons.pause : Icons.play_arrow,
                  color: const Color(0xFF3B82F6),
                ),
                onPressed: _startPlayback, //点击事件
              ),
            ],
          ),
          const SizedBox(height: 12),

          //进度条核心
          SliderTheme(
            data: SliderThemeData(
              trackHeight: 3, //轨道高度
              thumbShape: const RoundSliderThumbShape(
                enabledThumbRadius: 8, //滑块半径
              ),
              overlayShape: const RoundSliderOverlayShape(overlayRadius: 12), //涟漪效果半径
              activeTrackColor: const Color(0xFF3B82F6), //播放部分
              inactiveTrackColor: Colors.white.withOpacity(0.1), //未播放部分
              thumbColor: Colors.white, //滑块颜色
            ),
            child: Slider(
              value: _playbackProgress, //当前播放进度
              onChanged: (value) {
                setState(() {
                  _playbackProgress = value; //更新播放进度
                });
              },
            ),
          ),
          const SizedBox(height: 8),

          //时间显示行
          Row(
            mainAxisAlignment: MainAxisAlignment.spaceBetween,
            children: [
              Text(
                _formatTime(_playbackProgress * 180), // 格式化当前时间:假设总时长3分钟
                style: const TextStyle( //字体
                  color: Color(0xFF94A3B8),
                  fontSize: 12,
                ),
              ),
              //总时长
              Text(
                '03:00',
                style: const TextStyle(
                  color: Color(0xFF94A3B8),
                  fontSize: 12,
                ),
              ),
            ],
          ),
        ],
      ),
    );
  }
5.时间格式化函数
Dart
  String _formatTime(double seconds) {
    final minutes = (seconds / 60).floor(); //计算分钟数
    final remainingSeconds = (seconds % 60).floor(); //计算剩余秒数
    return '${minutes.toString().padLeft(2, '0')}:${remainingSeconds.toString().padLeft(2, '0')}';
  }
6.使用这个播放器进度条
Dart
_buildPlayerProgressCard(),