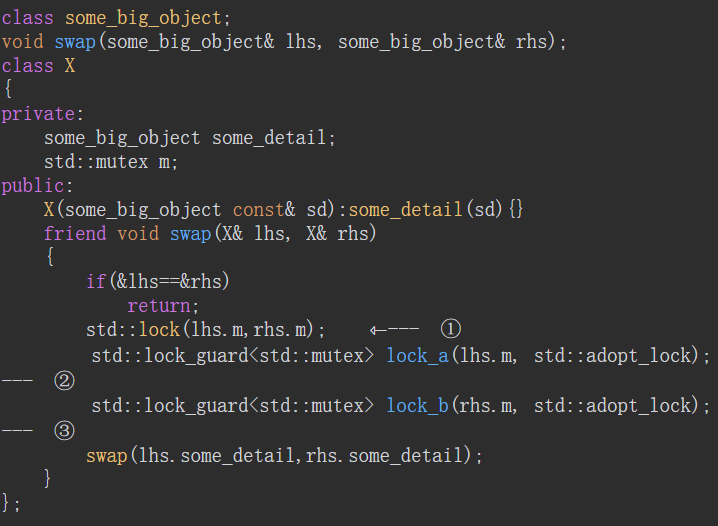
3.2.1 在C++中使用互斥
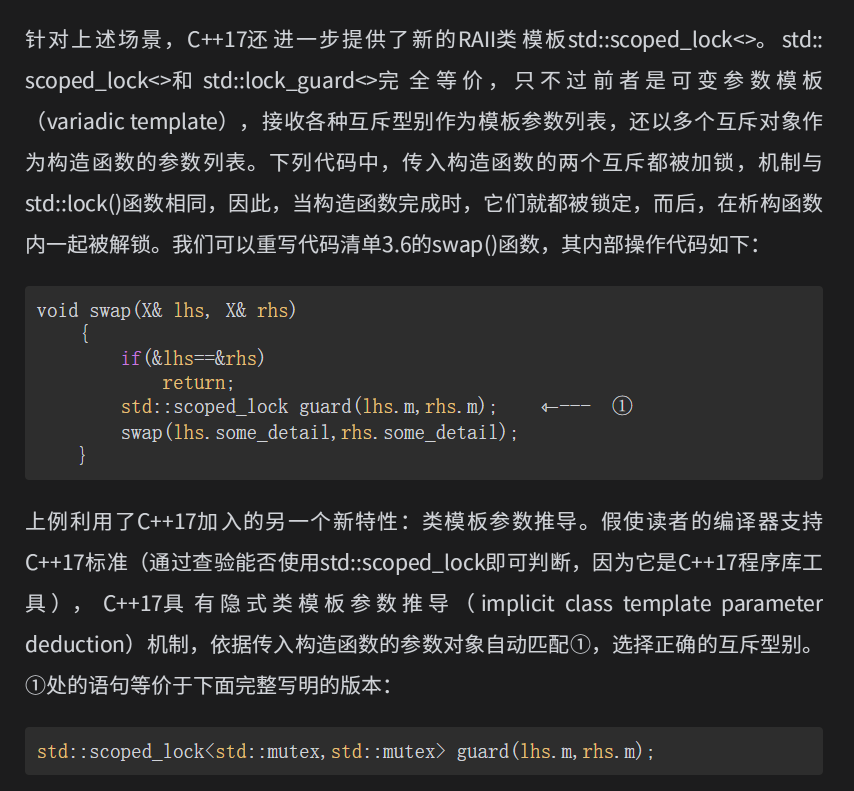
C++17引入了一个新特性,名为类模板参数推导。于std::lock_guard<>可以直接简化为std::lock_guard guard(some_mutex);
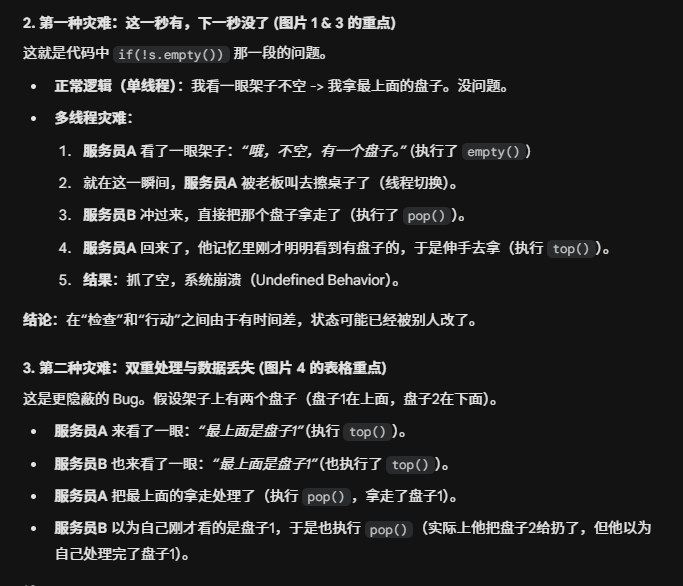
3.2.3 发现接口固有的条件竞争
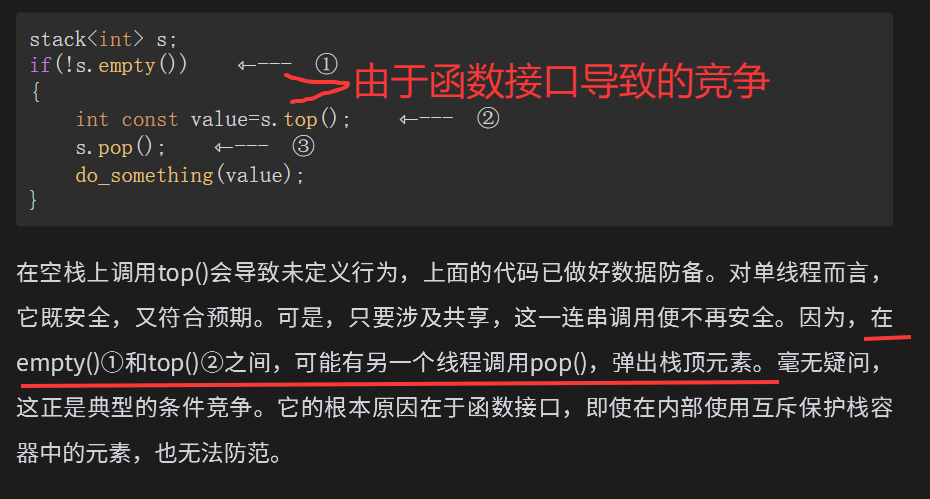
两难境地
pop的两种设计方法,一个是想用empty检查,再pop数据
另外一个是直接怕pop数据 --- 这种方法存在巨大风险
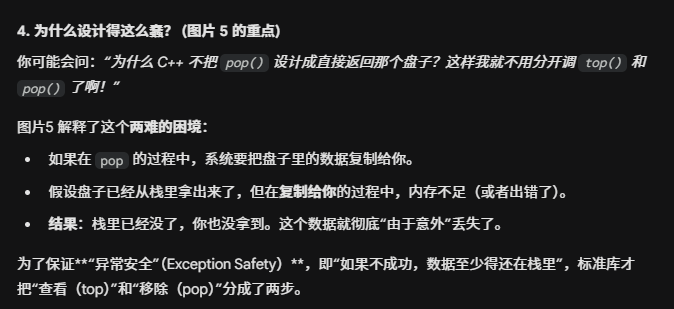
解决方法
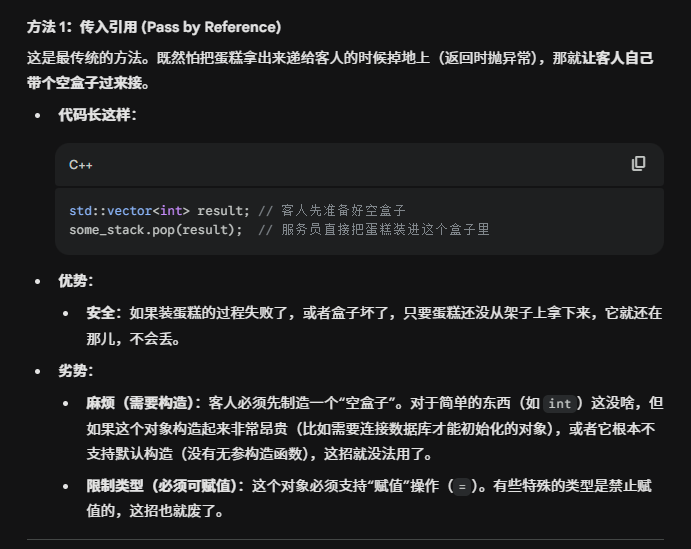
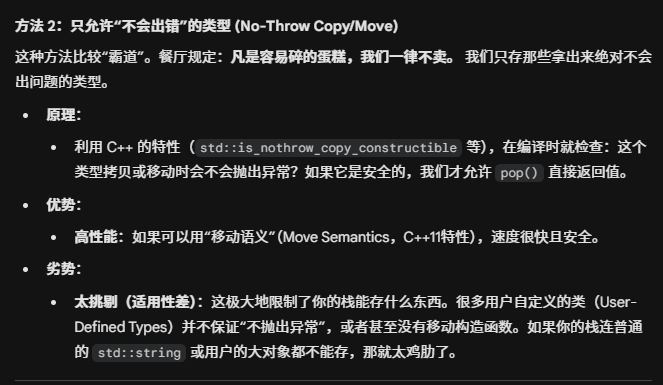
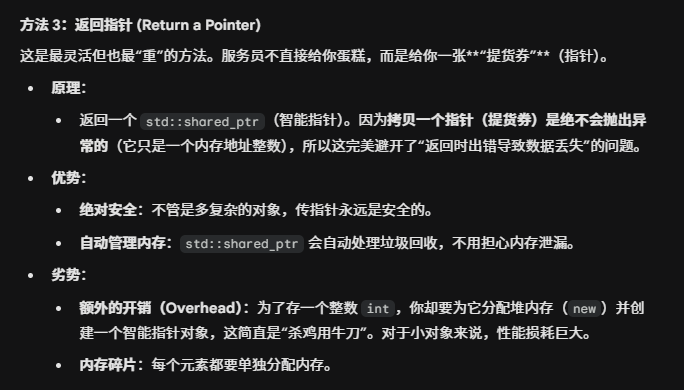
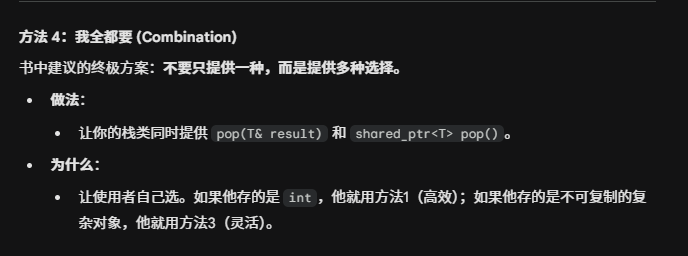
实例
cpp
#include <iostream>
#include <thread>
#include <memory>
#include <mutex>
#include <stack>
struct empty_stack : std::exception
{
const char *what() const throw();
};
template <typename T>
class threadsafe_stack
{
private:
std::stack<T> data;
mutable std::mutex m;
public:
threadsafe_stack() {}
threadsafe_stack(const threadsafe_stack &other)
{
std::lock_guard<std::mutex> lock(other.m);
data = other.data;
}
threadsafe_stack &operator=(const threadsafe_stack &) = delete;
void push(T new_value)
{
std::lock_guard<std::mutex> lock(m);
data.push(new_value);
}
std::shared_ptr<T> pop()
{
std::lock_guard<std::mutex> lock(m);
if (data.empty())
throw empty_stack();
std::shared_ptr<T> const res(std::make_shared<T>(data.top()));
data.pop();
return res;
}
void pop(T &value)
{
std::lock_guard<std::mutex> lock(m);
if (data.empty())
throw empty_stack();
value = data.top();
data.pop();
}
bool empty() const
{
std::lock_guard<std::mutex> lock(m);
return data.empty();
}
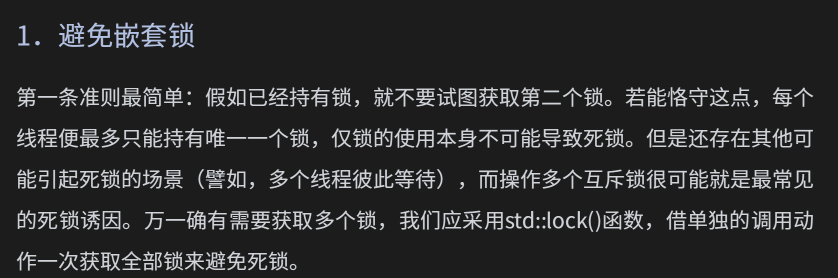
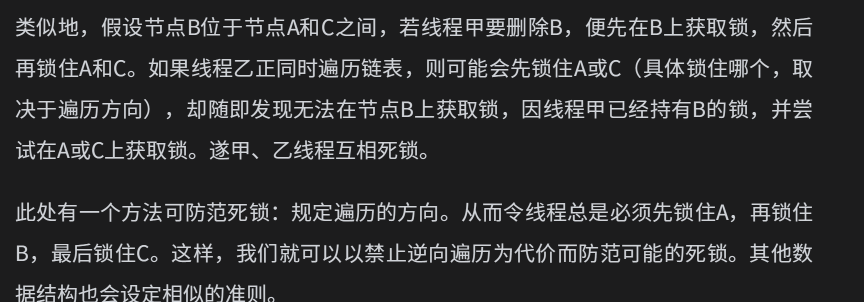
};死锁的预防
同时加锁
预防原则


cpp
#include <iostream>
#include <mutex>
#include <stdexcept> // 用于 std::logic_error
#include <climits> // 用于 ULONG_MAX
// ==========================================
// 层级锁类的定义
// ==========================================
class hierarchical_mutex
{
std::mutex internal_mutex; // 内部真正的锁
const unsigned long hierarchy_value; // 当前锁的层级值(固定不变)
unsigned long previous_hierarchy_value; // 保存加锁前的层级值(用于解锁时恢复)
// 关键点:thread_local
// 每个线程都有自己独立的"当前层级值",互不干扰。
// 初始值为 ULONG_MAX,表示线程刚开始没有持有任何锁,权力无限大。
// 这里的static很重要,表示这个变量属于类,而不是某个对象实例。表示一个对象加一次锁就会改动这个值。
static thread_local unsigned long this_thread_hierarchy_value;
public:
explicit hierarchical_mutex(unsigned long value) : hierarchy_value(value), previous_hierarchy_value(0) {}
// 核心检查逻辑
void check_for_hierarchy_violation()
{
// 规则:线程当前的层级必须【严格大于】想要获取的锁的层级
// 如果我现在手里拿着 5000 的锁,我就不能去拿 6000 的锁(向上加锁,禁止)
// 我也不能去拿另一个 5000 的锁(平级加锁,禁止,防止循环等待)
if (this_thread_hierarchy_value <= hierarchy_value)
{
throw std::logic_error("互斥锁层级违规 (Mutex hierarchy violated)");
}
}
// 更新线程状态
void update_hierarchy_value()
{
// 1. 记下老的值,比如原来是无穷大(ULONG_MAX)
previous_hierarchy_value = this_thread_hierarchy_value;
// 2. 把线程现在的"水位"降低到当前锁的层级
this_thread_hierarchy_value = hierarchy_value;
}
void lock()
{
// 1. 检查是否合规
check_for_hierarchy_violation();
// 2. 物理加锁(可能会阻塞)
internal_mutex.lock();
// 3. 更新当前线程的层级记录
update_hierarchy_value();
}
void unlock()
{
// 1. 恢复之前的层级值。
// 例如:我先拿了10000(High),又拿了5000(Low)。
// 解锁Low时,必须把我的层级从5000恢复回10000,这样我才能去释放High或者拿其他<10000的锁。
this_thread_hierarchy_value = previous_hierarchy_value;
// 2. 物理解锁
internal_mutex.unlock();
}
bool try_lock()
{
check_for_hierarchy_violation();
if (!internal_mutex.try_lock())
return false;
update_hierarchy_value();
return true;
}
};
// 初始化类的静态成员变量
// thread_local 变量在每个线程启动时会自动初始化为 ULONG_MAX
thread_local unsigned long hierarchical_mutex::this_thread_hierarchy_value(ULONG_MAX);
// ==========================================
// 测试部分
// ==========================================
// 定义两个锁:一个高层级,一个低层级
// 规则:必须先锁 High,再锁 Low (10000 -> 5000)
hierarchical_mutex high_level_mutex(10000);
hierarchical_mutex low_level_mutex(5000);
void test_correct_order()
{
std::cout << "\n=== 测试 1: 正确的加锁顺序 (高 -> 低) ===" << std::endl;
try
{
std::cout << "[Step 1] 尝试锁定 High(10000)..." << std::endl;
high_level_mutex.lock();
std::cout << " 锁定 High 成功。" << std::endl;
std::cout << "[Step 2] 尝试锁定 Low(5000)..." << std::endl;
// 当前线程层级是 10000,目标是 5000。 10000 > 5000,允许。
low_level_mutex.lock();
std::cout << " 锁定 Low 成功。" << std::endl;
// 执行任务...
std::cout << " (执行临界区任务...)" << std::endl;
low_level_mutex.unlock();
std::cout << " 解锁 Low。" << std::endl;
high_level_mutex.unlock();
std::cout << " 解锁 High。" << std::endl;
}
catch (const std::exception &e)
{
std::cout << "!!! 发生异常: " << e.what() << std::endl;
}
}
void test_wrong_order()
{
std::cout << "\n=== 测试 2: 错误的加锁顺序 (低 -> 高) ===" << std::endl;
try
{
std::cout << "[Step 1] 尝试锁定 Low(5000)..." << std::endl;
low_level_mutex.lock();
std::cout << " 锁定 Low 成功。当前线程层级降为 5000。" << std::endl;
std::cout << "[Step 2] 尝试锁定 High(10000)..." << std::endl;
// 当前线程层级是 5000,目标是 10000。
// 检查:5000 <= 10000 ? 是的。
// 结果:触发异常!
high_level_mutex.lock();
// 下面这行永远不会执行
std::cout << " 锁定 High 成功 (不应该发生!)。" << std::endl;
high_level_mutex.unlock();
low_level_mutex.unlock();
}
catch (const std::exception &e)
{
std::cout << "!!! 捕获到预期异常: " << e.what() << std::endl;
std::cout << " 说明层级锁机制生效了,防止了潜在的死锁风险。" << std::endl;
// 清理现场:因为异常跳出了,我们需要手动释放刚才锁住的 low_mutex
// (在实际C++项目中,通常建议使用 std::lock_guard 来自动处理这个,这里为了演示手动调用 unlock)
low_level_mutex.unlock();
}
}
int main()
{
test_correct_order();
test_wrong_order();
return 0;
}
// ==========================================
// 全局锁定义
// ==========================================
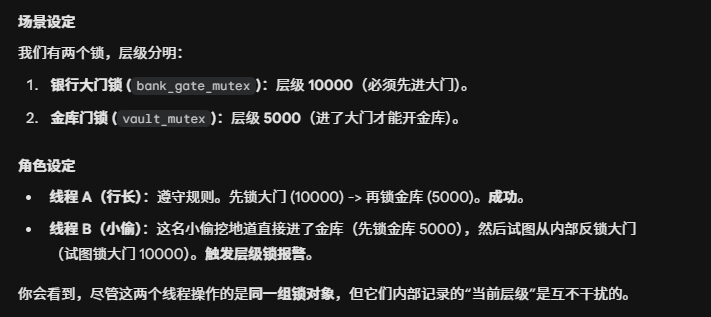
hierarchical_mutex m_bank_gate(10000); // 银行大门(高层级)
hierarchical_mutex m_vault(5000); // 内部金库(低层级)
// 辅助打印函数(加锁防止cout乱序)
std::mutex cout_mutex;
void print_status(const std::string& name, const std::string& msg) {
std::lock_guard<std::mutex> lk(cout_mutex);
std::cout << "[" << name << "] " << msg
<< " | 当前层级值: " << hierarchical_mutex::get_current_thread_hierarchy_value()
<< std::endl;
}
cpp
// ==========================================
// 线程 A:行长 (遵守规则)
// ==========================================
void manager_thread() {
    std::string name = "行长 A";
    try {
        print_status(name, "上班了,准备开大门(10000)...");
        m_bank_gate.lock(); // 1. 先锁高层级
        print_status(name, "大门已锁好,准备开金库(5000)...");

        // 模拟一点业务延迟,让大家有机会并发
        std::this_thread::sleep_for(std::chrono::milliseconds(100));

        m_vault.lock();     // 2. 再锁低层级
        print_status(name, "金库已打开!正在清点钞票...");

        // 这里的层级检查逻辑:
        // 当前是 10000,目标是 5000 -> OK -> 当前变为 5000

        m_vault.unlock();   // 解锁金库,层级恢复为 10000
        print_status(name, "金库关闭。");

        m_bank_gate.unlock(); // 解锁大门,层级恢复为 ULONG_MAX
        print_status(name, "下班回家。");
    }
    catch (const std::exception& e) {
        print_status(name, std::string("发生异常: ") + e.what());
    }
}

// ==========================================
// 线程 B:小偷 (违反规则)
// ==========================================
void thief_thread() {
    std::string name = "小偷 B";
    // 让行长先跑一步,演示并发互不干扰
    std::this_thread::sleep_for(std::chrono::milliseconds(50));

    try {
        print_status(name, "潜入中... 试图直接控制金库(5000)...");
        m_vault.lock(); // 1. 先锁低层级
        print_status(name, "成功控制金库!现在想反锁大门(10000)...");

        // 此时,线程 B 的 thread_local 变量值为 5000。

        // 2. 试图去锁高层级
        // 检查:当前(5000) <= 目标(10000) ? 是!
        // 结果:抛出异常
        m_bank_gate.lock();

        // 下面永远不会执行
        print_status(name, "大门锁上了 (不可能发生)");
        m_bank_gate.unlock();
        m_vault.unlock();
    }
    catch (const std::exception& e) {
        // 捕获异常
        std::lock_guard<std::mutex> lk(cout_mutex);
        std::cout << "\n>>> [" << name << "] !!!被抓住了!!! <<<" << std::endl;
        std::cout << "    错误原因: " << e.what() << std::endl;
        std::cout << "    (证明:即使是不同的线程,层级锁也能精准拦截逻辑错误)\n" << std::endl;

        // 记得释放金库锁,否则行长下次来就进不去了(虽然本例中程序结束了)
        m_vault.unlock();
    }
}

int main() {
    std::thread t1(manager_thread);
    std::thread t2(thief_thread);

    t1.join();
    t2.join();

    return 0;
}
3.2.7 在不同作用域之间转移互斥归属权
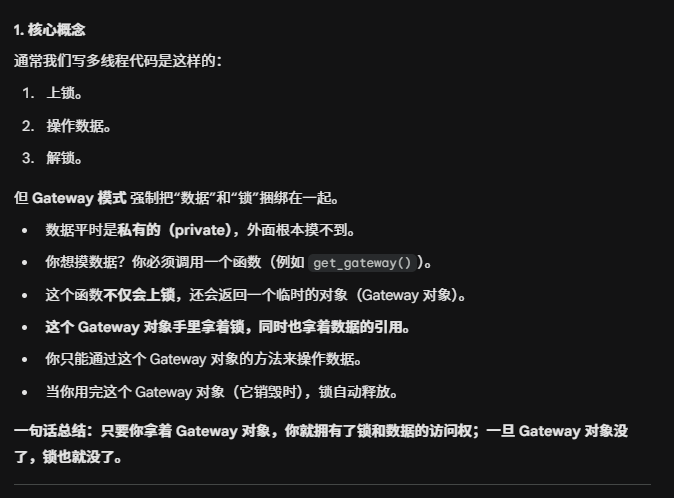
通道(Gateway)类
cpp
#include <iostream>
#include <vector>
#include <mutex>
#include <thread>
class DataManager
{
private:
std::vector<int> _data; // 数据是私有的,外部完全不可见
std::mutex _mutex; // 锁也是私有的
public:
// 这就是文中所说的 "通道(Gateway)类"
class Gateway
{
// 【关键点1】锁是它的数据成员
std::unique_lock<std::mutex> _guard;
// 持有数据的引用,以便操作
std::vector<int> &_ref_to_data;
public:
// 构造时:接收锁的所有权(上锁),并接收数据引用
Gateway(std::mutex &m, std::vector<int> &d)
: _guard(m), _ref_to_data(d)
{
std::cout << " [Gateway] 通道已建立,已上锁。\n";
}
// 默认生成移动构造函数(因为 unique_lock 可移动)
// 这满足了文中"通道对象几乎是可移动的"的要求
Gateway(Gateway &&) = default;
// 【关键点2】必须通过 Gateway 的成员函数才能访问数据
void add(int value)
{
std::cout << " [Gateway] 操作数据: 添加 " << value << "\n";
_ref_to_data.push_back(value);
}
void print()
{
std::cout << " [Gateway] 当前数据: ";
for (int i : _ref_to_data)
std::cout << i << " ";
std::cout << "\n";
}
// 析构时:_guard 自动销毁,锁随之释放
~Gateway()
{
std::cout << " [Gateway] 通道销毁,锁释放。\n";
}
};
// 外部获取 Gateway 的唯一入口
Gateway get_access()
{
// 返回 Gateway 实例。
// 这里的 return 会触发移动语义,把锁的归属权转移给调用者。
return Gateway(_mutex, _data);
}
};
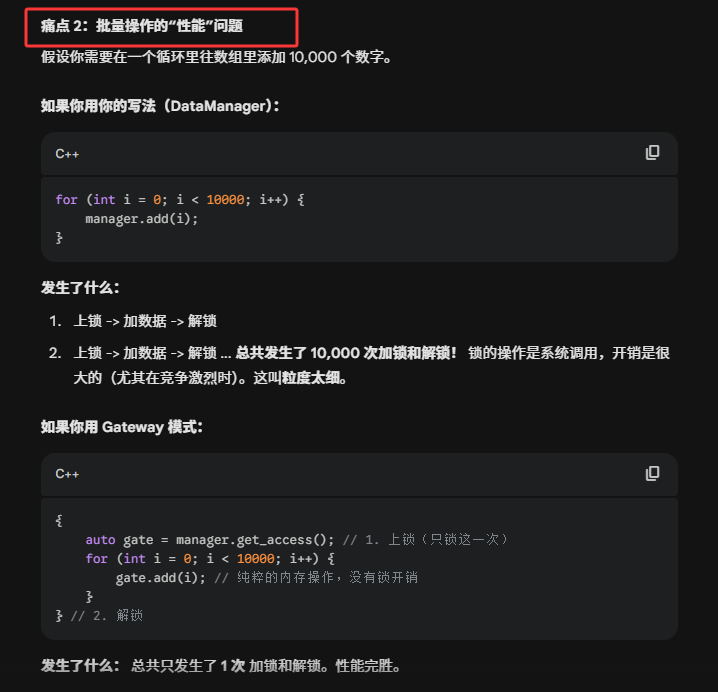
void worker(DataManager &manager, int id)
{
// 1. 获取通道对象(此时已经上锁)
// 这一步对应文中"需先取得通道类的实例...再借它执行加锁操作"
DataManager::Gateway gate = manager.get_access();
// 2. 通过通道操作数据
gate.add(id);
gate.print();
// 3. 函数结束,gate 销毁,自动解锁
}
int main()
{
DataManager my_manager;
std::thread t1(worker, std::ref(my_manager), 100);
std::thread t2(worker, std::ref(my_manager), 200);
t1.join();
t2.join();
return 0;
}
cpp
class DataManager
{
private:
    std::vector<int> _data; // 数据是私有的,外部完全不可见
    std::mutex _mutex;      // 锁也是私有的

public:
    void add(int value)
    {
        std::lock_guard<std::mutex> lock(_mutex);
        _data.push_back(value);
    }

    void print()
    {
        std::cout << "  [Gateway] 当前数据: ";
        for (int i : _data)
            std::cout << i << " ";
        std::cout << "\n";
    }
};
gateway设计的优势
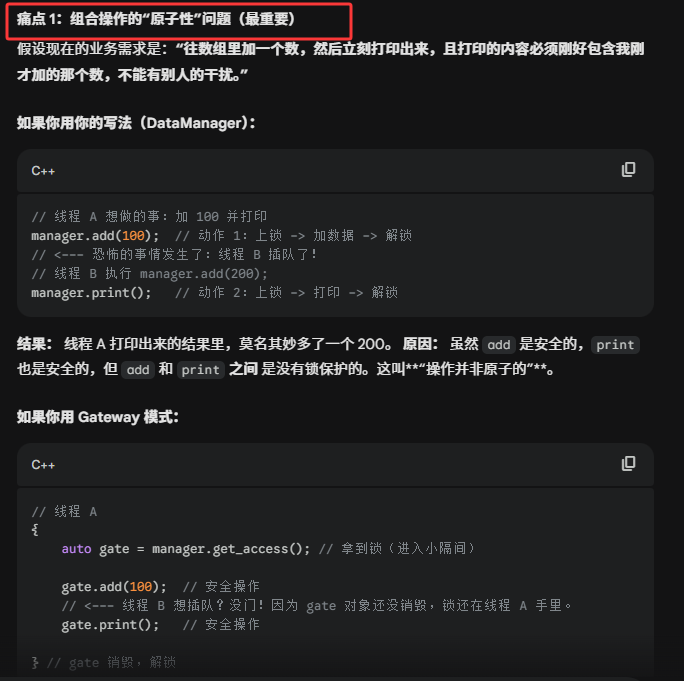
优势: Gateway 把多个步骤打包成了一个**"事务(Transaction)"**。只要 Gateway 对象还在,没人能打断你的一系列操作。
实现线程安全的其他手段
初始化过程中保护
- one_flag,call_once
- 利用static变量在C++11中的新规定
保护很少需要更新的数据
- 使用读写锁