从零构建Vue项目的完全指南:手把手打造现代化前端工程
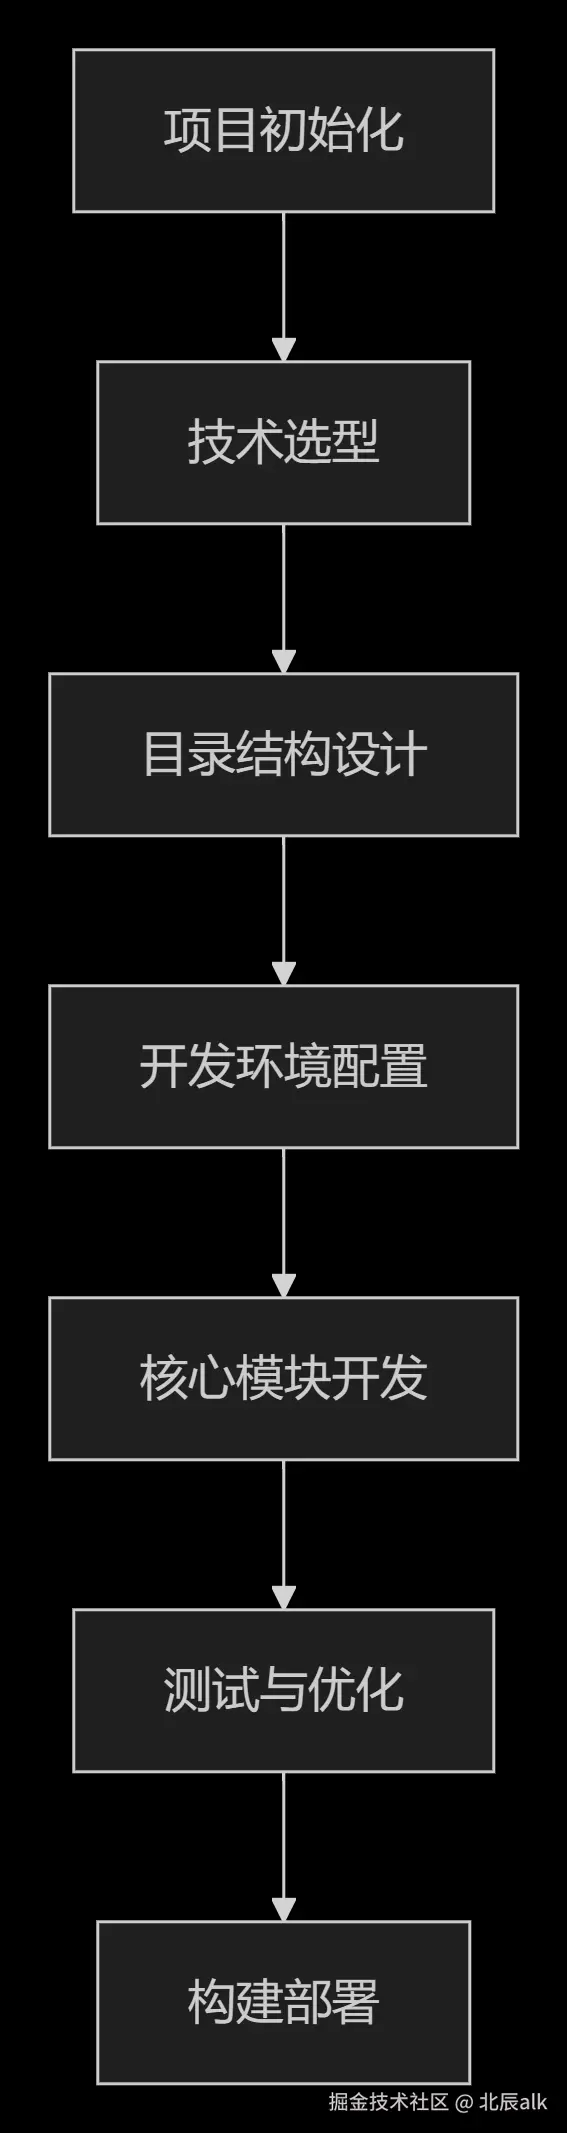
一、项目构建整体流程图
让我们先看看完整的项目构建流程:
二、详细构建步骤
步骤1:环境准备与项目初始化
首先确保你的开发环境已准备好:
perl
# 检查Node.js版本(建议18+)
node -v

# 检查npm版本
npm -v

# 安装Vue CLI(如果还没有)
npm install -g @vue/cli

# 创建新项目
vue create my-vue-project

# 选择配置(推荐手动选择)
? Please pick a preset:
  Default ([Vue 2] babel, eslint)
  Default (Vue 3) ([Vue 3] babel, eslint)
❯ Manually select features

# 选择需要的功能
? Check the features needed for your project:
 ◉ Babel
 ◉ TypeScript
 ◉ Progressive Web App (PWA) Support
 ◉ Router
 ◉ Vuex
 ◉ CSS Pre-processors
❯◉ Linter / Formatter
 ◯ Unit Testing
 ◯ E2E Testing
步骤2:项目目录结构设计
一个良好的目录结构是项目成功的基础。这是我推荐的目录结构:
csharp
my-vue-project/
├── public/                    # 静态资源
│   ├── index.html
│   ├── favicon.ico
│   └── robots.txt
├── src/
│   ├── api/                  # API接口管理
│   │   ├── modules/         # 按模块划分的API
│   │   ├── index.ts         # API统一导出
│   │   └── request.ts       # 请求封装
│   ├── assets/              # 静态资源
│   │   ├── images/
│   │   ├── styles/
│   │   └── fonts/
│   ├── components/          # 公共组件
│   │   ├── common/         # 全局通用组件
│   │   ├── business/       # 业务组件
│   │   └── index.ts        # 组件自动注册
│   ├── composables/        # 组合式函数
│   │   ├── useFetch.ts
│   │   ├── useForm.ts
│   │   └── index.ts
│   ├── directives/         # 自定义指令
│   │   ├── permission.ts
│   │   └── index.ts
│   ├── layouts/            # 布局组件
│   │   ├── DefaultLayout.vue
│   │   └── AuthLayout.vue
│   ├── router/             # 路由配置
│   │   ├── modules/       # 路由模块
│   │   ├── index.ts
│   │   └── guard.ts      # 路由守卫
│   ├── store/              # Vuex/Pinia状态管理
│   │   ├── modules/       # 模块化store
│   │   └── index.ts
│   ├── utils/              # 工具函数
│   │   ├── auth.ts        # 权限相关
│   │   ├── validate.ts    # 验证函数
│   │   └── index.ts
│   ├── views/              # 页面组件
│   │   ├── Home/
│   │   ├── User/
│   │   └── About/
│   ├── types/              # TypeScript类型定义
│   │   ├── api.d.ts
│   │   ├── global.d.ts
│   │   └── index.d.ts
│   ├── App.vue
│   └── main.ts
├── tests/                   # 测试文件
├── .env.*                   # 环境变量
├── vite.config.ts          # Vite配置
├── tsconfig.json           # TypeScript配置
└── package.json
步骤3:核心配置详解
1. 配置Vite(vite.config.ts)
php
import { defineConfig } from 'vite'
import vue from '@vitejs/plugin-vue'
import path from 'path'

export default defineConfig({
  plugins: [vue()],
  resolve: {
    alias: {
      '@': path.resolve(__dirname, 'src'),
      '@components': path.resolve(__dirname, 'src/components'),
      '@views': path.resolve(__dirname, 'src/views'),
    },
  },
  server: {
    host: '0.0.0.0',
    port: 3000,
    proxy: {
      '/api': {
        target: 'http://localhost:8080',
        changeOrigin: true,
        rewrite: (path) => path.replace(/^/api/, ''),
      },
    },
  },
  css: {
    preprocessorOptions: {
      scss: {
        additionalData: `@import "@/assets/styles/variables.scss";`,
      },
    },
  },
})
2. 路由配置(router/index.ts)
typescript
import { createRouter, createWebHistory } from 'vue-router'
import type { RouteRecordRaw } from 'vue-router'

const routes: RouteRecordRaw[] = [
  {
    path: '/',
    name: 'Home',
    component: () => import('@views/Home/Home.vue'),
    meta: {
      title: '首页',
      requiresAuth: true,
    },
  },
  {
    path: '/login',
    name: 'Login',
    component: () => import('@views/Login/Login.vue'),
    meta: {
      title: '登录',
    },
  },
  {
    path: '/user/:id',
    name: 'User',
    component: () => import('@views/User/User.vue'),
    props: true,
  },
]

const router = createRouter({
  history: createWebHistory(),
  routes,
})

// 路由守卫
router.beforeEach((to, from, next) => {
  document.title = to.meta.title as string || 'Vue项目'

  // 检查是否需要登录
  if (to.meta.requiresAuth && !localStorage.getItem('token')) {
    next('/login')
  } else {
    next()
  }
})

export default router
3. 状态管理(使用Pinia)
typescript
// store/user.ts
import { defineStore } from 'pinia'

interface UserState {
  userInfo: {
    name: string
    avatar: string
    roles: string[]
  } | null
}

export const useUserStore = defineStore('user', {
  state: (): UserState => ({
    userInfo: null,
  }),
  actions: {
    async login(credentials: { username: string; password: string }) {
      // 登录逻辑
      const response = await api.login(credentials)
      this.userInfo = response.data
      localStorage.setItem('token', response.token)
    },
    logout() {
      this.userInfo = null
      localStorage.removeItem('token')
    },
  },
  getters: {
    isLoggedIn: (state) => !!state.userInfo,
    hasRole: (state) => (role: string) =>
      state.userInfo?.roles.includes(role) || false,
  },
})
步骤4:核心工具库和插件选择
这是我在项目中推荐使用的库:
perl
{
  "dependencies": {
    "vue": "^3.3.0",
    "vue-router": "^4.2.0",
    "pinia": "^2.1.0",
    "axios": "^1.4.0",
    "element-plus": "^2.3.0",
    "lodash-es": "^4.17.21",
    "dayjs": "^1.11.0",
    "vxe-table": "^4.0.0",
    "vue-i18n": "^9.0.0"
  },
  "devDependencies": {
    "@vitejs/plugin-vue": "^4.2.0",
    "@types/node": "^20.0.0",
    "sass": "^1.62.0",
    "eslint": "^8.0.0",
    "prettier": "^3.0.0",
    "husky": "^8.0.0",
    "commitlint": "^17.0.0",
    "vitest": "^0.30.0",
    "unplugin-auto-import": "^0.16.0",
    "unplugin-vue-components": "^0.25.0"
  }
}
步骤5:实用的组件示例
1. 全局请求封装
typescript
// src/api/request.ts
import axios from 'axios'
import type { AxiosRequestConfig, AxiosResponse } from 'axios'
import { ElMessage } from 'element-plus'

const service = axios.create({
  baseURL: import.meta.env.VITE_API_BASE_URL,
  timeout: 10000,
})

// 请求拦截器
service.interceptors.request.use(
  (config) => {
    const token = localStorage.getItem('token')
    if (token) {
      config.headers.Authorization = `Bearer ${token}`
    }
    return config
  },
  (error) => {
    return Promise.reject(error)
  }
)

// 响应拦截器
service.interceptors.response.use(
  (response: AxiosResponse) => {
    const { code, data, message } = response.data

    if (code === 200) {
      return data
    } else {
      ElMessage.error(message || '请求失败')
      return Promise.reject(new Error(message))
    }
  },
  (error) => {
    if (error.response?.status === 401) {
      // 未授权,跳转到登录页
      localStorage.removeItem('token')
      window.location.href = '/login'
    }
    ElMessage.error(error.message || '网络错误')
    return Promise.reject(error)
  }
)

export default service
2. 自动导入组件配置
javascript
// vite.config.ts 补充配置
import AutoImport from 'unplugin-auto-import/vite'
import Components from 'unplugin-vue-components/vite'
import { ElementPlusResolver } from 'unplugin-vue-components/resolvers'

export default defineConfig({
  plugins: [
    // 自动导入API
    AutoImport({
      imports: ['vue', 'vue-router', 'pinia'],
      dts: 'src/types/auto-imports.d.ts',
      resolvers: [ElementPlusResolver()],
    }),
    // 自动导入组件
    Components({
      dts: 'src/types/components.d.ts',
      resolvers: [ElementPlusResolver()],
      dirs: ['src/components'],
    }),
  ],
})
3. 实用的Vue 3组合式函数
typescript
// src/composables/useForm.ts
import { ref, reactive, computed } from 'vue'
import type { Ref } from 'vue'

export function useForm<T extends object>(initialData: T) {
  const formData = reactive({ ...initialData }) as T
  const errors = reactive<Record<string, string>>({})
  const isSubmitting = ref(false)

  const validate = async (): Promise<boolean> => {
    // 这里可以集成具体的验证逻辑
    return true
  }

  const submit = async (submitFn: (data: T) => Promise<any>) => {
    if (!(await validate())) return

    isSubmitting.value = true
    try {
      const result = await submitFn(formData)
      return result
    } catch (error) {
      throw error
    } finally {
      isSubmitting.value = false
    }
  }

  const reset = () => {
    Object.assign(formData, initialData)
    Object.keys(errors).forEach(key => {
      errors[key] = ''
    })
  }

  return {
    formData,
    errors,
    isSubmitting: computed(() => isSubmitting.value),
    validate,
    submit,
    reset,
  }
}
步骤6:开发规范与最佳实践
1. 代码提交规范
bash
# 安装Git提交钩子
npx husky install
npm install -D @commitlint/config-conventional @commitlint/cli

# 创建commitlint配置
echo "module.exports = { extends: ['@commitlint/config-conventional'] }" > .commitlintrc.js

# 创建提交信息规范
# feat: 新功能
# fix: 修复bug
# docs: 文档更新
# style: 代码格式
# refactor: 重构
# test: 测试
# chore: 构建过程或辅助工具的变动
2. 环境变量配置
ini
# .env.development
VITE_APP_TITLE=开发环境
VITE_API_BASE_URL=/api
VITE_USE_MOCK=true

# .env.production
VITE_APP_TITLE=生产环境
VITE_API_BASE_URL=https://api.example.com
VITE_USE_MOCK=false
步骤7:性能优化建议
typescript
// 路由懒加载优化
const routes = [
  {
    path: '/dashboard',
    component: () => import(/* webpackChunkName: "dashboard" */ '@/views/Dashboard.vue'),
  },
  {
    path: '/settings',
    component: () => import(/* webpackChunkName: "settings" */ '@/views/Settings.vue'),
  },
]

// 图片懒加载指令
// src/directives/lazyLoad.ts
import type { Directive } from 'vue'

const lazyLoad: Directive = {
  mounted(el, binding) {
    const observer = new IntersectionObserver((entries) => {
      entries.forEach(entry => {
        if (entry.isIntersecting) {
          el.src = binding.value
          observer.unobserve(el)
        }
      })
    })
    observer.observe(el)
  },
}
三、项目启动和常用命令
json
{
  "scripts": {
    "dev": "vite",
    "build": "vue-tsc && vite build",
    "preview": "vite preview",
    "lint": "eslint . --ext .vue,.js,.jsx,.cjs,.mjs,.ts,.tsx,.cts,.mts --fix",
    "format": "prettier --write src/",
    "prepare": "husky install",
    "test": "vitest",
    "test:coverage": "vitest --coverage"
  }
}
四、总结与建议
通过以上步骤,你已经拥有了一个现代化、可维护的Vue项目基础。记住几个关键点:
-
- 保持一致性 - 无论是命名规范还是代码风格
-
- 模块化设计 - 功能解耦,便于维护和测试
-
- 类型安全 - 充分利用TypeScript的优势
-
- 自动化 - 尽可能自动化重复工作
-
- 渐进式 - 不要一开始就追求完美,根据项目需求逐步完善
项目代码就像一座大厦,良好的基础决定了它的稳固性和可扩展性。希望这篇指南能帮助你在Vue项目开发中少走弯路!