Qwen3-VL
Qwen3-VL是通义千问系列的最新力作,代表了当前大模型技术的巅峰成就。这一代在架构设计、性能表现和应用场景上实现了全方位突破,为从边缘计算到云端部署提供了完整的解决方案。
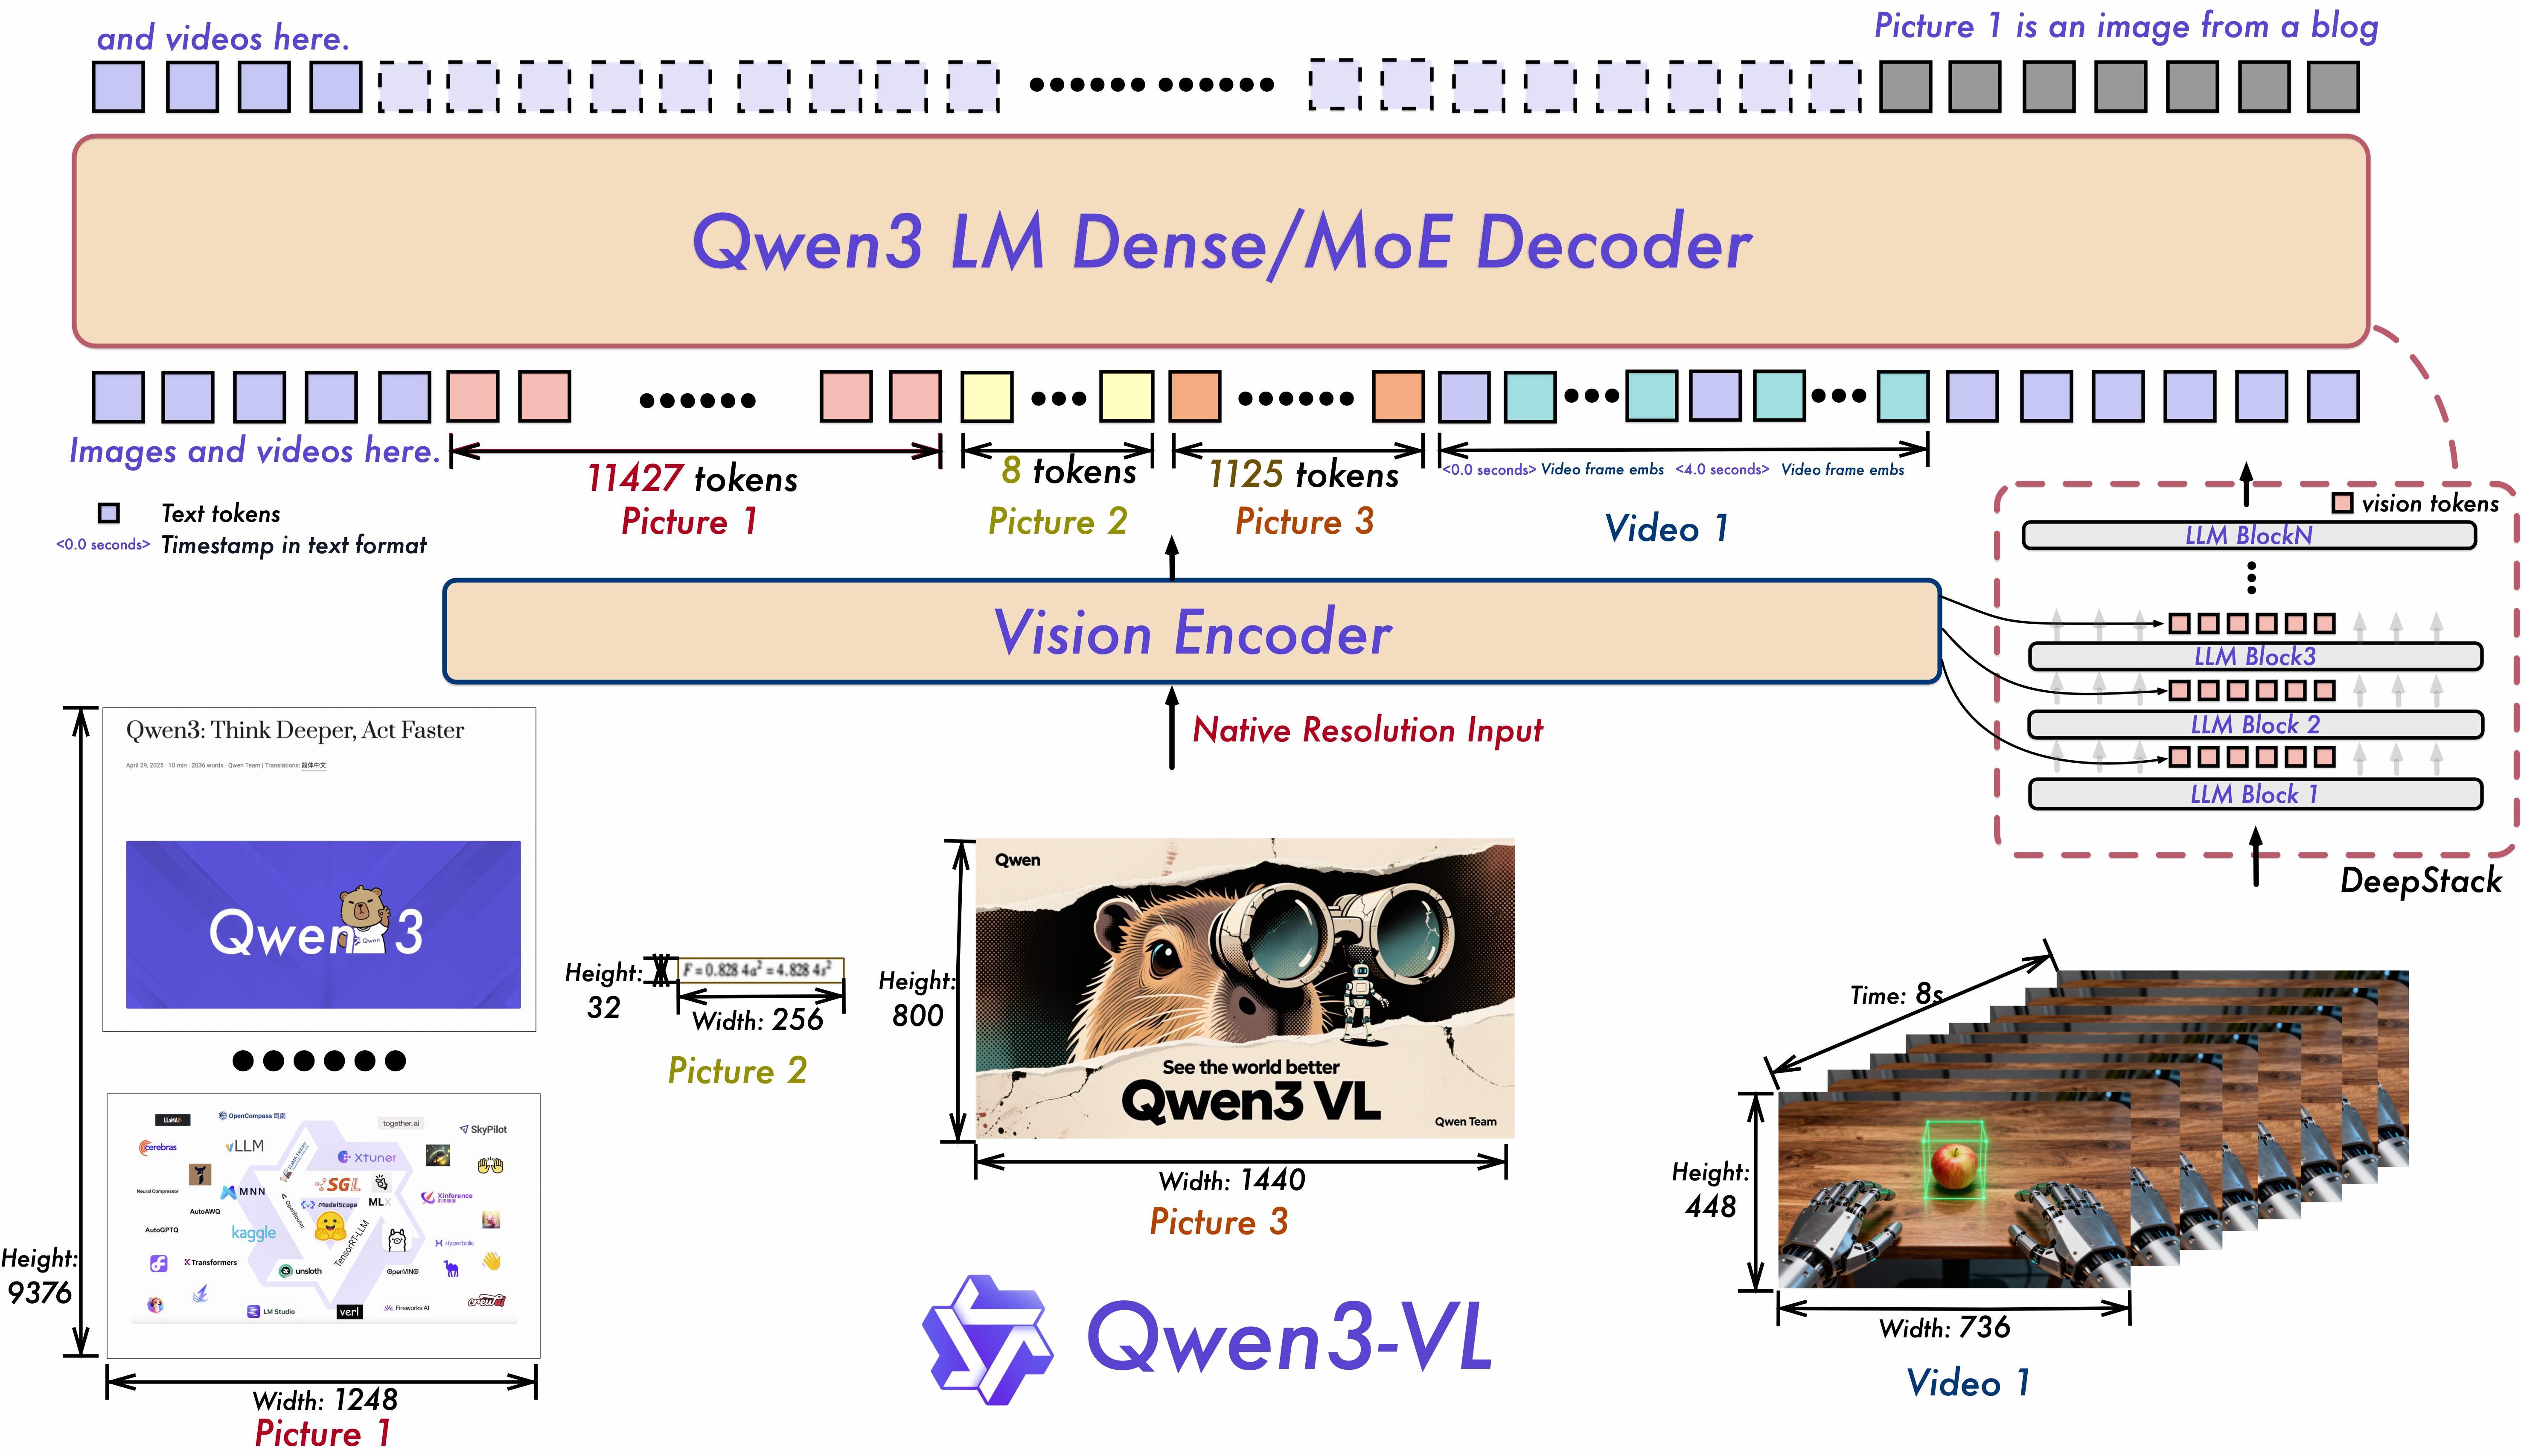
核心架构创新
Qwen3系列采用领先的密集型与混合专家(MoE)双架构设计 ,满足不同规模部署需求。提供Instruct版本 (专注指令跟随)和Thinking版本 (强化推理能力)两种模式,实现灵活的按需配置,让模型能力与应用场景精准匹配。
全维度能力升级
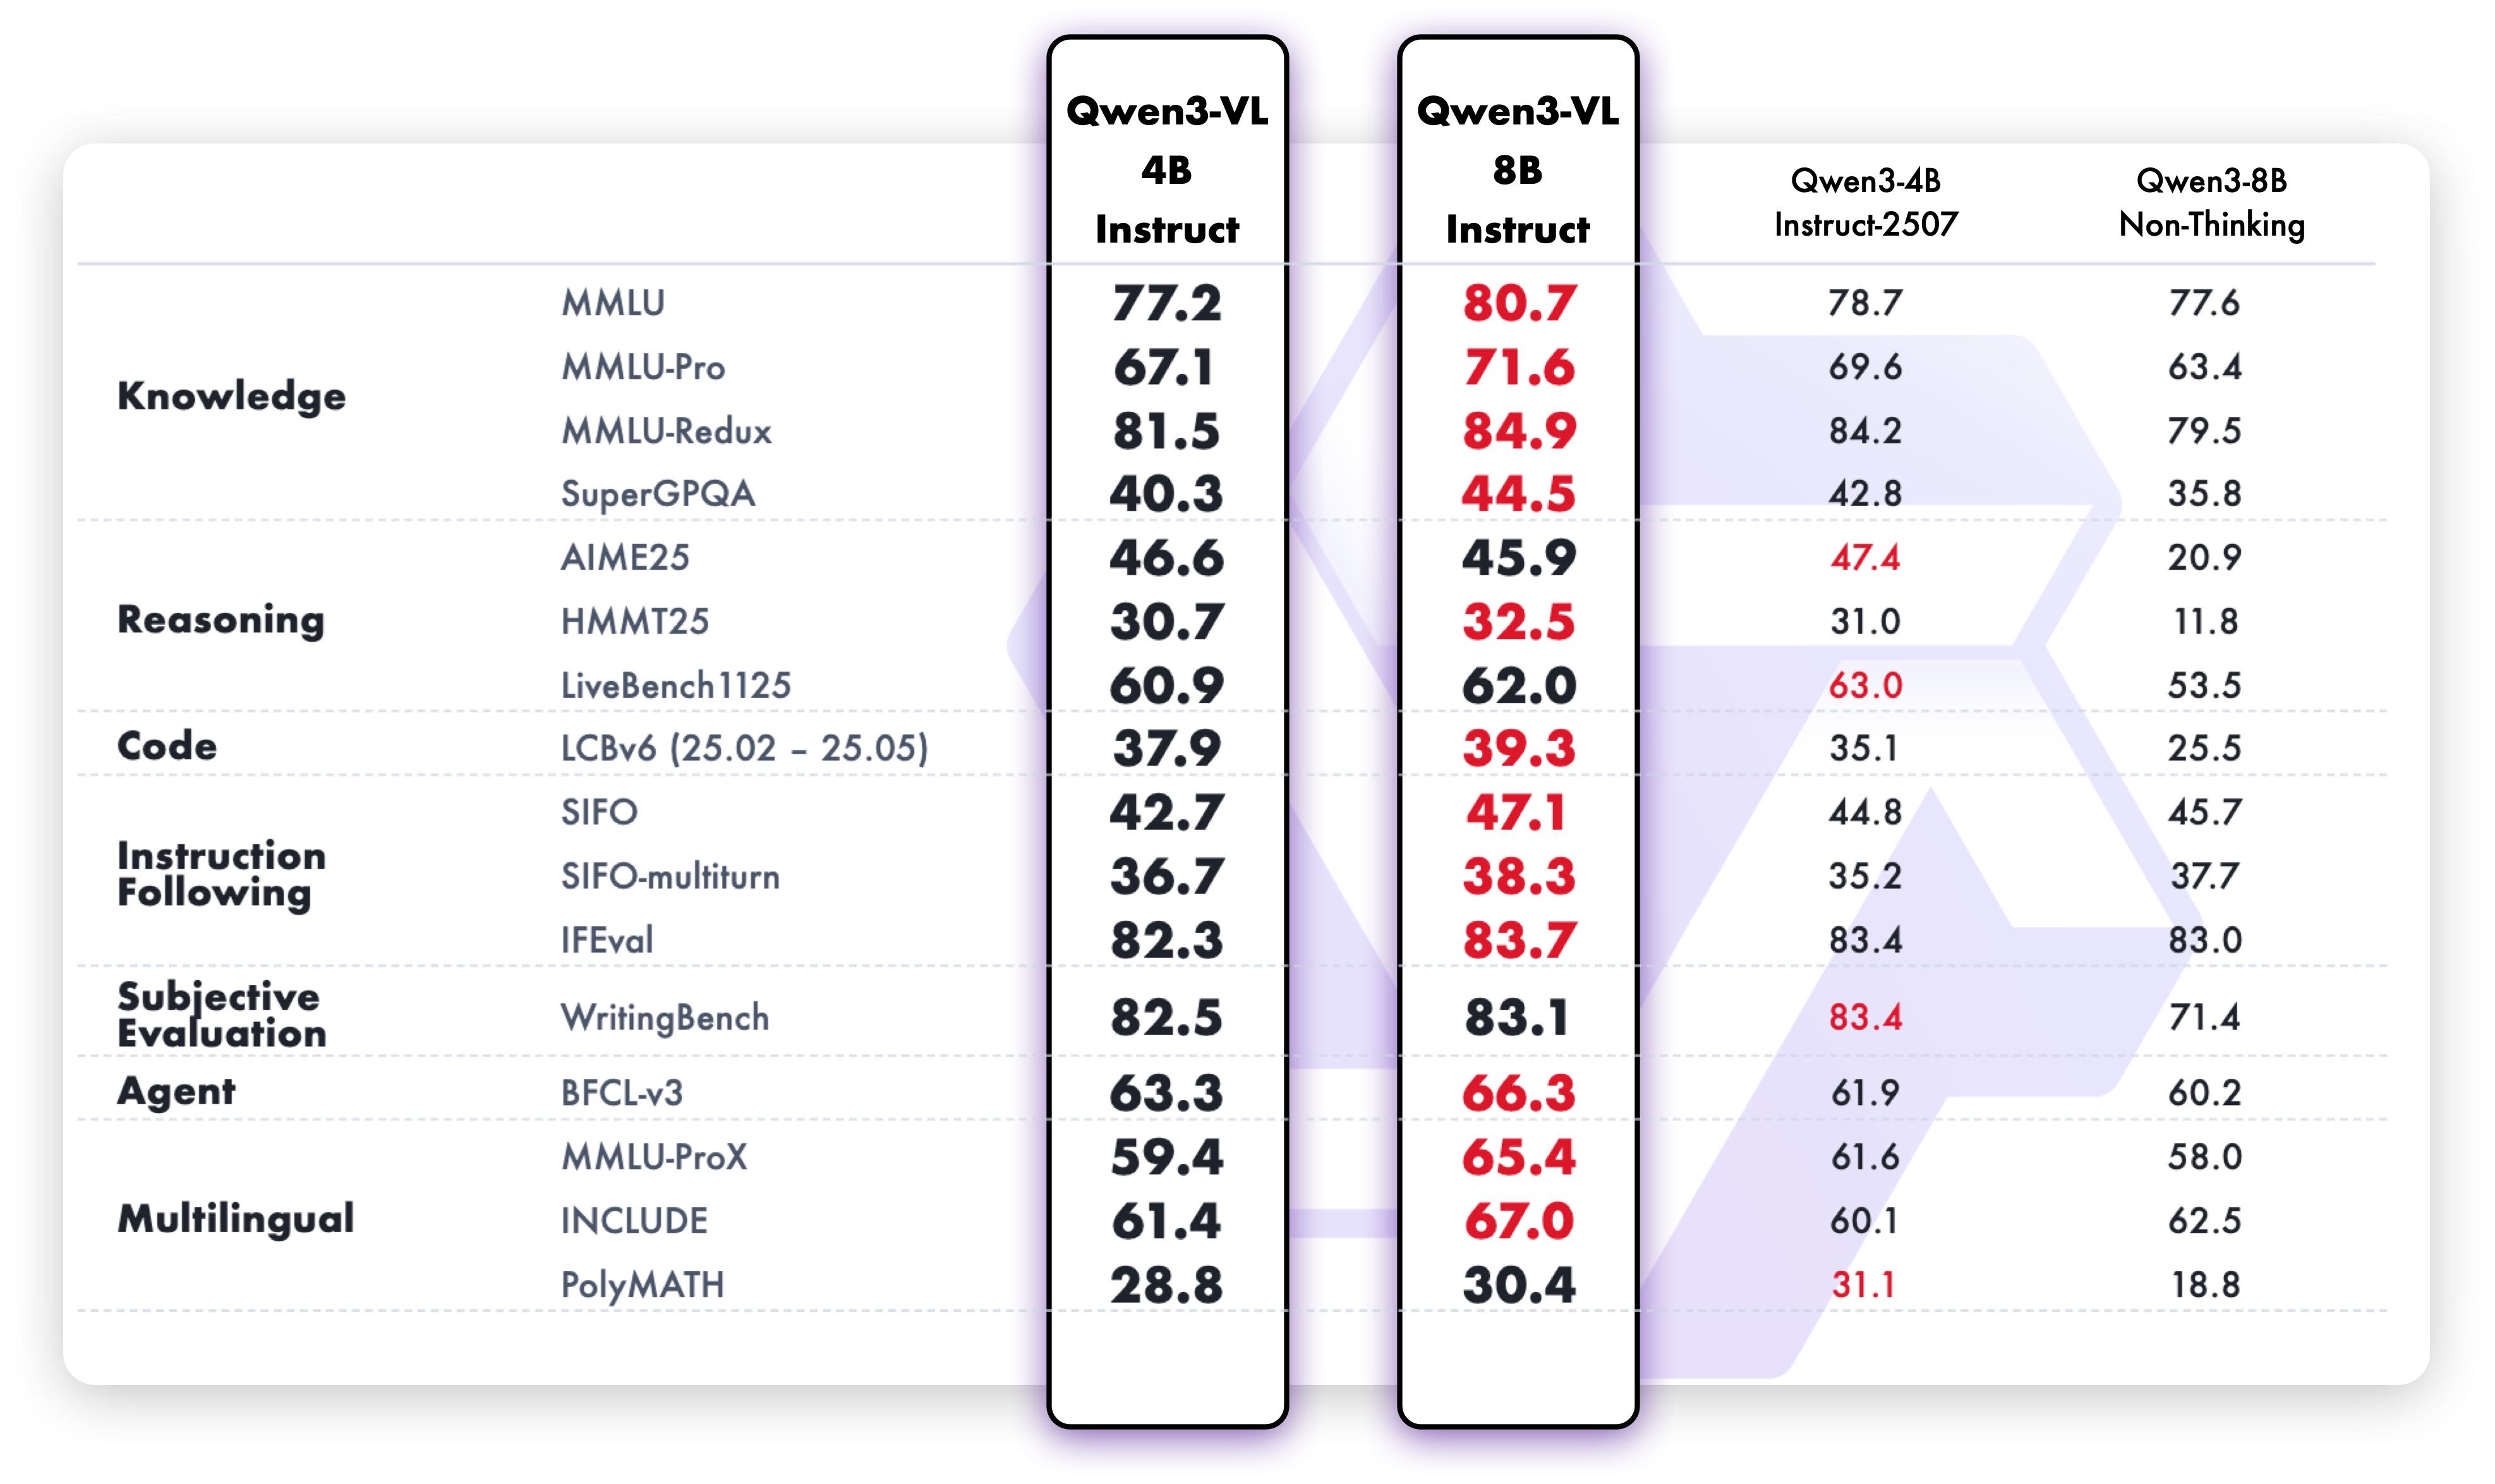
- 文本理解与生成:达到与纯语言模型相当的文本处理能力,实现无损、统一的语义理解
- 上下文处理:原生支持256K上下文长度,可扩展至1M token,轻松处理长文档、书籍级内容
- 多模态融合:深度整合视觉与语言能力,支持图像、视频等多模态输入的精准理解和生成
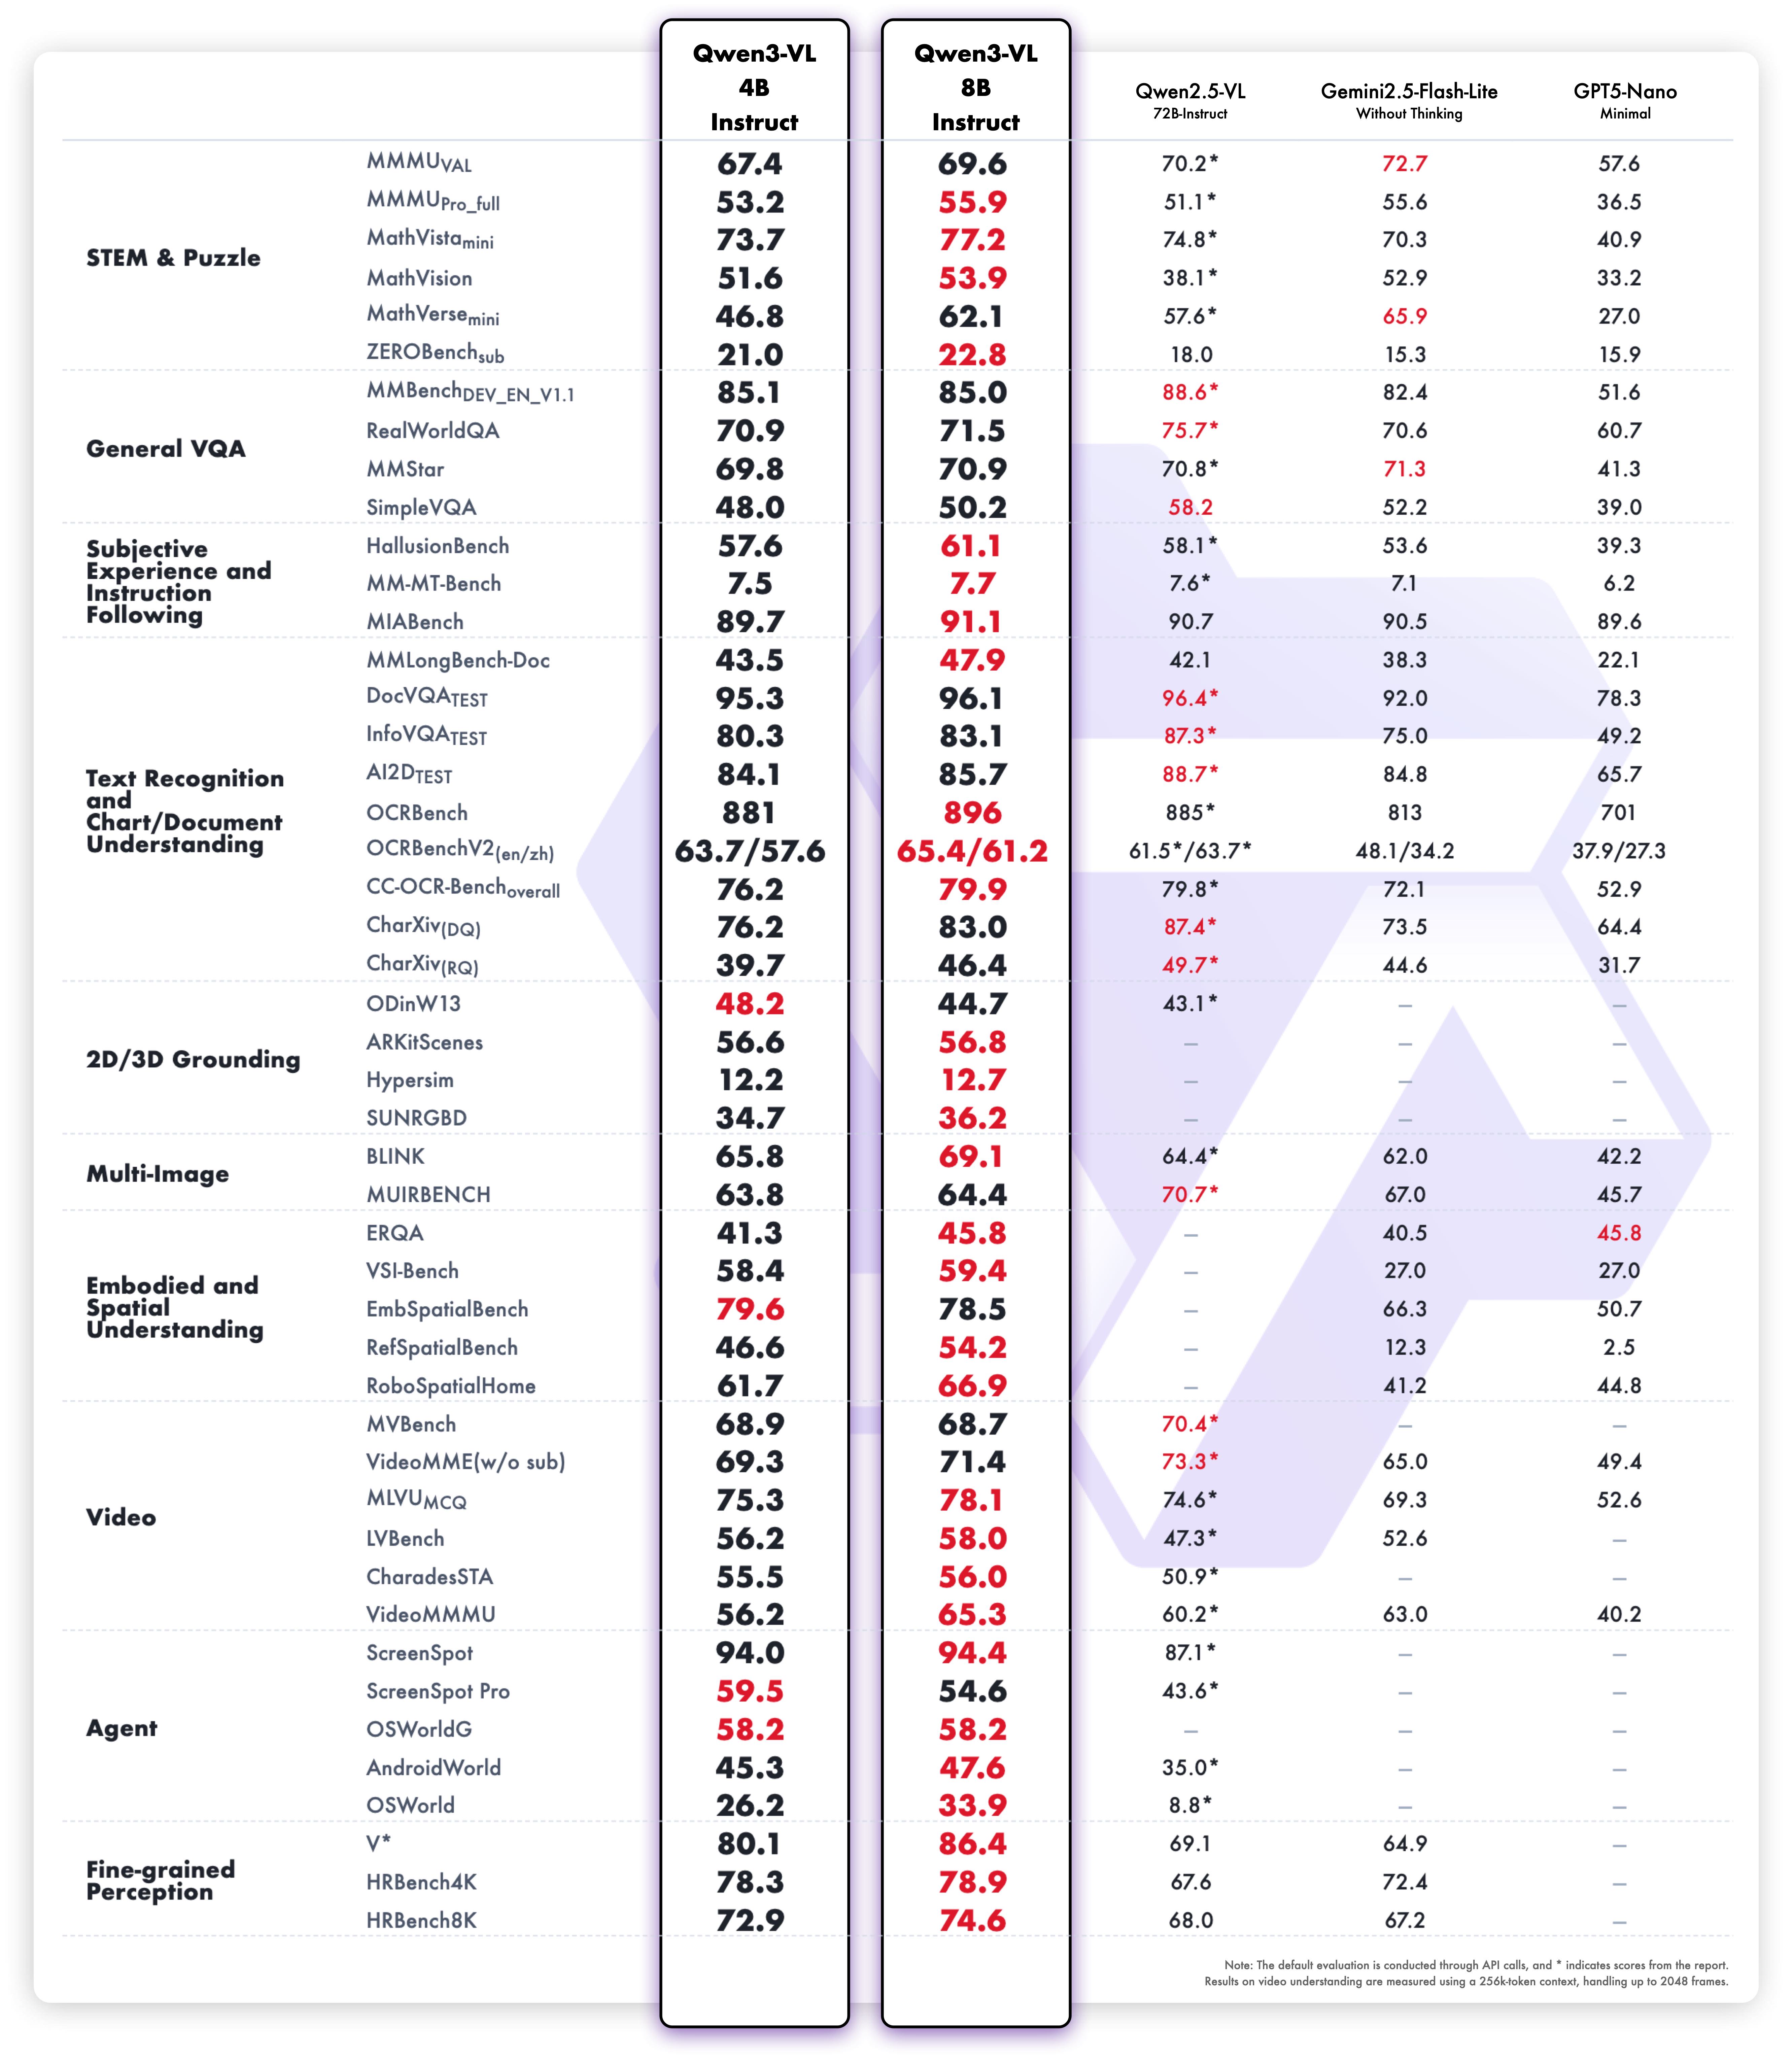
- 专业领域表现 :在STEM、数学等复杂领域展现出卓越的因果分析和逻辑推理能力
革命性技术突破
- 空间智能:具备高级空间感知能力,可判断物体位置、视角关系和遮挡状态,为3D基础模型和具身AI提供强大支撑
- 视觉代理能力:能够操作PC/移动设备GUI界面,识别界面元素、理解功能逻辑、调用工具完成任务
- 代码生成:直接从视觉内容生成Draw.io图表、HTML/CSS/JS代码,实现视觉到功能的无缝转换
- 视频理解 :支持数小时长视频的完整理解和秒级索引,具备精确的时间戳定位能力
全球化与实用性
- 多语言OCR:支持32种语言的文本识别,在低光、模糊等复杂条件下表现稳健
- 广泛识别能力:经过更全面、更高质量的预训练,能够识别名人、动漫、产品、地标、动植物等海量对象
- 文档处理:优化长文档结构解析能力,更好地处理罕见字符、古代文字和专业术语
应用场景拓展
Qwen3系列不仅适用于传统的文本生成、对话交互等场景,更在智能代理、内容创作、数据分析、教育辅助、科研支持、企业服务等领域展现出巨大潜力。其强大的空间推理和视觉理解能力,为机器人、AR/VR、自动驾驶等前沿领域提供了核心技术支撑。
Qwen3代表了大模型技术从"能用"到"好用"的关键跨越,通过全面的能力升级和架构优化,为构建真正智能的AI系统奠定了坚实基础。无论是开发者、企业用户还是终端消费者,都能在这一系列中找到适合自身需求的强大工具。
快速安装
新建虚拟环境,执行命令:
clike
conda create --name=myqwen python=3.12
conda activate myqwen
安装pytorch,我选用的是2.8,执行命令:
clike
pip install torch==2.8.0 torchvision==0.23.0 torchaudio==2.8.0 --index-url https://download.pytorch.org/whl/cu128安装库文件:
csharp
 pip install accelerate
 pip install av
 pip install transformers==4.57.0
推理图片
csharp
import glob

import torch
from tqdm import tqdm
from transformers import Qwen3VLForConditionalGeneration, AutoProcessor


# 加载模型和处理器,必须添加 trust_remote_code=True
model = Qwen3VLForConditionalGeneration.from_pretrained(
    "Qwen/Qwen3-VL-4B-Instruct",
    dtype="auto",  # 修正 dtype 参数为 torch_dtype
    device_map="auto",
    trust_remote_code=True  # 必须添加此参数
)
text="""
描述这张图片

"""
processor = AutoProcessor.from_pretrained("Qwen/Qwen3-VL-4B-Instruct", trust_remote_code=True)  # 必须添加此参数

imag_path_list=glob.glob("./predict6/*.jpg")
for imag_path in tqdm(imag_path_list):
    # 准备消息
    messages = [
        {
            "role": "user",
            "content": [
                {
                    "type": "image",
                    "image": imag_path,
                },
                {"type": "text", "text": text},
            ],
        }
    ]

    print(imag_path)
    inputs = processor.apply_chat_template(
        messages,
        tokenize=True,
        add_generation_prompt=True,
        return_dict=True,
        return_tensors="pt"
    )

    # 关键步骤:将输入数据移动到模型所在的设备
    device = next(model.parameters()).device
    inputs = {k: v.to(device) if isinstance(v, torch.Tensor) else v for k, v in inputs.items()}

    # 推理:生成输出
    with torch.no_grad():  # 使用 no_grad 减少内存消耗
        generated_ids = model.generate(
            **inputs,
            max_new_tokens=1024,
            do_sample=False
        )

    # 修剪输入部分,只保留生成的文本
    generated_ids_trimmed = generated_ids[:, inputs['input_ids'].shape[1]:]

    # 解码输出
    output_text = processor.batch_decode(
        generated_ids_trimmed,
        skip_special_tokens=True,
        clean_up_tokenization_spaces=False
    )
    print(output_text[0].strip())
使用Falsh_Attention加速
安装方法:https://blog.csdn.net/hhhhhhhhhhwwwwwwwwww/article/details/155629435?spm=1001.2014.3001.5501
代码:
clike
from transformers import Qwen3VLForConditionalGeneration, AutoProcessor
import torch

# Fix 1: Use dtype instead of torch_dtype (deprecated)
model = Qwen3VLForConditionalGeneration.from_pretrained(
    "Qwen/Qwen3-VL-4B-Instruct",
    dtype=torch.bfloat16,  # Use dtype instead of torch_dtype
    device_map="auto",
    attn_implementation="flash_attention_2",
    trust_remote_code=True
)

processor = AutoProcessor.from_pretrained("Qwen/Qwen3-VL-4B-Instruct")

messages = [
    {
        "role": "user",
        "content": [
            {
                "type": "image",
                "image": "https://qianwen-res.oss-cn-beijing.aliyuncs.com/Qwen-VL/assets/demo.jpeg",
                # Remove extra spaces
            },
            {"type": "text", "text": "Describe this image."},
        ],
    }
]

inputs = processor.apply_chat_template(
    messages,
    tokenize=True,
    add_generation_prompt=True,
    return_dict=True,
    return_tensors="pt"
)

# Fix 2: Move inputs to the same device as the model
inputs = {k: v.to(model.device) for k, v in
          inputs.items()}  # Ensures inputs and model tensors reside on the same device [[2]]

# Inference: Generation of the output
with torch.no_grad():  # Optional but recommended for inference to save memory
    generated_ids = model.generate(**inputs, max_new_tokens=1024)

generated_ids_trimmed = [
    out_ids[len(in_ids):] for in_ids, out_ids in zip(inputs["input_ids"], generated_ids)
]
output_text = processor.batch_decode(
    generated_ids_trimmed, skip_special_tokens=True, clean_up_tokenization_spaces=False
)
print(output_text)
推理视频
csharp
import torch
from transformers import Qwen3VLForConditionalGeneration, AutoProcessor


# 加载模型和处理器,必须添加 trust_remote_code=True
model = Qwen3VLForConditionalGeneration.from_pretrained(
    "Qwen/Qwen3-VL-4B-Instruct",
    dtype="auto",  # 修正 dtype 参数为 torch_dtype
    device_map="auto",
    trust_remote_code=True  # 必须添加此参数
)

processor = AutoProcessor.from_pretrained("Qwen/Qwen3-VL-4B-Instruct", trust_remote_code=True)  # 必须添加此参数
text='''
描述这个视频
'''

# 准备消息
messages = [
    {
        "role": "user",
        "content": [
            {
                "type": "video",
                "video": "aa.mp4",
                "max_pixels": 360 * 420,
                "fps": 1.0,
            },
            {"type": "text", "text": text},
        ],
    }
]


inputs = processor.apply_chat_template(
    messages,
    tokenize=True,
    add_generation_prompt=True,
    return_dict=True,
    return_tensors="pt"
)

# 关键步骤:将输入数据移动到模型所在的设备
device = next(model.parameters()).device
inputs = {k: v.to(device) if isinstance(v, torch.Tensor) else v for k, v in inputs.items()}

# 推理:生成输出
with torch.no_grad():  # 使用 no_grad 减少内存消耗
    generated_ids = model.generate(
        **inputs,
        max_new_tokens=128,
        do_sample=False
    )

# 修剪输入部分,只保留生成的文本
generated_ids_trimmed = generated_ids[:, inputs['input_ids'].shape[1]:]

# 解码输出
output_text = processor.batch_decode(
    generated_ids_trimmed,
    skip_special_tokens=True,
    clean_up_tokenization_spaces=False
)
print(output_text[0].strip())