docxtpl是 Python 中基于python-docx扩展的模板引擎库,核心用于批量生成 Word 文档(.docx 格式),支持 Jinja2 模板语法、循环 / 条件渲染、图片插入、表格动态生成等核心能力,是自动化生成合同、报表、报告等文档的首选工具。
1. 变量渲染
| 语法 | 作用 | 示例 | ||
|---|---|---|---|---|
{{ 变量名 }} |
渲染单个变量 | {{ salary }} |
||
| `{{ 变量 | 过滤器 }}` | 变量过滤(Jinja2 内置) | `{{ date | dateformat('%Y-%m-%d') }}` |
常用过滤器
upper/lower:大小写转换 →{{ name|upper }};default:默认值 →{{ address|default('未填写') }};length:获取长度 →{{ list_data|length }}。
1.1 简单变量渲染
举 例:
模版内容

python
##### 变量渲染 #####
import docxtpl
from docx import Document
def render_docx(template_file, output_file, context):
    doc = docxtpl.DocxTemplate(template_file)
    content = {
        'name': 'John',
        'age': 30,
        'city': 'New York',
        'address': '123 Main St',
        'list_data': [1, 2, 3, 4, 5],
    }
    doc.render(content)
    doc.save(output_file)

render_docx('tmp1.docx', 'output.docx', {})
输出结果

1.2 字典类型(点语法 / 键索引)
python
###### 使用字典的方式进行渲染 ######
import docxtpl
def render_docx_with_dict(template_file, output_file, context):
pasddoc = docxtpl.DocxTemplate(template_file)
render_context = {
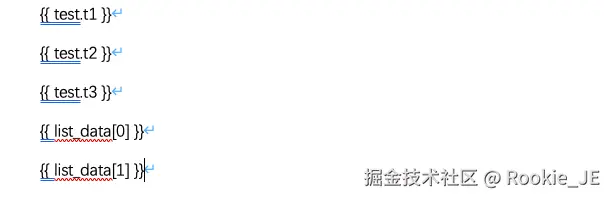
'test':{
't1':'test1',
't2':'test2',
't3':'test3'
},
'list_data': [1, 2, 3, 4, 5],
}
final_context = context if context else render_context
pasddoc.render(final_context)
pasddoc.save(output_file)
render_docx_with_dict('tmp2.docx', 'output.docx', context={})使用模版内容:
 程序输出结果:

1.3 富文本变量渲染
在进行富文本变了渲染的时候,注意使用docxtpl中的RichText库设置富文本,并且在模版中相比普通变量的渲染{{ variable }},需要在模版中添加字母"r" {{r variable }}。
python
##### 富文本变量渲染 #####
import docxtpl
from docxtpl import DocxTemplate,RichText

def render_docx_with_richtext(template_file, output_file, context):
    doc = DocxTemplate(template_file)
    rich_text = RichText()
    rich_text.add('This is ', bold=True)
    rich_text.add('rich ', italic=True, color='FF0000')
    rich_text.add('text.', underline=True)

    render_context = {
        'rich_text_var': rich_text,
        'list_data': [1, 2, 3, 4, 5],
    }
    final_context = context if context else render_context
    doc.render(final_context)
    doc.save(output_file)

if __name__ == '__main__':
    template_file = 'tmp3.docx'
    output_file = 'output.docx'
    context = None
    render_docx_with_richtext(template_file, output_file, context)
    print('Document rendered successfully.')
模版和渲染的结果 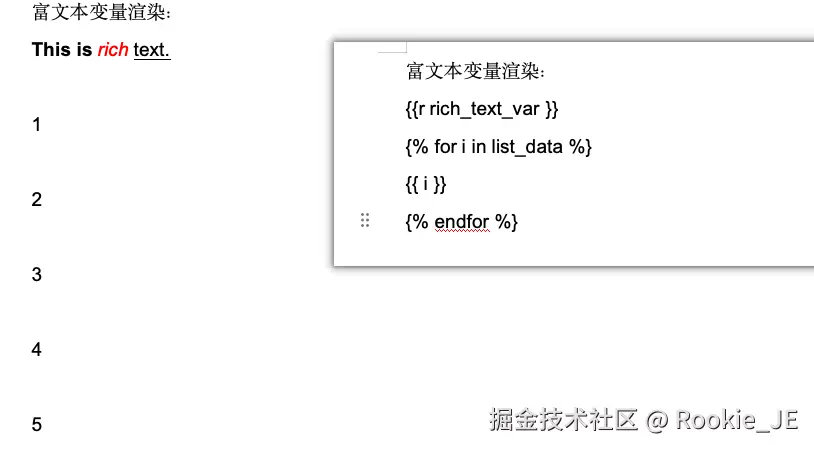
2. 注释
所有 {# ... #} 包裹的内容,在 docxtpl.render() 渲染时会被完全忽略,不会出现在最终的 Word 文档中,p/tr/tc 是人为约定的类型前缀(非 docxtpl 强制语法),目的是让模板开发者快速识别注释对应的 Word 元素(比如看到 {#tr ...#} 就知道这是针对表格行的注释)。
pyhton
{#p this is a comment as a paragraph #}
{#tr this is a comment as a table row #}
{#tc this is a comment as a table cell #}
3. 文本换行和合并
Jinja2 标签(如 {% ... %} {{ ... }})默认会保留标签前后的换行 / 空白字符,而 {%- 和 -%} 是「空白控制符」,用于合并标签与前后行的文本,消除多余空白。 举 例:
python
######## 文本换行和合并 #######
import docxtpl
from docx import Document

def render_docx_with_line_break(template_file, output_file, context):
    doc = docxtpl.DocxTemplate(template_file)

    # 创建包含换行符的文本
    multiline_text = "This is line 1.\nThis is line 2.\nThis is line 3."

    render_context = {
        'multiline_var': multiline_text,
        'list_data': [1, 2, 3, 4, 5],
    }
    final_context = context if context else render_context
    doc.render(final_context)
    doc.save(output_file)

if __name__ == '__main__':
    template_file = 'tmp4.docx'
    output_file = 'output.docx'
    context = None
    render_docx_with_line_break(template_file, output_file, context)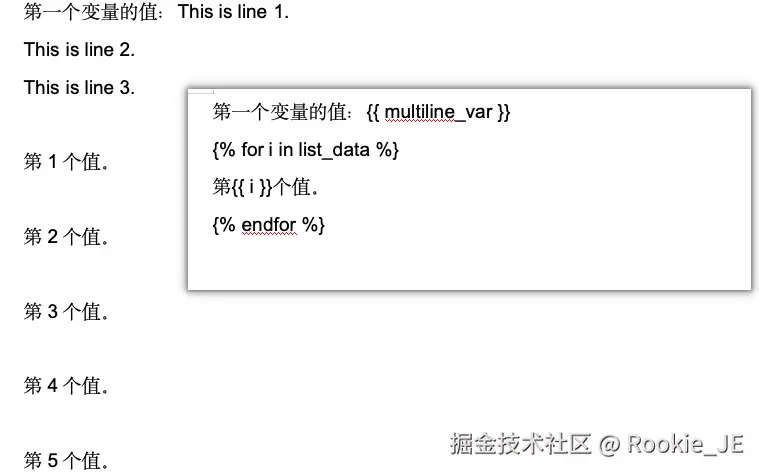
上面的效果中可以看出,列表中渲染的结果是每个值之间都是有一个空白行。使用去除空白行的方式查看一下效果。
python
######## 文本换行和合并 #######
import docxtpl
from docx import Document

def render_docx_with_line_break(template_file, output_file, context):
    doc = docxtpl.DocxTemplate(template_file)

    # 创建包含换行符的文本
    multiline_text = "This is line 1.\nThis is line 2.\nThis is line 3."

    render_context = {
        'multiline_var': multiline_text,
        'list_data': [1, 2, 3, 4, 5],
    }
    final_context = context if context else render_context
    doc.render(final_context)
    doc.save(output_file)

if __name__ == '__main__':
    template_file = 'tmp4.docx'
    output_file = 'output.docx'
    context = None
    render_docx_with_line_break(template_file, output_file, context)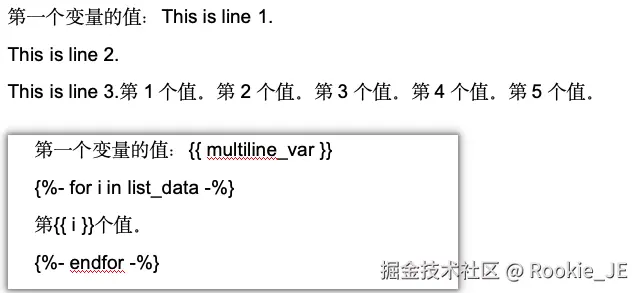
4. 插入表格和列表
4.1 插入列表
无序列表
python
import docx
from docxtpl import DocxTemplate

def insert_unordered_list(docx_path, output_path, list_data):
    doc = DocxTemplate(docx_path)
    render_context = {
        'list_data': [1, 2, 3, 4, 5]
    }
    doc.render(render_context)
    doc.save(output_path)

if __name__ == '__main__':
    docx_path = 'tmp5.docx'
    output_path = 'output.docx'
    list_data = [1, 2, 3, 4, 5]
    insert_unordered_list(docx_path, output_path, list_data)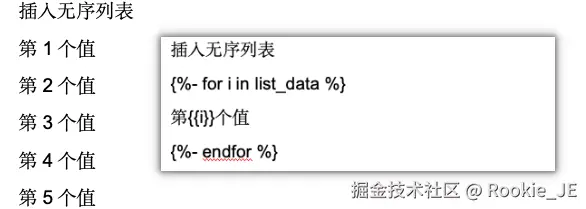
有序列表
使用{{ loop.index }}可以获得元素的索引值,默认是从1开始进行计数的。
python
import docx
from docxtpl import DocxTemplate

def insert_unordered_list(docx_path, output_path, list_data):
    doc = DocxTemplate(docx_path)
    render_context = {
        'list_data': [1, 2, 3, 4, 5]
    }
    doc.render(render_context)
    doc.save(output_path)

if __name__ == '__main__':
    docx_path = 'tmp5.docx'
    output_path = 'output.docx'
    list_data = [1, 2, 3, 4, 5]
    insert_unordered_list(docx_path, output_path, list_data)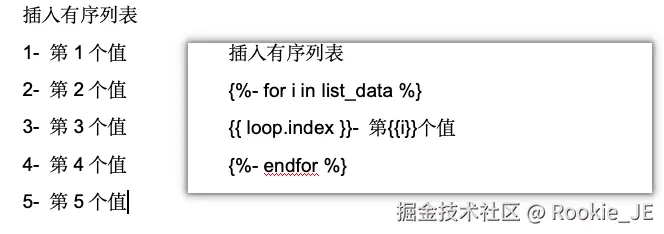
4.2 插入表格
注意在渲染表格内容的时候,{%tr for %}和直接{% for %}最后在表格中渲染出的结果是有差别的。
python
import docxtpl

def render_dynamic_row_table():
    tpl = docxtpl.DocxTemplate("tmp6.docx")
    context = {
        "emp_list": [
            {"name": "张三", "dept": "技术部", "salary": "15k"},
            {"name": "李四", "dept": "市场部", "salary": "12k"},
            {"name": "王五", "dept": "人事部", "salary": "10k"}
        ]
    }
    tpl.render(context)
    tpl.save("table_dynamic_row_output.docx")

render_dynamic_row_table()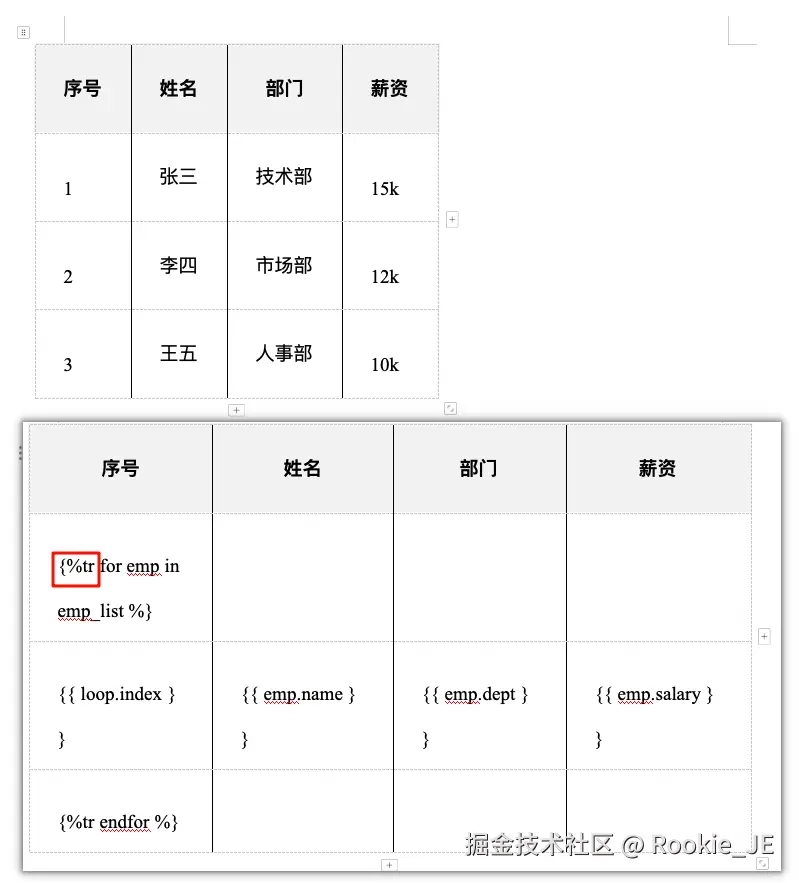

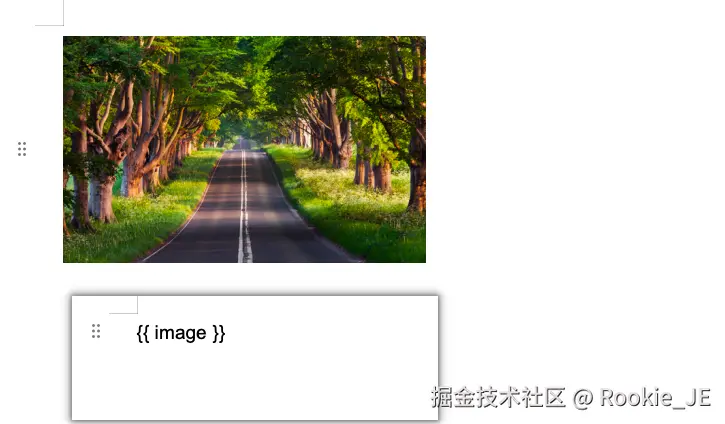
5. 图片渲染
docxtpl 使用 InlineImage 类来表示图片。你可以在模板中使用类似 {{ myimage }} 的占位符,然后在 Python 代码中将该变量替换为一个 InlineImage 实例。
python
##### 图片渲染 #####
import docxtpl
from docxtpl import DocxTemplate, InlineImage
from docx.shared import Mm

def render_docx_with_image(template_file, output_file, context):
    # 加载模板
    doc = DocxTemplate(template_file)
    image_path = 'image.png'
    render_context = {
        'image': InlineImage(doc, image_path,width=Mm(80), height=Mm(50)),
        'list_data': [1, 2, 3, 4, 5],
    }
    final_context = context if context else render_context
    doc.render(final_context)
    # 保存渲染后的文档
    doc.save(output_file)

if __name__ == '__main__':
    template_file = 'tmp7.docx'
    output_file = 'output.docx'
    render_docx_with_image(template_file, output_file, context=None)