目录
专栏导读
🌸 欢迎来到Python办公自动化专栏---Python处理办公问题,解放您的双手
🏳️🌈 个人博客主页:请点击------> 个人的博客主页 求收藏
🏳️🌈 Github主页:请点击------> Github主页 求Star⭐
🏳️🌈 知乎主页:请点击------> 知乎主页 求关注
🏳️🌈 CSDN博客主页:请点击------> CSDN的博客主页 求关注
👍 该系列文章专栏:请点击------>Python办公自动化专栏 求订阅
🕷 此外还有爬虫专栏:请点击------>Python爬虫基础专栏 求订阅
📕 此外还有python基础专栏:请点击------>Python基础学习专栏 求订阅
文章作者技术和水平有限,如果文中出现错误,希望大家能指正🙏
❤️ 欢迎各位佬关注! ❤️
Python实战:手把手教你开发一个批量图片水印工具 (PyQt5 + Pillow)
在日常工作和自媒体运营中,我们经常需要给大量的图片添加水印以保护版权。市面上的工具要么收费,要么功能单一。今天,我们将使用 Python 强大的 GUI 库 PyQt5 和图像处理库 Pillow (PIL),亲手打造一个免费、开源且功能强大的批量水印工具。
🎯 项目目标
我们需要实现一个具备以下功能的桌面软件:
- 批量处理:支持拖拽或选择多个文件/文件夹。
- 可视化预览:在调整参数时实时预览水印效果。
- 高度自定义:支持设置水印文字、大小、颜色、透明度、旋转角度。
- 布局灵活 :支持九宫格位置(如左上、右下)以及全图平铺模式。
- 防卡顿:使用多线程处理图片,避免界面冻结。
🛠️ 技术栈
- Python 3.x
- PyQt5: 用于构建图形用户界面 (GUI)。
- Pillow (PIL): 用于核心的图像处理(绘制文字、旋转、合成)。
📦 环境搭建
首先,我们需要安装必要的第三方库:
bash
pip install PyQt5 Pillow💡 核心实现思路
1. 界面设计 (PyQt5)
我们将界面分为左右两部分:
- 左侧 (控制面板):包含文件列表、输出路径设置、以及所有的水印参数控件(输入框、滑块、下拉框等)。
- 右侧 (预览区):显示当前选中图片的实时预览效果。
我们使用 QHBoxLayout (水平布局) 来容纳左右面板,左侧面板内部使用 QVBoxLayout (垂直布局) 来排列各个设置组 (QGroupBox)。
2. 图像处理核心 (Pillow)
这是整个工具的灵魂。主要步骤如下:
- 打开图片 :使用
Image.open()并转换为RGBA模式以便处理透明度。 - 创建水印层:创建一个与原图等大的透明图层。
- 绘制文字 :
- 使用
ImageDraw.Draw绘制文本。 - 计算文本大小 (
draw.textbbox) 以便居中或定位。 - 处理颜色和透明度。
- 使用
- 旋转与平铺 :
- 如果需要旋转,先在一个单独的小图层上绘制文字并旋转,然后粘贴到大水印层上。
- 平铺模式 :通过双重循环 (
for x... for y...) 计算坐标,将水印重复粘贴到全图。
- 合成与保存 :使用
Image.alpha_composite将水印层叠加到原图,最后保存。
3. 多线程处理 (QThread)
为了防止在处理几百张大图时界面卡死("未响应"),我们将耗时的图片处理逻辑放入后台线程 Worker 中。
python
class Worker(QThread):
    progress = pyqtSignal(int)  # 进度信号
    finished = pyqtSignal(str)  # 完成信号

    def run(self):
        # 遍历文件列表进行处理
        for i, file_path in enumerate(self.files):
            self.process_image(file_path)
            self.progress.emit(...) # 更新进度条
📝 核心代码解析
水印绘制逻辑
这是实现平铺和定位的关键代码片段:
python
def process_image(self, file_path):
    with Image.open(file_path).convert("RGBA") as img:
        # 创建全透明水印层
        watermark = Image.new('RGBA', img.size, (0, 0, 0, 0))

        # ... (省略字体加载和颜色设置) ...

        # 创建单个水印小图用于旋转
        txt_img = Image.new('RGBA', (max_dim, max_dim), (0, 0, 0, 0))
        txt_draw = ImageDraw.Draw(txt_img)
        txt_draw.text((text_x, text_y), text, font=font, fill=fill_color)

        # 旋转
        if rotation != 0:
            txt_img = txt_img.rotate(rotation, resample=Image.BICUBIC)

        # 核心布局逻辑
        if position == '平铺 (Tile)':
            # 双重循环实现全图平铺
            step_x = int(w_width + spacing)
            step_y = int(w_height + spacing)
            for y in range(0, img.height, step_y):
                for x in range(0, img.width, step_x):
                    watermark.paste(txt_img, (x, y), txt_img)
        else:
            # 九宫格定位逻辑
            # 根据 '左', '右', '上', '下' 关键字计算坐标
            # ...
            watermark.paste(txt_img, (pos_x, pos_y), txt_img)

        # 合成最终图片
        out = Image.alpha_composite(img, watermark)
实时预览实现
预览功能的难点在于性能。我们不能每次调整参数都去处理原图(原图可能几千万像素)。
优化方案:
- 加载原图后,先生成一个较小的缩略图(例如最大边长 800px)。
- 所有的预览计算都在这个缩略图上进行。
- 注意:字体大小和间距需要根据缩略图的比例进行缩放,否则预览效果会和实际输出不一致。
python
# 缩放比例计算
scale_factor = preview_img.width / original_img_width
# 字体大小也要随之缩放
preview_font_size = int(user_set_font_size * scale_factor)
🚀 完整功能展示
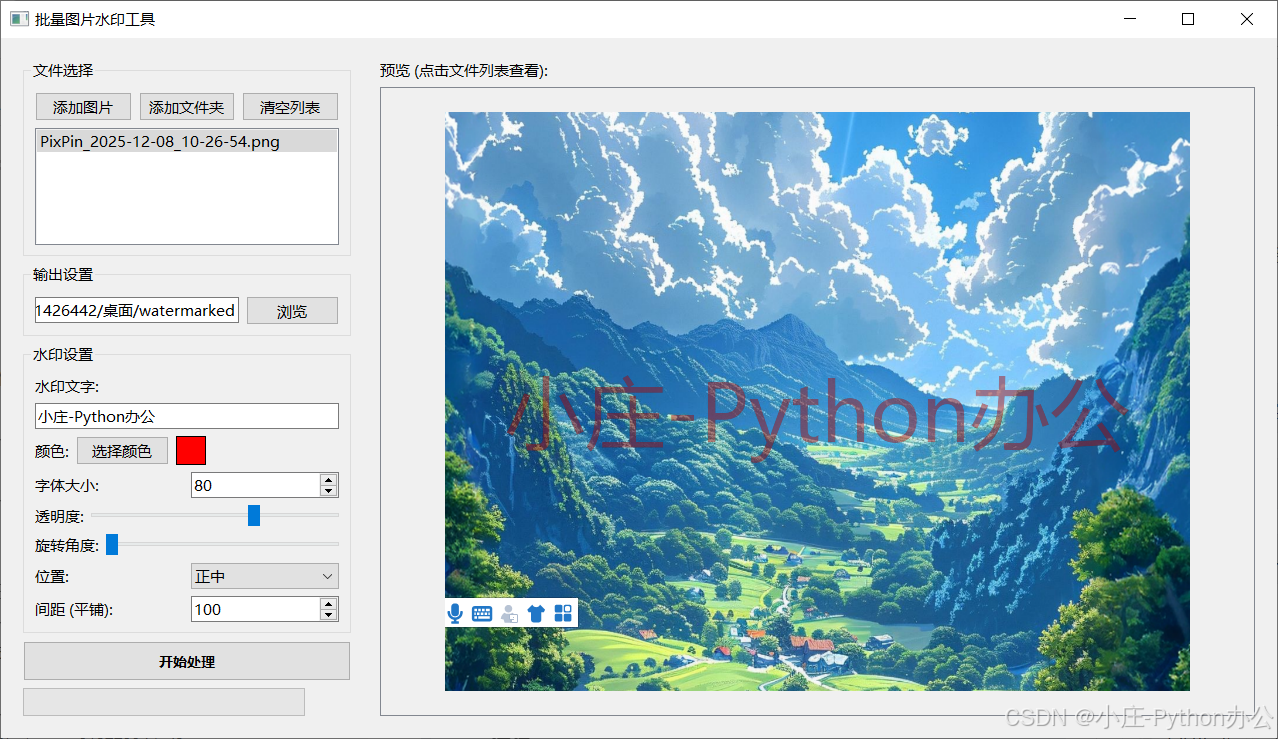
运行 main.py 后,你将看到如下界面:
- 添加图片:点击"添加图片"或"添加文件夹"导入素材。
- 调整参数 :
- 输入文字 "My Watermark"。
- 拖动"旋转角度"滑块到 30 度。
- 选择位置为"平铺"。
- 调整透明度为 30% 使得水印不喧宾夺主。
- 预览:右侧会立即显示效果,所见即所得。
- 输出:选择输出目录,点击"开始处理",进度条跑完即大功告成!
完整代码
python
import sys
import os
from PyQt5.QtWidgets import (QApplication, QMainWindow, QWidget, QVBoxLayout, QHBoxLayout,
QLabel, QPushButton, QLineEdit, QFileDialog, QSlider, QSpinBox,
QComboBox, QColorDialog, QProgressBar, QMessageBox, QGroupBox,
QScrollArea, QListWidget)
from PyQt5.QtCore import Qt, QThread, pyqtSignal
from PyQt5.QtGui import QPixmap, QImage, QColor, QFont
from PIL import Image, ImageDraw, ImageFont, ImageEnhance
import math
class Worker(QThread):
progress = pyqtSignal(int)
finished = pyqtSignal(str)
error = pyqtSignal(str)
def __init__(self, files, output_dir, config):
super().__init__()
self.files = files
self.output_dir = output_dir
self.config = config
self.is_running = True
def run(self):
total = len(self.files)
success_count = 0
if not os.path.exists(self.output_dir):
try:
os.makedirs(self.output_dir)
except Exception as e:
self.error.emit(f"无法创建输出目录: {str(e)}")
return
for i, file_path in enumerate(self.files):
if not self.is_running:
break
try:
self.process_image(file_path)
success_count += 1
except Exception as e:
print(f"Error processing {file_path}: {e}")
self.progress.emit(int((i + 1) / total * 100))
self.finished.emit(f"处理完成!成功: {success_count}/{total}")
def process_image(self, file_path):
try:
with Image.open(file_path).convert("RGBA") as img:
# 创建水印层
watermark = Image.new('RGBA', img.size, (0, 0, 0, 0))
draw = ImageDraw.Draw(watermark)
text = self.config['text']
font_size = self.config['font_size']
opacity = self.config['opacity']
rotation = self.config['rotation']
color = self.config['color'] # Tuple (r, g, b)
position = self.config['position']
spacing = self.config['spacing'] # For tiling
# 加载字体 (使用默认字体,因为系统字体路径复杂,这里简化处理)
try:
# 尝试使用微软雅黑
font = ImageFont.truetype("msyh.ttc", font_size)
except:
font = ImageFont.load_default()
# default font doesn't scale well, but fallback is needed
# If we really want size, we might need a standard font file distributed with app
# Trying basic arial if msyh fails
try:
font = ImageFont.truetype("arial.ttf", font_size)
except:
pass # Fallback to default
# 计算文本大小
bbox = draw.textbbox((0, 0), text, font=font)
text_width = bbox[2] - bbox[0]
text_height = bbox[3] - bbox[1]
# 创建单个水印图片用于旋转
# 留出足够空间以防旋转后被裁剪
max_dim = int(math.sqrt(text_width**2 + text_height**2))
txt_img = Image.new('RGBA', (max_dim, max_dim), (0, 0, 0, 0))
txt_draw = ImageDraw.Draw(txt_img)
# 居中绘制文本
text_x = (max_dim - text_width) // 2
text_y = (max_dim - text_height) // 2
# 设置颜色和透明度
fill_color = (color[0], color[1], color[2], int(255 * opacity))
txt_draw.text((text_x, text_y), text, font=font, fill=fill_color)
# 旋转
if rotation != 0:
txt_img = txt_img.rotate(rotation, resample=Image.BICUBIC)
# 获取旋转后的实际内容边界(可选,但为了精确布局最好做)
# 这里简单处理,直接使用txt_img
w_width, w_height = txt_img.size
if position == '平铺 (Tile)':
# 平铺逻辑
# spacing 是间距倍数或像素
step_x = int(w_width + spacing)
step_y = int(w_height + spacing)
if step_x <= 0: step_x = w_width + 50
if step_y <= 0: step_y = w_height + 50
for y in range(0, img.height, step_y):
for x in range(0, img.width, step_x):
watermark.paste(txt_img, (x, y), txt_img)
else:
# 单个位置逻辑
pos_x = 0
pos_y = 0
margin = 20
if '左' in position:
pos_x = margin
elif '右' in position:
pos_x = img.width - w_width - margin
else: # 中 (水平)
pos_x = (img.width - w_width) // 2
if '上' in position:
pos_y = margin
elif '下' in position:
pos_y = img.height - w_height - margin
else: # 中 (垂直)
pos_y = (img.height - w_height) // 2
watermark.paste(txt_img, (pos_x, pos_y), txt_img)
# 合成
out = Image.alpha_composite(img, watermark)
# 保存
filename = os.path.basename(file_path)
save_path = os.path.join(self.output_dir, filename)
# Convert back to RGB if saving as JPEG, otherwise keep RGBA for PNG
if filename.lower().endswith(('.jpg', '.jpeg')):
out = out.convert('RGB')
out.save(save_path, quality=95)
else:
out.save(save_path)
except Exception as e:
print(f"Processing failed for {file_path}: {e}")
raise e
class WatermarkApp(QMainWindow):
def __init__(self):
super().__init__()
self.setWindowTitle("批量图片水印工具")
self.resize(1000, 700)
# Data
self.image_files = []
self.current_preview_image = None
self.watermark_color = (255, 255, 255) # Default white
# UI Setup
central_widget = QWidget()
self.setCentralWidget(central_widget)
main_layout = QHBoxLayout(central_widget)
# Left Panel (Settings)
left_panel = QWidget()
left_layout = QVBoxLayout(left_panel)
left_panel.setFixedWidth(350)
main_layout.addWidget(left_panel)
# 1. File Selection
grp_files = QGroupBox("文件选择")
grp_files_layout = QVBoxLayout()
btn_layout = QHBoxLayout()
self.btn_add_files = QPushButton("添加图片")
self.btn_add_files.clicked.connect(self.add_files)
self.btn_add_folder = QPushButton("添加文件夹")
self.btn_add_folder.clicked.connect(self.add_folder)
self.btn_clear_files = QPushButton("清空列表")
self.btn_clear_files.clicked.connect(self.clear_files)
btn_layout.addWidget(self.btn_add_files)
btn_layout.addWidget(self.btn_add_folder)
btn_layout.addWidget(self.btn_clear_files)
self.list_files = QListWidget()
self.list_files.currentRowChanged.connect(self.update_preview)
grp_files_layout.addLayout(btn_layout)
grp_files_layout.addWidget(self.list_files)
grp_files.setLayout(grp_files_layout)
left_layout.addWidget(grp_files)
# 2. Output Directory
grp_output = QGroupBox("输出设置")
grp_output_layout = QVBoxLayout()
out_path_layout = QHBoxLayout()
self.edit_output = QLineEdit()
self.edit_output.setPlaceholderText("选择输出目录...")
self.btn_browse_output = QPushButton("浏览")
self.btn_browse_output.clicked.connect(self.browse_output)
out_path_layout.addWidget(self.edit_output)
out_path_layout.addWidget(self.btn_browse_output)
grp_output_layout.addLayout(out_path_layout)
grp_output.setLayout(grp_output_layout)
left_layout.addWidget(grp_output)
# 3. Watermark Settings
grp_settings = QGroupBox("水印设置")
grp_settings_layout = QVBoxLayout()
# Text
self.edit_text = QLineEdit("Sample Watermark")
self.edit_text.setPlaceholderText("输入水印文字")
self.edit_text.textChanged.connect(self.update_preview_delayed)
grp_settings_layout.addWidget(QLabel("水印文字:"))
grp_settings_layout.addWidget(self.edit_text)
# Color
color_layout = QHBoxLayout()
self.btn_color = QPushButton("选择颜色")
self.btn_color.clicked.connect(self.choose_color)
self.lbl_color_preview = QLabel(" ")
self.lbl_color_preview.setStyleSheet("background-color: white; border: 1px solid black;")
self.lbl_color_preview.setFixedWidth(30)
color_layout.addWidget(QLabel("颜色:"))
color_layout.addWidget(self.btn_color)
color_layout.addWidget(self.lbl_color_preview)
color_layout.addStretch()
grp_settings_layout.addLayout(color_layout)
# Font Size
size_layout = QHBoxLayout()
self.spin_size = QSpinBox()
self.spin_size.setRange(10, 500)
self.spin_size.setValue(40)
self.spin_size.valueChanged.connect(self.update_preview_delayed)
size_layout.addWidget(QLabel("字体大小:"))
size_layout.addWidget(self.spin_size)
grp_settings_layout.addLayout(size_layout)
# Opacity
opacity_layout = QHBoxLayout()
self.slider_opacity = QSlider(Qt.Horizontal)
self.slider_opacity.setRange(0, 100)
self.slider_opacity.setValue(50)
self.slider_opacity.valueChanged.connect(self.update_preview_delayed)
opacity_layout.addWidget(QLabel("透明度:"))
opacity_layout.addWidget(self.slider_opacity)
grp_settings_layout.addLayout(opacity_layout)
# Rotation
rotation_layout = QHBoxLayout()
self.slider_rotation = QSlider(Qt.Horizontal)
self.slider_rotation.setRange(0, 360)
self.slider_rotation.setValue(0)
self.slider_rotation.valueChanged.connect(self.update_preview_delayed)
rotation_layout.addWidget(QLabel("旋转角度:"))
rotation_layout.addWidget(self.slider_rotation)
grp_settings_layout.addLayout(rotation_layout)
# Position
pos_layout = QHBoxLayout()
self.combo_pos = QComboBox()
positions = [
"左上", "中上", "右上",
"左中", "正中", "右中",
"左下", "中下", "右下",
"平铺 (Tile)"
]
self.combo_pos.addItems(positions)
self.combo_pos.setCurrentText("右下")
self.combo_pos.currentIndexChanged.connect(self.update_preview_delayed)
pos_layout.addWidget(QLabel("位置:"))
pos_layout.addWidget(self.combo_pos)
grp_settings_layout.addLayout(pos_layout)
# Spacing (only for tile)
spacing_layout = QHBoxLayout()
self.spin_spacing = QSpinBox()
self.spin_spacing.setRange(0, 500)
self.spin_spacing.setValue(100)
self.spin_spacing.valueChanged.connect(self.update_preview_delayed)
spacing_layout.addWidget(QLabel("间距 (平铺):"))
spacing_layout.addWidget(self.spin_spacing)
grp_settings_layout.addLayout(spacing_layout)
grp_settings.setLayout(grp_settings_layout)
left_layout.addWidget(grp_settings)
left_layout.addStretch()
# Action Buttons
self.btn_start = QPushButton("开始处理")
self.btn_start.setMinimumHeight(40)
self.btn_start.setStyleSheet("font-weight: bold; font-size: 14px;")
self.btn_start.clicked.connect(self.start_processing)
left_layout.addWidget(self.btn_start)
self.progress_bar = QProgressBar()
left_layout.addWidget(self.progress_bar)
# Right Panel (Preview)
right_panel = QWidget()
right_layout = QVBoxLayout(right_panel)
main_layout.addWidget(right_panel)
right_layout.addWidget(QLabel("预览 (点击文件列表查看):"))
self.scroll_area = QScrollArea()
self.scroll_area.setWidgetResizable(True)
self.lbl_preview = QLabel()
self.lbl_preview.setAlignment(Qt.AlignCenter)
self.scroll_area.setWidget(self.lbl_preview)
right_layout.addWidget(self.scroll_area)
# Debounce timer for preview update to avoid lag
self.preview_timer = None
def add_files(self):
files, _ = QFileDialog.getOpenFileNames(self, "选择图片", "", "Images (*.png *.jpg *.jpeg *.bmp)")
if files:
self.image_files.extend(files)
self.update_file_list()
if not self.edit_output.text():
self.edit_output.setText(os.path.dirname(files[0]) + "/watermarked")
def add_folder(self):
folder = QFileDialog.getExistingDirectory(self, "选择文件夹")
if folder:
for root, dirs, files in os.walk(folder):
for file in files:
if file.lower().endswith(('.png', '.jpg', '.jpeg', '.bmp')):
self.image_files.append(os.path.join(root, file))
self.update_file_list()
if not self.edit_output.text():
self.edit_output.setText(folder + "/watermarked")
def clear_files(self):
self.image_files = []
self.update_file_list()
self.lbl_preview.clear()
def update_file_list(self):
self.list_files.clear()
for f in self.image_files:
self.list_files.addItem(os.path.basename(f))
if self.image_files:
self.list_files.setCurrentRow(0)
def browse_output(self):
folder = QFileDialog.getExistingDirectory(self, "选择输出目录")
if folder:
self.edit_output.setText(folder)
def choose_color(self):
color = QColorDialog.getColor()
if color.isValid():
self.watermark_color = (color.red(), color.green(), color.blue())
self.lbl_color_preview.setStyleSheet(f"background-color: {color.name()}; border: 1px solid black;")
self.update_preview()
def update_preview_delayed(self):
# In a real app, use a QTimer to debounce.
# For simplicity here, just call update_preview directly,
# but keep method name to indicate intent if we add timer later.
self.update_preview()
def update_preview(self):
row = self.list_files.currentRow()
if row < 0 or row >= len(self.image_files):
return
file_path = self.image_files[row]
# Generate preview
try:
config = self.get_config()
# Use PIL to generate preview
with Image.open(file_path).convert("RGBA") as img:
# Resize for preview if too large
preview_max_size = 800
if img.width > preview_max_size or img.height > preview_max_size:
img.thumbnail((preview_max_size, preview_max_size))
# Apply watermark (Reuse logic? For now duplicate simplified logic for preview speed)
watermark = Image.new('RGBA', img.size, (0, 0, 0, 0))
draw = ImageDraw.Draw(watermark)
font_size = config['font_size']
# Scale font size relative to preview thumbnail
# Note: config['font_size'] is for the original image?
# Ideally we should scale it down. But font size is usually absolute pixels.
# If we scaled down the image, the font will look HUGE if we don't scale it too.
# So we need to know the original image size vs preview size.
# Let's read original size first
with Image.open(file_path) as orig_img:
orig_w, orig_h = orig_img.size
scale_factor = img.width / orig_w
scaled_font_size = int(font_size * scale_factor)
if scaled_font_size < 1: scaled_font_size = 1
try:
font = ImageFont.truetype("msyh.ttc", scaled_font_size)
except:
font = ImageFont.load_default()
try:
font = ImageFont.truetype("arial.ttf", scaled_font_size)
except:
pass
text = config['text']
bbox = draw.textbbox((0, 0), text, font=font)
text_width = bbox[2] - bbox[0]
text_height = bbox[3] - bbox[1]
max_dim = int(math.sqrt(text_width**2 + text_height**2))
txt_img = Image.new('RGBA', (max_dim, max_dim), (0, 0, 0, 0))
txt_draw = ImageDraw.Draw(txt_img)
text_x = (max_dim - text_width) // 2
text_y = (max_dim - text_height) // 2
color = config['color']
opacity = config['opacity']
fill_color = (color[0], color[1], color[2], int(255 * opacity))
txt_draw.text((text_x, text_y), text, font=font, fill=fill_color)
if config['rotation'] != 0:
txt_img = txt_img.rotate(config['rotation'], resample=Image.BICUBIC)
w_width, w_height = txt_img.size
if config['position'] == '平铺 (Tile)':
scaled_spacing = int(config['spacing'] * scale_factor)
step_x = int(w_width + scaled_spacing)
step_y = int(w_height + scaled_spacing)
if step_x <= 0: step_x = w_width + 10
if step_y <= 0: step_y = w_height + 10
for y in range(0, img.height, step_y):
for x in range(0, img.width, step_x):
watermark.paste(txt_img, (x, y), txt_img)
else:
pos_x = 0
pos_y = 0
margin = int(20 * scale_factor)
position = config['position']
if '左' in position: pos_x = margin
elif '右' in position: pos_x = img.width - w_width - margin
else: pos_x = (img.width - w_width) // 2
if '上' in position: pos_y = margin
elif '下' in position: pos_y = img.height - w_height - margin
else: pos_y = (img.height - w_height) // 2
watermark.paste(txt_img, (pos_x, pos_y), txt_img)
out = Image.alpha_composite(img, watermark)
# Convert to QPixmap
if out.mode == "RGBA":
r, g, b, a = out.split()
out = Image.merge("RGBA", (b, g, r, a))
elif out.mode == "RGB":
r, g, b = out.split()
out = Image.merge("RGB", (b, g, r))
im2 = out.convert("RGBA")
data = im2.tobytes("raw", "RGBA")
qim = QImage(data, out.size[0], out.size[1], QImage.Format_ARGB32)
pixmap = QPixmap.fromImage(qim)
self.lbl_preview.setPixmap(pixmap)
except Exception as e:
print(f"Preview error: {e}")
def get_config(self):
return {
'text': self.edit_text.text(),
'font_size': self.spin_size.value(),
'opacity': self.slider_opacity.value() / 100.0,
'rotation': self.slider_rotation.value(),
'color': self.watermark_color,
'position': self.combo_pos.currentText(),
'spacing': self.spin_spacing.value()
}
def start_processing(self):
if not self.image_files:
QMessageBox.warning(self, "提示", "请先添加图片!")
return
output_dir = self.edit_output.text()
if not output_dir:
QMessageBox.warning(self, "提示", "请选择输出目录!")
return
self.btn_start.setEnabled(False)
self.progress_bar.setValue(0)
config = self.get_config()
self.worker = Worker(self.image_files, output_dir, config)
self.worker.progress.connect(self.progress_bar.setValue)
self.worker.finished.connect(self.processing_finished)
self.worker.error.connect(self.processing_error)
self.worker.start()
def processing_finished(self, msg):
self.btn_start.setEnabled(True)
QMessageBox.information(self, "完成", msg)
def processing_error(self, msg):
self.btn_start.setEnabled(True)
QMessageBox.critical(self, "错误", msg)
if __name__ == "__main__":
app = QApplication(sys.argv)
# 设置全局字体,看起来更现代一点
font = QFont("Microsoft YaHei", 9)
app.setFont(font)
window = WatermarkApp()
window.show()
sys.exit(app.exec_())🏁 总结
通过不到 400 行代码,我们结合了 PyQt5 的交互能力和 Pillow 的图像处理能力,开发出了一个实用的桌面工具。这个项目很好的展示了 Python 在自动化办公和工具开发领域的优势。
扩展思路:
- 支持图片水印(Logo)。
- 保存/加载配置模板,方便下次直接使用。
- 打包成 exe 文件(使用
pyinstaller),方便分享给没有安装 Python 的同事使用。
本文代码仅供学习交流,完整源码请参考项目仓库。
结尾
希望对初学者有帮助;致力于办公自动化的小小程序员一枚
希望能得到大家的【❤️一个免费关注❤️】感谢!
求个 🤞 关注 🤞 +❤️ 喜欢 ❤️ +👍 收藏 👍
此外还有办公自动化专栏,欢迎大家订阅:Python办公自动化专栏
此外还有爬虫专栏,欢迎大家订阅:Python爬虫基础专栏
此外还有Python基础专栏,欢迎大家订阅:Python基础学习专栏