文章目录
- 4.1等待事件或其他条件
- 4.2用期值等待一次性事件
-
- 4.2.1从后台任务返回值
- 4.2.2关联任务和期值
- [4.2.3 做出(std::)承诺](#4.2.3 做出(std::)承诺)
- 4.2.4为期值存储异常
- 4.2.5多线程等待
- 4.3有时间限制的等待
- 4.4使用操作同步来简化代码
-
- 4.4.1函数式编程与期值
- 4.4.2通过消息传递同步操作
- [4.4.3基于并发TS(Technical Specification,技术规范)的延续式并发](#4.4.3基于并发TS(Technical Specification,技术规范)的延续式并发)
- 4.4.4链接延续
- 4.4.5等待多个future
- 4.4.6使用when_any等待集合中的第一个future
- [4.4.7并发TS中的锁存器(Latch )和屏障(Barrier )](#4.4.7并发TS中的锁存器(Latch )和屏障(Barrier ))
- 4.4.8一个基础的锁存器类型:std::experimental::latch
- [4.4.9 一个基础的屏障类型:std::experimental::barrier](#4.4.9 一个基础的屏障类型:std::experimental::barrier)
- [4.4.10 std::experimental:: flex_barrier------std::experimental::barrier灵活的朋友](#4.4.10 std::experimental:: flex_barrier——std::experimental::barrier灵活的朋友)
4.1等待事件或其他条件
如果一个线程正在等待另一个线程完成任务,它可以不断检查共享数据中的一个标志(由互斥锁保护),并让第二个线程在完成任务时设置该标志。这在两个方面都是浪费的:
- 线程反复检查标志会消耗宝贵的处理时间
- 而当等待线程锁定互斥锁时,其他任何线程都无法锁定它
- 如果某线程要频繁操作某个数据,就频繁多次加锁解锁
可以选择让等待线程在检查之间使用 std::this_thread::sleep_for()函数短暂休眠:
cpp
bool flag;
std::mutex m;
void wait_for_flag() {
    std::unique_lock<std::mutex> lk(m);
    while(!flag) {
        lk.unlock(); // 解锁互斥锁 m
        std::this_thread::sleep_for(std::chrono::milliseconds(100)); //当前线程休眠100毫秒
        lk.lock(); // 重新锁定互斥锁 m
    }
}
这里的问题是休眠时间长短不好把握,设置太短,锁定的时间就会较长,效果不是很好;设置太长会导致线程没有及时检查flag,无法实时响应。
因此我们首选方案是使用C++标准库中的工具来,等待另一个线程触发事件的最基本机制是条件变量。从概念上讲,条件变量与事件或其他条件相关联,一个或多个线程可以等待该条件得到满足。当一个线程确定条件得到满足时,它可以通知一个或多个等待条件变量的线程,以唤醒它们并允许它们继续处理。
4.1.1等待带有条件变量的条件
C++标准库提供了两种条件变量的实现。两者都需要与互斥锁一起使用,才能提供适当的同步操作
- std::condition_variable仅限于与std::mutex一起使用
- 而std::condition_variable_any更加通用,可以与任何满足互斥锁基本条件的对象一起使用
- 由于std::condition_variable_any更加通用,它可能产生额外的开销,因此应优先采用std::condition_variable
cpp
std::mutex mut;
std::queue<data_chunk> data_queue; //需要保护的队列
std::condition_variable data_cond;
void data_preparation_thread() {
    while(more_data_to_prepare()) {
            data_chunk const data=prepare_data(); {
            std::lock_guard<std::mutex> lk(mut); //修改队列前先上锁
            data_queue.push(data);
        }//解锁
        data_cond.notify_one(); //这里只通知一个线程,要通知多个线程用notify_all
    }
}void data_processing_thread() {
    while(true) {
        std::unique_lock<std::mutex> lk(mut);
        //收到通知且队列不为空才往下处理
        data_cond.wait(lk,[]{return !data_queue.empty();});
        data_chunk data=data_queue.front();
        data_queue.pop();
        lk.unlock();
        process(data);
        if(is_last_chunk(data)) break;
    }
}
wait()会解锁,并将线程置于阻塞或等待状态。当条件变量被数据准备线程通过调用notify_one()通知时,线程会从睡眠中醒来,重新获取互斥锁,并再次检查条件。如果条件已满足,wait()会在互斥锁仍然锁定的情况下返回。如果条件尚未满足,线程会解锁互斥锁并恢复等待。这就是为什么需要使用std::unique_lock而不是std::lock_guard的原因。
上例中,就好比餐厅后厨(生产者)和服务员(消费者)协作
- data_queue = 传菜窗口(只能放3道菜)
- mut = 传菜窗口的锁(防止手滑打翻菜)
- data_cond = 后厨的铃铛
厨师线程(生产者)
cpp
void data_preparation_thread() {
    while(还有菜要做()) {
        菜 = 做好一道菜();
        {
            锁上窗口(lock_guard);  // 手别抖
            把菜放进窗口;           // 实际操作
        } // 自动解锁,让服务员能拿菜

        按一下铃铛(notify_one()); // "叮咚,菜好了!"
    }
}
服务员线程(消费者)
cpp
void data_processing_thread() {
    while(true) {
        锁上窗口(unique_lock);  // 准备拿菜

        // 关键操作:wait()
        while(窗口是空的) {      // 条件检查
            我先去旁边等着;       // 阻塞
            解锁窗口;             // 关键!让厨师能放菜进来
            等铃铛响;             // 等待notify_one()
            铃响了!重新锁上窗口;  // 醒来第一件事:抢锁
            再看一眼窗口有菜没;   // 重新检查条件
        }

        端走菜;      // 现在安全了,窗口有菜且我持有锁
        解锁窗口;    // 让厨师继续放菜

        送菜给客人;   // 耗时操作,不占用窗口锁

        if(这是最后一道菜) break;
    }
}
情景模拟:
1.服务员锁上窗口,发现没菜
2.如果他不解锁就干等着 → 厨师永远放不了菜 → 死锁!
3.所以他必须:解锁 → 等通知 → 重新加锁
为什么必须用 std::unique_lock 而不是 std::lock_guard?
| 特性 | lock_guard | unique_lock |
|---|---|---|
| 能否中途解锁 | ❌ 不能 | ✅ 可以(unlock()) |
| 能否重新加锁 | ❌ 不能 | ✅ 可以(lock()) |
| wait()能否用 | ❌ 不能用 | ✅ 必须用 |
完整时序图:
| 时间线 | 厨师线程 | 服务员线程 | 窗口状态 |
|---|---|---|---|
| t1 | 做菜中 | 锁窗口 → 发现空 → wait()解锁 | 空 |
| t2 | 锁窗口 → 放菜 → 解锁 | 睡觉中 | 1道菜 |
| t3 | notify_one()按铃铛 | 被唤醒 → 重新锁窗口 | 1道菜 |
| t4 | 继续做菜 | 检查:有菜!→ 端走 → 解锁 | 空 |
| t5 | ... | 处理菜中(无锁) | 空 |
4.1.2用条件变量构建线程安全的队列
使用队列在线程之间传输数据,是一种常见的情况。如果要设计一个线程安全的队列模板,那么花点时间思考一下可能需要的操作是值得的。以 C++标准库的std::queue< > 容器适配器为例,看看其接口以获取灵感:
cpp
template <class T, class Container = std::deque<T> >
class queue {
public:
    explicit queue(const Container&);
    explicit queue(Container&& = Container());
    template <class Alloc> explicit queue(const Alloc&);
    template <class Alloc> queue(const Container&, const Alloc&);
    template <class Alloc> queue(Container&&, const Alloc&);
    template <class Alloc> queue(queue&&, const Alloc&);
    void swap(queue& q);
    //查询整个队列的状态
    bool empty() const;
    size_type size() const;
    //查询队列元素
    T& front();
    const T& front() const;
    T& back();
    const T& back() const;
    //修改队列
    void push(const T& x);
    void push(T&& x);
    void pop();
    template <class... Args> void emplace(Args&&... args);
};
当使用队列在线程之间传递数据时,接收线程通常需要等待数据。可以提供两个 pop() 的变体:
- try_pop(),它尝试从队列中弹出值,但即使没有要检索的值,也总是立即返回(带有失败指示);
- wait_and_pop(),它等待直到有值可检索
下面C++代码,实现了一个线程安全的队列类 threadsafe_queue:
为了简化代码,减少了构造函数并消除了赋值
整个代码是
cpp
#include <memory>
template<typename T>
class threadsafe_queue
public:
    threadsafe_queue();
    threadsafe_queue(const threadsafe_queue&);
    threadsafe_queue& operator=(
            const threadsafe_queue&) = delete;
    void push(T new_value);
    bool try_pop(T& value);
    std::shared_ptr<T> try_pop();
    void wait_and_pop(T& value);
    std::shared_ptr<T> wait_and_pop();
    bool empty() const;
}

class threadsafe_queue{
private:
    std::mutex mut; // 互斥锁(保护队列)
    std::queue<T> data_queue; // 底层普通队列
    std::condition_variable data_cond; // 条件变量(线程间通信)
public:
    // 安全入队
    void push(T new_value){
        std::lock_guard<std::mutex> lk(mut); // 自动上锁
        data_queue.push(new_value); // 安全地放入数据
        data_cond.notify_one(); // 通知一个等待的线程
    }// 离开作用域,自动解锁

    // 安全出队(会等待)
    void wait_and_pop(T& value){
        std::unique_lock<std::mutex> lk(mut); // 上锁,但支持手动解锁
        // 关键:等待直到队列不为空
        data_cond.wait(lk, [this]() {
	       return !data_queue.empty(); });
        value = data_queue.front(); // 取出队首元素
        data_queue.pop(); // 移除队首
    }// 自动解锁
};
完整使用流程:
A线程
cpp
threadsafe_queue<int> q;
q.push(42);  // 安全放入
B线程
cpp
int value;
q.wait_and_pop(value);  // 安全取出(如果队列为空就等待)
协作过程:
1.线程B调用wait_and_pop(),发现队列空 → 解锁 → 等待
2.线程A调用push()放入数据 → 通知线程B
3.线程B被唤醒 → 重新上锁 → 取出数据 → 自动解锁
实际使用代码:
cpp
threadsafe_queue<data_chunk> data_queue; void data_preparation_thread(){
    while (more_data_to_prepare()) {
        data_chunk const data = prepare_data();
        data_queue.push(data);
    }
}void data_processing_thread(){
    while (true) {
        data_chunk data;
        data_queue.wait_and_pop(data);
        process(data);
        if (is_last_chunk(data)) {break;}
    }
}
按书本给出完整代码:
cpp
template<typename T>
class threadsafe_queue{
private:
    mutable std::mutex mut;
    std::queue<T> data_queue;
    std::condition_variable data_cond;
public:
    threadsafe_queue() {}//构造函数
    threadsafe_queue(threadsafe_queue const& other){
        std::lock_guard<std::mutex> lk(other.mut);
        data_queue = other.data_queue;
    }
    void push(T new_value){
        std::lock_guard<std::mutex> lk(mut);
        data_queue.push(new_value);
        data_cond.notify_one();
    }
    void wait_and_pop(T& value){
        std::unique_lock<std::mutex> lk(mut);
        data_cond.wait(lk, [this]() { return !data_queue.empty(); });
        value = data_queue.front();
        data_queue.pop();
    }

    //wait_and_pop返回值为指针的版本
    std::shared_ptr<T> wait_and_pop(){
        std::unique_lock<std::mutex> lk(mut);
        data_cond.wait(lk, [this]() { return !data_queue.empty(); });
        std::shared_ptr<T> res(std::make_shared<T>(data_queue.front()));
        data_queue.pop();
        return res;
    }

    bool try_pop(T& value){
        std::lock_guard<std::mutex> lk(mut);
        if (data_queue.empty()) return false;
        value = data_queue.front();
        data_queue.pop();
        return true;
    }

    std::shared_ptr<T> try_pop() {
        std::lock_guard<std::mutex> lk(mut);
        if (data_queue.empty()) return std::shared_ptr<T>();
        std::shared_ptr<T> res(std::make_shared<T>(data_queue.front()));
        data_queue.pop();
        return res;
    }

    bool empty() const{
        std::lock_guard<std::mutex> lk(mut);
        return data_queue.empty();
    }
};
条件变量在有多个线程等待同一事件的情况下也很有用。如果线程用于分担工作负载,因此只有一个线程应该响应通知;只需运行多个数据处理线程的实例。当新数据准备好时,对 notify_one() 的调用将触发当前正在执行 wait() 的其中一个线程检查其条件并从 wait() 返回(因为刚刚向 data_queue 添加了一个项目)。不能保证哪个线程会收到通知,甚至不能保证是否有线程等待通知;所有处理线程可能仍在处理数据。
通俗的说:多个线程等待同一任务时,notify_one()就像银行叫号系统只叫"下一个",随机唤醒一个空闲线程处理任务;如果所有线程都在忙,通知就没人响应。这种机制让线程自动分担工作负载,但不确定哪个线程会响应,也可能无人等待。
4.2用期值等待一次性事件
C++ 标准库使用一种称为期值的机制来模拟一次性事件
- 如果一个线程需要等待一个特定的一次性事件,它以某种方式获得代表该事件的期值
- 期值可能与数据相关联,也可能没有(std:future<void> )。一旦事件已经发生(并且 期值已经准备好),期值就不能重置了
- C++ 标准库中有两种期值:独占期值(std::future<>)和共享期值(std::shared_future<>)
- 多个 std::shared_future 实例可能引用同一个事件,所有实例将同时准备好
下面来看期值的几个应用场景。
4.2.1从后台任务返回值
假设有一个长期运行的计算任务,预计最终会得到一个有用的结果,但目前还不需要这个值。则可启动一个新线程来执行这个计算,但这意味着必须处理将结果传回的问题,因为 std::thread 并没有提供直接的机制来做到这一点。这就是 std::async 函数模板来完成该功能。
使用 std::async 来启动一个不需要立即结果的异步任务。它会返回一个 std::future 对象(期值),该对象最终将持有函数的返回值。当需要这个值时,只需在期值上调用 get(),线程就会阻塞,直到期值准备好,然后返回该值。
例子:
cpp
#include <future>
#include <iostream> int find_the_answer_to_ltuae();	// 用于查找生命、宇宙和一切的答案void do_other_stuff();		// 用于在等待异步任务完成时执行其他任务int main(){
    // 使用std::async启动一个异步任务,该任务将调用find_the_answer_to_ltuae函数
    // 并返回一个代表该任务的期值对象
    std::future<int> the_answer = std::async(find_the_answer_to_ltuae);
    // 在异步任务运行的同时,执行其他工作
    do_other_stuff();
    // 当需要异步任务的结果时,调用future对象的get()方法
    // 这将阻塞当前线程,直到异步任务完成,并获取任务的返回值
    std::cout << "The answer is " << the_answer.get() << std::endl;
}
std::async 允许向函数传递额外的参数,这与 std::thread 的做法相同。
如果第一个参数是指向成员函数的指针,那么第二个参数提供应用成员函数的对象(可以直接提供,或通过指针,或使用 std::ref 包装),其余参数作为成员函数的参数传递否则,第二个及后续参数作为参数传递给作为第一个参数指定的函数或可调用对象。
例子:
cpp
#include <string>
#include <future>
struct X {
    void foo(int, std::string const&);
    std::string bar(std::string const&);
};
X x;
auto f1 = std::async(&X::foo, &x, 42, "hello"); // 假设p是x的地址&x,这里相当于调用p->foo(42,"hello")
auto f2 = std::async(&X::bar, x, "goodbye"); // 调用tmpx.bar("goodbye"),其中tmpx是x(这里是左值,需要拷贝)的副本
struct Y {
    double operator()(double); 		// 接受一个double类型参数的函数调用操作符
};
Y y;
auto f3 = std::async(Y(), 3.141); 		// 调用tmpy(3.141),其中tmpy是由Y()(是个右值)移动构造的
auto f4 = std::async(std::ref(y), 2.718); 	// 调用 y(2.718)
cpp
X baz(X&);

std::async(baz, std::ref(x));// 使用std::async启动异步任务,调用baz函数,并传递x对象的引用

class move_only {
public:
    move_only();
    move_only(move_only&&);//mark 1
    move_only(move_only const&) = delete;//删除拷贝,确保只能移动
    move_only& operator=(move_only&&);
    move_only& operator=(move_only const&) = delete;//删除赋值,确保只能移动
    void operator()();
};
// 调用tmp(),其中tmp由std::move(move_only())构造
auto f5 = std::async(move_only());//调用的是mark 1
默认情况下,由实现来决定 std::async 是启动一个新线程,还是在等待期值时同步运行任务。可以通过在调用的函数之前向 std::async 传递一个额外的参数来指定使用哪种方式:
- 这个参数的类型是 std::launch
- std::launch::deferred :函数调用要延迟到对期值调用 wait() 或 get() 时
- std::launch::async :函数必须在自己的线程上运行
- std::launch::deferred | std::launch::async :实现可以选择。这个选项是默认值。如果函数调用被延迟,它可能永远不会运行
cpp
auto f6 = std::async(std::launch::async, Y(), 1.2); //在新线程中运行
auto f7 = std::async(std::launch::deferred, baz, std::ref(x)); //延迟执行,在baz调用wait()或get()时运行,baz需要的参数是x,这里使用的是引用方式。mark 2
auto f8 = std::async(std::launch::deferred | std::launch::async, baz, std::ref(x));//默认效果
auto f9 = std::async(baz, std::ref(x)); 	//同上为默认效果,运行时async自行选择

f7.wait();//mark 2的baz会在这里运行
4.2.2关联任务和期值
std::packaged_task<>的模板参数是一个函数签名,它将一个期值与一个函数或可调用对象绑定在一起
当 std::packaged_task<> 对象被调用时,它会执行相关的函数或可调用对象,并将期值准备好,返回值存储为关联的数据。
cpp
template<>
class packaged_task<std::string(std::vector<char>*, int)> {//类模板,两个参数在括号内,返回类型是string
public:
    template<typename Callable>
    explicit packaged_task(Callable&& f); //packaged_task对象是一个可调用对象
    std::future<std::string> get_future();
    void operator()(std::vector<char>*, int);// 对括号进行重载,调用时,它会执行存储的可调用对象,并准备期值
};
以上代码将任务封装在 std::packaged_task 中,并在将其对象传递到其他地方以便在适当时机执行之前,先获取与之关联的 std::future。在需要结果时,可以等待 std::future 准备就绪。
例如:我们常常需要在互斥锁的条件下,使用队列在多线程之间传递任务。下面代码中将任务打包到packaged_task中。
cpp
std::mutex m;
std::deque<std::packaged_task<void()> > tasks;
bool gui_shutdown_message_received();//模拟接受消息后关闭GUI
void get_and_process_gui_message();
void gui_thread() {
    while (!gui_shutdown_message_received()) {
        get_and_process_gui_message();   // 获取并处理下一个GUI消息,这里处理的是GUI本身的消息
        std::packaged_task<void()> task; // 创建一个包装任务的对象,这个任务不一定有东西
        {   std::lock_guard<std::mutex> lk(m);//先上锁
            if (tasks.empty()) continue;//任务队列为空则继续循环
            task = std::move(tasks.front());//移动任务
            tasks.pop_front(); //从队列中弹出任务
        }
        task();//执行任务
    }
}

//将任务放入队列中
std::thread gui_bg_thread(gui_thread);
template<typename Func>// 模板函数用于向GUI线程发布任务
std::future<void> post_task_for_gui_thread(Func f) {//模版参数是void,但很容易地扩展,以允许在GUI线程上运行的任务接受参数并通过 std::future 返回值
    std::packaged_task<void()> task(f);//封装函数f到task中
    std::future<void> res = task.get_future();//拿到task的期值
    std::lock_guard<std::mutex> lk(m);//上锁
    tasks.push_back(std::move(task));//将task放到队列中
    return res;
}
许多GUI框架要求对GUI的更新必须从特定线程执行,因此,如果其他线程需要更新GUI,必须向正确的线程发送消息才能进行。
4.2.3 做出(std::)承诺
std::promise<T> 提供了一种设置值的方法,该值稍后可以通过相关联的 std::future<T> 对象读取。相较前面的packaged_task,使用promise更加简单。
cpp
void process_connections(connection_set& connections) {//connection_set类似连接池
    while (!done(connections)) {  // 循环处理连接,直到所有连接都已完成
    		 // 内层循环:遍历连接池中的每个连接
        for (connection_iterator connection = connections.begin(),
                    end = connections.end(); connection != end; ++connection) {
            if (connection->has_incoming_data()) {// 检查当前连接是否有传入数据
                data_packet data = connection->incoming();// 获取传入的数据包
                // 根据数据ID找到对应的promise,设置值以通知等待方
                std::promise<payload_type>& p = connection->get_promise(data.id);
                p.set_value(data.payload);
            }
            if (connection->has_outgoing_data()) {// 检查当前连接是否有传出数据
                outgoing_packet data = connection->top_of_outgoing_queue();
                connection->send(data.payload); // 发送数据包
                data.promise.set_value(true);   // 表示数据已成功发送
            }
        }
    }
}
以上代码并没有给出future如何与promise一起工作的,下面是具体完整代码:
cpp
#include <iostream>
#include <map>
#include <future>
#include <string>
#include <thread>
#include <Windows.h> // 必须包含
using payload_type = std::string;//payload_type 就是字符串
class connection {
public:
std::map<int, std::promise<payload_type>> promises;//map的key和value分别是int和promise<payload_type>
std::future<payload_type> get_future(int id) {
std::promise<payload_type> promise;//承诺给出string类型的对象
std::future<payload_type> future = promise.get_future();//事先获得promise值
promises[id] = std::move(promise);//将承诺放入容器中
return future;
}
void send(const payload_type& data, int id) {
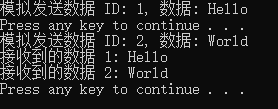
std::cout << "模拟发送数据 ID: " << id << ", 数据: " << data << std::endl;
if (promises.count(id) > 0) {
promises[id].set_value(data);//兑现承诺
}
else {
std::cerr << "No promise found for ID: " << id << std::endl;
}
}
};
int main() {
SetConsoleOutputCP(CP_UTF8); // 设置控制台为UTF-8
connection conn;//创建connection
auto future1 = conn.get_future(1);//提供id获取期值
auto future2 = conn.get_future(2);
std::thread sender([&]() { conn.send("Hello", 1); });// 在一个线程中模拟发送数据
system("pause");//没有会怎么样?
std::thread sender2([&]() { conn.send("World", 2); });// 在另一个线程中模拟发送数据
sender.join();
sender2.join();
std::cout << "接收到的数据 1: " << future1.get() << std::endl;
conn.promises.erase(conn.promises.find(1));//从容器中删除对应的future
std::cout << "接收到的数据 2: " << future2.get() << std::endl;
conn.promises.erase(conn.promises.find(2));
system("pause");
}
4.2.4为期值存储异常
在单线程中,如果向 square_root() 函数传递 -1 作为参数,它将抛出一个异常(调用者有机会捕获该异常):
cpp
double square_root(double x){
    if(x<0){
        throw std::out_of_range("x<0");
    }x
    return sqrt();
}
double y=square_root(-1);
在多线程中,square_root可能是在另外一个线程上运行的:
cpp
std::future<double> f = std::async(square_root,-1);
double y=f.get();
我们希望调用 f.get() 的线程也能像在单线程情况下一样看到异常。
实际上,异常会存储在期值中,也就是说作为 std::async 一部分调用的函数抛出异常,该异常会被存储在期值中,代替存储的值,期值会变为就绪状态,并且调用 get() 会重新抛出存储的异常。
std::promise 提供了同样的功能。如果希望存储一个异常而不是一个值,应该调用 set_exception() 成员函数而不是 set_value()。这通常用在捕获算法中抛出的异常的 catch 块中,用以将该异常填充到 promise 中,例如:
cpp
extern std::promise<double> some_promise;
try {
    some_promise.set_value(calculate_value());//这里本来是应该存储承诺的值
} catch(...) {//但发生异常则存储该异常
    some_promise.set_exception(std::current_exception());
}
另一种选择是使用 std::make_exception_ptr() 直接存储一个新的异常,而不需要抛出异常。如果已知异常的类型,这种方法比使用 try/catch 块要简洁得多,应该优先使用;它不仅简化了代码,还为编译器提供了更多优化代码的机会,例如:
cpp
#include <iostream>
#include <future>
#include <exception>
#include <thread>
#include <Windows.h> // 必须包含
void task_function(std::promise<void> promise) {
//try {throw std::logic_error("foo"); }
//catch (const std::exception& e) {
// 捕获异常并使用 promise 的 set_exception 方法存储异常
// promise.set_exception(std::current_exception());//这里是将当前未知异常
//}
promise.set_exception(std::make_exception_ptr(std::logic_error("foo")));//make_exception_ptr处理已知异常,可以替代上面的try/catch
}
int main() {
SetConsoleOutputCP(CP_UTF8); // 设置控制台为UTF-8
std::promise<void> some_promise;//创建promise对象
std::future<void> future = some_promise.get_future();//设置期值
std::thread task_thread(task_function, std::move(some_promise));//将期值some_promise作为参数,移动给task_function,并在新线程中运行
task_thread.join();
try {
future.get();//根据上面代码,这里会抛出异常
}
catch (const std::exception& e) {
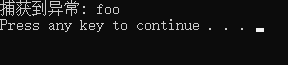
std::cout << "捕获到异常: " << e.what() << std::endl;
}
system("pause");
return 0;
}
这里可以尝试把task_function中两种捕获异常的方式都试试,看看是否结果一样。
另一种会在期值中存储异常的情况是,在未调用承诺上的任何设置函数或调用打包任务的情况下,就已经销毁与之关联的 std::promise 或 std::packaged_task。就是还未兑现承诺,承诺已经被销毁。
到目前为止,所有示例都使用了 std::future。然而,std::future 有其局限性,只有一个线程可以等待结果。下面看多线程等待结果的情况。
4.2.5多线程等待
与 std::future 只能移动不同,std::shared_future 实例是可以拷贝的。这样,多个线程可以共享对同一个异步事件的引用,并等待其结果,而不会出现数据竞争或未定义行为。使用 std::shared_future 时,所有关联的期值对象都会在事件发生时接收到通知,并且可以在线程安全的情况下并发地访问 std::shared_future 对象以获取结果。
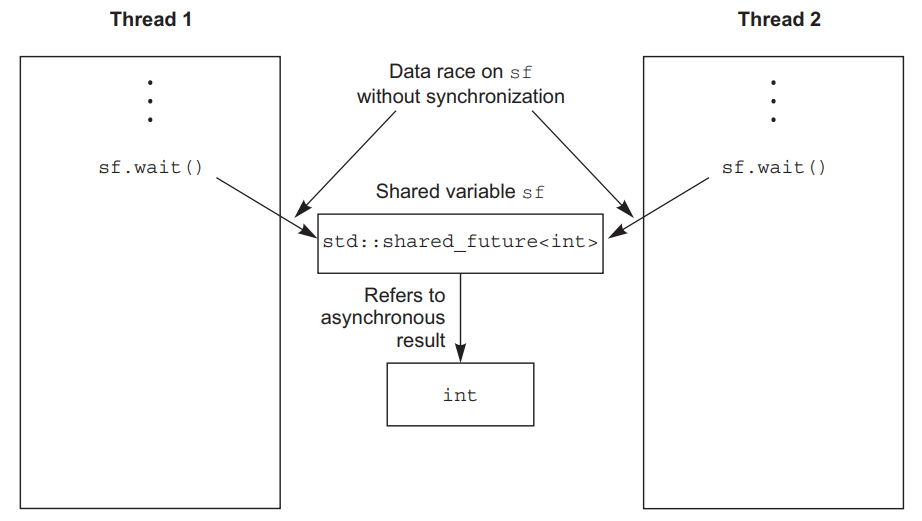
使用 std::shared_future,对单个对象的成员函数仍然是不同步的,所以为了避免在多个线程访问单个对象时发生数据竞争,必须使用锁来保护访问。例如下图中两个线程使用了同一个shared_future对象sf,都调用wait()成员函数使用refer引用的方式访问同一个int值,引用访问是可能产生修改的,同时修改明显不安全,应该是分别使用拷贝的值。
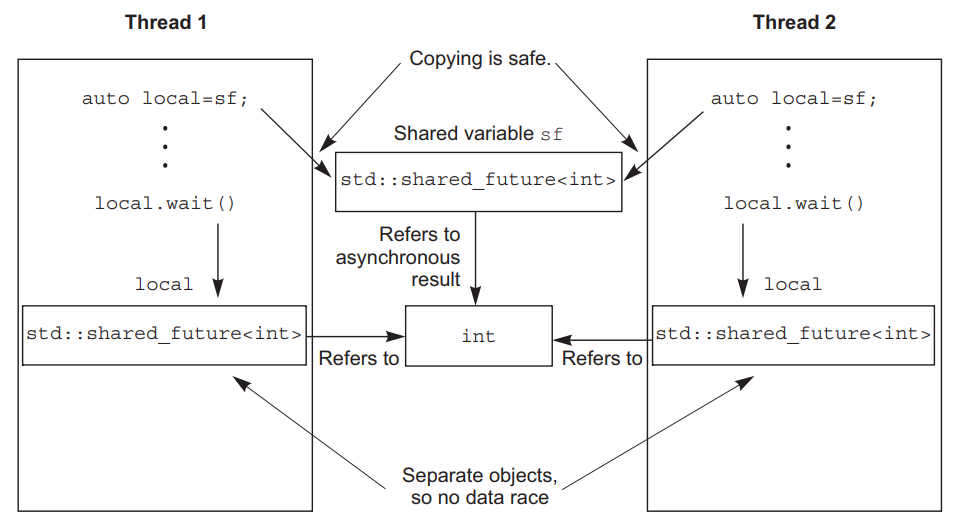
如果每个线程通过自己的 std::shared_future 对象访问共享的异步状态,那么从多个线程安全地访问该状态是可行的,例如下图中wait()来自各自线程中不同对象,不同对象通过引用访问同一个资源则没有问题。
引用某异步状态的 std::shared_future 实例是从引用该状态的 std::future 实例构建的。
std::future 对象不会与任何其他对象共享异步状态的所有权,因此必须使用 std::move 将所有权转移(使用move)给 std::shared_future,从而使 std::future 处于一个空状态,就好像它是一个默认构造函数一样。
cpp
std::promise<int> p;
std::future<int> f(p.get_future());
assert(f.valid()); 	// f有效
std::shared_future<int> sf(std::move(f));
assert(!f.valid());   // f已无效
assert(sf.valid());   // 现在sf有效
与其他可移动对象一样,所有权的转移对于 rvalue 是隐式的:
cpp
std::promise<std::string> p;
std::shared_future<std::string> sf(p.get_future());
std::future 有一个 share() 成员函数,它创建一个新的 std::shared_future 并直接将所有权转移给它。
cpp
std::promise< std::map< SomeIndexType, SomeDataType, SomeComparator,	SomeAllocator>::iterator> p;
auto sf=p.get_future().share();
auto 的作用
- 简化代码:隐藏复杂类型,避免重复书写长达数行的模板声明
- 提高可读性:代码意图更清晰("我要一个共享的 future")
- 减少维护成本:若 promise 类型变更,使用 auto 的代码无需修改
4.3有时间限制的等待
之前介绍的所有阻塞调用都会无限期地阻塞,直到等待的事件发生,线程才会被唤醒。但在某些情况下,可能希望设置一个等待时间的限制。有两种可能希望指定的超时类型:
1.基于持续时间的超时
- 等待特定的时间量(例如,30 毫秒);
- 处理基于持续时间的超时的变体具有 _for 后缀。
2.绝对超时
- 等待直到特定的时间点(例如,2011 年 11 月 30 日的 UTC 时间 17:30:15.045987023)。
- 处理绝对超时的变体具有 _until 后缀。
4.3.1时钟
对于C++标准库而已,时钟提供四种信息:当前时间、时间点类型、时钟tick周期、是否为稳定时钟。
当前时间:通过调用静态成员函数now()可以获取当前时间,如std::chrono::system_clock::now()返回系统时钟的当前时间。
时间点类型:特定时钟的时间点类型由 time_point 成员类型定义,因此 some_clock::now() 的返回类型是 some_clock::time_point。
时钟tick周期:时钟的滴答周期以秒的分数表示,每秒滴答 25 次的时钟周期为 std::ratio<1, 25>。周期可以指定为平均tick周期、最小可能的tick周期,或者库编写者认为合适的其他值。
是否为稳定时钟:稳定时钟是指能够以恒定速度运行且无法调整的时钟。如果时钟是稳定的,时钟类的 is_steady 静态数据成员为 true,否则为 false。通常,std::chrono::system_clock 不是稳定的。因为时钟可以被调整,稳定时钟对于超时计算很重要,所以 C++ 标准库以 std::chrono::steady_clock 的形式提供了一个。
std::chrono::system_clock:提供了将时间点转换为 time_t 值和从 time_t 值转换的时间点的函数
std::chrono::high_resolution_clock:提供最小tick周期的时钟,具有最高的精度
C++标准库提供的其他时间功能,可以在<chrono>库头文件中找到
4.3.2持续时间
在C++标准库中,有std::chrono::duration类模板,使用时需要提供两个参数:
1.类型的选择:允许用户自定义时间长度的表示类型,如int、double等
2.单位的设定:通过std::ratio定义单位与秒之间的换算比例,例如一分钟由60秒组成,一秒由1/1000毫秒组成。
例如:
std::chrono::duration<short, std::ratio<60,1>>:用short值表示分钟,一分钟有 60 秒
std::chrono::duration<double, std::ratio<1,1000>>:用double值表示毫秒,一毫秒是 1/1000秒
C++提供了预定义的时长别名,如nanoseconds(纳秒, 1 / 1 0 9 1/10^9 1/109)、microseconds(微秒, 1 / 1 0 6 1/10^6 1/106)等,方便用户快速使用。
为了方便,C++14 引入了 std::chrono_literals 命名空间,提供了许多预定义字面量后缀,例如:
cpp
using namespace std::chrono_literals;
auto one_day = 24h;
auto half_an_hour = 30min;
auto max_time_between_messages = 30ms;
当与整数字面量一起使用时,这些后缀等同于使用typedef预定义的某种类型,例如:
15ns :std::chrono::nanoseconds(15)
当与浮点字面量一起使用时,这些后缀创建了一个具有未指定浮点类型的持续时间类型,例如:
2.5min :std::chrono::duration<some-floating-point-type, std::ratio<60,1>>
显式转换可以使用 std::chrono::duration_cast<> 进行:
cpp
std::chrono::milliseconds ms(54802);
std::chrono::seconds s = std::chrono::duration_cast<std::chrono::seconds>(ms);
结果会被截断而不是四舍五入,所以在本例中 s 的值将是 54
基于持续时间的等待是使用 std::chrono::duration< > 的实例完成的。例如,可以等待期值准备好,最多 35 毫秒:
cpp
std::future<int> f=std::async(some_task);
if(f.wait_for(std::chrono::milliseconds(35))==std::future_status::ready)
    do_something_with(f.get());
上面代码中:
- wait_for如果等待超时(35毫秒),则返回 std::future_status::timeout;
- 如果期值已准备好,则返回 std::future_status::ready,执行do_something_with;
- 如果期值的任务被推迟,则返回 std::future_status::deferred。
4.3.3时间点
上节是一段时间的操作,这里看某个时间点。时钟的时间点由 std::chrono::time_point<> 类模板的实例表示,该模板也有两个参数:
选择时钟类型:std::chrono::time_point的第一个参数是时钟类型;
单位的选择:std::chrono::time_point的第二个参数是持续时间的特化,它定义了时间点的测量单位。
例如:
std::chrono::time_point<std::chrono::system_clock, std::chrono::minutes>
这将持有相对于系统时钟的时间,但以分钟为单位,而不是系统时钟的本机精度(通常是秒或更小)。
std::chrono::time_point实例的值代表了从时钟epoch开始,经过的时间长度。这个epoch可能不一样,可能是电脑开机时间,可能是某个时间点。
时钟可能共享一个纪元或有独立的纪元。如果两个时钟共享一个epoch,一个类中的time_point typedef可以指定另一个类作为与time_point相关联的时钟类型。
可以获取给定 time_point 的 time_since_epoch()。这个成员函数返回一个持续时间值,指定从时钟epoch到该特定时间点的时间长度。
时间点相减,结果是一个持续时间,例如:
cpp
auto start = std::chrono::high_resolution_clock::now();
do_something();
auto stop = std::chrono::high_resolution_clock::now();//与前面起始时间一样
std::cout << "do_something() took "
           << std::chrono::duration<double, std::chrono::seconds>(stop - start).count()
           << " seconds" << std::endl;//按秒为单位打印运行时间
时间点与 wait 函数的 _until 变体一起使用。典型的用例是作为程序中固定点处 some-clock::now() 的偏移量(尽管通过使用 std::chrono::system_clock::to_time_point() 静态成员函数从 time_t 转换,获取与系统时钟相关联的时间点)。具体例子:
cpp
#include <condition_variable>
#include <mutex>
#include <chrono> // 包含时间相关的类和函数
std::condition_variable cv; //条件变量
bool done;
std::mutex m; //互斥锁
bool wait_loop() {
    auto const timeout = std::chrono::steady_clock::now() + std::chrono::milliseconds(500);//时间点now+便宜500毫秒
    std::unique_lock<std::mutex> lk(m); //上锁
    while (!done) { // done应该会在另外线程中被改变状态。等待条件变量或超时,如果超时则返回 std::cv_status::timeout
        if (cv.wait_until(lk, timeout) == std::cv_status::timeout) {
            break; // 如果超时,退出循环
        }
    }
    return done; //最终返回 done 的值,表示循环是因为条件变量变为 true 还是因为超时而结束
}//解锁
完整代码如下:
cpp
#include <condition_variable>
#include <mutex>
#include <chrono>
#include <iostream>
#include <thread>
#include <Windows.h> // 必须包含
std::condition_variable cv;
bool done=false;
std::mutex m;//锁
bool wait_loop() {
//超时设置为当前时间后的1.5s
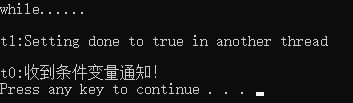
auto const timeout = std::chrono::steady_clock::now() + std::chrono::milliseconds(1500);
std::unique_lock<std::mutex> lk(m);//上锁
while (!done) {
puts("while......");
if (cv.wait_until(lk, timeout) == std::cv_status::timeout) {
break;
}
}
if (done) {
std::cout << "\nt0:收到条件变量通知!" << std::endl;
}
else {
std::cout << "\nt0:超时退出!" << std::endl;
}
return done;
}
int main() {
SetConsoleOutputCP(CP_UTF8); // 设置控制台为UTF-8
//std::thread t0(wait_loop);//mark1 在其他线程中修改 done 的值来控制等待线程的行为
wait_loop();//在当前线程执行wait_loop,没有机会修改done的值mark2
std::thread t1([&]() {
std::cout << "\nt1:Setting done to true in another thread" << std::endl;
done = true;
cv.notify_one();
});
//t0.join();//mark1
t1.join();
system("pause");
return 0;
}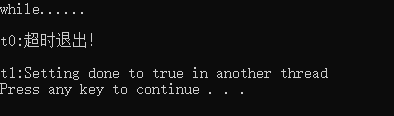
解开mark1两处的注释,注释掉mark2
4.3.4接受超时的函数
使用超时的最简单方式就是,对一个特定线程添加一个延迟处理;
当这个线程无所事事时,就不会占用可供其他线程处理的时间。就像上节代码中不断轮询done的状态,会有额外开销。因此可以用休眠:
- 指定时长的睡眠:std::this_thread::sleep_for()函数允许线程按照指定的时间长度进行休眠。
- 唤醒至特定时刻:std::this_thread::sleep_until()函数可以使线程在指定的时间点被唤醒。
sleep_for()适用于周期性任务,而sleep_until()则用于在特定时间触发事件。甚至可以在试图获取互斥锁时使用超时:
- std::timed_mutex是支持超时的互斥锁类型
- std::recursive_timed_mutex是支持超时的递归互斥锁类型
- std::try_lock_for()和std::try_lock_until()函数用于尝试在指定时间内或指定时间点之前获取锁,如果获取成功则返回true,否则返回false
4.4使用操作同步来简化代码
4.4.1函数式编程与期值
functional programming (FP)函数式编程是一种编程风格,结果只依赖于函数参数(相同参数会得到相同结果),不依赖于外部状态。通过使用期值,可以将结果分发给其他需要的线程。
C++是一种多范式语言,可以以函数式编程风格编写程序。C++11引入了lambda函数、std::bind和auto类型推导等功能,使得函数式编程在C++中更加容易实现。
期值在函数式并发中的作用是允许一个计算的结果依赖于另一个计算的结果,而无需显式访问共享数据(没有对共享数据被修改),从而简化了并发编程。
下面看一个使用函数式编程风格(FP-Style)进行快速排序的例子:
快速排序算法的实现步骤包括:选择基准元素、将待排序序列分为两部分(小于基准元素,大于等于基准元素)、递归调用快速排序函数对子序列进行排序,最后合并有序子序列得到最终的有序序列。
如下图,第一轮将第一个数字作为基准,比5小的放上面,比5大的放下面。
后面每个部分再执行相同操作。
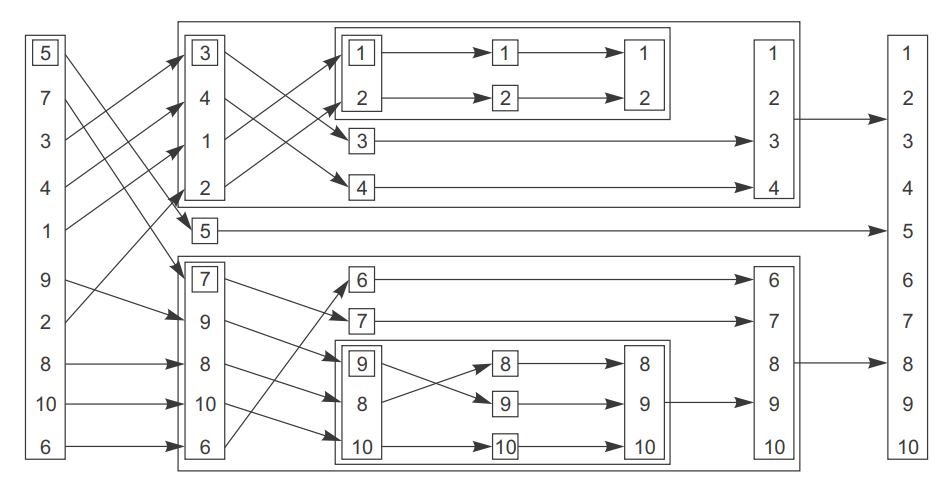
快速排序算法在FP-style并发中的应用:Quicksort算法是经典的排序算法之一,在FP-style并发中可以通过递归调用和futures来实现高效的排序操作,提高程序的性能和响应速度。
优势与挑战:FP-style并发具有简洁、可读性强的特点,能够更好地处理复杂的并发任务。然而,由于其基于递归的特性,可能会面临栈溢出等问题,需要合理设计和优化代码。
快速排序的顺序实现:
cpp
template<typename T>
std::list<T> sequential_quick_sort(std::list<T> input) {//sequential_quick_sort函数模板,接受list作为参数
    if(input.empty()) { return input; }//检查传入的list是否为空
    std::list<T> result;
    // 将输入列表的第一个元素移动到结果列表的开头
    result.splice(result.begin(),input,input.begin());
    T const& pivot=*result.begin();
    // 使用std::partition对输入列表进行划分
    auto divide_point=std::partition(input.begin(),input.end(),
						[&](T const& t){return t<pivot;});
    std::list<T> lower_part;
    lower_part.splice(lower_part.end(),input,input.begin(),divide_point);
    auto new_lower(sequential_quick_sort(std::move(lower_part)));
    auto new_higher(sequential_quick_sort(std::move(input)));
    result.splice(result.end(),new_higher);
    result.splice(result.begin(),new_lower);
    return result;
}
std::list的splice函数可以移动元素,这可避免不必要的元素复制,提高算法的效率;
std::partition函数的返回值是一个迭代器,指向重新排序的序列中第一个不满足条件的元素:
cpp
auto divide_point = std::partition(
    input.begin(),          // 分区起始位置
    input.end(),            // 分区结束位置
    [&](T const& t){        // Lambda谓词函数
        return t < pivot;   // 判断是否小于基准值
    }
);
接下来看使用期值的并行快速排序:
cpp
template<typename T>
std::list<T> parallel_quick_sort(std::list<T> input){
if(input.empty()) { return input; }
std::list<T> result;
result.splice(result.begin(),input,input.begin());
T const& pivot=*result.begin();
auto divide_point=std::partition(input.begin(),input.end(),
[&](T const& t){return t<pivot;});
std::list<T> lower_part;
lower_part.splice(lower_part.end(),input,input.begin(),divide_point);
// mark1使用std::async在一个新的线程中异步地对lower_part进行快速排序,返回的是期值
std::future<std::list<T> > new_lower(std::async(¶llel_quick_sort<T>,
std::move(lower_part)));
auto new_higher(parallel_quick_sort(std::move(input))); //这里是在当前线程计算
result.splice(result.end(),new_higher);
// 使用get()来获取在新线程中排序的结果(期值),并拼接到结果列表
result.splice(result.begin(),new_lower.get());
return result;
}上面代码使用std::async创建了一个新的线程来并行地对lower_part进行排序,同时在主线程中对input进行排序。这样可以充分利用多核CPU的并行计算能力,提高排序算法的性能。
mark1部分的代码,C++库可能会决定任务过多,会在调用get()的线程中运行(也就是当前线程运行),而不是在新线程上,从而避免在传递到另一个线程时的开销。
下面是一个实现spawn_task的示例:
cpp
template<typename F,typename A>
std::future<std::result_of<F(A&&)>::type> spawn_task(F&& f, A&& a){
    typedef std::result_of<F(A&&)>::type result_type;
    // 创建一个打包任务,该任务在被调用时会执行函数f
    std::packaged_task<result_type(A&&)> task(std::move(f));
    std::future<result_type> res(task.get_future());
    std::thread t(std::move(task), std::move(a));
    t.detach();    // 将新线程设为分离状态,这意味着主线程不需要等待新线程结束
    return res;
}
这就像叫外卖的过程------你下单后不用去餐厅等,外卖员会把饭菜送到你家,而你该干嘛干嘛。
cpp
spawn_task(做披萨, 榴莲) → 返回"订单号"(期值)作用:在新线程里异步执行函数,立即返回一个"提货凭证",过会儿凭此取结果。
| 步骤 | 比喻 | 代码 | 实际动作 |
|---|---|---|---|
| 1️⃣ | 确定菜品 | typedef ... result_type; |
算出做披萨(榴莲)会返回什么类型(比如Pizza) |
| 2️⃣ | 打包订单 | std::packaged_task task(...); |
把"做披萨"和"榴莲"打包成一个可执行的任务包 |
| 3️⃣ | 生成订单号 | task.get_future(); |
拿到一张订单小票 (future),将来凭此取披萨 |
| 4️⃣ | 派外卖小哥 | std::thread t(...); |
创建新线程,让小哥拿着任务包去厨房做披萨 |
| 5️⃣ | 小哥独立配送 | t.detach(); |
关键:小哥脱离餐厅管理,自己送餐(主线程不等他) |
| 6️⃣ | 给你订单号 | return res; |
把订单小票给你,主线程继续忙别的 |
4.4.2通过消息传递同步操作
通信顺序进程(CSP)
- 是一种形式语言,用来描述并发性系统间进行交互的模式
- 每个线程或进程独立运行,它们之间仅通过消息传递进行通信,而不是直接共享状态
- 每个线程实际上都是一个状态机:当它接收到一条消息时,会以某种方式更新自己的状态,并且可能会向其他线程发送消息
- 为了使线程进行通信,必须共享消息队列
以一个简化的ATM机为例,将代码分成三个独立的线程:
负责操作物理机器
负责处理ATM逻辑
用于与银行通信
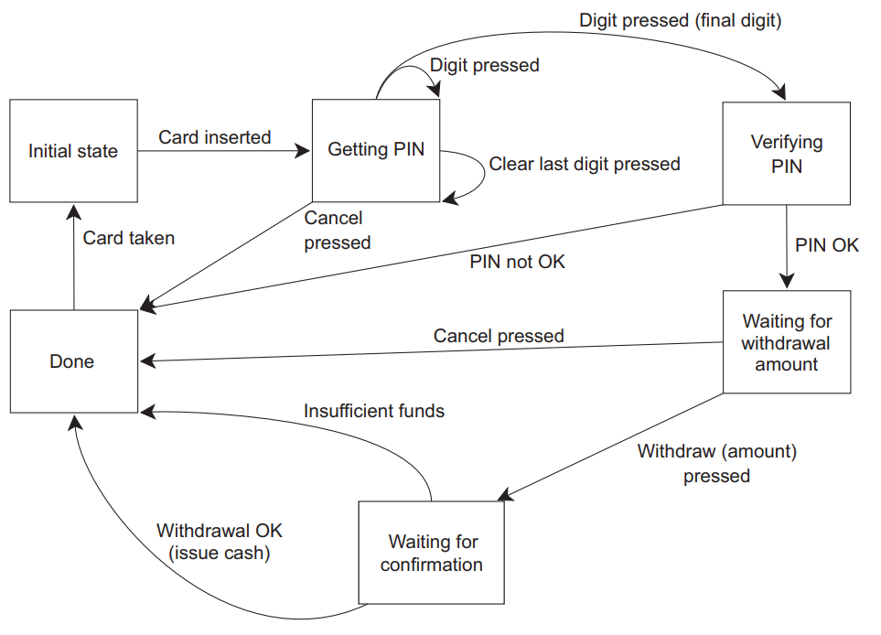
一个简单的ATM逻辑状态机:
用一个类来实现它,每个状态都有一个成员函数来表示。然后,每个成员函数可以等待特定的消息,并在它们到达时处理它们,可能触发切换到另一个状态。每一种不同的消息类型由一个独立的结构体表示
cpp
struct card_inserted {std::string account; };class atm {
	//所有消息传递所需的必要同步完全隐藏在messaging库内,具体代码见附录
    messaging::receiver incoming;
    messaging::sender bank;
    messaging::sender interface_hardware;
    void (atm::*state)(); // state是指针,指向atm类的一个成员函数(返回类型为void,无参数)
    std::string account;//账户
    std::string pin;//密码
    void waiting_for_card() {
        interface_hardware.send(display_enter_card());
        //让 ATM 保持等待状态,直到一个 card_inserted 消息被接收;一旦这个消息到达,它就会使用提供的 lambda 表达式来处理这个消息(读取消息的内容,更新内部状态,可能触发界面更新或转换到机器的另一个状态)
        incoming.wait().handle<card_inserted>([&](card_inserted const& msg) {
            account = msg.account; pin = ""; interface_hardware.send(display_enter_pin());
            state = &atm::getting_pin;
        });
    }
    void getting_pin();
public:
    void run() { 	// 启动,初始状态为等待插卡
        state = &atm::waiting_for_card;
        try {for (;;) { (this->*state)(); }}
        catch (messaging::close_queue const&) { }
    }
};
cpp
void atm::getting_pin() {
    incoming.wait()//这里的wait正在等待一个 digit_pressed 消息,一个 clear_last_pressed 消息或一个 cancel_pressed 消息。其他任何类型的消息再次被丢弃
	.handle<digit_pressed>([&](digit_pressed const& msg) {
        unsigned const pin_length = 4;
        pin += msg.digit;
        if(pin.length() == pin_length) {
            	bank.send(verify_pin(account, pin, incoming));//verify_pin是一个结构
            	state = &atm::verifying_pin;//verifying_pin代码在附录中
        }
    	})
    	.handle<clear_last_pressed>([&](clear_last_pressed const&) {
        if(!pin.empty()) {
            	pin.resize(pin.length() - 1);
        }
    	})
    	.handle<cancel_pressed>([&](cancel_pressed const&) {
        	state = &atm::done_processing;
    	});
}
4.4.3基于并发TS(Technical Specification,技术规范)的延续式并发
并发技术规范(Concurrency TS)在 std::experimental 命名空间中提供promise 和 packaged_task :返回 std::experimental::future 的实例,而不是 std::future。这使得用户能够利用 std::experimental::future 中的关键新特性------延续(continuation)。
std::experimental::future:提供了一种在原始future就绪时运行的机制,通过添加continuation实现异步处理;
std::experimental::future与std::async的区别:std::experimental::future允许在原始future就绪时运行,而std::async则在创建线程时立即执行函数;
使用then()方法添加延续(continuation):std::experimental::future的then()方法用于添加continuation,当原始future就绪时,调用指定的continuation函数进行处理。
cpp
std::experimental::future<int> find_the_answer();
auto fut = find_the_answer();
auto fut2 = fut.then(find_the_question);
assert(!fut.valid()); // then返回后,fut变无效
assert(fut2.valid()); // 返回的新 future 对象有效
如以上代码所示,std::experimental::future 与 std::future 类似,只允许存储的值被检索一次。如果这个值正在被一个延续(continuation)使用,它不能再被其他代码访问;通过 fut.then() 添加一个延续,原始的 future 对象 fut 会变得无效。fut.then() 调用会返回一个新的 future 对象,用来保存延续调用的结果。
当原始future就绪时,find_the_question继续函数被安排在"一个未指定的线程上"运行。
与对 std::async 或 std::thread 的直接调用不同,不能将参数传递给延续函数,因为参数已经由库定义(一个已准备好的期值)。假设 find_the_answer 函数返回一个 int,前面示例中引用的 find_the_question 函数必须采用 std::experimental::future 作为其唯一参数:
cpp
std::string find_the_question(std::experimental::future<int> the_answer);这是因为延续所绑定的期值可能最终持有一个值或一个异常。而通过将期值传显式的递给延续函数,延续函数可以处理异常(而不是在库里调用get的时候来处理)。
延续函数就像"接棒跑第二棒的运动员",你必须按照规则接过上一棒传来的"接力棒"(future对象),不能自己额外带东西上场。
这是一个与std::async(并发TS中并没有规定)等价的版本
cpp
template<typename Func>//函数模板
std::experimental::future<decltype(std::declval<Func>()())>//std::declval<Func>()假装产生了一个 Func 类型的对象
spawn_async(Func&& func) {
    std::experimental::promise<decltype(std::declval<Func>()())> p;
    auto res = p.get_future();
    std::thread t(
        [p=std::move(p), f=std::decay_t<Func>(func)]() mutable {
                try {
                    p.set_value_at_thread_exit(f()); // 尝试在线程退出时设置期值对象的值
                } catch(...) {
                    p.set_exception_at_thread_exit(std::current_exception());
                }
            }
    );  // 创建一个新线程 t
    t.detach();  // 分离线程,使其在后台运行
    return res;  // 返回创建的未来对象 res
}
4.4.4链接延续
作为顺序执行的代码,你可能会编写如下所示的代码:
cpp
void process_login(std::string const& username, std::string const& password) {
    try {
        user_id const id = backend.authenticate_user(username, password);
        user_data const info_to_display = backend.request_current_info(id);
        update_display(info_to_display);
    } catch (std::exception& e) {
        display_error(e);
    }
}
try中的三行代码会阻塞GUI线程,因此需要异步代码:
cpp
std::future<void> process_login(
    std::string const& username, std::string const& password){
    return std::async(std::launch::async, [=]() {
        try {
            user_id const id = backend.authenticate_user(username, password);
            user_data const info_to_display =backend.request_current_info(id);
            update_display(info_to_display);
        } catch (std::exception& e) {
            display_error(e);
        }
    });
}
使用 std::async,可以将所有任务都放到一个后台线程中执行,但这仍然会阻塞那个线程,等待任务完成时它会消耗资源。如果有很多这样的任务,那么可能最终会有很多线程除了等待之外什么也不做。为了避免所有这些被阻塞的线程,需要一种机制来在每个任务完成后串联任务:延续(continuation)。下面的代码示例展示了相同的整体流程,但这次被分割成一系列任务,每个任务作为一个延续串联在前一个任务上:
cpp
std::experimental::future<void>
process_login(std::string const& username, std::string const& password){
    return spawn_async([=]() {
        return backend.authenticate_user(username, password);
    }).then([](std::experimental::future<user_id> id) {
        return backend.request_current_info(id.get());
    }).then([](std::experimental::future<user_data> info_to_display) {
        try {
            update_display(info_to_display.get());
        } catch (std::exception& e) {
            display_error(e);
        }
    });
}
相当于将authenticate_user、request_current_info、update_display三个操作放到另外一个线程A,不会阻塞主线程,但如果有多个连接,那么线程A也会因为这三个串联操作遇到问题而阻塞。
因此,更进一步的解决方案是将这三个操作放到不同进程中异步执行,在后端调用返回期值,这些期值在数据准备好时变得可用,而不阻塞任何线程。
下例是一个用完全异步操作处理用户登录的函数,async_authenticate_user返回std::experimental::future<user_id> ,但是没有给出具体实现。由于期值解包的特性,这些 .then() 调用返回的期值直接是 future<user_data> 和 future<void>,而不是嵌套的期值
cpp
std::experimental::future<void>
process_login(std::string const& username, std::string const& password){
    return backend.async_authenticate_user(username, password).then(
        [](std::experimental::future<user_id> id) {
            return backend.async_request_current_info(id.get());
        }).then(
        [](std::experimental::future<user_data> info_to_display) {
            try {
                update_display(info_to_display.get());
            } catch(std::exception& e) {
                display_error(e);
            }
        });
}
以上是C++11的写法,在C++14中,可以使用lambda 表达式,那么 lambda 参数中的期值类型可以替换为 auto,这将进一步简化代码:
cpp
return backend.async_authenticate_user(username, password).then(
    [](auto id) {
        return backend.async_request_current_info(id.get());
    });
当一个事件结束后,想要启动多个线程,需要使用std::experimental::shared_future,它是C++标准库中的一个类模板,它支持多个延续,并且延续参数也是std::experimental::shared_future。
延续函数的参数必须是std::experimental::shared_future,而返回值是一个普通的std::experimental::future,需要通过某种方式进行共享。
cpp
auto fut = spawn_async(some_function).share();
auto fut2 = fut.then([](std::experimental::shared_future<some_data> data) {
    do_stuff(data);
});
auto fut3 = fut.then([](std::experimental::shared_future<some_data> data) {
    return do_other_stuff(data);
});
由于 share() 调用,fut 是一个 std::experimental::shared_future,所以延续函数必须接受一个 std::experimental::shared_future 作为其参数。然而,延续的返回值是一个普通的 std::experimental::future------那个值目前还没有被共享,直到你对它进行共享------所以 fut2 和 fut3 都是 std::experimental::futures。
4.4.5等待多个future
假如我们需要将输入容器vector分割成多个较小的数据块,并异步处理每个数据块,每个数据块的处理结果被存储在 results 中,最后通过另一个异步任务来收集汇总成最终结果:
cpp
std::future<FinalResult> process_data(std::vector<MyData>& vec) {
    size_t const chunk_size = /* 某种确定的值 */;
    std::vector<std::future<ChunkResult>> results; // 存储异步任务结果,先返回期值
    for (auto begin = vec.begin(), end = vec.end(); begin != end;) {
        size_t const remaining_size = end - begin; // 计算剩余数据的大小
        size_t const this_chunk_size = std::min(remaining_size, chunk_size);
        // 异步处理当前数据块,并将结果添加到results中,这里返回期值
        results.push_back(std::async(process_chunk, begin, begin + this_chunk_size));
        begin += this_chunk_size;// 移动到下一个数据块的开始
    }
    return std::async([all_results = std::move(results)]() {
        std::vector<ChunkResult> v; 		// 用于存储中间结果,不是期值,而是将前面的期值放进来
        v.reserve(all_results.size()); 	// 预留足够的空间
        for (auto& f : all_results) {	// 收集所有异步任务的结果
            v.push_back(f.get());//结果没好会等待
        }
        return gather_results(v);// 汇总结果并返回
    });
}
然而,由于是逐个等待每个任务的结果,会在每个结果可用时被调度器重复唤醒,当发现还有尚未准备好的结果时再次进入睡眠状态。这不仅占用了执行等待的线程,还在每个期值变得可用时增加了额外的上下文切换。可以把代码修改为:
cpp
std::experimental::future<FinalResult> process_data(
    std::vector<MyData>& vec) {
    size_t const chunk_size = /* 某种确定的值 */;
    std::vector<std::experimental::future<ChunkResult>> results;
    for (auto begin = vec.begin(), end = vec.end(); begin != end;) {
        size_t const remaining_size = end - begin;
        size_t const this_chunk_size = std::min(remaining_size, chunk_size);
        results.push_back(spawn_async(process_chunk, begin, begin + this_chunk_size));
        begin += this_chunk_size;
    }
    return std::experimental::when_all(// 等待所有异步任务完成,并返回一个新的future
        results.begin(), results.end()).then(
            [](std::future<std::vector<std::experimental::future<ChunkResult>>> ready_results) {
                std::vector<std::experimental::future<ChunkResult>> all_results = ready_results.get();
                std::vector<ChunkResult> v;
                v.reserve(all_results.size());
                for (auto& f : all_results) { v.push_back(f.get());}
                return gather_results(v);
            });
}
这段代码使用了std::experimental::when_all,可以避免这种等待和上下文切换,将需要等待的一组期值传递给 when_all,它返回一个新的期值,当集合中的所有期值都准备好时,这个新的期值就会变得可用,这个新的期值可以与延续(continuations)一起使用,来安排当所有期值都准备好时需要执行的额外工作。
4.4.6使用when_any等待集合中的第一个future
想象你派出一队海盗去荒岛上找宝藏,谁先找到就立即通知所有人停止搜索。
cpp
//返回一个FinalResult类型的future,承诺最终会给处理结果
std::experimental::future<FinalResult> find_and_process_value(std::vector<MyData> &data) {
    unsigned const concurrency = std::thread::hardware_concurrency();//获取硬件支撑的线程数量
    unsigned const num_tasks = (concurrency > 0) ? concurrency : 2;//获取失败则使用默认值2
    std::vector<std::experimental::future<MyData *>> results;
    auto const chunk_size = (data.size() + num_tasks - 1) / num_tasks;//根据线程数量计算数据块的大小,这里分母加上分子减1相当于向上取整,例如9分两份不会分成4,4,1,而是会分成5,4
    auto chunk_begin = data.begin();
    std::shared_ptr<std::atomic<bool>> done_flag =std::make_shared<std::atomic<bool>>(false);//原子类型的flag能保证不需要上锁只能一个线程访问它,任何人看到true就知道找到宝藏了,必须停手。
    for (unsigned i = 0; i < num_tasks; ++i) {//根据线程数量对数据进行切分,每个线程处理一块
        auto chunk_end =(i < (num_tasks - 1)) ? chunk_begin + chunk_size : data.end();
        results.push_back(spawn_async([=] {//每个线程都会执行这个lambda表达式
            for (auto entry = chunk_begin;!*done_flag && (entry != chunk_end);++entry) {
                if (matches_find_criteria(*entry)) {// 发现宝藏
                    *done_flag = true;// 设置停止标志
                    return &*entry;// 返回宝藏位置
                }
            }
            return (MyData *)nullptr;//没找到返回 空指针
        }));
        chunk_begin = chunk_end;
    }

    std::shared_ptr<std::experimental::promise<FinalResult>> final_result =
        std::make_shared<std::experimental::promise<FinalResult>>();

    struct DoneCheck { // 为了在递归中重复使用,重载operator()
        std::shared_ptr<std::experimental::promise<FinalResult>> final_result;
        DoneCheck(std::shared_ptr<std::experimental::promise<FinalResult>> final_result_)
            : final_result(std::move(final_result_)) {}
        void operator()(std::experimental::future<std::experimental::when_any_result<
                std::vector<std::experimental::future<MyData *>>>> results_param) {
            auto results = results_param.get();
            MyData *const ready_result =results.futures[results.index].get();
            if (ready_result)// 如果找到了
                final_result->set_value(process_found_value(*ready_result));
            else {// 没找到
                results.futures.erase(results.futures.begin() + results.index);// 移除这个已寻找过的区域
                if (!results.futures.empty()) {
                    std::experimental::when_any(// 递归!
                        results.futures.begin(), results.futures.end())
                        .then(std::move(*this)); // 递归
                }else {final_result->set_exception(// 全部找完了也没有
                        std::make_exception_ptr(std::runtime_error("Not found")));
                }
            }
        }
    };
    std::experimental::when_any(results.begin(), results.end()).
					then(DoneCheck(final_result));
    return final_result->get_future();
}
等所有人完成任务(when_all 模式)
cpp
// 异步启动三个不同的函数,并获取它们的future对象
std::experimental::future<int> f1 = spawn_async(func1);// 让水手1去搬木头
std::experimental::future<std::string> f2 = spawn_async(func2);// 让水手2去打水
std::experimental::future<double> f3 = spawn_async(func3); // 让水手3去做饭

// 等待所有任务完成,返回一个包含所有结果的"包裹"
// 使用std::experimental::when_all等待所有异步任务完成
// 它返回一个新的future对象,它在所有输入的future对象都变为ready时也变为ready
std::experimental::future<
    std::tuple<
        std::experimental::future<int>,
        std::experimental::future<std::string>,
        std::experimental::future<double>>> result =
std::experimental::when_all(std::move(f1), std::move(f2), std::move(f3));| 特性 | 作用 | 生活例子 |
|---|---|---|
future<T> |
承诺未来会给一个T类型的结果 |
"我保证会给你宝藏地图" |
promise<T> |
用来设置future的结果 |
藏宝图写好后装进信封 |
when_any |
任意一个完成就继续 | 谁先找到宝藏谁领奖 |
when_all |
全部完成才继续 | 等所有零件到齐才能组装 |
atomic<bool> |
无锁线程安全标志 | 升起的旗帜所有人可见 |
4.4.7并发TS中的锁存器(Latch )和屏障(Barrier )
Latch是一种同步对象,当其计数器减至零时变为就绪状态。一旦就绪,它将保持就绪状态直到被销毁;
barrier是一种可重用的同步组件,用于在一组线程之间进行内部同步;
Latch和Barrier都是同步工具,但它们有不同的使用方式。Latch不关心哪个线程减少计数器,而Barrier则确保每个线程在每个周期只能到达一次。
4.4.8一个基础的锁存器类型:std::experimental::latch
std::experimental::latch的构造函数接受一个初始计数值作为参数,指定等待事件的数量;
count_down用于将latch对象的计数器减一,当计数器达到零时,latch变为就绪状态;
wait用于等待latch对象变为就绪状态,而is_ready仅用于检查latch是否已经就绪;
先将latch的计数器减一,再调用wait函数,使当前线程阻塞,直到latch的计数器值变为零,即latch已经准备好。
cpp
void foo() {
    unsigned const thread_count = ...;
    latch done(thread_count); // 创建一个锁存器,初始计数器值为thread_count
    my_data data[thread_count];
    std::vector<std::future<void> > threads;
    for (unsigned i = 0; i < thread_count; ++i)
        threads.push_back(std::async(std::launch::async, [&, i] {
            data[i] = make_data(i); // 每个线程处理数据
            done.count_down(); 	// 减少锁存器的计数器
            do_more_stuff(); 		// 执行更多操作
        }));
    done.wait(); // 等待锁存器变得可用
    process_data(data, thread_count); // 处理所有线程的数据
}
上面代码中,在std::future的析构函数运行之前(退出foo时),不能保证所有线程都已经完成,因为do_more_stuff那部分是另外的线程在执行。
4.4.9 一个基础的屏障类型:std::experimental::barrier
arrive_and_wait 调用位于代码中的重要位置,即在所有线程准备好之前,不允许任何线程继续执行。在第一个同步点,所有线程都在等待线程 0 到达,但使用屏障可以为你提供一个清晰的界限。在第二个同步点,线程 0 将等待所有其他线程到达。
cpp
void process_data(data_source &source, data_sink &sink) {
    unsigned const concurrency = std::thread::hardware_concurrency();
    unsigned const num_threads = (concurrency > 0) ? concurrency : 2;
    std::experimental::barrier sync(num_threads);//根据任务数量创建barrier对象
    std::vector<joining_thread> threads(num_threads);
    std::vector<data_chunk> chunks;
    result_block result;//存放汇总数据
    for (unsigned i = 0; i < num_threads; ++i) {
        threads[i] = joining_thread( [&, i] {
            while (!source.done()) {
                if (!i) { // 如果是第一个线程,从数据源获取下一个数据块,并切块
                    data_block current_block = source.get_next_data_block();
                    chunks = divide_into_chunks(current_block, num_threads);
                }
                sync.arrive_and_wait();	// 等待所有线程到达屏障点,确保数据已准备好
                result.set_chunk(i, num_threads, process(chunks[i]));
                sync.arrive_and_wait();	// 再次等待所有线程到达屏障点,确保数据已处理完毕
                if (!i) sink.write_data(std::move(result));} // 第一个线程负责输出
            }});
    }
}
4.4.10 std::experimental:: flex_barrier------std::experimental::barrier灵活的朋友
std::experimental::flex_barrier 的接口与 std::experimental::barrier 的接口只有一个不同之处:它有一个额外的构造函数,该构造函数接受一个完成函数以及一个线程计数。
cpp
void process_data(data_source &source, data_sink &sink) {
    unsigned const concurrency = std::thread::hardware_concurrency();
    unsigned const num_threads = (concurrency > 0) ? concurrency : 2;
    std::vector<data_chunk> chunks;
    auto split_source = [&] {
        if (!source.done()) {
            data_block current_block = source.get_next_data_block();
            chunks = divide_into_chunks(current_block, num_threads);
        }
    };

    split_source();         // 初始分割数据
    result_block result;    // 创建一个结果块,用于存储处理后的数据

    std::experimental::flex_barrier sync(num_threads, [&] {
        sink.write_data(std::move(result)); // 将结果数据写入数据汇
        split_source();     // 再次获取和分割数据
        return -1;          // 完成函数的返回值,返回值-1 f表示参与线程的数量保持不变;其他值将指定下一个循环中参与的线程数
    });
    std::vector<joining_thread> threads(num_threads);
    for (unsigned i = 0; i < num_threads; ++i) {
        threads[i] = joining_thread([&, i] {
            while (!source.done()) {
                result.set_chunk(i, num_threads, process(chunks[i])); // 处理数据块
                sync.arrive_and_wait();      // 等待所有线程到达屏障(只有一个同步点)
            }
        });
    }
}