一、Ansible是干什么的
Ansible 就是个 **"批量处理的工具"**------ 简单说:你需要给100台服务器配置网卡信息,如果一台一台处理需要处理100次,但是你只要会使用ansible,此时就可以使用ansible来帮你完成这个繁琐的问题,在这 100 台机器上一次性完成所有操作
Ansible只需要在服务端安装ansible,无需在每个客户端安装客户端程序,通过ssh的方式来进行客户端服务器的管理,基于模块来实现批量数据配置、批量设备部署以及批量命令执行
二、安装
bash
centos7:

1、更新update
yum update
2、安装企业源
yum install epel-release
3、安装python3环境
yum install python3-devel rust cargo -y
4、升级pip相关工具
pip3 install --upgrade pip setuptools wheel setuptools_rust
5、安装ansible
pip3 install ansible
6、检查
ansible --version
bash
ubuntu22.04:

1、更新update
yum update
2、安装
apt install ansible -y
3、检查
ansible --version
三、创建免密登录
要想ansible可以控制多个客户端,必须让安装ansible的server端可以免密登录客户端
后续我把安装ansible的控制端我就称为server端,把被ansible控制的称为客户端
1. 生成密钥
bash
1、生成密钥
ssh-keygen
#在server端执行,执行完这个操作直接回车就行
2. 传输公钥
bash
2、传输公钥
ssh-copy-id root@192.168.153.138

#在server端上执行,这里的root是客户端的用户,ip是客户端的ip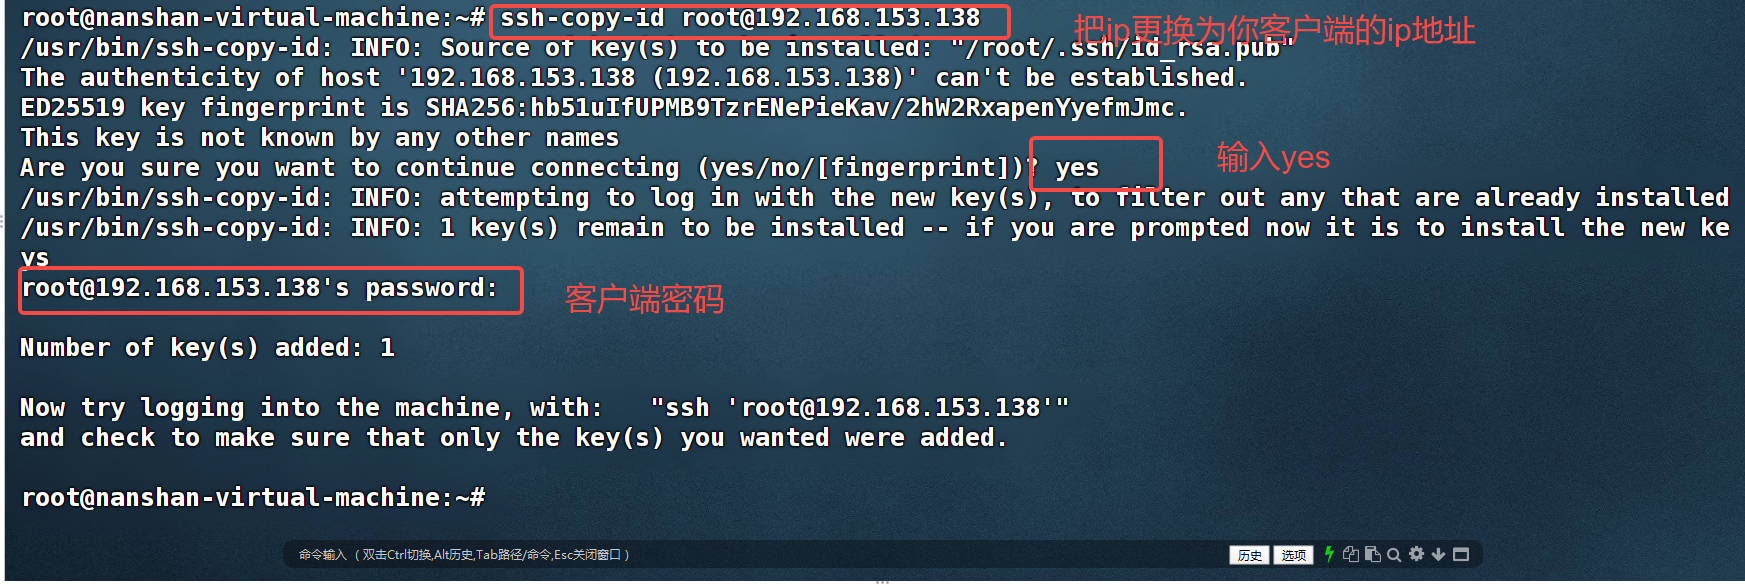
3. 测试
bash
3、远程登录
ssh root@192.168.153.138
#替换为你的用户和ip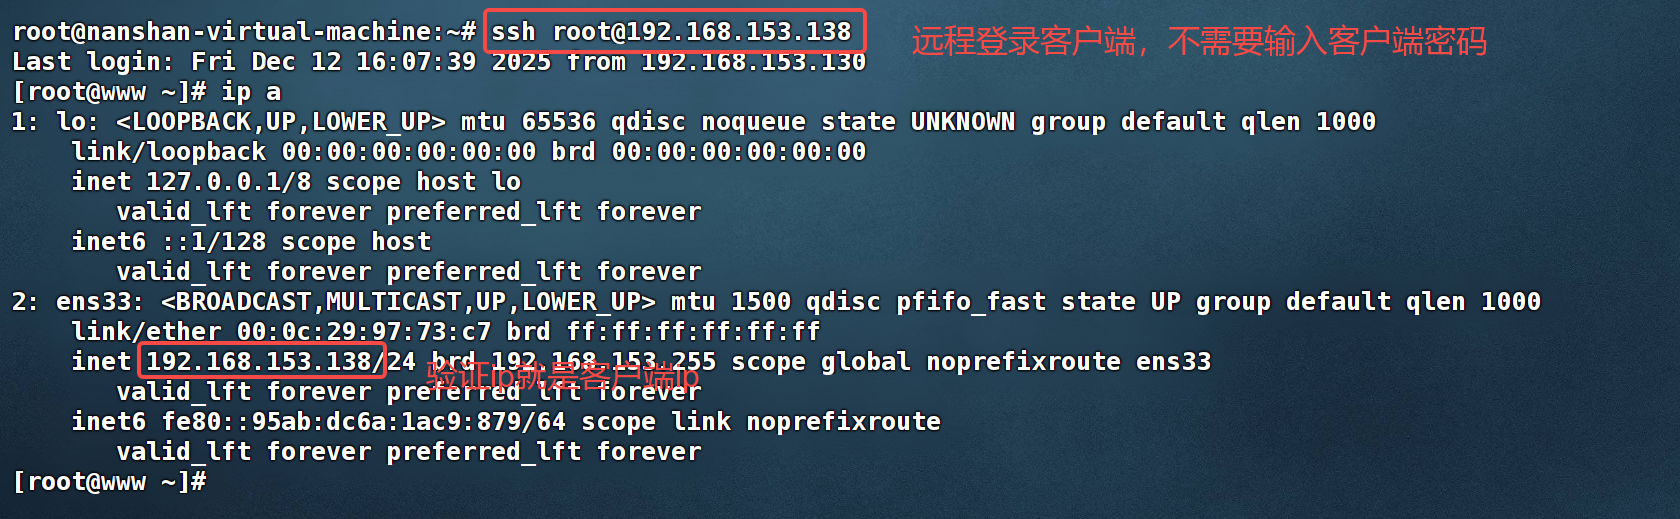
4. 测试ansible连接
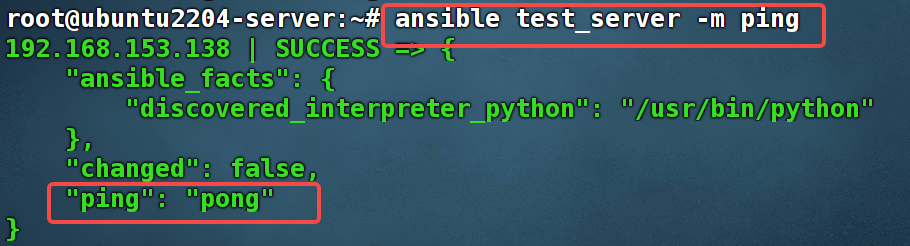
当你把ansible安装了,免密登录也完成了,接下来我们就来验证server端和客户端是否连接成功
server端操作:
bash
1、vim /etc/ansible/hosts
2、在文件底部加入你的客户端和群组名称

[test_server]      #群组名称
192.168.153.138    #客户端ip可以是多个需要换行添加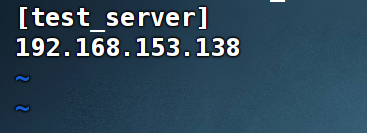
执行这条命令,如果出现"pong"说明客户端和server端建立连接成功:ansible test_server -m ping
五、ansible两种核心使用模式
1. 临时命令模式(Ad-Hoc)------ 执行单个 / 简单命令
这种模式就像在终端里给远程机器 "临时发一条指令",适合执行简单、一次性的操作,比如批量查看远程节点的磁盘空间、重启某个服务、批量创建用户等。
bash
# 1. 给192.168.153.129节点停止nginx服务(单个命令)
ansible 192.168.153.129 -m service -a "name=nginx state=stopped" --become  # --become表示提权(sudo)

# 2. 批量查看所有节点的内存使用情况
ansible all -m command -a "free -h"
2. 剧本模式(Playbook)------ 根据 YAML 剧本执行复杂任务
这种模式就像给 Ansible 写一份 "操作说明书"(用 YAML 格式的 Playbook 文件),里面可以包含多个步骤、多个任务,甚至可以定义条件、循环、变量等逻辑,适合执行复杂、可复用、需要分步执行的操作(比如部署整个 Web 服务:装 Nginx→装 PHP→配置数据库→启动服务)。
bash
- name: 部署并启动Nginx服务  # 剧本的名称(可选,方便识别)
  hosts: test_server        # 作用的目标节点
  remote_user: nanshan      # 远程登录用户
  become: yes               # 提权(sudo)
  tasks:                    # 具体要执行的任务列表
    - name: 安装Nginx包      # 第一个任务:安装Nginx
      yum:                  # 使用yum模块(CentOS系统),Ubuntu用apt模块
        name: nginx
        state: present      # 确保包已安装

    - name: 启动并开机自启Nginx  # 第二个任务:启动服务
      service:
        name: nginx
        state: started
        enabled: yes        # 开机自启
上述两种模式可类比于一个是执行单个shell命令,一个是shell脚本。
六、常用模块
1. Ping 模块(节点连通性测试)
| 模块 | 功能 & 命令示例 | 核心参数说明 |
|---|---|---|
ping |
测试单个节点连通性 ansible 192.168.13.153 -m ping测试整个节点组连通性 ansible test_server -m ping测试本地节点连通性 ansible localhost -m ping -a 'ansible_connection=local' |
1. 无核心参数,仅需指定-m ping即可2. ansible_connection=local:本地连接模式(无需 SSH,用于测试本机)3. 作用:验证 Ansible 能否与目标节点建立连接(并非 ICMP ping,而是基于 SSH / 本地连接的可用性测试) |
2. 包管理模块(适配不同系统,最常用)
| 模块 | 适用系统 | 功能 & 命令示例 | 核心参数说明 |
|---|---|---|---|
apt |
Ubuntu/Debian | 安装 nginx(更新缓存) ansible test_server -m apt -a 'name=nginx state=present update_cache=yes' --become卸载 nginx(删除配置) ansible test_server -m apt -a 'name=nginx state=absent purge=yes' --become安装指定版本 nginx ansible test_server -m apt -a 'name=nginx=1.18.0-0ubuntu1.7 state=present' --become |
name:包名(可指定版本)state:present(安装)/absent(卸载)/latest(最新版)update_cache:是否更新 apt 缓存purge:卸载时是否删除配置文件 |
yum |
CentOS/RHEL | 安装 nginx ansible test_server -m yum -a 'name=nginx state=present' --become卸载 nginx ansible test_server -m yum -a 'name=nginx state=absent' --become更新所有包(慎用) ansible test_server -m yum -a 'name=* state=latest' --become |
name:包名state:present/absent/latest无update_cache,默认用 yum 源缓存 |
dnf |
CentOS 8+/RHEL 8+ | 安装 nginx ansible test_server -m dnf -a 'name=nginx state=present' --become |
与yum模块参数一致,是yum的升级版 |
3. 命令执行模块(远程执行命令 / 脚本)
| 模块 | 功能 & 命令示例 | 核心参数说明 | |
|---|---|---|---|
command |
查看系统版本 ansible test_server -m command -a 'cat /etc/os-release'查看磁盘使用 ansible test_server -m command -a 'df -h' |
执行简单 Linux 命令,不支持管道、重定向(如 ` | 、>)<br>-a` 后直接跟命令内容 |
shell |
查看内存使用(带管道)`ansible test_server -m shell -a 'free -h | grep Mem'<br>**创建目录并赋权(组合命令)**<br>ansible test_server -m shell -a 'mkdir -p /data && chmod 755 /data' --become` |
支持 shell 语法(管道、重定向、组合命令),比command灵活 |
script |
执行本地脚本(传到客户端运行) ansible test_server -m script -a '/root/test.sh' --become |
src:服务端本地脚本路径(-a后直接跟路径)自动将脚本传到客户端并执行,无需提前拷贝 |
4. 文件 / 目录管理模块
| 模块 | 功能 & 命令示例 | 核心参数说明 |
|---|---|---|
file |
创建目录 ansible test_server -m file -a 'path=/data state=directory mode=0755 owner=root group=root' --become创建空文件 ansible test_server -m file -a 'path=/test.txt state=touch mode=0644' --become删除文件 / 目录 ansible test_server -m file -a 'path=/data state=absent' --become |
path:文件 / 目录路径state:directory(目录)/touch(文件)/absent(删除)mode:权限(如 0755、0644)owner/group:属主 / 属组 |
copy |
复制服务端文件到客户端 ansible test_server -m copy -a 'src=/root/test.txt dest=/tmp/test.txt owner=www group=www mode=0644' --become直接写入内容到客户端文件 ansible test_server -m copy -a 'content="hello ansible" dest=/tmp/hello.txt' --become |
src:服务端源文件路径dest:客户端目标路径(必须绝对路径)content:直接写入文件的内容(替代src) |
fetch |
从客户端下载文件到服务端 ansible test_server -m fetch -a 'src=/var/log/nginx/access.log dest=/root/logs/ flat=yes' --become |
src:客户端源文件(仅支持文件,不支持目录)dest:服务端目标目录flat=yes:不创建客户端 IP 的子目录(默认会创建) |
5. 服务管理模块
| 模块 | 功能 & 命令示例 | 核心参数说明 |
|---|---|---|
service |
启动并开机自启 nginx ansible test_server -m service -a 'name=nginx state=started enabled=yes' --become重启 nginx ansible test_server -m service -a 'name=nginx state=restarted' --become重载 nginx 配置 ansible test_server -m service -a 'name=nginx state=reloaded' --become停止 nginx ansible test_server -m service -a 'name=nginx state=stopped' --become |
name:服务名state:started(启动)/stopped(停止)/restarted(重启)/reloaded(重载)enabled:yes(开机自启)/no(关闭自启) |
6. 用户管理模块(系统用户)
| 模块 | 功能 & 命令示例 | 核心参数说明 |
|---|---|---|
user |
创建用户 testuser ansible test_server -m user -a 'name=testuser uid=10086 home=/home/testuser shell=/bin/bash groups=sudo' --become删除用户(含家目录) ansible test_server -m user -a 'name=testuser state=absent remove=yes' --become |
name:用户名uid:用户 IDhome:家目录shell:默认 shellgroups:所属组state=absent:删除用户remove=yes:删除家目录(默认不删) |
group |
创建组 testgroup ansible test_server -m group -a 'name=testgroup gid=10086 state=present' --become删除组 ansible test_server -m group -a 'name=testgroup state=absent' --become |
name:组名gid:组 IDstate:present/absent |