Ansible 是一种开源的自动化平台,用于配置管理、应用部署以及任务自动化。它简化了 IT 环境的管理工作,使得自动化变得更加容易实现。Ansible 使用简单的语言(YAML,即 'YAML Ain't Markup Language')来描述自动化任务,这使得它易于阅读和编写。它可以连接到客户端并在多个系统上执行任务,而无需在客户端上安装任何代理软件,因为它依赖于标准的 SSH 协议。
1.下载ansible
yum -y install epel-release

yum -y install ansible
2.ansible基础
ansible-doc -l    -查看所有模块

anisble-doc -s yum    -看yum模块,了解功能
2.1ansible定义主机清单&ping模块
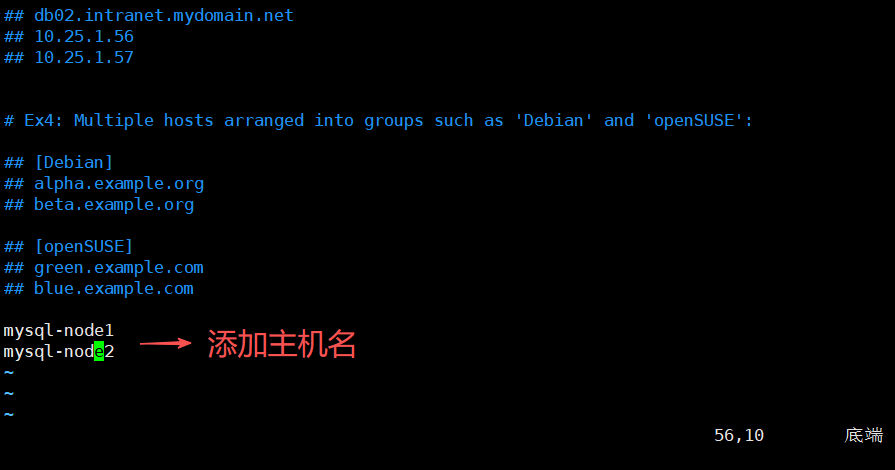
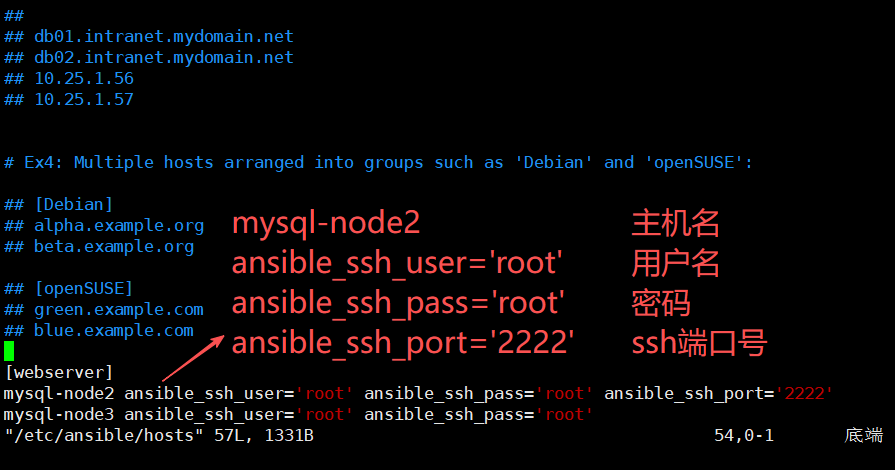
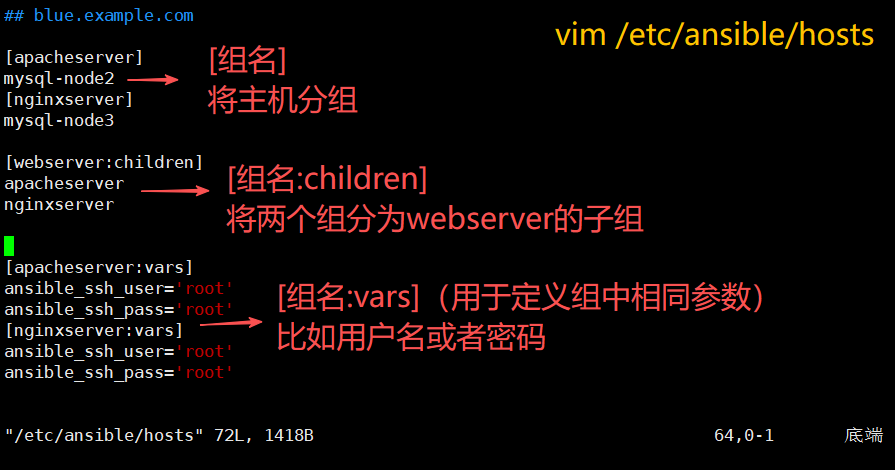
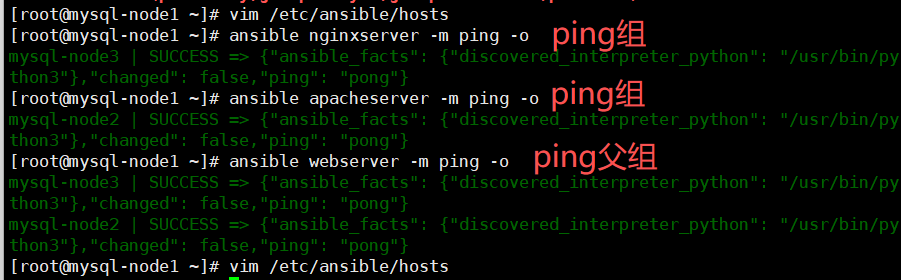
vim /etc/ansible/hosts 如果主机清单不在/etc/ansible/想要使用主机清单可以使用以下命令
ansible -i hosts 组名 -m 模块名 -o

[root@mysql-node1 ~]# ansible localhost -m ping -o -u root -k

-ping自己用localhost
-m 模式
-o 输出信息简写
-u 目标主机用户名
-k 目标主机密码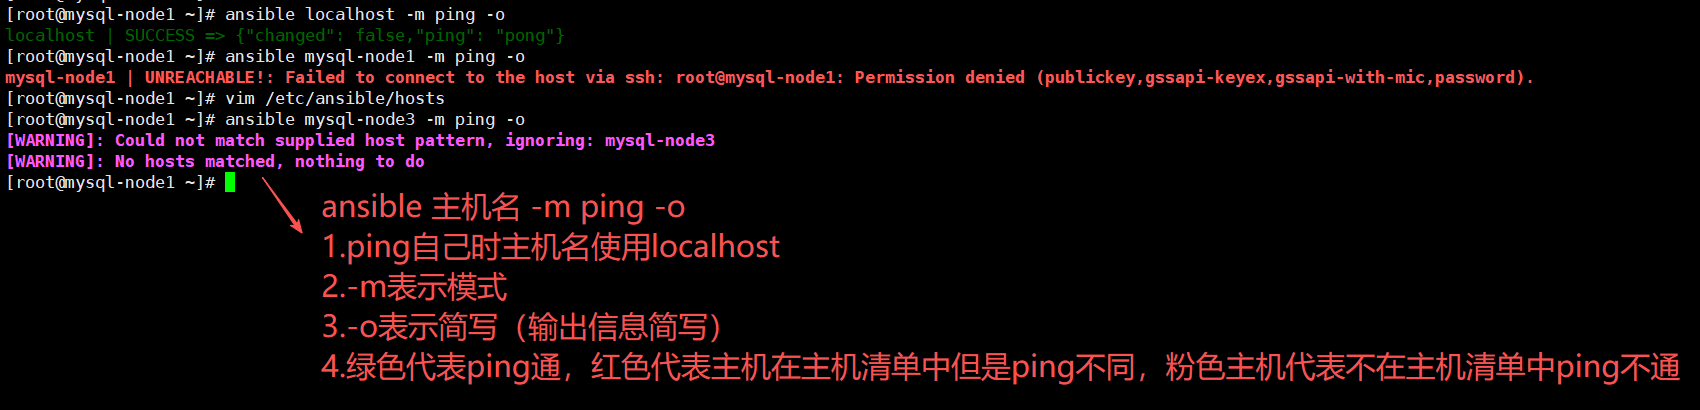
可以通过ssh免密登录实现主机互通,当主机清单文件内再次新添加主机时会连不上(原因是缓存问题)
解决方法:
1.需要ssh登录目标主机
2.root@mysql-node1 \~# ansible 目标主机 -m ping -o -u 目标主机用户名 -k
SSH password: 目标主机密码
[root@mysql-node1 ~]# ansible webserver -m ping -o -u root -k
SSH password:

-Ping组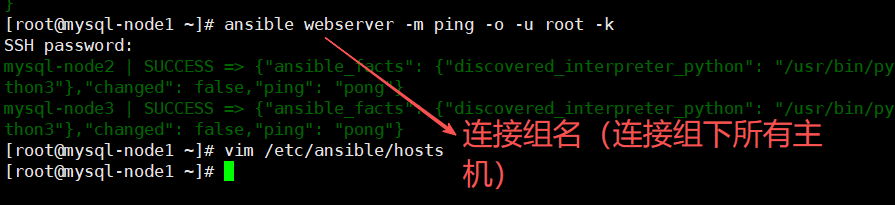
2.2复制模块-copy
ansible-doc copy -查看拷贝模块
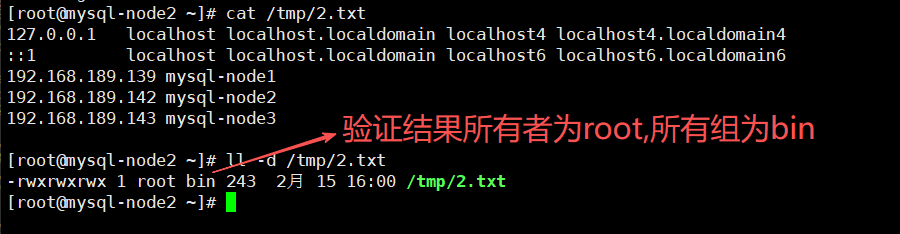
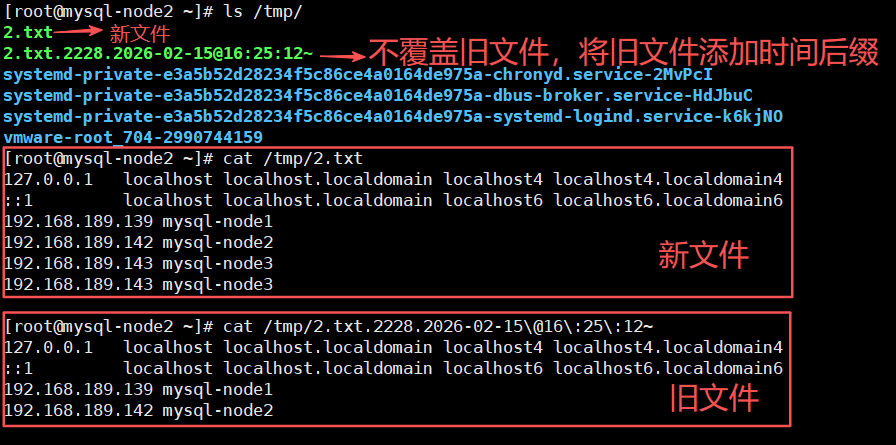
ansible apacheserver -m copy -a 'src=/etc/hosts dest=/tmp/2.txt owner=root group=bin mode=777 backup=yes'
-m 模块
-a 添加
src=源文件路径
dest=目标路径
owner=设置文件所有者
group=设置文件所有组
mode=设置权限
backup=yes表示如果复制相同文件名不同内容的文件则将旧文件备份(添加时间后缀),拷贝新文件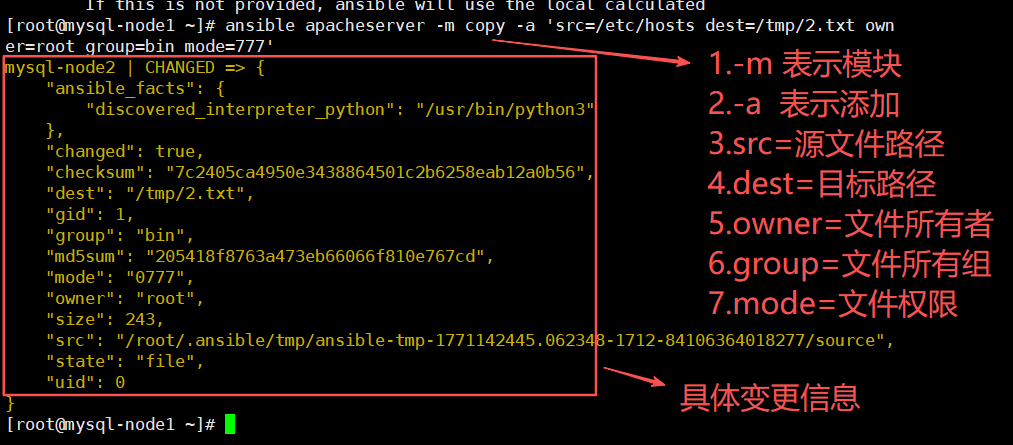
有backup=yes的情况
2.3用户模块-user
ansible-doc user -查看用户模块2.3.1创建用户
ansible webserver -m user -a 'name=uio state=present'

-创建用户uio
-m 模块
-a 添加
name=用户名
state=present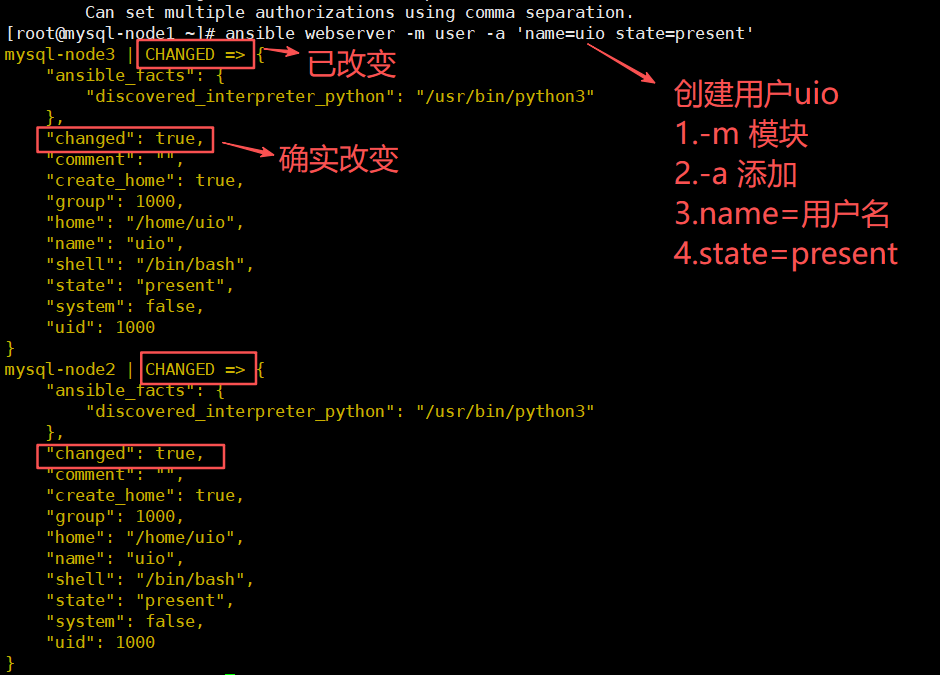

2.3.2修改密码
2.3.2.1生成加密密码
echo "uio" | openssl passwd -1 -stdin

-openssl passwd -1    -ssl一级加密
2.3.2.2修改密码
ansible webserver -m user -a 'name=uio password="$1$uq2sdv5D$ndEP2RKcBU1duGtf74zzW/"'

2.3.3修改shell
ansible webserver -m user -a 'name=uio shell=/sbin/nologin append=yes'

-修改shell
-m user user模块
-a 添加
name=用户名
shell=修改shell
append=yes 追加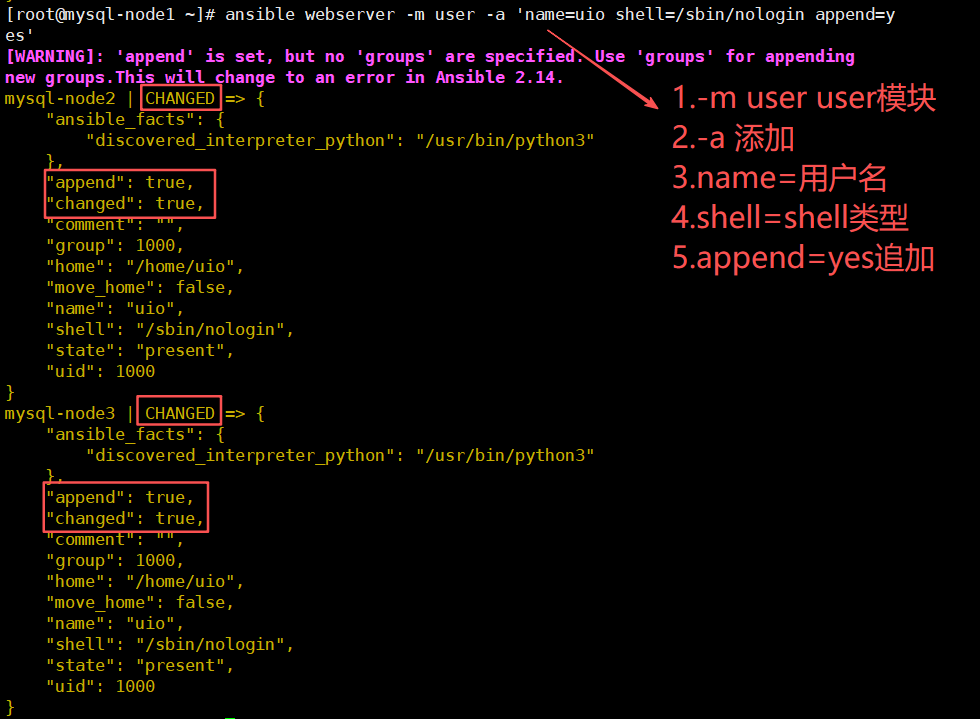

2.3.5删除用户
ansible webserver -m user -a 'name=uio state=absent'

-删除用户
-m 模块
-a 添加
name=用户名
state=absent

2.4.软件包管理模块-yum
ansible-doc yum -查看包管理模块2.4.1下载软件
ansible webserver -m yum -a 'name="nginx" state=latest'

-m yum 包管理模块
-a 添加
name=软件名
stste=版本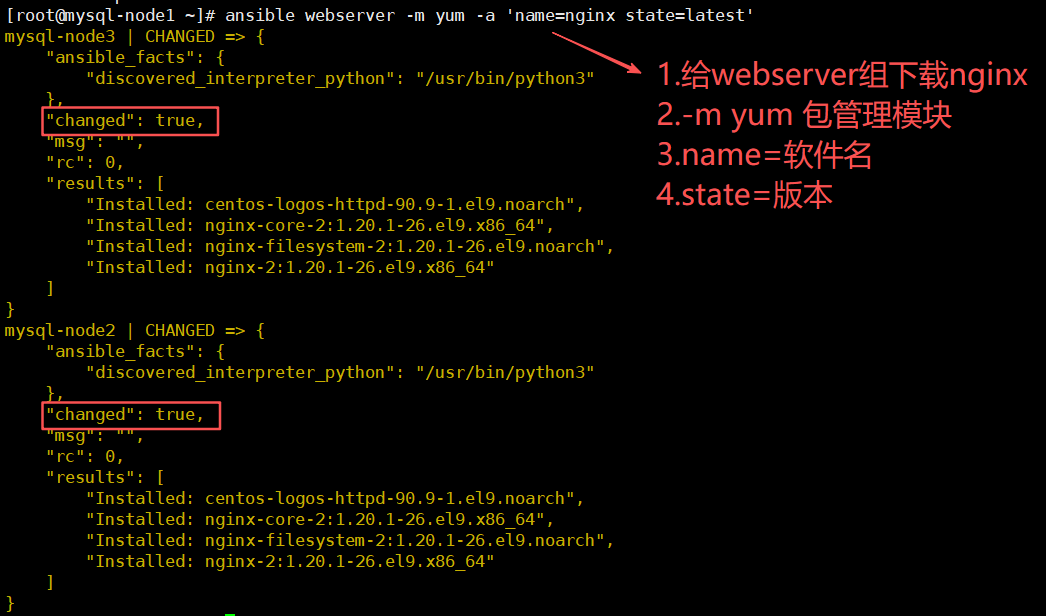
2.4.2删除软件
ansible webserver -m yum -a 'name="nginx" state=absent'

-卸载软件包
-state=absent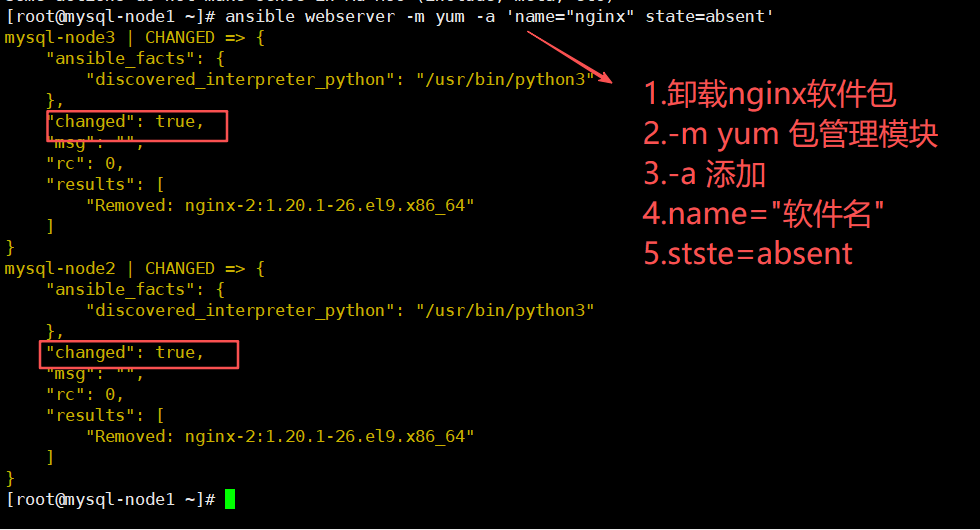
2.4.3更新所有软件
ansible webserver -m yum -a 'name="*" state=latest' -更新所有软件2.5服务模块-service
ansible-doc service -查看服务模块2.5.1启动服务
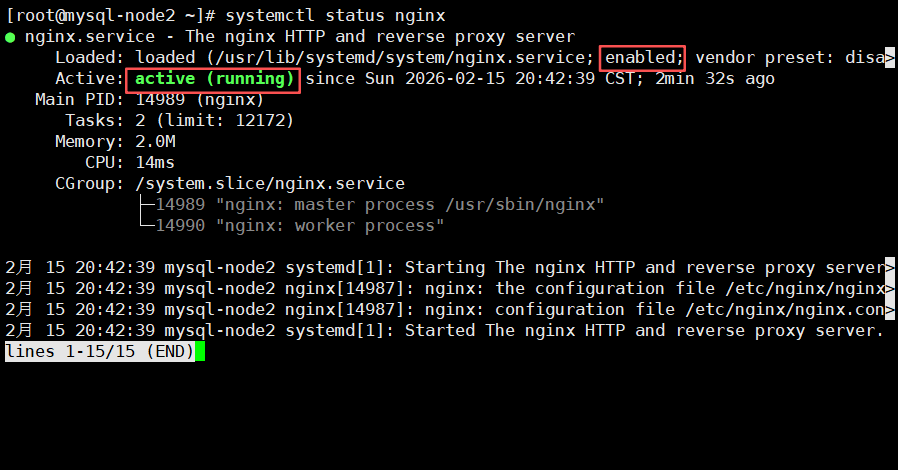
ansible webserver -m service -a 'name="nginx" state=started'    -启动niginx

ansible webserver -m service -a 'name="nginx" state=started enabled=yes'    -启动nginx,且开机自启
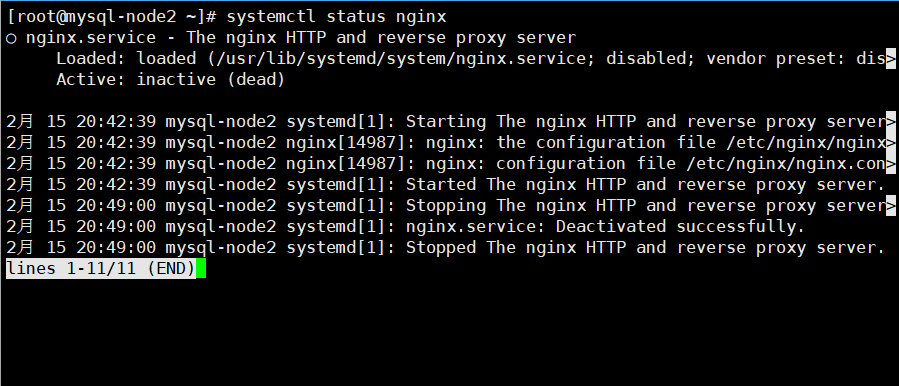
2.5.2关闭服务
ansible webserver -m service -a 'name=nginx state=stopped enabled=no' -关闭服务且关闭自启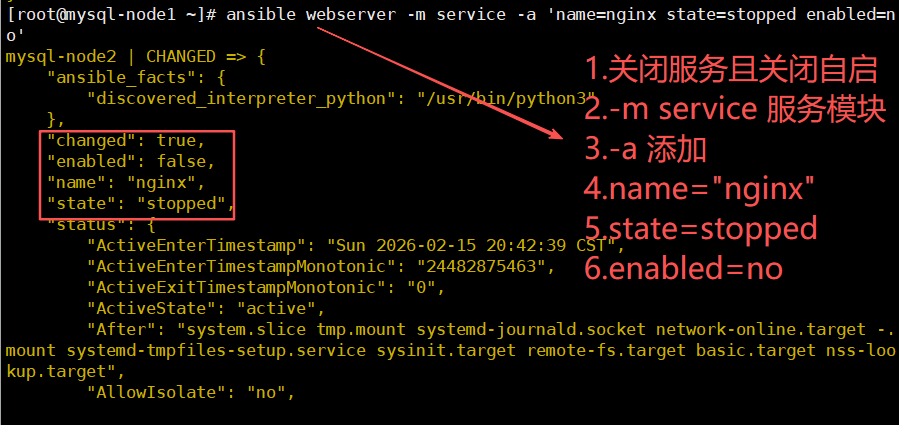
2.5.3重启服务
ansible webserver -m service -a 'name="nginx" state=restarted' -重启服务
2.6文件模块-file
ansible-doc file -查看文件模块2.6.1创建文件
ansible nginxserver -m file -a 'name=/root/uio state=touch'

-创建uio文件
-name或者path
-可以添加比如mode=777

2.6.2创建目录
ansible nginxserver -m file -a 'name=/root/dir1 state=directory'

-创建目录
-name或者path
-可以添加比如mode=777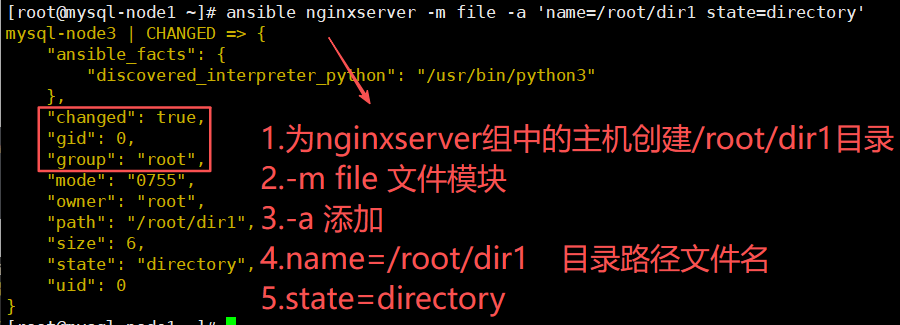
2.6.3删除文件/目录
ansible nginxserver -m file -a 'name=/root/uio state=absent'

-删除/root/uio文件
-name或者path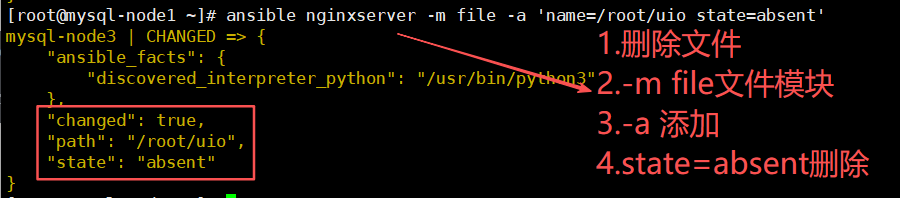
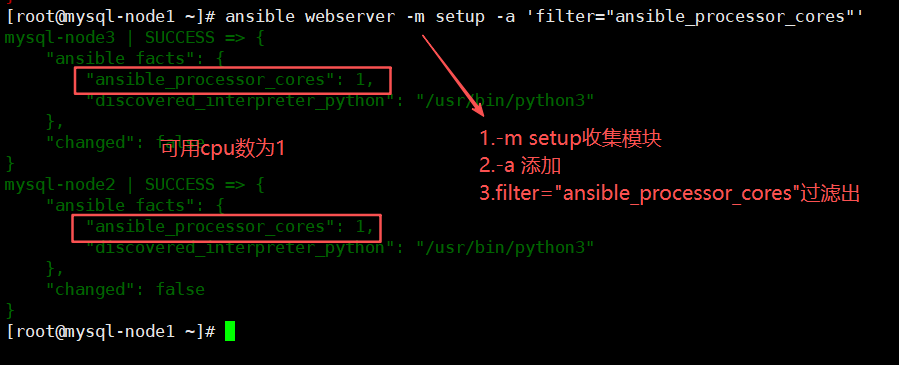
2.7收集模块-setup
ansible-doc setup -查看收集模块2.7.1收集主机信息
ansible nginxserver -m setup -收集主机信息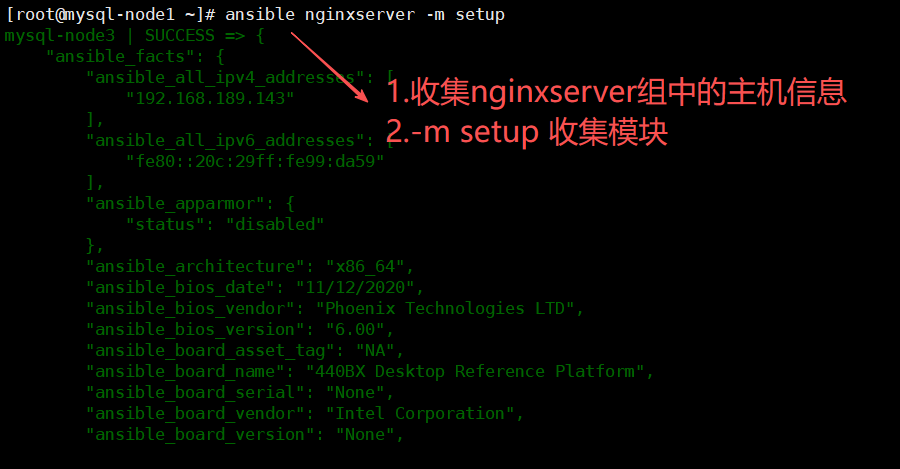
2.7.2收集主机信息过滤指定信息
过滤信息指定条件为"条件名称"(setup显示中双引号内容)
ansible nginxserver -m setup -a 'filter=ansible_processor' -收集主机信息,过滤指定信息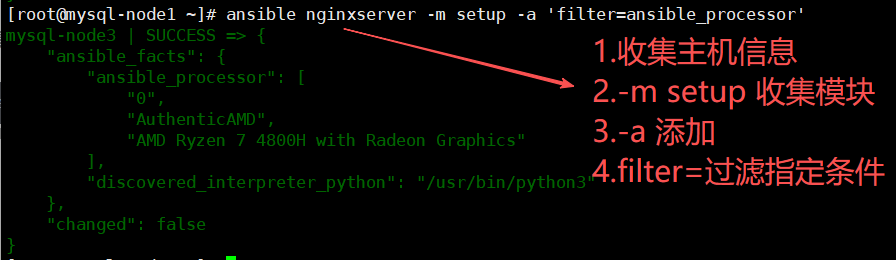
2.8fetch模块-(将其他主机文件传给ansible主机)
ansible-doc fetch -查看fetch模块2.8.1将目标主机文件传给ansible主机
ansible mysql-node3 -m fetch -a 'src=/root/a.txt dest=/root/b.txt'

-将mysql-node3主机的/root/a.txt文件传到ansible主机/root/b.txt(叫b.txt)
-传过来是一个同名目录文件在目录里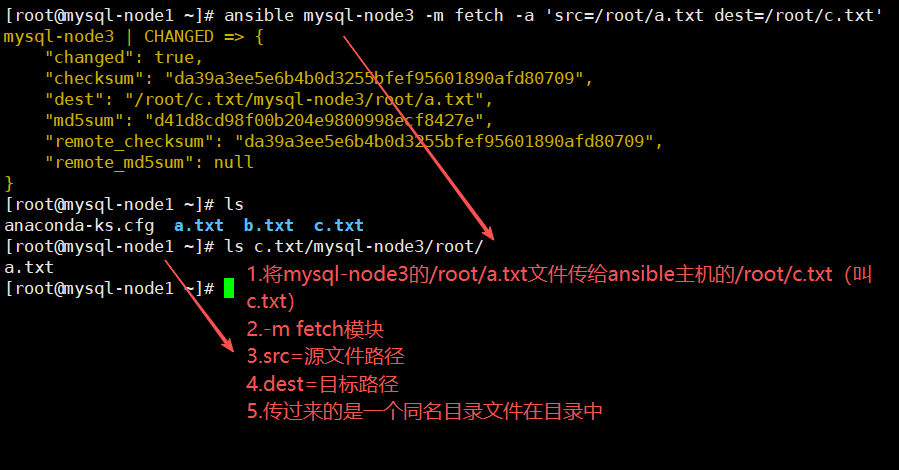
2.9cron模块-(任务计划)
ansible-doc cron -查看cron模块2.9.1为一个主机创建计划任务
ansible mysql-node3 -m cron -a 'name="sync time" minute="*/10" job="/sbin/ntpdate 192.168.189.139 &> /dev/null"'

-为其他主机创建计划任务
2.10group模块
ansible-doc group -查看group模块2.10.1创建组
ansible webserver -m group -a 'name=group1 state=present' -创建组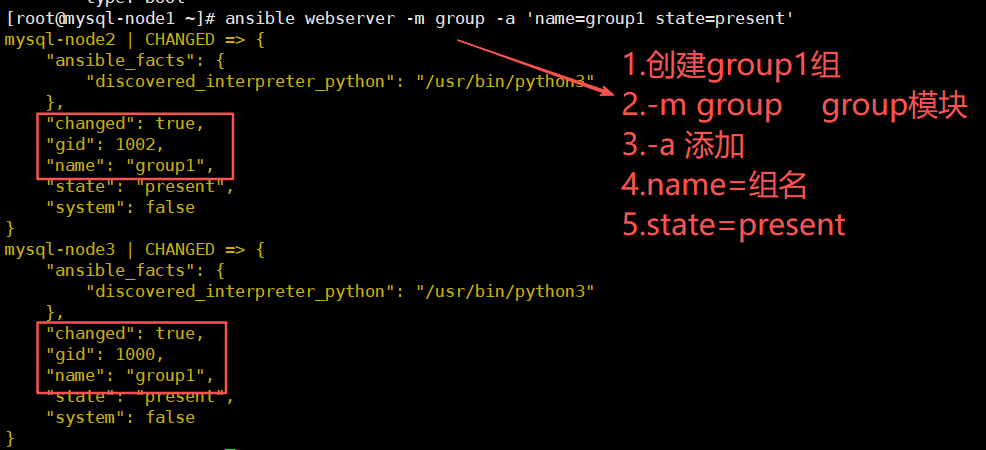

2.10.2删除组
ansible webserver -m group -a 'name=group1 state=absent' -删除组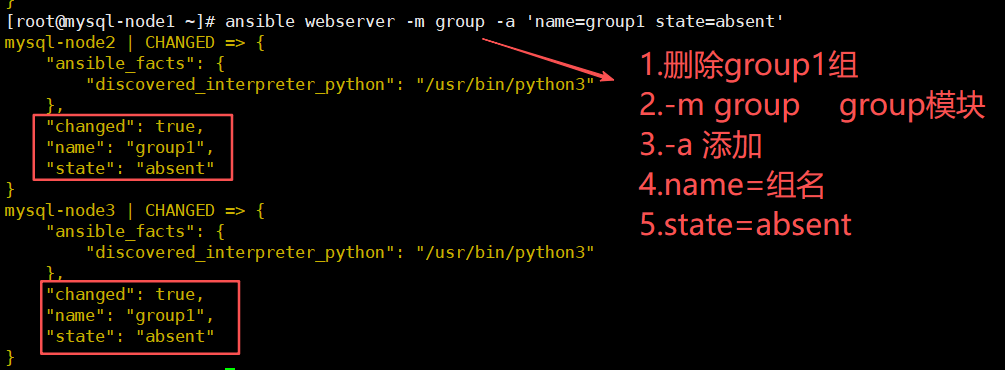

2.11script模块-(在目标主机立刻执行ansible主机脚本)
ansible-doc script -查看script模块2.11.1在目标主机立刻执行ansible主机脚本(无需加执行权限)
ansible webserver -m script -a '/root/test.sh ' -执行ansible主机脚本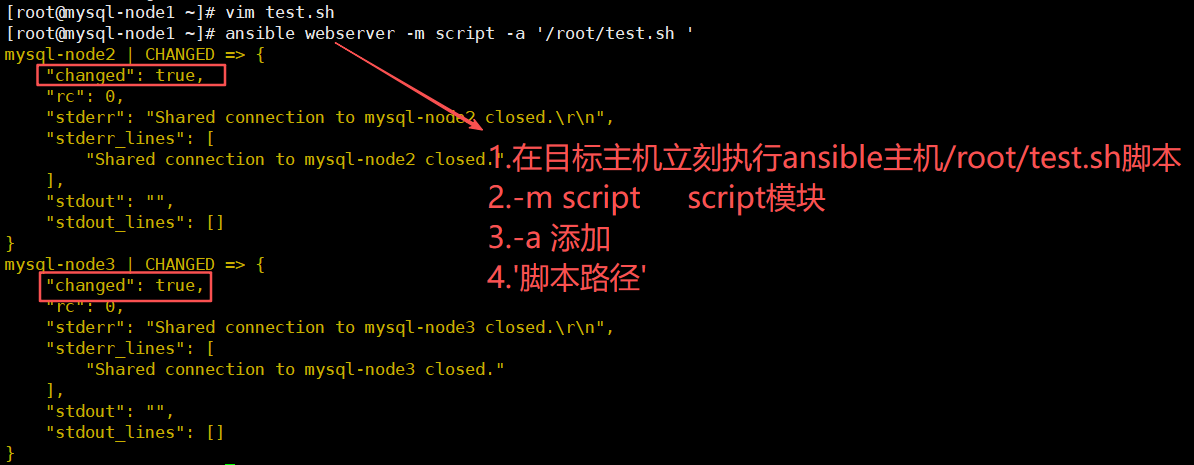


2.12unarchive模块-(将ansible主机压缩包拷贝到目标主机自动解压缩)
ansible-doc unarchive -查看unarchive模块2.12.1示例
ansible webserver -m unarchive -a 'src=/root/test.tar.gz dest=/tmp/'    -将压缩包传给目标主机

tar -cvzf ./test.tar.gz /etc    -将/etc目录压缩到/root下叫test.tar.gz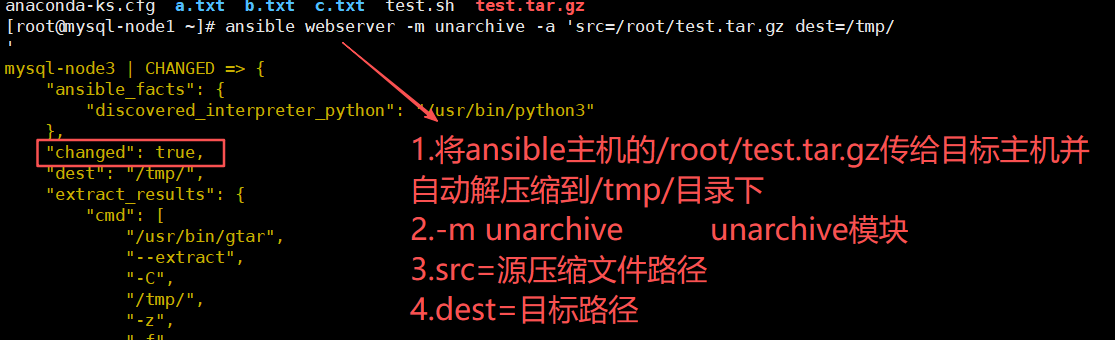

2.13shell模块-(在目标主机执行命令)
ansible-doc shell -查看shell模块2.13.1示例
ansible webserver -m shell -a 'hostname' -o    -在目标主机执行hostname命令

ansible webserver -m shell -a 'uptime' -o    -在目标主机执行uptime命令

ansible webserver -m shell -a 'yum -y install vsftpd' -o    -在目标主机执行yum -y install vsftpd命令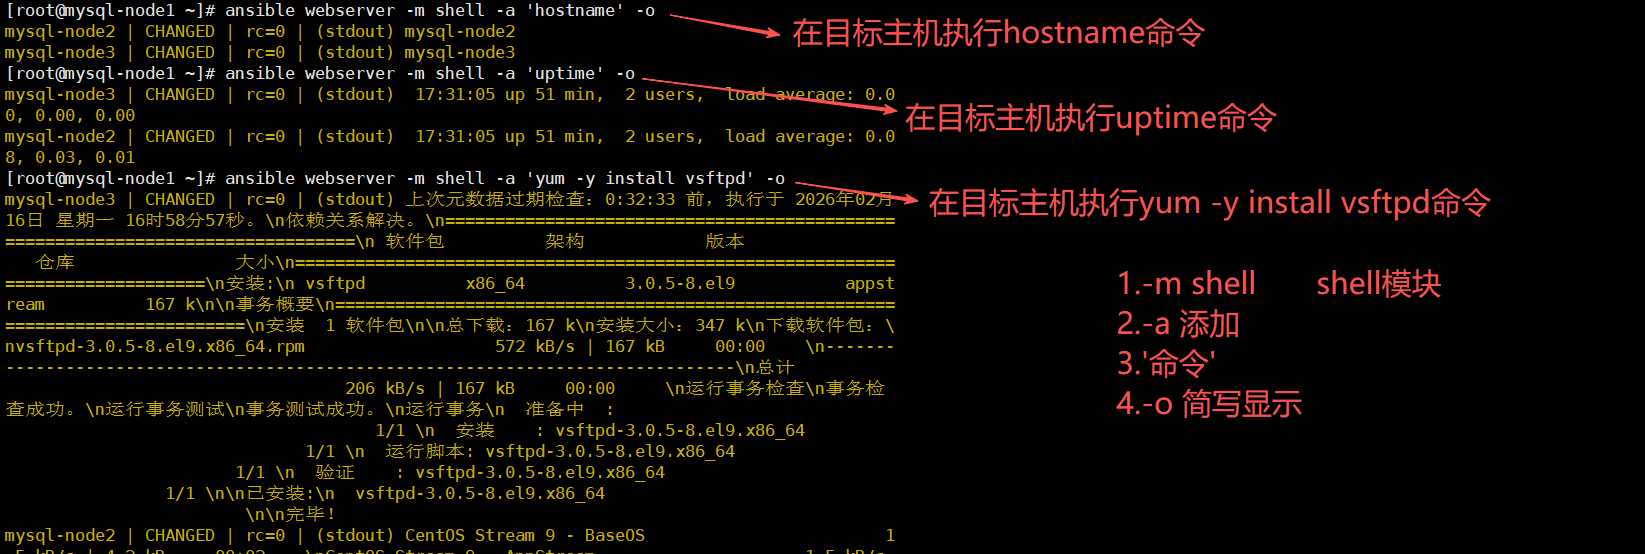
3..yaml语言-(用于编写剧本一次性执行多条命令)
3.1示例-(通过yaml语言编写一个简单剧本,完成web的部署,配置,启动)
3.1.1ansible主机下载httpd
yum -y install httpd -下载httpd3.1.2将httpd配置文件复制到/root/apache目录-(目的是可以修改配置文件)
mkdir apache
cd apache/
cp -rf /etc/httpd/conf/httpd.conf .
3.1.3编辑apache.yaml剧本
vim apache.yaml

- hosts: mysql-node2
  tasks:
  - name: install apache packages
    yum: name=httpd state=latest
  - name: copy apache conf
    copy: src=./httpd.conf dest=/etc/httpd/conf/httpd.conf
  - name: ensure apache is runing
    service: name="httpd" state=started enabled=yes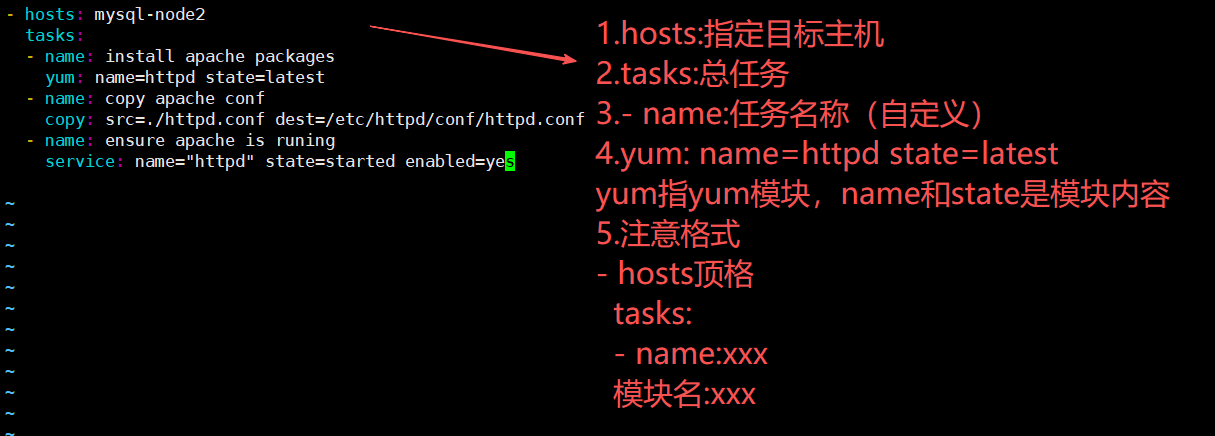
3.1.4检查脚本
ansible-playbook apache.yaml --syntax-check -检查剧本语法
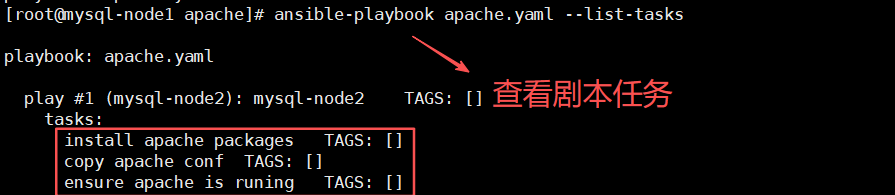
ansible-playbook apache.yaml --list-tasks -检查剧本任务
ansible-playbook apache.yaml --list-hosts -检查剧本主机

3.1.5执行剧本
ansible-playbook apache.yaml -执行剧本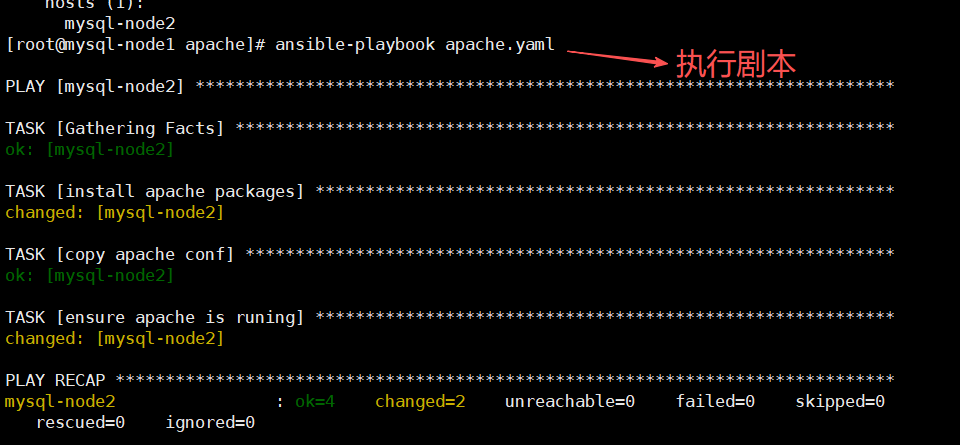
补充:执行器-handlers(只有当剧本内容发生指定变化时才执行)
示例:改变http配置文件端口(但是剧本没有重启服务任务,只要加入handlers命令,当检测到配置文件被修改时就执行handlers重启httpd服务)
1.handlers与notify搭配使用:
notify用于监测模块是否发生变化,如果有变化执行handlers(无变化则不执行handlers)
2.handlers不是模块与tasks一样用于管理模块
1.编辑剧本-vim apache.yaml
- hosts: mysql-node2
  tasks:
  - name: install apache packages
    yum: name=httpd state=latest
  - name: copy apache conf
    copy: src=./httpd.conf dest=/etc/httpd/conf/httpd.conf
    notify: restart apache server
  - name: ensure apache is runing
    service: name="httpd" state=started enabled=yes
  handlers:
  - name: restart apache server
    service: name=httpd state=restarted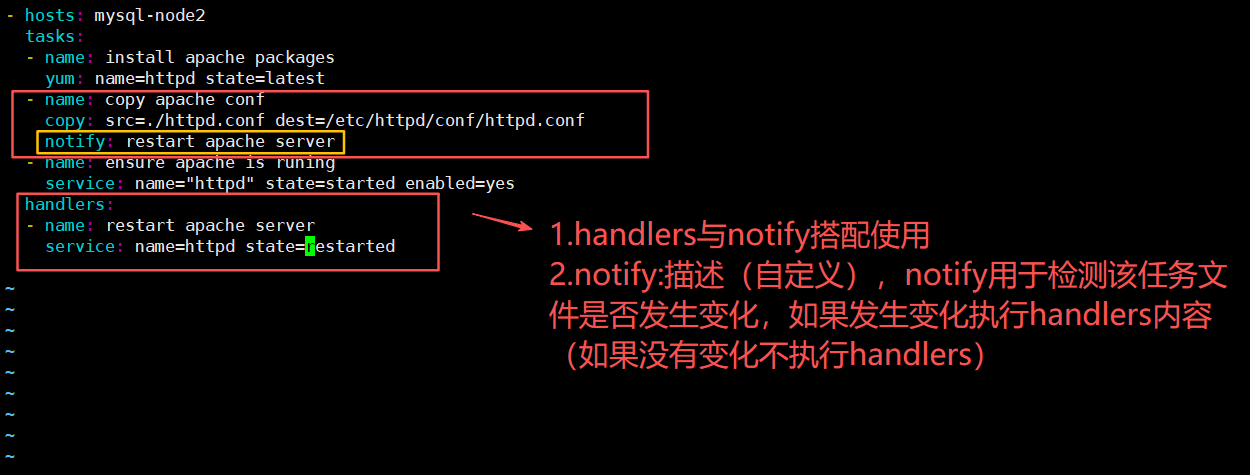
2.修改httpd配置文件-端口号
vim httpd.conf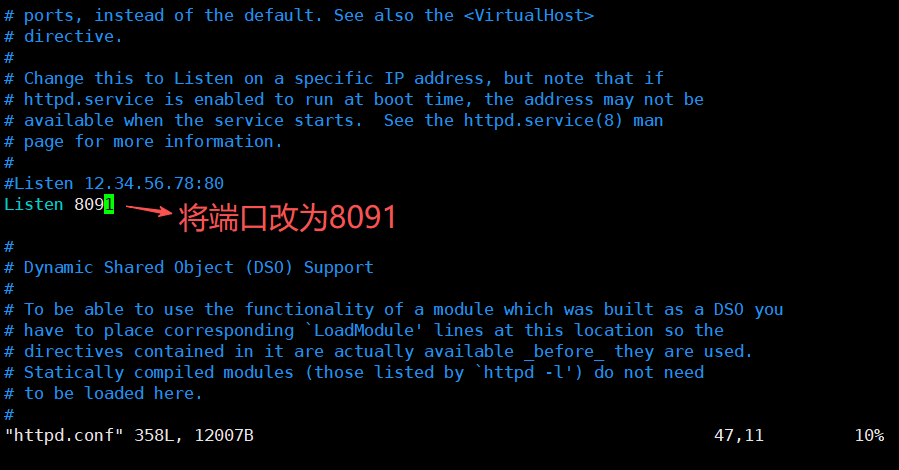
3.再次执行剧本
ansible-playbook apache.yaml 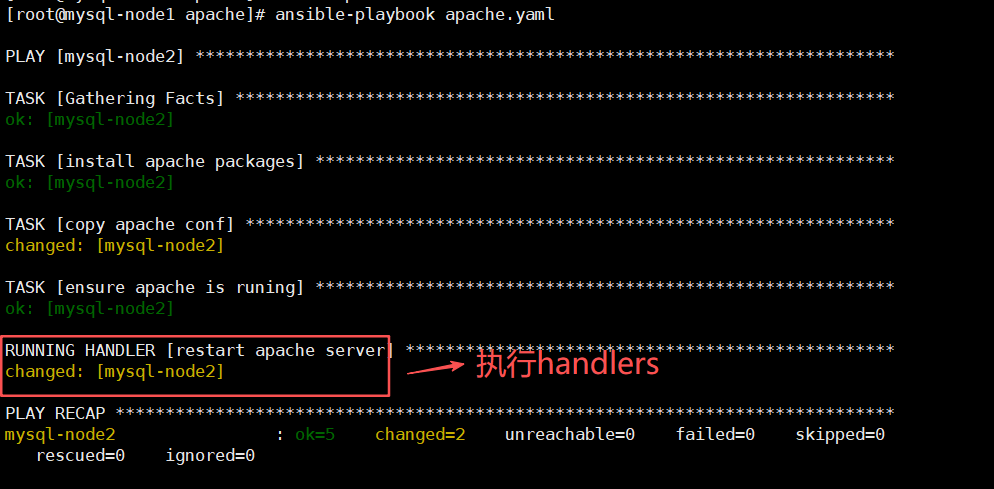
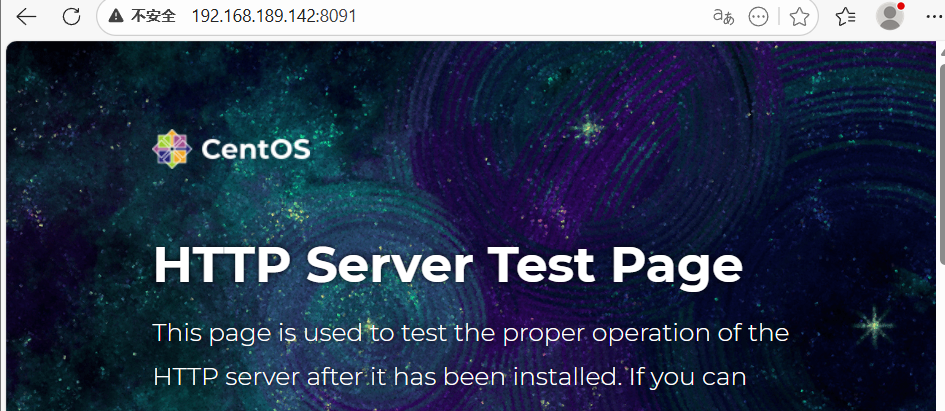
4.验证目标主机重启httpd服务且端口变为8091
netstat -nltp -查看端口
4.role-角色扮演
1.roles则是ansible中,playbook的目录组织结构
2.将代码或文件进行模块化,成为roles的文件目录组织结构
3.易读,代码可用性,层次清晰
4.1.ansible自动化运维实战.nginx剧本实战-tasks
目标:通过role远程部署Nginx并配置
4.1.1创建目录结构
[root@mysql-node1 ~]# mkdir -p roles/nginx/{files,handlers,tasks,templates,vars}
[root@mysql-node1 ~]# touch roles/site.yaml roles/nginx/{handlers,tasks,vars}/main.yaml
[root@mysql-node1 ~]# echo 1234 > roles/nginx/files/index.html
[root@mysql-node1 ~]# yum -y install nginx && cp /etc/nginx/nginx.conf roles/nginx/templates/nginx.conf.j2

yum -y install tree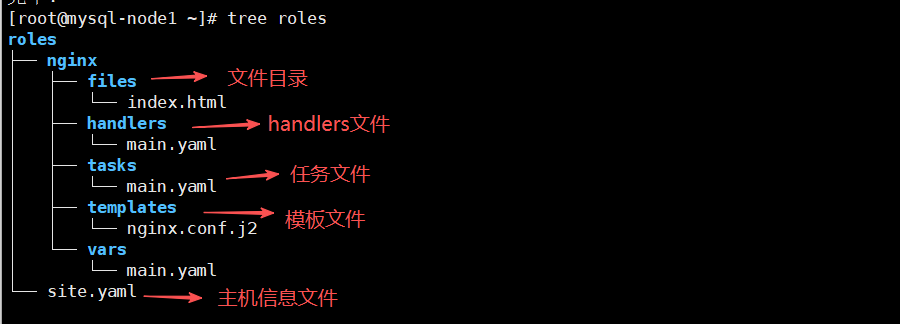
4.1.2编写tasks-主任务
vim /root/roles/nginx/tasks/main.yaml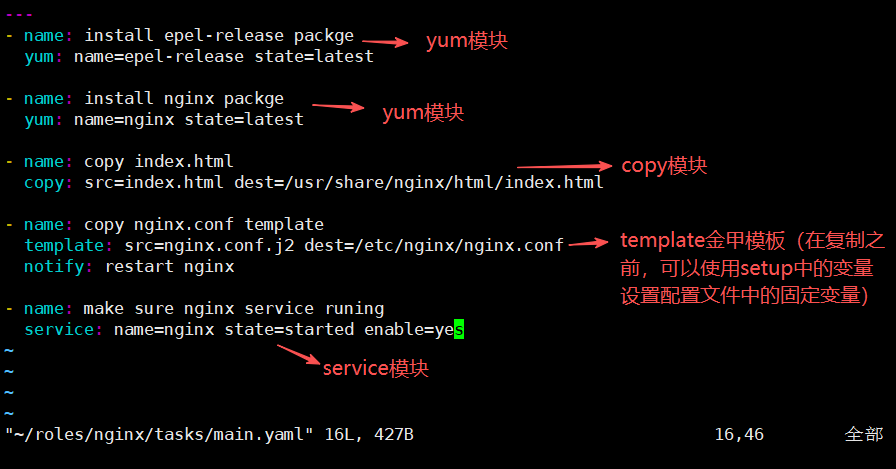
4.1.3编写templates模块-金甲模板
templates金甲模板,在拷贝之前进行内容替换的模板,可以根据需要灵活调整文档中的内容,推送给不同的服务器
vim /root/roles/nginx/templates/nginx.conf.j2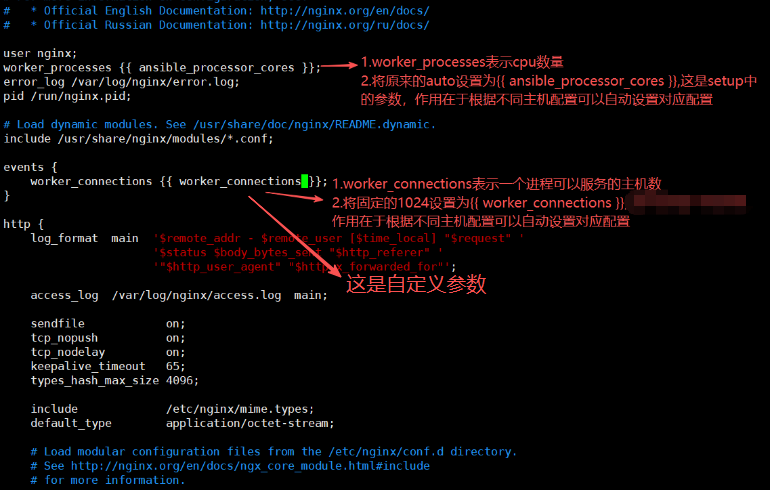
4.1.4编写变量-(所有自定义变量都写在这里)
vim /root/roles/nginx/vars/main.yaml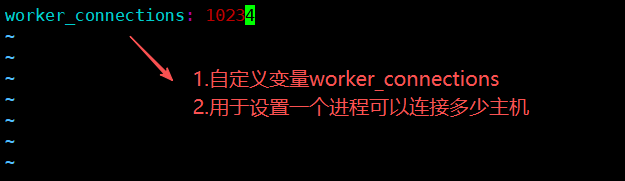
4.1.5编写处理程序-handlers
vim /root/roles/nginx/handlers/main.yaml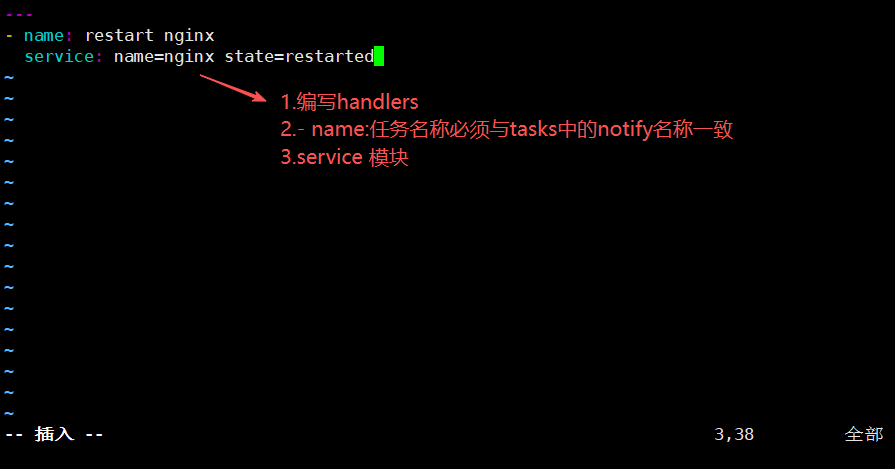
4.1.6编写操作主机文件-site.yaml
vim /root/roles/site.yaml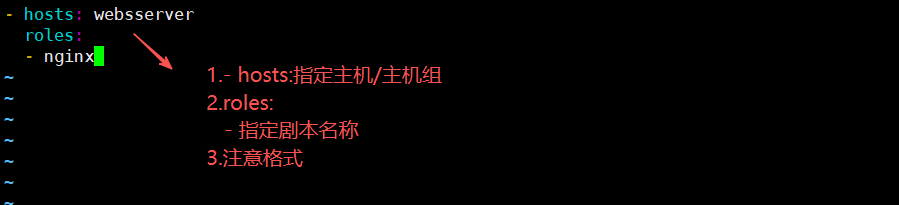
4.1.7执行剧本
ansible-playbook /root/roles/site.yaml --syntax-check -检查语法site.yaml注意:使用--syntax-check检查role剧本的单个文件会报错,因为它们文件存放是分散的
ansible-playbook /root/roles/site.yaml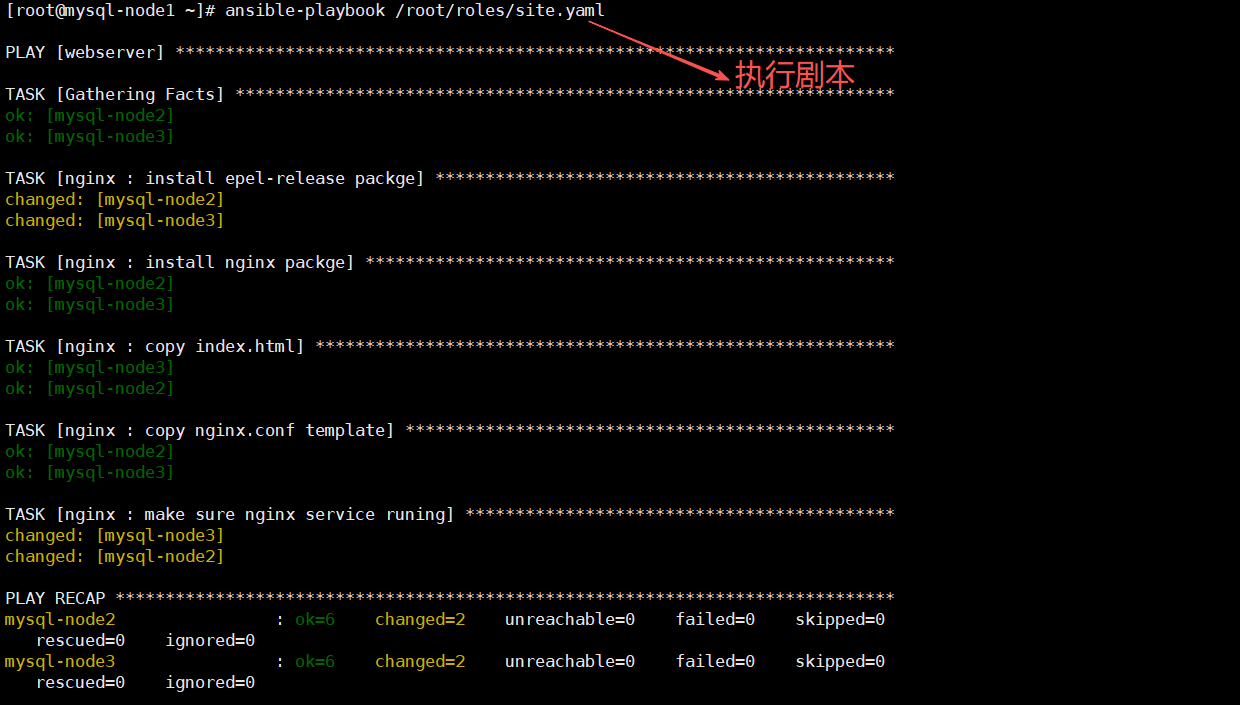
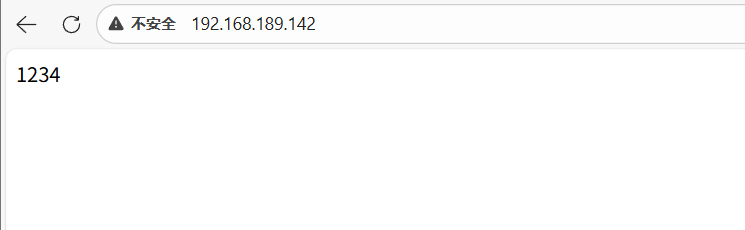
验证金甲模板-templates
vim /etc/nginx/nginx.conf