1.OpenStack
1.1.OpenStack概述
OpenStack是一种云操作系统, 可控制整个数据中心内的大型计算、存储和网络资源池, 所有资源都通过具有通用身份验证机制的API进行管理和配置。 管理员也可通过Web界面控制,同时授权用户通过Web界面配置资源。

1.2 OpenStack 简介
OpenStack既是一个社区, 也是一个项目和一个开源软件, 提供开放源码软件, 建立公共和私有云, 它提供了一个部署云的操作平台或工具集,其宗旨在于帮助组织运行为虚拟计算或存储服务的云, 为公有云、私有云, 也为大云、小云提供可扩展的、灵活的云计算。
作为一个开源的云计算管理平台, OpenStack由几个主要的组件组合起来完成具体工作。OpenStack支持几乎所有类型的云环境, 项目目标是提供实施简单、可大规模扩展、丰富、标准统一的云计算管理平台。OpenStack通过各种互补的服务提供了基础设施即服务(laaS)的解决方案, 每个服务提供API以进行集成

1.3 OpenStack 工作原理

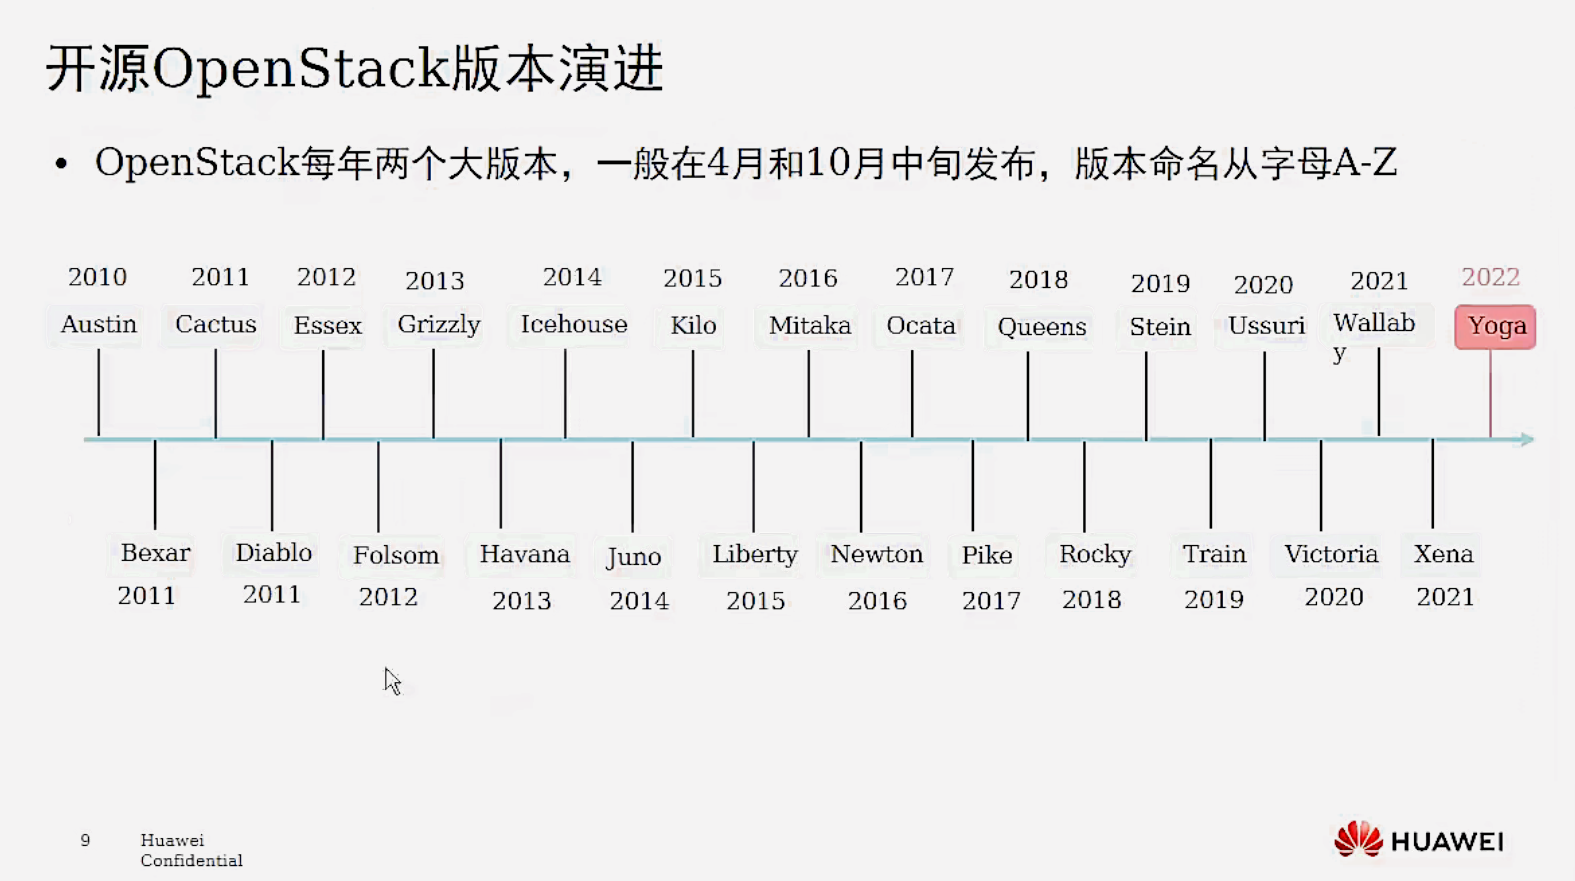
1.4 OpenStack 版本演进
OpenStack第一版代号为Austin, 以Rackspace所在的美国德克萨产斯州Texas首府命名,计划每隔几个月发布一个全新版本, 并且26个英文字母从A到Z顺序命名后面的版本代号。 通常以举办OpenStack峰会所在地的某个城市或地区来命名。
2017年华为成功晋级为白金会员, 成为亚洲首家OpenStack白金会员。
OpenStack基金会允许最多8家白金会员资格和24家黄金会员资各,目前已有AT&T、爱立信、华为、英特尔、Rackspace、红帽、SUSE和腾讯这8家白金会员, 以及九州云、中国移动、中国联通、中国电信、思科、EasyStack、烽火、浪潮、新华三以及中兴通讯等黄金会员。
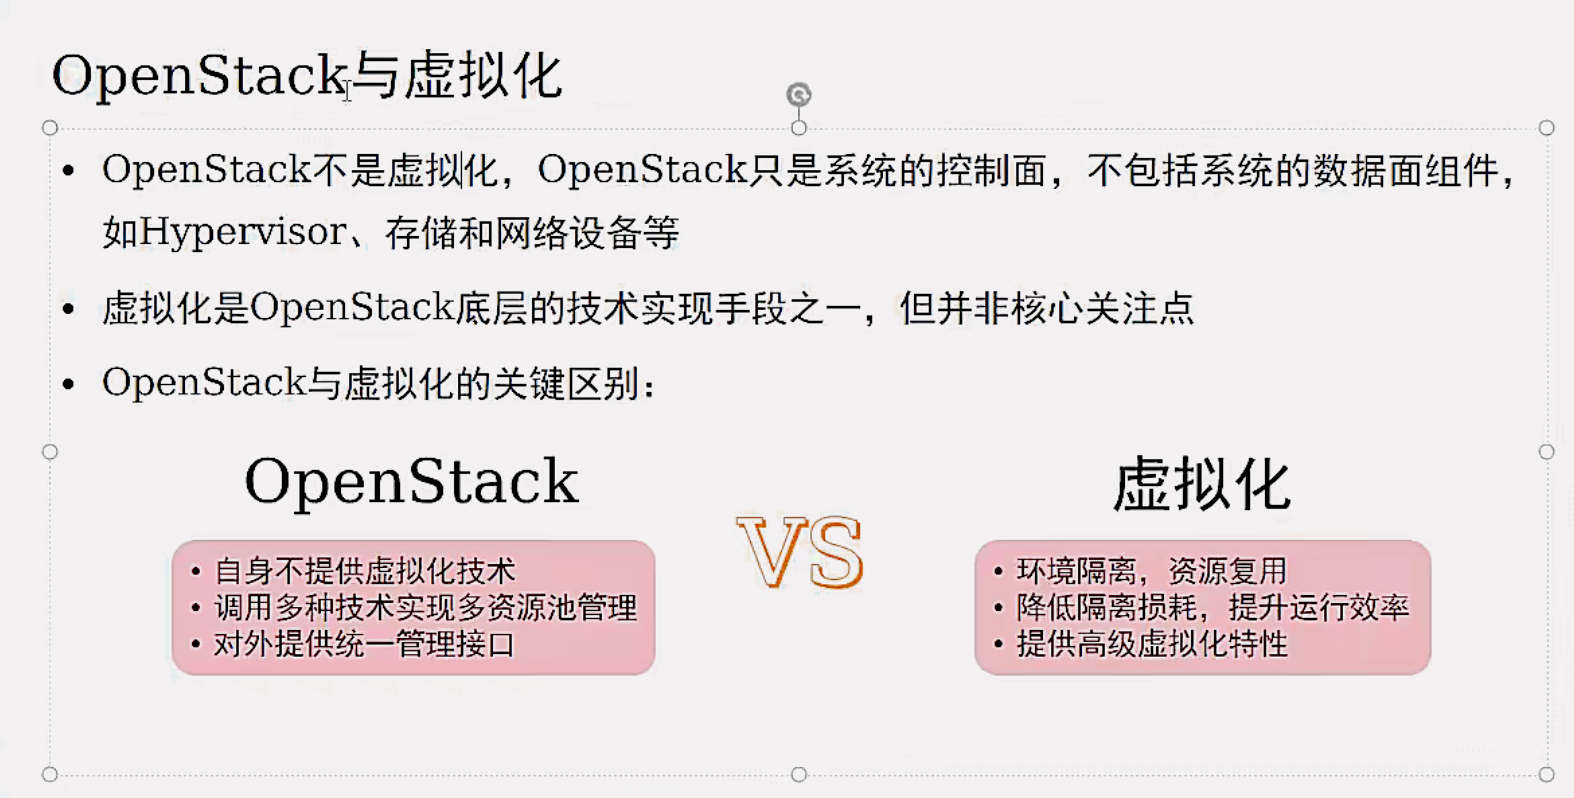
1.5 OpenStack 与 虚拟化
OpenStack优先关注控制面, OpenStack优先考虑如何将计算、存储、网络领域的各类资源抽象为资源池。在此基础上, 对资源池内的各类逻辑对象实施控制操作, 并将控制操作包装成面向用户的服务。数据面、管理面目前不是OpenStack的重点关注内内容。
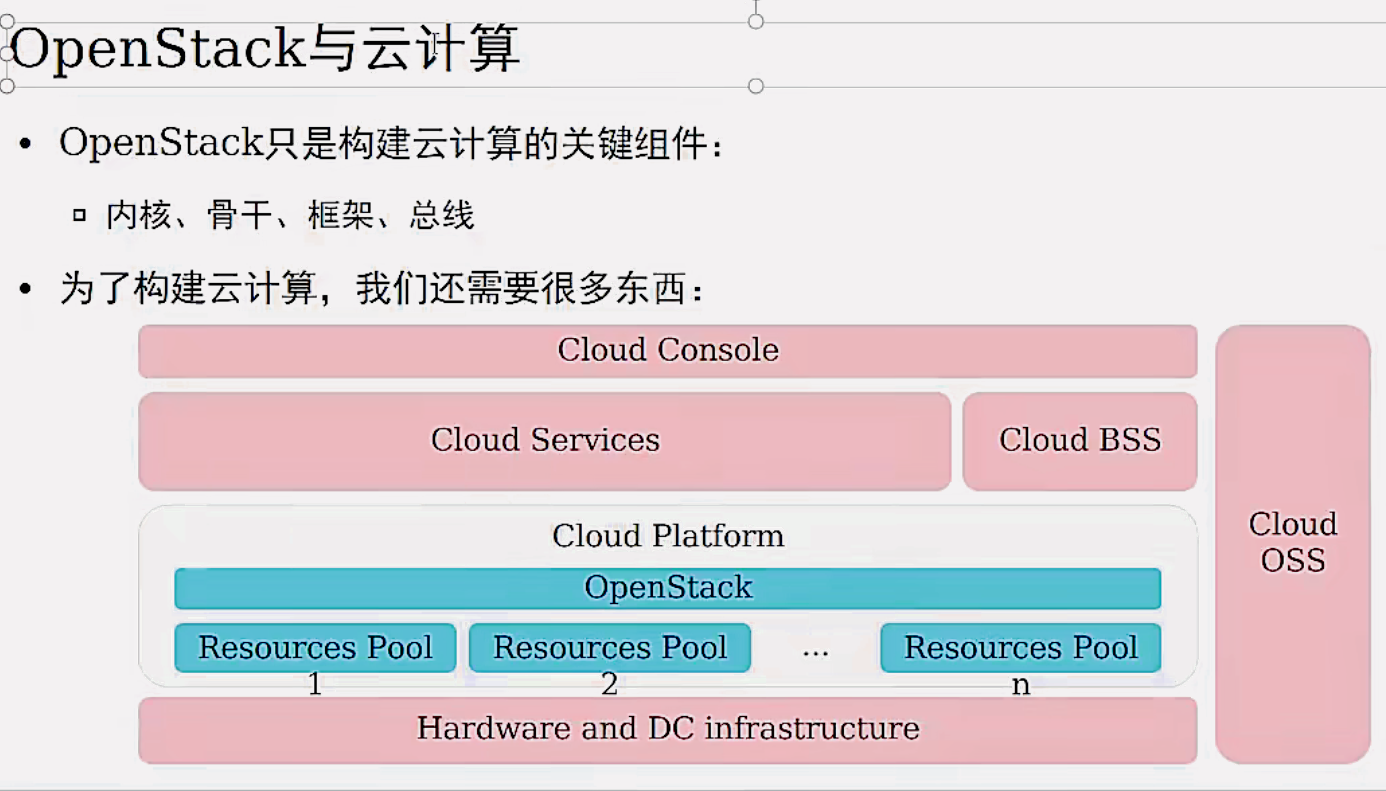
1.6 OpenStack 与 云计算
OpenStack是框架: 以OpenStack为框架, 将计算、存储、网络、管理、运营、运维等多个领域的软硬件产品组件整合在一起, 共同组成面向业务场景的整体解决方案。
OpenStack主要关注的问题:框架本身的开放性, 生态的繁荣与活跃; 控制面的服务能力、高可靠、高性能、可扩展、易操作、易维护等。
Cloud BSS:Cloud Business Support System, 云业务支撑系统。
Cloud OSS:Cloud Operation Support System, 云运营支撑。
综上两个对比, 可以总结出云计算与虚拟化的关键区别:
云计算的特点是 IT能力的服务化, 按需使用, 按量计费, 多租户隔离等。
虚拟化的特点是 环境隔离, 资源复用, 降低隔离损耗, 提升运行效率, 提供高级虚拟化特性等。
1.7 OpenStack 中的相关组件
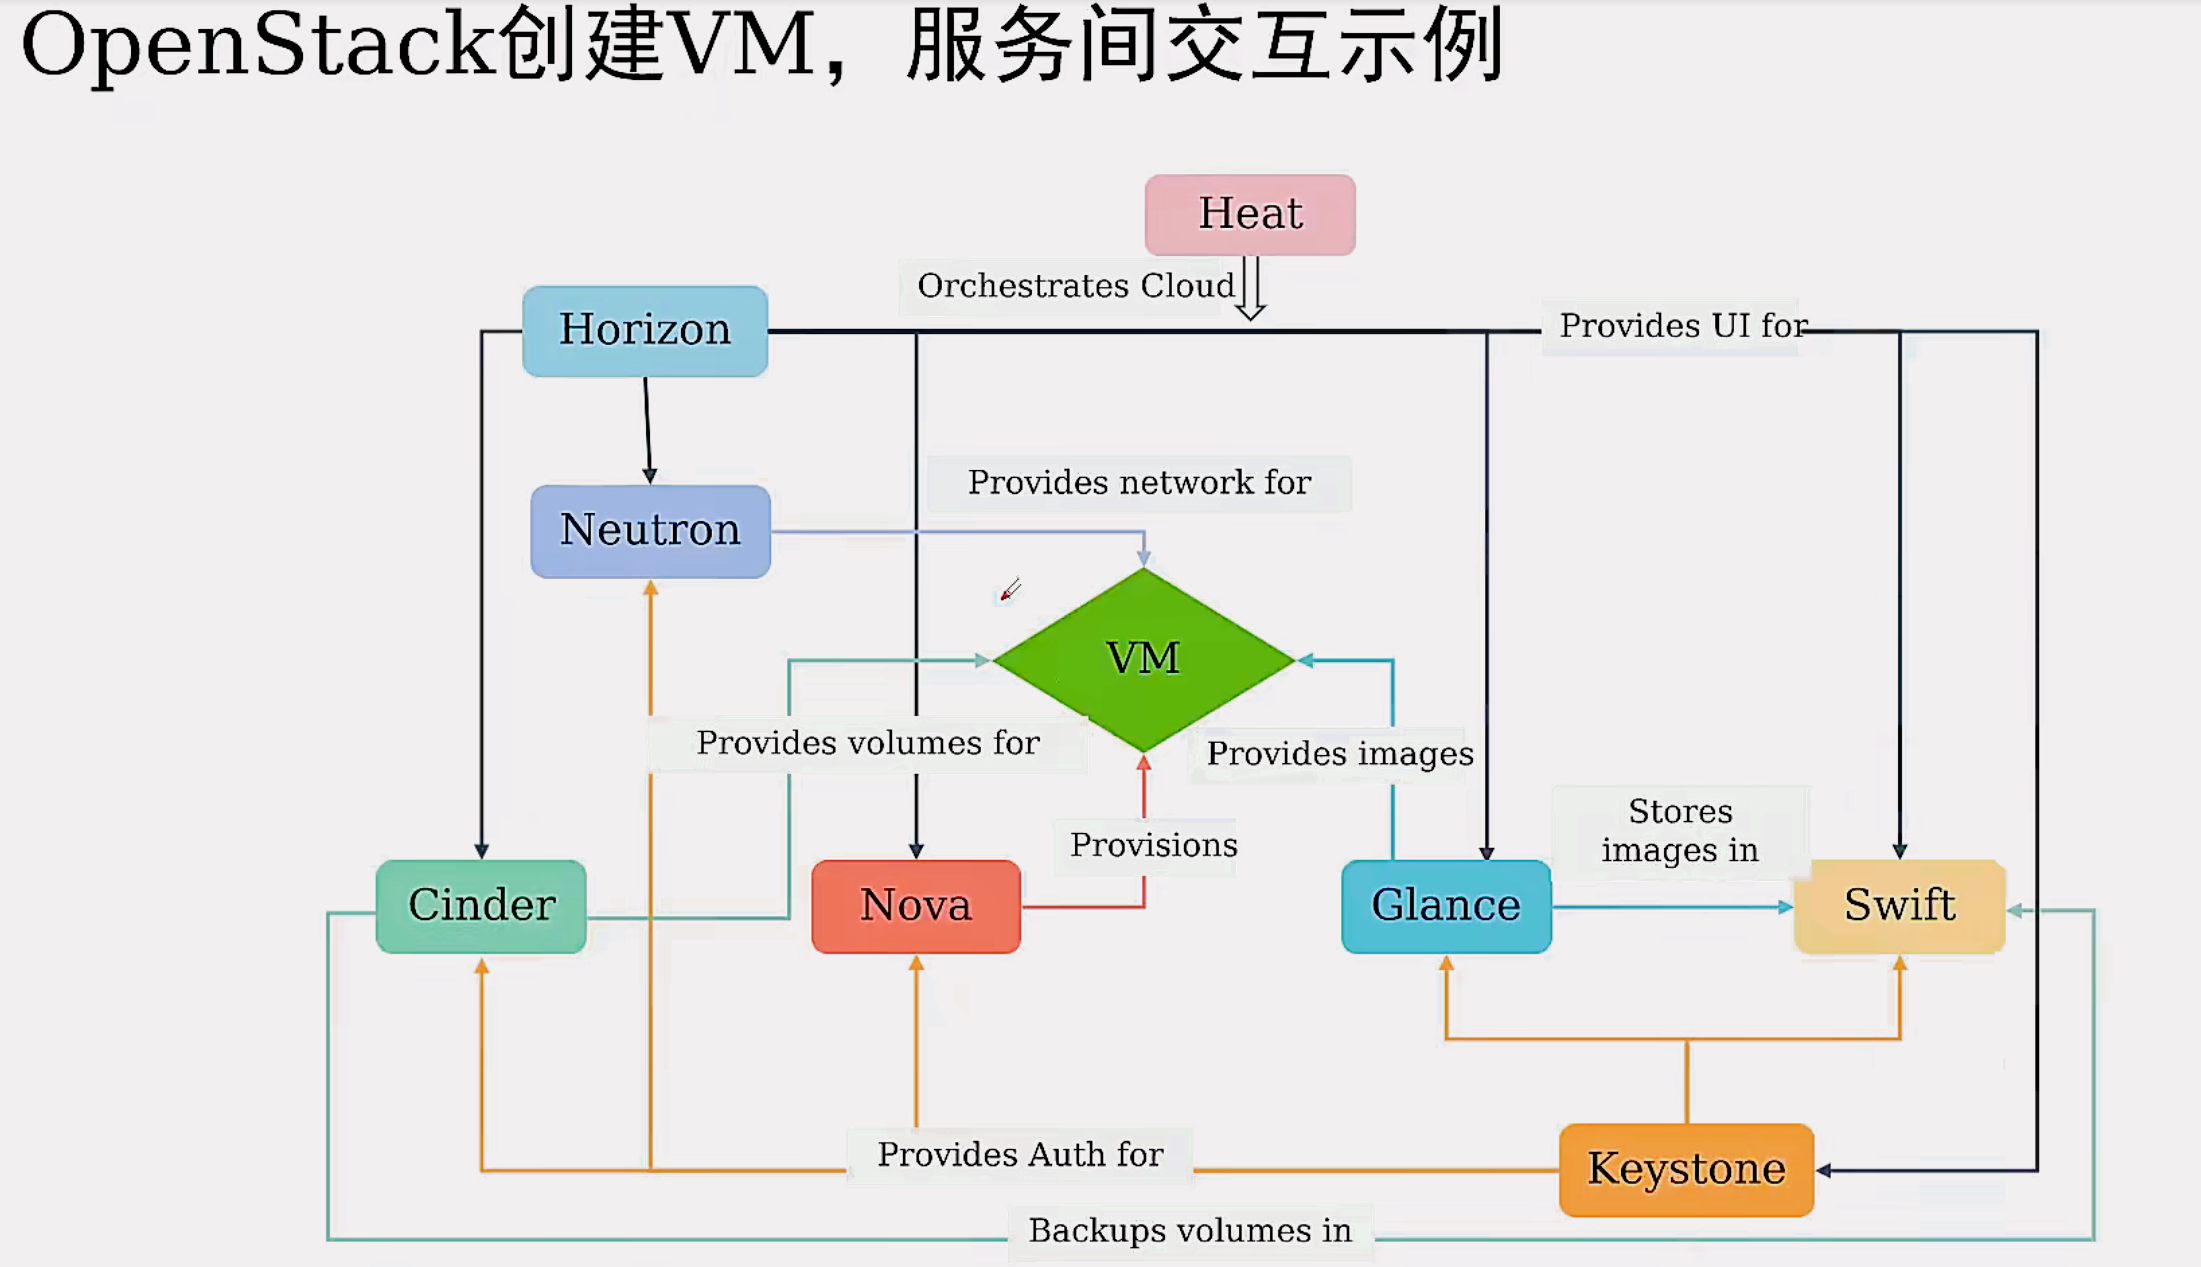
1.openstack组件不止这么多,一共 41 个
2.nova: 提供计算资源的
3.glance: 提供镜像服务的
4.swift: 对象存储,存储镜像/备份等
5.cinder: 提供块存储服务的,磁盘/卷
6.neturon: 提供网络服务的,网络/子网/端口等
7.keystone: 提供身份认证服务的
8.horizon: 提供dashboard面板服务,提供 webUl界面
9.heat: 编排服务,通过编写模板文件,一键式运行
2. 安装 allinone 版本
tips: 建议每做一步,拍摄一次快照
2.1 虚拟机相关设置
基于已有的虚拟机,更改这三项配置!
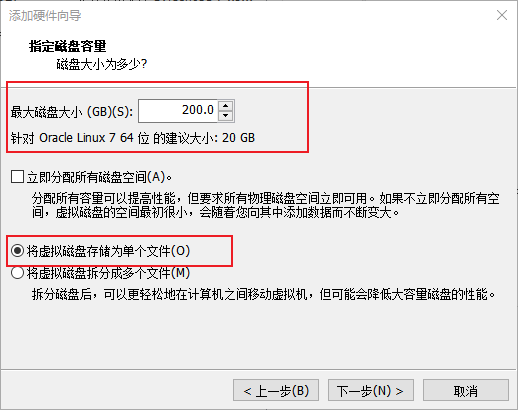
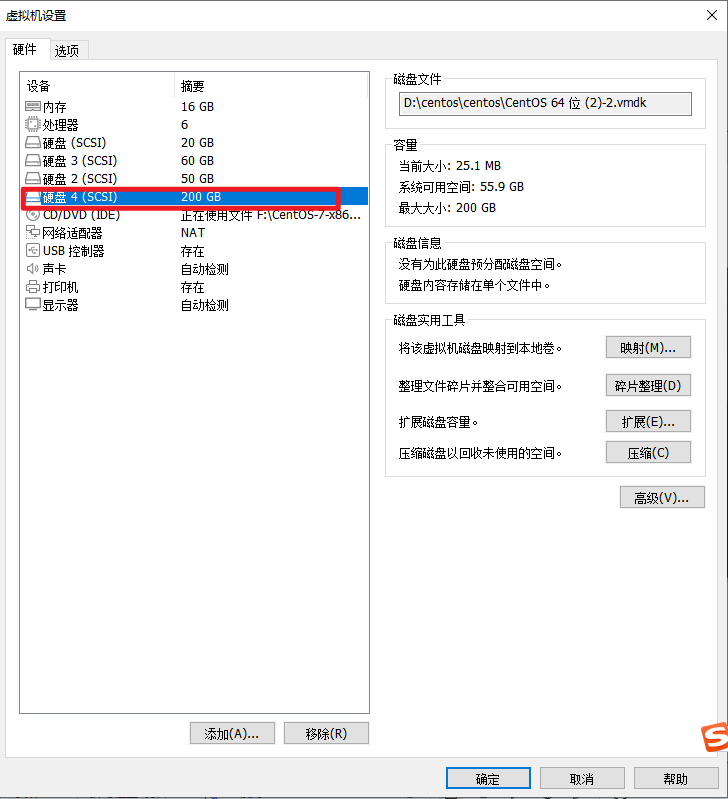
(1)设置磁盘大小为200G
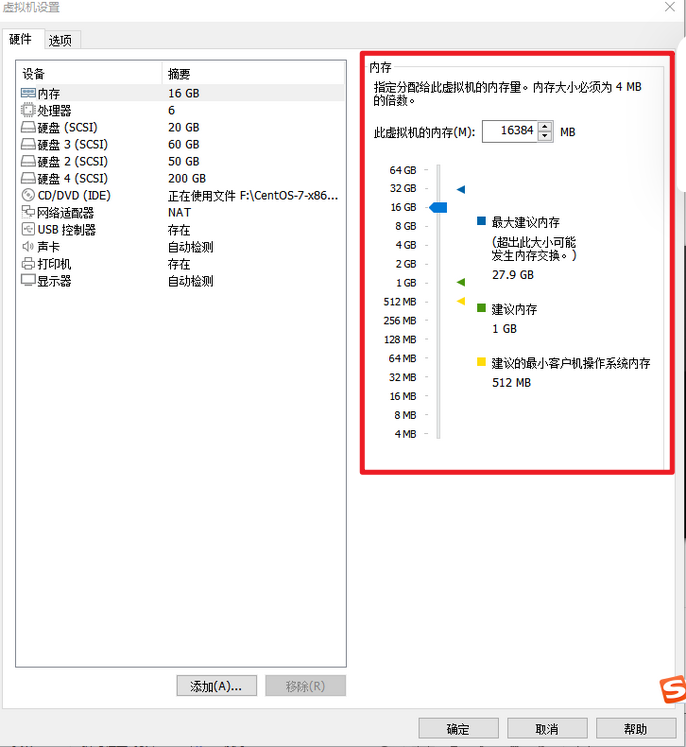
(2)设置内存为16G
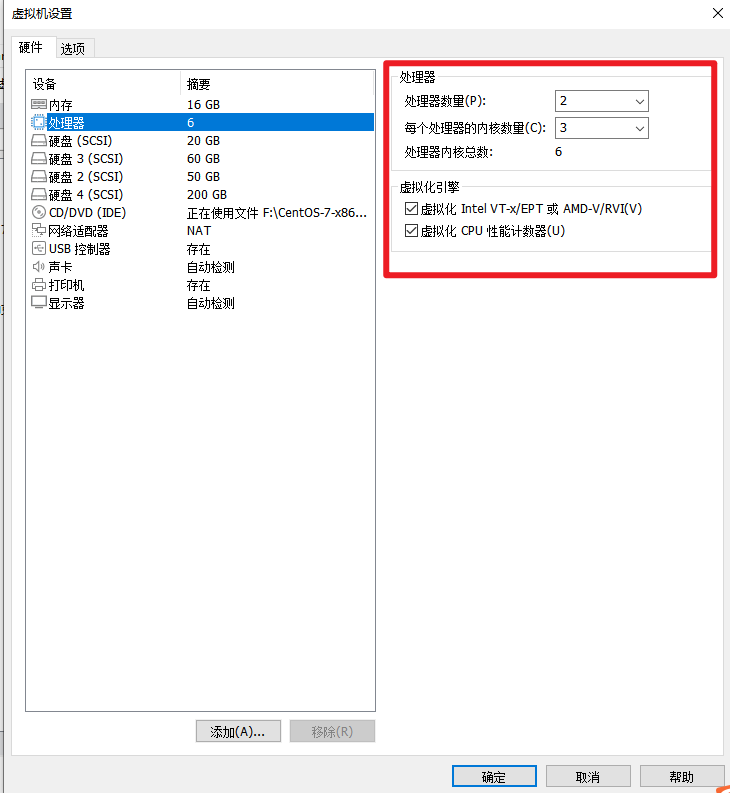
(3)处理器设置
2.2.查看生成的IP地址
[root@YL ~]# ip addr
1: lo: <LOOPBACK,UP,LOWER_UP> mtu 65536 qdisc noqueue state UNKNOWN group default qlen 1000
    link/loopback 00:00:00:00:00:00 brd 00:00:00:00:00:00
    inet 127.0.0.1/8 scope host lo
       valid_lft forever preferred_lft forever
    inet6 ::1/128 scope host
       valid_lft forever preferred_lft forever
2: ens33: <BROADCAST,MULTICAST,UP,LOWER_UP> mtu 1500 qdisc pfifo_fast state UP group default qlen 1000
    link/ether 00:0c:29:24:c2:87 brd ff:ff:ff:ff:ff:ff
    inet 192.168.220.130/24 brd 192.168.220.255 scope global noprefixroute dynamic ens33
       valid_lft 1115sec preferred_lft 1115sec
    inet6 fe80::cb96:6abb:8b1c:cdcd/64 scope link noprefixroute
       valid_lft forever preferred_lft forever
3: virbr0: <NO-CARRIER,BROADCAST,MULTICAST,UP> mtu 1500 qdisc noqueue state DOWN group default qlen 1000
    link/ether 52:54:00:21:6b:5a brd ff:ff:ff:ff:ff:ff
    inet 192.168.122.1/24 brd 192.168.122.255 scope global virbr0
       valid_lft forever preferred_lft forever
4: virbr0-nic: <BROADCAST,MULTICAST> mtu 1500 qdisc pfifo_fast master virbr0 state DOWN group default qlen 1000
link/ether 52:54:00:21:6b:5a brd ff:ff:ff:ff:ff:ff2.3.生成动态IP地址 (如果ip正常访问,不用做)

2.4. 修改网络 ( 如果ip正常访问,不用做 )
#进入到指定的目录
[root@localhost ~]# cd /etc/sysconfig/network-scripts/
[root@localhost network-scripts]# ls
[root@localhost network-scripts]# vi ifcfg-ens33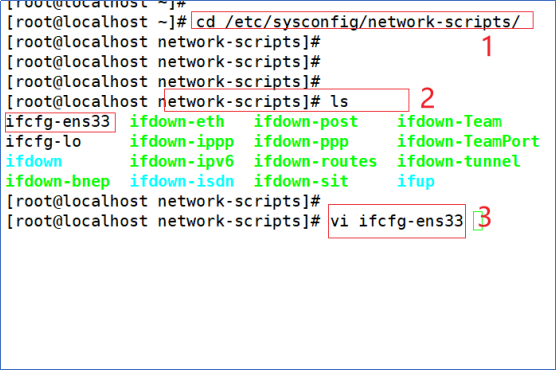
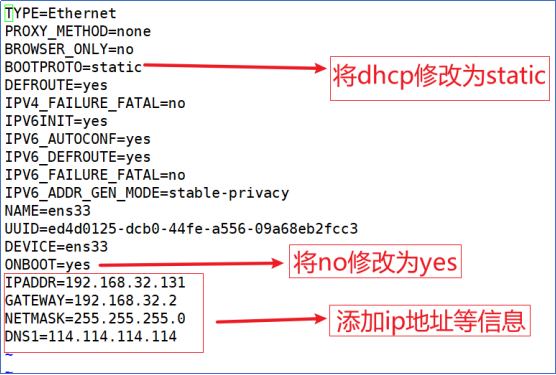
修改完成后,退出保存就可以
2.5 重启网卡
[root@YL ~]# systemctl restart network
[root@YL ~]# ping www.baidu.com
PING www.a.shifen.com (110.242.70.57) 56(84) bytes of data.
64 bytes from 110.242.70.57 (110.242.70.57): icmp_seq=1 ttl=128 time=65.7 ms
64 bytes from 110.242.70.57 (110.242.70.57): icmp_seq=2 ttl=128 time=65.7 ms
^C
--- www.a.shifen.com ping statistics ---
2 packets transmitted, 2 received, 0% packet loss, time 1003ms
rtt min/avg/max/mdev = 65.707/65.721/65.735/0.014 ms
2.6 禁止防火墙开机启动
[root@YL ~]# systemctl disable firewalld
Removed symlink /etc/systemd/system/multi-user.target.wants/firewalld.service.
Removed symlink /etc/systemd/system/dbus-org.fedoraproject.FirewallD1.service.
2.7 禁止SELinux
[root@YL ~]# vim /etc/selinux/config
[root@YL ~]# cat /etc/selinux/config

# This file controls the state of SELinux on the system.
# SELINUX= can take one of these three values:
#     enforcing - SELinux security policy is enforced.
#     permissive - SELinux prints warnings instead of enforcing.
#     disabled - No SELinux policy is loaded.
SELINUX=disable
# SELINUXTYPE= can take one of three values:
#     targeted - Targeted processes are protected,
#     minimum - Modification of targeted policy. Only selected processes are protected.
#     mls - Multi Level Security protection.
SELINUXTYPE=targeted
改为disable

设置完后, 重启系统 !!!!
2.8 停用NetWorkManager服务
[root@YL ~]# systemctl disable NetworkManager
Removed symlink /etc/systemd/system/multi-user.target.wants/NetworkManager.service.
Removed symlink /etc/systemd/system/dbus-org.freedesktop.nm-dispatcher.service.
Removed symlink /etc/systemd/system/network-online.target.wants/NetworkManager-wait-online.service.
[root@YL ~]# systemctl stop NetworkManager
[root@YL ~]# systemctl enable network
network.service is not a native service, redirecting to /sbin/chkconfig.
Executing /sbin/chkconfig network on
[root@YL ~]# systemctl start network2.9 . 修改主机名以及映射
在文件结尾添加如下内容
192.168.220.130(本机ip) node-a node-a.localdomain
[root@YL ~]# hostnamectl set-hostname node-a
[root@YL ~]# vim /etc/hosts
[root@YL ~]# cat /etc/hosts
127.0.0.1   localhost localhost.localdomain localhost4 localhost4.localdomain4
::1         localhost localhost.localdomain localhost6 localhost6.localdomain6
192.168.220.130 node-a node-a.localdomain
[root@YL ~]# ping node-a
PING node-a (192.168.220.130) 56(84) bytes of data.
64 bytes from node-a (192.168.220.130): icmp_seq=1 ttl=64 time=0.263 ms
64 bytes from node-a (192.168.220.130): icmp_seq=2 ttl=64 time=0.032 ms
64 bytes from node-a (192.168.220.130): icmp_seq=3 ttl=64 time=0.032 ms
^C
--- node-a ping statistics ---
3 packets transmitted, 3 received, 0% packet loss, time 2000ms
rtt min/avg/max/mdev = 0.032/0.109/0.263/0.108 ms
2.10 换源
Repo源文件链接:
通过网盘分享的文件:repo.zip
链接: https://pan.baidu.com/s/1092fYKrBvaBLnIbJHmOb7A 提取码: mtdb
--来自百度网盘超级会员v4的分享
方式一:使用finalshell等远程连接工具换源
finalshell下载链接:https://dl.hostbuf.com/oldversion/finalshell_windows_x64.exe
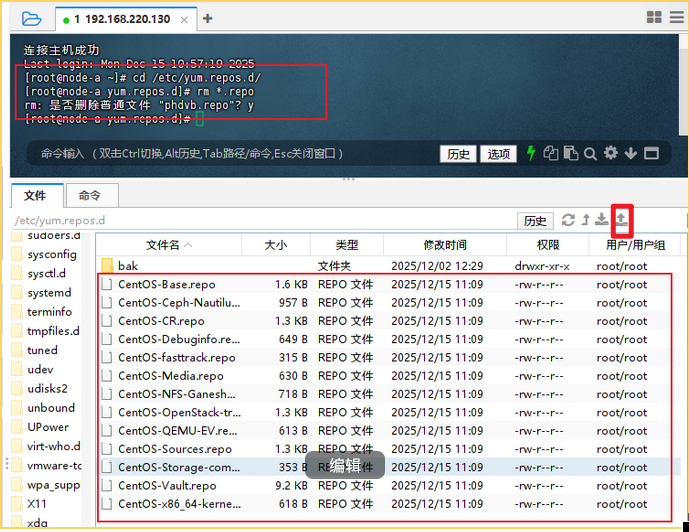
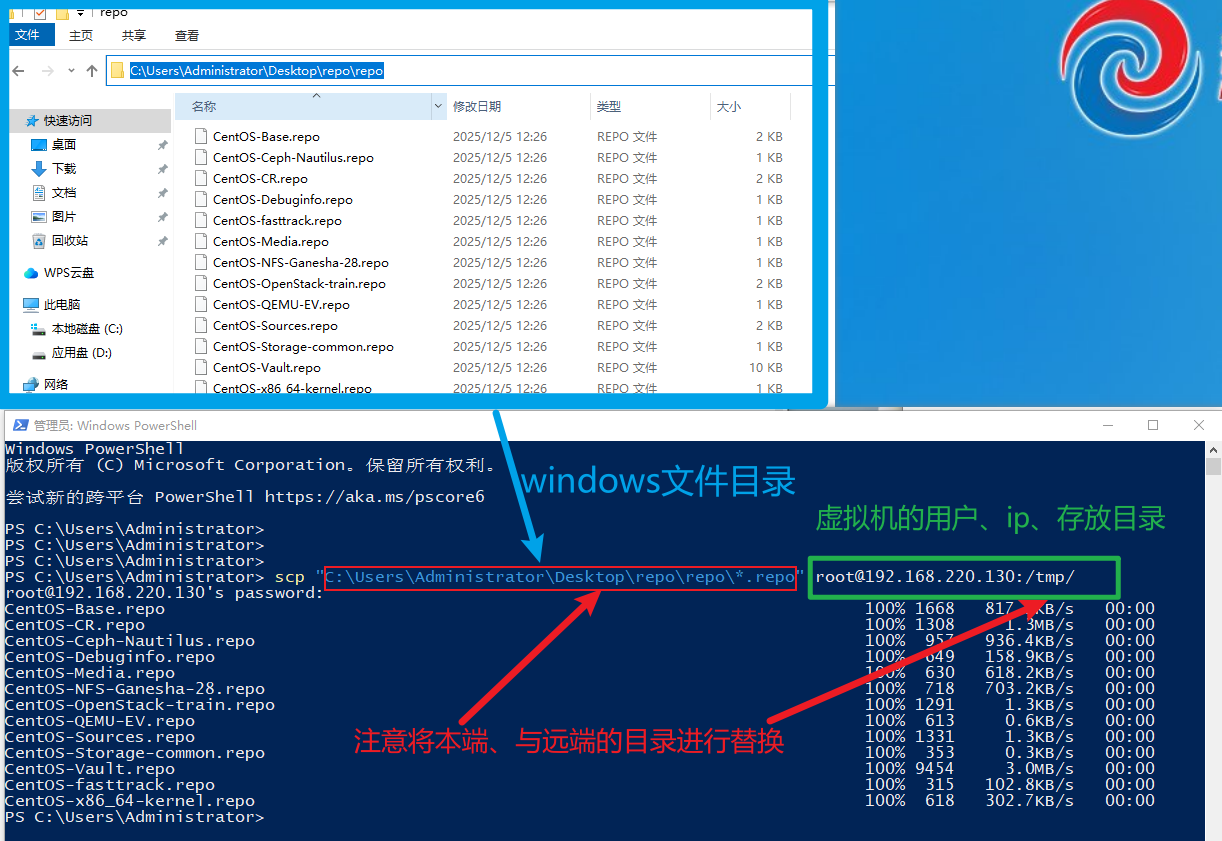
方式二:使用scp远程文件推送
打开windows 的powershell
scp "C:\Users\Administrator\Desktop\repo\repo\*.repo" root@192.168.220.130:/tmp/
2.1 1 . 安装时间同步软件
[root@node-a yum.repos.d]# yum install -y chrony
已加载插件:fastestmirror, langpacks
Repository 'centos-nfs-ganesha28': Error parsing config: Error parsing "baseurl = 'httpss://vault.centos.org/centos/7/storage/x86_64/nfs-ganesha-28/'": URL must be http, ftp, file or https not "httpss"
Loading mirror speeds from cached hostfile
base                                                                         | 3.6 kB  00:00:00
centos-ceph-nautilus                                                         | 3.0 kB  00:00:00
centos-openstack-train                                                       | 3.0 kB  00:00:00
centos-qemu-ev                                                               | 3.0 kB  00:00:00
extras                                                                       | 2.9 kB  00:00:00
updates                                                                      | 2.9 kB  00:00:00
(1/7): base/7/x86_64/group_gz                                                | 153 kB  00:00:00
(2/7): centos-qemu-ev/7/x86_64/primary_db                                    |  57 kB  00:00:00
(3/7): extras/7/x86_64/primary_db                                            | 253 kB  00:00:00
(4/7): centos-ceph-nautilus/7/x86_64/primary_db                              | 343 kB  00:00:01
(5/7): centos-openstack-train/7/x86_64/primary_db                            | 1.2 MB  00:00:01
(6/7): base/7/x86_64/primary_db                                              | 6.1 MB  00:00:01
(7/7): updates/7/x86_64/primary_db                                           |  27 MB  00:00:01
软件包 chrony-3.4-1.el7.x86_64 已安装并且是最新版本
无须任何处理2.1 2 . 添加N TP 服务地址
[root@node-a yum.repos.d]# vim /etc/chrony.conf
[root@node-a yum.repos.d]# cat /etc/chrony.conf
# Use public servers from the pool.ntp.org project.
# Please consider joining the pool (http://www.pool.ntp.org/join.html).
server 0.centos.pool.ntp.org iburst
server 1.centos.pool.ntp.org iburst
server 2.centos.pool.ntp.org iburst
server 3.centos.pool.ntp.org iburst

server ntp1.aliyun.com iburst
# Record the rate at which the system clock gains/losses time.
driftfile /var/lib/chrony/drift

# Allow the system clock to be stepped in the first three updates
# if its offset is larger than 1 second.
makestep 1.0 3

# Enable kernel synchronization of the real-time clock (RTC).
rtcsync

# Enable hardware timestamping on all interfaces that support it.
#hwtimestamp *

# Increase the minimum number of selectable sources required to adjust
# the system clock.
#minsources 2

# Allow NTP client access from local network.
#allow 192.168.0.0/16

# Serve time even if not synchronized to a time source.
#local stratum 10

# Specify file containing keys for NTP authentication.
#keyfile /etc/chrony.keys

# Specify directory for log files.
logdir /var/log/chrony

# Select which information is logged.
#log measurements statistics tracking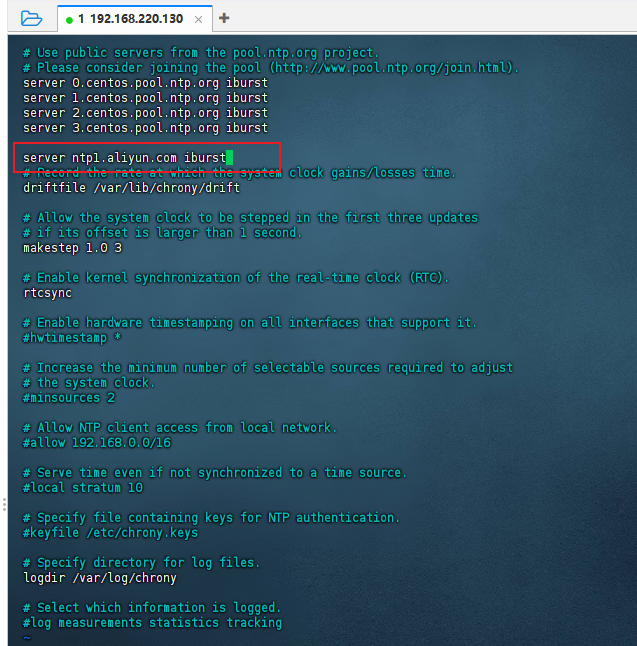
2.1 3 . 准备所需的软件库
[root@node-a yum.repos.d]# yum -y update
已加载插件:fastestmirror, langpacks
Repository 'centos-nfs-ganesha28': Error parsing config: Error parsing "baseurl = 'httpss://vault.centos.org/centos/7/storage/x86_64/nfs-ganesha-28/'": URL must be http, ftp, file or https not "httpss"
Loading mirror speeds from cached hostfile
正在解决依赖关系
--> 正在检查事务
---> 软件包 NetworkManager.x86_64.1.1.18.8-1.el7 将被 升级
---> 软件包 NetworkManager.x86_64.1.1.18.8-2.el7_9 将被 更新
....
...
..
.
(349/352): xz-5.2.2-2.el7_9.x86_64.rpm                                       | 229 kB  00:00:00
(350/352): xz-libs-5.2.2-2.el7_9.x86_64.rpm                                  | 103 kB  00:00:00
(351/352): zlib-1.2.7-21.el7_9.x86_64.rpm                                    |  90 kB  00:00:00
(352/352): zenity-3.28.1-2.el7_9.x86_64.rpm                                  | 4.0 MB  00:00:00
----------------------------------------------------------------------------------------------------
总计                                                                 12 MB/s | 602 MB  00:00:48
从 file:///etc/pki/rpm-gpg/RPM-GPG-KEY-CentOS-7 检索密钥
导入 GPG key 0xF4A80EB5:
 用户ID     : "CentOS-7 Key (CentOS 7 Official Signing Key) <security@centos.org>"
 指纹       : 6341 ab27 53d7 8a78 a7c2 7bb1 24c6 a8a7 f4a8 0eb5
 软件包     : centos-release-7-9.2009.0.el7.centos.x86_64 (@anaconda)
 来自       : /etc/pki/rpm-gpg/RPM-GPG-KEY-CentOS-7
从 file:///etc/pki/rpm-gpg/RPM-GPG-KEY-CentOS-SIG-Cloud 检索密钥


获取 GPG 密钥失败:[Errno 14] curl#37 - "Couldn't open file /etc/pki/rpm-gpg/RPM-GPG-KEY-CentOS-SIG-Cloud"[root@node-a yum.repos.d]# yum -y install centos-release-openstack-train
已加载插件:fastestmirror, langpacks
Repository 'centos-nfs-ganesha28': Error parsing config: Error parsing "baseurl = 'httpss://vault.centos.org/centos/7/storage/x86_64/nfs-ganesha-28/'": URL must be http, ftp, file or https not "httpss"
Loading mirror speeds from cached hostfile
正在解决依赖关系
--> 正在检查事务
---> 软件包 centos-release-openstack-train.noarch.0.1-1.el7.centos 将被 安装
--> 正在处理依赖关系 centos-release-qemu-ev,它被软件包 centos-release-openstack-train-1-1.el7.centos.noarch 需要
--> 正在处理依赖关系 centos-release-ceph-nautilus,它被软件包 centos-release-openstack-train-1-1.el7.centos.noarch 需要
--> 正在检查事务
.......
.....
...
.
已安装:
centos-release-openstack-train.noarch 0:1-1.el7.centos
作为依赖被安装:
centos-release-ceph-nautilus.noarch 0:1.2-2.el7.centos centos-release-nfs-ganesha28.noarch 0:1.0-3.el7.centos
centos-release-qemu-ev.noarch 0:1.0-4.el7.centos centos-release-storage-common.noarch 0:2-2.el7.centos
centos-release-virt-common.noarch 0:1-1.el7.centos
完毕!2.14 安装packstack安装器
[root@node-a ~]# yum -y update
Loaded plugins: fastestmirror, langpacks
Repository 'centos-nfs-ganesha28': Error parsing config: Error parsing "baseurl = 'httpss://vault.centos.org/centos/7/storage/x86_64/nfs-ganesha-28/'": URL must be http, ftp, file or https not "httpss"
Loading mirror speeds from cached hostfile
base                                                     | 3.6 kB     00:00
centos-ceph-nautilus                                     | 3.0 kB     00:00
centos-openstack-train                                   | 3.0 kB     00:00
centos-qemu-ev                                           | 3.0 kB     00:00
extras                                                   | 2.9 kB     00:00
updates                                                  | 2.9 kB     00:00
Resolving Dependencies
--> Running transaction check
......
.....
....
...
..
.
Replaced:
  python-backports.x86_64 0:1.0-8.el7
  python-chardet.noarch 0:2.2.1-3.el7
  python-coverage.x86_64 0:3.6-0.5.b3.el7
  python-dateutil.noarch 0:1.5-7.el7
  python-ipaddress.noarch 0:1.0.16-2.el7
  python-pyudev.noarch 0:0.15-9.el7
  python-requests.noarch 0:2.6.0-10.el7
  python-setuptools.noarch 0:0.9.8-7.el7
  python-six.noarch 0:1.9.0-2.el7
  python-suds.noarch 0:0.4.1-5.el7
  python-urllib3.noarch 0:1.10.2-7.el7
  qemu-img.x86_64 10:1.5.3-175.el7
  qemu-kvm.x86_64 10:1.5.3-175.el7
  qemu-kvm-common.x86_64 10:1.5.3-175.el7

Complete![root@node-a ~]# yum -y install openstack-packstack
Loaded plugins: fastestmirror, langpacks
Repository 'centos-nfs-ganesha28': Error parsing config: Error parsing "baseurl = 'httpss://vault.centos.org/centos/7/storage/x86_64/nfs-ganesha-28/'": URL must be http, ftp, file or https not "httpss"
Loading mirror speeds from cached hostfile
Resolving Dependencies
--> Running transaction check
---> Package openstack-packstack.noarch 1:15.1.0-1.el7 will be installed
--> Processing Dependency: openstack-packstack-puppet = 1:15.1.0-1.el7 for package: 1:openstack-packstack-15.1.0-1.el7.noarch
......
.....
....
...
..
.
ruby-facter.x86_64 1:3.9.3-7.el7
ruby-irb.noarch 0:2.0.0.648-39.el7_9
ruby-libs.x86_64 0:2.0.0.648-39.el7_9
ruby-shadow.x86_64 0:1.4.1-23.el7
rubygem-bigdecimal.x86_64 0:1.2.0-39.el7_9
rubygem-io-console.x86_64 0:0.4.2-39.el7_9
rubygem-json.x86_64 0:1.7.7-39.el7_9
rubygem-pathspec.noarch 0:0.2.1-3.el7
rubygem-psych.x86_64 0:2.0.0-39.el7_9
rubygem-rdoc.noarch 0:4.0.0-39.el7_9
rubygem-rgen.noarch 0:0.6.6-2.el7
rubygems.noarch 0:2.0.14.1-39.el7_9
yaml-cpp.x86_64 0:0.5.1-6.el7
Complete!2.1 5 运行 packstack 安装OpenStack
[root@node-a ~]# packstack --allinone
Welcome to the Packstack setup utility

The installation log file is available at: /var/tmp/packstack/20251216-120745-ogSMuS/openstack-setup.log
Packstack changed given value  to required value /root/.ssh/id_rsa.pub

Installing:
Clean Up                                             [ DONE ]
Discovering ip protocol version                      [ DONE ]
Setting up ssh keys                                  [ DONE ]
Preparing servers                                    [ DONE ]
Pre installing Puppet and discovering hosts' details [ DONE ]
......
....
..
.
_NEUTRON_L2_AGENT: You have chosen OVN Neutron backend. Note that this backend does not support the VPNaaS or FWaaS services. Geneve will be used as the encapsulation method for tenant networks
 * A new answerfile was created in: /root/packstack-answers-20251216-120746.txt
 * Time synchronization installation was skipped. Please note that unsynchronized time on server instances might be problem for some OpenStack components.
 * File /root/keystonerc_admin has been created on OpenStack client host 192.168.220.130. To use the command line tools you need to source the file.
 * To access the OpenStack Dashboard browse to http://192.168.220.130/dashboard .
Please, find your login credentials stored in the keystonerc_admin in your home directory.
 * Because of the kernel update the host 192.168.220.130 requires reboot.
 * The installation log file is available at: /var/tmp/packstack/20251216-120745-ogSMuS/openstack-setup.log
 * The generated manifests are available at: /var/tmp/packstack/20251216-120745-ogSMuS/manifests
You have new mail in /var/spool/mail/root
.....
...
..
.
192.168.220.130_controller.pp:                       [ DONE ]
Applying 192.168.220.130_network.pp
192.168.220.130_network.pp:                          [ DONE ]
Applying 192.168.220.130_compute.pp
192.168.220.130_compute.pp:                          [ DONE ]
Applying Puppet manifests                            [ DONE ]
Finalizing                                           [ DONE ]

 **** Installation completed successfully ******

Additional information:
 * Parameter CONFIG_NEUTRON_L2_AGENT: You have chosen OVN Neutron backend. Note that this backend does not support the VPNaaS or FWaaS services. Geneve will be used as the encapsulation method for tenant networks
 * A new answerfile was created in: /root/packstack-answers-20251216-120746.txt
 * Time synchronization installation was skipped. Please note that unsynchronized time on server instances might be problem for some OpenStack components.
 * File /root/keystonerc_admin has been created on OpenStack client host 192.168.220.130. To use the command line tools you need to source the file.
 * To access the OpenStack Dashboard browse to http://192.168.220.130/dashboard .
Please, find your login credentials stored in the keystonerc_admin in your home directory.
 * Because of the kernel update the host 192.168.220.130 requires reboot.
 * The installation log file is available at: /var/tmp/packstack/20251216-120745-ogSMuS/openstack-setup.log
 * The generated manifests are available at: /var/tmp/packstack/20251216-120745-ogSMuS/manifests
You have new mail in /var/spool/mail/root
2.16 查看安装版本并登录dashbroad
[root@node-a ~]# soucre /root/keystonerc_admin
bash: soucre: command not found...
[root@node-a ~]# source /root/keystonerc_admin
[root@node-a ~(keystone_admin)]# cat /root/keystonerc_admin
unset OS_SERVICE_TOKEN
    export OS_USERNAME=admin
    export OS_PASSWORD='c245f92437f1465a'
    export OS_REGION_NAME=RegionOne
    export OS_AUTH_URL=http://192.168.220.130:5000/v3
    export PS1='[\u@\h \W(keystone_admin)]\$ '

export OS_PROJECT_NAME=admin
export OS_USER_DOMAIN_NAME=Default
export OS_PROJECT_DOMAIN_NAME=Default
export OS_IDENTITY_API_VERSION=3
[root@node-a ~(keystone_admin)]# 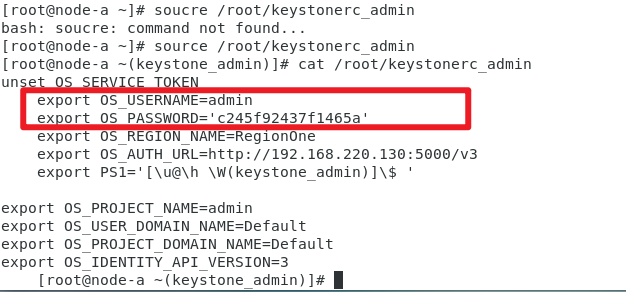
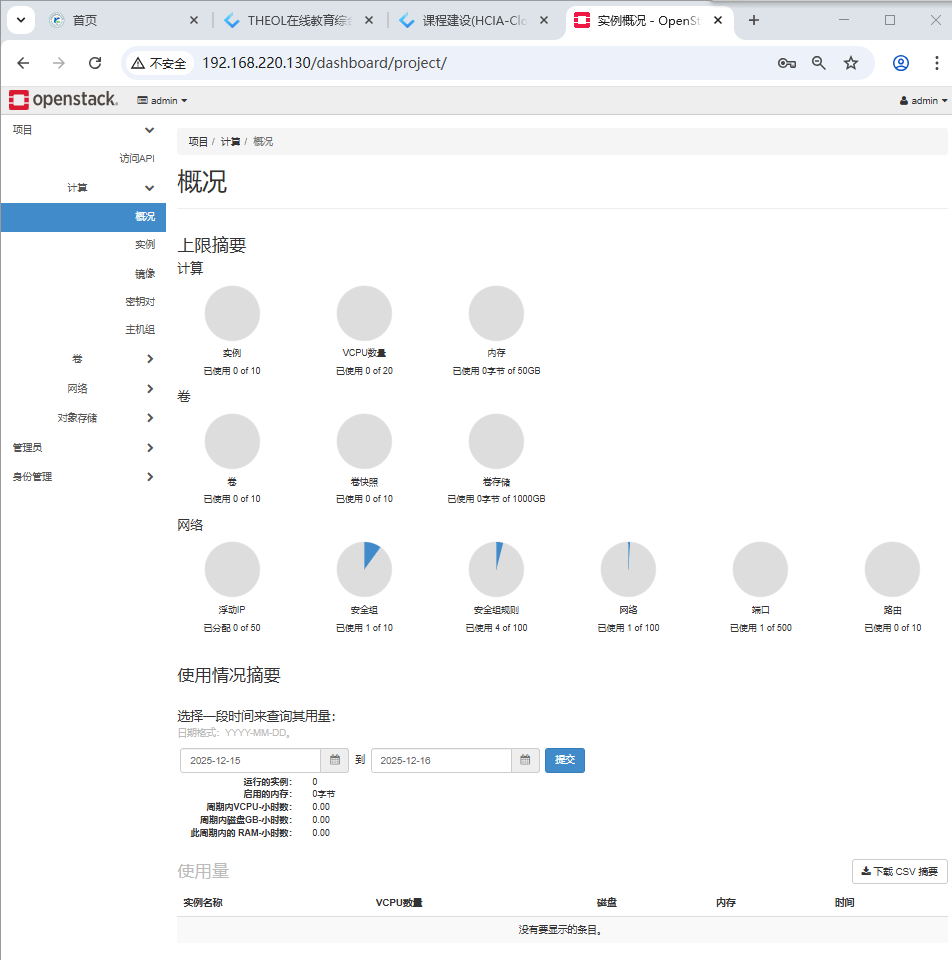
通过用户名密码登录 openstack 管理平台
3. 环境搭建
3.1 制作模板
未来我们搭建openstack环境,或者搭建docker/k8s集群,都要用到几台linux,如果手工一台一台去安装,非常麻烦,也很慢,可以安装一台linux,之后制作模板,关机。
后续如果用到linux,比如要创建3台,那么直接通过模板完整克隆3台即可。用centos stream 8 版本,安装一个最小化系统minimal即可,分区直接自动,自动获取ip地址。
大家一定要注意: 你虚拟机给的内存规格加起来, 一定要小于宿主机内存,比如宿主机16G内存, 每一台给8G内存,不可以。
大家通过模板克隆出来两台linux。
controller
compute