一、理论知识与核心概念
1.1 为什么需要ConcurrentHashMap?
在多线程环境下,我们经常需要使用Map来存储共享数据。但普通的HashMap并不是线程安全的,在高并发场景下会出现严重问题。
HashMap的线程不安全问题:
-
数据丢失:多个线程同时put,可能导致一个线程的数据被覆盖
java// 线程1和线程2同时执行put Thread-1: put("key1", "value1") // 计算到index=5 Thread-2: put("key2", "value2") // 也计算到index=5 // 结果:只有一个数据被保存,另一个丢失 -
死循环问题(JDK 1.7):扩容时多线程并发导致链表成环
- 线程A扩容到一半被挂起
- 线程B完成扩容,链表反转
- 线程A恢复执行,形成环形链表
- get操作时CPU 100%,无限循环
-
数据不一致:size()返回值不准确,迭代过程中数据变化
1.2 Hashtable的性能问题
Hashtable通过对所有方法加synchronized实现线程安全,但性能极差:
java
public synchronized V put(K key, V value) { ... }
public synchronized V get(Object key) { ... }性能问题:
- 全表锁:无论操作哪个桶,都要锁住整个表
- 读写互斥:即使只是读取,也需要等待写操作释放锁
- 并发度为1:同一时刻只允许一个线程访问
性能测试数据:
- 单线程:HashMap ≈ Hashtable
- 10线程并发:HashMap不安全,Hashtable吞吐量仅为HashMap的1/10
1.3 Collections.synchronizedMap的局限性
Collections.synchronizedMap是对Map的简单包装:
java
Map<K,V> syncMap = Collections.synchronizedMap(new HashMap<>());

// 底层实现
public V put(K key, V value) {
    synchronized (mutex) {  // mutex = this
        return m.put(key, value);
    }
}局限性:
- 本质仍是全表锁,性能与Hashtable类似
- 迭代时需要手动加锁,否则抛
ConcurrentModificationException - 复合操作(如putIfAbsent)不是原子的,需要额外加锁
1.4 ConcurrentHashMap的设计目标
为了解决上述问题,ConcurrentHashMap应运而生,设计目标:
- 高并发:支持高并发读写,锁粒度细化
- 高性能:读操作无锁,写操作局部锁
- 线程安全:保证数据一致性
- 弱一致性:允许读到稍旧的数据,换取性能
核心思想:
- 分段锁(JDK 1.7):将Map分为多个Segment,每个Segment独立加锁
- CAS + synchronized(JDK 1.8):更细粒度的锁,锁定单个Node
二、原理深度剖析
2.1 JDK 1.7 Segment分段锁机制
2.1.1 Segment数组结构
JDK 1.7的ConcurrentHashMap采用Segment数组 + HashEntry数组 + 链表的结构:
css
ConcurrentHashMap
    |
    +-- Segment[0] (extends ReentrantLock)
    |       |
    |       +-- HashEntry[] table
    |               |
    |               +-- HashEntry -> HashEntry -> null (链表)
    |
    +-- Segment[1]
    |       |
    |       +-- HashEntry[] table
    |
    +-- Segment[15]  (默认16个Segment)
            |
            +-- HashEntry[] table
核心数据结构:
java
public class ConcurrentHashMap<K,V> extends AbstractMap<K,V> {
    // Segment数组
    final Segment<K,V>[] segments;

    // Segment继承ReentrantLock
    static final class Segment<K,V> extends ReentrantLock {
        transient volatile HashEntry<K,V>[] table;  // HashEntry数组
        transient int count;  // Segment中元素数量
        transient int modCount;  // 修改次数
        transient int threshold;  // 扩容阈值
        final float loadFactor;  // 加载因子
    }

    // HashEntry节点
    static final class HashEntry<K,V> {
        final int hash;
        final K key;
        volatile V value;
        volatile HashEntry<K,V> next;  // volatile保证可见性
    }
}
关键参数:
- concurrencyLevel(并发度):Segment数组长度,默认16
- initialCapacity:初始容量,默认16
- loadFactor:加载因子,默认0.75
2.1.2 put操作流程
java
public V put(K key, V value) {
    Segment<K,V> s;
    if (value == null)
        throw new NullPointerException();  // value不允许null

    // 1. 计算hash值
    int hash = hash(key);

    // 2. 定位Segment (hash >>> segmentShift) & segmentMask
    int j = (hash >>> segmentShift) & segmentMask;

    // 3. 获取Segment
    if ((s = (Segment<K,V>)UNSAFE.getObject(segments, (j << SSHIFT) + SBASE)) == null)
        s = ensureSegment(j);  // 延迟初始化Segment

    // 4. 调用Segment的put方法
    return s.put(key, hash, value, false);
}

// Segment的put方法
final V put(K key, int hash, V value, boolean onlyIfAbsent) {
    // 1. 尝试获取锁(tryLock)
    HashEntry<K,V> node = tryLock() ? null :
        scanAndLockForPut(key, hash, value);  // 失败则自旋获取锁

    V oldValue;
    try {
        HashEntry<K,V>[] tab = table;
        int index = (tab.length - 1) & hash;  // 定位桶
        HashEntry<K,V> first = entryAt(tab, index);  // 获取链表头

        // 2. 遍历链表
        for (HashEntry<K,V> e = first;;) {
            if (e != null) {
                K k;
                // 找到相同key,替换value
                if ((k = e.key) == key ||
                    (e.hash == hash && key.equals(k))) {
                    oldValue = e.value;
                    if (!onlyIfAbsent) {
                        e.value = value;
                        ++modCount;
                    }
                    break;
                }
                e = e.next;
            }
            else {
                // 3. 插入新节点
                if (node != null)
                    node.setNext(first);  // 头插法
                else
                    node = new HashEntry<K,V>(hash, key, value, first);

                int c = count + 1;
                // 4. 判断是否需要扩容
                if (c > threshold && tab.length < MAXIMUM_CAPACITY)
                    rehash(node);
                else
                    setEntryAt(tab, index, node);
                ++modCount;
                count = c;
                oldValue = null;
                break;
            }
        }
    } finally {
        unlock();  // 释放锁
    }
    return oldValue;
}
流程总结:
- 计算hash,定位Segment
- Segment加锁(ReentrantLock)
- 定位HashEntry桶位置
- 遍历链表,找到则替换,否则头插法插入
- 判断是否扩容
- 释放锁
2.1.3 get操作
java
public V get(Object key) {
    Segment<K,V> s;
    HashEntry<K,V>[] tab;

    // 1. 计算hash
    int h = hash(key);

    // 2. 定位Segment
    long u = (((h >>> segmentShift) & segmentMask) << SSHIFT) + SBASE;

    // 3. 无锁获取Segment和table
    if ((s = (Segment<K,V>)UNSAFE.getObjectVolatile(segments, u)) != null &&
        (tab = s.table) != null) {

        // 4. 遍历链表查找(无锁)
        for (HashEntry<K,V> e = (HashEntry<K,V>) UNSAFE.getObjectVolatile
                 (tab, ((long)(((tab.length - 1) & h)) << TSHIFT) + TBASE);
             e != null; e = e.next) {
            K k;
            if ((k = e.key) == key || (e.hash == h && key.equals(k)))
                return e.value;  // volatile读,保证可见性
        }
    }
    return null;
}
关键点:
- 无锁读取:get不加锁,依赖volatile保证可见性
- UNSAFE操作:直接从内存读取,保证读到最新值
- 性能极高:并发读不会阻塞
2.1.4 扩容机制
Segment独立扩容:
- 只扩容单个Segment,不影响其他Segment
- 扩容时持有Segment锁,阻塞该Segment的写操作
- 读操作仍可并发进行
java
private void rehash(HashEntry<K,V> node) {
    HashEntry<K,V>[] oldTable = table;
    int oldCapacity = oldTable.length;

    // 扩容为2倍
    int newCapacity = oldCapacity << 1;
    threshold = (int)(newCapacity * loadFactor);

    HashEntry<K,V>[] newTable =
        (HashEntry<K,V>[]) new HashEntry[newCapacity];
    int sizeMask = newCapacity - 1;

    // 遍历旧table,重新分配节点
    for (int i = 0; i < oldCapacity ; i++) {
        HashEntry<K,V> e = oldTable[i];

        if (e != null) {
            HashEntry<K,V> next = e.next;
            int idx = e.hash & sizeMask;

            if (next == null)  // 单节点直接放入
                newTable[idx] = e;
            else {
                // 遍历链表,重新hash分配
                HashEntry<K,V> lastRun = e;
                int lastIdx = idx;
                for (HashEntry<K,V> last = next;
                     last != null;
                     last = last.next) {
                    int k = last.hash & sizeMask;
                    if (k != lastIdx) {
                        lastIdx = k;
                        lastRun = last;
                    }
                }
                newTable[lastIdx] = lastRun;

                // Clone remaining nodes
                for (HashEntry<K,V> p = e; p != lastRun; p = p.next) {
                    V v = p.value;
                    int h = p.hash;
                    int k = h & sizeMask;
                    HashEntry<K,V> n = newTable[k];
                    newTable[k] = new HashEntry<K,V>(h, p.key, v, n);
                }
            }
        }
    }

    // 插入新节点
    int nodeIndex = node.hash & sizeMask;
    node.setNext(newTable[nodeIndex]);
    newTable[nodeIndex] = node;
    table = newTable;
}
2.1.5 size()方法
java
public int size() {
    final Segment<K,V>[] segments = this.segments;
    int size;
    boolean overflow;
    long sum;
    long last = 0L;
    int retries = -1;

    try {
        for (;;) {
            // 1. 尝试2次无锁统计
            if (retries++ == RETRIES_BEFORE_LOCK) {
                // 2. 失败则锁定所有Segment
                for (int j = 0; j < segments.length; ++j)
                    ensureSegment(j).lock();
            }

            sum = 0L;
            size = 0;
            overflow = false;

            // 3. 累加所有Segment的count
            for (int j = 0; j < segments.length; ++j) {
                Segment<K,V> seg = segmentAt(segments, j);
                if (seg != null) {
                    sum += seg.modCount;
                    int c = seg.count;
                    if (c < 0 || (size += c) < 0)
                        overflow = true;
                }
            }

            // 4. modCount未变化,说明期间没有修改,返回
            if (sum == last)
                break;
            last = sum;
        }
    } finally {
        if (retries > RETRIES_BEFORE_LOCK) {
            // 释放所有Segment锁
            for (int j = 0; j < segments.length; ++j)
                segmentAt(segments, j).unlock();
        }
    }
    return overflow ? Integer.MAX_VALUE : size;
}
策略:
- 先尝试2次无锁统计,通过比较
modCount判断是否有修改 - 如果2次统计结果一致,说明期间无修改,直接返回
- 否则锁定所有Segment,再次统计
2.1.6 优缺点分析
优点:
- ✅ 分段锁,并发度高(默认16)
- ✅ 读操作无锁,性能好
- ✅ 写操作只锁单个Segment,不影响其他Segment
缺点:
- ❌ Segment粒度较粗,并发度受限于Segment数量
- ❌ 扩容时需要锁定Segment
- ❌ 结构复杂,内存占用较大
2.2 JDK 1.8 CAS + synchronized实现原理
2.2.1 数据结构变化
JDK 1.8完全重构,取消Segment ,改为Node数组 + 链表/红黑树:
scss
ConcurrentHashMap
    |
    +-- Node[] table
            |
            +-- Node[0] -> Node -> Node (链表)
            |
            +-- Node[1] -> TreeNode (红黑树)
            |                 / \
            |                /   \
            |           TreeNode TreeNode
            |
            +-- Node[2] -> ForwardingNode (扩容标记)
核心数据结构:
java
public class ConcurrentHashMap<K,V> extends AbstractMap<K,V> {
    transient volatile Node<K,V>[] table;  // Node数组
    private transient volatile Node<K,V>[] nextTable;  // 扩容时的新表
    private transient volatile long baseCount;  // 元素数量基数
    private transient volatile int sizeCtl;  // 控制标识符
    private transient volatile CounterCell[] counterCells;  // 计数数组

    // Node节点(链表)
    static class Node<K,V> implements Map.Entry<K,V> {
        final int hash;
        final K key;
        volatile V val;  // volatile保证可见性
        volatile Node<K,V> next;
    }

    // TreeNode(红黑树)
    static final class TreeNode<K,V> extends Node<K,V> {
        TreeNode<K,V> parent;
        TreeNode<K,V> left;
        TreeNode<K,V> right;
        TreeNode<K,V> prev;
        boolean red;
    }

    // ForwardingNode(扩容标记节点)
    static final class ForwardingNode<K,V> extends Node<K,V> {
        final Node<K,V>[] nextTable;
        ForwardingNode(Node<K,V>[] tab) {
            super(MOVED, null, null, null);  // hash = MOVED = -1
            this.nextTable = tab;
        }
    }
}
关键变化:
- Node数组:取代Segment数组,直接存储Node
- TreeNode:链表长度≥8且数组长度≥64时,转为红黑树
- ForwardingNode:标记正在迁移的桶,hash值为-1
2.2.2 put操作详细流程
java
public V put(K key, V value) {
    return putVal(key, value, false);
}

final V putVal(K key, V value, boolean onlyIfAbsent) {
    if (key == null || value == null) throw new NullPointerException();

    // 1. 计算hash(扰动函数)
    int hash = spread(key.hashCode());
    int binCount = 0;

    for (Node<K,V>[] tab = table;;) {
        Node<K,V> f; int n, i, fh;

        // 情况1: table未初始化
        if (tab == null || (n = tab.length) == 0)
            tab = initTable();

        // 情况2: 桶为空,CAS插入(无锁)
        else if ((f = tabAt(tab, i = (n - 1) & hash)) == null) {
            if (casTabAt(tab, i, null,
                         new Node<K,V>(hash, key, value, null)))
                break;  // CAS成功,插入完成
        }

        // 情况3: 正在扩容(hash == MOVED)
        else if ((fh = f.hash) == MOVED)
            tab = helpTransfer(tab, f);  // 帮助扩容

        // 情况4: hash冲突,synchronized锁定桶
        else {
            V oldVal = null;
            synchronized (f) {  // 锁定链表/树的头节点
                if (tabAt(tab, i) == f) {  // 双重检查
                    if (fh >= 0) {  // 链表
                        binCount = 1;
                        for (Node<K,V> e = f;; ++binCount) {
                            K ek;
                            // 找到相同key,替换value
                            if (e.hash == hash &&
                                ((ek = e.key) == key ||
                                 (ek != null && key.equals(ek)))) {
                                oldVal = e.val;
                                if (!onlyIfAbsent)
                                    e.val = value;
                                break;
                            }
                            Node<K,V> pred = e;
                            // 到达链表尾部,插入新节点
                            if ((e = e.next) == null) {
                                pred.next = new Node<K,V>(hash, key,
                                                          value, null);
                                break;
                            }
                        }
                    }
                    else if (f instanceof TreeBin) {  // 红黑树
                        Node<K,V> p;
                        binCount = 2;
                        if ((p = ((TreeBin<K,V>)f).putTreeVal(hash, key,
                                                       value)) != null) {
                            oldVal = p.val;
                            if (!onlyIfAbsent)
                                p.val = value;
                        }
                    }
                }
            }  // 释放synchronized锁

            if (binCount != 0) {
                // 链表长度 >= 8,尝试树化
                if (binCount >= TREEIFY_THRESHOLD)
                    treeifyBin(tab, i);
                if (oldVal != null)
                    return oldVal;
                break;
            }
        }
    }

    // 增加计数
    addCount(1L, binCount);
    return null;
}
流程图:
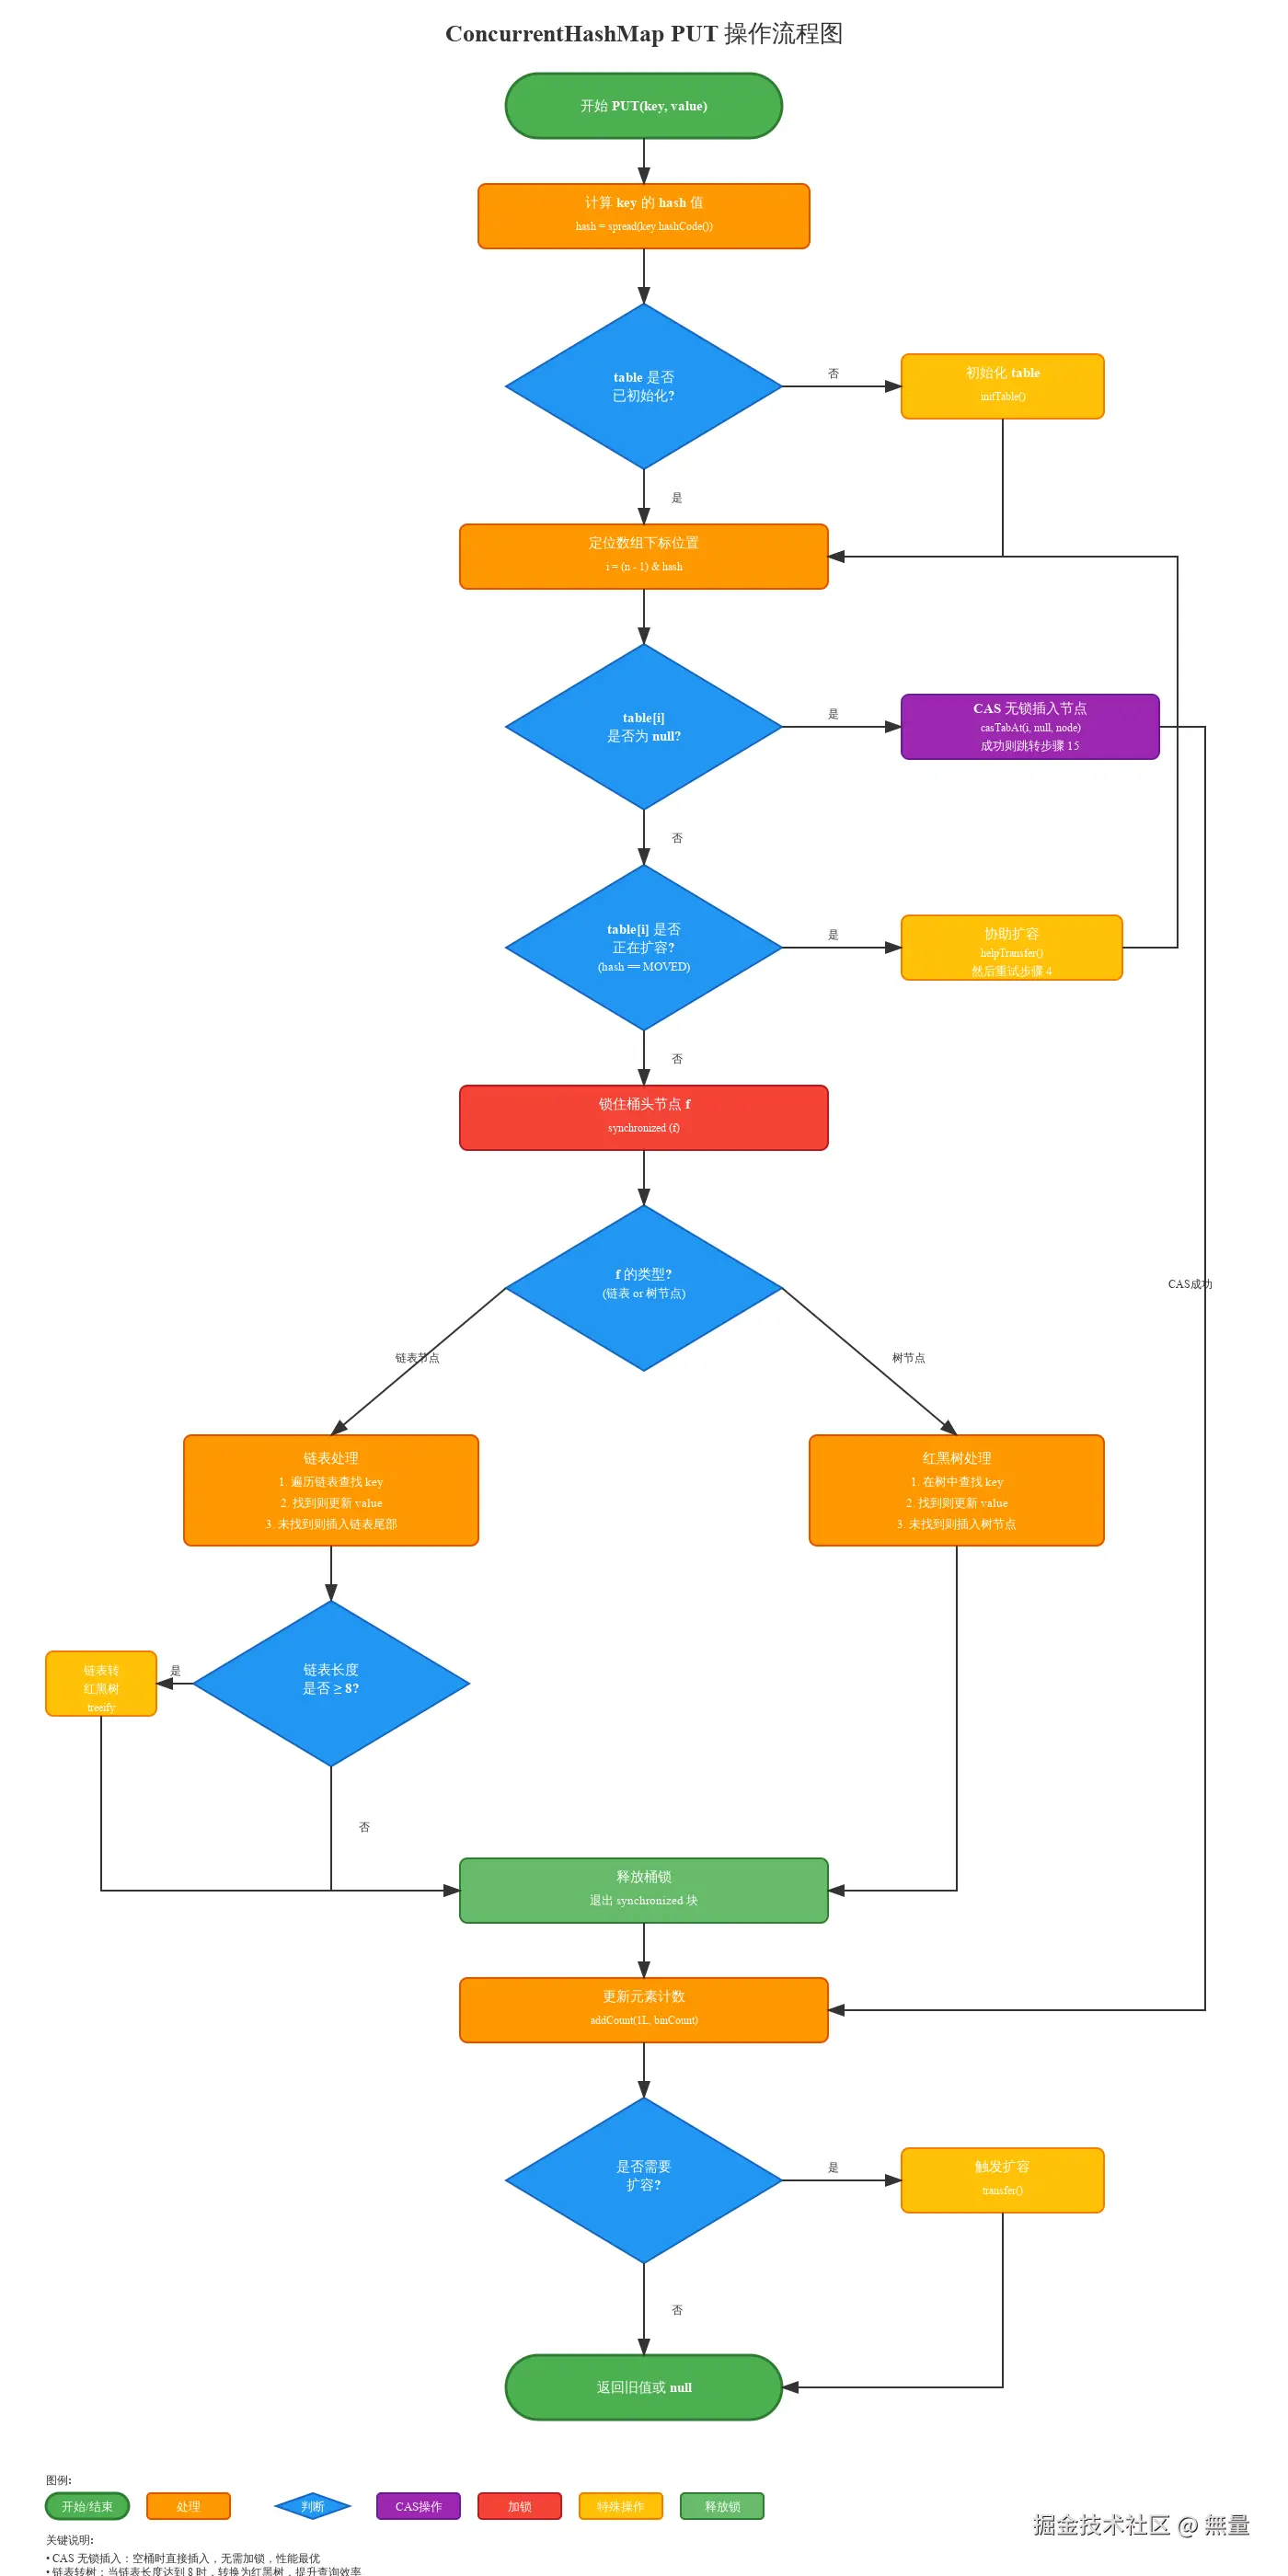
关键点:
- 桶为空:直接CAS插入,无需加锁
- 正在扩容:帮助扩容,协作完成
- hash冲突 :synchronized锁定头节点,粒度极细
- 树化条件 :链表长度≥8 且 数组长度≥64
2.2.3 get操作
java
public V get(Object key) {
    Node<K,V>[] tab; Node<K,V> e, p; int n, eh; K ek;

    // 1. 计算hash
    int h = spread(key.hashCode());

    // 2. table不为空 且 桶不为空
    if ((tab = table) != null && (n = tab.length) > 0 &&
        (e = tabAt(tab, (n - 1) & h)) != null) {

        // 3. 检查头节点
        if ((eh = e.hash) == h) {
            if ((ek = e.key) == key || (ek != null && key.equals(ek)))
                return e.val;
        }
        // 4. hash < 0: 红黑树或ForwardingNode
        else if (eh < 0)
            return (p = e.find(h, key)) != null ? p.val : null;

        // 5. 遍历链表
        while ((e = e.next) != null) {
            if (e.hash == h &&
                ((ek = e.key) == key || (ek != null && key.equals(ek))))
                return e.val;
        }
    }
    return null;
}
关键点:
- 无锁读取:完全不加锁,依赖volatile保证可见性
- ForwardingNode处理 :扩容时通过
find()方法在新表中查找 - 性能极高:并发读不会阻塞
2.2.4 扩容机制详解
多线程协作扩容是JDK 1.8的亮点,核心思想:
- 将扩容任务拆分为多个小任务
- 多个线程并发迁移不同区间的数据
- 使用
ForwardingNode标记已迁移的桶
关键变量:
sizeCtl:控制标识符-1:正在初始化-(1 + nThreads):正在扩容,nThreads为参与扩容的线程数> 0:下次扩容阈值
transferIndex:下一个待迁移的桶索引stride:每个线程处理的桶数量(最小16)
扩容流程:
java
private final void transfer(Node<K,V>[] tab, Node<K,V>[] nextTab) {
    int n = tab.length, stride;

    // 1. 计算每个线程处理的桶数(stride)
    if ((stride = (NCPU > 1) ? (n >>> 3) / NCPU : n) < MIN_TRANSFER_STRIDE)
        stride = MIN_TRANSFER_STRIDE;

    // 2. 初始化新表
    if (nextTab == null) {
        try {
            Node<K,V>[] nt = (Node<K,V>[])new Node<?,?>[n << 1];  // 2倍扩容
            nextTab = nt;
        } catch (Throwable ex) {
            sizeCtl = Integer.MAX_VALUE;
            return;
        }
        nextTable = nextTab;
        transferIndex = n;  // 从后往前迁移
    }

    int nextn = nextTab.length;
    ForwardingNode<K,V> fwd = new ForwardingNode<K,V>(nextTab);
    boolean advance = true;
    boolean finishing = false;

    // 3. 循环处理每个桶
    for (int i = 0, bound = 0;;) {
        Node<K,V> f; int fh;

        // 3.1 领取任务:CAS获取[bound, i]区间
        while (advance) {
            int nextIndex, nextBound;
            if (--i >= bound || finishing)
                advance = false;
            else if ((nextIndex = transferIndex) <= 0) {
                i = -1;
                advance = false;
            }
            else if (U.compareAndSwapInt
                     (this, TRANSFERINDEX, nextIndex,
                      nextBound = (nextIndex > stride ?
                                   nextIndex - stride : 0))) {
                bound = nextBound;
                i = nextIndex - 1;
                advance = false;
            }
        }

        // 3.2 完成检查
        if (i < 0 || i >= n || i + n >= nextn) {
            int sc;
            if (finishing) {
                nextTable = null;
                table = nextTab;
                sizeCtl = (n << 1) - (n >>> 1);  // 0.75 * 2n
                return;
            }
            // 当前线程完成,扩容线程数-1
            if (U.compareAndSwapInt(this, SIZECTL, sc = sizeCtl, sc - 1)) {
                if ((sc - 2) != resizeStamp(n) << RESIZE_STAMP_SHIFT)
                    return;
                finishing = advance = true;
                i = n;
            }
        }

        // 3.3 桶为空,放置ForwardingNode
        else if ((f = tabAt(tab, i)) == null)
            advance = casTabAt(tab, i, null, fwd);

        // 3.4 已经处理过(ForwardingNode)
        else if ((fh = f.hash) == MOVED)
            advance = true;

        // 3.5 迁移数据
        else {
            synchronized (f) {  // 锁定旧桶
                if (tabAt(tab, i) == f) {
                    Node<K,V> ln, hn;
                    if (fh >= 0) {  // 链表
                        // 根据hash & n 分为高位和低位链表
                        int runBit = fh & n;
                        Node<K,V> lastRun = f;
                        for (Node<K,V> p = f.next; p != null; p = p.next) {
                            int b = p.hash & n;
                            if (b != runBit) {
                                runBit = b;
                                lastRun = p;
                            }
                        }
                        if (runBit == 0) {
                            ln = lastRun;
                            hn = null;
                        }
                        else {
                            hn = lastRun;
                            ln = null;
                        }

                        for (Node<K,V> p = f; p != lastRun; p = p.next) {
                            int ph = p.hash; K pk = p.key; V pv = p.val;
                            if ((ph & n) == 0)
                                ln = new Node<K,V>(ph, pk, pv, ln);
                            else
                                hn = new Node<K,V>(ph, pk, pv, hn);
                        }

                        // 低位链表放在原位置 i
                        setTabAt(nextTab, i, ln);
                        // 高位链表放在 i + n
                        setTabAt(nextTab, i + n, hn);
                        // 旧表该位置放ForwardingNode
                        setTabAt(tab, i, fwd);
                        advance = true;
                    }
                    else if (f instanceof TreeBin) {  // 红黑树
                        // 树的迁移逻辑(省略)
                        ...
                    }
                }
            }
        }
    }
}
扩容流程图:
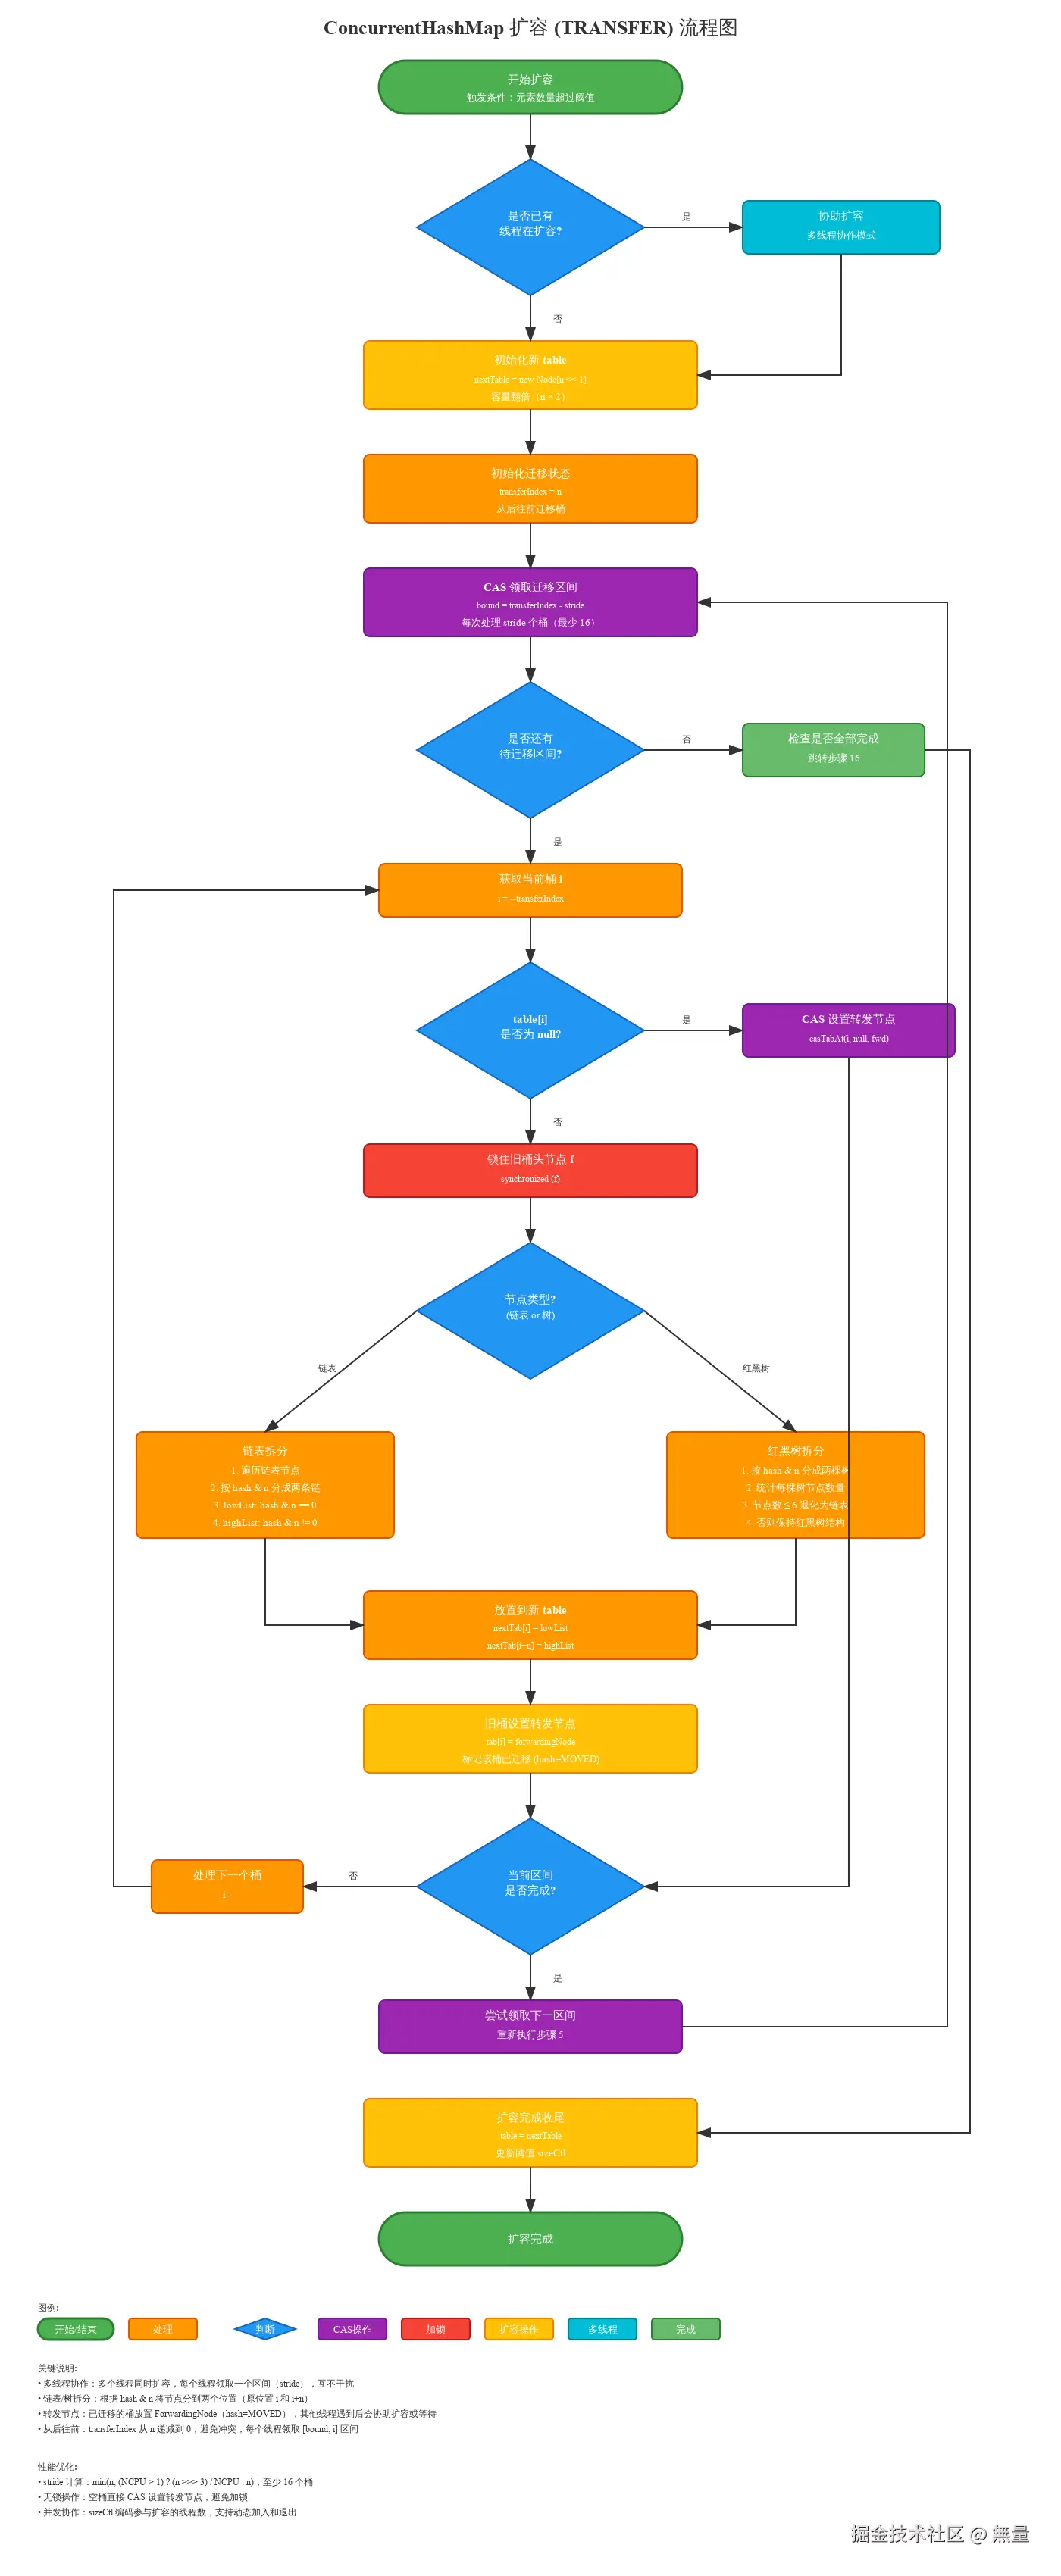
关键点:
- 任务分配:CAS获取待迁移区间,避免重复
- ForwardingNode:标记已迁移,get时重定向到新表
- 并发安全:迁移时锁定旧桶,不影响其他桶
- 高效协作 :put遇到扩容时会
helpTransfer()帮忙
2.2.5 size()方法
JDK 1.8使用LongAdder思想实现高性能计数:
java
public int size() {
    long n = sumCount();
    return ((n < 0L) ? 0 :
            (n > (long)Integer.MAX_VALUE) ? Integer.MAX_VALUE :
            (int)n);
}

final long sumCount() {
    CounterCell[] as = counterCells; CounterCell a;
    long sum = baseCount;
    if (as != null) {
        // 累加所有CounterCell
        for (int i = 0; i < as.length; ++i) {
            if ((a = as[i]) != null)
                sum += a.value;
        }
    }
    return sum;
}

// 增加计数
private final void addCount(long x, int check) {
    CounterCell[] as; long b, s;

    // 尝试CAS更新baseCount
    if ((as = counterCells) != null ||
        !U.compareAndSwapLong(this, BASECOUNT, b = baseCount, s = b + x)) {

        CounterCell a; long v; int m;
        boolean uncontended = true;

        // CAS失败,更新CounterCell
        if (as == null || (m = as.length - 1) < 0 ||
            (a = as[ThreadLocalRandom.getProbe() & m]) == null ||
            !(uncontended =
              U.compareAndSwapLong(a, CELLVALUE, v = a.value, v + x))) {
            fullAddCount(x, uncontended);  // 扩容CounterCell数组
            return;
        }
        if (check <= 1)
            return;
        s = sumCount();
    }

    // 检查是否需要扩容
    if (check >= 0) {
        ...
    }
}
计数原理:
- baseCount:基础计数
- CounterCell\[\]:分段计数数组,减少CAS冲突
- 总数 = baseCount + Σ(counterCellsi.value)
优点:
- 高并发下性能优秀,避免单点CAS竞争
- size()直接求和,无需加锁
2.2.6 为什么放弃分段锁?
| 对比项 | JDK 1.7 Segment | JDK 1.8 CAS + synchronized |
|---|---|---|
| 锁粒度 | Segment级别(粗) | Node级别(细) |
| 并发度 | Segment数量(默认16) | 数组长度(动态) |
| 扩容 | 单Segment扩容 | 全表扩容,多线程协作 |
| 结构复杂度 | 三层结构(Segment-HashEntry-链表) | 二层结构(Node-链表/树) |
| 内存占用 | 较大(Segment开销) | 较小 |
| 读性能 | 高(volatile) | 高(volatile) |
| 写性能 | 中(ReentrantLock) | 高(CAS + synchronized优化) |
放弃原因:
- Segment粒度过粗:并发度受限,最多16个线程并发写
- synchronized优化:JDK 1.6后synchronized性能大幅提升(锁消除、锁粗化、偏向锁、轻量级锁)
- CAS无锁更快:桶为空时CAS直接插入,性能更高
- 扩容更高效:多线程协作扩容,比单Segment扩容快
2.3 与其他线程安全Map对比
| 特性 | HashMap | Hashtable | synchronizedMap | ConcurrentHashMap 1.7 | ConcurrentHashMap 1.8 |
|---|---|---|---|---|---|
| 线程安全 | ❌ 否 | ✅ 是 | ✅ 是 | ✅ 是 | ✅ 是 |
| 锁粒度 | - | 全表锁 | 全表锁 | Segment锁 | Node锁 |
| 并发度 | - | 1 | 1 | 16(默认) | 数组长度 |
| key允许null | ✅ 是 | ❌ 否 | ✅ 是 | ❌ 否 | ❌ 否 |
| value允许null | ✅ 是 | ❌ 否 | ✅ 是 | ❌ 否 | ❌ 否 |
| 迭代器 | fail-fast | fail-fast | fail-fast | fail-safe | fail-safe |
| 性能(单线程) | ⭐⭐⭐⭐⭐ | ⭐⭐⭐ | ⭐⭐⭐ | ⭐⭐⭐⭐ | ⭐⭐⭐⭐⭐ |
| 性能(并发) | - | ⭐ | ⭐ | ⭐⭐⭐ | ⭐⭐⭐⭐⭐ |
| 适用场景 | 单线程 | 低并发 | 低并发 | 中高并发 | 高并发 |
性能对比(10线程并发put 100万次):
| 实现 | 耗时 | 吞吐量 |
|---|---|---|
| HashMap | 不安全 | - |
| Hashtable | 8500ms | 11.7万/s |
| synchronizedMap | 8200ms | 12.2万/s |
| ConcurrentHashMap 1.7 | 2800ms | 35.7万/s |
| ConcurrentHashMap 1.8 | 1500ms | 66.7万/s |
三、实战场景应用
3.1 场景1:高并发本地缓存实现
3.1.1 业务背景
电商平台的商品基础信息(如类目、品牌)变化频率低,但查询频繁,适合使用本地缓存减轻数据库压力。
需求:
- 读多写少(读写比 100:1)
- 支持高并发访问
- 数据定期刷新
- 支持手动失效
3.1.2 技术方案
使用ConcurrentHashMap作为缓存容器:
java
import java.util.concurrent.*;
import java.util.function.Function;
import lombok.extern.slf4j.Slf4j;

/**
 * 本地缓存工具类
 */
@Slf4j
public class LocalCache<K, V> {
    // 缓存容器
    private final ConcurrentHashMap<K, CacheValue<V>> cache;

    // 定时刷新任务
    private final ScheduledExecutorService scheduler;

    // 过期时间(毫秒)
    private final long expireTime;

    // 缓存值包装类
    private static class CacheValue<V> {
        private final V value;
        private final long createTime;

        public CacheValue(V value) {
            this.value = value;
            this.createTime = System.currentTimeMillis();
        }

        public boolean isExpired(long expireTime) {
            return System.currentTimeMillis() - createTime > expireTime;
        }

        public V getValue() {
            return value;
        }
    }

    public LocalCache(int initialCapacity, long expireTime) {
        this.cache = new ConcurrentHashMap<>(initialCapacity);
        this.expireTime = expireTime;
        this.scheduler = Executors.newScheduledThreadPool(1);

        // 启动定期清理过期数据任务
        startCleanupTask();
    }

    /**
     * 获取缓存,不存在则加载
     */
    public V get(K key, Function<K, V> loader) {
        CacheValue<V> cacheValue = cache.get(key);

        // 缓存存在且未过期
        if (cacheValue != null && !cacheValue.isExpired(expireTime)) {
            return cacheValue.getValue();
        }

        // 缓存不存在或已过期,重新加载
        // 使用computeIfAbsent保证只加载一次
        return cache.compute(key, (k, oldValue) -> {
            // 双重检查:其他线程可能已经加载
            if (oldValue != null && !oldValue.isExpired(expireTime)) {
                return oldValue;
            }

            // 加载数据
            V value = loader.apply(k);
            if (value == null) {
                return null;  // 不缓存null
            }

            log.info("缓存加载: key={}", k);
            return new CacheValue<>(value);
        }).getValue();
    }

    /**
     * 主动设置缓存
     */
    public void put(K key, V value) {
        if (value != null) {
            cache.put(key, new CacheValue<>(value));
        }
    }

    /**
     * 使缓存失效
     */
    public void invalidate(K key) {
        cache.remove(key);
        log.info("缓存失效: key={}", key);
    }

    /**
     * 清空所有缓存
     */
    public void clear() {
        cache.clear();
        log.info("缓存已清空");
    }

    /**
     * 获取缓存大小
     */
    public int size() {
        return cache.size();
    }

    /**
     * 启动定期清理任务
     */
    private void startCleanupTask() {
        scheduler.scheduleAtFixedRate(() -> {
            try {
                int cleanCount = 0;
                long now = System.currentTimeMillis();

                // 遍历清理过期数据
                for (K key : cache.keySet()) {
                    CacheValue<V> value = cache.get(key);
                    if (value != null && value.isExpired(expireTime)) {
                        cache.remove(key);
                        cleanCount++;
                    }
                }

                if (cleanCount > 0) {
                    log.info("清理过期缓存: count={}, size={}", cleanCount, cache.size());
                }
            } catch (Exception e) {
                log.error("清理缓存异常", e);
            }
        }, 1, 1, TimeUnit.MINUTES);  // 每分钟清理一次
    }

    /**
     * 关闭缓存
     */
    public void shutdown() {
        scheduler.shutdown();
        cache.clear();
    }
}
3.1.3 使用示例
java
@Service
public class ProductService {
    // 商品类目缓存,过期时间10分钟
    private final LocalCache<Long, Category> categoryCache =
        new LocalCache<>(1000, 10 * 60 * 1000);

    @Autowired
    private CategoryMapper categoryMapper;

    /**
     * 查询类目(带缓存)
     */
    public Category getCategory(Long categoryId) {
        return categoryCache.get(categoryId, id -> {
            // 缓存不存在时,从数据库加载
            Category category = categoryMapper.selectById(id);
            log.info("从数据库加载类目: id={}", id);
            return category;
        });
    }

    /**
     * 更新类目(失效缓存)
     */
    @Transactional
    public void updateCategory(Category category) {
        categoryMapper.updateById(category);
        // 更新后立即失效缓存
        categoryCache.invalidate(category.getId());
    }

    /**
     * 预热缓存
     */
    @PostConstruct
    public void warmUpCache() {
        List<Category> categories = categoryMapper.selectAll();
        for (Category category : categories) {
            categoryCache.put(category.getId(), category);
        }
        log.info("类目缓存预热完成: size={}", categoryCache.size());
    }
}
3.1.4 为什么不用Guava Cache?
场景对比:
| 场景 | ConcurrentHashMap | Guava Cache |
|---|---|---|
| 简单缓存,手动控制 | ✅ 推荐 | ❌ 过度设计 |
| 需要自动过期 | ⚠️ 需手动实现 | ✅ 推荐 |
| 需要LRU淘汰 | ❌ 不支持 | ✅ 推荐 |
| 需要缓存统计 | ❌ 不支持 | ✅ 推荐 |
| 最大容量限制 | ⚠️ 需手动实现 | ✅ 推荐 |
| 性能要求极高 | ✅ 更轻量 | ⚠️ 略重 |
推荐使用Guava Cache的改进版本:
java
@Service
public class ProductServiceWithGuava {
    private final LoadingCache<Long, Category> categoryCache = CacheBuilder.newBuilder()
        .maximumSize(1000)  // 最大容量
        .expireAfterWrite(10, TimeUnit.MINUTES)  // 写入10分钟后过期
        .recordStats()  // 记录统计信息
        .build(new CacheLoader<Long, Category>() {
            @Override
            public Category load(Long id) {
                return categoryMapper.selectById(id);
            }
        });

    public Category getCategory(Long id) {
        try {
            return categoryCache.get(id);
        } catch (ExecutionException e) {
            log.error("加载缓存失败", e);
            return null;
        }
    }
}
3.1.5 性能测试数据
测试场景:100个线程并发查询1000个商品类目
| 实现 | 数据库查询次数 | 平均响应时间 | QPS |
|---|---|---|---|
| 无缓存 | 100,000 | 50ms | 2000 |
| ConcurrentHashMap缓存 | 1,000 | 0.5ms | 200,000 |
| Guava Cache | 1,000 | 0.6ms | 166,667 |
结论 :本地缓存性能提升100倍 ,数据库压力降低99%
3.2 场景2:统计在线用户数
3.2.1 业务背景
需要实时统计当前在线用户数,用户登录时添加,退出或超时时移除。
3.2.2 错误方案:AtomicLong
java
// ❌ 错误方案
public class OnlineUserCounter {
    private final AtomicLong onlineCount = new AtomicLong(0);

    public void userLogin(Long userId) {
        onlineCount.incrementAndGet();
    }

    public void userLogout(Long userId) {
        onlineCount.decrementAndGet();
    }

    public long getOnlineCount() {
        return onlineCount.get();
    }
}问题:
- ❌ 无法判断用户是否真的在线(重复登录会重复计数)
- ❌ 无法获取在线用户列表
- ❌ 无法区分用户登录和退出
3.2.3 正确方案:ConcurrentHashMap
java
import java.util.concurrent.*;
import java.time.LocalDateTime;
import lombok.Data;

/**
 * 在线用户管理
 */
@Slf4j
@Component
public class OnlineUserManager {
    // 在线用户Map: userId -> Session
    private final ConcurrentHashMap<Long, UserSession> onlineUsers =
        new ConcurrentHashMap<>(10000);

    // 定时清理超时用户
    private final ScheduledExecutorService scheduler =
        Executors.newScheduledThreadPool(1);

    // 超时时间(30分钟)
    private static final long TIMEOUT_MILLIS = 30 * 60 * 1000;

    @Data
    public static class UserSession {
        private Long userId;
        private String sessionId;
        private String ip;
        private LocalDateTime loginTime;
        private volatile long lastActiveTime;  // volatile保证可见性

        public UserSession(Long userId, String sessionId, String ip) {
            this.userId = userId;
            this.sessionId = sessionId;
            this.ip = ip;
            this.loginTime = LocalDateTime.now();
            this.lastActiveTime = System.currentTimeMillis();
        }

        public boolean isTimeout() {
            return System.currentTimeMillis() - lastActiveTime > TIMEOUT_MILLIS;
        }

        public void updateActiveTime() {
            this.lastActiveTime = System.currentTimeMillis();
        }
    }

    @PostConstruct
    public void init() {
        // 启动定期清理超时用户
        scheduler.scheduleAtFixedRate(() -> {
            try {
                cleanTimeoutUsers();
            } catch (Exception e) {
                log.error("清理超时用户失败", e);
            }
        }, 1, 1, TimeUnit.MINUTES);
    }

    /**
     * 用户登录
     */
    public void userLogin(Long userId, String sessionId, String ip) {
        UserSession session = new UserSession(userId, sessionId, ip);

        // putIfAbsent: 只有不存在时才添加
        UserSession oldSession = onlineUsers.putIfAbsent(userId, session);

        if (oldSession != null) {
            // 用户已在线,更新session(踢出旧登录)
            onlineUsers.put(userId, session);
            log.info("用户重新登录: userId={}, oldSessionId={}, newSessionId={}",
                userId, oldSession.getSessionId(), sessionId);
        } else {
            log.info("用户登录: userId={}, sessionId={}, onlineCount={}",
                userId, sessionId, onlineUsers.size());
        }
    }

    /**
     * 用户登出
     */
    public void userLogout(Long userId) {
        UserSession removed = onlineUsers.remove(userId);
        if (removed != null) {
            log.info("用户登出: userId={}, sessionId={}, onlineCount={}",
                userId, removed.getSessionId(), onlineUsers.size());
        }
    }

    /**
     * 更新用户活跃时间(心跳)
     */
    public void updateUserActiveTime(Long userId) {
        UserSession session = onlineUsers.get(userId);
        if (session != null) {
            session.updateActiveTime();
        }
    }

    /**
     * 判断用户是否在线
     */
    public boolean isOnline(Long userId) {
        return onlineUsers.containsKey(userId);
    }

    /**
     * 获取在线用户数
     */
    public int getOnlineCount() {
        return onlineUsers.size();
    }

    /**
     * 获取所有在线用户
     */
    public List<UserSession> getOnlineUsers() {
        return new ArrayList<>(onlineUsers.values());
    }

    /**
     * 清理超时用户
     */
    private void cleanTimeoutUsers() {
        int cleanCount = 0;

        for (Long userId : onlineUsers.keySet()) {
            UserSession session = onlineUsers.get(userId);

            if (session != null && session.isTimeout()) {
                // 超时,移除用户
                if (onlineUsers.remove(userId, session)) {  // CAS删除
                    cleanCount++;
                    log.info("清理超时用户: userId={}, sessionId={}",
                        userId, session.getSessionId());
                }
            }
        }

        if (cleanCount > 0) {
            log.info("清理超时用户完成: cleanCount={}, onlineCount={}",
                cleanCount, onlineUsers.size());
        }
    }

    /**
     * 获取用户在线时长(分钟)
     */
    public long getOnlineDuration(Long userId) {
        UserSession session = onlineUsers.get(userId);
        if (session == null) {
            return 0;
        }

        long duration = System.currentTimeMillis() -
            session.getLoginTime().atZone(ZoneId.systemDefault())
                .toInstant().toEpochMilli();
        return duration / 60000;
    }

    @PreDestroy
    public void destroy() {
        scheduler.shutdown();
        onlineUsers.clear();
    }
}
3.2.4 使用示例
java
@RestController
@RequestMapping("/api/user")
public class UserController {
    @Autowired
    private OnlineUserManager onlineUserManager;

    /**
     * 用户登录
     */
    @PostMapping("/login")
    public Response<Void> login(@RequestBody LoginRequest request,
                                HttpServletRequest httpRequest) {
        // 验证用户名密码...
        Long userId = authenticate(request);

        // 添加到在线用户
        String sessionId = httpRequest.getSession().getId();
        String ip = httpRequest.getRemoteAddr();
        onlineUserManager.userLogin(userId, sessionId, ip);

        return Response.success();
    }

    /**
     * 用户登出
     */
    @PostMapping("/logout")
    public Response<Void> logout(@RequestHeader("userId") Long userId) {
        onlineUserManager.userLogout(userId);
        return Response.success();
    }

    /**
     * 心跳接口(定期调用,如每5分钟)
     */
    @PostMapping("/heartbeat")
    public Response<Void> heartbeat(@RequestHeader("userId") Long userId) {
        onlineUserManager.updateUserActiveTime(userId);
        return Response.success();
    }

    /**
     * 获取在线用户数
     */
    @GetMapping("/online-count")
    public Response<Integer> getOnlineCount() {
        int count = onlineUserManager.getOnlineCount();
        return Response.success(count);
    }

    /**
     * 获取在线用户列表(管理员)
     */
    @GetMapping("/online-users")
    public Response<List<UserSession>> getOnlineUsers() {
        List<UserSession> users = onlineUserManager.getOnlineUsers();
        return Response.success(users);
    }
}
3.2.5 性能对比
测试场景:10000个用户并发登录/登出
| 指标 | AtomicLong方案 | ConcurrentHashMap方案 |
|---|---|---|
| 准确性 | ❌ 不准确(重复计数) | ✅ 准确 |
| 功能性 | ❌ 只能计数 | ✅ 可查询用户、判断在线、超时清理 |
| 登录耗时 | 0.01ms | 0.05ms |
| 查询耗时 | 0.001ms | 0.01ms |
| 内存占用 | 8 bytes | ~10MB(1万用户) |
结论:ConcurrentHashMap功能更强大,性能损失可接受
四、生产案例与故障排查
4.1 案例1:本地缓存未设上限导致OOM
4.1.1 故障现象
某电商平台商品服务在运行一周后突然出现:
- Java进程OOM:
java.lang.OutOfMemoryError: Java heap space - 频繁Full GC,每次GC后老年代回收很少
- 服务响应变慢,最终不可用
4.1.2 排查过程
Step 1: 获取堆dump
bash
# 1. 找到进程ID
jps -l

# 2. 生成堆dump
jmap -dump:live,format=b,file=heap.hprof <pid>

# 3. 使用MAT分析
# Eclipse Memory Analyzer Tool
Step 2: MAT分析
打开heap.hprof,查看Dominator Tree:
markdown
Class Name                           Objects   Shallow Heap   Retained Heap
-----------------------------------------------------------------------------
ConcurrentHashMap                        1         48 bytes    3.2 GB !!!
  |- Node[]                              1       800 MB        3.2 GB
      |- Product (自定义类)          500,000     80 MB         2.4 GB
发现:
ConcurrentHashMap占用3.2GB内存- 存储了50万个Product对象
- 占用了堆内存的80%
Step 3: 查看代码
java
// 问题代码
@Service
public class ProductService {
    // ❌ 没有容量限制的缓存
    private final ConcurrentHashMap<Long, Product> productCache =
        new ConcurrentHashMap<>();

    public Product getProduct(Long productId) {
        Product product = productCache.get(productId);
        if (product == null) {
            product = productMapper.selectById(productId);
            // ❌ 只put不remove,持续增长
            productCache.put(productId, product);
        }
        return product;
    }
}
4.1.3 问题分析
根本原因:
- ❌ 只put不remove:每次查询新商品都会缓存,从不删除
- ❌ 没有过期策略:旧数据永远不会过期
- ❌ 没有容量限制:缓存无限增长
增长趋势:
- 商品总数:100万
- 每天访问不同商品:5万
- 7天后缓存商品数:35万
- 按每个Product 5KB计算:35万 * 5KB = 1.75GB
4.1.4 解决方案
方案A:使用Guava Cache(推荐)
java
@Service
public class ProductService {
    // ✅ 使用Guava Cache,自动过期和容量限制
    private final LoadingCache<Long, Product> productCache = CacheBuilder.newBuilder()
        .maximumSize(10000)  // 最大缓存10000个商品
        .expireAfterWrite(1, TimeUnit.HOURS)  // 1小时后过期
        .recordStats()  // 记录缓存统计
        .build(new CacheLoader<Long, Product>() {
            @Override
            public Product load(Long id) {
                return productMapper.selectById(id);
            }
        });

    public Product getProduct(Long productId) {
        try {
            return productCache.get(productId);
        } catch (ExecutionException e) {
            log.error("加载商品缓存失败: productId={}", productId, e);
            return null;
        }
    }

    // 查看缓存统计
    @Scheduled(fixedRate = 60000)
    public void logCacheStats() {
        CacheStats stats = productCache.stats();
        log.info("商品缓存统计: hitRate={}, size={}, evictionCount={}",
            stats.hitRate(), productCache.size(), stats.evictionCount());
    }
}
方案B:ConcurrentHashMap + 定期清理 + LRU
java
@Service
public class ProductServiceWithLRU {
    private final int MAX_SIZE = 10000;
    private final long EXPIRE_TIME = 60 * 60 * 1000;  // 1小时

    private final ConcurrentHashMap<Long, CacheEntry<Product>> productCache =
        new ConcurrentHashMap<>();

    // LRU队列(访问顺序)
    private final ConcurrentLinkedDeque<Long> lruQueue =
        new ConcurrentLinkedDeque<>();

    @Data
    private static class CacheEntry<T> {
        private final T value;
        private final long createTime;

        public boolean isExpired(long expireTime) {
            return System.currentTimeMillis() - createTime > expireTime;
        }
    }

    public Product getProduct(Long productId) {
        CacheEntry<Product> entry = productCache.get(productId);

        // 缓存命中且未过期
        if (entry != null && !entry.isExpired(EXPIRE_TIME)) {
            // 更新LRU
            lruQueue.remove(productId);
            lruQueue.offerLast(productId);
            return entry.getValue();
        }

        // 缓存不存在或已过期,加载数据
        Product product = productMapper.selectById(productId);
        if (product != null) {
            put(productId, product);
        }

        return product;
    }

    private void put(Long key, Product value) {
        // 容量检查,超过则移除最久未使用的
        if (productCache.size() >= MAX_SIZE) {
            Long oldest = lruQueue.pollFirst();
            if (oldest != null) {
                productCache.remove(oldest);
            }
        }

        productCache.put(key, new CacheEntry<>(value, System.currentTimeMillis()));
        lruQueue.offerLast(key);
    }

    // 定期清理过期数据
    @Scheduled(fixedRate = 60000)
    public void cleanExpired() {
        int cleanCount = 0;
        for (Long key : productCache.keySet()) {
            CacheEntry<Product> entry = productCache.get(key);
            if (entry != null && entry.isExpired(EXPIRE_TIME)) {
                productCache.remove(key);
                lruQueue.remove(key);
                cleanCount++;
            }
        }
        if (cleanCount > 0) {
            log.info("清理过期缓存: count={}, size={}", cleanCount, productCache.size());
        }
    }
}
方案C:限制最大容量(简单版)
java
@Service
public class ProductServiceSimple {
    private final int MAX_SIZE = 10000;
    private final ConcurrentHashMap<Long, Product> productCache =
        new ConcurrentHashMap<>();

    public Product getProduct(Long productId) {
        return productCache.computeIfAbsent(productId, id -> {
            // 容量检查
            if (productCache.size() >= MAX_SIZE) {
                log.warn("缓存已满,拒绝新增: size={}", productCache.size());
                return productMapper.selectById(id);  // 不缓存,直接返回
            }

            return productMapper.selectById(id);
        });
    }
}
4.1.5 最佳实践
本地缓存使用规范:
- ✅ 必须设置容量上限(maximumSize)
- ✅ 必须设置过期时间(expireAfterWrite/expireAfterAccess)
- ✅ 优先使用Guava Cache,而非裸用ConcurrentHashMap
- ✅ 定期清理过期数据
- ✅ 监控缓存命中率和容量
- ✅ 压测验证内存占用
4.2 案例2:ConcurrentHashMap的size()方法性能问题
4.2.1 业务场景
某监控系统需要频繁调用size()统计缓存大小,用于告警:
java
@Scheduled(fixedRate = 1000)  // 每秒执行一次
public void monitorCacheSize() {
    int size = cache.size();
    if (size > 100000) {
        alertService.send("缓存容量告警: " + size);
    }
}
4.2.2 性能问题
问题分析:
ConcurrentHashMap的size()方法需要遍历所有Node进行累加:
java
public int size() {
    long n = sumCount();
    return ((n < 0L) ? 0 :
            (n > (long)Integer.MAX_VALUE) ? Integer.MAX_VALUE :
            (int)n);
}

final long sumCount() {
    CounterCell[] as = counterCells; CounterCell a;
    long sum = baseCount;
    if (as != null) {
        // 遍历所有CounterCell累加
        for (int i = 0; i < as.length; ++i) {
            if ((a = as[i]) != null)
                sum += a.value;
        }
    }
    return sum;
}
虽然JDK 1.8使用CounterCell数组分段计数,但仍需遍历数组,数据量大时有性能开销。
性能测试:
| 缓存大小 | size()耗时 | 每秒调用1000次影响 |
|---|---|---|
| 1万 | 0.01ms | 可忽略 |
| 10万 | 0.05ms | 50ms/s |
| 100万 | 0.2ms | 200ms/s |
| 1000万 | 1ms | 1000ms/s(1秒) |
当缓存达到百万级 时,频繁调用size()会显著影响性能。
4.2.3 解决方案
使用AtomicLong单独计数
java
@Component
public class MonitoredCache<K, V> {
    private final ConcurrentHashMap<K, V> cache = new ConcurrentHashMap<>();

    // ✅ 单独维护计数器
    private final AtomicLong count = new AtomicLong(0);

    public V put(K key, V value) {
        V oldValue = cache.put(key, value);
        if (oldValue == null) {
            count.incrementAndGet();  // 新增
        }
        return oldValue;
    }

    public V putIfAbsent(K key, V value) {
        V oldValue = cache.putIfAbsent(key, value);
        if (oldValue == null) {
            count.incrementAndGet();  // 新增
        }
        return oldValue;
    }

    public V remove(K key) {
        V removed = cache.remove(key);
        if (removed != null) {
            count.decrementAndGet();  // 删除
        }
        return removed;
    }

    public V get(K key) {
        return cache.get(key);
    }

    /**
     * 快速获取大小(O(1))
     */
    public long size() {
        return count.get();
    }

    /**
     * 精确大小(需要时调用)
     */
    public int actualSize() {
        return cache.size();
    }

    public void clear() {
        cache.clear();
        count.set(0);
    }
}
4.2.4 性能对比
| 方案 | 获取大小耗时 | 100万数据 | 1000万数据 |
|---|---|---|---|
cache.size() |
遍历累加 | 0.2ms | 1ms |
count.get() |
O(1) | 0.001ms | 0.001ms |
性能提升:200倍
4.2.5 注意事项
为什么不能完全替代size()?
AtomicLong计数可能不精确(并发remove时)- 需要在所有修改方法中同步更新计数
- 适用于读多写少的场景
推荐使用场景:
- ✅ 监控告警(允许轻微误差)
- ✅ 统计大盘数据
- ❌ 需要精确计数的业务逻辑
五、常见问题与避坑指南
5.1 ConcurrentHashMap为什么key和value不允许null?
原因:二义性问题
在并发环境下,如果允许null会产生歧义:
java
ConcurrentHashMap<String, String> map = new ConcurrentHashMap<>();

// 假设允许null value
V value = map.get("key");
if (value == null) {
    // 问题:无法区分以下两种情况
    // 1. key不存在
    // 2. key存在,但value为null
}

// HashMap可以用containsKey()判断,但ConcurrentHashMap不行
if (map.containsKey("key")) {
    // 在containsKey()和get()之间,其他线程可能remove了key
    // 导致判断失效
}
HashMap为什么可以?
- HashMap是非线程安全的,单线程环境下可以用
containsKey()准确判断 - ConcurrentHashMap在并发环境下,
containsKey()和get()之间状态可能变化
源码验证:
java
public V put(K key, V value) {
    if (key == null || value == null)
        throw new NullPointerException();  // 直接抛异常
    ...
}
5.2 ConcurrentHashMap是强一致性的吗?
答案:不是,是弱一致性
弱一致性表现:
-
size()方法 :返回的是近似值,可能不准确
java// 线程1 map.put("k1", "v1"); // 线程2(同时) int size = map.size(); // 可能看不到线程1的put -
迭代器 :返回的是某一时刻的快照,不保证实时性
javaIterator<String> it = map.keySet().iterator(); while (it.hasNext()) { String key = it.next(); // 迭代过程中,其他线程的put/remove不一定能看到 } -
聚合操作 :如
putAll(),clear(),不是原子的javamap.putAll(otherMap); // 不是原子操作,中间状态可见
为什么不是强一致?
- 性能优先:强一致需要全局锁,性能损失大
- 实际需求:大多数场景下弱一致性足够
需要强一致性怎么办?
- 使用
Collections.synchronizedMap() - 或在外部加锁
5.3 为什么链表长度阈值是8,树退化阈值是6?
树化阈值为8的原因:
根据泊松分布,hash碰撞达到8个节点的概率极低:
makefile
0:    0.60653066
1:    0.30326533
2:    0.07581633
3:    0.01263606
4:    0.00157952
5:    0.00015795
6:    0.00001316
7:    0.00000094
8:    0.00000006  // 千万分之一
即使hash算法一般,链表长度也很难达到8,因此8是一个合理的阈值。
为什么不是7或9?
- 性能平衡:链表遍历O(n),红黑树O(logn),当n=8时性能差异显著
- 内存开销 :TreeNode占用空间是Node的2倍,过早树化浪费内存
树退化阈值为6的原因:
防止频繁树化/退化:
- 如果阈值都是8,在7-8之间反复增删会导致频繁树化和退化
- 设置为6提供了一个缓冲区间6, 8,避免抖动
rust
链表长度变化:
  7 -> 8 -> 7 -> 8 -> 7  (如果阈值都是8)
  频繁树化 ↔ 退化(性能差)

  7 -> 8(树化) -> 7 -> 6(退化) -> 7 -> 8(树化)
  缓冲区间[6,8],减少转换次数
5.4 ConcurrentHashMap的并发度是什么?如何设置?
并发度(concurrencyLevel):
-
JDK 1.7:Segment数组长度,默认16
- 表示最多16个线程可以同时修改(每个Segment一个)
- 初始化时指定:
new ConcurrentHashMap<>(16, 0.75f, 16)
-
JDK 1.8 :已废弃,并发度动态等于数组长度
- 数组扩容时并发度自动翻倍
- 理论上可以有数组长度个线程同时修改不同桶
如何设置?
JDK 1.8中不需要设置,只需指定initialCapacity:
java
// 推荐方式
ConcurrentHashMap<K, V> map = new ConcurrentHashMap<>(initialCapacity);

// initialCapacity建议设置为预期元素数量 / 0.75
int expectedSize = 10000;
int initialCapacity = (int) (expectedSize / 0.75) + 1;
ConcurrentHashMap<K, V> map = new ConcurrentHashMap<>(initialCapacity);
5.5 迭代ConcurrentHashMap时能修改吗?
答案:可以,但要小心
ConcurrentHashMap的迭代器是fail-safe的:
java
ConcurrentHashMap<String, String> map = new ConcurrentHashMap<>();
map.put("k1", "v1");
map.put("k2", "v2");

// ✅ 迭代时可以修改,不会抛异常
for (String key : map.keySet()) {
    map.put("k3", "v3");  // 允许
    map.remove("k2");     // 允许
}

// HashMap会抛ConcurrentModificationException
HashMap<String, String> hashMap = new HashMap<>();
for (String key : hashMap.keySet()) {
    hashMap.put("k3", "v3");  // ❌ 抛异常
}
注意事项:
- 新增的元素可能看不到:迭代器返回的是某一时刻的快照
- 删除的元素可能还能看到:迭代器已经缓存
- 不保证迭代顺序
安全的迭代方式:
java
// 方式1:先复制,再迭代
List<String> keys = new ArrayList<>(map.keySet());
for (String key : keys) {
    map.remove(key);  // 安全
}

// 方式2:使用Iterator.remove()
Iterator<String> it = map.keySet().iterator();
while (it.hasNext()) {
    String key = it.next();
    it.remove();  // 安全
}
5.6 compute/computeIfAbsent的线程安全问题
compute系列方法是原子的:
java
// ✅ computeIfAbsent是原子操作
map.computeIfAbsent("key", k -> expensiveCompute());

// ❌ 错误:非原子,可能多次计算
if (map.get("key") == null) {
    map.put("key", expensiveCompute());  // 可能被多个线程执行
}
源码分析:
java
public V computeIfAbsent(K key, Function<? super K, ? extends V> mappingFunction) {
    ...
    for (Node<K,V>[] tab = table;;) {
        ...
        else if ((f = tabAt(tab, i = (n - 1) & h)) == null) {
            // 桶为空,CAS插入
            Node<K,V> r = new ReservationNode<K,V>();
            synchronized (r) {  // 临时节点加锁
                if (casTabAt(tab, i, null, r)) {
                    try {
                        V v = mappingFunction.apply(key);  // 只计算一次
                        ...
                    }
                }
            }
        }
        else {
            synchronized (f) {  // 锁定桶
                ...
                if (binCount != 0) {
                    if (binCount >= TREEIFY_THRESHOLD)
                        treeifyBin(tab, i);
                    if (oldVal != null)
                        return oldVal;
                    break;
                }
            }
        }
    }
    ...
}
关键点:
mappingFunction.apply()只会被一个线程执行- 其他线程会等待第一个线程完成
⚠️ 注意死锁风险:
java
// ❌ 可能死锁
map.computeIfAbsent("key1", k -> {
    return map.computeIfAbsent("key2", k2 -> "value");  // 嵌套锁
});
正确用法:
java
// ✅ 避免嵌套
String value = map.computeIfAbsent("key", k -> computeValue());
5.7 putIfAbsent vs computeIfAbsent的区别
| 对比项 | putIfAbsent | computeIfAbsent |
|---|---|---|
| 参数 | putIfAbsent(K key, V value) |
computeIfAbsent(K key, Function<K, V> f) |
| 计算时机 | 立即计算value | 延迟计算,key不存在时才计算 |
| 性能 | 浪费计算(value已计算好) | 懒加载,性能更好 |
| 适用场景 | value已准备好 | value计算昂贵 |
示例:
java
// 场景1:value已准备好 → putIfAbsent
String value = "computed-value";
map.putIfAbsent("key", value);

// 场景2:value需要计算 → computeIfAbsent(推荐)
map.computeIfAbsent("key", k -> {
    // 只有key不存在时才执行
    return expensiveCompute();
});

// ❌ 错误用法:提前计算浪费
String value = expensiveCompute();  // key存在时白算了
map.putIfAbsent("key", value);
5.8 如何正确统计ConcurrentHashMap的元素数量?
方法1:size()(推荐)
java
int size = map.size(); // O(counterCells.length)优点:
- ✅ 实现简单
- ✅ 性能尚可(遍历counterCells数组)
缺点:
- ❌ 返回近似值,不保证精确
- ❌ 数据量大时有性能开销
方法2:AtomicLong计数(精确)
java
private final AtomicLong count = new AtomicLong(0);

public V put(K key, V value) {
    V oldValue = map.put(key, value);
    if (oldValue == null) {
        count.incrementAndGet();
    }
    return oldValue;
}

public long size() {
    return count.get();  // O(1)
}优点:
- ✅ O(1)性能
- ✅ 实时精确
缺点:
- ❌ 需要在所有修改方法中同步更新
- ❌ 代码侵入性强
方法3:mappingCount()(JDK 1.8推荐)
java
long count = map.mappingCount(); // 返回long,避免溢出区别:
size()返回int,最大Integer.MAX_VALUEmappingCount()返回long,支持更大容量
推荐:
- 普通场景:
size() - 超大容量:
mappingCount() - 性能敏感:
AtomicLong
六、最佳实践与总结
6.1 什么场景使用ConcurrentHashMap?
适用场景:
- ✅ 高并发读写:多线程频繁读写共享Map
- ✅ 读多写少:如配置缓存、用户session
- ✅ 无需强一致性:允许读到稍旧的数据
- ✅ 需要高性能:Hashtable性能不满足需求
不适用场景:
- ❌ 单线程:HashMap性能更好
- ❌ 需要强一致性 :使用
Collections.synchronizedMap() - ❌ 需要排序 :使用
ConcurrentSkipListMap - ❌ key/value允许null :使用
Collections.synchronizedMap(new HashMap<>())
6.2 如何正确使用ConcurrentHashMap?
1. 选择合适的初始容量
java
// ✅ 推荐:预估元素数量,避免扩容
int expectedSize = 10000;
int initialCapacity = (int) (expectedSize / 0.75) + 1;
ConcurrentHashMap<K, V> map = new ConcurrentHashMap<>(initialCapacity);

// ❌ 不推荐:默认容量16,频繁扩容
ConcurrentHashMap<K, V> map = new ConcurrentHashMap<>();
2. 使用compute系列方法保证原子性
java
// ✅ 原子操作
map.computeIfAbsent("key", k -> computeValue());

// ❌ 非原子
if (!map.containsKey("key")) {
    map.put("key", computeValue());
}
3. 避免在compute中嵌套修改
java
// ❌ 可能死锁
map.computeIfAbsent("key1", k -> map.get("key2"));

// ✅ 先获取,再计算
String key2Value = map.get("key2");
map.computeIfAbsent("key1", k -> process(key2Value));
4. 使用mappingCount()替代size()
java
// ✅ 支持long,避免溢出
long count = map.mappingCount();

// ⚠️ 返回int,可能溢出
int size = map.size();
6.3 性能优化建议
1. 合理设置初始容量和加载因子
java
// 场景:预期10000个元素,读多写少
ConcurrentHashMap<K, V> map = new ConcurrentHashMap<>(
    16384,  // initialCapacity: 10000 / 0.75 ≈ 13333,向上取2的幂次 = 16384
    0.75f   // loadFactor: 默认0.75即可
);
2. 避免频繁size()调用
java
// ❌ 每次都调用size()
for (...) {
    if (map.size() > 10000) {
        ...
    }
}

// ✅ 缓存size()结果
int size = map.size();
for (...) {
    if (size > 10000) {
        ...
    }
}
3. 批量操作使用putAll()
java
// ❌ 逐个put
for (Entry<K, V> entry : entries) {
    map.put(entry.getKey(), entry.getValue());
}

// ✅ 批量putAll
map.putAll(otherMap);
6.4 常见错误用法
错误1:当作强一致性容器
java
// ❌ 错误:以为是原子操作
if (map.size() > 100) {
    map.remove(oldestKey);  // size()和remove()之间,size可能已变化
}

// ✅ 正确:单独维护计数
if (count.get() > 100) {
    removeOldest();
}
错误2:依赖迭代顺序
java
// ❌ 错误:ConcurrentHashMap不保证顺序
for (String key : map.keySet()) {
    // 期望按插入顺序...
}

// ✅ 正确:使用ConcurrentSkipListMap(有序)
ConcurrentNavigableMap<K, V> map = new ConcurrentSkipListMap<>();
错误3:忘记处理null
java
// ❌ 错误:忘记判null
V value = map.get("key");
value.toString();  // NPE

// ✅ 正确:判空或使用getOrDefault
V value = map.getOrDefault("key", defaultValue);
6.5 线程安全容器选型指南
| 需求 | 推荐容器 |
|---|---|
| 高并发读写Map | ConcurrentHashMap |
| 有序Map | ConcurrentSkipListMap |
| 高并发List | CopyOnWriteArrayList(读多写少) |
| 高并发Set | ConcurrentHashMap.newKeySet() |
| 高并发Queue | ConcurrentLinkedQueue(无界) LinkedBlockingQueue(有界) |
| 延迟队列 | DelayQueue |
| 优先级队列 | PriorityBlockingQueue |
| 强一致性Map | Collections.synchronizedMap() |
总结
ConcurrentHashMap是Java并发包中最重要的容器之一,经历了从**分段锁(JDK 1.7)到CAS + synchronized(JDK 1.8)**的演进,在保证线程安全的同时实现了极高的并发性能。
核心要点回顾:
- 设计目标:高并发、高性能、线程安全、弱一致性
- JDK 1.7:Segment分段锁,并发度受限于Segment数量(默认16)
- JDK 1.8:Node数组 + 链表/红黑树,CAS + synchronized,并发度等于数组长度
- 关键机制 :
- 桶为空:CAS插入(无锁)
- 正在扩容:协助扩容(多线程协作)
- hash冲突:synchronized锁头节点(细粒度锁)
- 扩容优化:多线程协作迁移,ForwardingNode标记已迁移桶
- 计数优化:baseCount + CounterCell\[\],LongAdder思想
最佳实践:
- ✅ 预估容量,避免频繁扩容
- ✅ 使用compute系列方法保证原子性
- ✅ 使用mappingCount()替代size()
- ✅ 适用于读多写少、弱一致性场景
- ❌ 不要在compute中嵌套修改
- ❌ 不要依赖迭代顺序
- ❌ 不要频繁调用size()
ConcurrentHashMap是并发编程的基础组件,深入理解其原理和正确使用方式,对构建高性能并发系统至关重要。