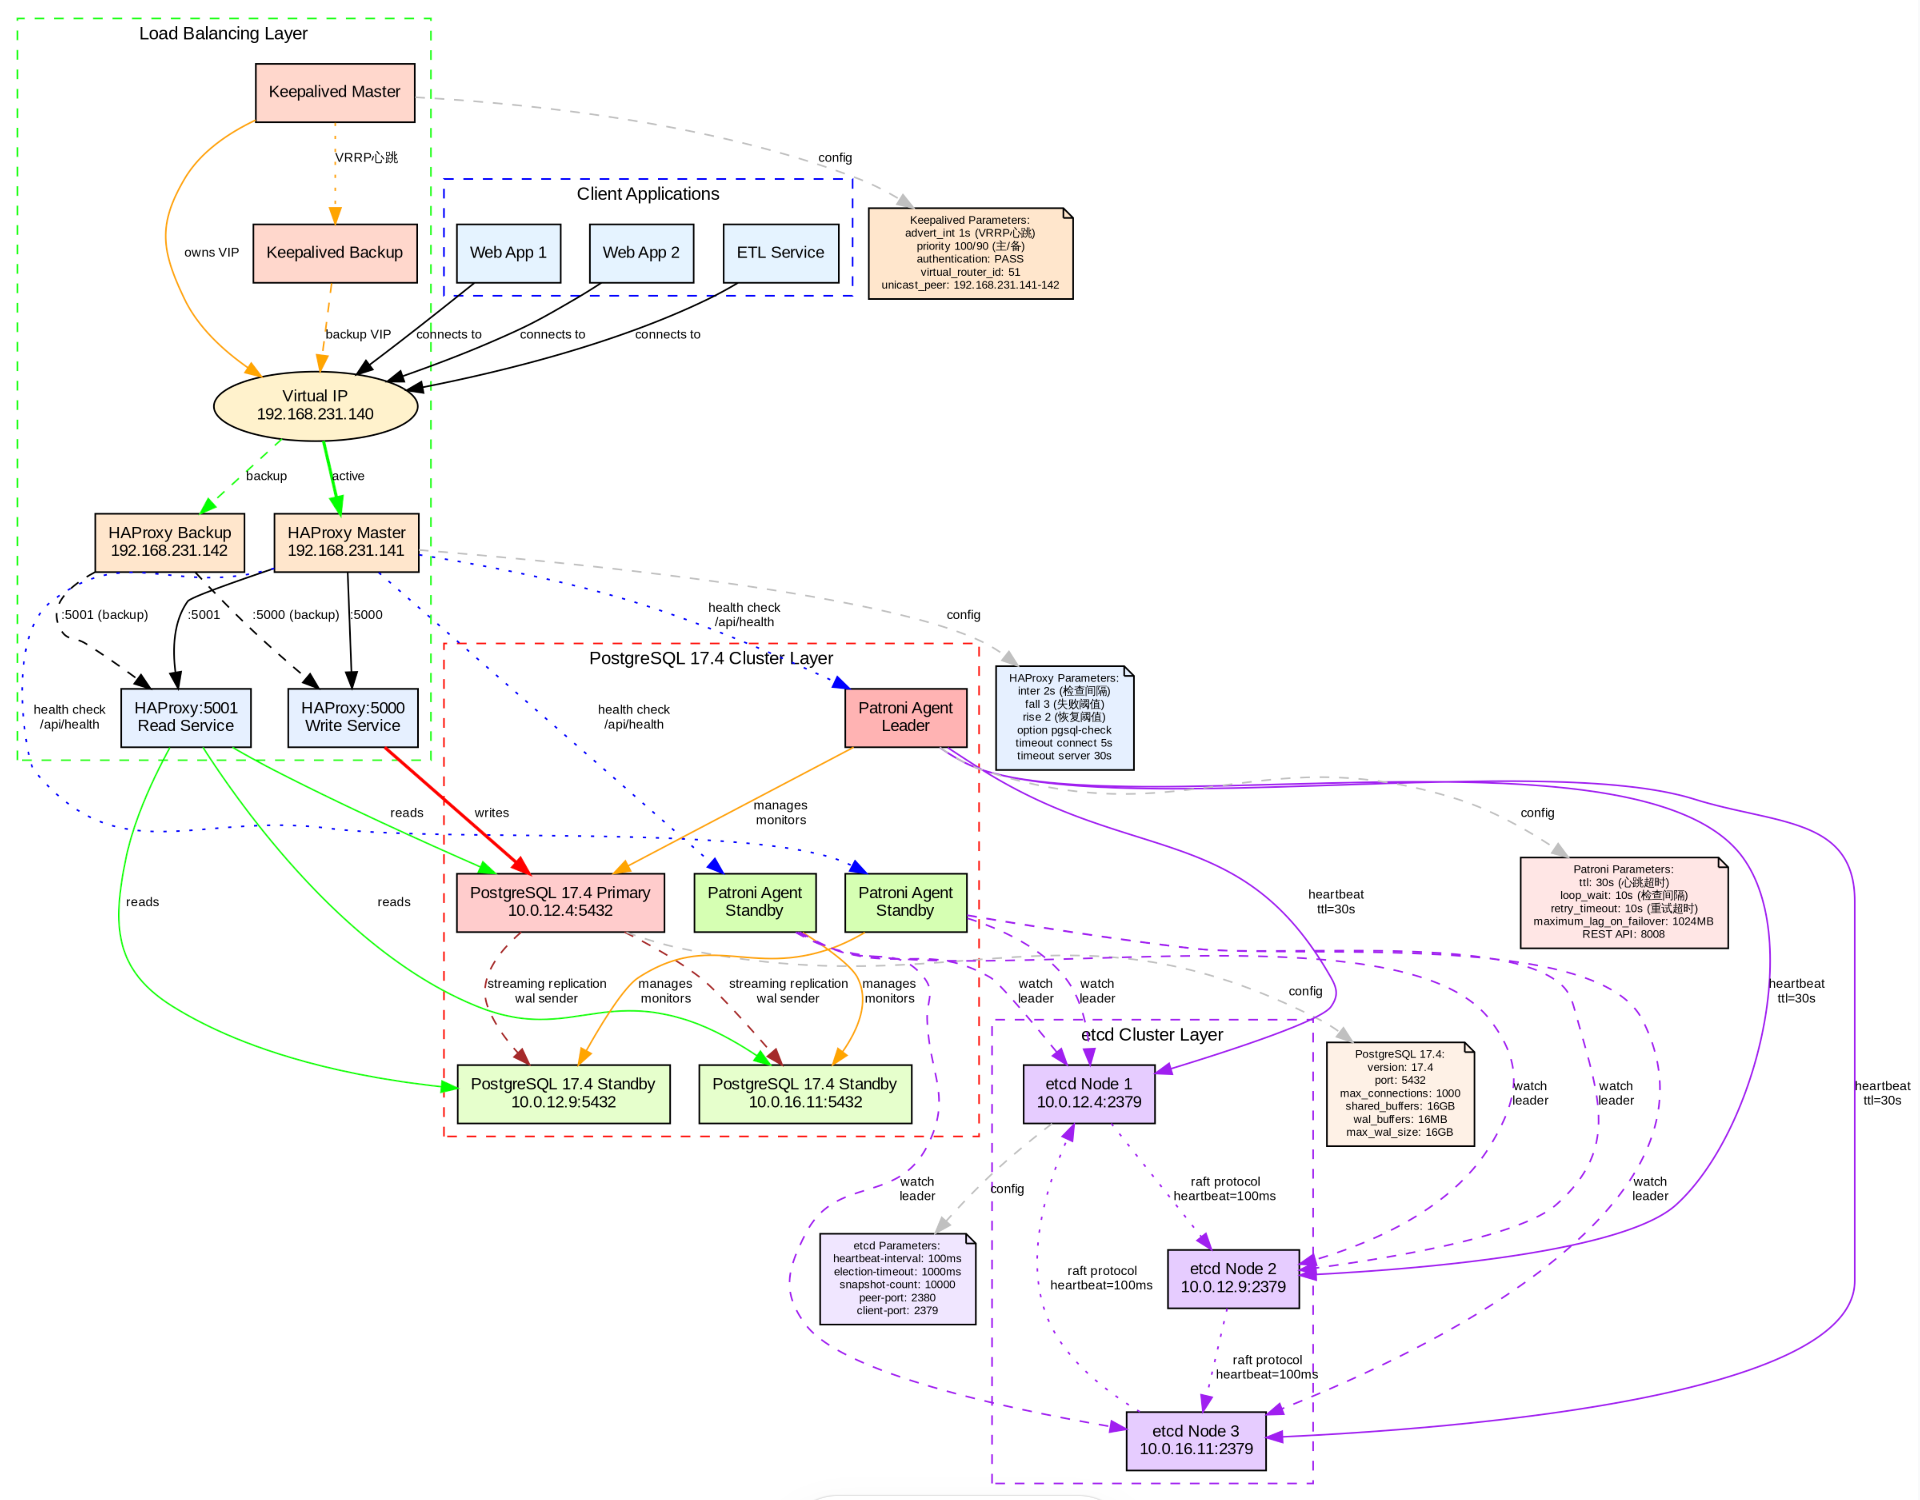
使用 Patroni + HAProxy + Keepalived + ETCD 搭建高可用的 PostgreSQL 集群
背景
单机 PG 面临服务器硬件故障、操作系统崩溃或网络中断,便会导致业务中断,无法连续性的提供服务。单机架构缺乏高可用机制,无法自动故障转移,恢复依赖人工干预,操作复杂,RTO时间较长。无法满足业务对连续性、可扩展性、高可靠性及容灾能力的要求。
为了确保 PG 的高可用性并防止宕机,耽误业务的使用,建设强大的PG-HA高可用架构至关重要。Patroni、HAProxy、Keepalived、etcd 等工具可以协同实现HA高可用的这一目标。
组件介绍
Patroni
Patroni 是一个使用 Python 构建的高可用性(HA)PostgreSQL 的方案,Patroni 支持多种分布式配置存储,如 ZooKeeper、etcd、Consul 或 Kubernetes,支持PostgreSQL 9.3 + 以上的版本。
HAProxy
HAProxy 是一款高性能的开源负载均衡器和反向代理器,适用于TCP和HTTP应用程序的连接。HAProxy 能够分配工作负载,能够提升应用程序的性能,表现为缩短响应时间和提高吞吐量。
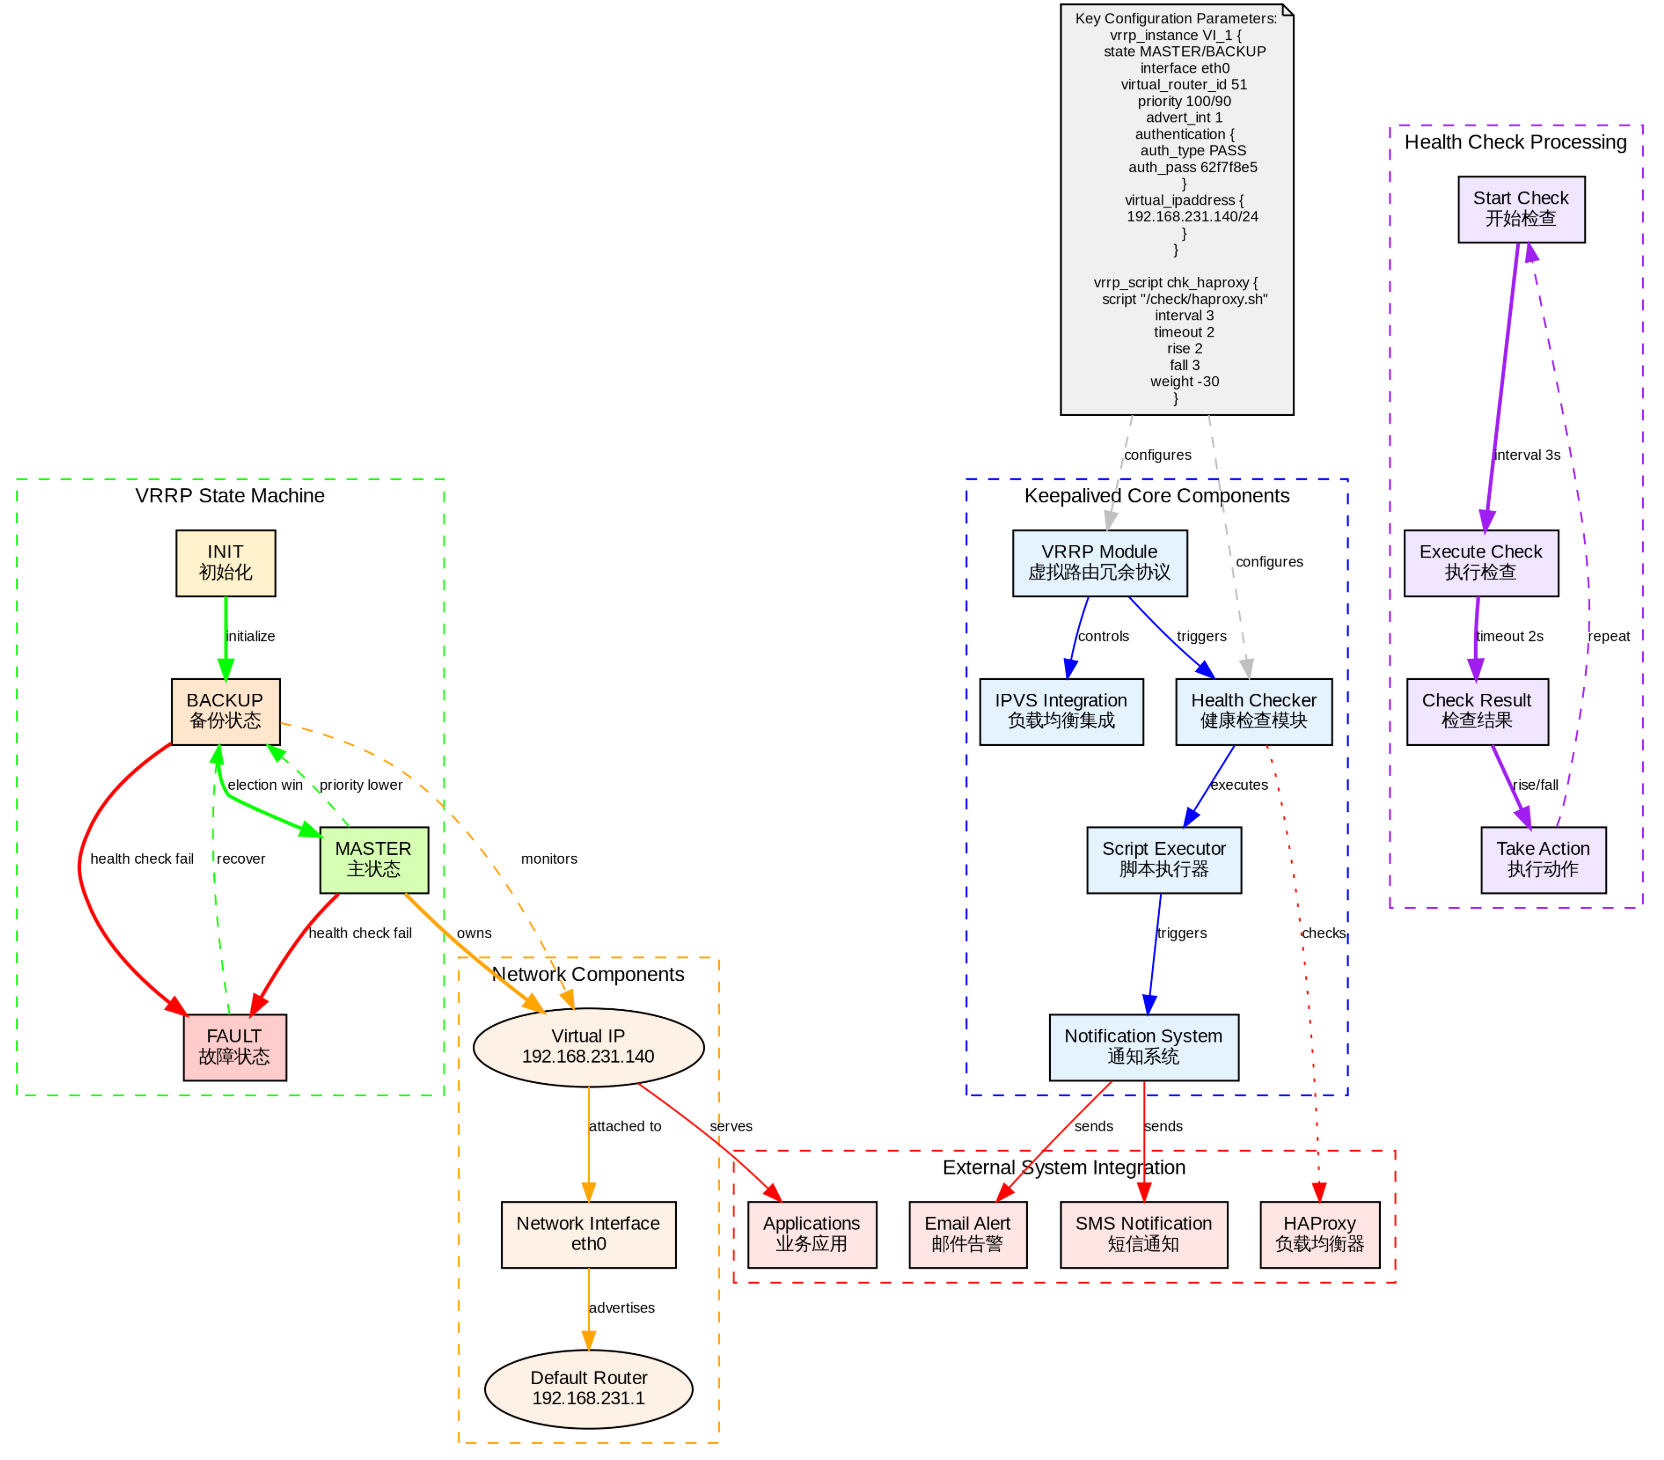
Keepalived
Keepalive 提供了负载平衡和高可用性的框架。Keepalive 实现了一组健康检查器,根据负载平衡服务器池的健康状况动态自适应地维护和管理负载平衡服务器池。
ETCD
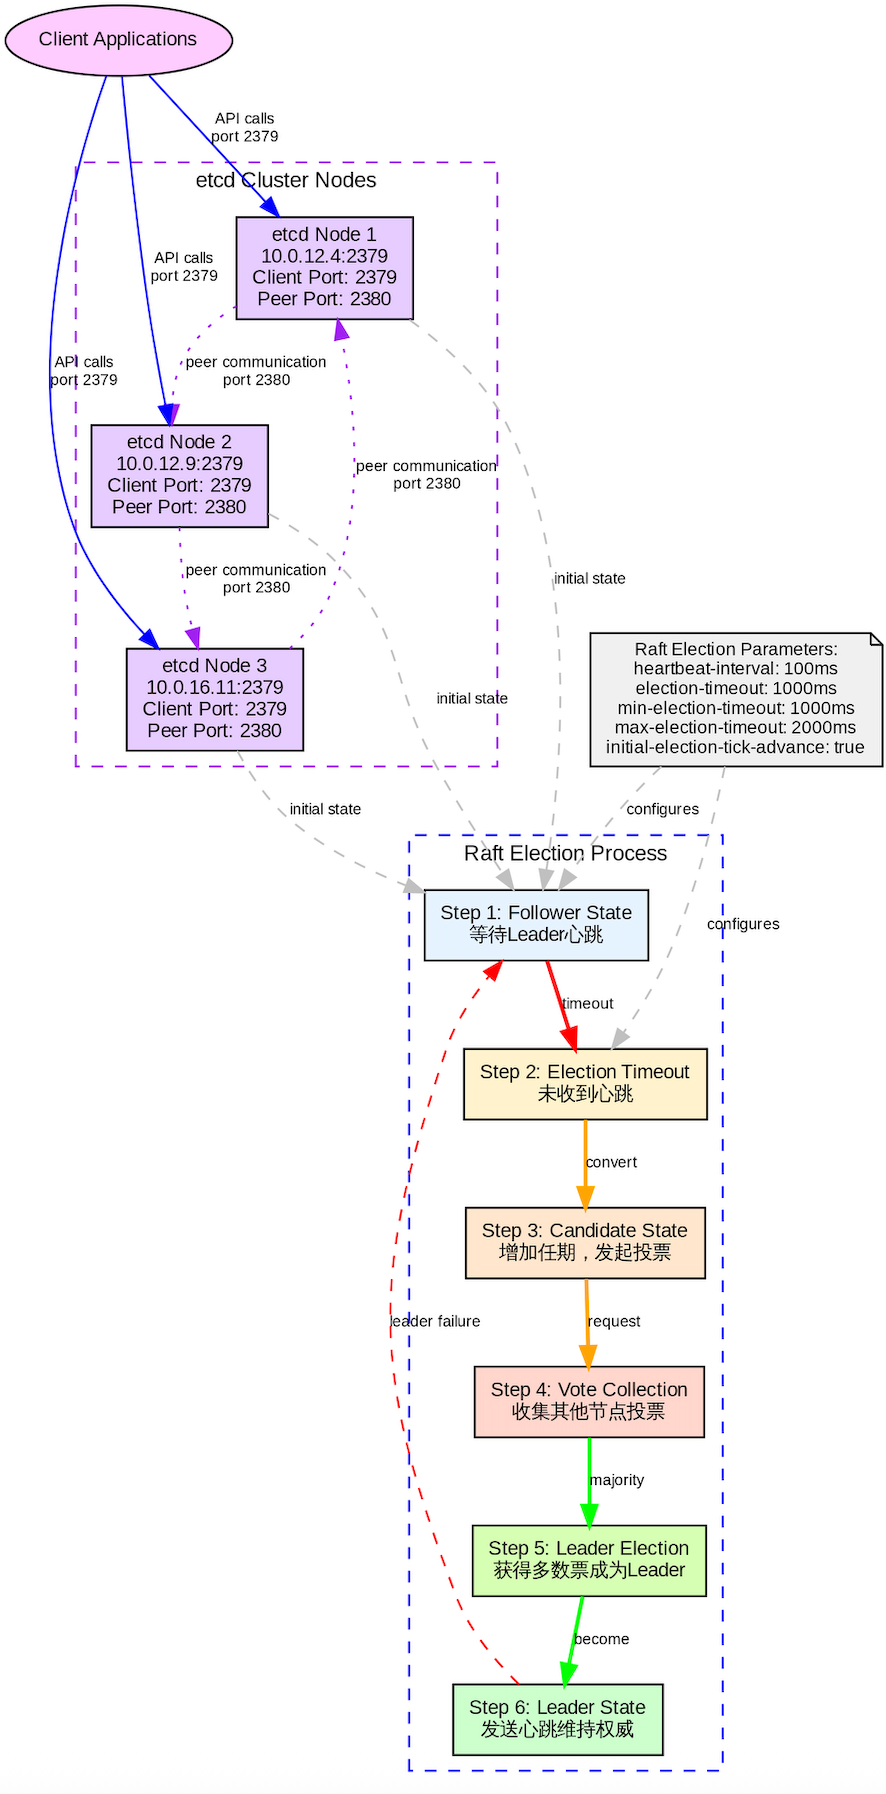
ETCD 是一种高度一致的分布式键值存储,提供了一种可靠的方式来存储需要被分布式系统或机器集群访问的数据。它能优雅地处理网络分区中的领导者选举,并且即使在领导者节点内也能容忍机器故障。存储PostgreSQL高可用集群的配置数据。它被Patroni用来管理集群状态,也被HAProxy和Keepalived用来确定当前哪个节点处于活跃状态。etcd确保配置数据在集群的所有节点上保持一致。
watchdog
watchdog进程负责监控PostgreSQL节点及其相关进程的健康状况。该进程确保PostgreSQL节点正常运行并能够处理客户端请求。如果watchdog检测到节点或其进程存在问题,它可以采取措施恢复节点或启动到备用节点的故障转移。
环境信息
| hostname | IP 地址 | CPU(Core) | mem | 配置组件 |
|---|---|---|---|---|
| mdw | 10.0.12.9 | 4 | 8GB | etcd, HAProxy, keepalived, Patroni and PostgreSQL, pgBouncer |
| standby | 10.0.12.4 | 4 | 8GB | etcd, HAProxy, keepalived, Patroni and PostgreSQL, pgBouncer |
| standby1 | 10.0.16.11 | 4 | 8GB | etcd, HAProxy, keepalived, Patroni and PostgreSQL, pgBouncer |
| ha-vip | 10.0.12.10 | 4 | 8GB | HA-VIP 高可用虚拟IP |
防火墙设置
防火墙直接关闭
在环境中如果允许关闭防火墙,则是一种最简答的方式。可以使用以下的命令进行关闭。
sql
-- 关闭防火墙
sudo systemctl stop firewalld

-- 查看防火墙的状态
sudo systemctl status firewalld
开放指定的端口
如果在实际的环境中,不允许关闭防火墙,只允许放开自定的端口情况下,需要使用以下的命令进行开放。
Patroni
- 8008:此端口用于Patroni的HTTP API
sql
-- 开放8008端口
sudo firewall-cmd --zone=public --add-port=8008/tcp --permanent

-- 重启防火墙使配置生效
sudo firewall-cmd --reload

-- 验证端口是否开放
sudo firewall-cmd --query-port=8008/tcp
HAProxy
- 5000:此端口用于与后端(PostgreSQL服务)的HTTP连接。
- 5001:此端口用于与后端(PostgreSQL服务)的HTTPS连接。
sql
-- 开放5000端口
sudo firewall-cmd --zone=public --add-port=5000/tcp --permanent

-- 开放5001端口
sudo firewall-cmd --zone=public --add-port=5001/tcp --permanent

-- 重启防火墙使配置生效
sudo firewall-cmd --reload

-- 验证端口是否开放
sudo firewall-cmd --query-port=5000/tcp
sudo firewall-cmd --query-port=5001/tcp
etcd
- 2379:此端口用于etcd客户端通信。
- 2380:此端口用于etcd服务器与服务器之间的通信。
sql
-- 开放2379端口
sudo firewall-cmd --zone=public --add-port=2379/tcp --permanent

-- 开放2380端口
sudo firewall-cmd --zone=public --add-port=2380/tcp --permanent

-- 重启防火墙使配置生效
sudo firewall-cmd --reload

-- 验证端口是否开放
sudo firewall-cmd --query-port=2379/tcp
sudo firewall-cmd --query-port=2380/tcp
Keepalived
- 112:此端口用于Keepalived实例之间的虚拟路由器冗余协议(VRRP)通信。
- 5405:此端口用于Keepalived实例之间的多播流量。
sql
-- 开放112端口
sudo firewall-cmd --zone=public --add-port=112/tcp --permanent

-- 开放5405端口
sudo firewall-cmd --zone=public --add-port=5405/tcp --permanent

-- 重启防火墙使配置生效
sudo firewall-cmd --reload

-- 验证端口是否开放
sudo firewall-cmd --query-port=112/tcp
sudo firewall-cmd --query-port=5405/tcp
Pgbouncer
- 6432:此端口用于Pgbouncer客户端连接。
sql
-- 开放6432端口
sudo firewall-cmd --zone=public --add-port=6432/tcp --permanent

-- 开放5405端口
sudo firewall-cmd --zone=public --add-port=6432/tcp --permanent

-- 重启防火墙使配置生效
sudo firewall-cmd --reload

-- 验证端口是否开放
sudo firewall-cmd --query-port=6432/tcp
PostgreSQL
5432:此端口用于PostgreSQL客户端连接。
sql
-- 开放5432端口
sudo firewall-cmd --zone=public --add-port=5432/tcp --permanent

-- 开放5432端口
sudo firewall-cmd --zone=public --add-port=5432/tcp --permanent

-- 重启防火墙使配置生效
sudo firewall-cmd --reload

-- 验证端口是否开放
sudo firewall-cmd --query-port=5432/tcp
Web server
- 5000:此端口用于与Web服务器的HTTP连接。
- 5001:此端口用于与Web服务器的HTTPS连接。
- 7000:此端口用于从Web服务器到HAProxy的反向代理连接。
sql
-- 开放5000端口
sudo firewall-cmd --zone=public --add-port=5000/tcp --permanent

-- 开放5001端口
sudo firewall-cmd --zone=public --add-port=5001/tcp --permanent

-- 开放7000端口
sudo firewall-cmd --zone=public --add-port=7000/tcp --permanent

-- 重启防火墙使配置生效
sudo firewall-cmd --reload

-- 验证端口是否开放
sudo firewall-cmd --query-port=5000/tcp
sudo firewall-cmd --query-port=5001/tcp
sudo firewall-cmd --query-port=7000/tcp
安装 PostgreSQL 17
需要在所有的机器上部署PostgreSQL17,仅是安装即可,不需要初始化,Patroni 在启动时会进行初始化实例。
sql
--  安装编译工具和依赖
sudo yum groupinstall "Development Tools" -y
sudo yum install readline-devel zlib-devel libicu-devel openssl-devel pam-devel libxml2-devel libxslt-devel systemd-devel -y

-- 创建用户和数据目录
sudo groupadd postgres
sudo useradd -g postgres postgres
sudo passwd postgres

-- 创建安装目录
sudo mkdir -p /opt/pgsql
sudo chown postgres:postgres /opt/pgsql
sudo mkdir -p /opt/pgdata17.4
sudo chown postgres:postgres /opt/pgdata17.4

-- PG的源码下载
cd /root
wget https://ftp.postgresql.org/pub/source/v17.4/postgresql-17.4.tar.gz
tar -zxvf postgresql-17.4.tar.gz

-- 进行编译和安装
cd postgresql-17.4
./configure --prefix=/opt/pgsql --with-openssl --with-libxml --with-icu --with-systemd
make -j$(nproc)
sudo make install
部署 ETCD 集群
需要在所有的节点上部署 ETCD ,三个节点形成 ETCD 的集群,使 ETCD 具有高可用性 。
源码安装 ETCD 节点
安装 GO 程序
sql
-- 使用yum 源进行安装
yum install -y go
编译 ETCD
sql
-- 拉去etcd的源代码
git clone https://github.com/etcd-io/etcd.git
cd etcd

-- 切换分支
git checkout v3.5.12

-- 进行build
./build.sh

-- 文件复制到执行文件中
sudo cp bin/etcd* /usr/local/bin/

-- 版本信息
$ etcdutl version
etcdutl version: 3.5.12
API version: 3.5

$ etcdctl version
etcdctl version: 3.5.12
API version: 3.5

$ etcd --version
etcd Version: 3.5.12
Git SHA: e7b3bb6cc
Go Version: go1.20.13
Go OS/Arch: linux/amd64
配置 ETCD 服务
按照以下步骤部署 ETCD 的集群。
sql
-- hostname 和IP 映射如下
10.0.12.4 standby
10.0.12.9 mdw
10.0.16.11 standby1在每个mdw 节点中配置以下内容
sql
$ cat /etc/etcd/etcd.conf.yml
name: mdw
data-dir: /var/lib/etcd
listen-peer-urls: http://10.0.12.9:2380
listen-client-urls: http://10.0.12.9:2379,http://127.0.0.1:2379
advertise-client-urls: http://10.0.12.9:2379
initial-advertise-peer-urls: http://10.0.12.9:2380
initial-cluster: standby=http://10.0.12.4:2380,mdw=http://10.0.12.9:2380,standby1=http://10.0.16.11:2380
initial-cluster-token: etcd-cluster-01
initial-cluster-state: new在standby节点上配置以下的内容。
sql
$ cat /etc/etcd/etcd.conf.yml
name: standby
data-dir: /var/lib/etcd
listen-peer-urls: http://10.0.12.4:2380
listen-client-urls: http://10.0.12.4:2379,http://127.0.0.1:2379
advertise-client-urls: http://10.0.12.4:2379
initial-advertise-peer-urls: http://10.0.12.4:2380
initial-cluster: standby=http://10.0.12.4:2380,mdw=http://10.0.12.9:2380,standby1=http://10.0.16.11:2380
initial-cluster-token: etcd-cluster-01
initial-cluster-state: new在standby1 节点上配置以下的内容。
sql
$ cat /etc/etcd/etcd.conf.yml
name: standby1
data-dir: /var/lib/etcd
listen-peer-urls: http://10.0.16.11:2380
listen-client-urls: http://10.0.16.11:2379,http://127.0.0.1:2379
advertise-client-urls: http://10.0.16.11:2379
initial-advertise-peer-urls: http://10.0.16.11:2380
initial-cluster: standby=http://10.0.12.4:2380,mdw=http://10.0.12.9:2380,standby1=http://10.0.16.11:2380
initial-cluster-token: etcd-cluster-01
initial-cluster-state: new
在每个节点上配置 etcd.service
sql
$ cat /etc/systemd/system/etcd.service
[Unit]
Description=etcd
Documentation=https://github.com/etcd-io/etcd
After=network.target

[Service]
Type=notify
User=etcd
ExecStart=/usr/local/bin/etcd --config-file=/etc/etcd/etcd.conf.yml
Restart=on-failure
RestartSec=5
LimitNOFILE=65536

[Install]
WantedBy=multi-user.target
使用以下命令 启动 ETCD 服务。
sql
-- 加载配置文件
sudo systemctl daemon-reload

-- 启动 ETCD 服务
sudo systemctl start etcd

-- 设置开机自启
sudo systemctl enable etcd

-- 查看 ETCD 运行的状态
sudo systemctl status etcd
查看 ETCD 集群内的个角色信息
sql
$ etcdctl --endpoints=http://10.0.12.9:2379,http://10.0.12.4:2379,http://10.0.16.11:2379   endpoint status -w table
+------------------------+------------------+---------+---------+-----------+------------+-----------+------------+--------------------+--------+
|        ENDPOINT        |        ID        | VERSION | DB SIZE | IS LEADER | IS LEARNER | RAFT TERM | RAFT INDEX | RAFT APPLIED INDEX | ERRORS |
+------------------------+------------------+---------+---------+-----------+------------+-----------+------------+--------------------+--------+
|  http://10.0.12.9:2379 | 6ede6b6607884170 |  3.5.12 |  414 kB |     false |      false |        13 |      55307 |              55307 |        |
|  http://10.0.12.4:2379 | 7147f212ee0d15e1 |  3.5.12 |  418 kB |     false |      false |        13 |      55307 |              55307 |        |
| http://10.0.16.11:2379 | 6aabc4a9a7fdc9a0 |  3.5.12 |  414 kB |      true |      false |        13 |      55307 |              55307 |        |
+------------------------+------------------+---------+---------+-----------+------------+-----------+------------+--------------------+--------+
查看 ETCD 集群内的成员
sql
$ etcdctl --endpoints=http://10.0.12.9:2379  member list -w table
+------------------+---------+----------+------------------------+------------------------+------------+
|        ID        | STATUS  |   NAME   |       PEER ADDRS       |      CLIENT ADDRS      | IS LEARNER |
+------------------+---------+----------+------------------------+------------------------+------------+
| 6aabc4a9a7fdc9a0 | started | standby1 | http://10.0.16.11:2380 | http://10.0.16.11:2379 |      false |
| 6ede6b6607884170 | started |      mdw |  http://10.0.12.9:2380 |  http://10.0.12.9:2379 |      false |
| 7147f212ee0d15e1 | started |  standby |  http://10.0.12.4:2380 |  http://10.0.12.4:2379 |      false |
+------------------+---------+----------+------------------------+------------------------+------------+
查看 ETCD 集群内的健康状态
sql
$ etcdctl --endpoints=http://10.0.12.9:2379 endpoint health --cluster
http://10.0.12.9:2379 is healthy: successfully committed proposal: took = 3.718339ms
http://10.0.12.4:2379 is healthy: successfully committed proposal: took = 3.926712ms
http://10.0.16.11:2379 is healthy: successfully committed proposal: took = 9.996198ms部署 keepalived
在每台服务器上部署 keepalived 主要是创建 VIP(虚拟 IP),用于实现客户端无感知故障切换(Failover)。按照以下的步骤在每台机器进行操作。
sql
-- 使用yum 源进行部署
yum install -y keepalived

-- 添加配置参数
echo "net.ipv4.ip_nonlocal_bind = 1" >> /etc/sysctl.conf
echo  "net.ipv4.ip_forward = 1"  >> /etc/sysctl.conf

-- 是配置生效
sudo sysctl --system
sudo sysctl -p
配置 keepalived.conf 文件
使用ifconfig获取你的网络的接口名称,然后根据接口的名字进行配置虚拟IP,需要再每台机器上进行配置。
配置 mdw 的机器
sql
[root@mdw ~]# ifconfig
eth0: flags=4163<UP,BROADCAST,RUNNING,MULTICAST>  mtu 1500
        inet 10.0.12.9  netmask 255.255.252.0  broadcast 10.0.15.255
*******

-- 备份一份配置文件
cp /etc/keepalived/keepalived.conf /etc/keepalived/keepalived.conf--back
对 keepalived.conf 配置文件进行以下修改。
sql
[root@mdw ~]# cat  /etc/keepalived/keepalived.conf
vrrp_script check_haproxy {
  script "pkill -0 haproxy"
  interval 2
  weight 2
}
vrrp_instance VI_1 {
  state MASTER
  interface eth0
  virtual_router_id 51
  priority 101
  advert_int 1
  virtual_ipaddress {
    192.168.231.140
  }
  track_script {
    check_haproxy
  }
}
配置 standby 的机器
sql
eth0: flags=4163<UP,BROADCAST,RUNNING,MULTICAST>  mtu 1500
        inet 10.0.12.4  netmask 255.255.252.0  broadcast 10.0.15.255
*******

-- 备份一份配置文件
cp /etc/keepalived/keepalived.conf /etc/keepalived/keepalived.conf--back
对 keepalived.conf 配置文件进行以下修改。
sql
[root@standby ~]# cat  /etc/keepalived/keepalived.conf
vrrp_script check_haproxy {
   script "pkill -0 haproxy"
   interval 2
   weight 2
}
vrrp_instance VI_1 {
  state BACKUP
  interface eth0
  virtual_router_id 51
  priority 100
  advert_int 1
  virtual_ipaddress {
    192.168.231.140
  }
  track_script {
  check_haproxy
  }
}
配置 standby1 的机器
sql
eth0: flags=4163<UP,BROADCAST,RUNNING,MULTICAST>  mtu 1500
        inet 10.0.16.11  netmask 255.255.252.0  broadcast 10.0.19.255
*******

-- 备份一份配置文件
cp /etc/keepalived/keepalived.conf /etc/keepalived/keepalived.conf--back
对 keepalived.conf 配置文件进行以下修改。
sql
[root@standby1 ~]# cat  /etc/keepalived/keepalived.conf
vrrp_script check_haproxy {
   script "pkill -0 haproxy"
   interval 2
   weight 2
}
vrrp_instance VI_1 {
  state BACKUP
  interface eth0
  virtual_router_id 51
  priority 100
  advert_int 1
  virtual_ipaddress {
    192.168.231.140
  }
  track_script {
  check_haproxy
  }
}
开启 keepalived 的服务
在每台机器上开启 keepalived 的服务,并检查服务是否运行正常。
sql
systemctl start keepalived
systemctl enable keepalived
systemctl status keepalived
检查 192.168.231.140 是否都生效
在每台机器上使用 ip addr检查是否有140的IP地址
mdw 机器
sql
2: eth0: <BROADCAST,MULTICAST,UP,LOWER_UP> mtu 1500 qdisc mq state UP group default qlen 1000
    link/ether 52:54:00:7a:59:78 brd ff:ff:ff:ff:ff:ff
    inet 10.0.12.9/22 brd 10.0.15.255 scope global eth0
       valid_lft forever preferred_lft forever
    inet 192.168.231.140/32 scope global eth0
    **********
standby 机器
sql
2: eth0: <BROADCAST,MULTICAST,UP,LOWER_UP> mtu 1500 qdisc mq state UP group default qlen 1000
    link/ether 52:54:00:26:6b:b6 brd ff:ff:ff:ff:ff:ff
    inet 10.0.12.4/22 brd 10.0.15.255 scope global eth0
       valid_lft forever preferred_lft forever
    inet 192.168.231.140/32 scope global eth0
  ******
standby1 机器
sql
2: eth0: <BROADCAST,MULTICAST,UP,LOWER_UP> mtu 1500 qdisc mq state UP group default qlen 1000
    link/ether 52:54:00:33:60:54 brd ff:ff:ff:ff:ff:ff
    inet 10.0.16.11/22 brd 10.0.19.255 scope global eth0
       valid_lft forever preferred_lft forever
    inet 192.168.231.140/32 scope global eth0
 ******
配置 HAProxy

安装 HAProxy
使用以下命令在每台机器机器上进行安装 haproxy
sql
yum install -y haproxy配置HAProxy
在 mdw 节点上配置 haproxy 的配置文件,然后再从 standby 和 standby1 节点上进行配置。
sql
-- 备份一份 haproxy 的文件
[root@mdw ~]# cp /etc/haproxy/haproxy.cfg /etc/haproxy/haproxy.cfg--back

-- 把以下内容加入到配置文件中(复制时注意格式问题)
[root@mdw ~]# cat   /etc/haproxy/haproxy.cfg
# /etc/haproxy/haproxy.cfg

global
    log /dev/log local0
    log /dev/log local1 notice
    chroot /var/lib/haproxy
    stats socket /run/haproxy/admin.sock mode 660 level admin
    stats timeout 30s
    user haproxy
    group haproxy
    daemon
    maxconn 1000

defaults
    mode tcp
    log global
    option tcplog
    retries 3
    timeout queue 1m
    timeout connect 4s
    timeout client 60m
    timeout server 60m
    timeout check 5s
    maxconn 900

# ----------------------------
# 监控页面(HTTP)
# ----------------------------
listen stats
    mode http
    bind *:7000
    stats enable
    stats uri /
    stats refresh 10s
    stats admin if TRUE

# ----------------------------
# 写流量:只路由到主库(Patroni /master 返回 200)
# ----------------------------
listen primary
    bind 192.168.231.140:5000
    mode tcp
    balance first
    option httpchk OPTIONS /master
    http-check expect status 200
    default-server inter 3s fall 3 rise 2 on-marked-down shutdown-sessions
    server mdw      10.0.12.9:5432  maxconn 100 check port 8008
    server standby  10.0.12.4:5432  maxconn 100 check port 8008
    server standby1 10.0.16.11:5432 maxconn 100 check port 8008

# ----------------------------
# 读流量:可路由到任意副本(/replica 或 /read-only 返回 200)
# ----------------------------
listen standby
    bind 192.168.231.140:5001
    mode tcp
    balance roundrobin
    option httpchk OPTIONS /replica
    http-check expect status 200
    default-server inter 3s fall 3 rise 2 on-marked-down shutdown-sessions
    server mdw      10.0.12.9:5432  maxconn 100 check port 8008
    server standby  10.0.12.4:5432  maxconn 100 check port 8008
    server standby1 10.0.16.11:5432 maxconn 100 check port 8008
校验文件的正确性
sql
[root@mdw ~]# sudo haproxy -c -f /etc/haproxy/haproxy.cfg
Configuration file is valid
把文件传到其他的节点上
sql
-- 传到其他的节点上
[root@mdw ~]# scp -r   /etc/haproxy/haproxy.cfg standby:/etc/haproxy/haproxy.cfg
haproxy.cfg                                                                                                             100% 1754     5.6MB/s   00:00
[root@mdw ~]# scp -r   /etc/haproxy/haproxy.cfg standby1:/etc/haproxy/haproxy.cfg
haproxy.cfg
创建目录并赋权
以下命令需要再每个服务器上执行
sudo mkdir -p /var/lib/haproxy
sudo chown root:root /var/lib/haproxy
sudo chmod 755 /var/lib/haproxy
sudo mkdir -p /run/haproxy
sudo chown haproxy:haproxy /run/haproxy
sudo chmod 755 /run/haproxy
对每个节点进行启动,确保无异常
sudo systemctl daemon-reload
systemctl start haproxy
systemctl enable haproxy
systemctl status haproxy
启用 watchdog
Watchdog 主要用于防止 Patroni 进程假死但未退出的情况, 既脑裂的情况,可以应用于 Patroni 高可用场景。当 Patroni 无法正常向watchdog发送消息时,系统将在超时后 自动重启,避免节点处于不确定状态。
以下操作需要再每台节点上操作。
watchdog 安装部署
sql
-- 使用 yum 源安装 watchdog
sudo yum install -y watchdog

--     加载 softdog 内核模块
sudo modprobe softdog
echo "softdog" | sudo tee /etc/modules-load.d/softdog.conf

-- 验证是否有效
$ lsmod | grep softdog
softdog                13319  0

-- 编辑配置文件,主要是把watchdog-device给打开
$ sudo cat /etc/watchdog.conf | grep -v "^#" | grep -v "^$"
watchdog-device    = /dev/watchdog
realtime        = yes
priority        = 1

-- watchdog 的权限
echo 'KERNEL=="watchdog", MODE="0600", OWNER="postgres"' | sudo tee /etc/udev/rules.d/99-watchdog.rules
sudo udevadm control --reload-rules
sudo udevadm trigger --subsystem-match=watchdog
sudo chown -R postgres:postgres /dev/watchdog
使用 Patroni 安装 PostgreSQL 17
需要再每个节点按照以下的步骤部署patroni
安装 Patroni
sql
-- 先安装python3想依赖的包
# sudo yum install -y python3 python3-pip

-- 安装patroni
sudo pip3 install patroni

or

sudo pip3 install -i https://pypi.tuna.tsinghua.edu.cn/simple patroni

-- 查看patroni的版本
# patroni --version
patroni 4.1.0
配置 Patroni
Patroni 的配置各不相同,需要再每个节点上进行配置patroni的配置文件和patroni.service配置文件。
mdw 节点
patroni.yml 配置文件配置
sql
[root@mdw ]# cat /etc/patroni.yml
scope: watchdogmycluster          # 所有节点必须一致
namespace: /db           # ecd 命名空间(可选)
name: mdw                # 本节点名称(每台机器不同)
restapi:
  listen: 10.0.12.9:8008
  connect_address: 10.0.12.9:8008
etcd3:
    hosts:                        # etcd 集群地址
    - 10.0.12.9:2379
    - 10.0.12.4:2379
    - 10.0.16.11:2379
bootstrap:
  allow_bootstrap: true
  dcs:
    ttl: 30               # leader 租约时间(秒)
    loop_wait: 10         # 主节点状态上报间隔
    retry_timeout: 10     # 故障重试超时
    maximum_lag_on_failover: 1048576  # 最大允许 lag(1MB)
    postgresql:
      use_pg_rewind: true
      parameters:
        wal_level: replica
        hot_standby: on
        max_wal_senders: 10
        wal_keep_size: 128MB
        max_replication_slots: 5
        password_encryption: md5
  pg_hba:
    - host replication replicator 0.0.0.0/24 md5
    - host replication replicator 10.0.12.4/32 md5
    - host replication replicator 10.0.12.9/32 md5
    - host replication replicator 10.0.16.11/32 md5
    - host    postgres        postgres        10.0.12.4/32       trust
    - host    postgres        postgres        10.0.12.9/32       trust
    - host    postgres        postgres        10.0.16.11/32       trust
    - host    postgres        postgres        13.201.152.146/32       trust
  initdb:
    - encoding: UTF8
    - data-checksums
    - "auth-host=md5"
    - "auth-local=trust"
postgresql:
  listen: 10.0.12.9:5432
  connect_address: 10.0.12.9:5432
  data_dir: /opt/pgdata17.4
  bin_dir: /opt/17.4/bin/
  pgpass: /tmp/pgpass
  authentication:
    replication:
      username: replicator
      password: rep_pass
    superuser:
      username: postgres
      password: postgres_pass
  parameters:
    password_encryption: md5
    unix_socket_directories: '/tmp'
watchdog:
  mode: required
  device: /dev/watchdog
  safety_margin: 5
tags:
    nofailover: false
    noloadbalance: false
    clonefrom: false
    nosync: false
standby 节点
sql
[root@standby ]# cat /etc/patroni.yml
scope: watchdogmycluster          # ,所有节点必须一致
namespace: /db           # ecd 命名空间(可选)
name: standby                # 本节点名称(每台机器不同)
restapi:
  listen: 10.0.12.4:8008
  connect_address: 10.0.12.4:8008
etcd3:
    hosts:                        # etcd 集群地址
    - 10.0.12.9:2379
    - 10.0.12.4:2379
    - 10.0.16.11:2379
bootstrap:
  allow_bootstrap: true
  dcs:
    ttl: 30               # leader 租约时间(秒)
    loop_wait: 10         # 主节点状态上报间隔
    retry_timeout: 10     # 故障重试超时
    maximum_lag_on_failover: 1048576  # 最大允许 lag(1MB)
    postgresql:
      use_pg_rewind: true
      parameters:
        wal_level: replica
        hot_standby: on
        max_wal_senders: 10
        wal_keep_size: 128MB
        max_replication_slots: 5
        password_encryption: md5
  pg_hba:
    - host replication replicator 0.0.0.0/24 md5
    - host replication replicator 10.0.12.4/32 md5
    - host replication replicator 10.0.12.9/32 md5
    - host replication replicator 10.0.16.11/32 md5
    - host    postgres        postgres        10.0.12.4/32       trust
    - host    postgres        postgres        10.0.12.9/32       trust
    - host    postgres        postgres        10.0.16.11/32       trust
    - host    postgres        postgres        13.201.152.146/32       trust
  initdb:
    - encoding: UTF8
    - data-checksums
    - "auth-host=md5"
    - "auth-local=trust"
postgresql:
  listen: 10.0.12.4:5432
  connect_address: 10.0.12.4:5432
  data_dir: /opt/pgdata17.4
  bin_dir: /opt/17.4/bin/
  pgpass: /tmp/pgpass
  authentication:
    replication:
      username: replicator
      password: rep_pass
    superuser:
      username: postgres
      password: postgres_pass
  parameters:
    password_encryption: md5
    unix_socket_directories: '/tmp'
watchdog:
  mode: required
  device: /dev/watchdog
  safety_margin: 5   # 提前5秒通知watchdog
tags:
    nofailover: false
    noloadbalance: false
    clonefrom: false
    nosync: false
standby1 节点
sql
[root@standby1 ]# cat /etc/patroni.yml
scope: watchdogmycluster          # ,所有节点必须一致
namespace: /db           # ecd 命名空间(可选)
name: standby1                # 本节点名称(每台机器不同)
restapi:
  listen: 10.0.16.11:8008
  connect_address: 10.0.16.11:8008
etcd3:
    hosts:                        # etcd 集群地址
    - 10.0.12.9:2379
    - 10.0.12.4:2379
    - 10.0.16.11:2379
bootstrap:
  allow_bootstrap: true
  dcs:
    ttl: 30               # leader 租约时间(秒)
    loop_wait: 10         # 主节点状态上报间隔
    retry_timeout: 10     # 故障重试超时
    maximum_lag_on_failover: 1048576  # 最大允许 lag(1MB)
    postgresql:
      use_pg_rewind: true
      parameters:
        wal_level: replica
        hot_standby: on
        max_wal_senders: 10
        wal_keep_size: 128MB
        max_replication_slots: 5
        password_encryption: md5
  pg_hba:
    - host replication replicator 0.0.0.0/24 md5
    - host replication replicator 10.0.12.4/32 md5
    - host replication replicator 10.0.12.9/32 md5
    - host replication replicator 10.0.16.11/32 md5
    - host    postgres        postgres        10.0.12.4/32       trust
    - host    postgres        postgres        10.0.12.9/32       trust
    - host    postgres        postgres        10.0.16.11/32       trust
    - host    postgres        postgres        13.201.152.146/32       trust
  initdb:
    - encoding: UTF8
    - data-checksums
    - "auth-host=md5"
    - "auth-local=trust"
postgresql:
  listen: 10.0.16.11:5432
  connect_address: 10.0.16.11:5432
  data_dir: /opt/pgdata17.4
  bin_dir: /opt/17.4/bin/
  pgpass: /tmp/pgpass
  authentication:
    replication:
      username: replicator
      password: rep_pass
    superuser:
      username: postgres
      password: postgres_pass
  parameters:
    password_encryption: md5
    unix_socket_directories: '/tmp'
watchdog:
  mode: required
  device: /dev/watchdog
  safety_margin: 5   # 提前5秒通知watchdog
tags:
    nofailover: false
    noloadbalance: false
    clonefrom: false
    nosync: false
配置 patroni.service 服务
每台机器需要按照以下方法修改 patroni.service 文件
sql
[root@mdw ~]# cat /etc/systemd/system/patroni.service
[Unit]
Description=Runners to orchestrate a high-availability PostgreSQL
After=syslog.target network.target

[Service]
Type=simple
User=postgres
Group=postgres
ExecStart=/usr/local/bin/patroni /etc/patroni.yml
KillMode=process
TimeoutSec=30
Restart=on-failure
RestartSec=5s

[Install]
WantedBy=multi-user.target
创建对应PG初始化保存的目录
需要再每台机器上创建以下的目录,并赋予相对应的权限。
sql
mkdir -p /opt/pgdata17.4
chown -R postgres:postgres /opt/pgdata17.4
启动 patroni 服务
需要再每台机器上运行以下命令,并且定运行状态正常。
sql
-- 加载配置文件
sudo systemctl daemon-reload
-- 启动patroni
sudo systemctl start patroni
--  查看patroni的运行状态
sudo systemctl status patroni
如果在部署过程中有异常,可以使用
etcdctl --endpoints=* del "/db/mycluster/" --prefix删除掉key重新进行初始化patroni
查看 patroni 集群的运行状态
可以在部署的 patroni 节点上运行以下的命令查看运行状态。
sql
# patronictl -c /etc/patroni.yml list watchdogmycluster
+ Cluster: watchdogmycluster (7585445892328633499) +-------------+-----+------------+-----+
| Member   | Host       | Role    | State     | TL | Receive LSN | Lag | Replay LSN | Lag |
+----------+------------+---------+-----------+----+-------------+-----+------------+-----+
| mdw      | 10.0.12.9  | Leader  | running   |  1 |             |     |            |     |
| standby  | 10.0.12.4  | Replica | streaming |  1 |   0/5054D40 |   0 |  0/5054D40 |   0 |
| standby1 | 10.0.16.11 | Replica | streaming |  1 |   0/5054D40 |   0 |  0/5054D40 |   0 |
+----------+------------+---------+-----------+----+-------------+-----+------------+-----+| 列名 | 含义 | 说明 |
|---|---|---|
| Member | 成员名称 | 在 patroni.yml 中配置的 name 字段,用于唯一标识该节点 |
| Host | 主机地址 | PostgreSQL 监听的 IP |
| Role | 角色 | Leader: 当前主库(可读写) Replica:备库(只读,正在流复制) Pending(Uninitialized):未就绪 |
| State | PostgreSQL 状态 | running:PostgreSQL 正常运行 stopped:PostgreSQL 已停止 starting / restarting:正在启停 streaming:备库正在接收 WAL |
| TL | Timeline(时间线) | PostgreSQL 的 WAL 时间线编号。主库每次 promote 都会增加 TL |
| Receive LSN | 接收到的 WAL 位置(Log Sequence Number) | 备库从主库 接收到的最新 WAL 位置 |
| Lag | 接收延迟(Bytes) | 主库当前 LSN - Receive LSN,表示 网络/传输延迟,值越大,说明 WAL 还未完全传到备库。 |
| Replay LSN | 已重放的 WAL 位置 | 备库 已应用到数据库的 WAL 位置,可能小于 Receive LSN。 |
| Lag | 重放延迟(Bytes) | 主库当前 LSN - Replay LSN ,表示 备库数据落后主库的程度。这是判断能否安全 failover 的关键指标 |
LSN(Log Sequence Number) 是 PostgreSQL WAL 日志的唯一递增标识,格式如 0/5054D40,通过
SELECT pg_wal_lsn_diff('0/6000000', '0/5FFF000')计算差值。
使用 haproxy 链接PostgreSQL数据库
在每台的机器上进行查看192.168.231.140的IP和500的端口是否存在。
sql
[postgres@mdw pgdata17.4]$ ip addr|grep 140
    inet 192.168.231.140/32 scope global eth0
[postgres@mdw pgdata17.4]$ netstat -nltp|grep 500
(Not all processes could be identified, non-owned process info
 will not be shown, you would have to be root to see it all.)
tcp        0      0 192.168.231.140:5000    0.0.0.0:*               LISTEN      -
tcp        0      0 192.168.231.140:5001    0.0.0.0:*               LISTEN      -
使用psql 在每台节点上测试连接数据库。
sql
-- mdw 的机器
$ psql -h 192.168.231.140 -p 5000
psql (17.4)
Type "help" for help.

postgres=#

--  standby 的机器
[postgres@standby pgdata17.4]$ psql -h 192.168.231.140 -p 5000
psql (17.4)
Type "help" for help.

postgres=#

-- standby1 的机器
[postgres@standby1 pgdata17.4]$ psql -h 192.168.231.140 -p 5000
psql (17.4)
Type "help" for help.

postgres=#
模拟故障
手动切换Leader节点到备节点上,观察集群的promote过程。
sql
-- 当前mdw 为 Leader 节点,手动把mdw节点切换到standby 节点上。
[root@mdw ~]# patronictl -c /etc/patroni.yml list watchdogmycluster
+ Cluster: watchdogmycluster (7585445892328633499) +-------------+-----+------------+-----+
| Member | Host | Role | State | TL | Receive LSN | Lag | Replay LSN | Lag |
+----------+------------+---------+-----------+----+-------------+-----+------------+-----+
| mdw | 10.0.12.9 | Leader | running | 1 | | | | |
| standby | 10.0.12.4 | Replica | streaming | 1 | 0/549C168 | 0 | 0/549C168 | 0 |
| standby1 | 10.0.16.11 | Replica | streaming | 1 | 0/549C168 | 0 | 0/549C168 | 0 |
+----------+------------+---------+-----------+----+-------------+-----+------------+-----+
-- 切换步骤
[root@mdw ~]# patronictl -c /etc/patroni.yml switchover
Current cluster topology
+ Cluster: watchdogmycluster (7585445892328633499) +-------------+-----+------------+-----+
| Member | Host | Role | State | TL | Receive LSN | Lag | Replay LSN | Lag |
+----------+------------+---------+-----------+----+-------------+-----+------------+-----+
| mdw | 10.0.12.9 | Leader | running | 1 | | | | |
| standby | 10.0.12.4 | Replica | streaming | 1 | 0/549C168 | 0 | 0/549C168 | 0 |
| standby1 | 10.0.16.11 | Replica | streaming | 1 | 0/549C168 | 0 | 0/549C168 | 0 |
+----------+------------+---------+-----------+----+-------------+-----+------------+-----+
Primary [mdw]:
Candidate ['standby', 'standby1'] []: standby
When should the switchover take place (e.g. 2025-12-19T20:33 ) [now]: now
Are you sure you want to switchover cluster watchdogmycluster, demoting current leader mdw? [y/N]: y
2025-12-19 19:33:57.77979 Successfully switched over to "standby"
+ Cluster: watchdogmycluster (7585445892328633499) ------------+-----+------------+-----+
| Member | Host | Role | State | TL | Receive LSN | Lag | Replay LSN | Lag |
+----------+------------+---------+---------+----+-------------+-----+------------+-----+
| mdw | 10.0.12.9 | Replica | stopped | | unknown | | unknown | |
| standby | 10.0.12.4 | Leader | running | 1 | | | | |
| standby1 | 10.0.16.11 | Replica | running | 1 | 0/549C2B0 | 0 | 0/549C2B0 | 0 |
+----------+------------+---------+---------+----+-------------+-----+------------+-----+
-- 再次查看集群的状态
[root@mdw ~]# patronictl -c /etc/patroni.yml list watchdogmycluster
+ Cluster: watchdogmycluster (7585445892328633499) +-------------+-----+------------+-----+
| Member | Host | Role | State | TL | Receive LSN | Lag | Replay LSN | Lag |
+----------+------------+---------+-----------+----+-------------+-----+------------+-----+
| mdw | 10.0.12.9 | Replica | streaming | 2 | 0/549D268 | 0 | 0/549D268 | 0 |
| standby | 10.0.12.4 | Leader | running | 2 | | | | |
| standby1 | 10.0.16.11 | Replica | streaming | 2 | 0/549D268 | 0 | 0/549D268 | 0 |
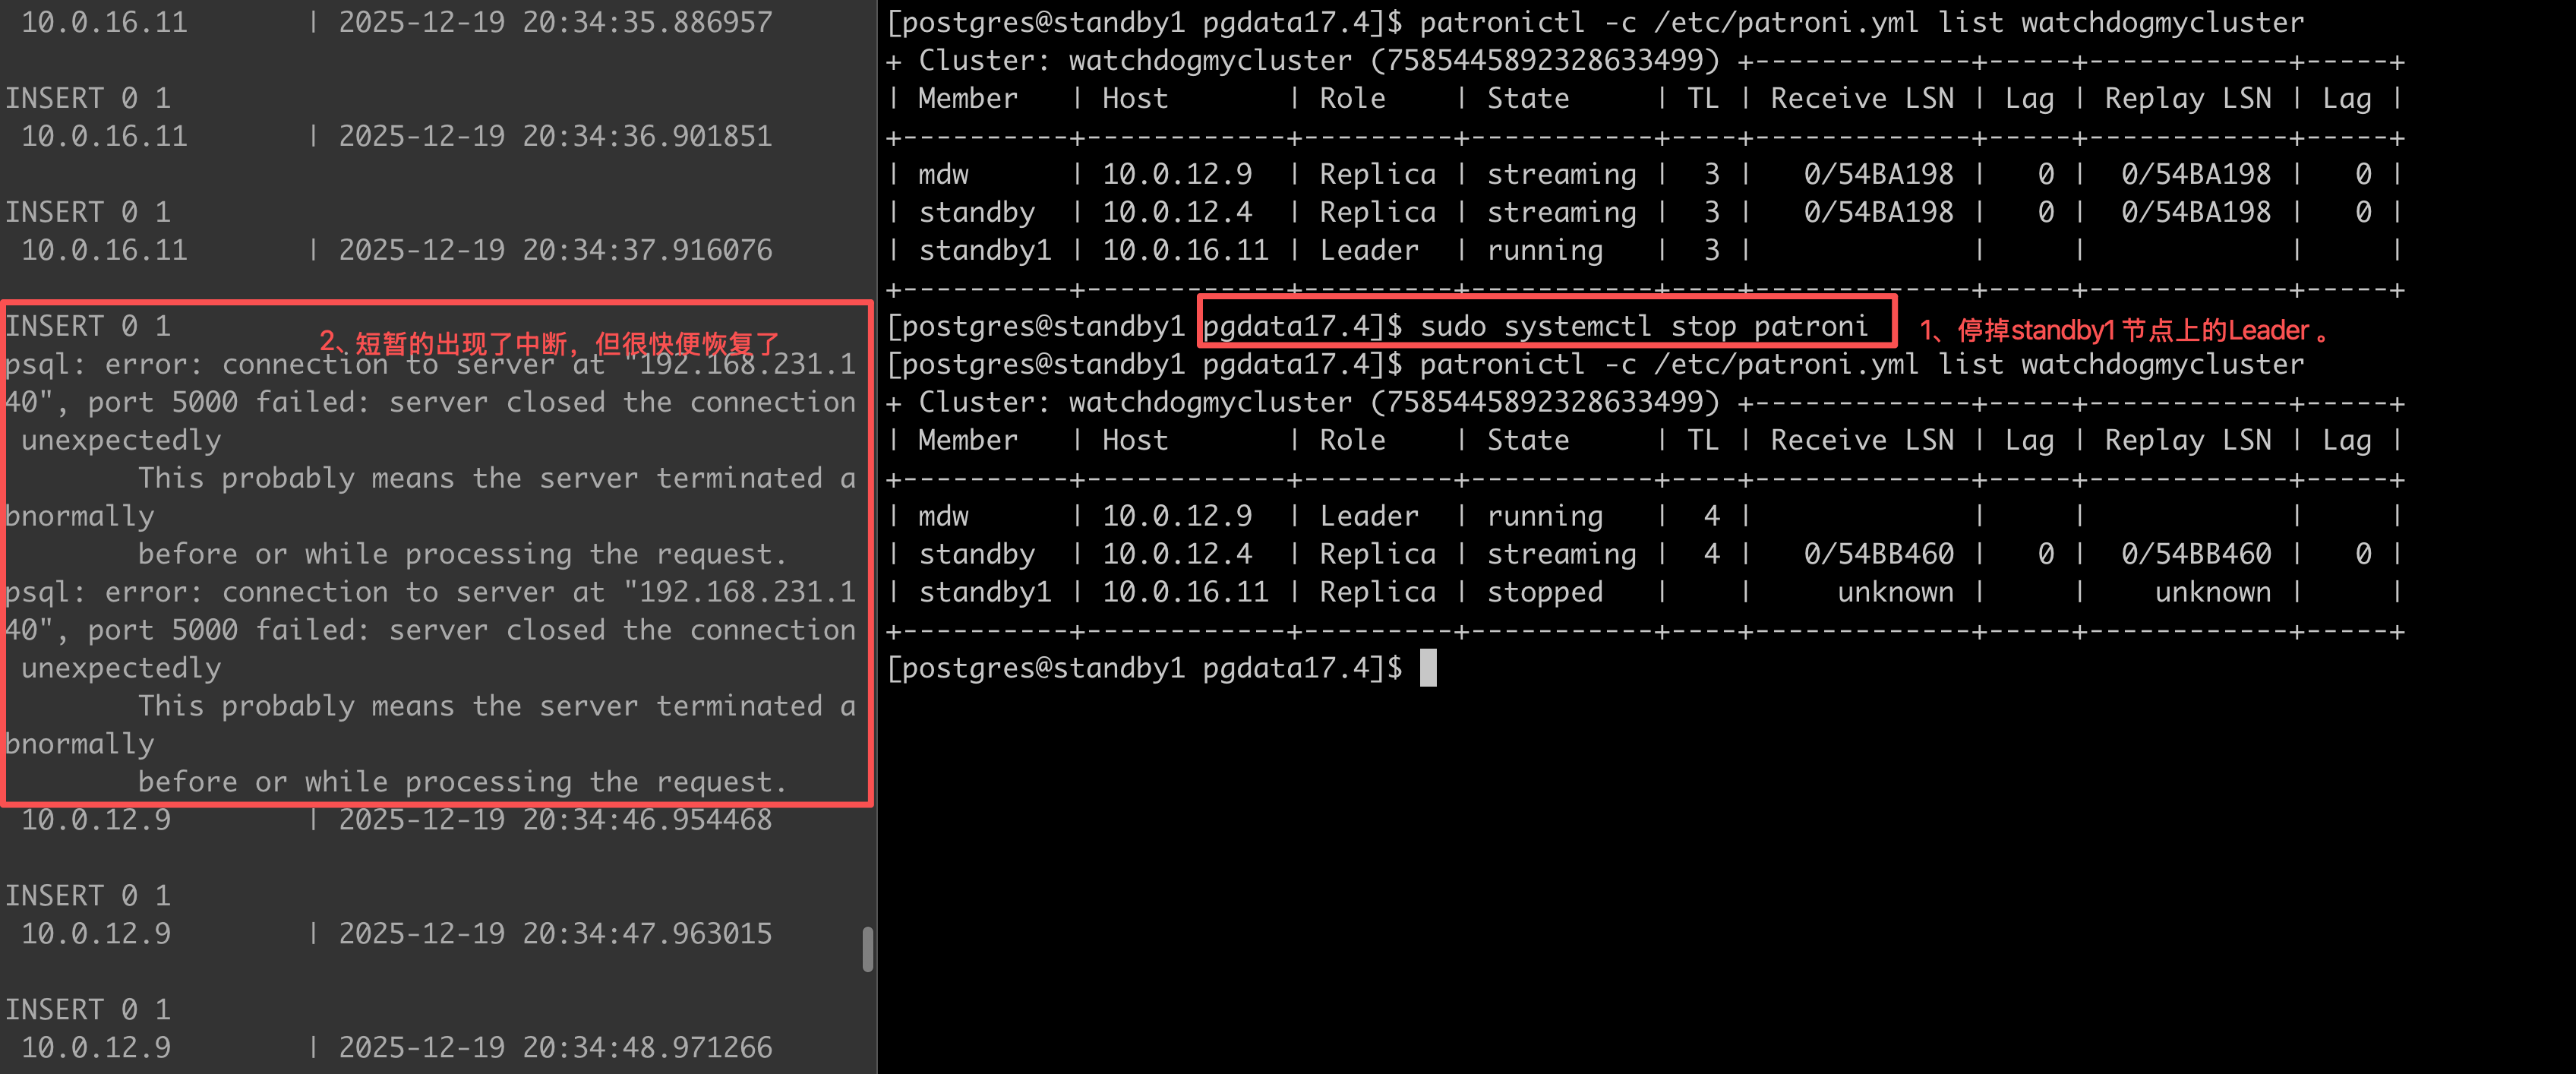
+----------+------------+---------+-----------+----+-------------+-----+------------+-----+手动停掉 Leader 节点,让其自动切换到其他的节点上
sql
[postgres@standby pgdata17.4]$ patronictl -c /etc/patroni.yml  list watchdogmycluster
+ Cluster: watchdogmycluster (7585445892328633499) +-------------+-----+------------+-----+
| Member   | Host       | Role    | State     | TL | Receive LSN | Lag | Replay LSN | Lag |
+----------+------------+---------+-----------+----+-------------+-----+------------+-----+
| mdw      | 10.0.12.9  | Replica | streaming |  2 |   0/549D268 |   0 |  0/549D268 |   0 |
| standby  | 10.0.12.4  | Leader  | running   |  2 |             |     |            |     |
| standby1 | 10.0.16.11 | Replica | streaming |  2 |   0/549D268 |   0 |  0/549D268 |   0 |
+----------+------------+---------+-----------+----+-------------+-----+------------+-----+

-- 在 Leader 节点上停掉 patroni 服务
[postgres@standby pgdata17.4]$ sudo systemctl stop patroni

-- 把 Leader 切换到了standby1 上
[postgres@standby pgdata17.4]$ patronictl -c /etc/patroni.yml  list watchdogmycluster
+ Cluster: watchdogmycluster (7585445892328633499) +-------------+-----+------------+-----+
| Member   | Host       | Role    | State     | TL | Receive LSN | Lag | Replay LSN | Lag |
+----------+------------+---------+-----------+----+-------------+-----+------------+-----+
| mdw      | 10.0.12.9  | Replica | streaming |  3 |   0/549D3E8 |   0 |  0/549D3E8 |   0 |
| standby  | 10.0.12.4  | Replica | stopped   |    |     unknown |     |    unknown |     |
| standby1 | 10.0.16.11 | Leader  | running   |  3 |             |     |            |     |
+----------+------------+---------+-----------+----+-------------+-----+------------+-----+

-- 超过 loop_wait  参数的设置后会把该节点给移除掉
[postgres@standby pgdata17.4]$ patronictl -c /etc/patroni.yml  list watchdogmycluster
+ Cluster: watchdogmycluster (7585445892328633499) +-------------+-----+------------+-----+
| Member   | Host       | Role    | State     | TL | Receive LSN | Lag | Replay LSN | Lag |
+----------+------------+---------+-----------+----+-------------+-----+------------+-----+
| mdw      | 10.0.12.9  | Replica | streaming |  3 |   0/549D420 |   0 |  0/549D420 |   0 |
| standby1 | 10.0.16.11 | Leader  | running   |  3 |             |     |            |     |
+----------+------------+---------+-----------+----+-------------+-----+------------+-----+

-- 重新启动后该节点为Replica
[postgres@standby pgdata17.4]$ sudo systemctl start patroni
[postgres@standby pgdata17.4]$ patronictl -c /etc/patroni.yml  list watchdogmycluster
+ Cluster: watchdogmycluster (7585445892328633499) +-------------+-----+------------+-----+
| Member   | Host       | Role    | State     | TL | Receive LSN | Lag | Replay LSN | Lag |
+----------+------------+---------+-----------+----+-------------+-----+------------+-----+
| mdw      | 10.0.12.9  | Replica | streaming |  3 |   0/549D420 |   0 |  0/549D420 |   0 |
| standby  | 10.0.12.4  | Replica | streaming |  3 |   0/549D420 |   0 |  0/549D420 |   0 |
| standby1 | 10.0.16.11 | Leader  | running   |  3 |             |     |            |     |
+----------+------------+---------+-----------+----+-------------+-----+------------+-----+
patroni 控制切换与心跳的核心参数
以下是控制 patroni 的参数。
| 参数 | 默认值 | 作用 | 说明 |
|---|---|---|---|
| ttl | 30 | Leader 锁的 TTL(秒) | 主节点必须在 ttl 秒内更新 etcd 中的 leader key,否则锁过期,触发 failover |
| loop_wait | 10 | Patroni 主循环间隔(秒) | 每隔 loop_wait 秒检查一次集群状态、更新锁、watchdog等 |
| retry_timeout | 10 | 单次操作超时(秒) | 如连接 PostgreSQL、写 WAL、获取锁等操作的超时时间 |
| maximum_lag_on_failover | 1MB | 复制延迟 | 故障转移时备库最大允许的复制延迟 |
| master_start_timeout | 300(秒) | 最大等待时间 | 新主节点启动并接受连接的最大等待时间 |
时间线示例
| 时间 | 事件 |
|---|---|
| T=0s | 主库正常,更新锁(TTL=30s) |
| T=10s | 主循环再次更新锁 |
| T=20s | 主循环再次更新锁 |
| T=25s | 主库宕机(无法更新) |
| T=30s | 锁过期(30s TTL 到期) |
| T=30~40s | 备库检测到无 Leader,发起 failover |
| T=40s | 新主库完成 promote,更新锁 |
总故障恢复时间 ≈ ttl + loop_wait + promote_time(通常 40~60 秒)
测试业务持续写入故障
在主库上创建一张t表。
sql
[postgres@standby1 pgdata17.4]$ psql
psql (17.4)
Type "help" for help.

postgres=# create table t(id int);
CREATE TABLE
模拟持续写入的脚本。
sql
while true;
do
psql -d postgres -Upostgres -h192.168.231.140 -p5000 -c "select inet_server_addr(),now()::timestamp;" -c "insert into t values((random()*10))" -t;
sleep 1;
done
停掉patroni的Leader观察业务持续写入的情况。