缩小输入框之间的间距:
1. 使用紧凑布局容器
python
with ui.column().classes('gap-0'):  # 设置间距为0
    ui.input(label='输入框1')
    ui.input(label='输入框2')
    ui.input(label='输入框3')
2. 自定义间距类
python
# 方法1: 使用Tailwind CSS类
with ui.column().classes('gap-1'):  # 设置较小的间距(0.25rem)
    ui.input(label='姓名')
    ui.input(label='邮箱')
    ui.input(label='电话')

# 方法2: 更小的间距
with ui.column().classes('gap-px'):  # 最小间距(1px)
    ui.input(label='用户名')
    ui.input(label='密码')
3. 使用网格布局减少间距
python
# 网格布局可以更精确控制
with ui.grid(columns=1).classes('gap-1'):
    ui.input(label='项目1')
    ui.input(label='项目2')
    ui.input(label='项目3')
4. 自定义CSS样式
python
# 全局减少所有输入框间距
ui.add_css('''
    .nicegui-content .q-field {
        margin-bottom: 4px !important;
    }
    .nicegui-content .q-field__control {
        min-height: 40px !important;
    }
''')

# 或者针对特定容器
with ui.column().classes('my-container'):
    ui.input(label='测试1')
    ui.input(label='测试2')

ui.add_css('''
    .my-container .q-field {
        margin-bottom: 2px !important;
    }
''')
5. 使用紧凑模式
python
# 创建紧凑的表单
with ui.column().classes('compact-form'):
    ui.input(label='字段A').classes('my-1')  # 上下边距1
    ui.input(label='字段B').classes('my-1')
    ui.input(label='字段C').classes('my-1')

ui.add_css('''
    .compact-form .q-field {
        margin-bottom: 4px;
    }
    .compact-form .q-field__label {
        font-size: 12px;
        margin-bottom: 2px;
    }
''')
6. 水平排列减少垂直间距
python
# 如果合适,可以考虑水平排列
with ui.row().classes('items-center gap-2'):
    ui.input(label='名字').classes('w-32')
    ui.input(label='姓氏').classes('w-32')
    ui.input(label='年龄').classes('w-20')
7. 完整示例
python
from nicegui import ui
# 方法1: 使用紧凑列
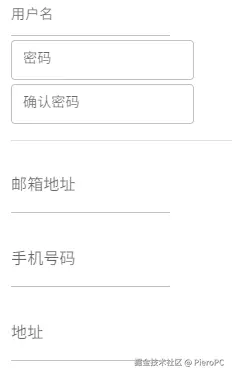
with ui.column().classes('gap-1 w-64'):
ui.input(label='用户名').props('dense') # dense属性让输入框更紧凑
ui.input(label='密码').props('dense outlined')
ui.input(label='确认密码').props('dense outlined')
ui.separator()
# 方法2: 自定义间距
with ui.column().classes('my-form w-64'):
ui.input(label='邮箱地址').classes('mb-1')
ui.input(label='手机号码').classes('mb-1')
ui.input(label='地址').classes('mb-1')
# 自定义CSS
ui.add_css('''
.my-form .q-field {
margin-bottom: 2px;
}
.my-form .q-field__control {
min-height: 36px;
}
''')
ui.run()建议:
- 先尝试
gap-1或gap-0.5- 这些通常是合适的紧凑间距 - 配合使用
props('dense')- 让输入框内部也更紧凑 - 使用网格布局 - 对于需要精确控制的情况
根据你的具体布局需求,可以组合使用这些方法。
对于 ui.textarea,缩小间距
对于 ui.textarea,同样可以使用类似的方法缩小间距。以下是针对 ui.textarea 的具体方案:
1. 使用紧凑布局容器
python
# 基本的紧凑布局
with ui.column().classes('gap-1'):  # 小间距
    ui.input(label='标题')
    ui.textarea(label='内容描述').props('rows=3')
    ui.input(label='标签')
2. 自定义textarea样式
python
# 减少特定textarea的间距
with ui.column().classes('gap-1 w-full'):
    ui.input(label='主题')

    # 使用props调整textarea特性
    ui.textarea(label='详细内容') \
        .props('''
            dense
            outlined
            autogrow
            rows=3
        ''') \
        .classes('mb-1')  # 单独控制下边距

    ui.input(label='联系方式')
3. 多个textarea紧凑排列
python
with ui.column().classes('compact-textareas gap-1'):
    ui.textarea(label='需求描述').props('rows=2 dense')
    ui.textarea(label='技术要求').props('rows=2 dense')
    ui.textarea(label='备注说明').props('rows=1 dense')

ui.add_css('''
    .compact-textareas .q-field {
        margin-bottom: 4px !important;
    }
    .compact-textareas textarea {
        min-height: 60px !important;
    }
''')
4. 表单中混合使用input和textarea
python
# 创建紧凑表单
with ui.column().classes('w-96 gap-1'):
    ui.input(label='项目名称').props('dense outlined')

    ui.textarea(label='项目描述') \
        .props('dense outlined autogrow rows=2') \
        .classes('min-h-[80px]')

    ui.input(label='负责人').props('dense outlined')

    ui.textarea(label='注意事项') \
        .props('dense outlined rows=1') \
        .classes('min-h-[50px]')

    ui.input(label='截止日期').props('dense outlined')
5. 使用网格布局精确控制
python
# 使用网格布局控制间距
with ui.grid(columns=1).classes('gap-1 w-full'):
    ui.input(label='标题').props('dense')

    ui.textarea(label='正文内容') \
        .props('dense autogrow rows=4') \
        .classes('col-span-1')

    with ui.row().classes('gap-2 w-full'):
        ui.input(label='分类').props('dense').classes('flex-grow')
        ui.input(label='优先级').props('dense').classes('w-24')
6. 自定义高度和间距
python
# 控制textarea的高度和间距
ui.textarea(label='评论') \
    .props('dense outlined rows=2') \
    .classes('''
        mb-1
        min-h-[80px]
        max-h-[120px]
    ''')

# 或者使用style直接设置
ui.textarea(label='备注') \
    .style('margin-bottom: 4px; min-height: 60px;')
7. 完整示例:评论表单
python
from nicegui import ui
# 紧凑的评论表单
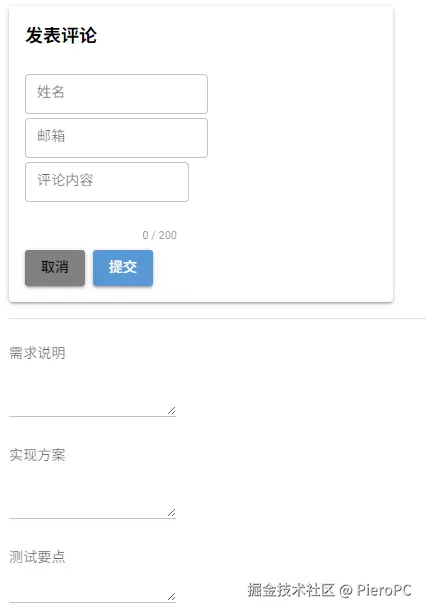
with ui.card().classes('w-96'):
ui.label('发表评论').classes('text-lg font-bold mb-2')
with ui.column().classes('gap-1'):
ui.input(label='姓名').props('dense outlined')
ui.input(label='邮箱').props('dense outlined')
ui.textarea(label='评论内容') \
.props('''
dense
outlined
autogrow
rows=2
counter
maxlength=200
''') \
.classes('min-h-[80px] mb-1')
with ui.row().classes('justify-end gap-2'):
ui.button('取消', color='gray')
ui.button('提交', color='primary')
ui.separator()
# 另一种方式:使用自定义CSS类
with ui.column().classes('compact-form w-96'):
ui.textarea(label='需求说明') \
.props('dense rows=3') \
.classes('form-field')
ui.textarea(label='实现方案') \
.props('dense rows=3') \
.classes('form-field')
ui.textarea(label='测试要点') \
.props('dense rows=2') \
.classes('form-field')
# 自定义CSS
ui.add_css('''
.compact-form .form-field {
margin-bottom: 4px !important;
}
.compact-form .q-field__control {
min-height: 40px !important;
}
.compact-form textarea {
padding: 6px !important;
font-size: 14px !important;
}
''')
ui.run()8. 响应式布局中的textarea
python
# 在不同设备上保持紧凑
with ui.column().classes('''
    gap-1
    sm:gap-2
    md:gap-1
    w-full
    max-w-2xl
'''):
    ui.input(label='标题').props('dense')

    ui.textarea(label='内容') \
        .props('dense autogrow') \
        .classes('''
            min-h-[100px]
            sm:min-h-[120px]
            md:min-h-[150px]
        ''')

    ui.input(label='标签').props('dense')
主要技巧总结:
- 使用
props('dense')- 这是让textarea变紧凑的最有效方法 - 配合
rows属性 - 控制默认显示行数 - 使用
gap-1或更小的间距类 - 用
min-h-[]控制最小高度 - 避免textarea太小 - 考虑使用
autogrow- 让textarea根据内容自动调整高度
根据你的具体需求选择合适的组合方式!
对于 ui.button 的间距调整
对于 ui.button 的间距调整,这里有多种方法:
1. 按钮组紧凑排列
python
# 水平按钮组
with ui.row().classes('gap-1'):  # 小间距
    ui.button('保存', color='primary')
    ui.button('取消', color='gray')
    ui.button('删除', color='red')

# 垂直按钮组
with ui.column().classes('gap-1 w-32'):
    ui.button('选项一', color='primary')
    ui.button('选项二', color='secondary')
    ui.button('选项三', color='accent')
2. 紧凑按钮样式
python
# 使用dense属性
ui.button('紧凑按钮', color='primary').props('dense')

# 组合使用
with ui.row().classes('gap-0.5'):
    ui.button('新建').props('dense outline')
    ui.button('编辑').props('dense outline')
    ui.button('删除').props('dense outline')
3. 表单中的紧凑按钮
python
with ui.column().classes('w-64 gap-2'):
    ui.input(label='用户名').props('dense')
    ui.input(label='密码').props('dense type=password')

    # 按钮行使用更小间距
    with ui.row().classes('gap-1 justify-end'):
        ui.button('登录', color='primary').props('dense')
        ui.button('重置', color='gray').props('dense flat')
4. 图标按钮紧凑排列
python
# 图标按钮工具栏
with ui.row().classes('gap-0.5 items-center'):
    ui.button(icon='format_bold').props('dense flat')
    ui.button(icon='format_italic').props('dense flat')
    ui.button(icon='format_underlined').props('dense flat')
    ui.button(icon='format_color_text').props('dense flat')
    ui.separator().props('vertical').classes('mx-1')
    ui.button(icon='undo').props('dense flat')
    ui.button(icon='redo').props('dense flat')
5. 自定义按钮样式和间距
python
# 自定义按钮类
with ui.row().classes('compact-buttons'):
    ui.button('操作1').classes('compact-btn')
    ui.button('操作2').classes('compact-btn')
    ui.button('操作3').classes('compact-btn')

ui.add_css('''
    .compact-buttons {
        gap: 2px !important;
    }
    .compact-btn {
        padding: 4px 8px !important;
        font-size: 12px !important;
        min-height: 28px !important;
    }
''')
6. 按钮与其他元素的紧凑布局
python
# 输入框带按钮
with ui.column().classes('gap-1 w-80'):
    with ui.row().classes('items-center gap-1 w-full'):
        ui.input(label='搜索内容').props('dense').classes('flex-grow')
        ui.button('搜索', icon='search').props('dense')

    with ui.row().classes('items-center gap-1 w-full'):
        ui.textarea(label='消息').props('dense rows=2').classes('flex-grow')
        ui.button('发送', icon='send').props('dense').classes('self-end')
7. 导航栏/工具栏紧凑按钮
python
# 紧凑工具栏
with ui.row().classes('items-center gap-1 p-2 bg-gray-100 rounded'):
    ui.button('文件', icon='folder').props('dense flat')
    ui.button('编辑', icon='edit').props('dense flat')
    ui.button('视图', icon='visibility').props('dense flat')
    ui.button('工具', icon='build').props('dense flat')
    ui.space()  # 占位
    ui.button(icon='notifications').props('dense flat')
    ui.button(icon='account_circle').props('dense flat')
8. 完整示例:紧凑表单
python
from nicegui import ui
# 登录表单
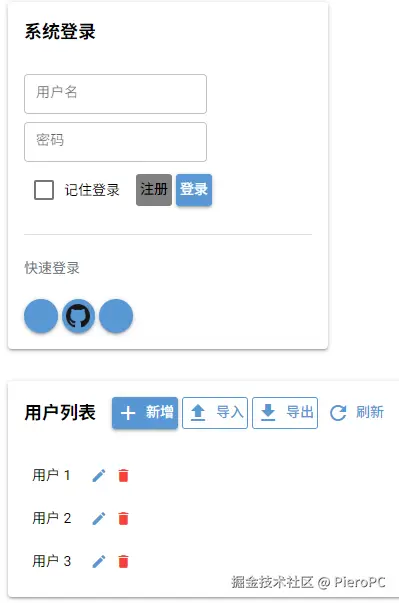
with ui.card().classes('w-80'):
ui.label('系统登录').classes('text-lg font-bold mb-3')
with ui.column().classes('gap-2'):
ui.input(label='用户名').props('dense outlined')
ui.input(label='密码').props('dense outlined type=password')
with ui.row().classes('items-center justify-between'):
ui.checkbox('记住登录')
with ui.row().classes('gap-1'):
ui.button('注册', color='gray').props('dense flat')
ui.button('登录', color='primary').props('dense')
ui.separator().classes('my-2')
# 社交登录按钮
ui.label('快速登录').classes('text-sm text-gray-500 mb-1')
with ui.row().classes('gap-1 justify-center'):
ui.button(icon='img:https://www.google.com/favicon.ico').props('dense round')
ui.button(icon='img:https://github.com/favicon.ico').props('dense round')
ui.button(icon='img:https://facebook.com/favicon.ico').props('dense round')
# 数据表格操作按钮
with ui.card().classes('w-full mt-4'):
with ui.row().classes('items-center justify-between mb-3'):
ui.label('用户列表').classes('text-lg font-bold')
with ui.row().classes('gap-1'):
ui.button('新增', icon='add', color='primary').props('dense')
ui.button('导入', icon='upload').props('dense outline')
ui.button('导出', icon='download').props('dense outline')
ui.button('刷新', icon='refresh').props('dense flat')
# 模拟表格
with ui.column().classes('gap-1'):
for i in range(3):
with ui.row().classes('items-center gap-2 p-2 hover:bg-gray-50'):
ui.label(f'用户 {i+1}')
ui.space()
with ui.row().classes('gap-0.5'):
ui.button(icon='edit').props('dense flat size=sm')
ui.button(icon='delete').props('dense flat size=sm color=red')
ui.run()9. 使用CSS自定义按钮样式
python
# 超紧凑按钮
with ui.row().classes('ultra-compact'):
    ui.button('按钮1')
    ui.button('按钮2')
    ui.button('按钮3')

ui.add_css('''
    .ultra-compact {
        gap: 1px !important;
    }
    .ultra-compact button {
        margin: 0 !important;
        padding: 2px 6px !important;
        min-width: 0 !important;
        font-size: 11px !important;
        border-radius: 2px !important;
    }
''')
10. 响应式按钮间距
python
# 根据屏幕大小调整按钮间距
with ui.row().classes('''
    gap-1
    sm:gap-2
    md:gap-1
    lg:gap-0.5
'''):
    ui.button('首页', icon='home').props('dense')
    ui.button('产品', icon='shopping_bag').props('dense')
    ui.button('服务', icon='handyman').props('dense')
    ui.button('关于', icon='info').props('dense')
    ui.button('联系', icon='contact_mail').props('dense')
主要技巧:
- 使用
props('dense')- 减小按钮内边距 - 设置
gap-1或更小 - 控制按钮间距 - 图标按钮用
flat- 去掉背景更紧凑 - 自定义CSS - 精确控制边距和大小
- 考虑使用
size=sm- 更小的按钮尺寸
根据具体场景选择合适的方法!
对于 ui.label 的间距调整
对于 ui.label 的间距调整,这里有一些实用的方法:
1. 标签与输入框紧凑排列
python
# 基本紧凑布局
with ui.column().classes('gap-1'):
    ui.label('基本信息').classes('text-sm font-medium mb-0.5')
    ui.input(label='姓名').props('dense')
    ui.input(label='年龄').props('dense')
2. 表单标签紧凑样式
python
# 紧凑的表单标签
with ui.column().classes('w-64 gap-1'):
    ui.label('用户名:').classes('''
        text-sm
        font-medium
        mb-0
        -mt-1
    ''')
    ui.input(placeholder='请输入用户名').props('dense')

    ui.label('密码:').classes('text-sm font-medium mb-0 mt-1')
    ui.input(placeholder='请输入密码').props('dense type=password')
3. 行内标签紧凑排列
python
# 水平布局紧凑标签
with ui.row().classes('items-center gap-1'):
    ui.label('状态:').classes('text-sm')
    ui.toggle(['启用', '停用'], value='启用').props('dense')
    ui.space()
    ui.label('优先级:').classes('text-sm')
    ui.select(['高', '中', '低'], value='中').props('dense')
4. 标题标签紧凑样式
python
# 紧凑的标题区域
with ui.column().classes('gap-1'):
    ui.label('用户设置').classes('''
        text-lg
        font-bold
        mb-1
    ''')

    with ui.row().classes('items-center gap-2'):
        ui.label('个人资料').classes('text-base font-medium')
        ui.button('编辑', icon='edit').props('dense size=sm')

    ui.separator().classes('my-1')
5. 卡片内的紧凑标签
python
# 紧凑卡片布局
with ui.card().classes('w-80 p-3'):
    # 卡片标题紧凑
    with ui.row().classes('items-center justify-between mb-2'):
        ui.label('订单信息').classes('text-base font-bold')
        ui.label('ID: 202312345').classes('text-xs text-gray-500')

    # 内容区域紧凑
    with ui.column().classes('gap-0.5'):
        ui.label('客户: 张三').classes('text-sm')
        ui.label('电话: 13800138000').classes('text-sm')
        ui.label('地址: 北京市朝阳区').classes('text-sm')
        ui.label('金额: ¥1280.00').classes('text-sm font-medium')
6. 表格/列表中的紧凑标签
python
# 紧凑的数据列表
with ui.column().classes('gap-0'):
    # 表头
    with ui.row().classes('bg-gray-100 p-2 gap-2'):
        ui.label('姓名').classes('w-24 text-sm font-medium')
        ui.label('部门').classes('w-32 text-sm font-medium')
        ui.label('状态').classes('w-20 text-sm font-medium')
        ui.label('操作').classes('flex-grow text-sm font-medium')

    # 数据行
    for i in range(3):
        with ui.row().classes('items-center p-2 border-b gap-2 hover:bg-gray-50'):
            ui.label(f'员工{i+1}').classes('w-24 text-sm')
            ui.label(f'部门{i+1}').classes('w-32 text-sm')
            ui.label('在职').classes('w-20 text-xs text-green-600')
            with ui.row().classes('gap-1'):
                ui.button('查看', icon='visibility').props('dense flat size=sm')
                ui.button('编辑', icon='edit').props('dense flat size=sm')
7. 标签与图标紧凑组合
python
# 带图标的紧凑标签
with ui.row().classes('items-center gap-1'):
    ui.icon('info', color='blue', size='sm')
    ui.label('这是一条提示信息').classes('text-sm text-blue-600')
8. 完整示例:紧凑设置面板
python
from nicegui import ui
# 设置面板
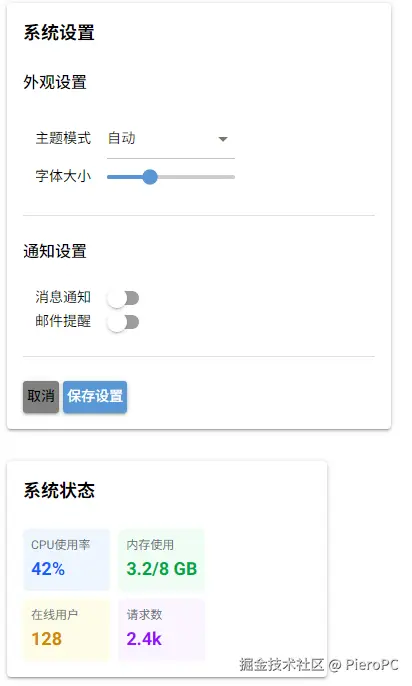
with ui.card().classes('w-96'):
# 面板标题
ui.label('系统设置').classes('text-lg font-bold mb-3')
# 设置项分组
ui.label('外观设置').classes('text-base font-medium mb-2 -mt-1')
with ui.column().classes('gap-1 ml-3'):
with ui.row().classes('items-center justify-between'):
ui.label('主题模式').classes('text-sm')
ui.select(['自动', '浅色', '深色'], value='自动').props('dense').classes('w-32')
with ui.row().classes('items-center justify-between'):
ui.label('字体大小').classes('text-sm')
ui.slider(min=12, max=18, value=14).classes('w-32')
ui.separator().classes('my-2')
ui.label('通知设置').classes('text-base font-medium mb-2')
with ui.column().classes('gap-1 ml-3'):
with ui.row().classes('items-center justify-between'):
ui.label('消息通知').classes('text-sm')
ui.switch().props('dense')
with ui.row().classes('items-center justify-between'):
ui.label('邮件提醒').classes('text-sm')
ui.switch().props('dense')
ui.separator().classes('my-2')
# 按钮区域
with ui.row().classes('justify-end gap-1'):
ui.button('取消', color='gray').props('dense')
ui.button('保存设置', color='primary').props('dense')
# 状态显示面板
with ui.card().classes('w-80 mt-4'):
ui.label('系统状态').classes('text-lg font-bold mb-2')
with ui.grid(columns=2).classes('gap-2'):
# 状态项
with ui.column().classes('gap-0.5 p-2 bg-blue-50 rounded'):
ui.label('CPU使用率').classes('text-xs text-gray-500')
ui.label('42%').classes('text-lg font-bold text-blue-600')
with ui.column().classes('gap-0.5 p-2 bg-green-50 rounded'):
ui.label('内存使用').classes('text-xs text-gray-500')
ui.label('3.2/8 GB').classes('text-lg font-bold text-green-600')
with ui.column().classes('gap-0.5 p-2 bg-yellow-50 rounded'):
ui.label('在线用户').classes('text-xs text-gray-500')
ui.label('128').classes('text-lg font-bold text-yellow-600')
with ui.column().classes('gap-0.5 p-2 bg-purple-50 rounded'):
ui.label('请求数').classes('text-xs text-gray-500')
ui.label('2.4k').classes('text-lg font-bold text-purple-600')
ui.run()9. 标签的CSS自定义
python
# 超紧凑标签
ui.label('紧凑标签').classes('compact-label')

# 标签组
with ui.column().classes('compact-labels gap-0'):
    ui.label('项目1')
    ui.label('项目2')
    ui.label('项目3')

ui.add_css('''
    /* 单个标签紧凑 */
    .compact-label {
        margin: 0 !important;
        padding: 2px 4px !important;
        font-size: 12px !important;
        line-height: 1.2 !important;
    }

    /* 标签组紧凑 */
    .compact-labels .nicegui-label {
        margin-bottom: 2px !important;
        padding: 1px 0 !important;
        font-size: 13px !important;
    }

    /* 表单标签紧凑 */
    .form-label {
        display: block;
        margin-bottom: 3px !important;
        font-size: 13px !important;
        font-weight: 500 !important;
    }
''')

# 使用自定义类
ui.label('用户名').classes('form-label')
ui.input()
10. 响应式标签间距
python
# 根据不同屏幕调整标签间距
ui.label('响应式标签').classes('''
    mb-1
    sm:mb-2
    md:mb-1
    lg:mb-0.5
    text-sm
    sm:text-base
    md:text-sm
    lg:text-xs
''')
主要技巧:
- 使用负边距 -
-mt-1、-mb-1可以减小上下间距 - 设置
mb-0或mt-0- 清除默认边距 - 配合
gap-0.5或gap-1- 容器级别控制 - 使用小字号 -
text-sm、text-xs让标签更紧凑 - 行内布局 - 与
ui.row()配合实现水平紧凑排列
选择适合你布局需求的方法!