简单介绍
Spring的事件监听机制是一个标准的观察者设计模式。它为JavaBean之间提供了消息通信的功能,当一个Bean处理完一个事件后,其他的Bean可以感知到,并进行后续处理。
观察者设计模式:一种行为设计模式, 允许你定义一种订阅机制, 可在对象事件发生时通知多个 "观察" 该对象的其他对象。
其逻辑图如下:
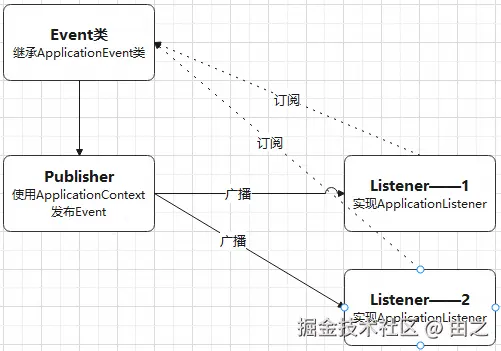
从上图看,当要实现一个Spring事件监听机制,需要三个元素:
- 自定义的Event类:它包含事件完成所需要的内容,比如:成员函数、成员变量等。
- Publisher:负责使用ApplicationContext发布Event。
- Listener:一个或多个监听器,当Publisher发布Event后,其能给监听并执行Listener重定义的onApplicationEvent方法。
Demo实现
第一步:自定义Event类
自定义Event类方法:
- 继承ApplicationEvent类
- 实现响应的构造函数
代码如下:
java
package demo;

import lombok.Getter;
import lombok.Setter;

import org.springframework.context.ApplicationEvent;

@Getter
@Setter
public class DemoEvent extends ApplicationEvent {
    private static final long serialVersionUID = 1L;

    private String message;

    public DemoEvent(Object source, String msg) {
        super(source);
        this.message = msg;
    }
}
第二步:实现监听器
实现方法:
- 实现ApplicationListener接口
- 重写onApplicationEvent方法
- 设置@Component注解,将Bean实例化到Spring容器中。(导入 org.springframework.stereotype.Component)
代码如下:
java
package demo;

import org.springframework.context.ApplicationListener;
import org.springframework.stereotype.Component;

@Component
public class DemoListenerOne implements ApplicationListener<DemoEvent> {
    @Override
    public void onApplicationEvent(DemoEvent event) {
        System.out.println("DemoListenerOne接收到的消息如下:");
        System.out.println(event.getMessage());
    }
}
按照同样的方式实现再实现DemoListenerTwo监听器。
第三步:发布事件
使用ApplicationContext发布事件,代码如下:
java
package demo;

import org.springframework.beans.factory.annotation.Autowired;
import org.springframework.context.ApplicationContext;
import org.springframework.stereotype.Component;

@Component
public class DemoPublisher {
    // 容器注入
    @Autowired
    private ApplicationContext context;

    public void send(String msg) {
        // 发布事件
        context.publishEvent(new DemoEvent(this, msg));
    }
}
第四步:测试
java
package demo;

import org.springframework.context.annotation.AnnotationConfigApplicationContext;

import java.util.Date;

public class MainController {
    public static void main(String[] args) {
        AnnotationConfigApplicationContext context = new AnnotationConfigApplicationContext(AopConfig.class);
        try {
            DemoPublisher publisher = context.getBean(DemoPublisher.class);
            for (int i = 1; i < 6; i++) {
                publisher.send("发送时间:" + new Date() + ";第" + i + "次发送,请不要回答");
                Thread.sleep(1000);
            }
        } catch (Exception exception) {
            System.out.println(exception.getMessage());
        } finally {
            context.close();
        }
    }
}
执行代码如下:
text
DemoListenerOne接收到的消息如下:
发送时间:Mon Dec 22 11:46:25 CST 2025;第1次发送,请不要回答
DemoListenerTwo接收到的消息如下:
发送时间:Mon Dec 22 11:46:25 CST 2025;第1次发送,请不要回答
DemoListenerOne接收到的消息如下:
发送时间:Mon Dec 22 11:46:26 CST 2025;第2次发送,请不要回答
DemoListenerTwo接收到的消息如下:
发送时间:Mon Dec 22 11:46:26 CST 2025;第2次发送,请不要回答
DemoListenerOne接收到的消息如下:
发送时间:Mon Dec 22 11:46:27 CST 2025;第3次发送,请不要回答
DemoListenerTwo接收到的消息如下:
发送时间:Mon Dec 22 11:46:27 CST 2025;第3次发送,请不要回答
DemoListenerOne接收到的消息如下:
发送时间:Mon Dec 22 11:46:28 CST 2025;第4次发送,请不要回答
DemoListenerTwo接收到的消息如下:
发送时间:Mon Dec 22 11:46:28 CST 2025;第4次发送,请不要回答
DemoListenerOne接收到的消息如下:
发送时间:Mon Dec 22 11:46:29 CST 2025;第5次发送,请不要回答
DemoListenerTwo接收到的消息如下:
发送时间:Mon Dec 22 11:46:29 CST 2025;第5次发送,请不要回答
结语
To be continue...