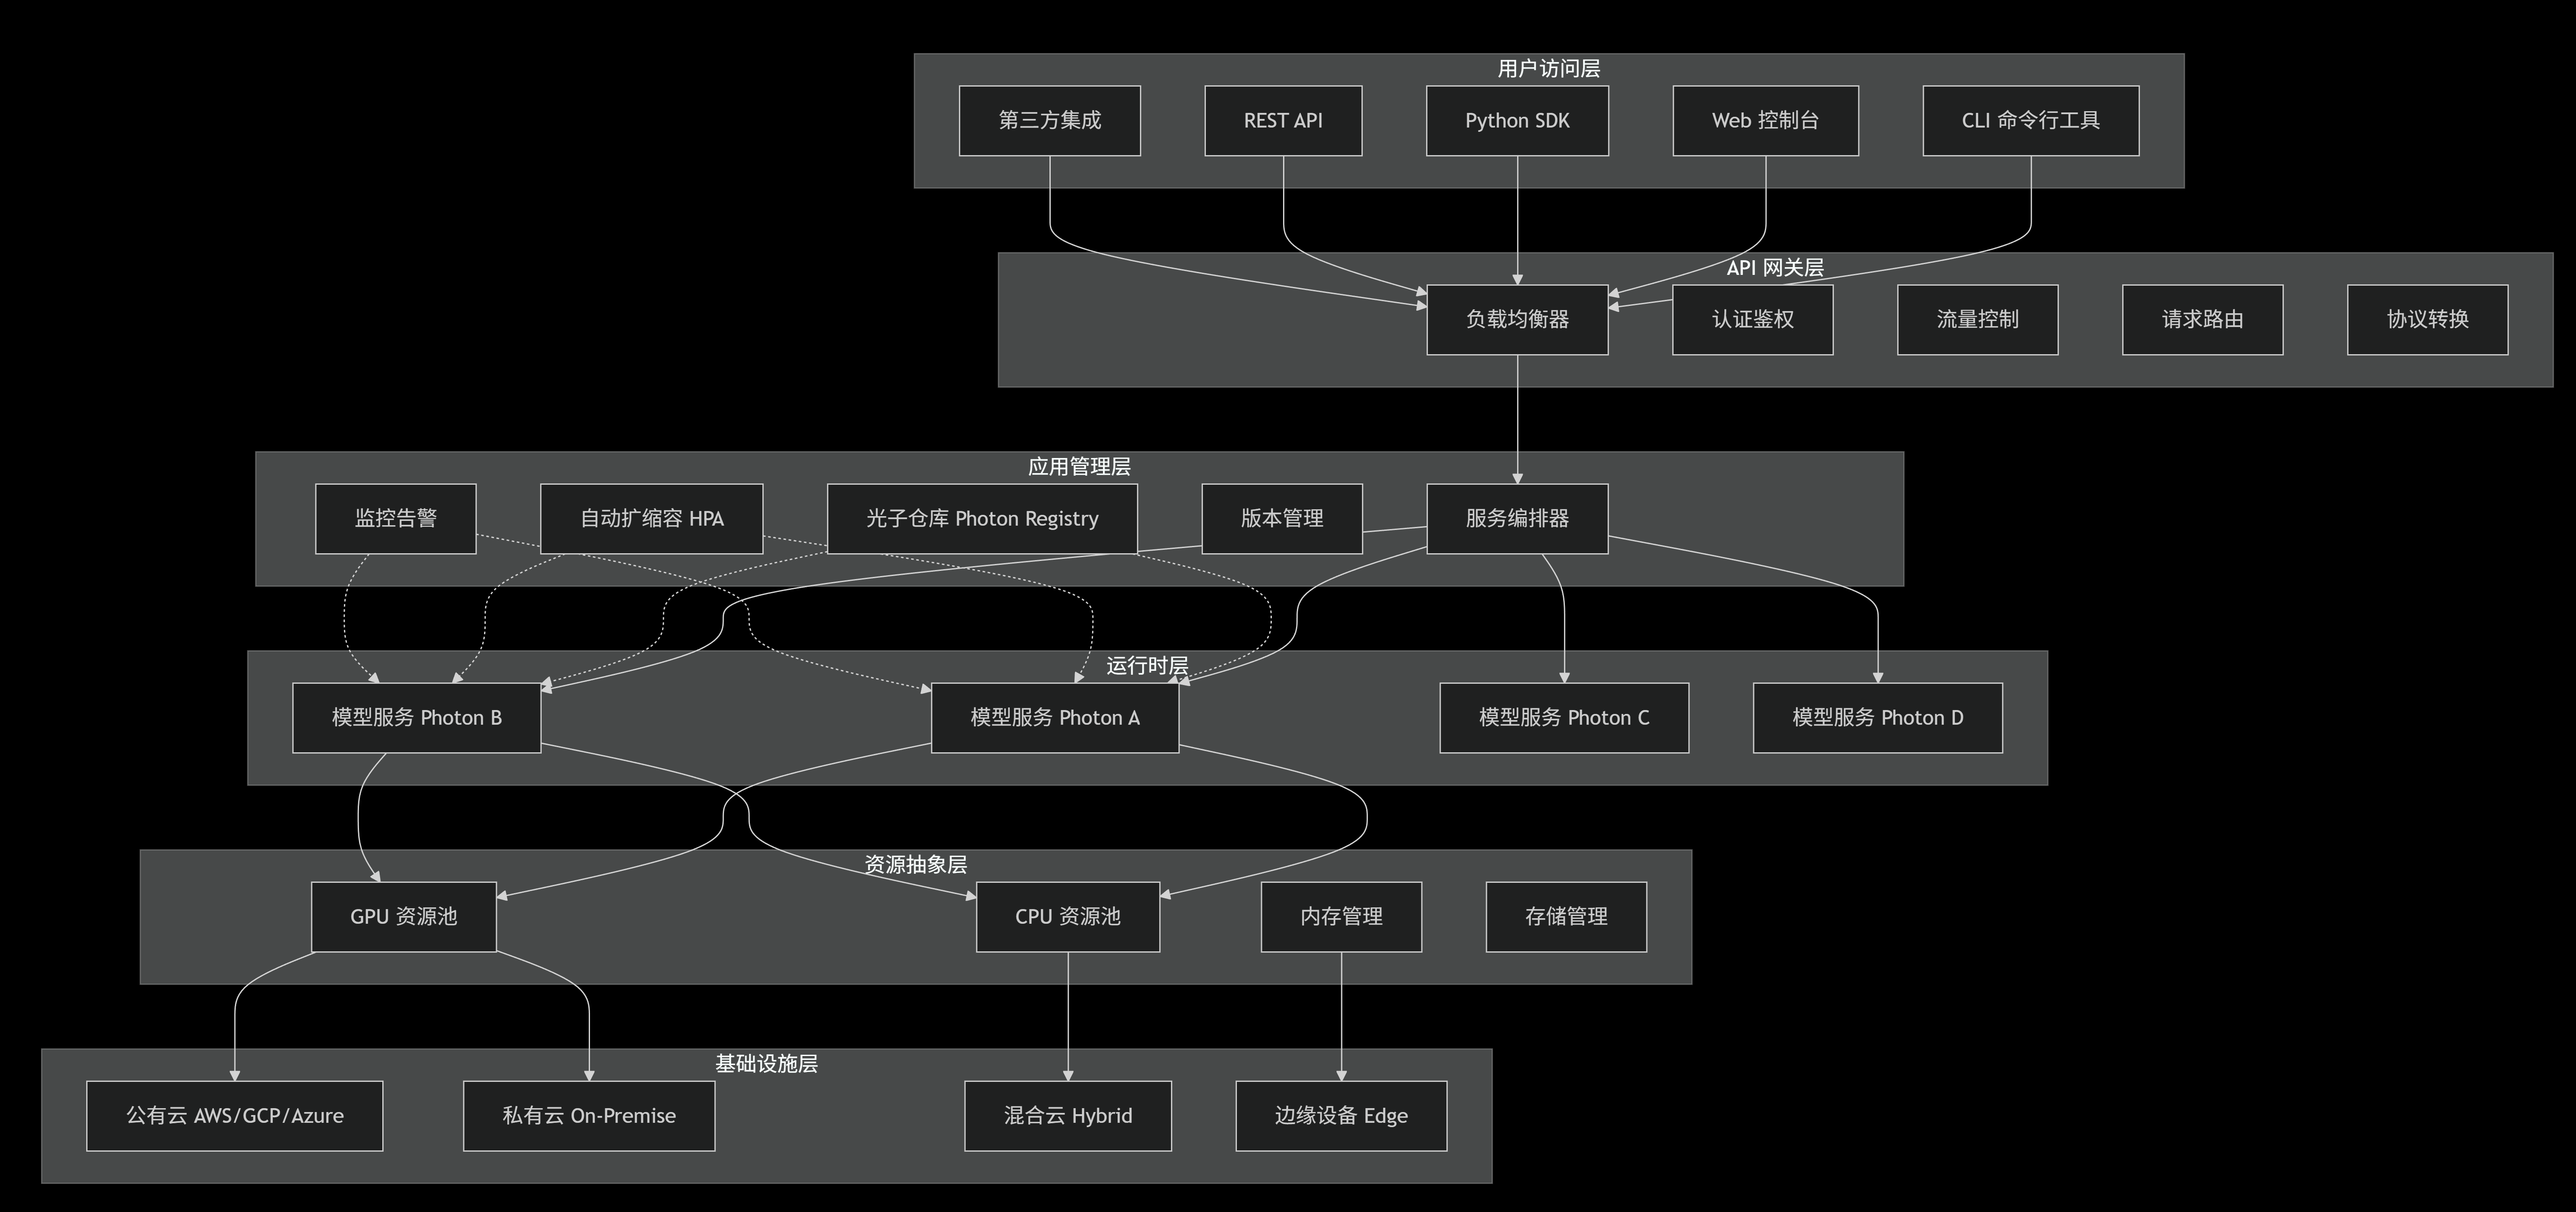
一、架构设计图
二、实现原理框图

三、常见使用场景
场景1:大语言模型(LLM)服务化
python
# 企业知识问答系统
# 医疗诊断辅助
# 法律文档分析
# 客服聊天机器人
场景2:多模态AI应用
python
# 图像生成(Stable Diffusion)
# 视频理解与分析
# 语音识别与合成
# 文档OCR识别
场景3:批处理推理流水线
python
# 电商商品标注
# 金融风控分析
# 社交媒体内容审核
# 科研数据处理
场景4:边缘AI部署
cpp
# 智能摄像头分析
# 工厂质检系统
# 自动驾驶推理
# IoT设备智能分析
四、完整 Demo 演示
Demo:构建和部署情感分析服务
步骤1:安装 Lepton AI SDK
bash
pip install leptonai步骤2:创建情感分析 Photon
python
# sentiment_analyzer.py
from typing import Dict, Any
from transformers import pipeline
from leptonai import Photon, handler

class SentimentAnalyzer(Photon):
    """
    情感分析服务 - 支持中英文文本情感分析
    """

    # 定义依赖
    requirement_dependencies = ["torch", "transformers"]

    def init(self):
        """初始化模型"""
        # 加载预训练模型
        self.analyzer = pipeline(
            "sentiment-analysis",
            model="distilbert-base-uncased-finetuned-sst-2-english",
            device=-1  # -1 for CPU, 0 for GPU
        )

        # 中文情感分析模型
        self.zh_analyzer = pipeline(
            "text-classification",
            model="bert-base-chinese",
            device=-1
        )

    @handler("analyze")
    def analyze_sentiment(self, text: str, language: str = "en") -> Dict[str, Any]:
        """
        分析文本情感
        Args:
            text: 待分析文本
            language: 语言 (en/zh)
        Returns:
            情感分析结果
        """
        if language == "zh":
            result = self.zh_analyzer(text)
        else:
            result = self.analyzer(text)

        return {
            "text": text,
            "sentiment": result[0]['label'],
            "confidence": float(result[0]['score']),
            "language": language,
            "timestamp": self._get_timestamp()
        }

    @handler("batch_analyze", method="POST")
    def batch_analyze(self, texts: list, language: str = "en") -> Dict[str, Any]:
        """批量分析"""
        results = []
        for text in texts:
            results.append(self.analyze_sentiment(text, language))

        return {
            "total": len(results),
            "results": results,
            "positive_count": sum(1 for r in results if r['sentiment'].lower() in ['positive', '积极']),
            "negative_count": sum(1 for r in results if r['sentiment'].lower() in ['negative', '消极'])
        }

    def _get_timestamp(self):
        from datetime import datetime
        return datetime.now().isoformat()

if __name__ == "__main__":
    # 本地测试
    photon = SentimentAnalyzer()

    # 测试单个分析
    result = photon.analyze_sentiment("I love this product! It's amazing!")
    print(f"测试结果: {result}")
步骤3:本地测试运行
python
# 保存为 sentiment_analyzer.py 后运行
lep photon run -n sentiment -m sentiment_analyzer.py

# 或者使用Python直接运行
python -c "
from sentiment_analyzer import SentimentAnalyzer
photon = SentimentAnalyzer()
print(photon.analyze_sentiment('This is absolutely wonderful!'))
"
步骤4:打包为 Photon
python
# 创建 photon 配置
lep photon create -n sentiment-analyzer -m sentiment_analyzer.py

# 查看创建的 photon
lep photon list

# 本地运行 photon
lep photon run -n sentiment-analyzer --local
步骤5:部署到 Lepton Cloud
python
# 登录到 Lepton AI
lep login

# 推送到云端仓库
lep photon push sentiment-analyzer

# 部署为在线服务
lep deployment create sentiment-service \
  --model-name sentiment-analyzer \
  --resource-shape gpu.t4  # 使用 T4 GPU
  --min-replicas 1 \
  --max-replicas 5 \
  --auto-scaling-by-requests=100  # 每副本处理100个请求后扩容

# 查看部署状态
lep deployment status sentiment-service
步骤6:使用 Python SDK 调用服务
python
# client_demo.py
from leptonai import Client
import json

# 连接到部署的服务
client = Client(
    endpoint="https://sentiment-service.lepton.ai",
    token="your-api-token"  # 从控制台获取
)

# 单条分析
result = client.analyze(
    text="The movie was fantastic with great acting!",
    language="en"
)
print("单条分析结果:")
print(json.dumps(result, indent=2))

# 批量分析
batch_result = client.batch_analyze(
    texts=[
        "I'm so happy today!",
        "This is terrible and awful.",
        "It's okay, nothing special.",
        "Absolutely magnificent experience!"
    ]
)
print("\n批量分析结果:")
print(json.dumps(batch_result, indent=2))

# 使用中文分析
chinese_result = client.analyze(
    text="这部电影真是太精彩了,演员表演出色!",
    language="zh"
)
print("\n中文分析结果:")
print(json.dumps(chinese_result, indent=2))
步骤7:使用 HTTP API 调用
bash
# 获取 API 端点
lep deployment status sentiment-service --show-endpoint

# 使用 curl 调用
curl -X POST \
  https://sentiment-service.lepton.ai/analyze \
  -H "Content-Type: application/json" \
  -H "Authorization: Bearer YOUR_TOKEN" \
  -d '{
    "text": "The service is incredibly fast and reliable!",
    "language": "en"
  }'

# 批量请求
curl -X POST \
  https://sentiment-service.lepton.ai/batch_analyze \
  -H "Content-Type: application/json" \
  -H "Authorization: Bearer YOUR_TOKEN" \
  -d '{
    "texts": [
      "Excellent product quality",
      "Poor customer service",
      "Average experience"
    ],
    "language": "en"
  }'
步骤8:监控和管理
bash
# 查看服务日志
lep deployment logs sentiment-service

# 查看资源使用情况
lep deployment status sentiment-service --show-resources

# 扩缩容调整
lep deployment update sentiment-service --min-replicas 2 --max-replicas 10

# 更新模型版本
lep deployment update sentiment-service --model-version v2.0

# 删除部署
lep deployment delete sentiment-service
步骤9:进阶功能 - 创建 Web 界面
python
# web_ui.py
import streamlit as st
import requests
import json

st.set_page_config(page_title="情感分析平台", page_icon="😊")

st.title("📊 智能情感分析平台")
st.markdown("使用AI模型分析文本情感倾向")

# 侧边栏配置
with st.sidebar:
    st.header("配置")
    api_endpoint = st.text_input(
        "API端点",
        value="https://sentiment-service.lepton.ai"
    )
    api_token = st.text_input("API Token", type="password")
    language = st.selectbox("语言", ["en", "zh"])

    st.divider()
    st.markdown("### 批量处理")
    batch_mode = st.checkbox("启用批量分析")

    st.divider()
    st.markdown("### 关于")
    st.info("基于Lepton AI平台构建的情感分析服务")

# 主界面
tab1, tab2, tab3 = st.tabs(["单条分析", "批量分析", "历史记录"])

with tab1:
    st.subheader("单文本情感分析")
    text_input = st.text_area(
        "输入待分析文本",
        height=150,
        placeholder="请输入要分析的文本..."
    )

    if st.button("开始分析", type="primary"):
        if text_input.strip():
            try:
                headers = {
                    "Content-Type": "application/json",
                    "Authorization": f"Bearer {api_token}"
                }

                payload = {
                    "text": text_input,
                    "language": language
                }

                response = requests.post(
                    f"{api_endpoint}/analyze",
                    headers=headers,
                    json=payload
                )

                if response.status_code == 200:
                    result = response.json()

                    # 显示结果
                    col1, col2, col3 = st.columns(3)

                    with col1:
                        sentiment = result['sentiment']
                        if sentiment.lower() in ['positive', '积极']:
                            st.metric("情感倾向", "积极", delta="正向",
                                     delta_color="normal")
                        else:
                            st.metric("情感倾向", "消极", delta="负向",
                                     delta_color="inverse")

                    with col2:
                        confidence = result['confidence']
                        st.metric("置信度", f"{confidence:.2%}")

                    with col3:
                        st.metric("语言", result['language'].upper())

                    # 显示详细结果
                    with st.expander("查看详细结果"):
                        st.json(result)

                else:
                    st.error(f"请求失败: {response.text}")

            except Exception as e:
                st.error(f"发生错误: {str(e)}")
        else:
            st.warning("请输入文本内容")

with tab2:
    st.subheader("批量文本分析")

    uploaded_file = st.file_uploader(
        "上传文本文件(每行一个文本)",
        type=['txt', 'csv']
    )

    sample_texts = st.text_area(
        "或直接输入多个文本(每行一个)",
        height=200,
        help="每行输入一个待分析的文本"
    )

    if st.button("批量分析", type="primary"):
        texts = []

        if uploaded_file is not None:
            content = uploaded_file.getvalue().decode("utf-8")
            texts = [line.strip() for line in content.split('\n') if line.strip()]
        elif sample_texts:
            texts = [line.strip() for line in sample_texts.split('\n') if line.strip()]

        if texts:
            try:
                headers = {
                    "Content-Type": "application/json",
                    "Authorization": f"Bearer {api_token}"
                }

                payload = {
                    "texts": texts,
                    "language": language
                }

                with st.spinner("分析中..."):
                    response = requests.post(
                        f"{api_endpoint}/batch_analyze",
                        headers=headers,
                        json=payload
                    )

                if response.status_code == 200:
                    result = response.json()

                    # 显示统计信息
                    col1, col2, col3 = st.columns(3)

                    with col1:
                        st.metric("总文本数", result['total'])

                    with col2:
                        st.metric("积极数", result['positive_count'])

                    with col3:
                        st.metric("消极数", result['negative_count'])

                    # 显示详细结果表格
                    st.subheader("分析结果详情")

                    import pandas as pd
                    df = pd.DataFrame(result['results'])
                    st.dataframe(df)

                    # 可视化
                    st.subheader("情感分布")
                    import plotly.express as px

                    fig = px.pie(
                        values=[result['positive_count'], result['negative_count']],
                        names=['积极', '消极'],
                        title="情感分布比例"
                    )
                    st.plotly_chart(fig)

                else:
                    st.error(f"批量分析失败: {response.text}")

            except Exception as e:
                st.error(f"发生错误: {str(e)}")
        else:
            st.warning("请上传文件或输入文本")

with tab3:
    st.subheader("分析历史")
    st.info("此功能需要后端存储支持,可根据需求扩展")

if __name__ == "__main__":
    # 运行Streamlit应用
    # streamlit run web_ui.py
    pass
步骤10:创建 Docker Compose 本地部署
python
# docker-compose.yml
version: '3.8'

services:
  lepton-local:
    image: leptonai/lepton:latest
    container_name: lepton-local
    ports:
      - "8080:8080"
      - "8081:8081"
    environment:
      - LEPTON_ENV=local
      - LEPTON_STORAGE=/data
    volumes:
      - ./data:/data
      - ./photon_cache:/cache
    restart: unless-stopped
    networks:
      - lepton-network

  sentiment-service:
    build:
      context: .
      dockerfile: Dockerfile.sentiment
    container_name: sentiment-service
    ports:
      - "5000:5000"
    environment:
      - MODEL_CACHE_DIR=/cache
      - MAX_WORKERS=4
    volumes:
      - ./model_cache:/cache
    depends_on:
      - lepton-local
    networks:
      - lepton-network
    deploy:
      resources:
        reservations:
          devices:
            - driver: nvidia
              count: 1
              capabilities: [gpu]

networks:
  lepton-network:
    driver: bridge
五、关键优势总结
1. 开发效率
-
从代码到服务仅需几分钟
-
本地开发与云端部署一致
-
丰富的预构建模型模板
2. 运维简化
-
自动扩缩容
-
集成监控告警
-
版本管理无缝
3. 成本优化
-
按实际使用量计费
-
GPU资源共享
-
冷启动优化
4. 企业级特性
-
多租户支持
-
数据安全合规
-
私有化部署支持
六、最佳实践建议
-
模型优化
-
使用量化技术减少模型大小
-
实现请求批处理提高吞吐量
-
添加缓存层减少重复计算
-
-
部署策略
-
根据流量模式设置合适的副本数
-
使用蓝绿部署进行版本更新
-
设置合理的资源限制
-
-
监控告警
-
监控QPS、延迟、错误率
-
设置GPU利用率告警
-
记录详细的访问日志
-
这个完整的Demo展示了Lepton AI平台从开发、部署到使用的全流程。您可以根据实际需求调整模型、配置和部署方式。