Bipes项目二次开发/硬件编程-设备连接websocket(七)
时间很快,25年也要过完了,这篇是今年的最后一篇,设备连接。设备连接之前也是有出过一期讲解(https://blog.csdn.net/weixin_44852027/article/details/139945812?spm=1011.2415.3001.5331),这一期主要修改websocket连接设备方式,废话不多说,上操作。**广告:需要二开Bipes,Scratch,blockly可以找我**
项目地址:https://maxuecan.github.io/Bipes/index.html
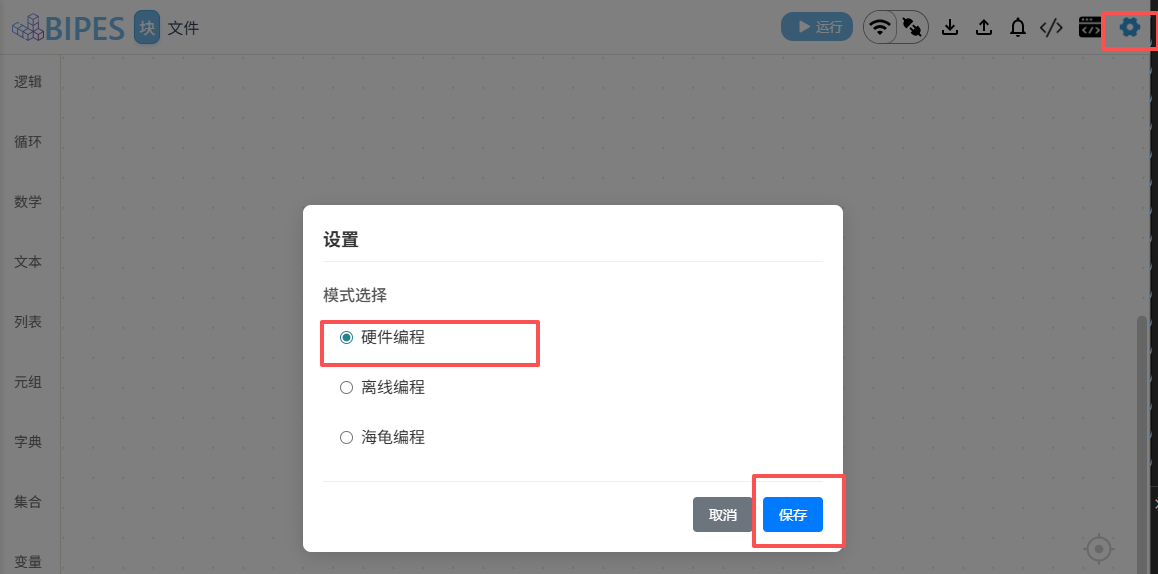
第一:模式选择
首先点击设置图标,将模式设为硬件编程,保存
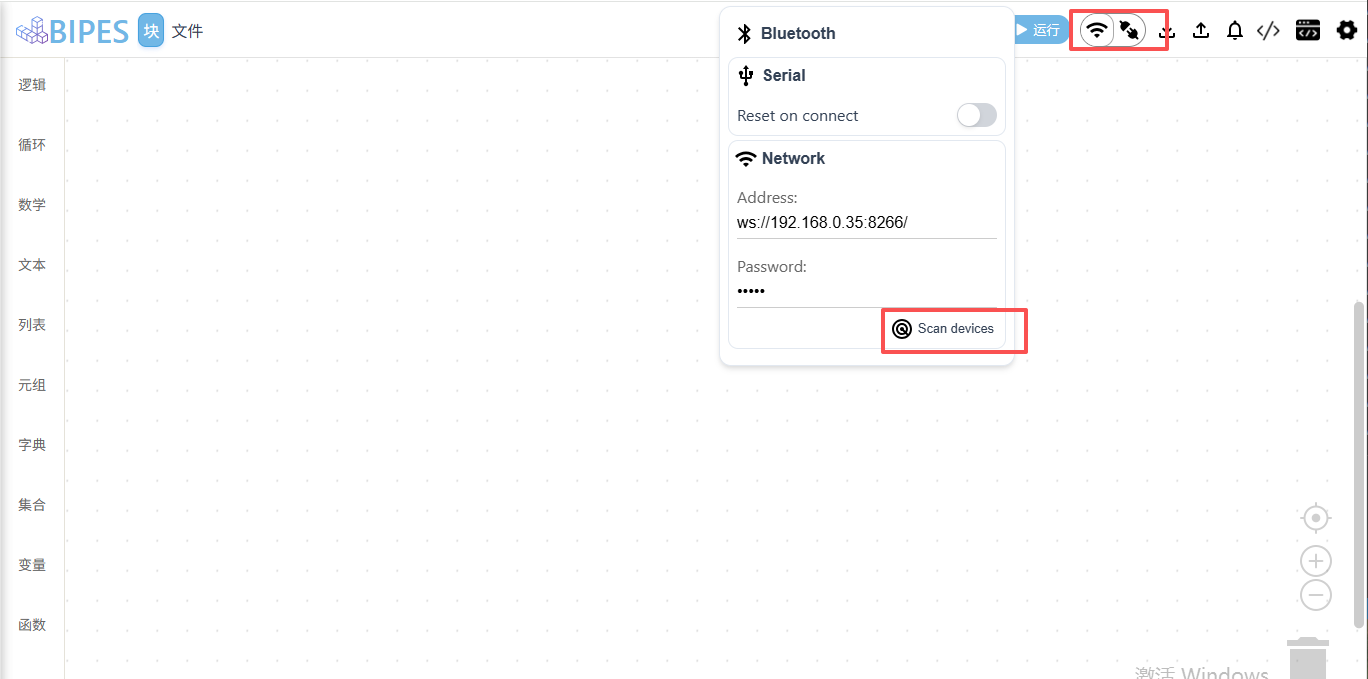
第二:选择连接方式
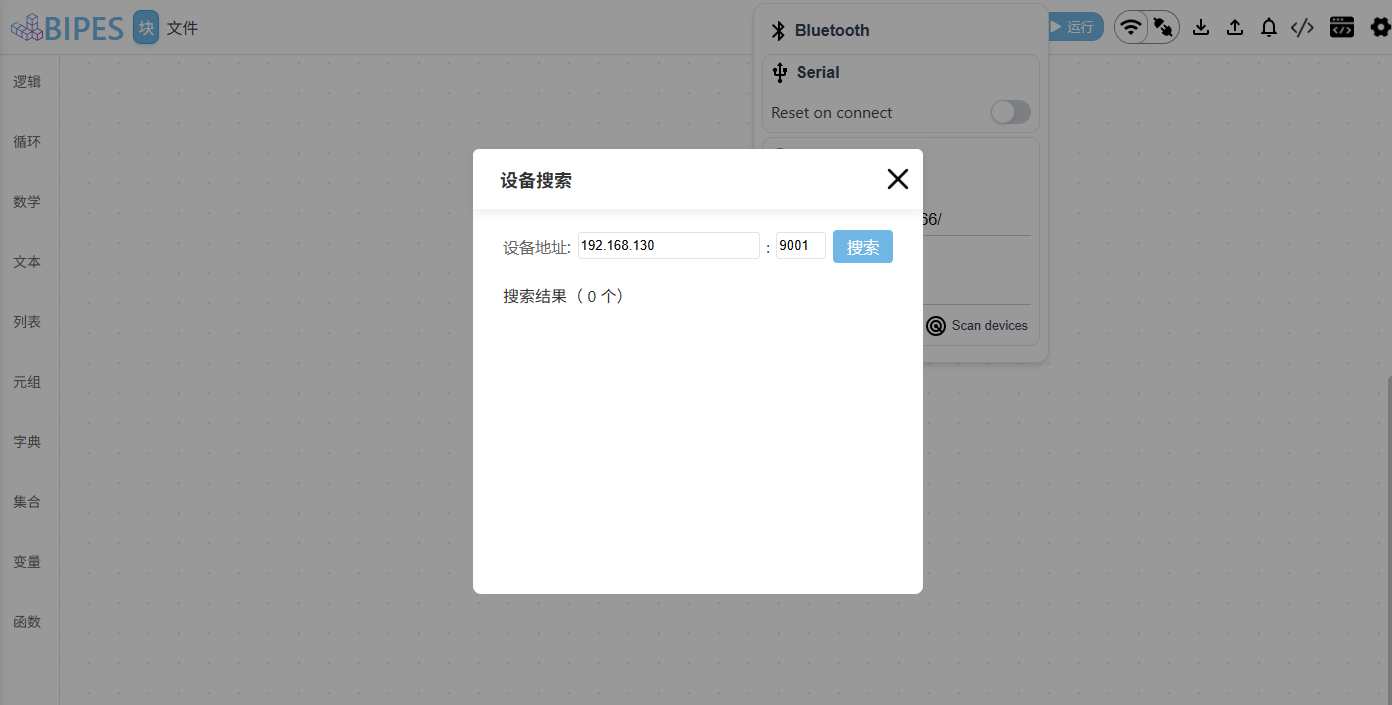
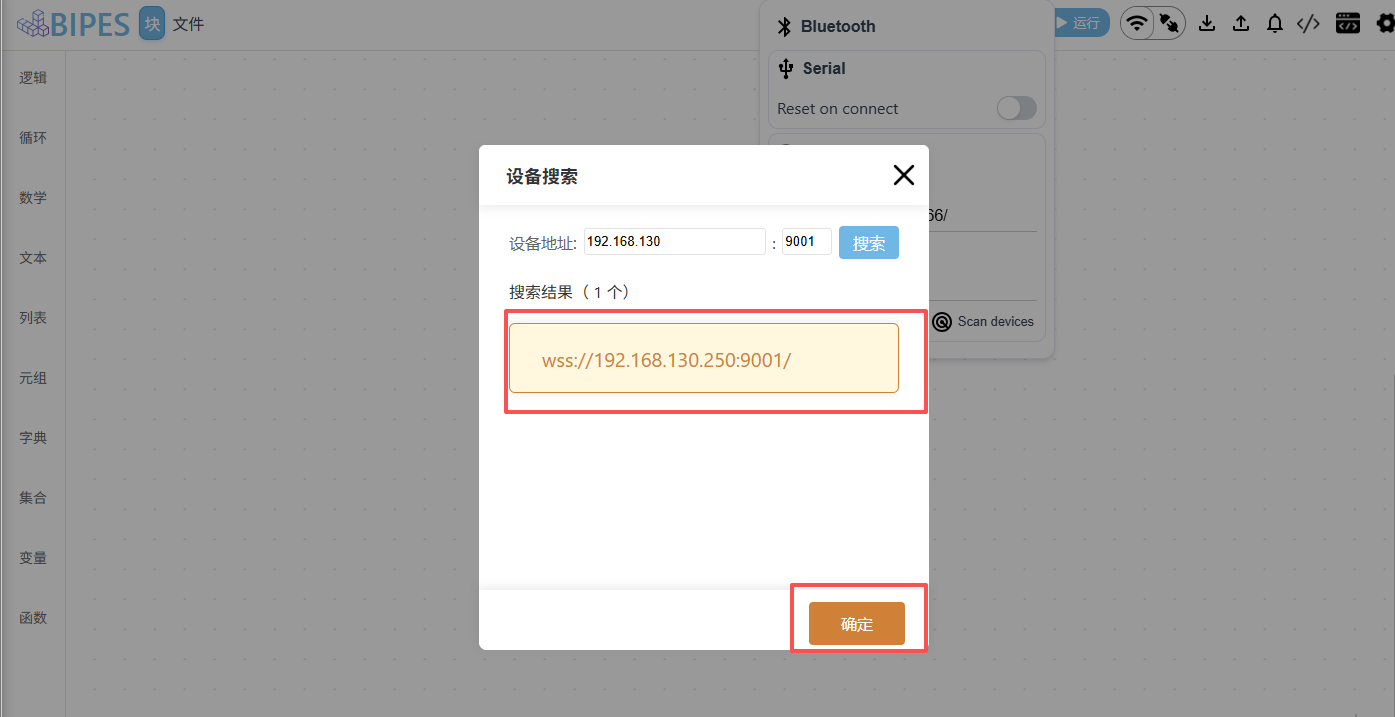
点击wifi图标(wifi图标是选择连接方式,右边图标是连接状态),点击后会弹窗一个设备连接方式的选项,一共有三种:蓝牙,usb,网络。我们着重看网络连接(websocket),点击Scan devices,原始项目是跳出一个网页去搜索设备,这次我将搜索设备进行调整,输入ip,前三位与端口,点击搜索,会进行ip扫描,连接成功后,会显示可以使用的ip地址,点击ip地址,会出现确认按钮,点击确认按钮后我们就能与设备进行连接。这里我也录了一个视频,有兴趣可以看下
BIPES Project - Google
第三:代码改动
1,ui/utils/bipes-controller.js
cpp
// 文件引用
import SearchDevice from '../components/search-device.js'
// 定义变量
this.SEARCH_DEVICE = null

// 注册搜索按钮事件
$('#scanButton').on('click', this.openSearchDevice.bind(this))
// 搜索事件
openSearchDevice() {
	if (!this.SEARCH_DEVICE) this.SEARCH_DEVICE = new SearchDevice()

	$('body').append(this.SEARCH_DEVICE.render())
	this.SEARCH_DEVICE.initEvent()
}
2,ui/components/search-device.js
cpp
export default class SearchDevice {
    constructor() {
        this.search_list = [] // 搜索到的设备列表
        this.search_act = -1
    }

    initEvent() {
        $('.search-device-close').on('click', this.close.bind(this))
        $('.search-btn').on('click', this.scan.bind(this))
        $('.search-device-list').on('click', this.selectDevice.bind(this))
        $('.search-device-confirm').on('click', this.confirm.bind(this))
    }
    removeEvent() {
        $('.search-device-close').off('click', this.close.bind(this))
        $('.search-btn').off('click', this.scan.bind(this))
        $('.search-device-list').off('click', this.selectDevice.bind(this))
        $('.search-device-confirm').off('click', this.confirm.bind(this))
    }
    // 关闭
    close() {
        this.resetConfig()
        this.removeEvent()
        $('.com-mask').remove()
    }
    // 搜索
    scan() {
        $('.search-device-list').empty()
        this.resetConfig()
        let found = 0;
        let count = 0;
        let last = 155;
        let net = $('#network').val();
        let port = $('#port').val();
        let that = this
        if (!this.ValidateIPaddress(net)) return;

        $('.search-device-load').css('display', 'block')

        for (let i = 1; i <= last; i++) {
            // let x = "ws://" + net + "." + i + ":" + port;
            let x = "wss://" + net + "." + i + ":" + port;
            let s = new WebSocket(x);
            s.start = performance.now();
            s.port = port;

            s.onerror = function() {
                count++;
                if (count === last) {
                    setTimeout(that.secondScan(count, found, net, port), 200)
                }
            }

            let ws = s;
            s.onopen = function() {
                that.search_list.push(this.url);
                found++;
                cound++;
                let li = $('<li>').attr('key', found)
                let name = $('<div>').text(this.url).attr('key', found)
                $('.search-device-list').append(
                    li.append(name)
                )
                ws.close()

                if (count == last) {
                    setTimeout(that.secondScan(count, found, net, port), 200)
                }
            }
        }
    }
    // 兼容浏览器
    secondScan(count, found, net, port) {
        let founds = found;
        let counts = count + 1;
        let last = 255;
        let that = this
        for (let i = counts; i <= last; i++) {
            // let x = "ws://" + net + "." + i + ":" + port;
            let x = "wss://" + net + "." + i + ":" + port;
            let s = new WebSocket(x);
            s.start = performance.now();
            s.port = port;

            s.onerror = function() {
                counts++;
                if (counts === last) {
                    $('.search-device-load').css('display', 'none')
                    $('.device-num').text(
                        $('.search-device-list').children().length
                    )
                }
            }

            let ws = s
            s.onopen = function() {
                that.search_list.push(this.url);
                founds++;
                counts++;
                let li = $('<li>').attr('key', founds)
                let name = $('<div>').text(this.url).attr('key', founds)
                $('.search-device-list').append(
                    li.append(name)
                )
                ws.close()

                if (counts == last) {
                    $('.search-device-load').css('display', 'none')
                    $('.device-num').text(
                        $('.search-device-list').children().length
                    )
                }
            }
        }
    }
    // 网段校验
    ValidateIPaddress(ipaddress) {
        // if (/^(25[0-5]|2[0-4][0-9]|[01]?[0-9][0-9]?)\.(25[0-5]|2[0-4][0-9]|[01]?[0-9][0-9]?)\.(25[0-5]|2[0-4][0-9]|[01]?[0-9][0-9]?)\.(25[0-5]|2[0-4][0-9]|[01]?[0-9][0-9]?)$/.test(ipaddress)) {
        if (/^(25[0-5]|2[0-4][0-9]|[01]?[0-9][0-9]?)\.(25[0-5]|2[0-4][0-9]|[01]?[0-9][0-9]?)\.(25[0-5]|2[0-4][0-9]|[01]?[0-9][0-9]?)$/.test(ipaddress)) {
            return (true)
        }
        alert("You have entered an invalid network prefix!")
        return (false)
    }
    // 选择设备
    selectDevice(e) {
        let key = $(e.target).attr('key')
        if (key === null || key === undefined) return false
        key = +key - 1

        if (this.search_act !== -1) {
            $('.search-device-list').children()[this.search_act].className = ''
        }
        $('.search-device-list').children()[key].className = key === this.search_act ? '' : 'search-device-list-act'

        this.search_act = (key === this.search_act ? -1 : key)
        $('.search-device-footer').css('display', (this.search_act !== -1 ? 'block' : 'none'))
    }
    // 重置配置
    resetConfig() {
        this.search_list = []
        this.search_act = -1
    }
    // 确认
    confirm() {
        UI ['workspace'].websocket.ws = this.search_list[this.search_act]
        UI.workspace.connectClick()
        this.close()
    }

    render() {
        return `
        <div class="com-mask">
            <div class="search-device-dialog">
                <div class="com-header search-device-header">
                    <h4 class="search-device-name">设备搜索</h4>
                    <img
                        class="com-close search-device-close"
                        src="../media/new-icon/com-close.png"
                        alt=""
                    >
                </div>
                <div class="search-device-content">
                    <div class="search-device-search">
                        <span>设备地址:</span>
                        <input id="network" type="text" placeholder="192.168.137.200" value="192.168.130">:
                        <input id="port" type="text" placeholder="8266" value="9001">
                        <button class="search-btn">搜索</button>
                    </div>
                    <div class="search-device-num">
                        搜索结果( <span class="device-num">0</span> 个)
                    </div>
                    <ul class="search-device-list"></ul>
                    <div class="search-device-load">
                        <div class="ws-circle" style="margin: 160px auto 0 auto;">
                            <div class="circle-bor">
                                <div></div>
                            </div>
                            <div class="circle-mask">
                                <div class="part bg-blue pos01"></div>
                                <div class="part bg-red pos02"></div>
                                <div class="part bg-green pos03"></div>
                            </div>
                        </div>
                        <p>扫描设备中...</p>
                    </div>
                </div>
                <div class="com-footer search-device-footer">
                    <button class="search-device-confirm">确定</button>
                </div>
            </div>
        </div>
        `
    }
}
总结
设备连接功能也算落幕了,改动的内容也不算太难,有兴趣的可以看下github日志,每期出完都会提交的git上面,也有对应日志