在 C# 开发(尤其是 Unity 开发)中,闭包(Closure)是一个非常强大的特性。但如果你在 for 循环中不小心使用了闭包,很可能会掉进一个经典的"内存陷阱"。
一、经典的"闭包陷阱"
我们先来看一段看似正常的测试代码。我们的目标是:保存 5 个委托,每个委托打印它被创建时的索引值。
csharp
using System;
using System.Collections.Generic;
using UnityEngine;

namespace ClosureTest
{
    public class TestCode : MonoBehaviour
    {
        private static readonly List<Action> List = new List<Action>();

        private void Start()
        {
            Debug.Log("=== 开始测试 ===");
            TestMain();

            Debug.Log("=== 验证独立性 ===");
            // 我们期望 list[0] 打印 0,list[1] 打印 1
            Debug.Log("再次调用 list[0] (期望是 0):");
            List[0]();

            Debug.Log("再次调用 list[1] (期望是 1):");
            List[1]();
        }

        private void TestMain()
        {
            List.Clear();

            // ❌ 陷阱代码:直接捕获循环变量 index
            for (int index = 0; index < 5; index++)
            {
                 List.Add(() => Debug.Log(index));
            }

            Debug.Log("--- 第一轮遍历调用 ---");
            foreach (var t in List)
            {
                t();
            }
        }
    }
}
运行结果
为什么? 为什么所有的委托都指向了同一个值?是时候看一眼底层的 IL 代码了。
深入 IL:寻找"罪魁祸首"
通过反编译工具(如 Rider 自带的 IL Viewer),我们发现了编译器背后的操作。
铁证 1:只有一个闭包实例(共享的盒子)
生成了一个闭包类
csharp
.class nested private sealed auto ansi beforefieldinit
    '<>c__DisplayClass2_0'
      extends [netstandard]System.Object
  {
    //...
    .field public int32 index
     //...
  }
在 TestMain 方法的开头,循环开始之前,我们发现了这样一行代码:
il
 .method private hidebysig instance void
    TestMain() cil managed
 {
    .maxstack 3
    .locals init (
      [0] class ClosureTest.TestCode/'<>c__DisplayClass2_0' 'CS$<>8__locals0',//闭包类实例名
      [1] int32 V_1,
      [2] valuetype [netstandard]System.Collections.Generic.List`1/Enumerator<class [netstandard]System.Action> V_2
    )

	//...

    // 🛑 核心证据 1:newobj 在循环外面!
    // 注意:这行代码在 loop 开始跳转 (IL_0019) 之前。
    // 这意味着整个方法只执行一次 newobj,只创建了一个闭包实例。
    IL_000a: newobj       instance void ClosureTest.TestCode/'<>c__DisplayClass2_0'::.ctor()
    IL_0011: stloc.0      // 🛑 把这个唯一的实例存到变量 'CS$<>8__locals0'

    // [30 18 - 30 31] 初始化 index = 0
    IL_0010: ldloc.0
    IL_0011: ldc.i4.0
    IL_0012: stfld        int32 ClosureTest.TestCode/'<>c__DisplayClass2_0'::index

    // 跳转进循环检查
    IL_0017: br.s         IL_003f
    //...
}
解析: 编译器把 index 变量提升到了一个自动生成的类(闭包类)中。关键在于,它只实例化了一次 。你可以把它想象成编译器在桌子上放了唯一的一个盒子。
铁证 2:循环体内在"共用"
进入循环体内部,我们看看委托是如何被创建的:
il
      // start of loop, entry point: IL_003f
      //加载委托列表
      IL_0019: ldsfld       class [netstandard]System.Collections.Generic.List`1<class [netstandard]System.Action> ClosureTest.TestCode::List
      IL_001e: ldloc.0      // 🛑 核心证据 2:加载前面的CS$<>8__locals0实例!

      // 创建委托
      IL_001f: ldftn        instance void ClosureTest.TestCode/'<>c__DisplayClass2_0'::'<TestMain>b__0'()
      //这里面的object就是CS$<>8__locals0的地址,指向同一个对象
      IL_0025: newobj       instance void [netstandard]System.Action::.ctor(object, native int)
      IL_002a: callvirt     instance void class [netstandard]System.Collections.Generic.List`1<class [netstandard]System.Action>::Add(!0/*class [netstandard]System.Action*/)
解析: 每次循环添加委托时,所有委托的 object 都指向了那个唯一的盒子。这就好比你拍了 5 张照片,但 5 张照片拍的都是同一个时钟。
铁证 3:修改的是同一个字段
再看 index++ 是怎么执行的:
il
      IL_003b: ldloc.0
      IL_003f: stfld        int32 ...::index // 修改它的 index
IL_0017: br.s         IL_003f
    // start of loop, entry point: IL_003f

      // [32 17 - 32 50]
      IL_0019: ldsfld       class [netstandard]System.Collections.Generic.List`1<class [netstandard]System.Action> ClosureTest.TestCode::List
      IL_001e: ldloc.0      // 'CS$<>8__locals0'
      IL_001f: ldftn        instance void ClosureTest.TestCode/'<>c__DisplayClass2_0'::'<TestMain>b__0'()
      IL_0025: newobj       instance void [netstandard]System.Action::.ctor(object, native int)
      IL_002a: callvirt     instance void class [netstandard]System.Collections.Generic.List`1<class [netstandard]System.Action>::Add(!0/*class [netstandard]System.Action*/)

      // [30 44 - 30 51] index++操作
      IL_002f: ldloc.0      // 'CS$<>8__locals0'
      IL_0030: ldfld        int32 ClosureTest.TestCode/'<>c__DisplayClass2_0'::index
      IL_0035: stloc.1      // V_1
      IL_0036: ldloc.0      // 'CS$<>8__locals0'
      IL_0037: ldloc.1      // V_1
      IL_0038: ldc.i4.1
      IL_0039: add
       // 🛑 核心证据 3:写回同一个实例!
      IL_003a: stfld        int32 ClosureTest.TestCode/'<>c__DisplayClass2_0'::index

      // [30 33 - 30 42]
      IL_003f: ldloc.0      // 'CS$<>8__locals0'
      IL_0040: ldfld        int32 ClosureTest.TestCode/'<>c__DisplayClass2_0'::index
      IL_0045: ldc.i4.5
      IL_0046: blt.s        IL_0019
    // end of loop
结论: 循环每次执行 index++,实际上是在修改堆上那个唯一对象 里的字段。当循环结束时,盒子里的 index 变成了 5。当你后来调用委托时,大家打开同一个盒子,看到的自然都是 5。
二、解决方案:引入局部变量
要解决这个问题,我们需要打破"共享",实现"独享"。方法非常简单:在循环内部引入一个临时变量。
csharp
private void TestMain()
{
    List.Clear();
    for (int index = 0; index < 5; index++)
    {
         // ✅ 关键修改:在循环体内创建局部变量
         int localI = index;

         // 闭包捕获 localI,而不是 index
         List.Add(() => Debug.Log(localI));
    }
    // ...
}
修正后的运行结果
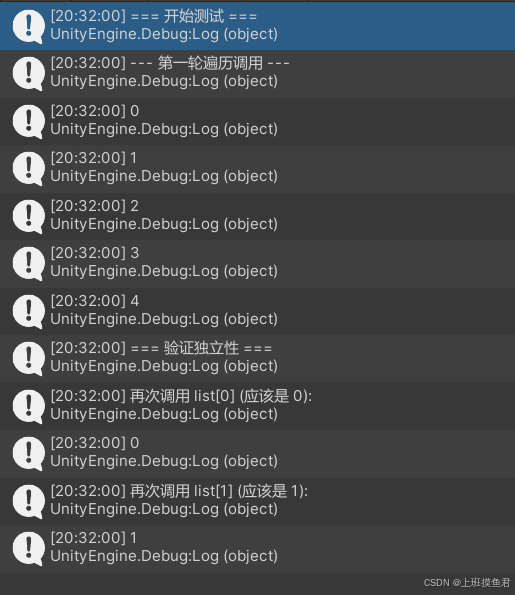
输出结果为 0, 1, 2, 3, 4,完美!但这在底层到底发生了什么变化?
IL 复盘:为何这样做就"独立"了?
让我们再次查看修正后的 IL 代码,真相一目了然。
证据 A:newobj 跑到了循环体内
il
    IL_000e: br.s         IL_003a  // 跳转到循环判断
    // start of loop, entry point: IL_003a

      // 🛑 核心变化在此!
      // 每次循环开始,都会执行一次 newobj
      // 这意味着:第1次循环创建对象A,第2次循环创建对象B...
      IL_0010: newobj       instance void ClosureTest.TestCode/'<>c__DisplayClass2_0'::.ctor()
      IL_0015: stloc.1      // 把新对象存入局部变量 1
解析: 因为变量 localI 的作用域限制在循环体内,编译器被强制要求每次循环都创建一个新的闭包实例 。这就好比给每个委托发了一个全新的玩具,而不是大家抢一个。
证据 B:数据的"快照"复制
il
      // 加载刚刚创建的新对象
      IL_0017: ldloc.1
      // 加载当前的循环索引 index (比如 0, 1, 2...)
      IL_0018: ldloc.0
      // 把 index 的值【复制】到闭包对象的 localI 字段中
      IL_0019: stfld        int32 ClosureTest.TestCode/'<>c__DisplayClass2_0'::localI
解析: 这里发生了值拷贝。
- 第 1 次循环:创建对象 A,把 index(0) 拷给
A.localI。 - 第 2 次循环:创建对象 B,把 index(1) 拷给
B.localI。 - 对象 A 和 B 互不干扰。
三、终极总结
通过 IL 代码的实锤验证,我们可以得出一个确定的结论:
在循环中捕获变量时:
- 如果捕获的是循环变量 (如
for头部的index),所有委托都会共享同一个变量实例。 - 如果捕获的是循环内声明的局部变量 (如
localI),每个委托会捕获一个独立的实例。
| 比较项 | ❌ 陷阱做法 (捕获 index) | ✅ 正确做法 (捕获 localI) |
|---|---|---|
| C# 代码 | () => Debug.Log(index) |
int localI = index; () => Debug.Log(localI) |
IL newobj 位置 |
循环体外部 (只创建一次) | 循环体内部 (每次循环都创建) |
| 闭包对象数量 | 全程只有 1 个 | 循环 N 次创建 N 个 |
| 数据关系 | 所有委托共享同一个引用 | 每个委托持有独立的数据副本 |
| 结果 | 全是 5 | 0, 1, 2, 3, 4 |
四、进阶测试:当"共享"遇上"独享"
如果我们在同一个闭包里,既捕获了循环外的变量(共享),又捕获了循环内的变量(独享),会发生什么?
下面把TestMain改成如下
csharp
private void TestMain()
{
// 清空列表以防万一
List.Clear();
int outside = 0; // ← 共享变量,只声明一次
for (int index = 0; index < 5; index++)
{
int inside = 0; // ← 独立变量,每次循环都创建新实例
List.Add(() =>
{
Debug.Log($"({outside},{inside})");
outside++; // 修改共享变量
inside++; // 修改独立变量);
});
}
// 调用所有委托
Debug.Log("--- 第一轮遍历调用 ---");
foreach (var t in List)
{
t();
}
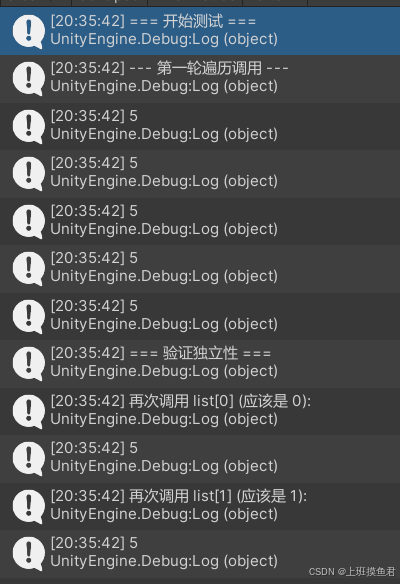
}运行结果分析

观察到的现象:
- outside(左边数字):0, 1, 2, 3, 4 -> 持续递增!说明大家共用同一个变量。
- inside(右边数字):0, 0, 0, 0, 0 -> 每次都是从 0 开始!说明每个人都有自己的变量。
这完全符合我们的预期:outside 是共享的,inside 是独立的。
IL 深度解密:嵌套闭包结构
这背后的 IL 实现比之前的例子更复杂,也更精妙。编译器实际上生成了 两个 闭包类!
1. 结构分析:大盒子套小盒子
通过 IL 代码,我们发现了两个编译器生成的类:
csharp
.class nested private sealed auto ansi beforefieldinit
    '<>c__DisplayClass2_0'
      extends [netstandard]System.Object
  {
    ...

    .field public int32 outside
    ...
}<>c__DisplayClass2_0(外层类) :- 存放
outside变量。 - 只创建 1 次(在循环外)。
- 存放
csharp
.class nested private sealed auto ansi beforefieldinit
    '<>c__DisplayClass2_1'
      extends [netstandard]System.Object
  {
  ...
    .field public int32 inside  // 自己的数据

    //指向外层闭包实例的引用!
   .field public class ClosureTest.TestCode/'<>c__DisplayClass2_0' 'CS$<>8__locals1'
    ...
}<>c__DisplayClass2_1(内层类) :- 存放
inside变量。 - 循环 5 次创建 5 个。
- 关键点 :它里面有一个字段
CS$<>8__locals1,指向外层类实例!
- 存放
2. 实例化过程:连连看
在 TestMain 的 IL 代码中,我们可以清晰地看到这层关系的构建过程:
il
   // --- 1. 循环外:创建外层大盒子 ---
   IL_0000: newobj       instance void ClosureTest.TestCode/'<>c__DisplayClass2_0'::.ctor()
   IL_0005: stloc.0      // 存起来 (locals0)

   // 初始化 outside = 0
   IL_0014: stfld        int32 ClosureTest.TestCode/'<>c__DisplayClass2_0'::outside

    // --- 2. 循环内:创建内层小盒子 ---
    // start of loop
      IL_001d: newobj       instance void ClosureTest.TestCode/'<>c__DisplayClass2_1'::.ctor()
      IL_0022: stloc.2      // 存起来 (locals1)

      // 🛑关键连接:把大盒子塞进小盒子里!
      IL_0023: ldloc.2      // 加载小盒子
      IL_0024: ldloc.0      // 加载大盒子
      // 建立引用关系
      IL_0025: stfld        class ClosureTest.TestCode/'<>c__DisplayClass2_0' ClosureTest.TestCode/'<>c__DisplayClass2_1'::'CS$<>8__locals1'

      // 初始化 inside = 0
      IL_002d: stfld        int32 ClosureTest.TestCode/'<>c__DisplayClass2_1'::inside

      // 创建委托:Target 指向【小盒子】
      IL_003e: newobj       instance void [netstandard]System.Action::.ctor(object, native int)
3. 图解内存引用
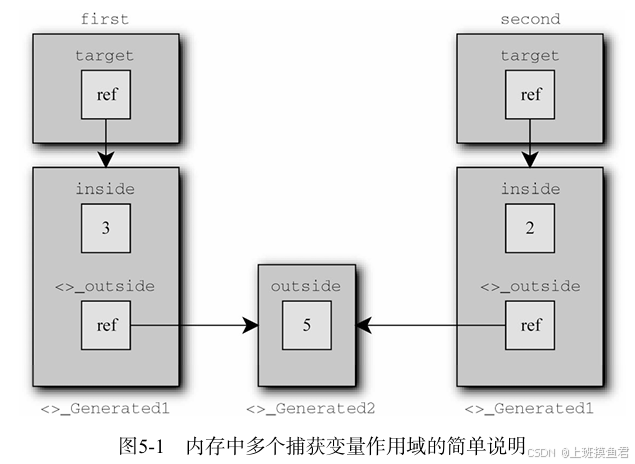
此时内存里的对象关系是这样的:
text
[Delegate 0] -> [小盒子 0 (inside=0)] -> [唯一的大盒子 (outside=0)]
[Delegate 1] -> [小盒子 1 (inside=0)] -> ↗ (同一个引用)
[Delegate 2] -> [小盒子 2 (inside=0)] -> ↗
...- 当你修改
inside时,改的是各自的小盒子。 - 当你修改
outside时,大家通过小盒子里的引用,顺藤摸瓜找到同一个大盒子进行修改。
五、终极结论
当一个委托同时捕获多个变量时,编译器会根据变量的作用域精准地决定其存储位置:
- 作用域在循环外的变量 :被提升到外层闭包类,全程只有一个实例,所有委托共享(引用传递)。
- 作用域在循环内的变量 :被提升到内层闭包类,每次循环创建新实例,每个委托独享。
- 引用关系:内层闭包会持有外层闭包的引用,从而实现"既能独享内部,又能共享外部"的混合效果。
⚠️ 最佳实践建议:
虽然这种机制非常智能,但在实际开发中,混合使用共享和独立变量容易导致代码逻辑难以理解。为了代码的可维护性,建议尽量明确变量的作用域,避免在复杂的循环闭包中修改外部状态。