设计者模式
设计者模式一共23种,下面从:定义,分类,原则说一下设计者模式
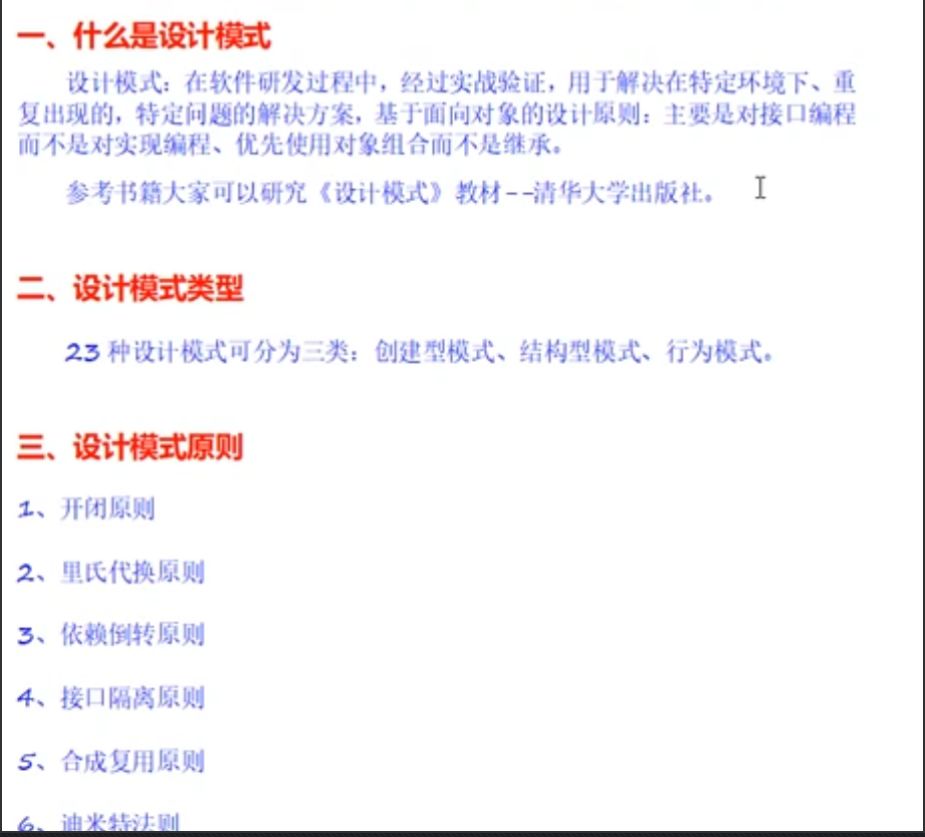
1、创建型模式:简单工厂模式、单例模式、抽象工厂模式、原型模式、建造者模式(5种)
2、结构型模式:代理模式、外观模式、享元模式、组合模式、装饰器模式、适配器模式、桥接模式(7种)
3、行为模式:访问者模式、策略模式、模板模式、状态模式、备忘录模式、观察者模式、中介者模式、迭代器模式、解释器模式、责任链模式、命令模式(11种)
创建型模式
简单工厂模式
作用

就是我通过调用一个接口,可以找到这5种实现的任意一种
Plaintext
	   ┌──────────────┐
       │  IDatabase   │ <──────────┐ (实现接口)
       └──────┬───────┘            │
              ▲                    │
     ┌────────┴────────┬───────┬───────┬───────┐
     │                 │       │       │       │
┌────┴─────┐ ┌────────┴┐┌──────┴┐┌─────┴──┐┌───┴───┐
│SQL Server│ │  MySQL  ││ Oracle││ SQLite ││ Redis │
└──────────┘ └─────────┘└───────┘└────────┘└───────┘
     ^                                         ^
     └────────────────────┬────────────────────┘
                          │ (由工厂创建)
                  ┌───────┴─────────┐
                  │ DatabaseFactory │
                  └─────────────────┘
案例分析
代码实战
c++
#include <iostream>
#include <string>
using namespace std;

// 1. 抽象汽车类 (Abstract Product)
class AbstractCar {
public:
    virtual void ShowCarName() = 0;
    virtual ~AbstractCar() {} // 建议添加虚析构函数
};

// 2. 具体汽车类 (Concrete Products)
class Magotan : public AbstractCar {
public:
    virtual void ShowCarName() {
        cout << "Magotan Car." << endl;
    }
};

class Audi : public AbstractCar {
public:
    virtual void ShowCarName() {
        cout << "Audi Car." << endl; // 图片中代码此处误写为Magotan,已保留逻辑
    }
};

class Benz : public AbstractCar {
public:
    virtual void ShowCarName() {
        cout << "Benz Car." << endl;
    }
};

// 假设存在的 Camry 类(工厂逻辑中有体现)
class Camry : public AbstractCar {
public:
    virtual void ShowCarName() {
        cout << "Camry Car." << endl;
    }
};

// 3. 汽车工厂类 (Simple Factory)
class CarFactory {
public:
    // 通过传递参数来确定需要生成哪种汽车
    static AbstractCar* CreateCarFunc(string cname) {
        if (cname == "Cmary") { // 注意:图片中拼写为Cmary
            return new Camry;
        }
        else if (cname == "Magotan") {
            return new Magotan;
        }
        else if (cname == "Audi") {
            return new Audi;
        }
        else if (cname == "Benz") {
            return new Benz;
        }
        else {
            return nullptr;
        }
    }
    CarFactory();
    ~CarFactory();
};

// 4. 客户端调用
int main() {
    // 创建工厂对象(虽然CreateCarFunc是静态的,但代码中实例化了工厂)
    CarFactory* fty = new CarFactory();

    // 创建汽车指针
    AbstractCar* car;

    // 指定工厂需要创建的汽车
    car = fty->CreateCarFunc("Benz");

    if (car != nullptr) {
        car->ShowCarName();
        delete car; // 释放内存
    }

    delete fty;
    return 0;
}
这里梳理一下逻辑
我的各种具体的型号的汽车,都是交给 工厂去new出来的,可以直接通过字符串的形式,或者枚举的形式,让工厂new一个具体的车型
创建阶段
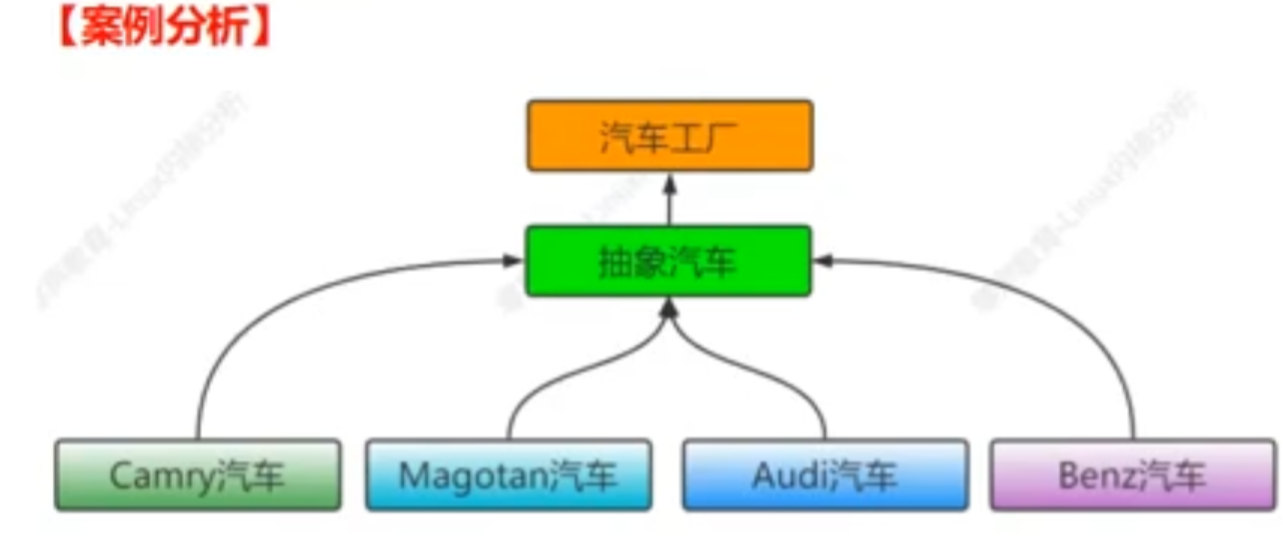
1、先创建抽象汽车,
2、在创建4个具体的汽车,继承并实现抽象汽车的方法
3、创建工厂,这个工厂设置一个静态方法,这个方法适用于通过参数的类型,去返回一个具体的对象
使用阶段
1、把工厂给new出来
2、创建一个 不会new的 某一种具体型号的汽车对象
3、调用工厂方法的创建对象的方法
4、然后就可以去调用这一个具体型号汽车的方法了
存在三种角色:抽象汽车, 四种具体的不同的车(继承抽象汽车),一个工厂
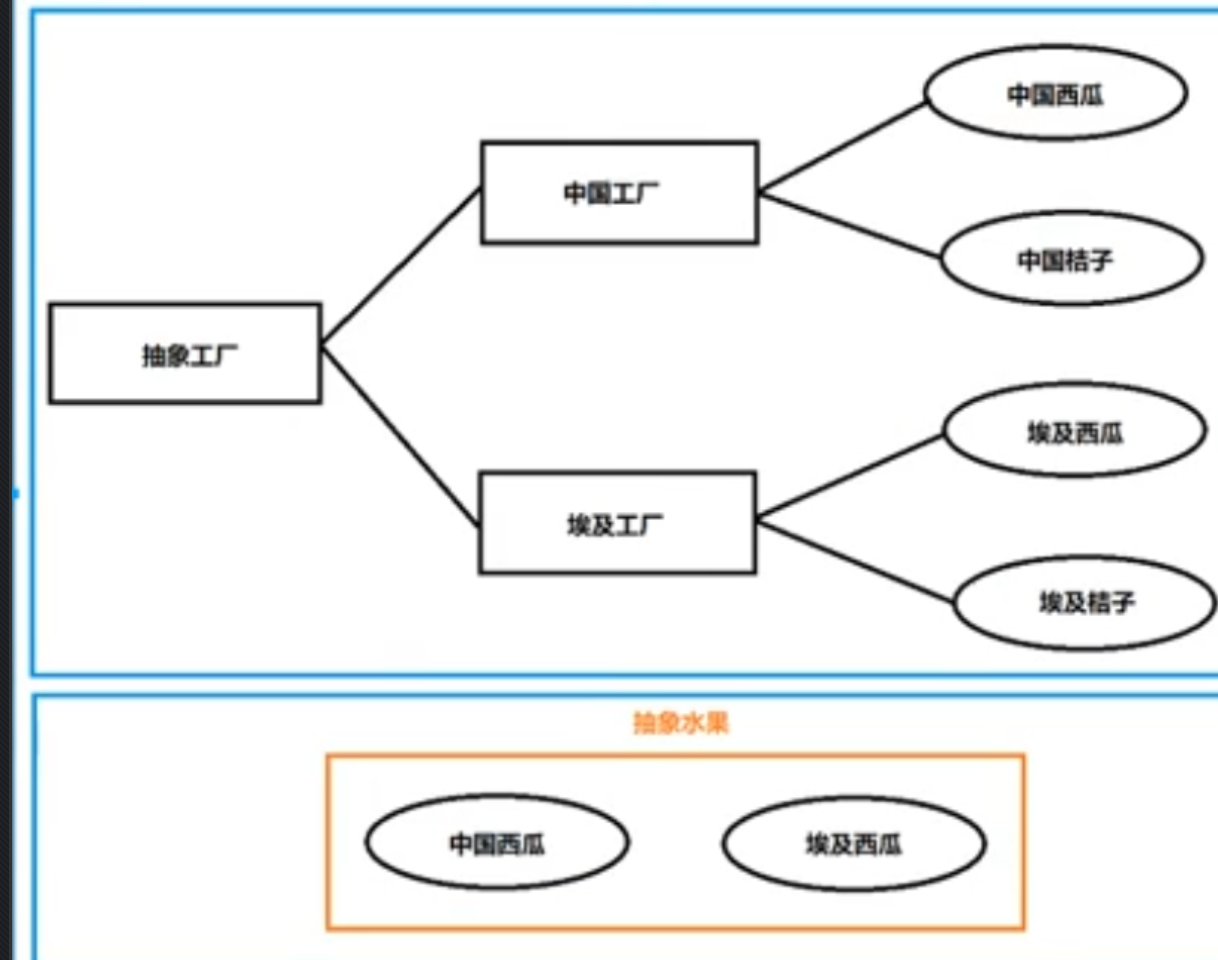
抽象工厂
代码实战
还是那汽车举例
上面的简单工厂 案例中,我只有一种版本的汽车,不需要多个工厂,一个工厂足以
1、现在我需要两种版本的汽车,一个工厂本生产豪华版(Luxury),一个工厂生产基本版(base),
2、然后每个工厂都需要生产:Magotan 和 Benz 两种汽车
如果要实现一个接口,就能拿到具体的版本的汽车的话,工厂也需要抽象出来
(产品族:基础款)                 (产品族:豪华款)
    ┌──────────────────┐             ┌──────────────────┐
    │   BaseFactory    │             │    LuxFactory    │  <--- 具体工厂 (Concrete Factory)
    ├──────────────────┤             ├──────────────────┤
    │+ CreateMagotan() │             │+ CreateMagotan() │
    │+ CreateBenz()    │             │+ CreateBenz()    │
    └────────┬─────────┘             └────────┬─────────┘
             │                                │
             └───────────────┬────────────────┘
                             ▼
                    ┌─────────────────┐
                    │ AbstractFactory │ <--- 抽象工厂 (Abstract Factory)
                    ├─────────────────┤
                    │ virtual Magotan │
                    │ virtual Benz    │
                    └─────────────────┘
                             │
            ┌────────────────┴────────────────┐
            ▼                                 ▼
    ┌───────────────┐                 ┌───────────────┐
    │AbstractMagotan│                 │  AbstractBenz │ <--- 抽象产品 (Abstract Product)
    └───────┬───────┘                 └───────┬───────┘
     ┌──────┴──────┐                   ┌──────┴──────┐
     ▼             ▼                   ▼             ▼
┌──────────┐  ┌──────────┐       ┌──────────┐  ┌──────────┐
│BaseMagotan│ │LuxMagotan│       │ BaseBenz │  │ LuxBenz  │ <--- 具体产品
└──────────┘  └──────────┘       └──────────┘  └──────────┘
c++
#include <iostream>
#include <string>
using namespace std;

// === 第一步:抽象产品 (不同品牌的车型) ===
class AbstractMagotan {
public:
    virtual void ShowInfo() = 0;
    virtual ~AbstractMagotan() {}
};

class AbstractBenz {
public:
    virtual void ShowInfo() = 0;
    virtual ~AbstractBenz() {}
};

// === 第二步:具体产品 (品牌下的不同档次) ===
class BaseMagotan : public AbstractMagotan {
public:
    void ShowInfo() override { cout << "生产:基础版 迈腾" << endl; }
};

class LuxMagotan : public AbstractMagotan {
public:
    void ShowInfo() override { cout << "生产:豪华版 迈腾" << endl; }
};

class BaseBenz : public AbstractBenz {
public:
    void ShowInfo() override { cout << "生产:基础版 奔驰" << endl; }
};

class LuxBenz : public AbstractBenz {
public:
    void ShowInfo() override { cout << "生产:豪华版 奔驰" << endl; }
};

// === 第三步:抽象工厂 (定义生产一整套产品的接口) ===
class AbstractFactory {
public:
    // 抽象工厂同时包含多个品牌的生产方法
    virtual AbstractMagotan* CreateMagotan() = 0;
    virtual AbstractBenz* CreateBenz() = 0;
    virtual ~AbstractFactory() {}
};

// === 第四步:具体工厂 (按档次一次性实现多个品牌) ===
// 基础款工厂:专门生产所有品牌的基础款
class BaseFactory : public AbstractFactory {
public:
    AbstractMagotan* CreateMagotan() override { return new BaseMagotan(); }
    AbstractBenz* CreateBenz() override { return new BaseBenz(); }
};

// 豪华款工厂:专门生产所有品牌的豪华款
class LuxFactory : public AbstractFactory {
public:
    AbstractMagotan* CreateMagotan() override { return new LuxMagotan(); }
    AbstractBenz* CreateBenz() override { return new LuxBenz(); }
};

// === 第五步:客户端代码 ===
int main() {
    AbstractFactory* factory = nullptr;
    AbstractMagotan* m = nullptr;
    AbstractBenz* b = nullptr;

    // 1. 想要一整套基础款汽车
    cout << "--- 访问基础款工厂 ---" << endl;
    factory = new BaseFactory();
    m = factory->CreateMagotan(); // 生产基础迈腾
    b = factory->CreateBenz();    // 生产基础奔驰
    m->ShowInfo();
    b->ShowInfo();
    delete m; delete b; delete factory;

    // 2. 想要一整套豪华款汽车
    cout << "\n--- 访问豪华款工厂 ---" << endl;
    factory = new LuxFactory();
    m = factory->CreateMagotan(); // 生产豪华迈腾
    b = factory->CreateBenz();    // 生产豪华奔驰
    m->ShowInfo();
    b->ShowInfo();
    delete m; delete b; delete factory;

    return 0;
}
抽象工厂 (AbstractFactory):位于逻辑顶层或中心,它定义了生产"迈腾"和"奔驰"的规范。
具体工厂 (BaseFactory / LuxFactory) :实现了该规范。BaseFactory 就像一条生产线,它只关心基础款,但能同时造出基础款的迈腾和奔驰。
产品族 :基础款迈腾和基础款奔驰属于同一个产品族。抽象工厂的最大作用就是约束产品族的配套,防止你用"基础工厂"去造出"豪华奔驰"。
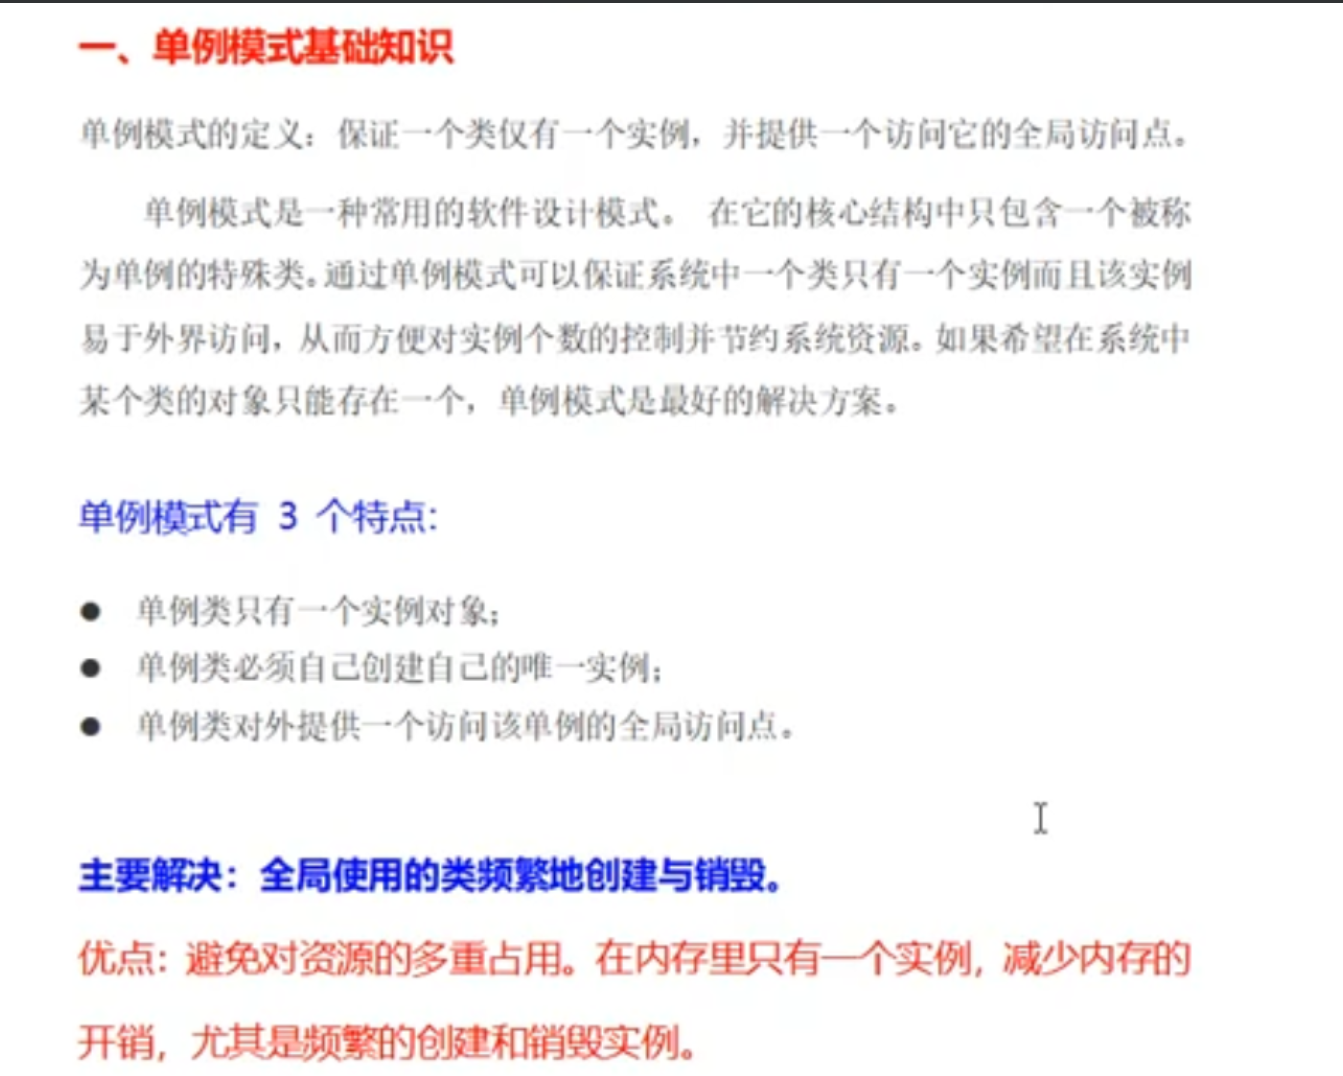
单例模式
基础知识
案例
1、饿汉式:类加载时就完成了初始化。它是线程安全的,但如果实例一直没被使用,会浪费内存。
c++
#include <iostream>

class HungrySingleton {
private:
    // 1. 私有化构造函数,防止外部创建对象
    HungrySingleton() {}

    // 2. 静态私有实例,类加载时即创建
    static HungrySingleton* instance;

public:
    // 3. 禁用拷贝构造和赋值
    HungrySingleton(const HungrySingleton&) = delete;
    HungrySingleton& operator=(const HungrySingleton&) = delete;

    // 4. 提供全局访问接口
    static HungrySingleton* getInstance() {
        return instance;
    }

    void show() { std::cout << "这是饿汉式单例" << std::endl; }
};

// 在类外初始化静态变量
HungrySingleton* HungrySingleton::instance = new HungrySingleton();

int main() {
    HungrySingleton* s1 = HungrySingleton::getInstance();
    s1->show();
    return 0;
}
2、懒汉式:只有在第一次调用 getInstance 时才创建实例。为了性能和简洁,这里推荐 C++11 标准后的局部静态变量方式 (又称 Meyers' Singleton),它是天生线程安全的。
c++
#include <iostream>

class LazySingleton {
private:
    // 1. 私有化构造函数
    LazySingleton() { std::cout << "懒汉式实例已创建" << std::endl; }

    // 2. 禁用拷贝和赋值
    LazySingleton(const LazySingleton&) = delete;
    LazySingleton& operator=(const LazySingleton&) = delete;

public:

    // 3. 静态局部变量方式实现
    static LazySingleton& getInstance() {
        // C++11 规定:如果静态局部变量正在初始化,线程会等待直到初始化完成
        static LazySingleton instance;
        return instance;
    }

    void show() { std::cout << "这是懒汉式单例" << std::endl; }
};

int main() {
    std::cout << "程序开始运行..." << std::endl;
    // 只有执行下面这一行时,构造函数才会被调用
    LazySingleton& s1 = LazySingleton::getInstance();
    s1.show();
    return 0;
}
不要用指针,因为线程不安全,建议全部用static去实现,比较好,且安全
原型模式
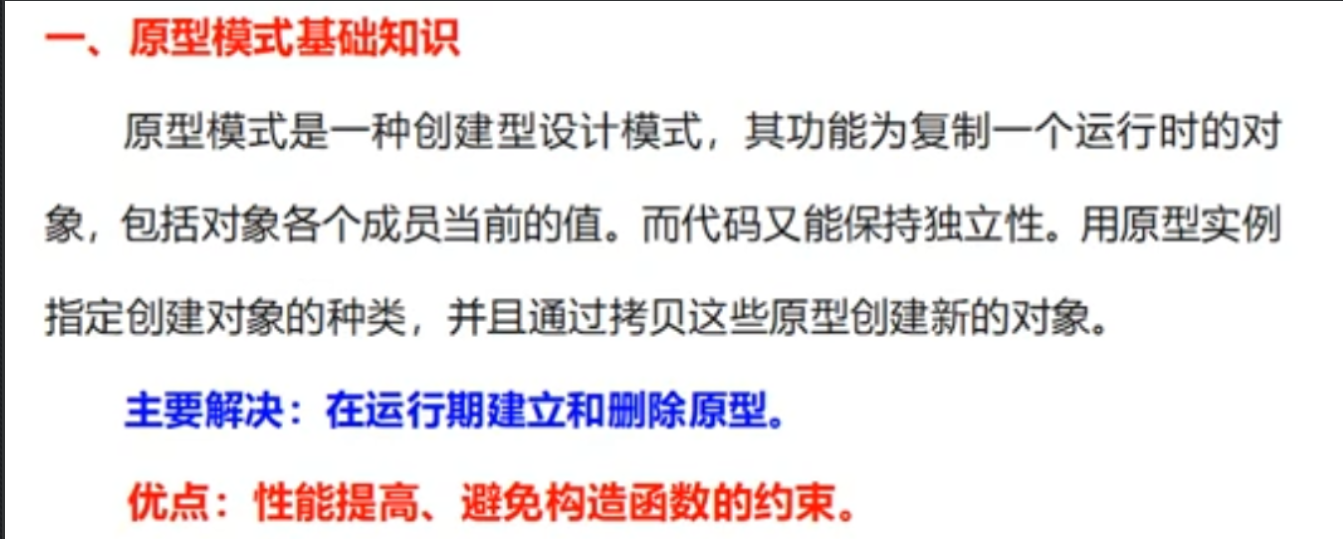
原型模式 (Prototype Pattern) 的核心思想是:通过**克隆(Clone)**现有的对象来创建新对象,而不是通过 new 操作符重新初始化。这种模式在对象创建成本较高(如需要复杂的数据库查询或大量计算)时非常有用。
在 C++ 中,原型模式通常通过一个抽象基类中的纯虚函数 clone() 来实现。
1. 原型模式关系字符图
text
       ┌──────────────────┐
       │    Prototype     │ (抽象类)
       ├──────────────────┤
       │virtual clone() =0│
       └────────┬─────────┘
                ▲
       ┌────────┴────────┐
       │ ConcreteProtorype│ (具体实现类)
       ├──────────────────┤
       │ clone() {        │────┐
       │   return new Self│    │ (返回自身的副本)
       │ }                │<───┘
       └──────────────────┘
2. C++ 代码实现
为了保持一致性,我们继续使用汽车的例子。假设我们要克隆一辆已经配置好的"迈腾"。
cpp
#include <iostream>
#include <string>
using namespace std;

// === 1. 抽象原型类 ===
class AbstractCar {
public:
    virtual ~AbstractCar() {}
    virtual AbstractCar* clone() = 0; // 核心:克隆接口
    virtual void showConfig() = 0;
};

// === 2. 具体原型类 ===
class Magotan : public AbstractCar {
private:
    string color;
    string engine;

public:
    Magotan(string c, string e) : color(c), engine(e) {}

    // 实现克隆函数
    AbstractCar* clone() override {
        // 调用拷贝构造函数,创建一个完全一样的新对象
        return new Magotan(*this);
    }

    void showConfig() override {
        cout << "迈腾配置 -> 颜色: " << color << ", 发动机: " << engine << " [地址: " << this << "]" << endl;
    }
};

// === 3. 客户端调用 ===
int main() {
    // 创建一个原型对象
    AbstractCar* prototypeMagotan = new Magotan("黑色", "V6");
    cout << "--- 原型对象 ---" << endl;
    prototypeMagotan->showConfig();

    // 通过克隆产生新对象,而不是用 new 重新设置参数
    cout << "\n--- 克隆产生的对象 ---" << endl;
    AbstractCar* car1 = prototypeMagotan->clone();
    AbstractCar* car2 = prototypeMagotan->clone();

    car1->showConfig();
    car2->showConfig();

    // 释放内存
    delete prototypeMagotan;
    delete car1;
    delete car2;

    return 0;
}
3. 原型模式的关键点
- 克隆而非新建 :
clone()方法内部通常利用拷贝构造函数来完成对象的复制。 - 深拷贝与浅拷贝 :如果类中包含指针成员,在实现
clone()时必须确保执行的是深拷贝,否则多个克隆体将共享同一块动态内存,导致程序崩溃。 - 性能优势:当初始化一个对象的过程非常繁琐(例如需要读取配置文件、初始化硬件等)时,直接内存拷贝(克隆)的速度要快得多。
拓展知识点:
建造者模式
思想
核心思想 : 将一个复杂对象的构建过程与它的**表示(最终对象)**分离,使得同样的构建过程可以创建不同的表示。
👉 重点不是"拷贝",而是一步一步组装。
与原型模式的区别
| 模式 | 关注点 |
|---|---|
| 原型模式 | 已有对象 → 快速复制 |
| 建造者模式 | 无到有 → 按步骤构建复杂对象 |
建造者模式非常适合:
- 构造函数参数很多(10+)
- 对象有固定构建流程,但配置组合不同
- 需要可读性强的对象创建代码
原型模式:我有一个现成对象,复制一个一模一样的
建造者模式:我知道建造流程,一步一步把对象"拼"出来
建造者模式角色结构图
        ┌──────────────────┐
        │     Director     │  (指挥者:控制构建顺序)
        └────────┬─────────┘
                 │
        ┌────────▼────────┐
        │     Builder     │  (抽象建造者)
        ├─────────────────┤
        │ buildColor()    │
        │ buildEngine()   │
        │ buildGearbox()  │
        │ getResult()     │
        └────────┬────────┘
                 ▲
        ┌────────┴────────┐
        │ ConcreteBuilder │  (具体建造者)
        └─────────────────┘
                 │
        ┌────────▼────────┐
        │      Product    │  (最终产品)
        └─────────────────┘
代码落地
c++
// 1、最终产品
#include <iostream>
#include <string>
using namespace std;

// === 产品类 ===
class Car {
public:
    string color;
    string engine;
    string gearbox;

    void showConfig() const {
        cout << "汽车配置 -> "
             << "颜色: " << color
             << ", 发动机: " << engine
             << ", 变速箱: " << gearbox
             << endl;
    }
};

// 2、抽象建造者
// === 抽象建造者 ===
class CarBuilder {
public:
    virtual ~CarBuilder() {}
    virtual void buildColor() = 0;
    virtual void buildEngine() = 0;
    virtual void buildGearbox() = 0;
    virtual Car* getResult() = 0;
};

// 3、具体建造者:MagotanBuilder
// === 具体建造者 ===
class MagotanBuilder : public CarBuilder {
private:
    Car* car;

public:
    MagotanBuilder() {
        car = new Car();
    }

    void buildColor() override {
        car->color = "黑色";
    }

    void buildEngine() override {
        car->engine = "V6";
    }

    void buildGearbox() override {
        car->gearbox = "8AT";
    }

    Car* getResult() override {
        return car;
    }
};

// 4、指挥者 Director(控制  构建顺序)
// === 指挥者 ===
class Director {
public:
    void construct(CarBuilder& builder) {
        builder.buildColor();
        builder.buildEngine();
        builder.buildGearbox();
    }
};

// 5、客户端调用
int main() {
    Director director;

    CarBuilder* builder = new MagotanBuilder();

    // 指挥者负责"怎么建"
    director.construct(*builder);

    // 客户端只关心最终结果
    Car* magotan = builder->getResult();
    magotan->showConfig();

    delete magotan;
    delete builder;
    return 0;
}
进阶:更"现代 C++"的 Builder(链式写法)
c++
class CarBuilder {
private:
    Car car;
public:
    CarBuilder& color(const string& c) {
        car.color = c;
        return *this;
    }
    CarBuilder& engine(const string& e) {
        car.engine = e;
        return *this;
    }
    CarBuilder& gearbox(const string& g) {
        car.gearbox = g;
        return *this;
    }

    Car build() {
        return car;
    }
};

Car car = CarBuilder()
            .color("黑色")
            .engine("V6")
            .gearbox("8AT")
            .build();

car.showConfig();
结构型模式
适配器模式
定义
适配器模式 通过引入一个中间层,把一个类的接口转换成客户端期望的接口,
在不修改原有代码的前提下实现接口兼容。
什么时候用适配器
典型场景(非常工程化):
- 接入 第三方库 / 老代码,接口改不了
- 新系统接口已定,但老系统还要继续用
- 重构过程中,需要平滑过渡
📌 关键点:不改旧代码,只包一层
适配器模式角色结构图
        ┌──────────────────┐
        │      Target      │  (客户端期望的接口)
        ├──────────────────┤
        │   request()      │
        └────────┬─────────┘
                 ▲
        ┌────────┴────────┐
        │     Adapter      │  (适配器)
        ├──────────────────┤
        │  request()       │───┐
        └────────┬─────────┘   │
                 │             │
        ┌────────▼────────┐    │
        │    Adaptee       │◄──┘
        ├──────────────────┤
        │ specificRequest()│ (旧接口)
        └──────────────────┘
代码举例(汽车接口适配器)
适配器分为两种:对象适配器 和 类适配器
场景设定:
- 新系统 :统一调用
start()启动车辆- 老系统 / 第三方类 :只有
ignite()方法- 👉 接口不一致,不能直接用
1、对象适配器
c++
// === 1、目标接口(新系统) ===
class Car {
public:
    virtual ~Car() {}
    virtual void start() = 0;
};


// === 2、被适配者(老接口 / 第三方库) ===
class OldCarSystem {
public:
    void ignite() {
        cout << "老系统:点火启动汽车" << endl;
    }
};


// === 3、适配器(核心) === (对象适配器,就是老类成为对象,供新接口调用)
class CarAdapter : public Car {
private:
    OldCarSystem* oldCar;

public:
    CarAdapter(OldCarSystem* car) : oldCar(car) {}

    void start() override {
        // 接口转换
        oldCar->ignite();
    }
};

int main() {
    // 老系统对象
    OldCarSystem* oldSystem = new OldCarSystem();

    // 通过适配器,让老系统"看起来像"新接口
    Car* car = new CarAdapter(oldSystem);

    // 客户端只认 start()
    car->start();

    delete car;
    delete oldSystem;
    return 0;
}
解耦
更灵活
2、类适配器
c++
class CarAdapter : public Car, public OldCarSystem {
public:
    void start() override {
        ignite();
    }
};
强耦合
受限于多继承
不利于维护
桥接模式
定义
核心思想 :
将抽象(Abstraction)与实现(Implementation)分离, 使它们可以独立变化,而不是通过继承形成类爆炸。
为什么需要桥接模式
假设你现在要支持:
-
车型:
SUV、Sedan -
发动机:
V6、Electric
❌ 不用桥接(继承爆炸)
SUV_V6
SUV_Electric
Sedan_V6
Sedan_Electric
👉 2 × 2 = 4 个类
再加一个发动机类型?立刻翻倍。
✅ 用桥接(两个维度独立)
车型(抽象) <───桥接───> 发动机(实现)桥接模式结构图
        ┌──────────────────────┐
        │     Abstraction      │  (抽象:车型)
        ├──────────────────────┤
        │ Engine* engine       │◄───────┐
        │ drive()              │        │
        └──────────┬───────────┘        │
                   ▲                    │
        ┌──────────┴───────────┐        │
        │  RefinedAbstraction  │        │
        │ (SUV / Sedan)        │        │
        └──────────────────────┘        │
                                        │
        ┌───────────────────────────────▼──────────────┐
        │              Implementor                     │
        │             (Engine 接口)                     │
        ├──────────────────────────────────────────────┤
        │ start()                                      │
        └───────────────┬──────────────────────────────┘
                        ▲
        ┌───────────────┴──────────────────────────────┐
        │        ConcreteImplementor                   │
        │        (V6 / Electric)                       │
        └──────────────────────────────────────────────┘
C++实例
c++
// 1️⃣ 实现层:发动机接口(Implementation)
#include <iostream>
using namespace std;

// === 实现接口:发动机 ===
class Engine {
public:
    virtual ~Engine() {}
    virtual void start() = 0;
};

// 2、2️⃣ 具体实现:不同发动机
class V6Engine : public Engine {
public:
    void start() override {
        cout << "V6 发动机启动" << endl;
    }
};

class ElectricEngine : public Engine {
public:
    void start() override {
        cout << "电动机启动" << endl;
    }
};

// 3️⃣ 抽象层:车型(Abstraction)
// === 抽象:车型 ===
class Car {
protected:
    Engine* engine;   // ⭐ 桥接点

public:
    Car(Engine* e) : engine(e) {}
    virtual ~Car() {}

    virtual void drive() = 0;
};

// 4️⃣ 扩展抽象:具体车型
class SUV : public Car {
public:
    SUV(Engine* e) : Car(e) {}

    void drive() override {
        cout << "SUV 行驶中,";
        engine->start();
    }
};

class Sedan : public Car {
public:
    Sedan(Engine* e) : Car(e) {}

    void drive() override {
        cout << "轿车行驶中,";
        engine->start();
    }
};

// 5️⃣ 客户端调用
int main() {
    Engine* v6 = new V6Engine();
    Engine* electric = new ElectricEngine();

    Car* car1 = new SUV(v6);
    Car* car2 = new Sedan(electric);

    car1->drive();
    car2->drive();

    delete car1;
    delete car2;
    delete v6;
    delete electric;
    return 0;
}
作用
桥接模式通过组合而非继承,将抽象与实现解耦, 使它们可以独立扩展,避免类爆炸问题。
组合实体对象
核心思想 :
将一组相互关联的持久化对象 (Dependent Objects)
统一封装 成一个粗粒度对象(Composite Entity) ,客户端只与这个组合实体交互,而不是直接操作多个对象。
一句话直觉版:
"一堆数据对象 → 对外只暴露一个入口"
为什么要用组合实体对象
典型问题(非常像业务代码):
- 一个业务对象由多个子对象组成
- 这些子对象:
- 生命周期一致
- 数据强相关
- 经常一起加载 / 保存
- 客户端如果直接操作它们:
- 耦合高
- 易出错
- 接口复杂
👉 组合实体 = 数据聚合 + 访问门面
组合实体模式结构图
        ┌──────────────────────┐
        │    CompositeEntity   │  (组合实体)
        ├──────────────────────┤
        │  get/set data        │
        │  内部管理对象        │
        └──────────┬───────────┘
                   │
        ┌──────────┴───────────┐
        │     CoarseGrained     │  (粗粒度对象)
        ├──────────────────────┤
        │  DependentObject A   │
        │  DependentObject B   │
        └──────────┬───────────┘
                   │
        ┌──────────┴───────────┐
        │  DependentObject     │  (依赖对象)
        └──────────────────────┘
案例
c++
// 1、1️⃣ Dependent Objects(依赖的实体对象)
#include <iostream>
#include <string>
using namespace std;

// === 依赖对象:用户实体 ===
class CustomerInfo {
public:
    CustomerInfo() {
        cout << "[CustomerInfo] 构造" << endl;
    }
    ~CustomerInfo() {
        cout << "[CustomerInfo] 析构" << endl;
    }

    void set(const string& n, const string& a) {
        name = n;
        address = a;
    }

    void show() const {
        cout << "用户: " << name << ", 地址: " << address << endl;
    }

private:
    string name;
    string address;
};

// === 依赖对象:支付实体 ===
class PaymentInfo {
public:
    PaymentInfo() {
        cout << "[PaymentInfo] 构造" << endl;
    }
    ~PaymentInfo() {
        cout << "[PaymentInfo] 析构" << endl;
    }

    void set(const string& m, double a) {
        method = m;
        amount = a;
    }

    void show() const {
        cout << "支付: " << method << ", 金额: " << amount << endl;
    }

private:
    string method;
    double amount;
};

// 这里是组合实体模式的关键点之一, 2️⃣ Coarse-Grained Object(负责创建 / 聚合)
// === 粗粒度对象 ===
class OrderData {
public:
    OrderData() {
        customer = new CustomerInfo();
        payment  = new PaymentInfo();
    }

    ~OrderData() {
        delete customer;
        delete payment;
    }

    void setCustomer(const string& name, const string& addr) {
        customer->set(name, addr);
    }

    void setPayment(const string& method, double amount) {
        payment->set(method, amount);
    }

    void show() const {
        customer->show();
        payment->show();
    }

private:
    CustomerInfo* customer;
    PaymentInfo*  payment;
};

// 3️⃣ Composite Entity(对外唯一入口)
// === 组合实体 ===
class OrderEntity {
public:
    OrderEntity() {
        orderData = new OrderData();
    }

    ~OrderEntity() {
        delete orderData;
    }

    void setOrder(const string& name,
                  const string& addr,
                  const string& payMethod,
                  double amount) {
        orderData->setCustomer(name, addr);
        orderData->setPayment(payMethod, amount);
    }

    void show() const {
        cout << "====== 订单 ======" << endl;
        orderData->show();
    }

private:
    OrderData* orderData;
};

// 4️⃣ 客户端调用(完整生命周期)
int main() {
    {
        OrderEntity order;   // 只 new 一个组合实体
        order.setOrder("小孔", "北京霍营", "微信支付", 199.0);
        order.show();
    } // 作用域结束,内部对象全部自动释放

    return 0;
}
装饰器模式
为什么需要装饰器模式呢?
核心思想:
在不修改原有类 的前提下, 动态地为对象添加职责(功能)。
一句话版:
功能要叠加,但又不想继承爆炸
假设你有一个 Car,功能需求不断增加:
- 基础车
-
- 天窗
-
- 自动驾驶
-
- 运动套件
❌ 继承的下场(类爆炸)
Car
├─ CarWithSunroof
├─ CarWithAutoDrive
├─ CarWithSunroofAndAutoDrive
├─ CarWithSportKit
├─ ...
👉 这路子迟早炸。
✅ 装饰器的思路
Car + 装饰器(功能模块) → 动态组合自我感觉:装饰器模式:就是把原本基础的数据类型,用来其,经过各种各项得到修饰处理,得到我们像要的值
装饰器模式结构图
        ┌──────────────────┐
        │    Component     │  (抽象组件【对象】)
        │  operation()     │
        └────────┬─────────┘
                 ▲
        ┌────────┴────────┐
        │ ConcreteComponent│  (基础对象)
        └─────────────────┘
                 ▲
        ┌────────┴────────┐
        │    Decorator     │  (抽象装饰器)
        │  Component*     │
        └────────┬────────┘
                 ▲
        ┌────────┴────────┐
        │ConcreteDecorator │  (具体装饰器)
        └─────────────────┘
C++ 示例(汽车功能叠加)
c++
// 1️⃣ Component:抽象组件
#include <iostream>
#include <string>
using namespace std;

// === 抽象组件 ===
class Car {
public:
    virtual ~Car() {}
    virtual string getDescription() = 0;
    virtual double cost() = 0;
};

// 2️⃣ ConcreteComponent:基础对象
// === 具体组件 ===
class BasicCar : public Car {
public:
    string getDescription() override {
        return "基础车型";
    }

    double cost() override {
        return 200000;
    }
};

// 3️⃣ Decorator:抽象装饰器
// === 抽象装饰器 ===
class CarDecorator : public Car {
protected:
    Car* car;

public:
    CarDecorator(Car* c) : car(c) {}
};

// 4️⃣ ConcreteDecorator:具体装饰器
// 4.1天窗
class SunroofDecorator : public CarDecorator {
public:
    SunroofDecorator(Car* c) : CarDecorator(c) {}

    string getDescription() override {
        return car->getDescription() + " + 天窗";
    }

    double cost() override {
        return car->cost() + 12000;
    }
};

// 4.2自动驾驶
class AutoDriveDecorator : public CarDecorator {
public:
    AutoDriveDecorator(Car* c) : CarDecorator(c) {}

    string getDescription() override {
        return car->getDescription() + " + 自动驾驶";
    }

    double cost() override {
        return car->cost() + 30000;
    }
};

// 5️⃣ 客户端动态组合
int main() {
    Car* car = new BasicCar();

    car = new SunroofDecorator(car);
    car = new AutoDriveDecorator(car);

    cout << car->getDescription() << endl;
    cout << "总价: " << car->cost() << endl;

    delete car; // 注意:这里只 delete 最外层

    return 0;
}
3️⃣ Decorator:抽象装饰器 📌 关键点:
- 装饰器 "是一个 Car"
- 同时 "包着一个 Car"
装饰器 vs 继承(本质区别)
| 对比点 | 继承 | 装饰器 |
|---|---|---|
| 功能扩展 | 编译期 | 运行期 |
| 组合方式 | 静态 | 动态 |
| 类数量 | 爆炸 | 可控 |
| 单一职责 | ❌ | ✔ |
👉 装饰器是 "用组合代替继承" 的经典案例。
装饰器 vs 适配器 vs 代理(高频混淆)
| 模式 | 核心目的 |
|---|---|
| 装饰器 | 增强功能 |
| 适配器 | 转换接口 |
| 代理 | 控制访问 |
一句话区分:
- 装饰器:功能叠加
- 适配器:接口转换
- 代理:加一道门
工程级注意点(很 C++)
1️⃣ 析构必须是 virtual
virtual ~Car() {}否则多态 delete 会炸。
2️⃣ 建议用智能指针
unique_ptr<Car> car = make_unique<BasicCar>();
car = make_unique<SunroofDecorator>(std::move(car));
car = make_unique<AutoDriveDecorator>(std::move(car));
外观模式
定义
核心思想 :
为一组复杂的子系统 提供一个统一的、高层接口 ,
让客户端更容易使用这个子系统。
一句话版:系统很复杂,对外给个"傻瓜接口"
用外观模式的时机
你一定遇到过这种代码 👇
c++
SubA a;
SubB b;
SubC c;

a.init();
b.load();
c.prepare();
a.run(b, c);
客户端:
- 要知道调用顺序
- 要知道子系统依赖
- 一改全炸
👉 外观模式就是来"挡复杂度"的
外观模式结构图
        Client
          │
          ▼
      ┌─────────┐
      │ Facade  │  (外观)
      └────┬────┘
           │
   ┌───────┼────────┐
   │       │        │
┌──▼──┐ ┌──▼──┐ ┌───▼───┐
│SubA │ │SubB │ │ SubC  │
└─────┘ └─────┘ └───────┘要点:
- Facade 不实现业务
- 只负责 协调 / 编排
C++ 示例(汽车启动系统)
场景设定
启动一辆车,需要:
- 引擎系统
- 电池系统
- ECU 系统
客户端如果直接操作,非常麻烦。
c++
// 1️⃣ 子系统类(复杂)
#include <iostream>
using namespace std;

// === 子系统 ===
class EngineSystem {
public:
    void start() {
        cout << "发动机启动" << endl;
    }
};

class BatterySystem {
public:
    void check() {
        cout << "电池自检通过" << endl;
    }
};

class ECUSystem {
public:
    void boot() {
        cout << "ECU 系统启动" << endl;
    }
};

// 2️⃣ 外观类(Facade)
// === 外观 ===
class CarFacade {
public:
    CarFacade() {
        engine = new EngineSystem();
        battery = new BatterySystem();
        ecu = new ECUSystem();
    }

    ~CarFacade() {
        delete engine;
        delete battery;
        delete ecu;
    }

    // 对外只暴露一个简单接口
    void startCar() {
        battery->check();
        ecu->boot();
        engine->start();
    }

private:
    EngineSystem* engine;
    BatterySystem* battery;
    ECUSystem* ecu;
};

// 3️⃣ 客户端调用
int main() {
    CarFacade car;
    car.startCar();
    return 0;
}
外观 vs 适配器
| 外观 | 适配器 | |
|---|---|---|
| 目的 | 简化使用 | 接口转换 |
| 面向 | 子系统 | 单个类 |
| 是否改变接口 | 否(封装) | 是(转换) |
👉 外观是"简化",适配是"兼容"
外观模式 为复杂子系统提供一个统一的高层接口,
降低客户端与子系统之间的耦合,提高系统可用性和可维护性。
享元模式
核心思想
核心思想 : 将对象中可共享的内部状态(Intrinsic State)提取出来, 在系统中只创建少量共享对象, 把**不可共享的外部状态(Extrinsic State)**在使用时传入。
用时间换空间,用"传参"换"对象数量"
为何需要享元
假设你要渲染 10 万辆车:
new Car("迈腾", "2.0T", "黑色", x, y);问题:
- 品牌、发动机、模型 99% 是重复的
- 真正不同的是:位置、速度、车牌
👉 享元模式:共享的数据不变的,需要分类的数据是 分离变化的
享元模式结构图
        Client
          │
          ▼
   ┌─────────────┐
   │ Flyweight   │ (抽象享元)
   └──────┬──────┘
          ▲
   ┌──────┴────────┐
   │ ConcreteFlywt │ (共享对象)
   └──────┬────────┘
          │
   ┌──────▼────────--┐
   │FlyweightFactory │ (工厂 + 缓存 => 享元的核心)
   └─────────────────┘
核心概念
1️⃣ 内部状态(共享)
- 不随环境变化
- 可以被多个对象共享
例如:
品牌 / 发动机 / 型号2️⃣ 外部状态(不共享)
- 每次使用时 通过参数传入
- 不存储在享元对象中,而是放在工厂中,当一个缓存
例如:
坐标 / 速度 / 车牌C++ 示例(车辆渲染)
c++
// 1️⃣ 抽象享元
#include <iostream>
#include <string>
#include <unordered_map>
using namespace std;

// === 抽象享元 ===
class CarFlyweight {
public:
    virtual ~CarFlyweight() {}
    virtual void draw(int x, int y) = 0; // 外部状态
};

// 2️⃣ 具体享元(共享对象)
// === 具体享元 ===
class CarModel : public CarFlyweight {
private:
    // 内部状态(共享)
    string brand;
    string engine;

public:
    CarModel(string b, string e)
        : brand(b), engine(e) {
        cout << "【创建享元】" << brand << " " << engine << endl;
    }

    void draw(int x, int y) override {
        cout << "绘制 " << brand << "-" << engine
             << " 在位置 (" << x << ", " << y << ")" << endl;
    }
};

// 3️⃣ 享元工厂(关键)
// === 享元工厂 ===
class CarFactory {
public:
    static CarFlyweight* getCar(const string& brand,
                                const string& engine) {
        string key = brand + "_" + engine;

        if (pool.find(key) == pool.end()) {
            pool[key] = new CarModel(brand, engine); // new 只发生一次
        }
        return pool[key];
    }

private:
    static unordered_map<string, CarFlyweight*> pool;
};

// 静态成员定义
unordered_map<string, CarFlyweight*> CarFactory::pool;

// 4️⃣ 客户端使用
int main() {
    CarFlyweight* car1 =
        CarFactory::getCar("迈腾", "2.0T");
    car1->draw(10, 20);

    CarFlyweight* car2 =
        CarFactory::getCar("迈腾", "2.0T");
    car2->draw(30, 40);

    CarFlyweight* car3 =
        CarFactory::getCar("奥迪A6", "3.0T");
    car3->draw(50, 60);

    return 0;
}

// 输出结果
【创建享元】迈腾 2.0T
绘制 迈腾-2.0T 在位置 (10, 20)
绘制 迈腾-2.0T 在位置 (30, 40)
【创建享元】奥迪A6 3.0T
绘制 奥迪A6-3.0T 在位置 (50, 60)
关键点
✔ 享元 ≠ 少 new
- 核心不是"减少 new"
- 核心是 状态拆分
✔ 必须有 Factory
没有缓存工厂,就不叫享元。
❌ 把外部状态存进享元
// 错误
class CarModel {
    int x, y;
};
👉 会导致共享污染
❌ 享元对象可变
共享对象一旦可修改,等于埋雷。
👉 享元对象最好不可变
代理模式
定义
代理模式 :为某个对象提供一个替身(代理) ,由代理对象 控制 对真实对象的 访问。
核心思想不是"扩展功能"(那是装饰器), 而是 控制访问、间接访问、附加访问逻辑。
使用场景
| 场景 | 说明 |
|---|---|
| 延迟加载(虚代理) | 对象很重,真正用到才 new |
| 权限控制(保护代理) | 访问前做权限校验 |
| 日志 / 统计 | 调用前后插逻辑 |
| 远程代理 | 本地对象代表远程服务 |
| 智能指针 | shared_ptr 本质就是代理 |
代理模式结构图
                   +------------------+
                   |      Image       |   ← 抽象主题(Subject)
                   +------------------+
                   | + display()      |
                   +------------------+
                     ▲       	   ▲
                     |        	   |
          implements |        	   | implements
                     |        	   |
     +-----------------------+   +-------------------------+
     |      ImageProxy       |   |        RealImage        |
     +-----------------------+   +-------------------------+
     | - m_filename          |   | - m_filename            |
     | - m_realImage : ptr   |   +-------------------------+
     +-----------------------+   | + display()             |
     | + display()           |   | - loadFromDisk()        |
     +-----------------------+   +-------------------------+
              |
              | owns / controls
              ▼
        RealImage (延迟 new)
关键点:
Proxy和RealSubject实现同一个接口- Client 不知道自己用的是代理还是真对象
C++示例
c++
// 1️⃣ 抽象接口(Subject)
class Image {
public:
    virtual ~Image() = default;
    virtual void display() = 0;
};

// 2️⃣ 真实对象(RealSubject)
class RealImage : public Image {
public:
    explicit RealImage(const std::string& filename) : m_filename(filename)  {
        loadFromDisk(); // 构造时,去加载文件
    }

    void display() override {
        std::cout << "Display image: " << m_filename << std::endl;
    }

private:
    std::string m_filename;

    void loadFromDisk() {
        std::cout << "Loading image from disk: " << m_filename << std::endl;
    }
};

// 3️⃣ 代理对象(Proxy)
class ImageProxy : public Image {
public:
    explicit ImageProxy(const std::string& filename) : m_filename(filename), m_realImage(nullptr) {
        std::cout << "ImageProxy created\n";
    }

    ~ImageProxy() override {
        delete m_realImage;
    }

    void display() override {
        if (!m_realImage) {
            // 延迟创建真实对象
            m_realImage = new RealImage(m_filename);
        }
        m_realImage->display();
    }

private:
    std::string m_filename;
    RealImage* m_realImage;
};

// 4️⃣ Client 使用(完全无感知)
int main() {
    Image* image = new ImageProxy("test.png");

    std::cout << "Image created, not loaded yet.\n";

    image->display();  // 第一次才真正加载
    image->display();  // 第二次直接用

    delete image;
    return 0;
}
📌 核心点全在这:
- 构造
ImageProxy时 没有 new RealImage - 只有真正
display()才 new - 代理负责生命周期控制
什么时机用代理模式呢?
✔ 满足任意一条就值得考虑:
- 对象创建很重
- 访问需要权限 / 校验
- 想控制真实对象生命周期
- 想隐藏复杂性或远程调用
行为模式
责任链模式
定义
请求沿着一条"处理者链"往下传,每个处理者要么处理,要么交给下一个。
核心思想:👉 发送请求的对象 ≠ 处理请求的对象
责任链模式 ------ 类结构图
                    +------------------------+
                    |   Handler (抽象处理者) |
                    +------------------------+
                    | - m_next : Handler*    |
                    +------------------------+
                    | + setNext(Handler*)   |
                    | + handleRequest() = 0 |
                    +-----------▲------------+
                                |
        ┌───────────────────────┼────────────────────────┐
        |                       |                        |
+-------------------+  +-------------------+  +-------------------+
| ConcreteHandlerA  |  | ConcreteHandlerB  |  | ConcreteHandlerC  |
+-------------------+  +-------------------+  +-------------------+
| + handleRequest() |  | + handleRequest() |  | + handleRequest() |
+-------------------+  +-------------------+  +-------------------+
结构重点(请你记住这 3 点)
- 每个 Handler 内部都持有一个
next指针 - Client 只和 链头 打交道
- 请求是 "一层一层传",不是跳着找
C++示例
我们用一个很经典、很好理解的例子 :👉 请假审批流程
- 组长:≤ 1 天
- 经理:≤ 3 天
- 总监:≤ 7 天
- 再多就拒绝
C++
// 1️⃣ 抽象处理者(Handler)
#include <iostream>
using namespace std;

class LeaveHandler {
protected:
    LeaveHandler* m_next = nullptr;  // m_next:责任链的"链"

public:
    virtual ~LeaveHandler() = default;

    void setNext(LeaveHandler* next) {
        m_next = next;
    }

    virtual void handleRequest(int days) = 0;  // handleRequest:统一入口
};

// 2️⃣ 具体处理者
// 2.1 组长
class TeamLeader : public LeaveHandler {
public:
    void handleRequest(int days) override {
        if (days <= 1) {
            cout << "组长批准请假 " << days << " 天\n";
        } else if (m_next) {
            m_next->handleRequest(days);
        }
    }
};
// 2.2 经理
class Manager : public LeaveHandler {
public:
    void handleRequest(int days) override {
        if (days <= 3) {
            cout << "经理批准请假 " << days << " 天\n";
        } else if (m_next) {
            m_next->handleRequest(days);
        }
    }
};
// 2.3 总监
class Director : public LeaveHandler {
public:
    void handleRequest(int days) override {
        if (days <= 7) {
            cout << "总监批准请假 " << days << " 天\n";
        } else {
            cout << "请假 " << days << " 天,被拒绝 ❌\n";
        }
    }
};

// 3️⃣ Client 端(重点:new + 组链)
int main() {
    // 创建处理者对象
    LeaveHandler* leader = new TeamLeader();
    LeaveHandler* manager = new Manager();
    LeaveHandler* director = new Director();

    // 组装责任链
    leader->setNext(manager);
    manager->setNext(director);

    cout << "=== 请假 1 天 ===\n";
    leader->handleRequest(1);

    cout << "\n=== 请假 3 天 ===\n";
    leader->handleRequest(3);

    cout << "\n=== 请假 10 天 ===\n";
    leader->handleRequest(10);

    // 清理
    delete leader;
    delete manager;
    delete director;

    return 0;
}
运行时期关系图
Client
  |
  ▼
TeamLeader  --->  Manager  --->  Director

Client 只调用 TeamLeader , 并不知道 Manager / Director 的存在
👉 责任链 = "谁能处理,谁上"
核心要点
责任链模式通过让多个处理对象形成一条链,请求沿链传递,直到某个对象处理它为止, 从而实现请求发送者与处理者的解耦
中介者模式
介绍
对象之间不再直接通信,而是通过一个中介者来协作, 从而把"网状依赖"变成"星状依赖"。
关键词:
👉 解耦对象之间的相互引用
👉 逻辑集中在中介者
类结构图
                    +-------------------------+
                    |      Mediator           |  ← 抽象中介者
                    +-------------------------+
                    | + notify(sender, evt)  |
                    +------------▲------------+
                                 |
                implements       |
                                 |
                    +-------------------------+
                    |   ConcreteMediator      |
                    +-------------------------+
                    | - colleagueA*           |
                    | - colleagueB*           |
                    +-------------------------+
                    | + notify(...)           |
                    +------------▲------------+
                                 |
        ┌────────────────────────┼────────────────────────┐
        |                        |                        |
+-------------------+   +-------------------+   +-------------------+
|   Colleague       |   | ConcreteColleagueA|   | ConcreteColleagueB|
+-------------------+   +-------------------+   +-------------------+
| - mediator*       |   | + doA()           |   | + doB()           |
+-------------------+   | + receive()       |   | + receive()       |
| + send(event)     |   +-------------------+   +-------------------+
+-------------------+
🔑 结构记忆点(一定要记)
- Colleague 只认识 Mediator
- Mediator 认识所有 Colleague
- 业务协作逻辑 集中在 Mediator
我中介者 是知道我所有的 同事 是谁,并且交给我去让他们两者简介传递信息
而不同的同事,就只认识中介,并不知道要跟谁通信
C++代码示例
下面这个例子,并不涉及到同事之间的通信,但是会让自己的状态信息,让中介去处理,并更新自己
当然也可以更新同事,这里就不具体展开讲解了
c++
// 1️⃣ 抽象中介者
#include <iostream>
#include <string>
using namespace std;

class Colleague;

// 按理说:我中介 知道我所需要的 Colleague的所有具体的对象
class Mediator {
public:
    virtual ~Mediator() = default;
    virtual void notify(Colleague* sender, const string& event) = 0;
};


// 2️⃣ 抽象同事类, 自己只知道中介
class Colleague {
protected:
    Mediator* m_mediator;

public:
    explicit Colleague(Mediator* mediator) : m_mediator(mediator) {}

    virtual ~Colleague() = default;
};

// 3️⃣ 具体同事类
// 3.1 按钮
class Button : public Colleague {
public:
    using Colleague::Colleague;

    void click() {
        cout << "[Button] clicked\n";
        m_mediator->notify(this, "click");
    }

    void enable() {
        cout << "[Button] enabled\n";
    }
};

// 3.2文本框
class TextBox : public Colleague {
public:
    using Colleague::Colleague;

    void inputText(const string& text) {
        cout << "[TextBox] input: " << text << "\n";
        m_mediator->notify(this, "textChanged");
    }

    void clear() {
        cout << "[TextBox] cleared\n";
    }
};

// 4️⃣ 具体中介者(核心逻辑)
class DialogMediator : public Mediator {
private:
    Button* m_button;
    TextBox* m_textBox;

public:
    DialogMediator(Button* btn, TextBox* tb) : m_button(btn), m_textBox(tb) {}

    // 这里只让对应的 同事做自己应该做的状态,并不涉及同事之间的交流,当然也可以让他们更新,只不过通过我这个中介
    void notify(Colleague* sender, const string& event) override {
        if (sender == m_textBox && event == "textChanged") {
            m_button->enable();
        }
        else if (sender == m_button && event == "click") {
            m_textBox->clear();
        }
    }
};

// 5️⃣ Client(new + 组装关系)
int main() {
    DialogMediator* mediator = nullptr;

    Button* button = new Button(mediator);
    TextBox* textBox = new TextBox(mediator);

    mediator = new DialogMediator(button, textBox);

    // 重新注入 mediator
    button->m_mediator = mediator;
    textBox->m_mediator = mediator;

    textBox->inputText("Hello");
    button->click();

    delete button;
    delete textBox;
    delete mediator;
    return 0;
}
📌 注意这里
- 所有协作逻辑都在中介者
- Button / TextBox 完全不知道彼此
👉 中介者 = 把"群聊"变成"找群主"
一句话背诵版(稳)
中介者模式通过引入一个中介对象, 封装对象之间的交互,使对象不再直接引用彼此,从而降低系统耦合度。
策略模式
定义
定义一组算法,把每个算法封装成独立策略,它们可以互换,且不影响使用算法的上下文对象。
关键词:
👉 算法可替换
👉 消灭 if / switch
👉 行为解耦
类结构图
                    +----------------------+
                    |    Strategy          |  ← 抽象策略
                    +----------------------+
                    | + execute()          |
                    +-----------▲----------+
                                |
          implements             |
                                |
        ┌───────────────────────┼───────────────────────┐
        |                       |                       |
+-------------------+  +-------------------+  +-------------------+
| StrategyA         |  | StrategyB         |  | StrategyC         |
+-------------------+  +-------------------+  +-------------------+
| + execute()       |  | + execute()       |  | + execute()       |
+-------------------+  +-------------------+  +-------------------+

                    +----------------------+
                    |     Context          |
                    +----------------------+
                    | - strategy : ptr     |
                    +----------------------+
                    | + setStrategy()      |
                    | + doWork()           |
                    +----------------------+
🔑 结构记忆点
- Context 持有 Strategy
- Strategy 之间互相不知道
- Context 不关心具体算法
C++示例
我们用一个工程中最常见的场景 :
👉 支付策略(微信 / 支付宝 / 银行卡)
c++
// 1️⃣ 抽象策略
#include <iostream>
using namespace std;

class PaymentStrategy {
public:
    virtual ~PaymentStrategy() = default;
    virtual void pay(int amount) = 0;
};


// 2️⃣ 具体策略
// 2.1 微信支付
class WeChatPay : public PaymentStrategy {
public:
    void pay(int amount) override {
        cout << "使用微信支付 " << amount << " 元\n";
    }
};

// 2.2 支付宝
class AliPay : public PaymentStrategy {
public:
    void pay(int amount) override {
        cout << "使用支付宝支付 " << amount << " 元\n";
    }
};

// 2.3 银行卡
class BankCardPay : public PaymentStrategy {
public:
    void pay(int amount) override {
        cout << "使用银行卡支付 " << amount << " 元\n";
    }
};


// 3️⃣ Context(重点)
class PaymentContext {
private:
    PaymentStrategy* m_strategy;

public:
    explicit PaymentContext(PaymentStrategy* strategy) : m_strategy(strategy) {}

    void setStrategy(PaymentStrategy* strategy) {
        m_strategy = strategy;
    }

    void pay(int amount) {
        if (m_strategy)
            m_strategy->pay(amount);
    }
};


// 4️⃣ Client(new + 切换策略)
int main() {
    PaymentStrategy* wechat = new WeChatPay();
    PaymentStrategy* alipay = new AliPay();
    PaymentStrategy* bank = new BankCardPay();

    PaymentContext context(wechat);
    context.pay(100);

    context.setStrategy(alipay);
    context.pay(200);

    context.setStrategy(bank);
    context.pay(300);

    delete wechat;
    delete alipay;
    delete bank;
    return 0;
}
📌 注意
- Context 不
new策略 - 只"使用"策略
运行时期的对象关系图
yaml
Client
  |
  ▼
PaymentContext
  |
  ▼
PaymentStrategy  --->  WeChatPay / AliPay / BankCardPay
切换算法 = 换策略对象
请求执行流程(时序): Client → Context → Strategy.execute()
需要知道:
策略模式通过将算法封装为独立对象,使它们可以互换, 从而让算法的变化不影响使用它们的上下文。
模板模式
定义
在父类中定义算法的整体骨架, 把某些步骤延迟到子类中实现,从而在不改变算法结构的前提下,重定义部分步骤
关键词:
👉 流程固定
👉 步骤可变
👉 继承 + 多态
类结构图
                    +---------------------------+
                    |   AbstractClass           |
                    +---------------------------+
                    | + templateMethod() final  |  ← 模板方法
                    | - step1()                 |
                    | - step2() = 0             |  ← 可变步骤
                    | - step3()                 |
                    +-------------▲-------------+
                                  |
                implements        |
                                  |
                    +---------------------------+
                    |   ConcreteClass           |
                    +---------------------------+
                    | + step2()                 |
                    +---------------------------+
🔑 结构记忆点
- 模板方法在父类 (且不可以被重载 final)
- 执行顺序写死
- **子类只去填补 为 "空"**的方法
C++示例
c++
// 1️⃣ 抽象父类(模板定义者)
#include <iostream>
using namespace std;

class Beverage {
public:
    virtual ~Beverage() = default;

    // 模板方法:流程固定
    void make() final {
        boilWater();
        brew();
        pourInCup();
        addCondiments();
    }

protected:
    void boilWater() {
        cout << "烧水\n";
    }

    virtual void brew() = 0;         // 可变步骤
    virtual void addCondiments() = 0; // 可变步骤

    void pourInCup() {
        cout << "倒入杯中\n";
    }
};


// 2️⃣ 具体子类
// 2.1 咖啡
class Coffee : public Beverage {
protected:
    void brew() override {
        cout << "冲泡咖啡\n";
    }

    void addCondiments() override {
        cout << "加糖和牛奶\n";
    }
};

// 2.2 茶
class Tea : public Beverage {
protected:
    void brew() override {
        cout << "泡茶叶\n";
    }

    void addCondiments() override {
        cout << "加柠檬\n";
    }
};

// 3️⃣ Client(new + 使用)
int main() {
    Beverage* coffee = new Coffee();
    Beverage* tea = new Tea();

    cout << "=== 制作咖啡 ===\n";
    coffee->make();

    cout << "\n=== 制作茶 ===\n";
    tea->make();

    delete coffee;
    delete tea;
    return 0;
}
📌 重点
make()是模板方法- 子类 不能改流程
- 只能实现
brew()/addCondiments()
运行期间执行流程
make()
 ├─ boilWater()      (父类)
 ├─ brew()           (子类 Coffee)
 ├─ pourInCup()      (父类)
 └─ addCondiments()  (子类 Coffee)
📌 流程不变,行为可变
👉 算法控制权在父类
模板方法里常见的"进阶点"(工程常用)
1️⃣ 钩子方法(Hook)
c
virtual bool customerWantsCondiments() {
    return true;
}
c
void make() {
    boilWater();
    brew();
    pourInCup();
    if (customerWantsCondiments()) {
        addCondiments();
    }
}
子类可选择覆盖,也可不管。这个过程是通过 钩子方法来去确定的
核心
👉 模板方法 = 父类定流程,子类填细节
模板方法模式在父类中定义算法骨架, 将部分步骤延迟到子类实现, 从而在不改变算法结构的情况下扩展行为。
状态模式
定义
允许对象在其内部状态 改变时改变 它的行为, 看起来就像修改了对象的类。
关键词:
👉 行为随状态变
👉 状态自动切换
👉 消灭状态 if / switch
状态模式 类结构图
                    +----------------------+
                    |       State          |  ← 抽象状态
                    +----------------------+
                    | + handle()           |
                    +-----------▲----------+
                                |
          implements            |
                                |
        ┌───────────────────────┼───────────────────────┐
        |                       |                       |
+-------------------+  +-------------------+  +-------------------+
| ConcreteStateA    |  | ConcreteStateB    |  | ConcreteStateC    |
+-------------------+  +-------------------+  +-------------------+
| + handle()        |  | + handle()        |  | + handle()        |
+-------------------+  +-------------------+  +-------------------+

                    +----------------------+
                    |       Context        |
                    +----------------------+
                    | - state : State*     |
                    +----------------------+
                    | + setState()         |
                    | + request()          |
                    +----------------------+
🔑 结构记忆点(非常重要)
- Context 持有 State
- State 决定下一个 State
- Client 不参与状态切换
C++示例
我们用一个非常典型的例子 :👉 自动售货机(待机 / 已投币 / 出货)
c++
// 1️⃣ 抽象状态
#include <iostream>
using namespace std;

class VendingMachine;

class State {
public:
    virtual ~State() = default;
    virtual void handle(VendingMachine* machine) = 0;
};

// 2️⃣ Context(状态持有者)
class VendingMachine {
private:
    State* m_state;

public:
    explicit VendingMachine(State* state) : m_state(state) {}

    void setState(State* state) {
        m_state = state;
    }

    void request() {
        m_state->handle(this);
    }
};

// 3️⃣ 具体状态类
// 3.1 待机状态
class IdleState : public State {
public:
    void handle(VendingMachine* machine) override;
};

// 3.2 已投币状态
class HasCoinState : public State {
public:
    void handle(VendingMachine* machine) override;
};

// 3.3 出货状态
class DispenseState : public State {
public:
    void handle(VendingMachine* machine) override;
};

// 4️⃣ 状态行为 + 状态切换(核心)
void IdleState::handle(VendingMachine* machine) {
    cout << "投币成功\n";
    machine->setState(new HasCoinState());
}

void HasCoinState::handle(VendingMachine* machine) {
    cout << "选择商品\n";
    machine->setState(new DispenseState());
}

void DispenseState::handle(VendingMachine* machine) {
    cout << "正在出货\n";
    machine->setState(new IdleState());
}

// 5️⃣ Client(new + 使用)
int main() {
    VendingMachine machine(new IdleState());

    machine.request(); // 投币
    machine.request(); // 选择商品
    machine.request(); // 出货
    machine.request(); // 再次投币

    return 0;
}
📌 注意
- Context 只转发 ; 不写 if / switch
- 状态自己决定切换, Context 不关心"切到哪"
每个具体的状态,利用状态机在处理完毕的时候,去切换状态到下一个状态
状态机 每 执行一次 , 就会切换一次状态
运行期间的状态流程图
IdleState  <-------------|
    ↓ 投币				|
HasCoinState			  |
    ↓ 选择商品			   |
DispenseState			  |
    ↓ 出货完成			   |
IdleState				  |
	↓---------------------|
📌 行为 = 状态类的方法
核心
状态模式通过将 状态 封装为独立对象,使对象在 不同状态下 表现出不同的行为,并由状态对象自身负责状态转换。
状态机去执行具体的 某种状态下的行为,这种状态的切换 由 具体的状态自己负责
观察者模式
定义
定义对象之间的一对多依赖关系,当一个对象状态发生变化时, 所有依赖它的对象都会收到通知并自动更新。
关键词:
👉 发布 / 订阅
👉 广播通知
👉 松耦合
类结构图
                +----------------------+
                |      Subject         |  ← 被观察者(抽象)
                +----------------------+
                | + attach(Observer*)  |
                | + detach(Observer*)  |
                | + notify()           |
                +-----------▲----------+
                            |
            implements      |
                            |
                +----------------------+
                |   ConcreteSubject    |
                +----------------------+
                | - state              |
                +----------------------+
                | + getState()         |
                | + setState()         |
                +-----------▲----------+
                            |
                            |
        ┌───────────────────┼───────────────────┐
        |                   |                   |
+-------------------+ +-------------------+ +-------------------+
|   Observer        | | ConcreteObserverA | | ConcreteObserverB |
+-------------------+ +-------------------+ +-------------------+
| + update()        | | + update()        | | + update()        |
+-------------------+ +-------------------+ +-------------------+
🔑 结构记忆点(非常重要)
- Subject 持有 Observer 列表
- Observer 只关心 Subject
- 通知是"广播",不是定向
c++示例
我们用一个特别经典、非常好理解的例子 : 👉 股票价格变化 → 多个客户端同步更新
c++
// 1️⃣ 抽象观察者
#include <iostream>
#include <vector>
using namespace std;

class Observer {
public:
    virtual ~Observer() = default;
    virtual void update(int price) = 0;
};

// 2️⃣ 抽象被观察者(Subject)
class Subject {
public:
    virtual ~Subject() = default;
    virtual void attach(Observer* obs) = 0;
    virtual void detach(Observer* obs) = 0;
    virtual void notify() = 0;
};

// 3️⃣ 具体被观察者
class Stock : public Subject {
private:
    int m_price = 0;
    vector<Observer*> m_observers;

public:
    void attach(Observer* obs) override {
        m_observers.push_back(obs);
    }

    void detach(Observer* obs) override {
        m_observers.erase(
            remove(m_observers.begin(), m_observers.end(), obs),
            m_observers.end());
    }

    void setPrice(int price) {
        m_price = price;
        notify();
    }

    int getPrice() const {
        return m_price;
    }

    void notify() override {
        for (auto* obs : m_observers) {
            obs->update(m_price);
        }
    }
};

// 4️⃣ 具体观察者
// 4.1 手机客户端
class MobileClient : public Observer {
public:
    void update(int price) override {
        cout << "[手机] 股票价格更新为: " << price << endl;
    }
};

// 4.2 网页客户端
class WebClient : public Observer {
public:
    void update(int price) override {
        cout << "[网页] 股票价格更新为: " << price << endl;
    }
};

// 5️⃣ Client(new + 组装关系)
int main() {
    Stock* stock = new Stock();

    Observer* mobile = new MobileClient();
    Observer* web = new WebClient();

    stock->attach(mobile);
    stock->attach(web);

    stock->setPrice(100);
    stock->setPrice(120);

    delete mobile;
    delete web;
    delete stock;
    return 0;
}
📌 关键点
Subject不知道 Observer 的具体类型 , 只是通过notify调用update
运行期间关系图
           Stock (Subject)
             |
     ┌───────┼────────┐
     ▼       ▼        ▼
 Mobile   WebClient  ...
Observer

// 通知流程(时序)
setPrice()
   ↓
notify()
   ↓
ObserverA.update()
ObserverB.update()
ObserverC.update()
📌 一变,多响
✔ 没有顺序保证
✔ 没有返回值依赖
总结:观察者模式定义了一种一对多的依赖关系,当被观察对象状态发生变化时,所有观察者都会收到通知并自动更新。
备忘录模式
定义
在不破坏对象封装性的前提下,捕获并保存对象的 内部状态,以便以后可以 恢复到该状态。
关键词:
👉 快照 / 回滚
👉 封装不被破坏
👉 状态由外部保存
类结构图
                 +----------------------+
                 |     Originator       |  ← 原发器(状态拥有者)
                 +----------------------+
                 | - state              |
                 +----------------------+
                 | + createMemento()    |
                 | + restore(Memento)   |
                 +-----------▲----------+
                             |
                             | creates / uses
                             |
                 +----------------------+
                 |      Memento         |  ← 备忘录
                 +----------------------+
                 | - state              |
                 +----------------------+
                 | (对 Caretaker 不可见) |
                 +----------------------+

                 +----------------------+
                 |     Caretaker        |  ← 管理者
                 +----------------------+
                 | - memento            |
                 +----------------------+
🔑 结构记忆点(非常重要)
- 状态只存在于 Originator
- Caretaker 只保存,不读取
- Memento 是"封装的快照"
C++示例
👉 文本编辑器的撤销功能
c++
// 1️⃣ 备忘录类(只存状态)
#include <iostream>
#include <string>
using namespace std;

class Memento {
private:
    string m_text;

public:
    explicit Memento(const string& text) : m_text(text) {}

    string getText() const {
        return m_text;
    }
};

// 2️⃣ 原发器(状态拥有者)
class TextEditor {
private:
    string m_text;

public:
    void setText(const string& text) {
        m_text = text;
        cout << "当前文本: " << m_text << endl;
    }

    Memento* createMemento() {
        return new Memento(m_text);
    }

    void restore(Memento* memento) {
        m_text = memento->getText();
        cout << "恢复文本: " << m_text << endl;
    }
};

// 3️⃣ 管理者(Caretaker)
class History {
private:
    Memento* m_memento = nullptr;

public:
    void save(Memento* memento) {
        m_memento = memento;
    }

    Memento* get() {
        return m_memento;
    }
};

// 4️⃣ Client(new + 使用)
int main() {
    TextEditor editor;
    History history;

    editor.setText("Hello");
    history.save(editor.createMemento()); // 保存快照

    editor.setText("Hello World");
    editor.setText("Hello World!!!");

    cout << "\n=== Undo ===\n";
    editor.restore(history.get()); // 回滚

    return 0;
}
📌 注意
- 备忘录类的:状态是私有的, 外部无法修改
- 只有 TextEditor 能读 Memento, 外部无法窥探内部状态
- Caretaker 的职责只有一个:保存
运行期间对象关系图
Client
  |
  ▼
Caretaker ----> Memento
                    ▲
                    |
               Originator

五、撤销流程(一步一步看)
1. Originator.createMemento()
2. Caretaker 保存 Memento
3. Originator 状态变化
4. Originator.restore(Memento)
✔ 没有 if / switch
✔ 没有状态泄漏
工程中的真实使用场景
- 文本编辑器 Undo / Redo
- IDE 历史记录
- 游戏存档
- 配置回滚
备忘录模式在不破坏封装的前提下,捕获并保存对象的内部状态, 使对象能够恢复到之前的状态。
命令模式
定义
把"请求"封装成一个对象,从而让你用 不同的请求、队列、撤销、日志等方式 来参数化调用者
再直白点:
- 调用者(Invoker):不关心"怎么做"
- 命令(Command):知道"做什么"
- 接收者(Receiver):真正干活的人
📌 核心解耦点:
"谁发命令" 和 "谁执行命令" 解耦
应用场景
你会在这些场景中非常适合用它:
- GUI 按钮(Qt 里特别典型)
- 撤销 / 重做(Undo / Redo)
- 宏命令(一次执行多个操作)
- 日志 / 事务 / 队列化请求
👉 Qt 的 QAction + slot,本质上就很像命令模式
角色划分
| 角色 | 含义 |
|---|---|
| Command | 抽象命令接口 |
| ConcreteCommand | 具体命令 |
| Receiver | 真正执行动作的对象 |
| Invoker | 调用命令的对象 |
| Client | 创建并组装对象 |
类结构图
        +----------------+
        |    Command     |  <----- 抽象命令
        |----------------|
        | +execute()     |
        +----------------+
                 ▲
                 |
        +----------------------+
        | ConcreteCommand      |
        |----------------------|
        | - receiver           |
        | +execute()           |
        +----------------------+
                 |
                 v
        +----------------+
        |   Receiver     |  <----- 真正干活
        |----------------|
        | +action()      |
        +----------------+

        +----------------+
        |   Invoker      |  <----- 调用者
        |----------------|
        | - command      |
        | +click()       |
        +----------------+
📌 Invoker 完全不知道 Receiver 的存在
C++示例
我们用一个**"遥控器控制灯"**的经典例子
c++
// 1️⃣ 抽象命令
class Command {
public:
    virtual ~Command() {}
    virtual void execute() = 0;
};

// 2️⃣ 接收者(真正干活的人)
#include <iostream>
using namespace std;

class Light {
public:
    void on() {
        cout << "灯被打开了" << endl;
    }

    void off() {
        cout << "灯被关闭了" << endl;
    }
};

// 3️⃣ 具体命令(封装请求)
// 3.1 开启
class LightOnCommand : public Command {
public:
    LightOnCommand(Light* light) : m_light(light) {}

    void execute() override {
        m_light->on();
    }

private:
    Light* m_light;
};

// 3.2关闭
class LightOffCommand : public Command {
public:
    LightOffCommand(Light* light) : m_light(light) {}

    void execute() override {
        m_light->off();
    }

private:
    Light* m_light;
};

// 4️⃣ 调用者(Invoker)
class RemoteControl {
public:
    RemoteControl(Command* command) : m_command(command) {}

    void pressButton() {
        m_command->execute();
    }

private:
    Command* m_command;
};

// 5️⃣ Client(组装对象)
int main() {
    // 接收者
    Light* livingRoomLight = new Light();

    // 命令
    Command* lightOn = new LightOnCommand(livingRoomLight);
    Command* lightOff = new LightOffCommand(livingRoomLight);

    // 调用者, 通过命令,去让这个命令做一些工作, 而这个命名会让这个ligit去给一个命令,去做具体的任务
    RemoteControl* remote1 = new RemoteControl(lightOn);
    RemoteControl* remote2 = new RemoteControl(lightOff);

    remote1->pressButton();  // 打开灯
    remote2->pressButton();  // 关闭灯

    // 释放资源
    delete remote1;
    delete remote2;
    delete lightOn;
    delete lightOff;
    delete livingRoomLight;

    return 0;
}| 设计模式 | Qt 中的影子 |
|---|---|
| Command | QAction |
| Invoker | QPushButton / QMenu |
| Receiver | 业务对象 |
| execute | slot |
命令模式 = 把"函数调用"升级成"对象"
访问者模式
定义
把"对一组对象的操作"抽离出来,放到访问者中,而不是写在对象里
- 对象结构稳定(类很少改)
- 操作经常变(分析 / 统计 / 导出 / 打印 / 校验)
👉 那就用访问者
为何需要访问者
假设你有这些类:
Circle
Rectangle
Triangle
现在你要:
- 计算面积
- 打印信息
- 导出 JSON
- 做碰撞检测
- 生成 DXF
❌ 不用访问者:
👉 每加一种"操作",每个类都要改
✔️ 用访问者:
👉 类不动,只加 Visitor
访问者模式最关键的一点:运行时同时根据「元素类型」和「访问者类型」分派函数
主要是依靠这句:
element->accept(visitor);
结构图
                +----------------+
                |   Visitor      |  <---- 抽象访问者
                |----------------|
                | visit(A)       |
                | visit(B)       |
                +----------------+
                         ▲
                         |
        +--------------------------------+
        | ConcreteVisitor                |
        +--------------------------------+

        +----------------+
        |   Element      |  <---- 抽象元素
        |----------------|
        | accept(Visitor)|
        +----------------+
                 ▲
     +-----------+-----------+
     |                       |
+----------+            +----------+
| ElementA |            | ElementB |
|----------|            |----------|
| accept() |            | accept() |
+----------+            +----------+
c++示例
我们用一个几何图形 + 面积 / 打印访问者的例子
c++
// 1️⃣ 前向声明
class Circle;
class Rectangle;

// 2️⃣ 抽象访问者
class ShapeVisitor {
public:
    virtual ~ShapeVisitor() {}
    virtual void visit(Circle* circle) = 0;
    virtual void visit(Rectangle* rect) = 0;
};

// 3️⃣ 抽象元素
class Shape {
public:
    virtual ~Shape() {}
    virtual void accept(ShapeVisitor* visitor) = 0;
};

// 4️⃣ 具体元素
// 4.1 Circle
class Circle : public Shape {
public:
    Circle(double r) : m_radius(r) {}

    double radius() const { return m_radius; }

    void accept(ShapeVisitor* visitor) override {
        visitor->visit(this);   // 👈 关键
    }

private:
    double m_radius;
};

// 4.2Rectangle
class Rectangle : public Shape {
public:
    Rectangle(double w, double h)
        : m_width(w), m_height(h) {}

    double width() const { return m_width; }
    double height() const { return m_height; }

    void accept(ShapeVisitor* visitor) override {
        visitor->visit(this);
    }

private:
    double m_width;
    double m_height;
};

// 5️⃣ 具体访问者 ①:面积计算
#include <iostream>
using namespace std;

class AreaVisitor : public ShapeVisitor {
public:
    void visit(Circle* circle) override {
        double area = 3.14159 * circle->radius() * circle->radius();
        cout << "Circle area = " << area << endl;
    }

    void visit(Rectangle* rect) override {
        double area = rect->width() * rect->height();
        cout << "Rectangle area = " << area << endl;
    }
};

// 6️⃣ 具体访问者 ②:信息打印
class PrintVisitor : public ShapeVisitor {
public:
    void visit(Circle* circle) override {
        cout << "Circle, radius = " << circle->radius() << endl;
    }

    void visit(Rectangle* rect) override {
        cout << "Rectangle, width = "
             << rect->width()
             << ", height = "
             << rect->height()
             << endl;
    }
};

// 7️⃣ Client(new + 构造)
#include <vector>

int main() {
    vector<Shape*> shapes;

    shapes.push_back(new Circle(5.0));
    shapes.push_back(new Rectangle(4.0, 6.0));

    ShapeVisitor* areaVisitor = new AreaVisitor();
    ShapeVisitor* printVisitor = new PrintVisitor();

    for (auto shape : shapes) {
        shape->accept(printVisitor);
        shape->accept(areaVisitor);
    }

    // 清理
    delete areaVisitor;
    delete printVisitor;

    for (auto shape : shapes)
        delete shape;

    return 0;
}
总结
✅ 优点
- 新增"操作"极其方便
- 符合 单一职责原则
- 非常适合 AST / OCC 拓扑遍历 / 文档模型
❌ 缺点(劝退点)
- 新增 Element 很痛苦
- 要改所有 Visitor
- 类之间耦合强(Visitor 依赖所有 Element)
- 对新手不友好(双分派)
✔️ 用它
- 对象结构 稳定
- 操作 经常变
- 编译器 / 解析器 / 几何拓扑遍历
❌ 别用它
- 类结构经常变
- 只是简单多态就能搞定
- 访问逻辑很少
访问者模式 = 把"算法"从"数据结构"里剥离出来
解释器模式
定义
定义:说人话:
- 你先定义一套 规则 / 语法
- 再用一堆对象 "解释"表达式
- 最终得到一个结果
使用场景
- 数学表达式:
1 + 2 - 3 - 规则引擎:
age > 18 AND vip == true - SQL where 子集
- 配置规则 / 权限表达式
- 编译器里的 AST 解释执行
👉 语法固定 + 反复解释
结构图
c++
                 +----------------------+
                 |   AbstractExpression |
                 |----------------------|
                 | interpret(Context)   |
                 +-----------▲----------+
                             |
           +-----------------+-----------------+
           |                                   |
+-----------------------+        +------------------------+
| TerminalExpression    |        | NonTerminalExpression  |
|-----------------------|        |------------------------|
| interpret()           |        | interpret()            |
+-----------------------+        +------------------------+
                                         ▲
                                         |
                              +-----------------------+
                              |  Expression组合结构    |
                              +-----------------------+

                 +----------------------+
                 |      Context         |
                 |----------------------|
                 | 输入 / 状态 / 变量表   |
                 +----------------------+
C++示例
以最经典的加减法表达式为例:去解释这个表达式:
(5 + 3) - 2
c++
// 1️⃣ Context(上下文,可选),这里我们不放变量,简化成直接返回值。
class Context {
    // 这里可以放变量表、环境信息
};

// 2️⃣ 抽象表达式
class Expression {
public:
    virtual ~Expression() {}
    virtual int interpret(Context& ctx) = 0;
};

// 3️⃣ 终结符表达式(数字)
class NumberExpression : public Expression {
public:
    explicit NumberExpression(int value)
        : m_value(value) {}

    int interpret(Context&) override {
        return m_value;
    }

private:
    int m_value;
};

// 4️⃣ 非终结符表达式(加法)
class AddExpression : public Expression {
public:
    AddExpression(Expression* left, Expression* right)
        : m_left(left), m_right(right) {}

    ~AddExpression() {
        delete m_left;
        delete m_right;
    }

    int interpret(Context& ctx) override {
        return m_left->interpret(ctx) + m_right->interpret(ctx);
    }

private:
    Expression* m_left;
    Expression* m_right;
};

// 5️⃣ 非终结符表达式(减法)
class SubExpression : public Expression {
public:
    SubExpression(Expression* left, Expression* right)
        : m_left(left), m_right(right) {}

    ~SubExpression() {
        delete m_left;
        delete m_right;
    }

    int interpret(Context& ctx) override {
        return m_left->interpret(ctx) - m_right->interpret(ctx);
    }

private:
    Expression* m_left;
    Expression* m_right;
};

// 6️⃣ Client(new + 构造 AST)
#include <iostream>
using namespace std;

int main() {
    Context ctx;

    // 构造表达式树:(5 + 3) - 2
    Expression* expression =
        new SubExpression(
            new AddExpression(
                new NumberExpression(5),
                new NumberExpression(3)
            ),
            new NumberExpression(2)
        );

    cout << "Result = " << expression->interpret(ctx) << endl;

    delete expression;
    return 0;
}
执行过程:
SubExpression
 ├─ AddExpression
 │   ├─ Number(5)
 │   └─ Number(3)
 └─ Number(2)
执行顺序:

Number(5) → 5

Number(3) → 3

Add → 8

Number(2) → 2

Sub → 6
总结
解释器模式为一门简单语言定义语法表示,并定义解释器来解释语言中的句子。
迭代器模式
定义
提供一种方法顺序访问一个聚合对象中的各个元素,而不暴露其内部表示。
翻成工程话:
- 数据怎么存的,你别管
- 我给你一个"游标"
- 你只管
next / hasNext
使用迭代器的原因:
不用迭代器,你会写出这样的代码:
for (int i = 0; i < arrSize; ++i) {
    // 访问数组
}
但如果内部结构变成:
- 链表?
- 树?
- 跳表?
- OCC 的拓扑结构?
❌ Client 全崩
✔️ 迭代器:访问逻辑不变
结构图
            +----------------------+
            |      Iterator        |
            |----------------------|
            | hasNext()            |
            | next()               |
            +-----------▲----------+
                        |
            +----------------------+
            |  ConcreteIterator    |
            +----------------------+

            +----------------------+
            |     Aggregate        |
            |----------------------|
            | createIterator()     |
            +-----------▲----------+
                        |
            +----------------------+
            | ConcreteAggregate    |
            |----------------------|
            | 内部数据结构           |
            +----------------------+
C++示例
我们做一个简单数组容器,但 Client 完全不知道它是数组。
c++
// 1️⃣ 迭代器接口
class Iterator {
public:
    virtual ~Iterator() {}
    virtual bool hasNext() = 0;
    virtual int next() = 0;
};

// 2️⃣ 聚合接口
class Aggregate {
public:
    virtual ~Aggregate() {}
    virtual Iterator* createIterator() = 0;
};

// 3️⃣ 具体聚合(内部是数组)
class IntCollection : public Aggregate {
public:
    IntCollection(int* data, int size)
        : m_data(data), m_size(size) {}

    Iterator* createIterator() override;

    int get(int index) const {
        return m_data[index];
    }

    int size() const {
        return m_size;
    }

private:
    int* m_data;
    int m_size;
};

// 4️⃣ 具体迭代器
class IntIterator : public Iterator {
public:
    explicit IntIterator(IntCollection* collection)
        : m_collection(collection), m_index(0) {}

    bool hasNext() override {
        return m_index < m_collection->size();
    }

    int next() override {
        return m_collection->get(m_index++);
    }

private:
    IntCollection* m_collection;
    int m_index;
};

// 5️⃣ 关联 Iterator 和 Aggregate
Iterator* IntCollection::createIterator() {
    return new IntIterator(this);
}

// 6️⃣ Client 使用(完全不知道内部结构)
#include <iostream>
using namespace std;

int main() {
    int data[] = {1, 3, 5, 7, 9};

    Aggregate* collection = new IntCollection(data, 5);
    Iterator* it = collection->createIterator();

    while (it->hasNext()) {
        cout << it->next() << " ";
    }

    cout << endl;

    delete it;
    delete collection;
    return 0;
}
👉 STL 是迭代器模式的教科书级实现
c
for (auto it = v.begin(); it != v.end(); ++it) {
    cout << *it;
}
优缺点:
✅ 优点
- 解耦遍历与数据结构
- 支持多种遍历方式
- 统一访问接口
❌ 缺点
- 类数量变多
- 简单结构用它显得"重"
总结
迭代器模式提供一种统一方式顺序访问聚合对象的元素,而不暴露其内部结构。