本文深入探讨了 Python 全局解释器锁(GIL)的内部机制,揭示其对多线程性能的影响,帮助开发者理解如何在多线程环境中优化 Python 应用。原文:Tearing Off the GIL Veil: A Deep Dive into Python Multithreading's Inner Mechanics

Python 全局解释器锁(GIL,Global Interpreter Lock)引发的讨论比其他任何语言功能都多。不止你一个人在看到 CPU 核心闲置,而 Python 脚本缓慢运行时,会觉得疑惑。你也不是唯一一个想知道为什么增加线程有时会让代码变慢。这不仅是学术上的好奇心,而是因为理解 GIL 决定了你是在构建可扩展的系统还是在高负载下会崩溃的系统。
说实话,大多数 Python 开发者都误解了 GIL。他们要么把 GIL 当作致命因素,要么完全忽视,而这两种想法都是错误的。事实更为复杂,也更有趣。
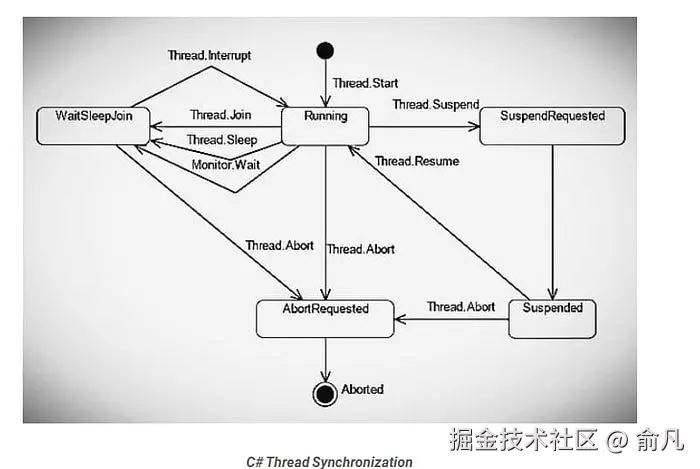
揭开 GIL 面纱 ------ 这到底是什么?
要真正掌握 Python 多线程,必须先征服 GIL 系统,这是无法回避的。
GIL 实质
GIL 是 CPython 解释器内部的一个互斥锁。它的工作看似简单:确保任何时刻只有一个线程执行 Python 字节码。可以把它看作是一次性后台通行证 ------ 无论有多少表演者(线程),同一时间只能有一个上台。
这里有个大多数教程都会忽略的关键见解:GIL 保护的是解释器,而不是应用业务代码。它存在于应用逻辑之下的一个层级。

为什么需要 GIL?
GIL 并非为了折磨开发者,而是基于 Python 内存管理架构的务实工程决策。
参考计数问题
Python 内存管理依赖引用计数。每个对象都维护一个 ob_refcnt 变量,跟踪指向它的引用数量。当计数归零时,对象会被垃圾回收。听起来很简单,对吧?
混乱由此开始。考虑没有 GIL 的情景:
python
# 伪代码演示竞态条件下的危险性
# 线程 1:
a = "Hello"  # 读取 ob_refcnt = 1, 准备增加

# 线程 2 (并发):
del a       # 读取 ob_refcnt = 1, 准备减少

# 如果没有同步,最终结果可能是 0, 1, 或 2
# 结果: 内存泄漏或灾难性崩溃
没有保护,并发线程会损坏引用计数,导致内存泄漏(对象未被释放)或分段错误(对象过早释放)。CPython 团队面临抉择:
- 细粒度锁定:为每个对象和操作添加锁
- 全局锁:一个主锁控制解释器访问
他们选择了第二个选项。为什么?因为细粒度锁定会让 Python 的单线程性能(常见情况)大幅下降,而与 C 扩展集成也会变成一场噩梦。
GIL 的实际性能影响
大多数文章都说错了真相:GIL 并不是永久锁。解释器会策略性的进行释放:
- 在执行字节码指令后,现代 Python(3.2+)采用基于时间的切换 ------ 默认每 5ms 一次
- 在 I/O 操作期间:文件读取、网络请求和数据库查询都会触发 GIL 释放
- 在调用 C 扩展时,许多 NumPy/SciPy 函数会释放 GIL
- 在
time.sleep()期间:明确释放 GIL
性能影响可以明确划分:
- CPU 密集型任务:线程开销增加,但没有并行性。线程花更多时间用于争夺 GIL 而非计算。上下文切换成本高昂,性能通常比单线程代码差 。
- I/O 密集型任务:线程在这里大放异彩。当某个线程等待网络响应时,其他线程可以执行。这就是为什么网页服务器、网页爬虫器和 API 客户端从线程中获益巨大。
内部机制 ------ Python 如何调度线程
当代码调用 thread.start() 时,底层实际上在干什么?我们一层层剥开。
用户空间与内核空间:线程所在
Python 的 threading 模块会封装本地操作系统线程,理解这一点至关重要:
- 每个 Python 线程对应一个真实的操作系统线程(Unix 上的 POSIX 线程,Windows 上的 Windows 线程)
- 操作系统调度器给线程分配 CPU 时间
- Python 解释器在操作系统调度之上管理 GIL 分发
这形成了双层系统,操作系统决定哪个线程获得 CPU 时间 ,而 GIL 决定哪个线程能执行 Python 代码。
抢占式调度及其陷阱
CPython 使用抢占式线程调度,以下是 Python 3.2+ 的时间线:
在 Python 3.2 之前,解释器每 100 字节指令发布一次 GIL(可通过现已弃用的 sys.setcheckinterval() 配置)。
Python 3.2 起,改用 sys.setswitchinterval(),改为基于时间的间隔,默认 5ms。
python
import sys

# 检查当前切换间隔 (Python 3.2+)
interval = sys.getswitchinterval()
print(f"Switch interval: {interval}s")  # 默认: 0.005

# 如果需要,请调整(很少需要调整)
sys.setswitchinterval(0.001)  # 1ms - 响应更及时,但开销更高
饥饿问题:如果代码执行没有 I/O 的长时间事务,可能会长时间垄断 GIL,其他线程则会"饥饿",无助的等待。
GIL 超时(Python 3.2+改进版)
David Beazley 的研究揭示了 Python 3.2 之前的一个关键缺陷:当 CPU 和 I/O 限制线程竞争时,系统会因上下文切换而卡顿,每次切换增加 5ms 的开销。
Python 3.2 引入了超时机制。当线程想要 GIL 但无法获得时,会启动超时并等待。如果超时结束(5ms),线程会设置"gil drop request"标志。当前线程定期检查该标志并生成 GIL。
尽管并未完全消除 GIL 的争议开销,但极大提升了公平性,
核心参数与同步原语的实际应用
没有实践的理论是没用的。接下来我们深入探讨实际生产环境的同步代码。
线程核心参数解析
python
import threading
import time
from typing import List

def worker(name: str, delay: float, result_list: List[str]) -> str:
    """
    线程工作函数。

    关键洞察:返回值被线程对象忽略。
    使用共享数据结构(如result_list)来收集结果。
    """
    print(f"🎬 Thread-{name}: starting")
    time.sleep(delay)  # Simulates I/O-GIL released here
    result = f"✅ Thread-{name} completed after {delay}s"
    result_list.append(result)
    return result  # This return value is lost!
# 共享结果存储
results: List[str] = []
# 使用所有参数创建线程
t = threading.Thread(
    target=worker,
    args=("A", 2),              # 位置参数
    kwargs={"result_list": results},  # 关键字参数
    name="Worker-A",             # 🔥 对调试至关重要
    daemon=True                  # 🔥 守护进程的行为将在后面解释
)
t.start()  # 启动线程
t.join(timeout=3)  # 最多等待 3s 完成
print(f"Results: {results}")
理解 daemon=True:
daemon=False(默认):主线程等待所有子线程完成后退出daemon=True:主线程强制终止所有守护线程
何时使用守护线程:
- ✅ 后台任务:心跳监测、缓存刷新、日志轮换
- ❌ 关键操作:数据库写入、文件保存、财务交易
守护线程可能在运行中被中断,可能导致数据损坏或事务不完整。
五个基本同步原语
1. 锁定(互斥)
基本构建模块,一次只能有一个线程获得锁。
python
import threading

balance = 0
lock = threading.Lock()
def deposit(amount: int, iterations: int) -> None:
    global balance
    for _ in range(iterations):
        with lock:  # 自动获取和释放
            balance += amount
def withdraw(amount: int, iterations: int) -> None:
    global balance
    for _ in range(iterations):
        with lock:
            balance -= amount
# 测试竞态条件保护
t1 = threading.Thread(target=deposit, args=(1, 100000))
t2 = threading.Thread(target=withdraw, args=(1, 100000))
t1.start()
t2.start()
t1.join()
t2.join()
print(f"💰 Final balance: {balance}") # 锁定时应为 0,未锁定时随机生产环境小贴士:始终使用上下文管理器(with lock:),而不是手动操作 lock.acquire() 和 lock.release(),让其自动处理异常。
2. RLock(可重入锁)
允许同一线程多次获得锁 ------ 这对递归函数至关重要。
python
import threading

rlock = threading.RLock()

def recursive_func(n: int) -> None:
    with rlock:  # 同一线程可以多次获取锁
        if n > 0:
            print(f"🔁 Level {n}")
            recursive_func(n - 1)  # 重新获取锁
# 启动测试
threading.Thread(target=recursive_func, args=(5,)).start()
何时使用 RLock:调用同一对象内其他同步方法的方法。
3. 信号(计数锁)
控制同时访问资源的线程数量。
python
import threading
import time

# 允许最多 3 个并发工作线程
semaphore = threading.Semaphore(3)

def access_resource(worker_id: int) -> None:
    print(f"⏳ Worker {worker_id} waiting...")
    with semaphore:
        print(f"👷 Worker {worker_id} acquired semaphore")
        time.sleep(2)  # 模拟工作
        print(f"✅ Worker {worker_id} released semaphore")
# 启动 10 个工作线程,但只有 3 个可以同时运行
threads = [
    threading.Thread(target=access_resource, args=(i,))
    for i in range(10)
]
for t in threads:
    t.start()
for t in threads:
    t.join()
实际应用场景:限制并发数据库连接、API 速率限制和资源池管理。
4. 事件(线程协调)
允许线程等待信号后再继续。
python
import threading
import time
import random
from typing import List

# 共享事件和结果
start_event = threading.Event()
results: List[str] = []
def worker(worker_id: int) -> None:
    print(f"⏳ Worker {worker_id} waiting for start signal...")
    start_event.wait()  # Block until event is set

    # 模拟时间可变的工作
    time.sleep(random.random())
    results.append(f"Worker {worker_id} completed")
    print(f"✅ Worker {worker_id} finished")
# 创建 5 个工作线程,全部等待
workers = [
    threading.Thread(target=worker, args=(i,))
    for i in range(5)
]
for w in workers:
    w.start()
# 主线程准备资源
print("🔧 Preparing resources...")
time.sleep(2)
# 同时释放所有工作线程
print("🚀 Releasing all workers!")
start_event.set()
for w in workers:
    w.join()
print(f"📊 Results: {results}")
模式:非常适合需要多个线程同时启动并"准备就绪"的场景。
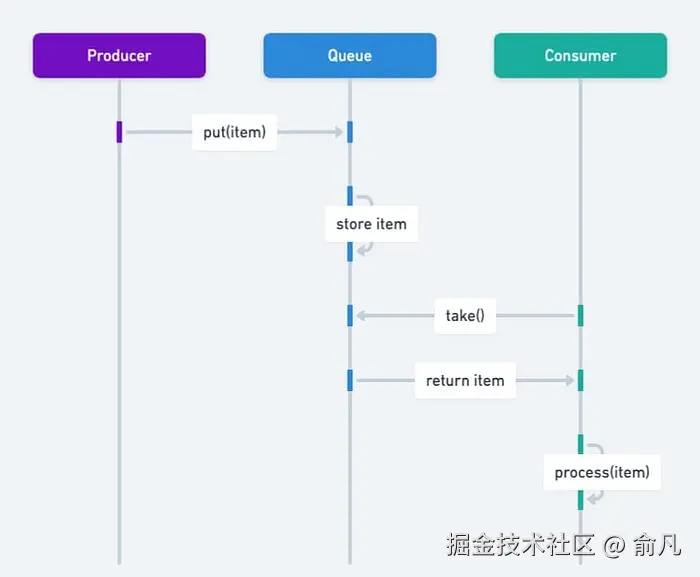
5. 条件(复杂协调)
最强大的原语 ------ 将锁与等待/通知机制结合。
python
import threading
import time
from collections import deque
from typing import Deque, TypeVar

T = TypeVar('T')

class BoundedBuffer:
    """
    线程安全的带边界缓冲区,实现生产者-消费者模式。
    展示现实中 Condition 的使用情况。
    """
    def __init__(self, capacity: int):
        self.capacity = capacity
        self.buffer: Deque[T] = deque()
        self.lock = threading.Lock()
        # 两个条件变量共享同一个锁
        self.not_empty = threading.Condition(self.lock)
        self.not_full = threading.Condition(self.lock)
    def put(self, item: T) -> None:
        """生产者将数据添加到缓冲区。"""
        with self.not_full:  # 自动获取锁
            while len(self.buffer) >= self.capacity:
                print("📦 Buffer full, producer waiting...")
                self.not_full.wait()  # 释放锁并等待

            self.buffer.append(item)
            print(f"📦 Produced: {item} (buffer size:...})")
            self.not_empty.notify()  # 唤醒一个消费者
    def get(self) -> T:
        """消费者从缓冲区移除数据。"""
        with self.not_empty:
            while len(self.buffer) == 0:
                print("📥 Buffer empty, consumer waiting...")
                self.not_empty.wait()

            item = self.buffer.popleft()
            print(f"📥 Consumed: {item} (buffer size: {len(self.buffer)})")
            self.not_full.notify()  # 唤醒生产者
            return item
# 测试生产者-消费者模式
buffer = BoundedBuffer(capacity=3)
def producer() -> None:
    for i in range(10):
        buffer.put(f"Item-{i}")
        time.sleep(0.1)  # 模拟生产时间
def consumer() -> None:
    for _ in range(10):
        item = buffer.get()
        time.sleep(0.2)  # 模拟处理时间
t1 = threading.Thread(target=producer, name="Producer")
t2 = threading.Thread(target=consumer, name="Consumer")
t1.start()
t2.start()
t1.join()
t2.join()
Condition 强大的原因:用高效的睡眠通知取代了忙碌等待(在循环中检查标志)的状态。
生产级最佳实践
接下来我们谈谈生产环境中的代码,特别是那种能处理数百万请求、支持横向扩展,而且不会在凌晨 3 点吵醒你的代码。
拥抱 concurrent.futures --- 弃用手动线程管理
原始线程是用来学习的,生产代码使用 concurrent.futures。
python
from concurrent.futures import ThreadPoolExecutor, as_completed, wait
import requests
from typing import List, Dict, Tuple
import time

def fetch_url(url: str, timeout: int = 2) -> Tuple[str, str]:
    """
    获取 URL 内容,并带错误处理。
    返回 (url, result_message).
    """
    try:
        response = requests.get(url, timeout=timeout)
        return (url, f"✅ {len(response.content)} bytes")
    except requests.Timeout:
        return (url, "❌ Timeout")
    except requests.RequestException as e:
        return (url, f"❌ {type(e).__name__}")
# 测试 URL
urls = [
    "https://httpbin.org/delay/1",
    "https://httpbin.org/delay/2",
    "https://httpbin.org/status/404",
    "https://invalid-url-that-does-not-exist.com",
]
# 方法 1: as_completed - 结果一到就处理
print("🎯 Method 1: as_completed (real-time processing)")
with ThreadPoolExecutor(max_workers=3) as executor:
    future_to_url = {
        executor.submit(fetch_url, url): url
        for url ..._to_url[future]
        try:
            url, result = future.result(timeout=1)
            print(f"  {result}")
        except Exception as e:
            print(f"  ⚠️ {url} generated exception: {e}")
# 方法 2: map - 保持输入顺序
print("\n📊 Method 2: map (maintains order)")
with ThreadPoolExecutor(max_workers=3) as executor:
    results = executor.map(fetch_url, urls, timeout=5)
    for url, result in zip(urls, results):
        print(f"  {url}: {result}")
# 方法 3: wait - 策略性批量控制
print("\n⏱️ Method 3: wait (flexible completion strategy)")
with ThreadPoolExecutor(max_workers=3) as executor:
    futures = [executor.submit(fetch_url, url) for url in urls]

    # 策略性批量控制, 或者基于 FIRST_COMPLETED, FIRST_EXCEPTION
    done, not_done = wait(futures, timeout=3, return_when="ALL_COMPLETED")

    print(f"  Completed: {len(done)}, Pending: {len(not_done)}")
    for future in done:
        url, result = future.result()
        print(f"  {result}")
线程池大小计算:
python
import os

num_cores = os.cpu_count() or 4

# CPU 密集型任务
cpu_pool_size = num_cores + 1

# I/O 密集型任务(来自Brian Goetz的公式)
wait_time = 0.050  # 50ms 等待 API 响应
service_time = 0.005  # 5ms 处理响应
io_pool_size = num_cores * (1 + wait_time / service_time)
print(f"CPU pool size: {cpu_pool_size}")
print(f"I/O pool size: {int(io_pool_size)}")
生产洞察:使用两个独立线程池 ------ 一个用于 CPU 密集型任务,一个用于 I/O 密集型任务。混合使用会导致性能不佳。
避免常见死亡陷阱
陷阱 1:非同步共享可变状态
python
from queue import Queue
import threading

# ❌ 错误: 竞态条件
shared_list = []
def unsafe_append(value: int) -> None:
    for i in range(1000):
        shared_list.append(value)  # 数据丢失是必然的

# ✅ 正确: 使用线程安全队列
def safe_producer(q: Queue, items: List[int]) -> None:
    for item in items:
        q.put(item)
    q.put(None)  # 标识结束的哨兵值

def safe_consumer(q: Queue) -> None:
    while True:
        item = q.get()
        if item is None:
            q.put(None)  # 将哨兵传递给其他消费者
            break
        print(f"Consumed: {item}")

# 用法
q: Queue = Queue()
producer = threading.Thread(target=safe_producer, args=(q, range(10)))
consumer = threading.Thread(target=safe_consumer, args=(q,))
producer.start()
consumer.start()
producer.join()
consumer.join()
黄金法则:切勿在未同步的情况下共享可变状态。使用 Queue 进行通信。
陷阱 2:线程池死锁
python
from concurrent.futures import ThreadPoolExecutor

# ❌ 死锁: 线程等待其自身的池
def deadlock_example():
    def wait_on_future():
        future = executor.submit(pow, 5, 2)
        return future.result()  # Blocks forever

    executor = ThreadPoolExecutor(max_workers=1)
    executor.submit(wait_on_future)

# ✅ 解决方案: 区分不同的池,或者增加工作线程
executor = ThreadPoolExecutor(max_workers=2)
来自 PEP 3148,有经验的开发者也会出错。
陷阱 3:异常消失
python
# ❌ 错误: 异常消失
def silent_failure():
    raise ValueError("This exception vanishes")

t = threading.Thread(target=silent_failure)
t.start()
t.join()

# 没有明显错误 - 异常被吞噬了
# ✅ 正确: 使用带异常处理的执行器
with ThreadPoolExecutor() as executor:
    future = executor.submit(silent_failure)
    try:
        future.result()
    except ValueError as e:
        print(f"Caught exception: {e}")
线程异常不会传播到主线程,务必检查 future.result()。
线程安全日志
python
import logging
from logging.handlers import RotatingFileHandler
import threading

# 配置线程安全的日志记录
logging.basicConfig(
    level=logging.INFO,
    format='%(asctime)s - %(threadName)s - %(levelname)s - %(message)s',
    handlers=[
        RotatingFileHandler(
            'app.log',
            maxBytes=10*1024*1024,  # 10MB
            backupCount=5
        ),
        logging.StreamHandler()
    ]
)

logger = logging.getLogger(__name__)
def thread_work(thread_id: int) -> None:
    logger.info(f"Thread {thread_id} started")
    # 业务逻辑
    logger.info(f"Thread {thread_id} finished")

# 多线程同时记录日志 - 无损坏
threads = [
    threading.Thread(target=thread_work, args=(i,), name=f"Worker-{i}")
    for i in range(5)
]
for t in threads:
    t.start()
for t in threads:
    t.join()
Python 的日志模块设计上是线程安全的,在生产环境中用它代替 print()。
高级话题 ------ 被忽略的细节
GIL 释放时间深度解析
python
import sys
import threading
import time

def demonstrate_gil_release():
    """展示哪些操作会释放GIL。"""

    print("1. Pure Python computation (GIL held)")
    for i in range(1000000):
        _ = i ** 2  # CPU 密集型,最小化 GIL 释放

    print("2. I/O operation (GIL released)")
    with open('/tmp/test.txt', 'w') as f:
        f.write('test' * 10000)  # 文件 I/O 释放 GIL

    print("3. time.sleep() (GIL released)")
    time.sleep(0.1)  # 总是释放 GIL

    print("4. C extension calls (varies)")
    import numpy as np
    # 许多 NumPy 操作会释放 GIL
    arr = np.random.rand(1000000)
    result = np.sum(arr)  # 计算过程中释放 GIL

demonstrate_gil_release()
关键见解:像 NumPy/SciPy 这样的 C 扩展在计算过程中常常释放 GIL,即使用 threading 也能实现真正的并行。
线程本地存储(TLS)
每个线程都有自己的私有数据命名空间。
python
import threading

# 创建线程本地存储
thread_local = threading.local()

def show_thread_data():
    """每个线程看到自己的数据。"""
    try:
        data = thread_local.data
    except AttributeError:
        data = "default"
        thread_local.data = data

    print(f"{threading.current_thread().name}: {data}")
def worker(custom_data: str):
    thread_local.data = custom_data
    show_thread_data()

# 用不同的数据启动线程
threads = [
    threading.Thread(target=worker, args=(f"data-{i}",), name=f"Thread-{i}")
    for i in range(3)
]

for t in threads:
    t.start()

for t in threads:
    t.join()
用例:数据库连接、请求上下文、事务状态。
性能对决:线程 vs. 进程 vs. 异步
python
import time
import threading
import multiprocessing
import asyncio
from concurrent.futures import ProcessPoolExecutor

def cpu_bound_task(n: int) -> int:
    """CPU 密集型:斐波那契计算"""
    count = 0
    for i in range(n):
        count += i * i
    return count

async def async_io_task() -> str:
    """使用 asyncio 进行 I/O 模拟。"""
    await asyncio.sleep(0.1)
    return "async done"

def benchmark():
    """比较 threading, multiprocessing, 和 async."""
    n = 1000000
    tasks = 8

    # 单线程基线
    start = time.perf_counter()
    for _ in range(tasks):
        cpu_bound_task(n)
    baseline = time.perf_counter() - start
    print(f"Single-threaded: {baseline:.2f}s")

    # 多线程(受 GIL 限制)
    start = time.perf_counter()
    threads = [
        threading.Thread(target=cpu_bound_task, args=(n,))
        for _ in range(tasks)
    ]
    for t in threads:
        t.start()
    for t in threads:
        t.join()
    threaded = time.perf_counter() - start
    print(f"Multi-threaded: {threaded:.2f}s (slowdown: {threaded/baseline:.2f}x)")

    # 多进程(真正的并行)
    start = time.perf_counter()
    with ProcessPoolExecutor(max_workers=tasks) as executor:
        futures = [executor.submit(cpu_bound_task, n) for _ in range(tasks)]
        for f in futures:
            f.result()
    multiproc = time.perf_counter() - start
    print(f"Multi-processing: {multiproc:.2f}s (speedup: {baseline/multiproc:.2f}x)")

benchmark()
4 核 CPU(典型)的结果:
- 单线程: 8.5s
- 多线程:11.2s(因 GIL 开销导致慢了 1.3 倍)
- 多进程:2.3s(真正的并行快了 3.7 倍)
Python 3.13 与未来 ------ 自由线程的到来
2024 年 10 月标志着历史性里程碑:Python 3.13 引入了实验性的自由线程模式。
实现自由线程
从源代码构建(支持自由线程必不可少):
bash
# 下载 Python 3.13 源码
wget https://www.python.org/ftp/python/3.13.0/Python-3.13.0.tgz
tar -xf Python-3.13.0.tgz
cd Python-3.13.0

# 配置 --disable-gil
./configure --disable-gil --prefix=$HOME/python3.13

# 编译安装
make
make altinstall
运行时控制:
bash
# 通过命令行禁用 GIL
python -X gil=0 script.py

# 或者通过环境变量
export PYTHON_GIL=0
python script.py
检测 GIL 状态:
python
import sys
import sysconfig

def check_gil_status():
    """检查是否启用了 GIL (Python 3.13+)."""
    if sys.version_info >= (3, 13):
        if hasattr(sys, '_is_gil_enabled'):
            status = sys._is_gil_enabled()
            print(f"GIL enabled: {status}")
        else:
            print("Free-threading build not available")
    else:
        print("Python 3.13+ required for GIL control")

check_gil_status()
性能特征
单线程性能下降:
- 自由线程模式在单线程代码中慢了 6--15%
- 由禁用的自适应解释器引起(尚未支持线程安全)
- 来自单对象锁定和原子操作的额外开销
多线程 CPU 密集型增益:
- 4 线程:3.5 倍加速(斐波那契基准测试从 0.42s 到 0.12s)
- 8 线程:CPU 密集型任务的近线性扩展
- 纯 Python 代码终于解锁了真正的并行
内存影响:
- 垃圾回收开销增加了约 14%
- Mimalloc 分配器生效(默认包含)
- 更复杂的内存协调以实现线程安全
建议:生产环境等待 Python 3.14 以上版本,3.13 的自由线程模式是实验性的,处理边界条件还比较粗糙。
总结与反模式指南
Python 多线程黄金法则
✅ 线程用于:
- 网页请求处理(API,爬虫)
- 文件 I/O 操作(批处理)
- 数据库查询聚合
- 实时数据收集
- 网络任务
❌ 避免用线程处理:
- 科学计算
- 图像/视频处理
- 加解密
- 机器学习训练
- 纯 CPU 密集型工作
对于 CPU 密集型任务,可以使用 multiprocessing 或 asyncio。
必知原则
- 一定要用线程池,绝不要手动管理线程
- 共享可变状态必须同步(锁或
Queue) - 谨慎设置
daemon------ 理解终止语义 - 用
Queue进行线程间通信 - 检查
future.result()以捕捉异常 - 用正确的锁层级监控死锁
常见的陷阱
🚨 死锁:
- 无序嵌套锁
- 线程池的自我等待
- GC 期间访问
__del__
🚨 竞态条件:
- 非同步共享变量
- 对列表/指令的非原子操作
- 对
balance += 1这样的操作没有锁定
🚨 线程泄露:
- 在非守护线程中忘记
join() - 长期运行的线程正在累积内存
- 解决方案:周期性回收
🚨 异常丢失:
- 线程异常不会自动传播
- 一定要使用执行程序或显式错误处理
新时代:自由线程 Python
Python 3.13 的可选移除 GIL 只是开始,生态系统影响:
- 库:NumPy、Pandas、scikit-learn 需要更新
- 性能调优:自由线程代码需要新的配置文件
- 迁移时间表:预计 Python 3.14--3.15 版本将实现生产准备
GIL 定义了 Python 的 30 年,它的移除将定义未来 30 年。
延伸阅读:
Python 线程官方文档:docs.python.org/3/library/t...
David Beazley 的 GIL 深度分析:www.dabeaz.com/python/Unde...
真实的 Python 线程指南:realpython.com/intro-to-py...
PEP 703(自由线程提案):peps.python.org/pep-0703
Hi,我是俞凡,一名兼具技术深度与管理视野的技术管理者。曾就职于 Motorola,现任职于 Mavenir,多年带领技术团队,聚焦后端架构与云原生,持续关注 AI 等前沿方向,也关注人的成长,笃信持续学习的力量。在这里,我会分享技术实践与思考。欢迎关注公众号「DeepNoMind」,星标不迷路。也欢迎访问独立站 www.DeepNoMind.com,一起交流成长。