序言
本文适用于mqtt mosquitto部署的初步入门,旨在提供一个从0到1的基础操作指引,实现从基础部署到测试联调。关于本文中使用的mosquitto命令详细说明,请自行参考官方文档或其他资料。
准备
1、一台云服务器。
2、本地电脑环境,需要python运行环境。
安装
1、安装mosquitto环境。
sudo apt install mosquitto mosquitto-clients2、确认安装是否成功,安装成功之后,会有版本信息打印。
mosquitto -v启用服务
1、启动服务。
sudo systemctl start mosquitto2、设置开机自启。
sudo systemctl enable mosquitto3、查看状态。
sudo systemctl status mosquitto配置用户和密码
1、在 /etc/mosquitto/passwd 路径创建密码文件,并添加一个名为 user_test_01 的用户。
mosquitto_passwd -c /etc/mosquitto/passwd user_test_012、根据提示输入两次密码。

3、修改 /etc/mosquitto/mosquitto.conf 文件,在文件末尾插入如下代码。参考官网
########## Authentication methods start ##########
per_listener_settings true
# password
listener 1883
password_file /etc/mosquitto/passwd
# plugins
# todo
# anonymous
allow_anonymous false
########## Authentication methods end ##########per_listener_settings true:启用授权方法组合策略
listener 1883 和 password_file /etc/mosquitto/passwd:启用网络连接,否则mosquitto会一直保持在 only local 模式下。而且 listener 一定要放在 password_file 前面。
allow_anonymous false:禁用匿名连接。
4、配置完成后重启改服务。
sudo systemctl restart mosquitto测试
本地客户端
一、测试原理:本地用python脚本模拟subscriber和publisher客户端,和broker(mosquitto服务器)通信。
二、测试步骤
1、将如下 publisher.py、subscriber.py、config.json放置在统一文件夹下。
2、根据自己的配置,修改config.json。
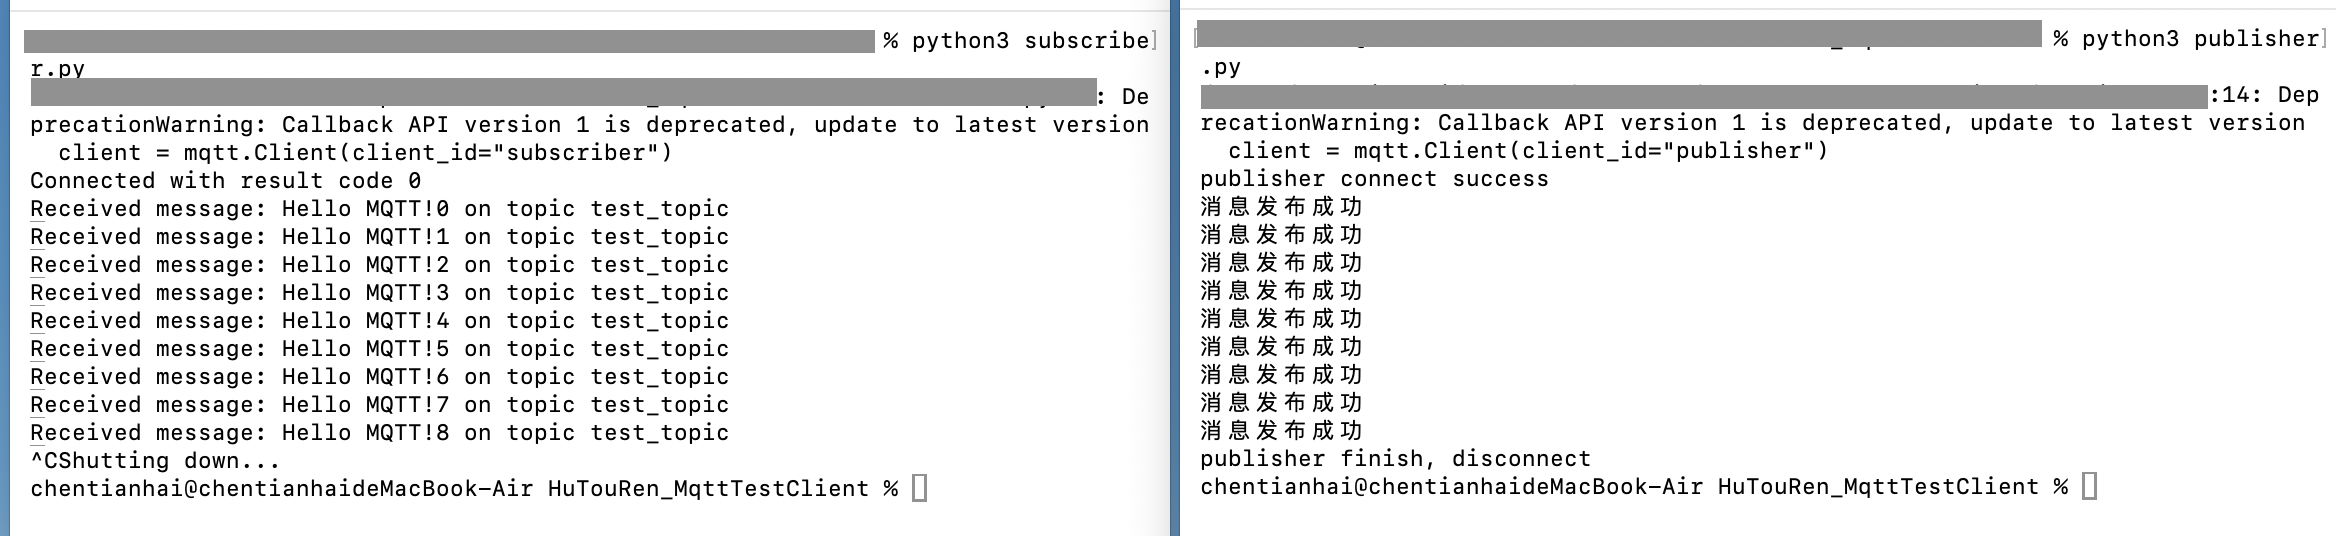
3、先运行subscriber.py,再运行publisher.py。可以看到publish客户端发送的数据,发给broker后,subscribe客户端能正确收到。
三、测试结果
四、源码
# publisher.py.py
import paho.mqtt.client as mqtt
import json
import time
with open('config.json', 'r') as f:
config = json.load(f)
broker_address = config['broker']['host']
broker_port = config['broker']['port']
broker_user = config['broker']['user']
broker_password = config['broker']['password']
broker_topic = config['broker']['topic']
client = mqtt.Client(client_id="publisher")
def on_publish(client, userdata, result): # 当消息被发送出去后,会调用这个函数
print("消息发布成功")
def init_publisher_client():
client.on_publish = on_publish
client.username_pw_set(broker_user,broker_password)
ret = client.connect(broker_address)
if 0 == ret:
print("publisher connect success")
return True
else:
print("publisher connect failed " + ret)
return False
def send_message():
for index in range(0,9):
message = "Hello MQTT!" + str(index)
client.publish(broker_topic, message)
time.sleep(2)
def end_publisher_client():
client.disconnect()
print("publisher finish, disconnect")
if init_publisher_client():
send_message()
end_publisher_client()
else:
print("publisher fail")
# subscriber.py
import paho.mqtt.client as mqtt
import json
with open('config.json', 'r') as f:
config = json.load(f)
broker_address = config['broker']['host']
broker_port = config['broker']['port']
broker_user = config['broker']['user']
broker_password = config['broker']['password']
broker_topic = config['broker']['topic']
def on_connect(client, userdata, flags, rc):
print(f"Connected with result code {rc}")
client.subscribe(broker_topic)
def on_message(client, userdata, msg):
print(f"Received message: {msg.payload.decode()} on topic {msg.topic}")
client = mqtt.Client(client_id="subscriber")
client.on_connect = on_connect
client.on_message = on_message
client.username_pw_set(broker_user,broker_password)
client.connect(broker_address)
client.loop_start()
try:
while True:
pass
except KeyboardInterrupt:
print("Shutting down...")
finally:
client.disconnect()
client.loop_stop()
# config.json
{
"broker": {
"host": "xx.xx.xx.xx", # host ip, example: 12.34.56.78
"port": 1833, # 默认 1833
"user": "user_name", # mosquitto_passwd 创建的用户名称
"password": "password", # mosquitto_passwd 创建的用户对应的密码
"topic": "test_topic" # 随便填
}
}附
可以查看服务器的日志,某些情况可能有用。
cat /var/log/mosquitto/mosquitto.log