如果你用过 vite,那么想必对依赖预构建这一个名词并不陌生,本文就基于此来进行一些探讨。
PS:本文分析来自于笔者的个人理解,如果发现了错误,可以在进行指正。当然说的是 vite 依赖于 esbuild 和 rollup 的时候,而非 rolldown。
为什么需要依赖预构建
通常如果要知道为什么需要一个东西,我们首要的前提就是知道"它解决了什么问题?"。这一点其实 vite 的文档已经给出了,主要是两个目的:规范兼容性 和性能。
性能
我们知道,浏览器是可以通过给 script 标签添加 type="module" 来让其支持模块化的导入,所以,我简单写了一个 demo,demo 的结果如下:
css
依赖预构建
├── a.js
├── b.js
├── c.js
├── index.html
└── index.js
文件内容很简单,只要看一下 index.js 即可,如下:
javascript
import { a } from './a.js'
import { b } from './b.js'
import { c } from './c.js'
console.log('index.js -- start')
a()
b()
c()
console.log('index.js -- end')输出为:
less
index.js -- start
a.js:2 a.js
b.js:2 b.js
c.js:2 c.js
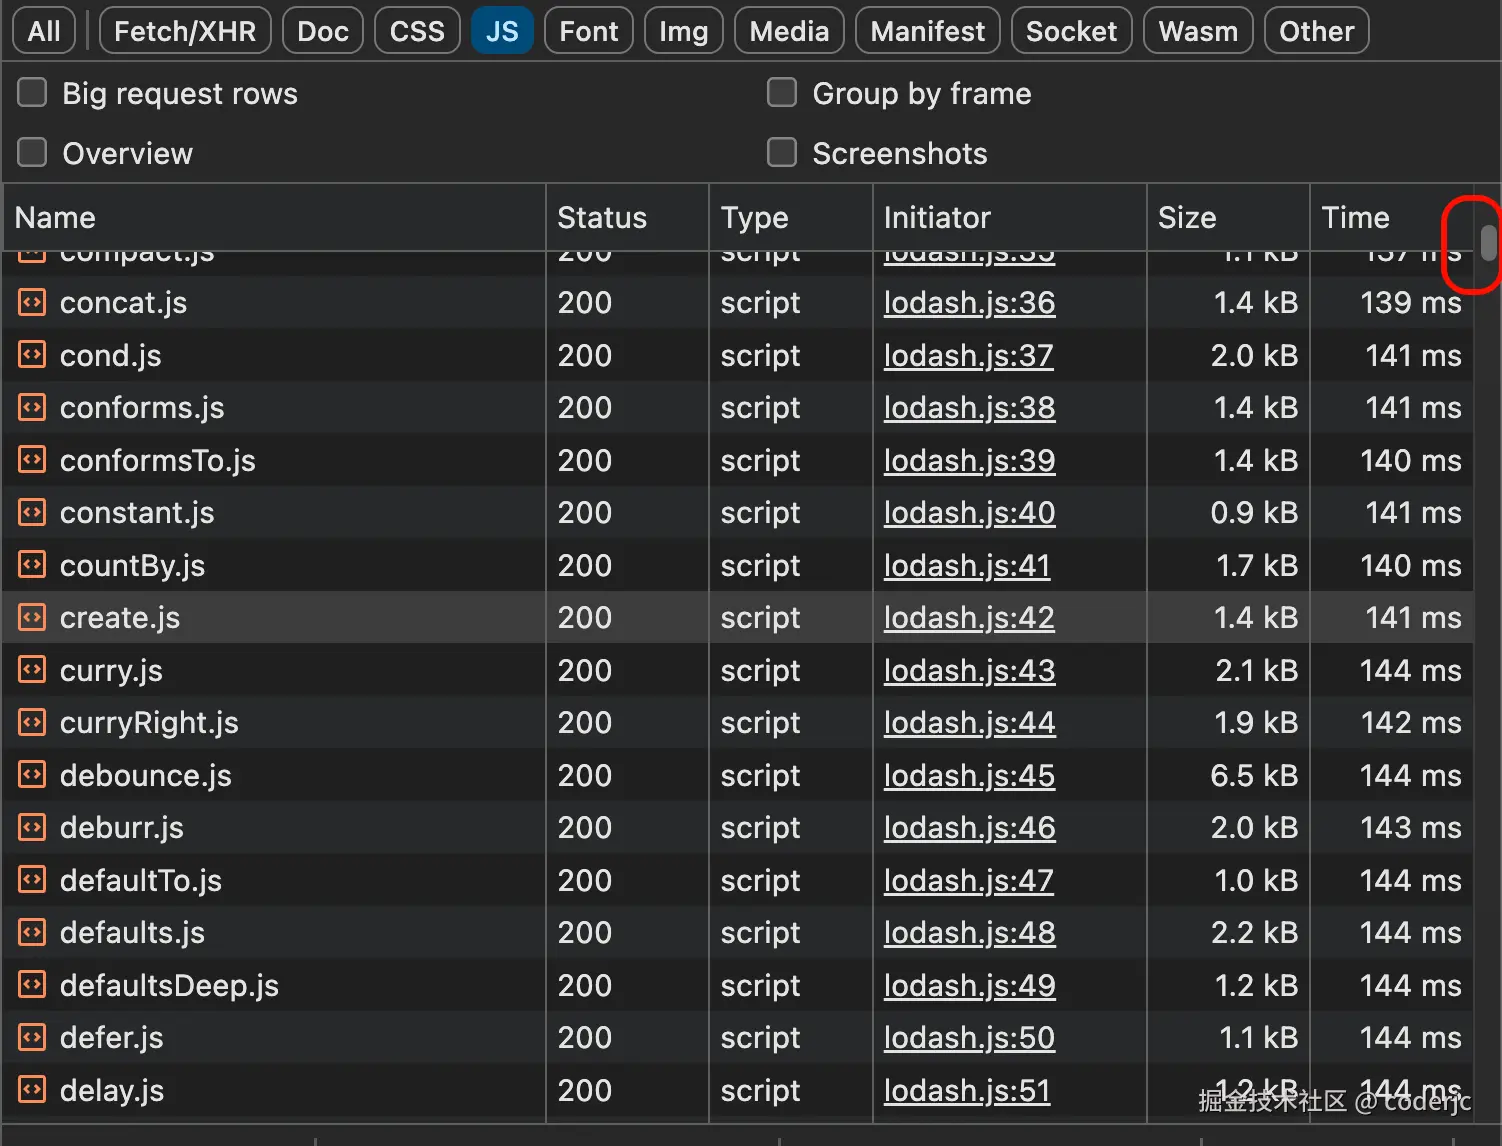
index.js:11 index.js -- end好像一切都是岁月静好,但是其实它背后存在一个"负担",我们来打开网络面板就可以看到了,如图:

三个导入就有三个请求,一个请求就是一个网络开销,而如果是一个成熟的第三方包,一个包就可能会有几十几百个文件的导入,这还是只是一个依赖,实际开发中,我们的项目是不会止步于一个依赖的。所以管中窥豹,就算再本地环境,这个网络开销也很难承受。
可能文字的描述还是略显苍白,那么让我们看一个引入 lodash 的例子,index.js 文件如下:
javascript
// 因为这是浏览器环境,所以要知道精确的具体的 js 文件
import { toUpper } from './node_modules/lodash-es/lodash.js'
const msg = 'hello world'
console.log(toUpper(msg))
请求效果如图:
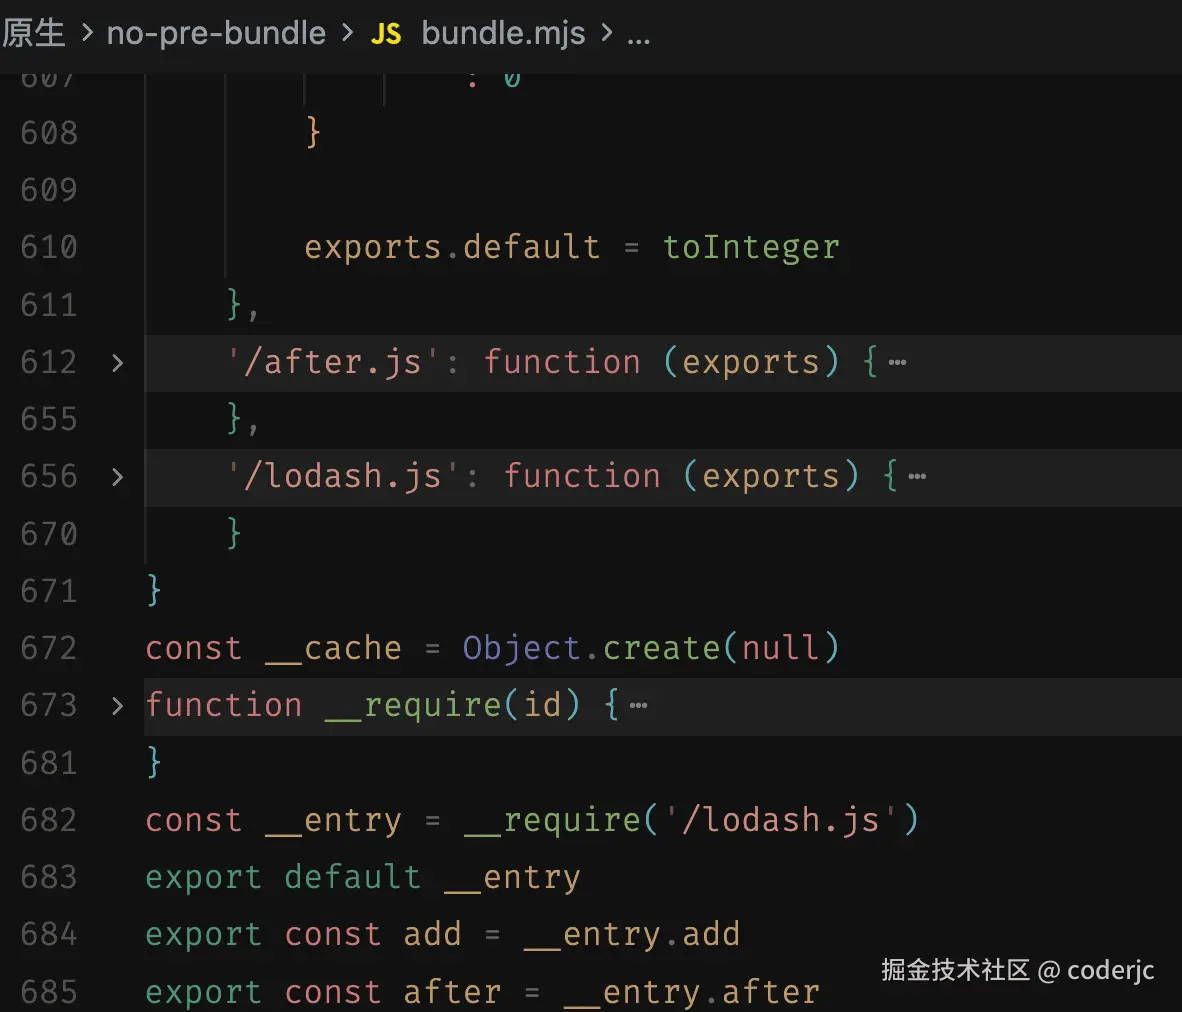
可以看到这个数量还是很恐怖的。而如果有依赖预构建呢?我们看一下请求的效果图:
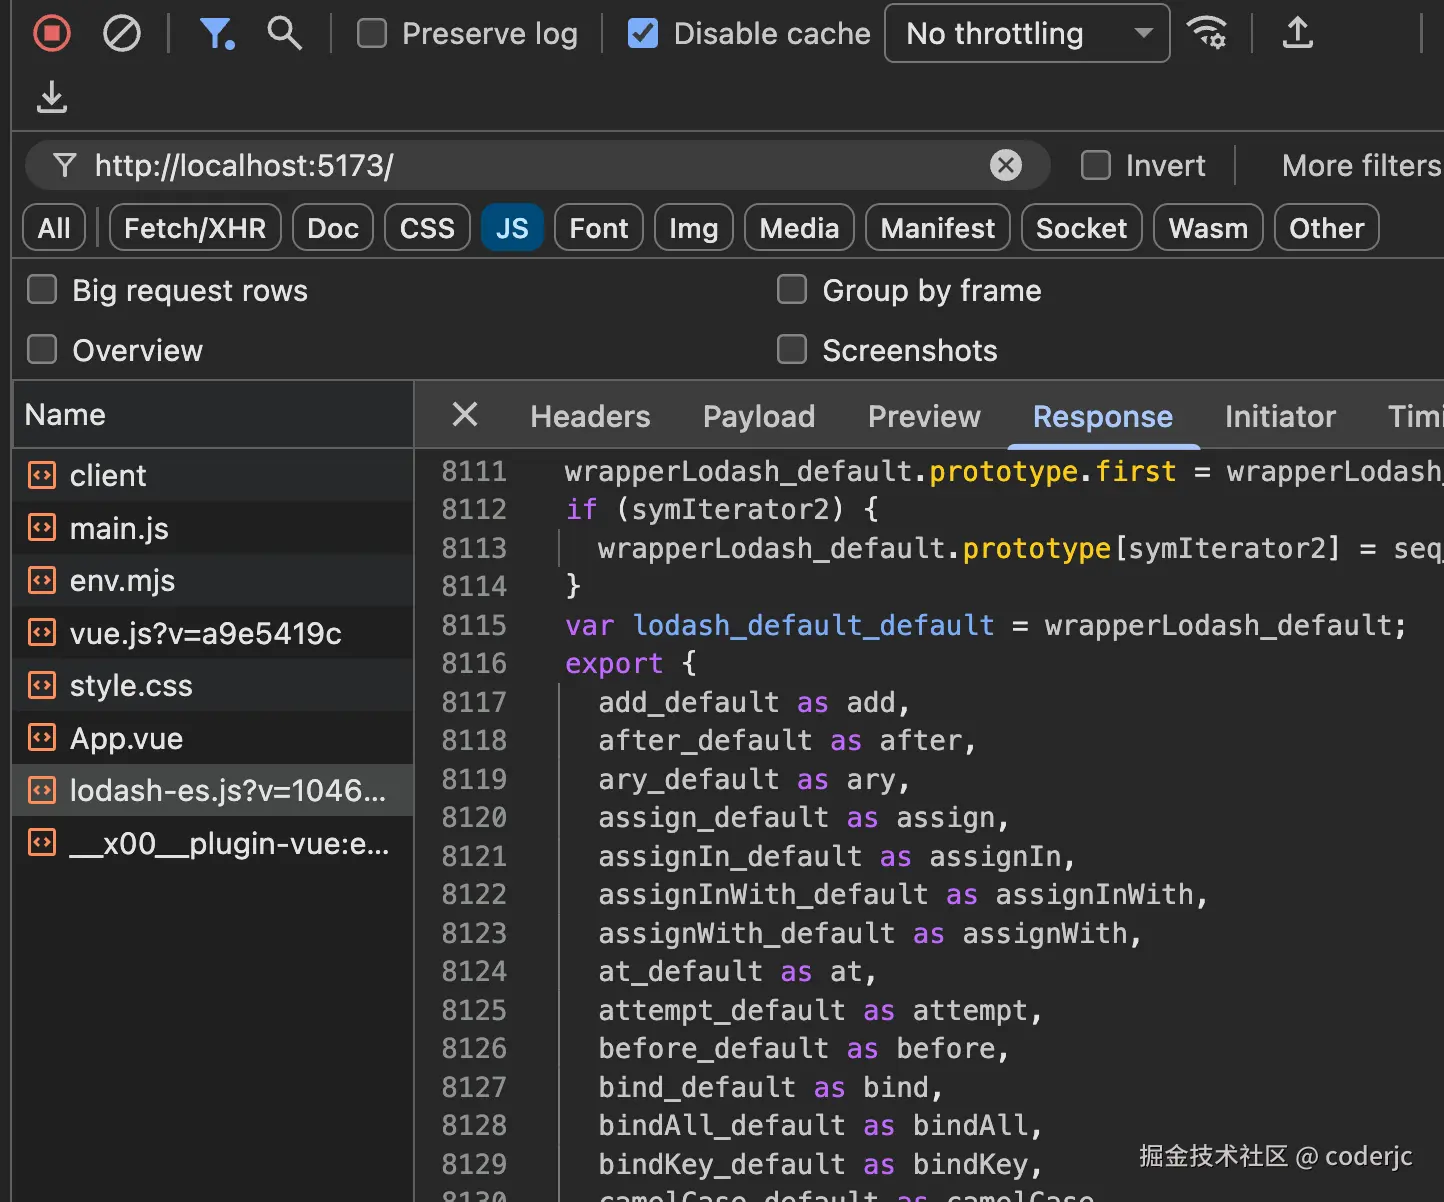
可以看到,这个 lodash 请求数量都集中到一个文件,那么网络开销就少得多。而虽然这个文件的体积大很多,但是只需要进行一次网络的传输就可以了。这种大家可以尝试用一个较小的 node_modules 目录,进行复制传输或者打包压缩,它的时间比正常大文件的时间要多的多,
规范兼容性
性能问题解决了,但还有一个更棘手的问题在等着我们。
不知道你有没有想过,npm 上那些第三方包,它内部用的是什么模块规范?你不知道它是 commonjs 还是 esmodule。
而这就会导致一个比较尴尬的状况,我们来看一个例子,假设某个第三方包 some-package 内部是这样写的:
javascript
// some-package/index.js
const helper = require('./helper.js')
module.exports = {
doSomething() {
return helper.process()
}
}当你在项目里 import { doSomething } from 'some-package' 的时候,你敢这么用,浏览器就敢来表演一下罢工,因为它压根不认识 require 和 module.exports 是啥。
所以就需要通过依赖预构建来解决这个问题,它会把这些 CommonJS 格式的代码转换成 ESM 格式,就像一个翻译官,把"方言"翻译成浏览器能听懂的"普通话"。转换后的代码大概如下:
javascript
// 预构建后
import helper from './helper.js'
export function doSomething() {
return helper.process()
}最小实现
本文对于 esbuild 不会做出过多赘述,有兴趣的读者可以自己去查阅相关资料
分析
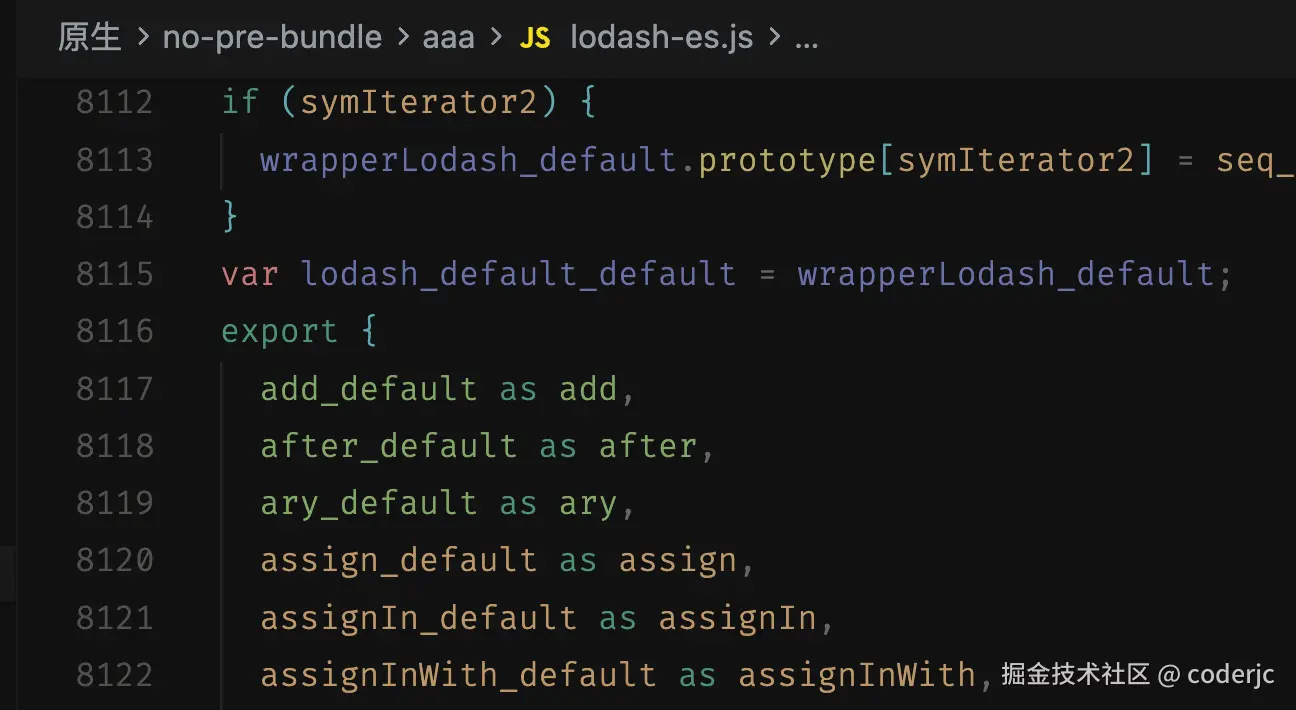
通过查看上文的一个截图,我们大概能看出,其实依赖预构建,就是吧 lodash 这个包的函数都打包到了一个文件里面,然后做了一个统一的导出,所以我们来实现的依赖预构建,也就是要完成这一个目标。
要完成这个目标如果采用比较原始的方式,莫过于在 node 中读取入口文件,根据导入的路径去读取文件的内容,写入到一个文件里面,最后添加一端统一的导出字符串。
这种想法好像一看没什么问题,但是其中还是有些问题的,比如入口文件导入的那个依赖文件,它内部还依赖了其他文件,如果只是粗暴的分析一个入口文件,最后的打包的单文件一定是不完整的,而其中还会存在重复的依赖引入,比如一些通用的工具函数,所以我们需要换一种思路。
我们聊的东西本质上就是:如何从单一入口,递归地构建一个依赖图,并按依赖顺序读取所有模块内容。因此大概执行的步骤如下:
markdown
1. 从入口文件的依赖开始,比如 from './add'
2. 再解析 add 内部的 import
3. 后续的依赖文件也执行这个逻辑
4. 直到最后没有新的依赖为止生成依赖图,为什么是图而不是树呢?毕竟一想到递归,很多情况下大家不约而同的就想到了树结构,树结构如下:
css
# 树结构
entry
 ├─ a
 │   └─ shared
 └─ b
     └─ shared
那图结构有什么好处?
-
一个模块可能被多个模块依赖(多父节点) :这在真实项目里太常见了,工具函数、运行时垫片、第三方包内部的小工具......树结构天生表达不了"同一个东西被多处引用但只存在一份"。
什么是多父节点,比如:
cssA.js ──┐ ├──> utils.js B.js ──┘A.js里import utils from './utils.js'B.js里import utils from './utils.js'- 这个日常中很常见,于是 utils.js 就存在了两个父节点了,这就是多父节点
-
循环依赖是存在的 :比如
aimportb,b又 importa。树要求"从上到下不能绕回来",但依赖关系就是允许绕回来的,所以需要用图来描述,并且用"访问过就不再深入"的方式避免无限递归。
所以这里我们从一开始就用"依赖图"的视角去做:一边递归收集依赖,一边用绝对路径做去重,保证每个模块最多处理一次。
构建依赖图
因此第一步让我们来实现一个函数,给我一段文件源码字符串,在使用正则匹配出导入语句,如下:
vbnet
/**
* 从文件内容中解析所有的 import/export from 语句,提取依赖路径
*/
function parseImports(content) {
const imports = []
// 匹配 import xxx from 'xxx' 或 export xxx from 'xxx'
const importRegex =
/(?:import|export)\s+(?:[^'"]*)\s+from\s+['"]([^'"]+)['"]/g
let match
while ((match = importRegex.exec(content)) !== null) {
imports.push(match[1])
}
return imports
}
// 使用 lodash 的入口文件两个导入代码来做测试
const sourceCode = `export { default as add } from './add.js';
export { default as after } from './after.js';`
console.log(parseImports(sourceCode))输入结果如下:
css
[ './add.js', './after.js' ]那么下一步要做的事情就是,实现一个递归遍历函数,来反复执行这个过程,后面的代码就没什么特殊的,可以直接浏览一下相对完全的代码,如下:
javascript
import fs from 'node:fs'
import path from 'node:path'
const entryFilePath = path.join(
process.cwd(),
'./node_modules/lodash-es/lodash.js'
)
/**
* 从文件内容中解析所有的 import/export from 语句,提取依赖路径
*/
function parseImports(content) {
const imports = []
// 匹配 import xxx from 'xxx' 或 export xxx from 'xxx'
const importRegex =
/(?:import|export)\s+(?:[^'"]*)\s+from\s+['"]([^'"]+)['"]/g
let match
while ((match = importRegex.exec(content)) !== null) {
imports.push(match[1])
}
return imports
}
/**
* 将相对路径解析为绝对路径
*/
function resolveModulePath(importPath, currentFilePath) {
const currentDir = path.dirname(currentFilePath)
return path.resolve(currentDir, importPath)
}
/**
* 递归解析依赖,构建依赖图
*/
function buildDependencyGraph(entryPath) {
// 依赖图
const graph = new Map()
// 已访问过的文件
const visited = new Set()
function traverse(filePath) {
// 规范化路径
const normalizedPath = path.normalize(filePath)
// 已访问过则跳过
if (visited.has(normalizedPath)) {
return
}
visited.add(normalizedPath)
// 读取文件内容
let content
try {
content = fs.readFileSync(normalizedPath, 'utf-8')
} catch (err) {
console.error(`无法读取文件: ${normalizedPath}`)
return
}
// 解析 import 语句
const imports = parseImports(content)
// 解析为绝对路径
const dependencies = imports.map(imp =>
resolveModulePath(imp, normalizedPath)
)
// 存入依赖图
graph.set(normalizedPath, dependencies)
// 递归处理每个依赖
for (const dep of dependencies) {
traverse(dep)
}
}
traverse(entryPath)
return graph
}
// 构建依赖图
const dependencyGraph = buildDependencyGraph(entryFilePath)
// 输出依赖图信息
console.log(`\n依赖图构建完成,共 ${dependencyGraph.size} 个模块\n`)
// 打印依赖图结构
for (const [file, deps] of dependencyGraph) {
const relativePath = path.relative(process.cwd(), file)
console.log(`+ ${relativePath}`)
for (const dep of deps) {
const relativeDepPath = path.relative(process.cwd(), dep)
console.log(` └── ${relativeDepPath}`)
}
}输出如下:
bash
+ node_modules/lodash-es/lodash.js
   └── node_modules/lodash-es/add.js
   └── node_modules/lodash-es/after.js
+ node_modules/lodash-es/add.js
   └── node_modules/lodash-es/_createMathOperation.js
+ node_modules/lodash-es/_createMathOperation.js
   └── node_modules/lodash-es/_baseToNumber.js
   └── node_modules/lodash-es/_baseToString.js
+ node_modules/lodash-es/_baseToNumber.js
   └── node_modules/lodash-es/isSymbol.js
+ node_modules/lodash-es/isSymbol.js
   └── node_modules/lodash-es/_baseGetTag.js
   └── node_modules/lodash-es/isObjectLike.js
+ node_modules/lodash-es/_baseGetTag.js
   └── node_modules/lodash-es/_Symbol.js
   └── node_modules/lodash-es/_getRawTag.js
   └── node_modules/lodash-es/_objectToString.js
+ ...有了这个依赖图之后,我们离这个核心就非常接近了,这个依赖图一眼看过去,都不知要如何遍历执行,所以我们还欠缺一个步骤,拓扑排序。
拓扑排序
如果按照上面依赖图区进行遍历读取,肯定会出现问题的,但是在实际的 bundle 中,就会爆炸,要得到正确的 bundle 就要做到 所有模块按"依赖先、使用后"的顺序排好队,而这个排队就是拓扑排序。
而实现的手段不做限制,毕竟在 ai 如此流行的情况,我相信 ai 可以写的很好很完善,还可以解释每一行代码的意义,我这里就直接贴出代码,如下:
scss
/**
* 对依赖图做拓扑排序,返回"依赖在前、被依赖在后"的模块顺序
*/
function topologicalSort(graph) {
const allNodes = new Set()
for (const [filePath, deps] of graph) {
allNodes.add(filePath)
for (const dep of deps) {
allNodes.add(dep)
}
}
// indegree:一个模块还剩多少"依赖"没有被处理(依赖越多 indegree 越大)
const indegree = new Map()
// dependents:某个依赖被处理完后,哪些模块可以被推进
const dependents = new Map()
for (const node of allNodes) {
indegree.set(node, 0)
dependents.set(node, new Set())
}
for (const [filePath, deps] of graph) {
for (const dep of deps) {
if (!dependents.has(dep)) {
dependents.set(dep, new Set())
}
dependents.get(dep).add(filePath)
indegree.set(filePath, (indegree.get(filePath) ?? 0) + 1)
}
}
const queue = []
for (const node of allNodes) {
if ((indegree.get(node) ?? 0) === 0) {
queue.push(node)
}
}
const sorted = []
let idx = 0
while (idx < queue.length) {
const node = queue[idx++]
sorted.push(node)
const nextNodes = dependents.get(node)
if (!nextNodes) continue
for (const next of nextNodes) {
const nextIn = (indegree.get(next) ?? 0) - 1
indegree.set(next, nextIn)
if (nextIn === 0) {
queue.push(next)
}
}
}
if (sorted.length !== allNodes.size) {
const cyclicNodes = []
for (const [node, deg] of indegree) {
if (deg > 0) cyclicNodes.push(node)
}
throw new Error(
`检测到循环依赖,无法完成拓扑排序:\n${cyclicNodes.join('\n')}`
)
}
return sorted
}结果如下:
arduino
[
  // ...
  '/Users/coderjc/Documents/test-code/原生/no-pre-bundle/node_modules/lodash-es/_baseGetTag.js',
  '/Users/coderjc/Documents/test-code/原生/no-pre-bundle/node_modules/lodash-es/isSymbol.js',
  '/Users/coderjc/Documents/test-code/原生/no-pre-bundle/node_modules/lodash-es/_baseToNumber.js',
  '/Users/coderjc/Documents/test-code/原生/no-pre-bundle/node_modules/lodash-es/_baseToString.js',
  '/Users/coderjc/Documents/test-code/原生/no-pre-bundle/node_modules/lodash-es/toNumber.js',
  '/Users/coderjc/Documents/test-code/原生/no-pre-bundle/node_modules/lodash-es/_createMathOperation.js',
  '/Users/coderjc/Documents/test-code/原生/no-pre-bundle/node_modules/lodash-es/toFinite.js',
  '/Users/coderjc/Documents/test-code/原生/no-pre-bundle/node_modules/lodash-es/add.js',
  '/Users/coderjc/Documents/test-code/原生/no-pre-bundle/node_modules/lodash-es/toInteger.js',
  '/Users/coderjc/Documents/test-code/原生/no-pre-bundle/node_modules/lodash-es/after.js',
  '/Users/coderjc/Documents/test-code/原生/no-pre-bundle/node_modules/lodash-es/lodash.js'
]
我们的例子中为了更好的观察,只保留了 add 和 after 两个函数的导入,从结果来看,是没什么问题的。
后续的步骤大概可以拆分为两步,一步是源码转换,一步是 bundle 生成,这一步其实比较简单,因为我们可以直接利用 esbuild 来完成。
当然也可以自己写,不过我是直接丢给 ai 实现,大概的结果如图:
使用 esbuild 完成构建
其实利用 esbuild 都不需要我们去自己实现依赖图什么的,只是为了说明大概做了什么事情而写的,下面看看使用 esbuild 如何实现。如下:
javascript
import esbuild from 'esbuild'
export async function prebundleDeps(deps) {
await Promise.all(
deps.map(dep => {
return esbuild.build({
entryPoints: [dep],
bundle: true,
format: 'esm',
platform: 'browser',
outfile: './dist/lodash-es.js',
sourcemap: true
})
})
)
}
prebundleDeps(['lodash-es'])打包结果如图:
大家可以和前文的网络请求的文件截图对比一下,结果都是一致的。