本次编辑器采用
Visual Studio Code

官方文档链接
dotnet 命令安装
- 下载地址:https://dotnet.microsoft.com/zh-cn/download
- 安装完成之后打开vscode,打开终端
- 终端输入命令
dotnet new webapp -o SignalRChat cd到SignalRChat目录下
添加 SignalR 客户端库
- 在集成终端中,在卸载任何早期版本(如果存在)后,运行以下命令,安装 LibMan。
bash
dotnet tool uninstall -g Microsoft.Web.LibraryManager.Cli
dotnet tool install -g Microsoft.Web.LibraryManager.Cli
注意!!!一定要用cmd终端 别使用Git bash
接下来在SignalRChat 文件夹中打开终端输入命令
bash
libman install @microsoft/signalr@latest -p unpkg -d wwwroot/js/signalr --files dist/browser/signalr.js创建 SignalR 中心
在 SignalRChat 项目文件夹中,创建 Hubs 文件夹。
在 Hubs 文件夹中,使用以下代码创建 ChatHub 类:
c
using Microsoft.AspNetCore.SignalR;

namespace SignalRChat.Hubs
{
    public class ChatHub : Hub
    {
        public async Task SendMessage(string user, string message)
        {
            await Clients.All.SendAsync("ReceiveMessage", user, message);
        }
    }
}
配置 SignalR
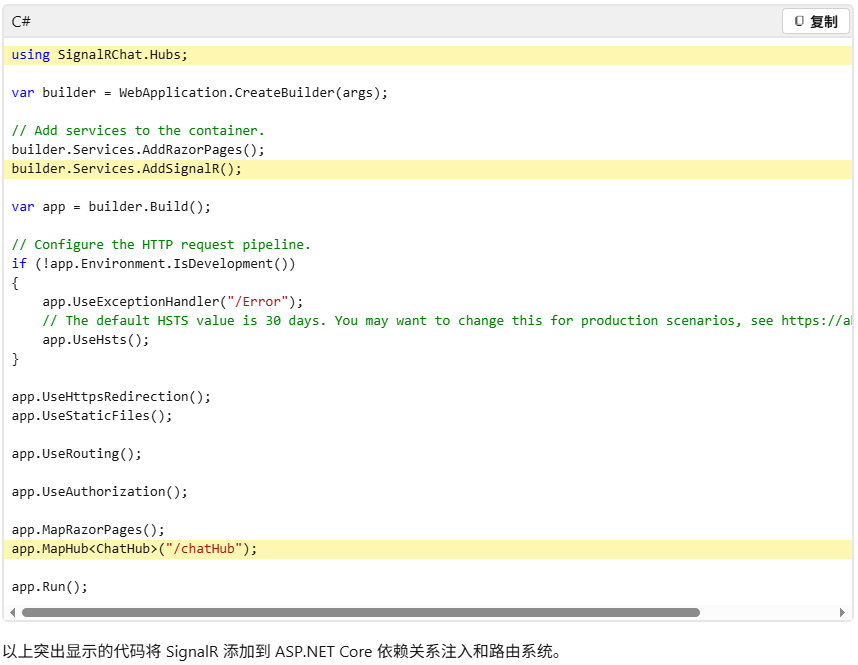
必须将 SignalR 服务器配置为将 SignalR 请求传递给 SignalR。 将以下突出显示的代码添加到 Program.cs 文件。(实则文档都有,本次只做搬运)
添加 SignalR 客户端代码
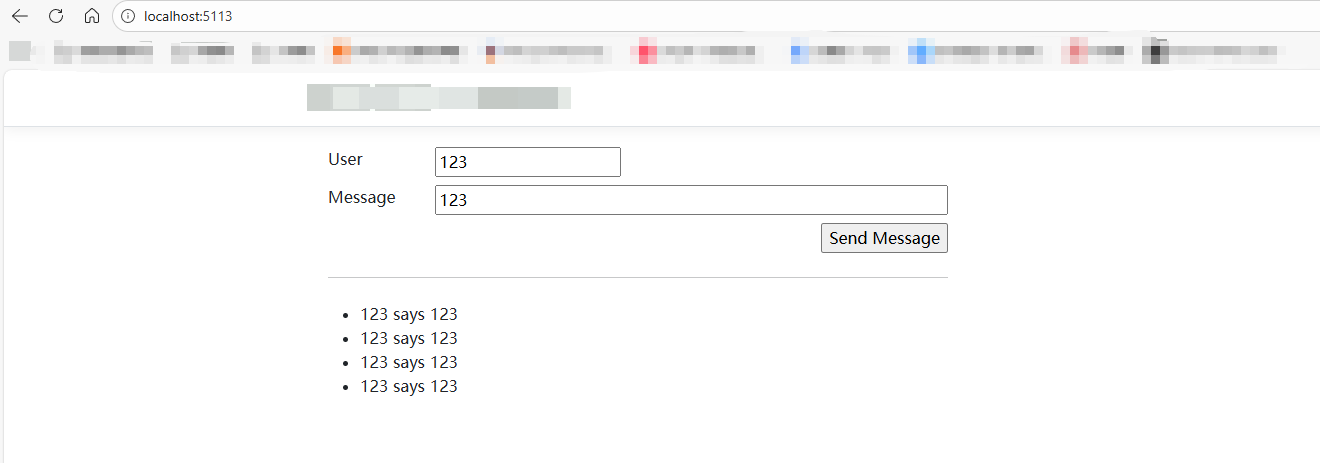
使用以下代码替换 Pages/Index.cshtml 中的内容:
html
@page
<div class="container">
    <div class="row p-1">
        <div class="col-1">User</div>
        <div class="col-5"><input type="text" id="userInput" /></div>
    </div>
    <div class="row p-1">
        <div class="col-1">Message</div>
        <div class="col-5"><input type="text" class="w-100" id="messageInput" /></div>
    </div>
    <div class="row p-1">
        <div class="col-6 text-end">
            <input type="button" id="sendButton" value="Send Message" />
        </div>
    </div>
    <div class="row p-1">
        <div class="col-6">
            <hr />
        </div>
    </div>
    <div class="row p-1">
        <div class="col-6">
            <ul id="messagesList"></ul>
        </div>
    </div>
</div>
<script src="~/js/signalr/dist/browser/signalr.js"></script>
<script src="~/js/chat.js"></script>
在 wwwroot/js 文件夹中,使用以下代码创建 chat.js 文件:
js
"use strict";

var connection = new signalR.HubConnectionBuilder().withUrl("/chatHub").build();

//Disable the send button until connection is established.
document.getElementById("sendButton").disabled = true;

connection.on("ReceiveMessage", function (user, message) {
    var li = document.createElement("li");
    document.getElementById("messagesList").appendChild(li);
    // We can assign user-supplied strings to an element's textContent because it
    // is not interpreted as markup. If you're assigning in any other way, you
    // should be aware of possible script injection concerns.
    li.textContent = `${user} says ${message}`;
});

connection.start().then(function () {
    document.getElementById("sendButton").disabled = false;
}).catch(function (err) {
    return console.error(err.toString());
});

document.getElementById("sendButton").addEventListener("click", function (event) {
    var user = document.getElementById("userInput").value;
    var message = document.getElementById("messageInput").value;
    connection.invoke("SendMessage", user, message).catch(function (err) {
        return console.error(err.toString());
    });
    event.preventDefault();
});之后在SignalRChat 文件夹下输入dotnet run就可以启动了
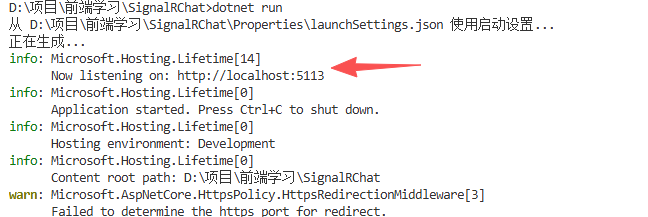
如果看见上述执行结果,就代表成功了。此时打开localhost:5113 就可以访问了
当然上面的都是C#里的代码,由于作者是前端开发的,C#虽说里面有CSHTML的代码,但是由于项目使用的是Vue2,并且自己为了学习测试,必须要前后端分离
改造前后端分离
在之前的Program.cs 文件中,改写以下代码支持前端跨域访问
cs
using SignalRChat.Hubs;
var builder = WebApplication.CreateBuilder(args);

// Add services to the container.
builder.Services.AddRazorPages();
builder.Services.AddSignalR();
builder.Services.AddCors();
var app = builder.Build();

// Configure the HTTP request pipeline.
if (!app.Environment.IsDevelopment())
{
    app.UseExceptionHandler("/Error");
    // The default HSTS value is 30 days. You may want to change this for production scenarios, see https://aka.ms/aspnetcore-hsts.
    app.UseHsts();
}

app.UseHttpsRedirection();
app.UseCors(options =>
{
    options.WithOrigins(["http://localhost:8080", "http://localhost:3000"]) // 前端应用的地址
           .AllowAnyHeader()
           .AllowAnyMethod()
           .AllowCredentials(); // 如果前端需要带 cookie 或认证,才加这个
});
app.UseRouting();

app.UseAuthorization();

app.MapStaticAssets();
app.MapRazorPages()
   .WithStaticAssets();

app.MapHub<ChatHub>("/chathub");

app.Run();改完之后重新dotnet run命令执行
前端代码
首先
npm install @microsoft/signalr这个命令在vue2和vue3都通用的
signalr.js文件
js
import * as signalR from "@microsoft/signalr";
class SignalRService {
constructor() {
this.connection = null;
}
// 连接到 SignalR hub
connect() {
this.connection = new signalR.HubConnectionBuilder()
.withUrl("http://localhost:5113/chathub") // .NET Core 服务中 hub 的地址
.configureLogging(signalR.LogLevel.Information)
.build();
// 启动连接
this.connection
.start()
.then(() => console.log("SignalR 连接成功"))
.catch((err) => console.error("SignalR 连接失败:", err));
// 监听服务器发送的消息
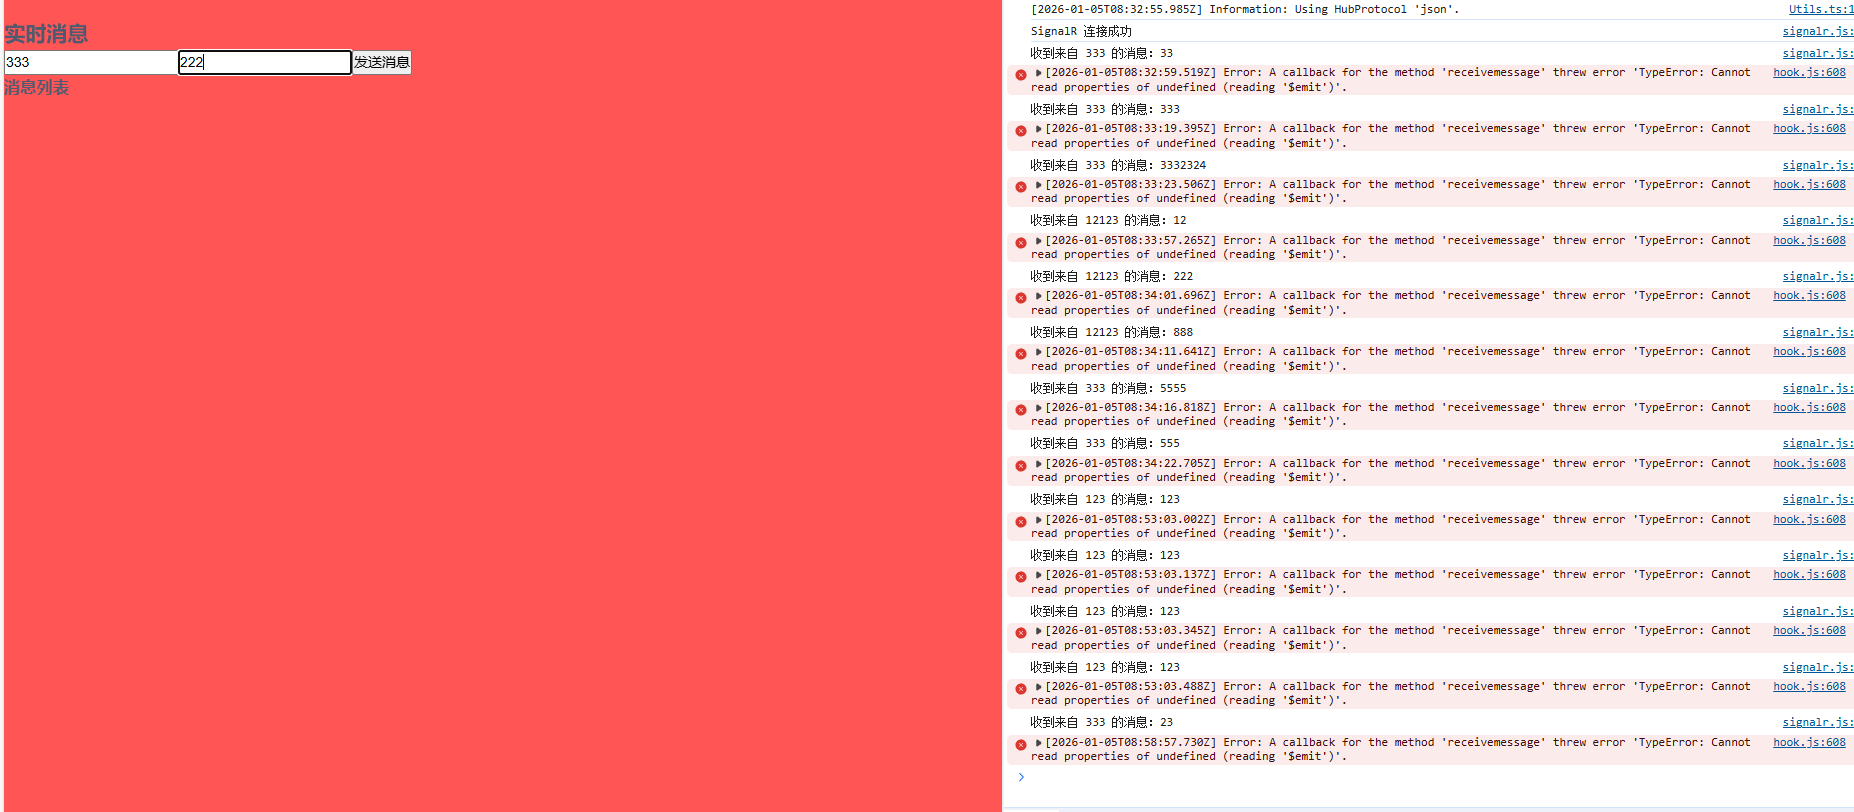
this.connection.on("ReceiveMessage", (user, message) => {
// 这里可以将消息传递给组件,例如通过事件总线或状态管理库
console.log(`收到来自 ${user} 的消息:${message}`);
// 假设使用 Vue 的事件总线
this.$bus.$emit("receiveMessage", { user, message });
});
}
// 发送消息到服务器
sendMessage(user, message) {
if (
this.connection &&
this.connection.state === signalR.HubConnectionState.Connected
) {
this.connection
.invoke("SendMessage", user, message)
.catch((err) => console.error("发送消息失败:", err));
} else {
console.error("SignalR 未连接,无法发送消息");
}
}
// 断开连接
disconnect() {
if (this.connection) {
this.connection
.stop()
.then(() => console.log("SignalR 断开连接"))
.catch((err) => console.error("SignalR 断开连接失败:", err));
this.connection = null;
}
}
}
export default new SignalRService();main.js文件
js
import Vue from "vue";
import App from "./App.vue";
// 创建事件总线
Vue.prototype.$bus = new Vue();
Vue.config.productionTip = false;
new Vue({
  render: (h) => h(App),
}).$mount("#app");
vue页面代码
js
<template>
  <div>
    <h2>实时消息</h2>
    <div>
      <input v-model="user" placeholder="请输入用户名" />
      <input v-model="message" placeholder="请输入消息内容" />
      <button @click="send">发送消息</button>
    </div>
    <div>
      <h3>消息列表</h3>
      <ul>
        <li v-for="(msg, index) in messages" :key="index">
          {{ msg.user }}: {{ msg.message }}
        </li>
      </ul>
    </div>
  </div>
</template>

<script>
import signalRService from "../utils/signalr";

export default {
  data() {
    return {
      user: "",
      message: "",
      messages: [],
    };
  },
  created() {
    // 连接到 SignalR hub
    signalRService.connect();

    // 监听事件总线上的消息
    this.$bus.$on("receiveMessage", (msg) => {
      this.messages.push(msg);
    });
  },
  beforeDestroy() {
    // 断开连接
    signalRService.disconnect();
    // 移除事件监听
    this.$bus.$off("receiveMessage");
  },
  methods: {
    send() {
      if (this.user && this.message) {
        signalRService.sendMessage(this.user, this.message);
        this.message = "";
      } else {
        alert("请输入用户名和消息内容");
      }
    },
  },
};
</script>
运行前端项目,就可以连接启动了,后面eventBus大家可以删掉