用可复现实验直观理解 CORS 与 CSRF 的区别与联系
-
- 前言:它们到底有啥区别?
- 基础知识
- 实验环境准备
-
- [1. Victim 服务端代码 (victim/server.js)](#1. Victim 服务端代码 (victim/server.js))
- [2. Attacker 服务端与前端页面 (attacker/server.js & attacker/index.html)](#2. Attacker 服务端与前端页面 (attacker/server.js & attacker/index.html))
- [实验一:基础跨域读失败(默认无 CORS 配置)和跨站携带凭证 (Cookie)](#实验一:基础跨域读失败(默认无 CORS 配置)和跨站携带凭证 (Cookie))
- 实验二:预检请求 (Preflight Request)
- [实验三:CSRF 表单攻击 (不经过 CORS)](#实验三:CSRF 表单攻击 (不经过 CORS))
- [防护一:CSRF Token](#防护一:CSRF Token)
- [防护二:SameSite Cookie](#防护二:SameSite Cookie)
- 交叉总结
前言:它们到底有啥区别?
一句话总结:CORS 决定了你的脚本能不能"看"到响应,而 CSRF 利用了浏览器自动"带"凭证的特性去"做"坏事。
- CORS (Cross-Origin Resource Sharing):跨域资源共享。
- 本质上是浏览器为了安全,限制"脚本"(如 JavaScript)读取"另一个来源"的资源。
- 它关心的是读权限和可见性。一个请求发出去了,服务器也返回了,但浏览器觉得不安全,就不让你在代码里拿到返回结果。
- CSRF (Cross-Site Request Forgery):跨站请求伪造。
- 本质上是攻击者"借用"了你的身份(浏览器自动携带的 Cookie),去执行一些非你本意的操作。
- 它关心的是跨站执行写操作,比如转账、修改个人资料。
基础知识
一、核心概念
| 子项 | 具体内容 | 取值/要求 | 实验关联/作用 |
|---|---|---|---|
| 同源策略(SOP) | 浏览器核心安全规则:仅「协议+域名+端口」完全相同的页面,脚本才能读写对方资源(Cookie、DOM、响应数据) | - | CORS是同源策略的"例外机制",CSRF是同源策略的"绕过漏洞" |
| 跨域请求分类 | 简单请求:GET/POST(Content-Type为application/x-www-form-urlencoded/text/plain等),无自定义头; 预检请求(Preflight):PUT/DELETE、自定义头、Content-Type为application/json,浏览器先发OPTIONS请求校验 | - | 实验二专门验证预检请求,需理解OPTIONS的作用 |
| 凭证(Credentials) | 浏览器中标识用户身份的信息:Cookie(如session_id)、HTTP认证、TLS客户端证书 | - | CORS的Allow-Credentials和CSRF的核心都是"凭证自动携带" |
| SameSite Cookie | 控制Cookie是否跨域携带: - Strict:仅同站请求携带; - Lax:仅导航类跨域请求(链接/表单)携带; - None:所有跨域请求携带(需配合Secure) | Strict/Lax/None | 影响CSRF是否生效、CORS跨域带Cookie是否成功 |
二、CORS核心响应头
| 子项 | 具体内容 | 取值/要求 | 实验关联/作用 |
|---|---|---|---|
| Access-Control-Allow-Origin | 告诉浏览器:允许该来源的脚本读取响应 | ① 具体域名(如http://localhost:4000); ② *(通配符,不可与Allow-Credentials: true混用) |
实验一(基础CORS)、实验三(带凭证CORS) |
| Access-Control-Allow-Credentials | 告诉浏览器:是否允许跨域请求携带Cookie等凭证 | true/false(仅true允许跨域带凭证) |
实验三(核心),缺失会报"Credentials模式为include但该头不是true" |
| Access-Control-Allow-Methods | 预检请求时,告诉浏览器:允许的请求方法 | GET/POST/PUT/DELETE/OPTIONS等 | 实验二(预检请求) |
| Access-Control-Allow-Headers | 预检请求时,告诉浏览器:允许的自定义请求头 | Content-Type、X-Custom-Header等 | 实验二(核心) |
| Access-Control-Max-Age | 缓存预检请求结果,避免重复发OPTIONS | 秒数(如3600) | 实验二(优化,非必需) |
三、Cookie相关响应头
| 子项 | 具体内容 | 取值/要求 | 实验关联/作用 |
|---|---|---|---|
| Set-Cookie | 登录时设置用户凭证Cookie | 示例:session_id=123; HttpOnly; SameSite=None; Secure; Max-Age=86400 |
所有实验的基础:无Cookie则CORS/CSRF都无意义 - HttpOnly:防止JS读取Cookie(防XSS,不影响CSRF); - SameSite:控制跨域携带规则; - Secure:仅HTTPS传输(SameSite=None时强制要求) |
四、CSRF防护相关
| 子项 | 具体内容 | 取值/要求 | 实验关联/作用 |
|---|---|---|---|
| X-CSRF-Token(响应头) | 返回CSRF Token,要求前端请求时携带 | 随机字符串(如token_123456) |
对比实验:开启/关闭Token校验,看CSRF是否生效 |
| SameSite=Lax/Strict(Cookie属性) | 天然防护CSRF:跨域脚本请求无法带Cookie | Strict/Lax | 实验四:修改SameSite值,看CSRF表单是否能触发转账 |
五、前端请求配置
| 分类 | 子项 | 具体内容 | 取值/要求 | 实验关联/作用 |
|---|---|---|---|---|
| 前端请求配置 | fetch(url, { credentials: 'include' }) | 告诉浏览器:跨域请求时携带目标域名的Cookie | include/same-origin/omit | 对应服务端Access-Control-Allow-Credentials: true + Access-Control-Allow-Origin: 具体域名 |
| 前端请求配置 | 自定义请求头(如X-Custom-Header) | 触发预检请求(OPTIONS) | 任意自定义头名称 | 对应服务端Access-Control-Allow-Headers |
| 前端请求配置 | POST请求Content-Type: application/json | 触发预检请求(OPTIONS) | application/json | 对应服务端Access-Control-Allow-Methods + Access-Control-Allow-Headers |
实验环境准备
我们需要模拟两个不同来源的站点:
| Victim (受害者) 站 | Attacker (攻击者) 站 |
|---|---|
| http://localhost:3000 | http://localhost:4000 |
这里使用 Node.js 和 Express 来快速搭建这两个服务。
操作步骤:
-
创建一个新的项目文件夹,例如 cors_csrf_lab
-
在文件夹中创建两个子文件夹:victim 和 attacker。
-
分别进入这两个文件夹,执行
npm init -y初始化项目,并安装 express 和 cookie-parser(仅 Victim 需要)。在 victim 文件夹下执行:
shellnpm init -y npm install express cookie-parser在 attacker 文件夹下执行:
shellnpm init -y npm install express
1. Victim 服务端代码 (victim/server.js)
启动 Victim 服务:在 victim 文件夹下打开终端,运行 node server.js。
这是模拟受害者的"受保护"服务,提供了登录、查询数据和转账的接口。
js
// victim/server.js
const express = require('express');
const cookieParser = require('cookie-parser');
const app = express();
app.use(cookieParser());
app.use(express.urlencoded({ extended: true }));
app.use(express.json());
// 模拟 CSRF Token 存储
let csrfTokenStore = '';
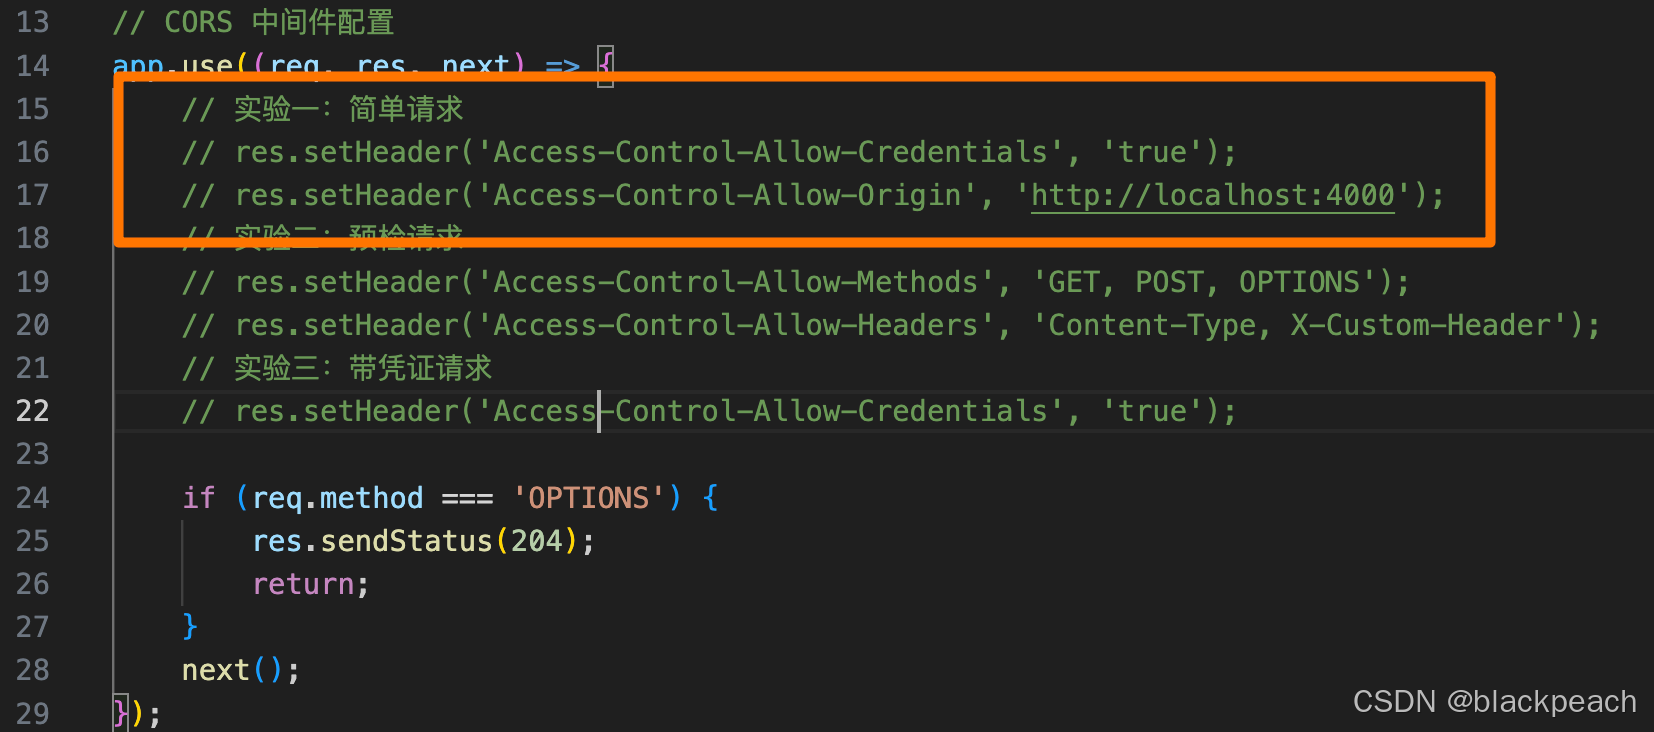
// CORS 中间件配置
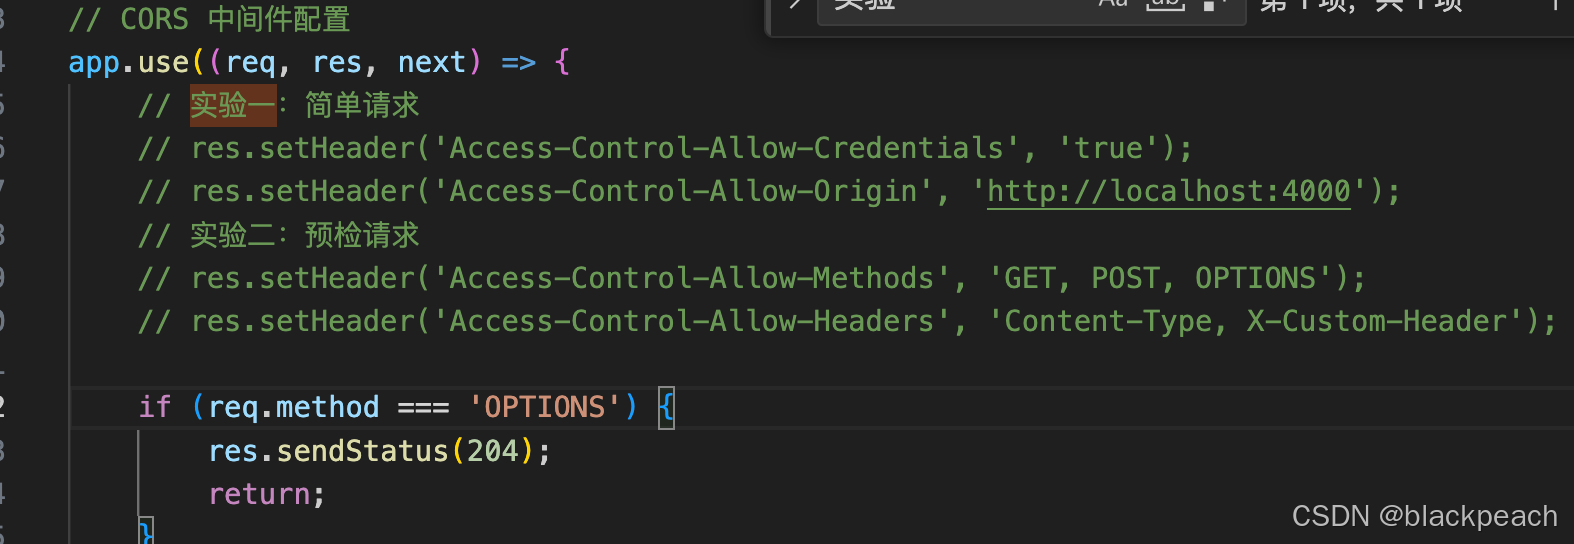
app.use((req, res, next) => {
// 实验一:简单请求
res.setHeader('Access-Control-Allow-Credentials', 'true');
res.setHeader('Access-Control-Allow-Origin', 'http://localhost:4000');
// 实验二:预检请求
res.setHeader('Access-Control-Allow-Methods', 'GET, POST, OPTIONS');
res.setHeader('Access-Control-Allow-Headers', 'Content-Type, X-Custom-Header');
if (req.method === 'OPTIONS') {
res.sendStatus(204);
return;
}
next();
});
// 1. 登录接口:设置 Cookie
app.post('/login', (req, res) => {
const { samesite, username, password } = req.body; // 新增用户名密码参数
// 简单校验(模拟)
if (!username || !password) {
return res.status(400).json({ error: '请输入用户名和密码' });
}
let cookieOptions = {
httpOnly: true,
maxAge: 1000 * 60 * 60 * 24 // 1天有效期
};
if (samesite === 'None') {
cookieOptions.sameSite = 'none';
cookieOptions.secure = true;
console.log('设置 Cookie: SameSite=None; Secure');
} else {
cookieOptions.sameSite = samesite || 'Lax';
console.log(`设置 Cookie: SameSite=${cookieOptions.sameSite}`);
}
// 设置登录态 Cookie
res.cookie('session_id', `user_${username}_${Date.now()}`, cookieOptions);
res.cookie('username', username, { maxAge: 1000 * 60 * 60 * 24 }); // 非httpOnly,便于页面查看
res.json({
message: `登录成功!Cookie已设置 (SameSite=${cookieOptions.sameSite})`,
username: username
});
});
// 2. 退出登录接口:清除 Cookie
app.post('/logout', (req, res) => {
res.clearCookie('session_id');
res.clearCookie('username');
res.json({ message: '退出登录成功,Cookie已清除' });
});
// 3. 获取用户信息接口
app.get('/user-data', (req, res) => {
if (req.cookies.session_id) {
res.json({
username: req.cookies.username || 'Alice',
balance: 1000,
session_id: req.cookies.session_id,
loginStatus: '已登录'
});
} else {
res.status(401).json({
error: '未授权,请先登录',
loginStatus: '未登录'
});
}
});
// 4. 转账接口
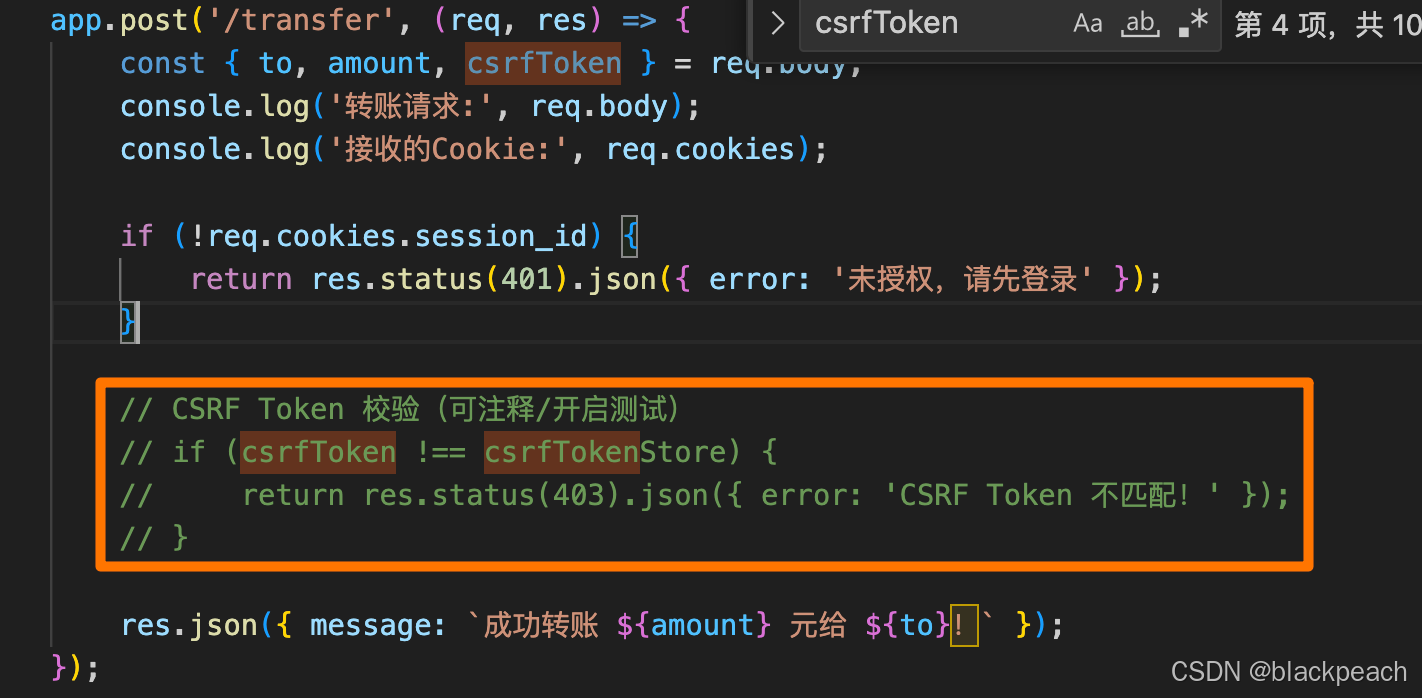
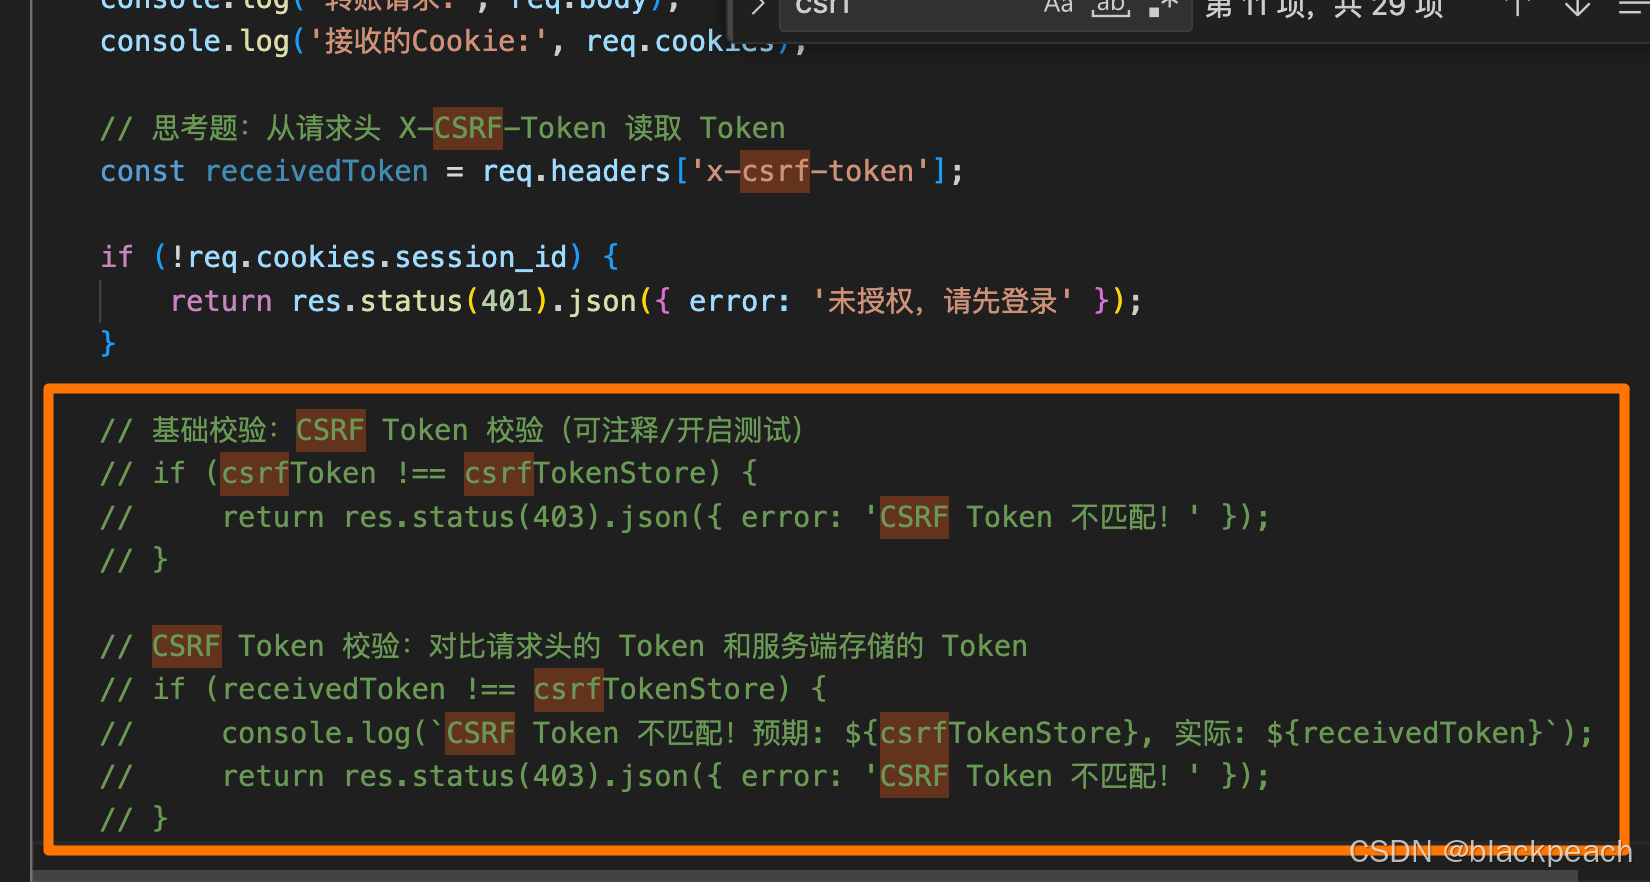
app.post('/transfer', (req, res) => {
const { to, amount, csrfToken } = req.body;
console.log('转账请求:', req.body);
console.log('接收的Cookie:', req.cookies);
// 思考题:从请求头 X-CSRF-Token 读取 Token
const receivedToken = req.headers['x-csrf-token'];
if (!req.cookies.session_id) {
return res.status(401).json({ error: '未授权,请先登录' });
}
// 基础校验:CSRF Token 校验(可注释/开启测试)
// if (csrfToken !== csrfTokenStore) {
// return res.status(403).json({ error: 'CSRF Token 不匹配!' });
// }
// CSRF Token 校验:对比请求头的 Token 和服务端存储的 Token
// if (receivedToken !== csrfTokenStore) {
// console.log(`CSRF Token 不匹配!预期: ${csrfTokenStore}, 实际: ${receivedToken}`);
// return res.status(403).json({ error: 'CSRF Token 不匹配!' });
// }
res.json({ message: `成功转账 ${amount} 元给 ${to}!` });
});
// 5. 主页:带UI交互的页面
app.get('/', (req, res) => {
// 生成CSRF Token
csrfTokenStore = `token_${Date.now()}`;
console.log('生成CSRF Token:', csrfTokenStore);
// 渲染带按钮的HTML页面
res.send(`
<!DOCTYPE html>
<html lang="zh-CN">
<head>
<meta charset="UTF-8">
<title>受害者银行 - 模拟登录测试</title>
<style>
body { font-family: Arial, sans-serif; max-width: 800px; margin: 20px auto; padding: 0 20px; }
.container { margin: 20px 0; padding: 20px; border: 1px solid #ddd; border-radius: 8px; }
button { padding: 8px 16px; margin: 5px; cursor: pointer; background: #007bff; color: white; border: none; border-radius: 4px; }
button:hover { background: #0056b3; }
.logout-btn { background: #dc3545; }
.logout-btn:hover { background: #c82333; }
#status { margin: 10px 0; padding: 10px; border-radius: 4px; }
.success { background: #d4edda; color: #155724; }
.error { background: #f8d7da; color: #721c24; }
.info { background: #d1ecf1; color: #0c5460; }
input { margin: 5px 0; padding: 8px; width: 200px; }
pre { background: #f8f9fa; padding: 10px; border-radius: 4px; overflow-x: auto; }
</style>
</head>
<body>
<h1>受害者银行系统</h1>
<!-- 登录区域 -->
<div class="container">
<h2>🔑 用户登录</h2>
<div>
<input type="text" id="username" placeholder="输入用户名" value="testuser"><br>
<input type="password" id="password" placeholder="输入密码" value="123456"><br>
<label>SameSite 模式:</label>
<select id="samesite-mode">
<option value="Strict">Strict</option>
<option value="Lax" selected>Lax</option>
<option value="None">None</option>
</select><br>
<button onclick="login()">登录</button>
<button class="logout-btn" onclick="logout()">退出登录</button>
</div>
</div>
<!-- 登录状态 & Cookie 信息 -->
<div class="container">
<h2>📌 登录状态 & Cookie 信息</h2>
<div id="status" class="info">未登录,点击登录按钮尝试登录</div>
<div>
<button onclick="checkLoginStatus()">刷新登录状态</button>
<button onclick="showCookies()">查看浏览器Cookie</button>
</div>
<pre id="cookie-info"></pre>
</div>
<!-- 用户信息区域 -->
<div class="container">
<h2>👤 用户信息</h2>
<button onclick="getUserData()">获取用户信息</button>
<pre id="user-data"></pre>
</div>
<!-- 转账操作区域 -->
<div class="container">
<h2>💸 转账操作</h2>
<div>
<input type="text" id="transfer-to" placeholder="收款方账号" value="zhangsan"><br>
<input type="number" id="transfer-amount" placeholder="转账金额" value="100"><br>
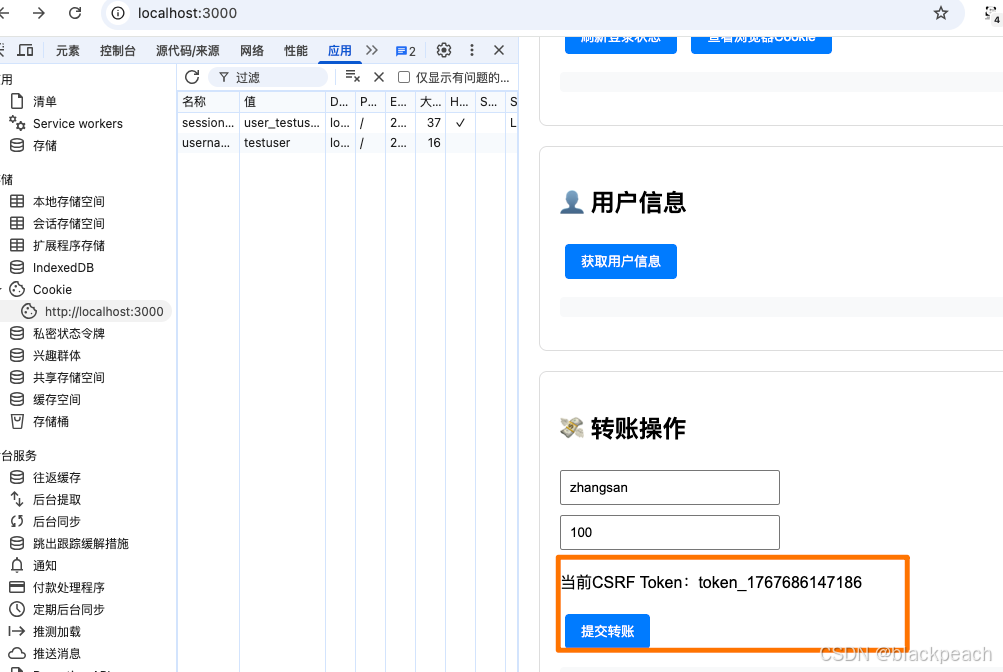
<input type="hidden" id="csrf-token" value="${csrfTokenStore}">
<p>当前CSRF Token:<span id="csrf-token-display">${csrfTokenStore}</span></p>
<button onclick="transfer()">提交转账</button>
</div>
<pre id="transfer-result"></pre>
</div>
<script>
// 工具函数:更新状态提示
function updateStatus(message, type = 'info') {
const statusEl = document.getElementById('status');
statusEl.textContent = message;
statusEl.className = type;
}
// 1. 登录功能
async function login() {
const username = document.getElementById('username').value;
const password = document.getElementById('password').value;
const samesite = document.getElementById('samesite-mode').value;
if (!username || !password) {
updateStatus('请输入用户名和密码!', 'error');
return;
}
try {
const response = await fetch('/login', {
method: 'POST',
headers: {
'Content-Type': 'application/json'
},
body: JSON.stringify({ username, password, samesite })
});
const data = await response.json();
if (response.ok) {
updateStatus(data.message, 'success');
showCookies(); // 自动刷新Cookie信息
} else {
updateStatus(data.error, 'error');
}
} catch (error) {
updateStatus('登录请求失败:' + error.message, 'error');
}
}
// 2. 退出登录功能
async function logout() {
try {
const response = await fetch('/logout', {
method: 'POST'
});
const data = await response.json();
updateStatus(data.message, 'success');
document.getElementById('cookie-info').textContent = '';
document.getElementById('user-data').textContent = '';
document.getElementById('transfer-result').textContent = '';
} catch (error) {
updateStatus('退出登录失败:' + error.message, 'error');
}
}
// 3. 检查登录状态
async function checkLoginStatus() {
try {
const response = await fetch('/user-data');
const data = await response.json();
if (response.ok) {
updateStatus('当前状态:已登录', 'success');
} else {
updateStatus('当前状态:未登录 - ' + data.error, 'error');
}
} catch (error) {
updateStatus('检查状态失败:' + error.message, 'error');
}
}
// 4. 查看浏览器Cookie
function showCookies() {
const cookieEl = document.getElementById('cookie-info');
// 获取当前页面所有Cookie
const cookies = document.cookie.split('; ').reduce((obj, cookie) => {
const [key, value] = cookie.split('=');
obj[key] = value;
return obj;
}, {});
cookieEl.textContent = JSON.stringify(cookies, null, 2);
}
// 5. 获取用户信息
async function getUserData() {
try {
const response = await fetch('/user-data');
const data = await response.json();
const userDataEl = document.getElementById('user-data');
userDataEl.textContent = JSON.stringify(data, null, 2);
if (!response.ok) {
updateStatus('获取用户信息失败:' + data.error, 'error');
}
} catch (error) {
updateStatus('获取用户信息请求失败:' + error.message, 'error');
}
}
// 6. 转账功能
async function transfer() {
const to = document.getElementById('transfer-to').value;
const amount = document.getElementById('transfer-amount').value;
const csrfToken = document.getElementById('csrf-token').value;
if (!to || !amount) {
updateStatus('请填写收款方和转账金额!', 'error');
return;
}
try {
const response = await fetch('/transfer', {
method: 'POST',
headers: {
'Content-Type': 'application/json',
'X-CSRF-Token': csrfToken // 思考题:添加自定义头 X-CSRF-Token
},
body: JSON.stringify({ to, amount, csrfToken })
});
const data = await response.json();
const transferResultEl = document.getElementById('transfer-result');
transferResultEl.textContent = JSON.stringify(data, null, 2);
if (response.ok) {
updateStatus('转账请求提交成功', 'success');
} else {
updateStatus('转账失败:' + data.error, 'error');
}
} catch (error) {
updateStatus('转账请求失败:' + error.message, 'error');
}
}
// 页面加载时自动检查登录状态
window.onload = function() {
checkLoginStatus();
};
</script>
</body>
</html>
`);
});
// 启动服务器
app.listen(3000, () => {
console.log('受害者服务器运行在: http://localhost:3000');
});2. Attacker 服务端与前端页面 (attacker/server.js & attacker/index.html)
启动 Attacker 服务:在 attacker 文件夹下打开终端,运行 node server.js。
攻击站提供一个 HTML 页面,用于发起对 Victim 站的各种请求。
js
Attacker 服务端代码 (attacker/server.js):
// attacker/server.js
const express = require('express');
const path = require('path');
const app = express();

app.use(express.static('.')); // 托管当前目录的静态文件

app.get('/', (req, res) => {
    res.sendFile(path.join(__dirname, 'index.html'));
});

app.listen(4000, () => {
    console.log('Attacker server listening on http://localhost:4000');
});
Attacker 前端页面 (attacker/index.html):
html
<!-- attacker/index.html -->
<!DOCTYPE html>
<html lang="zh-CN">
<head>
<meta charset="UTF-8">
<title>Attacker Page</title>
<style>
#result { margin: 20px 0; padding: 10px; border: 1px solid #ddd; }
.error { color: red; }
.success { color: green; }
button { margin: 5px; padding: 8px 16px; cursor: pointer; }
</style>
</head>
<body>
<h1>Attacker's Page (http://localhost:4000)</h1>
<p>This page will try to access resources from http://localhost:3000</p>
<h2>实验一、二:使用 fetch API (CORS 场景)</h2>
<!-- 新增:登录按钮(模拟受害者登录,无需Postman) -->
<button onclick="fetchUserData()">1. Fetch User Data (GET) with Credentials (Cookie)</button>
<button onclick="fetchWithCustomHeader()">2. Fetch with Custom Header (Trigger Preflight)</button>
<!-- 新增:测试带 X-CSRF-Token 的跨域转账请求 -->
<button onclick="fetchWithCSRFHeader()">3. Fetch Transfer with X-CSRF-Token (Preflight)</button>
<div id="result"></div>
<hr>
<h2>实验三:CSRF 表单攻击 (非 CORS 场景)</h2>
<p>这个表单是隐藏的,页面加载后会自动提交,模拟对 Victim 站点的转账操作。</p>
<iframe name="csrf-frame" style="display:none;"></iframe>
<form id="csrf-form" action="http://localhost:3000/transfer" method="POST" target="csrf-frame">
<input type="hidden" name="to" value="Mallory (The Attacker)">
<input type="hidden" name="amount" value="100">
<!-- 防护一:尝试带上 Token,但攻击者无法获取 -->
<!-- <input type="hidden" name="csrfToken" value="attacker_cannot_get_this"> -->
</form>
<script>
const victimUrl = 'http://localhost:3000/user-data';
const resultDiv = document.getElementById('result');
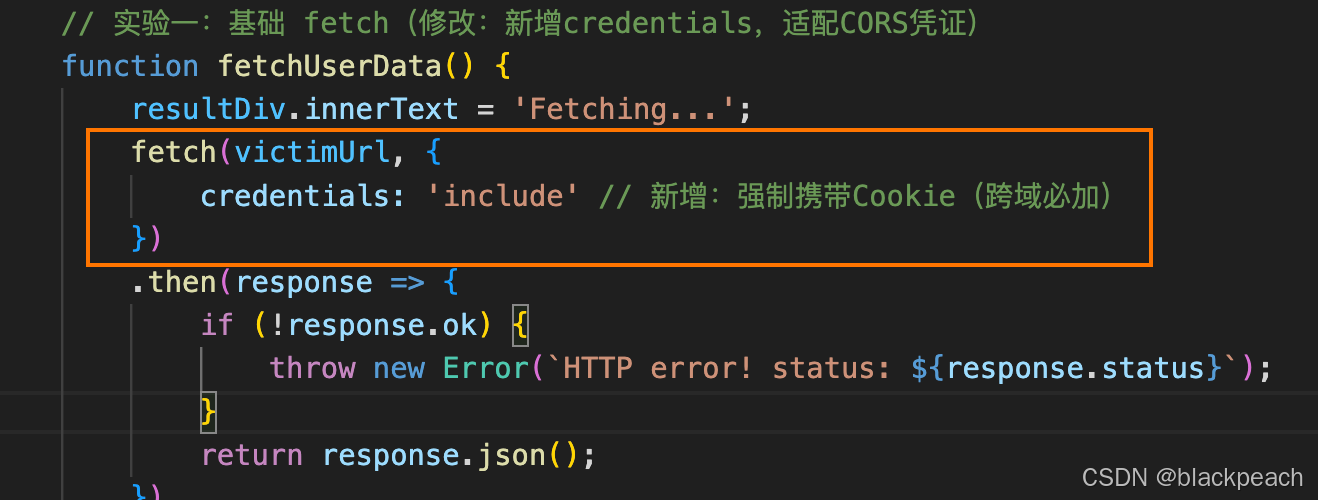
// 实验一:基础 fetch(修改:新增credentials,适配CORS凭证)
function fetchUserData() {
resultDiv.innerText = 'Fetching...';
fetch(victimUrl, {
credentials: 'include' // 新增:强制携带Cookie(跨域必加)
})
.then(response => {
if (!response.ok) {
throw new Error(`HTTP error! status: ${response.status}`);
}
return response.json();
})
.then(data => {
resultDiv.innerHTML = `<p class="success">✅ Success! Data: ${JSON.stringify(data)}</p>`;
})
.catch(e => {
console.error('Fetch error:', e);
resultDiv.innerHTML = `<p class="error">❌ Fetch failed: ${e.message}<br>请检查CORS配置和登录状态</p>`;
});
}
// 实验二:带自定义头的 fetch,触发预检(修改:新增credentials)
function fetchWithCustomHeader() {
resultDiv.innerText = 'Fetching with custom header...';
fetch('http://localhost:3000/transfer', {
method: 'POST',
headers: {
'X-Custom-Header': 'my-custom-value', // 自定义头
'Content-Type': 'application/json'
},
body: JSON.stringify({ to: 'Bob', amount: 50 }),
credentials: 'include' // 新增:携带Cookie
})
.then(res => res.json())
.then(data => {
resultDiv.innerHTML = `<p class="success">✅ Success! Data: ${JSON.stringify(data)}</p>`;
})
.catch(e => {
console.error('Fetch error:', e);
resultDiv.innerHTML = `<p class="error">❌ Fetch failed: ${e.message}<br>检查预检请求(OPTIONS)是否通过</p>`;
});
}
// 新增:测试带 X-CSRF-Token 的跨域转账请求
function fetchWithCSRFHeader() {
resultDiv.innerText = 'Fetching transfer with X-CSRF-Token...';
fetch('http://localhost:3000/transfer', {
method: 'POST',
headers: {
'Content-Type': 'application/json',
'X-CSRF-Token': 'fake_token_123456' // 思考题:攻击者无法获取真实Token
},
body: JSON.stringify({ to: 'Mallory', amount: 200 }),
credentials: 'include'
})
.then(res => res.json())
.catch(e => {
console.error('Fetch error:', e);
resultDiv.innerHTML = `<p class="error">❌ Fetch failed: ${e.message}<br>预检失败</p>`;
});
}
// 页面加载后自动提交 CSRF 表单
window.onload = function() {
// console.log("Submitting CSRF form automatically...");
// document.getElementById('csrf-form').submit(); // 注释:手动触发更易测试
console.log("CSRF form ready (手动点击下方按钮触发)");
};
// 新增:手动触发CSRF表单提交(便于调试)
function submitCSRFForm() {
document.getElementById('csrf-form').submit();
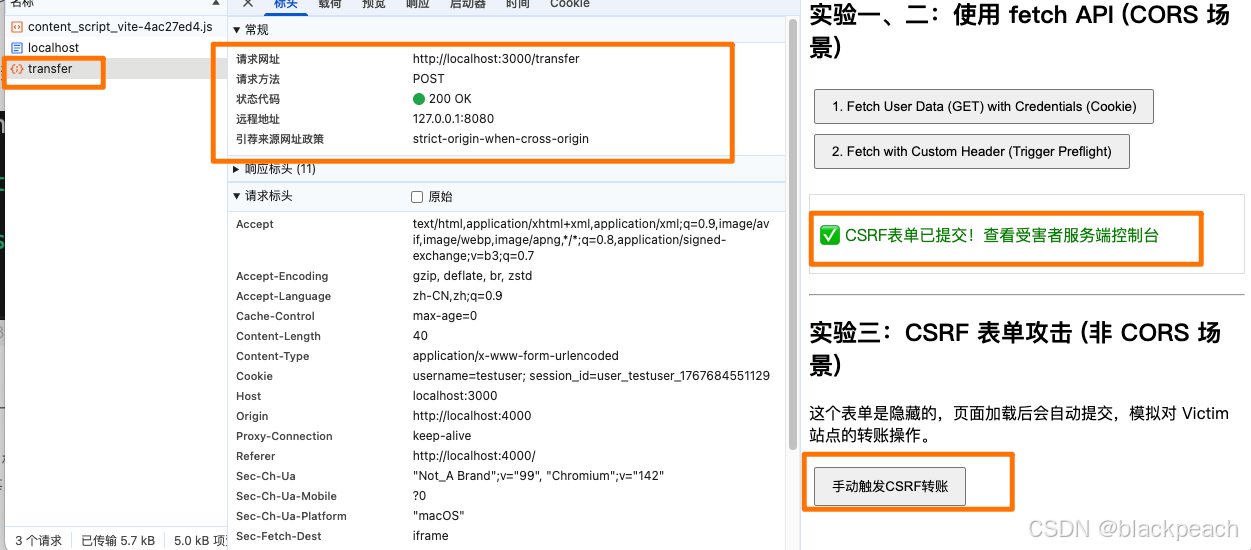
resultDiv.innerHTML = `<p class="success">✅ CSRF表单已提交!查看受害者服务端控制台</p>`;
}
</script>
<!-- 新增:CSRF手动触发按钮 -->
<button onclick="submitCSRFForm()">手动触发CSRF转账</button>
</body>
</html>实验一:基础跨域读失败(默认无 CORS 配置)和跨站携带凭证 (Cookie)
目标: 观察在没有 Access-Control-Allow-Origin (ACAO) 头和Access-Control-Allow-Credentials(ACAC)时,浏览器如何阻止跨域读取以及如何阻止带凭据发请求。
操作步骤:
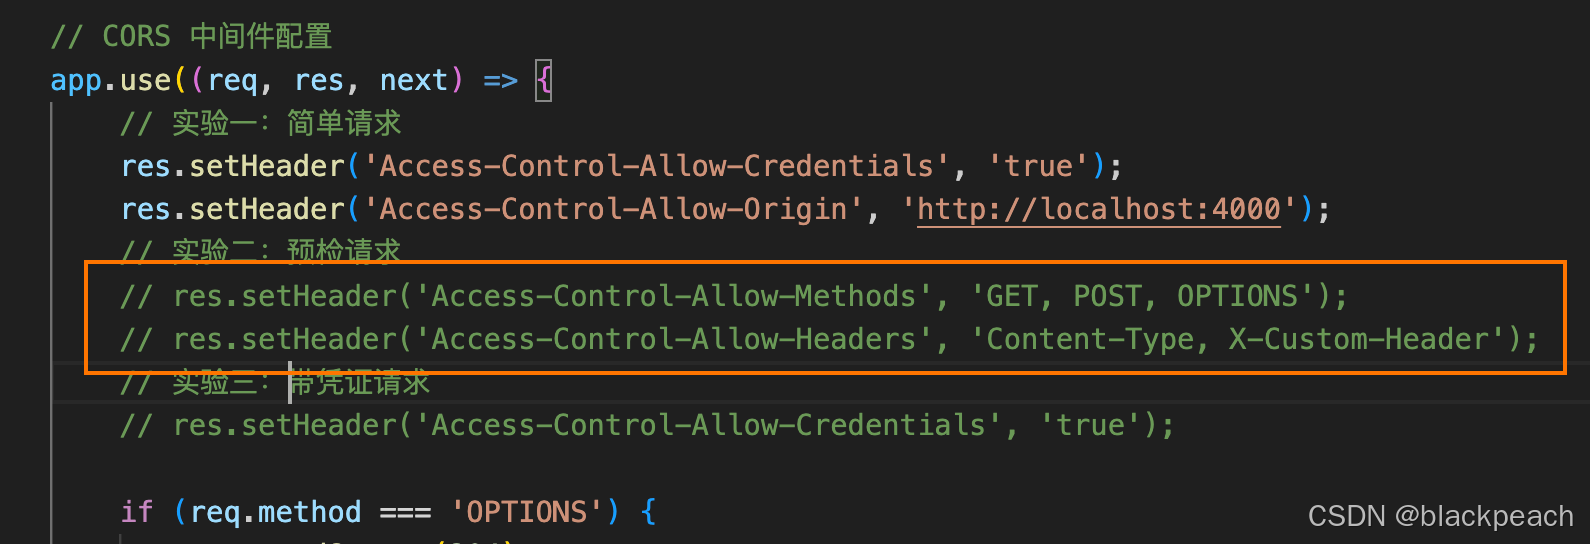
- 确保
victim/server.js中所有 CORS 相关的 res.setHeader 都被注释掉。重启 Victim 服务。
- 登录 Victim 站:为了后续实验,我们先登录。
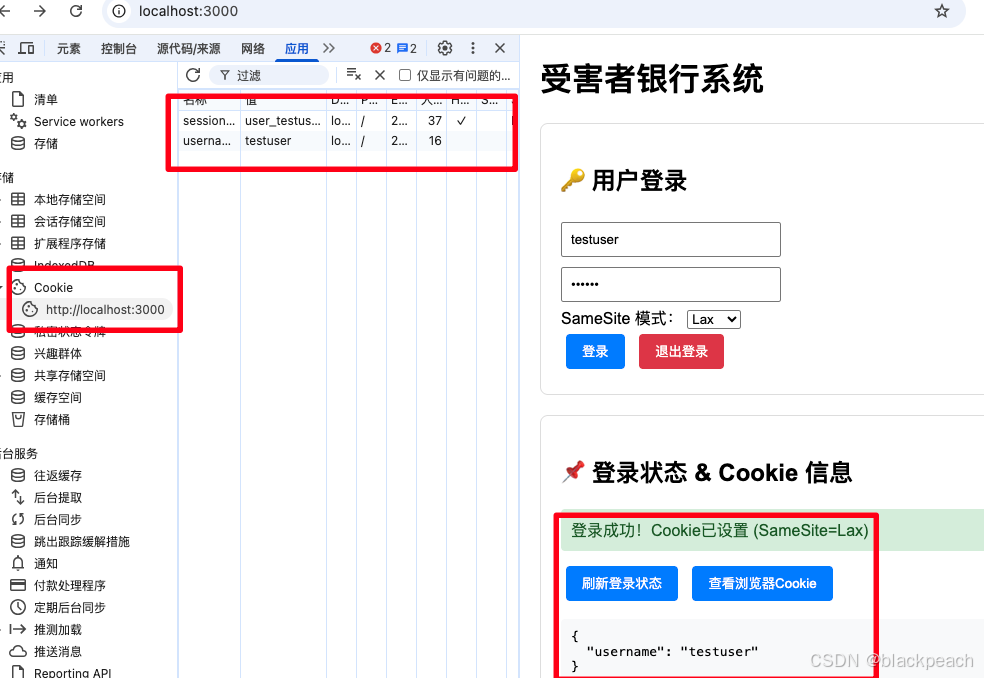
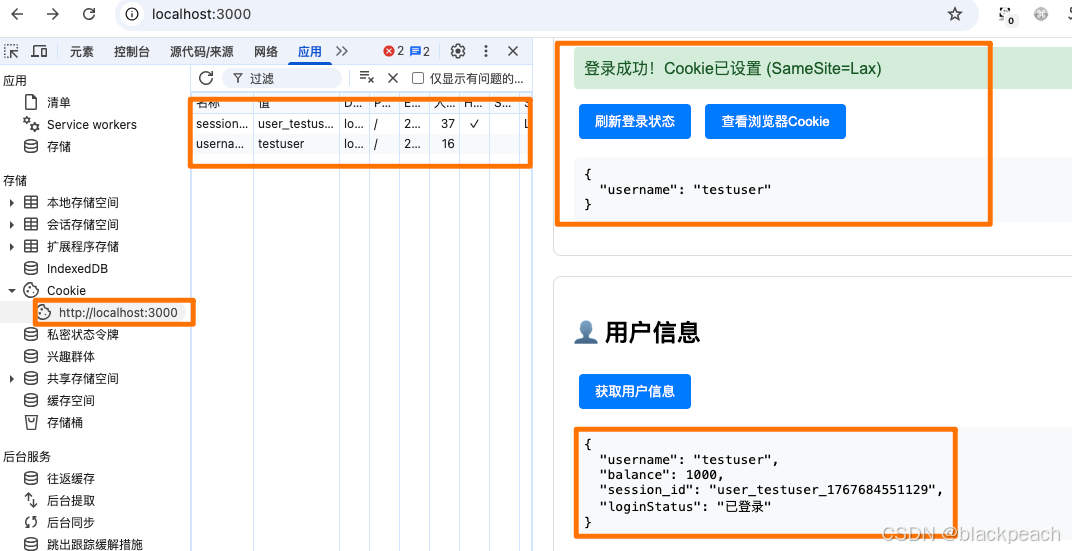
此时应该会在浏览器 DevTools 的 Application -> Cookies 面板中看到 session_id。 - 打开浏览器,访问 Attacker 页面 http://localhost:4000, 点击页面上的 "1. Fetch User Data (GET)" 按钮。
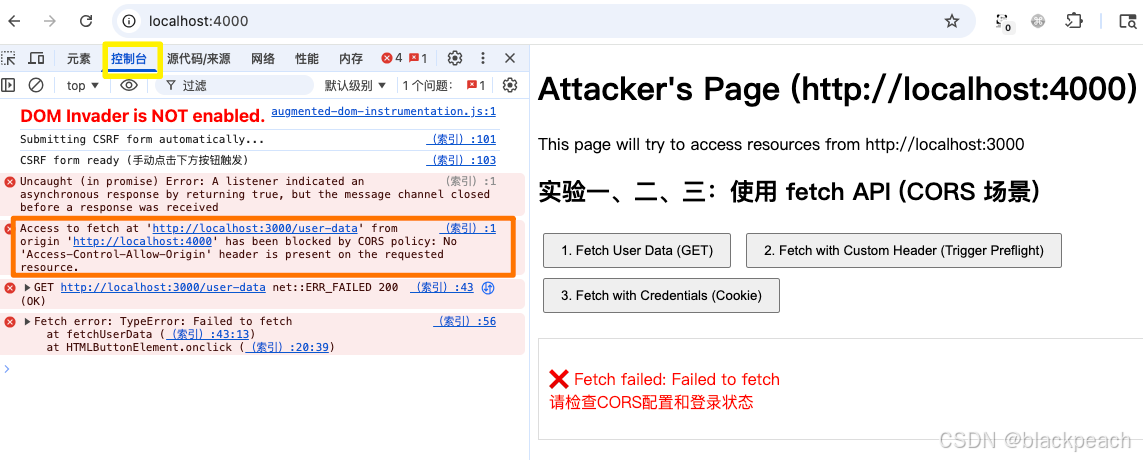
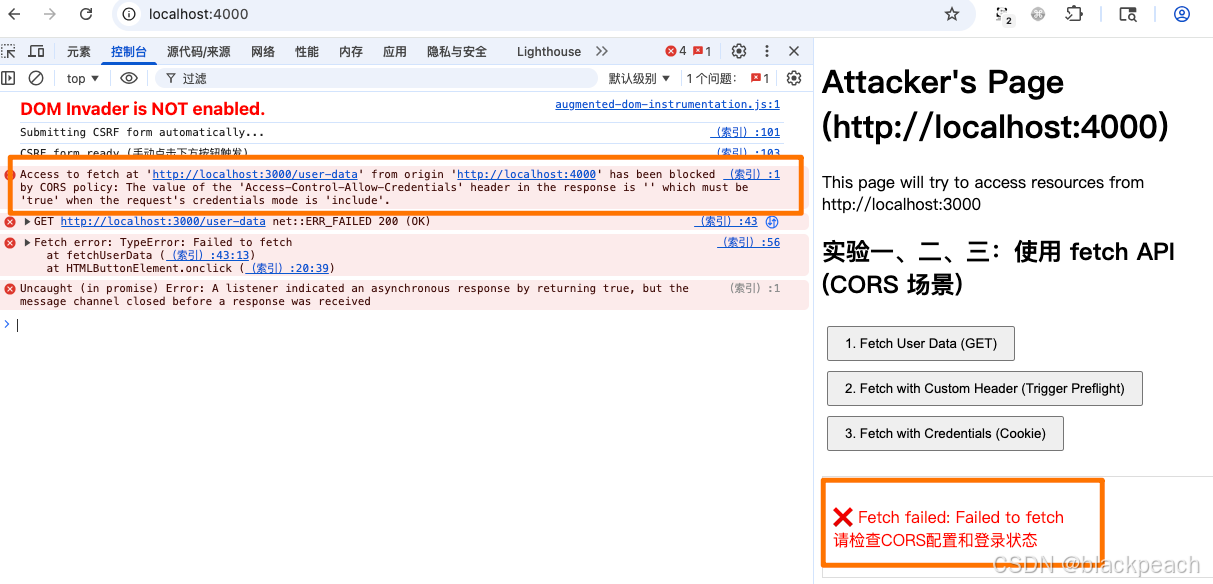
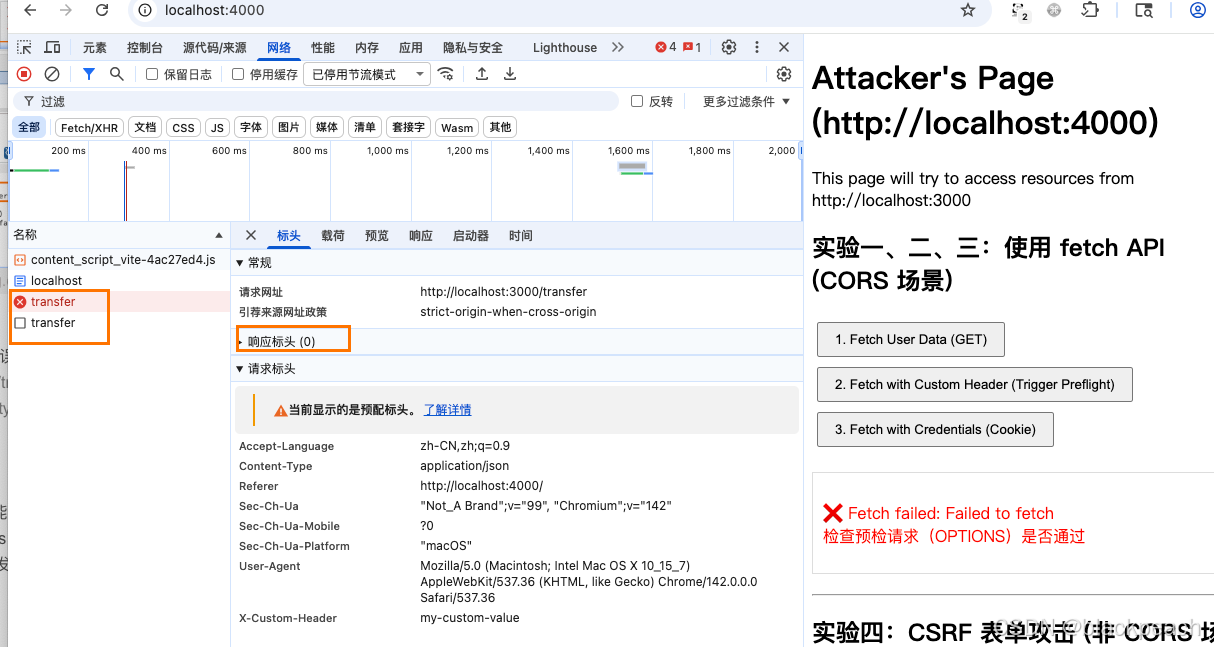
你会看到一个红色的 CORS 错误,内容类似: Access to fetch at 'http://localhost:3000/user-data' from origin 'http://localhost:4000' has been blocked by CORS policy: No 'Access-Control-Allow-Origin' header is present on the requested resource. - 打开 DevTools (F12),切换到 Console 和 Network 面板。
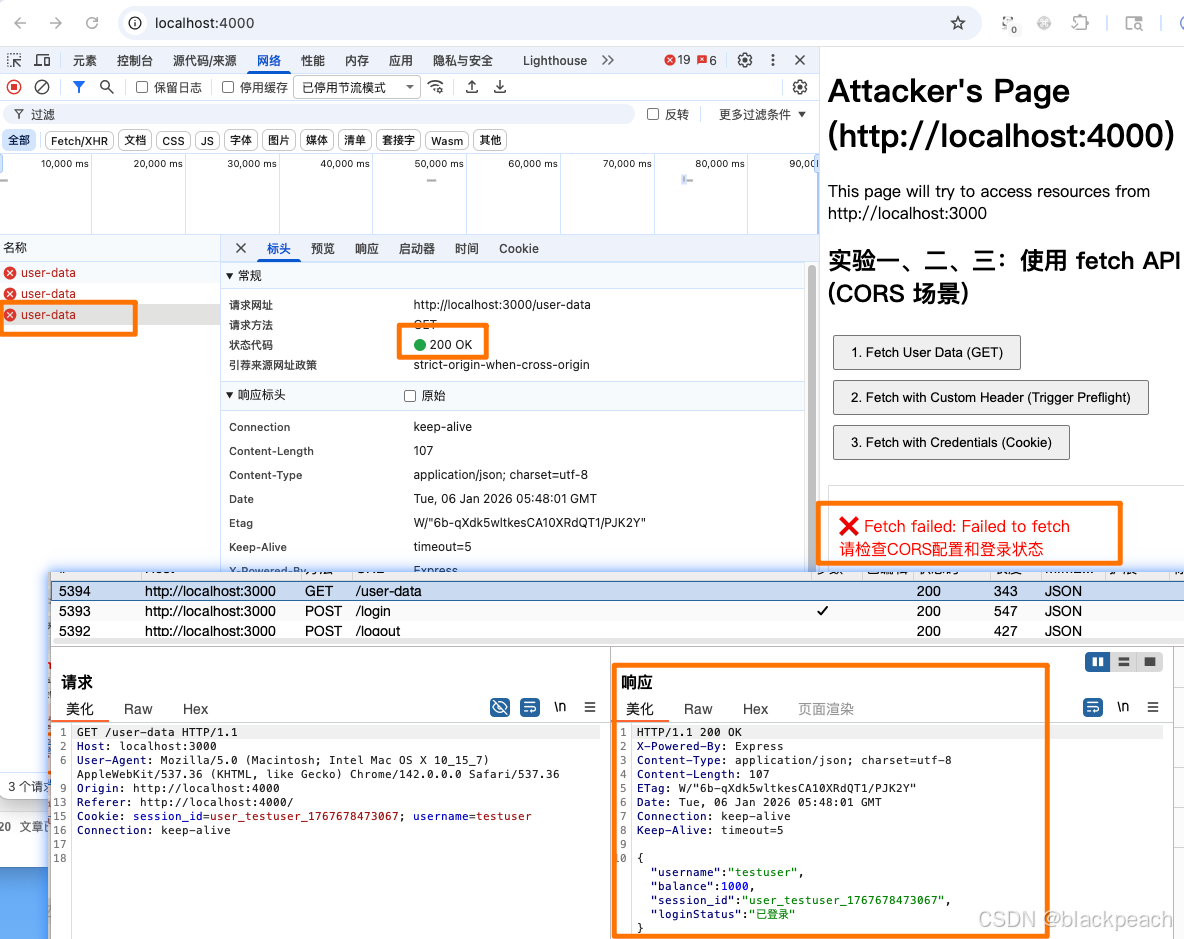
你会看到对/user-data的请求。点击它,你会发现 请求已成功发送 (Status 200),并且 Response 标签页里有服务端返回的数据。但是,在页面上,我们的脚本却拿不到这个数据,这就是浏览器的同源策略在起作用。请求可以发,但响应不可读。
如何拿到请求的响应?
-
在 victim/server.js 中,找到 CORS 中间件部分,取消注释下面这行代码:
jsres.setHeader('Access-Control-Allow-Origin', 'http://localhost:4000'); -
重启 Victim 服务 (node server.js)。
-
刷新 Attacker 页面 (http://localhost:4000),再次点击按钮。
此时会发现还是拿不到响应,这还是浏览器安全策略的问题,当前端强制携带了cookie后,服务端的响应头必须携带
Access-Control-Allow-Credentials:trueAccess to fetch at 'http://localhost:3000/user-data' from origin 'http://localhost:4000' has been blocked by CORS policy: The value of the 'Access-Control-Allow-Credentials' header in the response is '' which must be 'true' when the request's credentials mode is 'include'.
-
在 victim/server.js 中,找到 CORS 中间件部分,取消注释下面这两行代码:
jsres.setHeader('Access-Control-Allow-Credentials', 'true'); res.setHeader('Access-Control-Allow-Origin', 'http://localhost:4000'); -
再次重启受害者服务端,测试
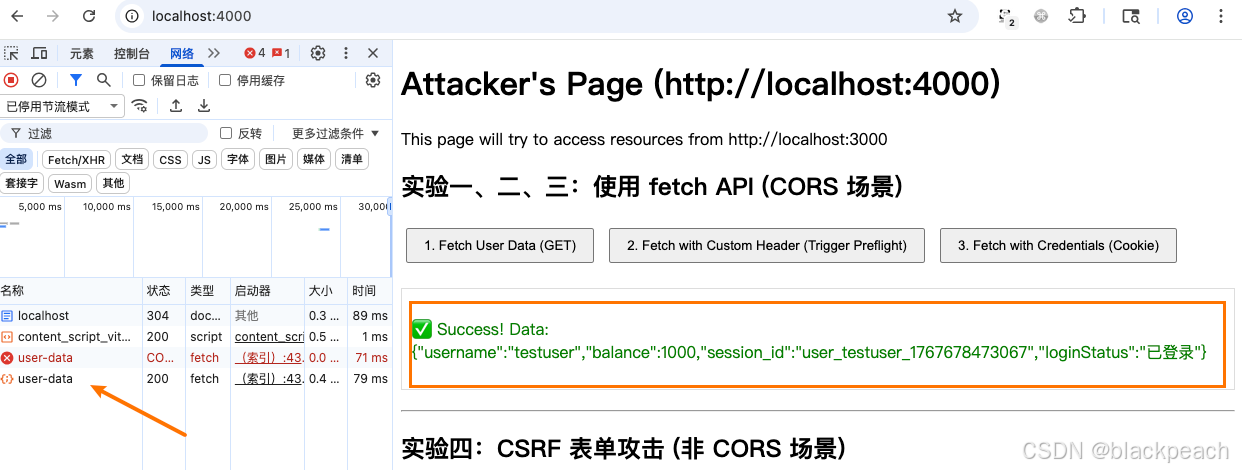
此时成功拿到受害者服务端的响应
结论:
- CORS 的核心机制就是服务端通过
Access-Control-Allow-Origin头告诉浏览器:"我允许来自 http://localhost:4000 的脚本读取我的响应"。 - 如果有携带cookie场景那么需要服务端通过
Access-Control-Allow-Credentials头告诉浏览器:"我允许来自 http://localhost:4000 的脚本携带cookie来请求"。
实验二:预检请求 (Preflight Request)
目标: 理解什么情况下会触发预检请求 (OPTIONS),以及服务端如何正确响应。
某些"非简单请求(复杂请求)"会触发浏览器自动发送一个 OPTIONS 方法的预检请求,询问服务器是否允许接下来的实际请求。触发条件包括:
- 使用了 GET, POST, HEAD 之外的方法(如 PUT, DELETE)。
- Content-Type 是 application/json, application/xml 等。
- 带有自定义请求头 (e.g., X-Custom-Header)。
操作步骤:
- 确保 victim/server.js 中只有
Access-Control-Allow-Origin和Access-Control-Allow-Credentials是开启的。其他Access-Control-Allow-*头先注释掉。重启服务。
- 在 Attacker 页面 (http://localhost:4000),点击 "2. Fetch with Custom Header (Trigger Preflight)" 按钮。

Console 面板:
你会看到一个关于预检请求失败的 CORS 错误,提示错误如下
Access to fetch at 'http://localhost:3000/transfer' from origin 'http://localhost:4000' has been blocked by CORS policy: Request header field content-type is not allowed by Access-Control-Allow-Headers in preflight response.
Network 面板:你会看到 两个 请求:
- 一个
OPTIONS /transfer请求,状态码可能是204 No Content或404 Not Found,但关键是它的响应头里没有我们需要的 Access-Control-Allow-Headers 和 Access-Control-Allow-Methods。 - 真正的 POST /transfer 请求 根本没有被发送。浏览器在预检失败后就直接阻止了它。
让这个复杂请求成功:
-
在 victim/server.js 的 CORS 中间件中,取消注释以下两行:
jsres.setHeader('Access-Control-Allow-Methods', 'GET, POST, OPTIONS'); res.setHeader('Access-Control-Allow-Headers', 'Content-Type, X-Custom-Header'); -
重启 Victim 服务。
-
刷新 Attacker 页面,再次点击按钮。

- Network 面板:
OPTIONS 请求的响应头中包含了我们刚加的Allow-Methods 和 Allow-Headers。随后,浏览器发出了实际的 POST 请求,并成功得到了响应。 - 页面显示:
✅ Success! Data: {"message":"成功转账 50 元给 Bob!"}
结论:预检请求是浏览器在发送复杂跨域请求前的"安全检查"。服务端必须正确响应 OPTIONS 请求,明确告知允许的方法和头,否则实际请求将被浏览器拦截。
实验三:CSRF 表单攻击 (不经过 CORS)
目标:证明传统的 HTML 表单提交 不受 CORS 策略的约束,并且浏览器会自动携带目标站点的 Cookie,从而导致 CSRF 攻击。
操作步骤:
-
准备环境:
-
确保你已登录 Victim 站,且浏览器存有
session_id Cookie。
-
关闭所有 CORS 设置!在
victim/server.js中,注释掉所有Access-Control-Allow-*的 res.setHeader 行。这模拟了一个完全没有配置 CORS 的、自以为安全的后端。
-
确保 /transfer 接口中的 CSRF Token 校验逻辑也是注释掉的。
-
重启 Victim 服务。
-
-
访问 Attacker 页面 http://localhost:4000。页面加载后,隐藏的表单会自动提交。
预期现象:
- Victim 服务端控制台:你会看到一条转账请求日志,并且 成功接收到了 Cookie!

- Attacker 页面:攻击者页面本身什么也看不到,因为表单提交到了一个隐藏的 iframe 中,并且由于同源策略,它也无法读取 iframe 的响应。但攻击已经发生了!
结论:这是 CSRF 的核心。即使 Victim 服务器没有开放任何 CORS 权限,一个简单的 HTML 表单提交(其 Content-Type 为 application/x-www-form-urlencoded 或 text/plain 等,属于"简单请求")就能携带用户凭证,完成一次"写"操作。CORS 管不住它!
防护一:CSRF Token
目标: 演示如何通过在请求中加入一个攻击者无法获取的 Token 来有效防御 CSRF。
操作步骤:
-
开启 Token 校验:在
victim/server.js的/transfer接口中,取消注释CSRF Token的校验逻辑。jsapp.post('/transfer', (req, res) => { const { to, amount, csrfToken } = req.body; console.log('转账请求:', req.body); console.log('接收的Cookie:', req.cookies); if (!req.cookies.session_id) { return res.status(401).json({ error: '未授权,请先登录' }); } // CSRF Token 校验(可注释/开启测试) if (csrfToken !== csrfTokenStore) { return res.status(403).json({ error: 'CSRF Token 不匹配!' }); } res.json({ message: `成功转账 ${amount} 元给 ${to}!` }); }); -
重启 Victim 服务。
-
获取合法 Token:访问 Victim 站首页
http://localhost:3000,页面上会显示一个 Token。攻击者是无法通过脚本从http://localhost:4000跨域获取这个 Token 的(因为没有 CORS 读权限)。
-
再次访问 Attacker 页面 http://localhost:4000,提交 CSRF 表单。
现象:
-
Victim 服务端控制台:你会看到 CSRF Token mismatch! 的日志,请求被 403 Forbidden 拒绝了。
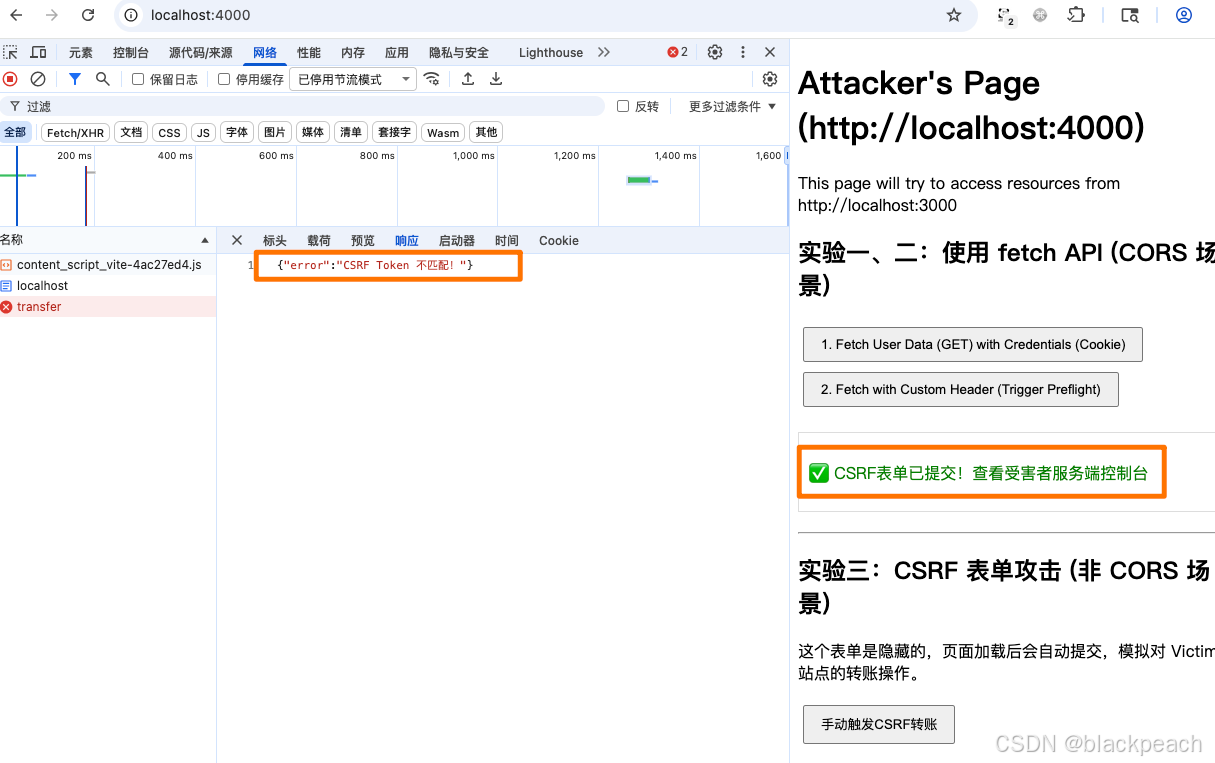
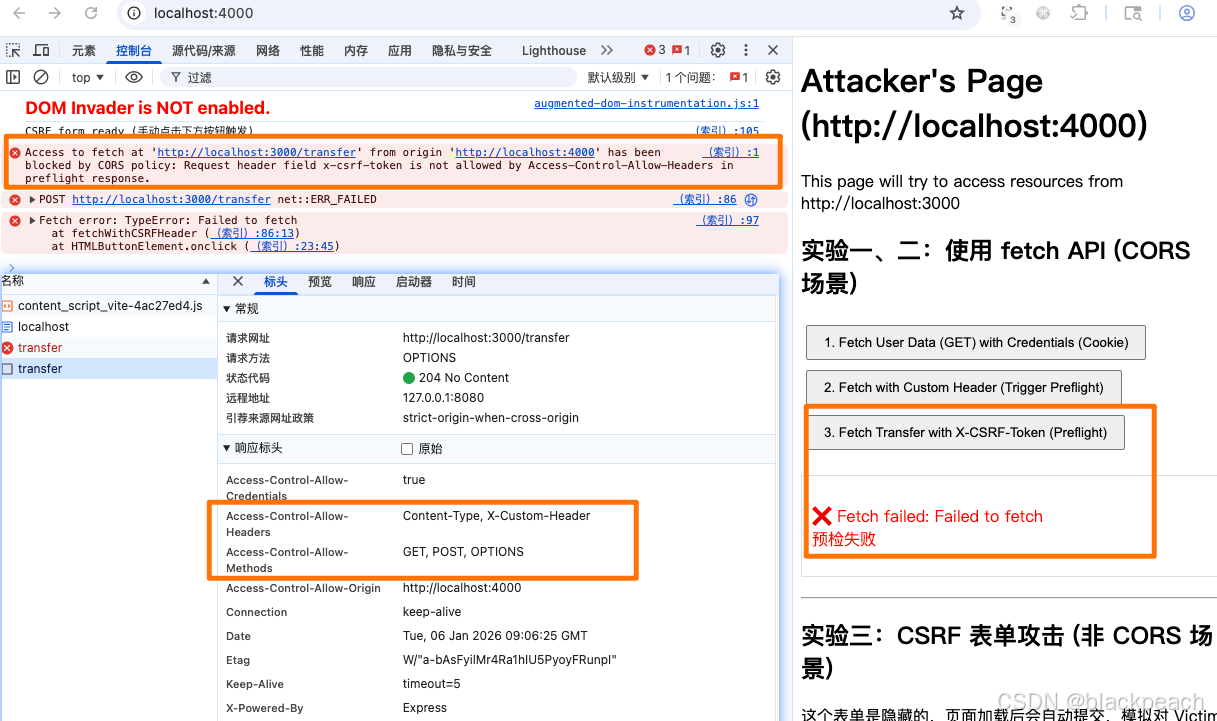
额外思考: 如果我们把 CSRF Token 放在自定义请求头
X-CSRF-Token中,会发生什么?根据实验二的知识,这会使简单请求变成复杂请求从而,触发一个 预检请求。如果 Victim 服务器没有通过
Access-Control-Allow-Headers允许这个自定义头,那么这个跨域的 fetch 请求甚至在预检阶段就会被浏览器阻止,这本身也提供了一层保护 。这被称为 "Double Submit Cookie" 模式的变种,或者更简单的说,利用了 CORS 预检来增强 CSRF 防护。
Access to fetch at 'http://localhost:3000/transfer' from origin 'http://localhost:4000' has been blocked by CORS policy: Request header field x-csrf-token is not allowed by Access-Control-Allow-Headers in preflight response.
防护二:SameSite Cookie
目标: 观察 SameSite Cookie 属性如何从根本上阻止浏览器在跨站请求中发送 Cookie。
SameSite 有三个值:
- Strict:最严格。任何跨站请求(包括链接跳转、表单提交)都不会携带 Cookie。
- Lax:适中 (现代浏览器默认值)。允许一些顶层导航的 GET 请求携带 Cookie (如点击链接跳转),但禁止跨站的 POST 请求、
<img>、<iframe>等携带 Cookie。 - None:最宽松。允许所有跨站请求携带 Cookie,但 必须同时设置 Secure 属性(即只在 HTTPS 环境下发送)。
操作步骤 (演示 Strict 的效果):
-
关闭 CSRF Token 校验:在
victim/server.js中注释掉 Token 校验逻辑,以便我们只观察 SameSite 的效果。
-
用 Strict 模式登录:清空浏览器的 Cookie。向 http://localhost:3000/login 发送 POST 请求,Body 为
{"samesite": "Strict"}。
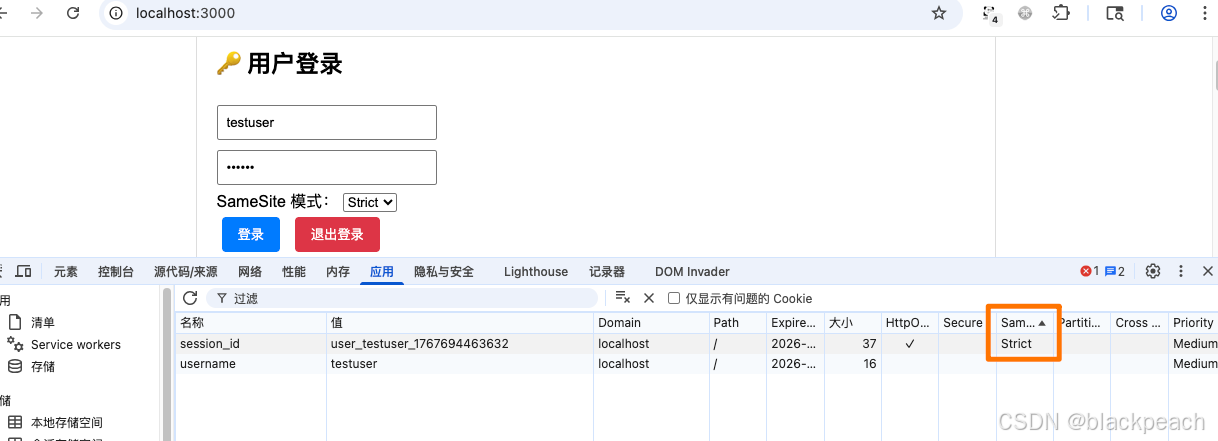
-
重启 Victim 服务。
-
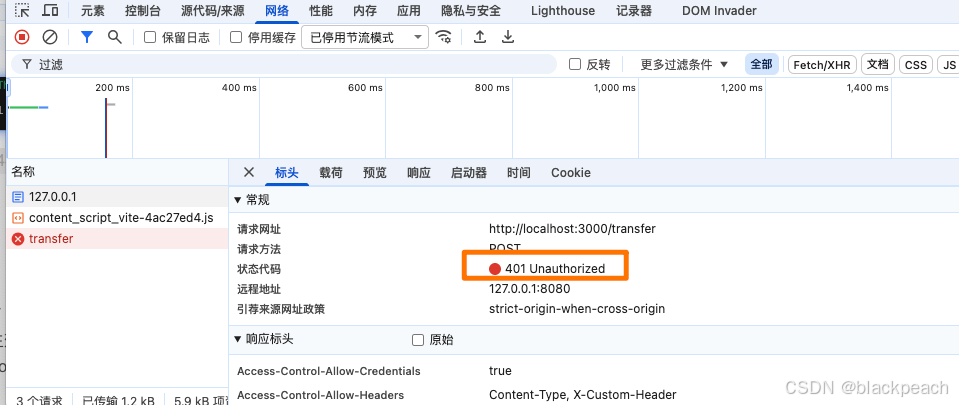
再次访问 Attacker 页面 http://127.0.0.1:4000【和localhost不同站】,提交 CSRF 表单。
现象:
- Victim 服务端控制台:你会看到转账请求日志,但 这次没有接收到 Cookie!

- 攻击失败,因为没有凭证,请求被 401 Unauthorized 拒绝。
尝试:
- 将 samesite 设置为 Lax,会得到和 Strict 同样的结果(因为 CSRF 表单是 POST 请求)。
- 将 samesite 设置为 None,SameSite=None 会让 Cookie 重新被发送,CSRF 攻击会再次成功。

结论: SameSite 是防御 CSRF 的一道非常强大且根本的防线。将关键的会话 Cookie 设置为 Strict 或 Lax 可以有效缓解大部分 CSRF 风险。
交叉总结
| 维度 | CORS (跨域资源共享) | CSRF (跨站请求伪造) |
|---|---|---|
| 核心问题 | 一个域的脚本想 "读取" 另一个域的资源,被浏览器阻止了。 | 攻击者诱导用户在已登录状态下,向目标站发送了一个非本意的 "写入" 请求。 |
| 谁是主角 | 浏览器、JavaScript (fetch, XMLHttpRequest) | 浏览器、用户身份 (Cookie)、攻击者构造的请求 (HTML form, <img>, 链接) |
| 浏览器行为 | * 检查响应头 Access-Control-Allow-Origin。 * 如果不匹配,请求可能已成功,但响应对脚本不可见。 * 对复杂请求,先发 OPTIONS 预检。 | * 自动携带 目标域的 Cookie (除非被 SameSite 阻止)。 * 不会主动阻止请求发送,只要是合法的 HTML 元素触发的请求。 |
| 服务端配置要点 | * Access-Control-Allow-Origin * Access-Control-Allow-Methods * Access-Control-Allow-Headers * Access-Control-Allow-Credentials | * (防御) 实施 CSRF Token 校验。 * (防御) 设置 Cookie 的 SameSite 属性为 Strict 或 Lax。 |
| 典型现象/报错 | * 控制台红色 CORS policy 错误。 * Network 面板看到 OPTIONS 请求失败。 | * 用户在不知情的情况下,数据被修改(如银行转账、修改密码)。 * 服务端日志显示一个合法的、带凭证的请求,但源头可疑。 |
| 联系与误区 | * CORS 不是 CSRF 的解决方案:一个完全没配 CORS 的网站,恰恰是 CSRF 攻击的温床(如实验四)。 * 但 CORS 可以辅助防御 CSRF:如果一个写操作强制要求 Content-Type: application/json 或自定义头,它就会触发 CORS 预检。攻击者的跨域 fetch 若没有得到 CORS 许可,就会在预检阶段被浏览器拦截,从而间接防御了 CSRF。 |