一、引言
在电机驱动过程中,有一个很重要的参数:转速,电机以何种初始速度开始驱动,是否匀速,是否停止,怎么实现的,围绕这个话题,我们引出此文。
二、分析
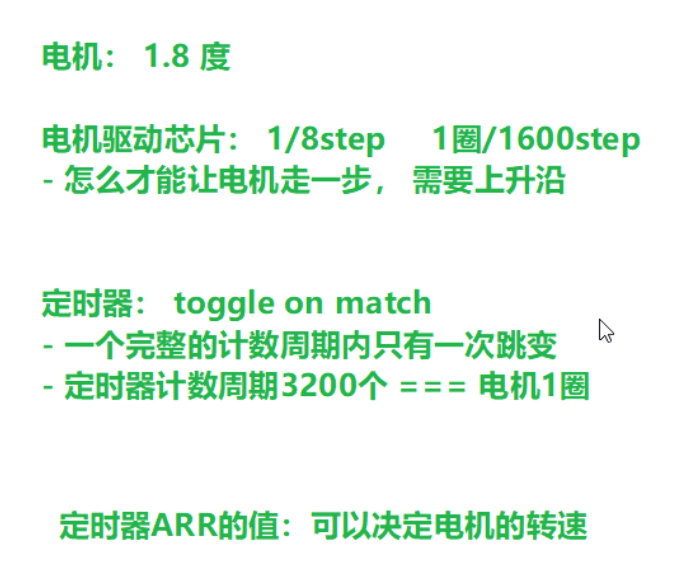
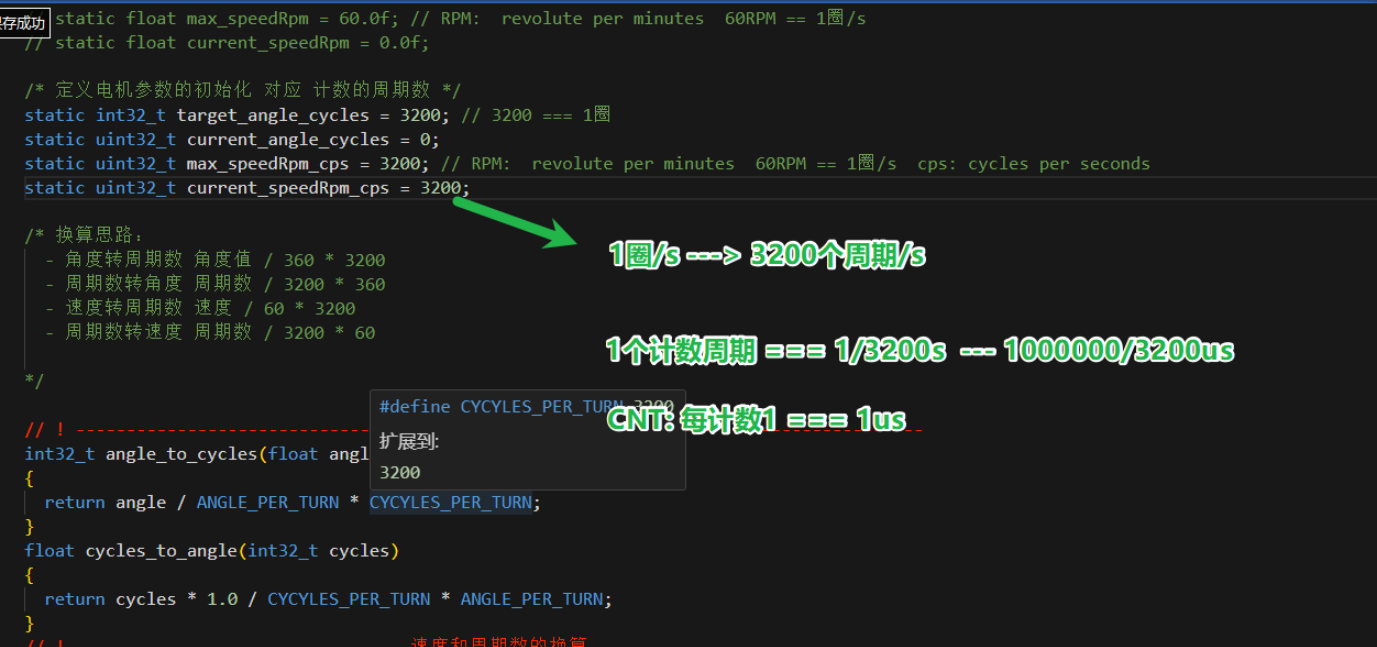
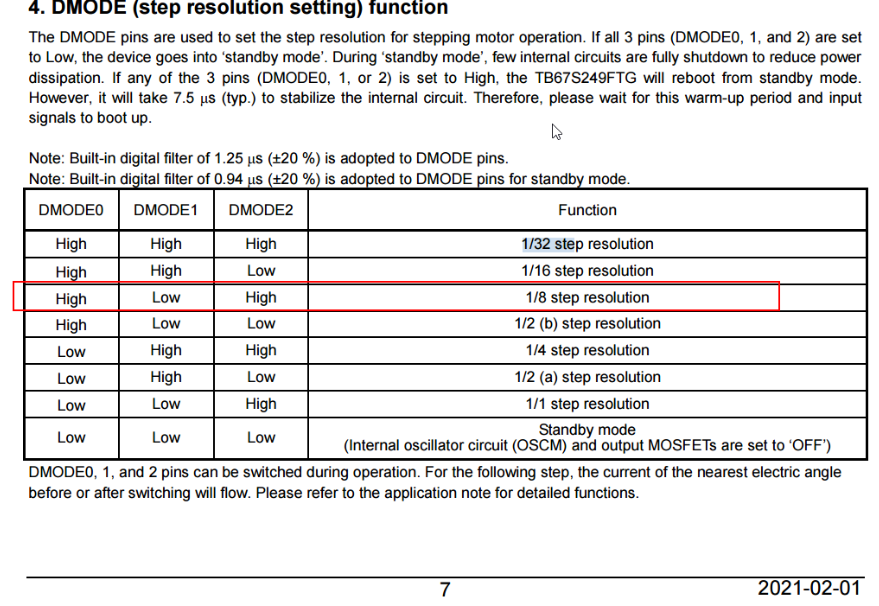
57电机的步距角是1.8°,转一圈(360)需要走200步, 57电机是8分频,所以走1圈是200*8=1600步,又因为涉及中断设置的Toggle on match模式,到设置的值反转一次电平(一次跳变沿),需要两个跳变沿是一个周期,所以转1圈需要3200个周期(步)。
(1)初始化代码配置
cpp
//定义电机参数的初始化 对应计数的周期数
static int32_t target_angle_cycles = 3200 * 5;
static uint32_t current_angle_cycles = 0;
static uint32_t max_speedRpm_cps = 3200 * 2;
static uint32_t current_speedRpm_cps = 0;
/* 定义电机的启动速度 */
static uint32_t min_speedRpm_cps = 1000;
//定义电机的加速度
static uint32_t acc_speedRpm_cps = 5000; //启动速度太小 电机震动会很大
//定义电机加速度阶段所使用的计数周期数
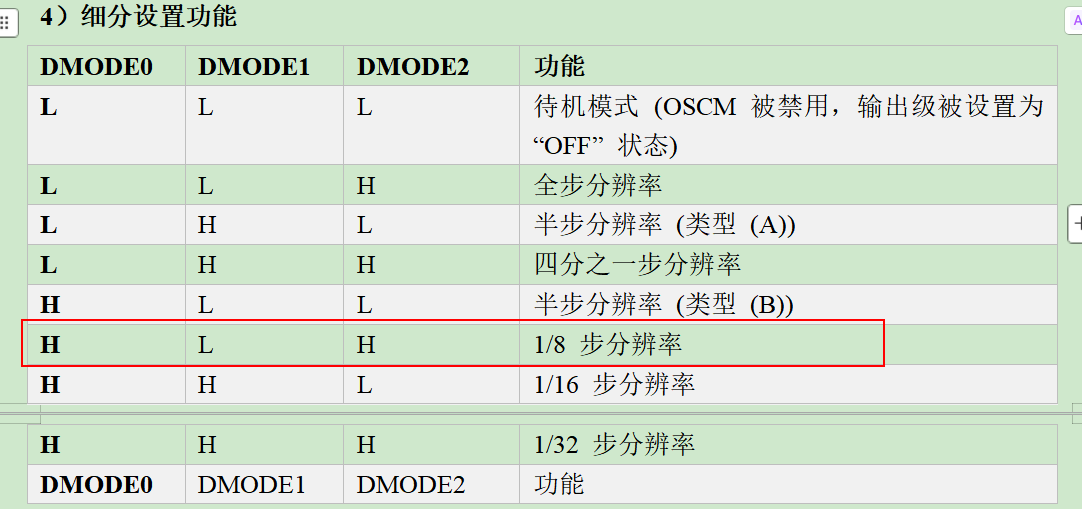
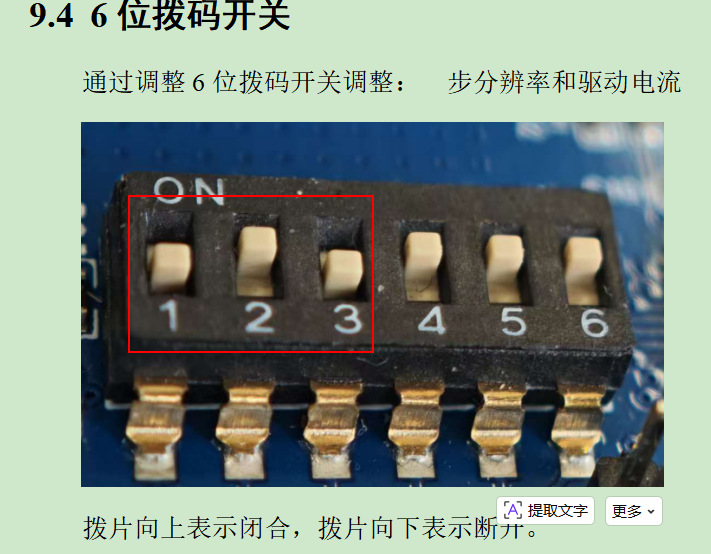
static uint32_t acc_needSpeedRpm_cps = 0;(2)电机硬件支持:由拨片开关前三位决定什么功能,后三位在转速中暂时用不少(不关注)。
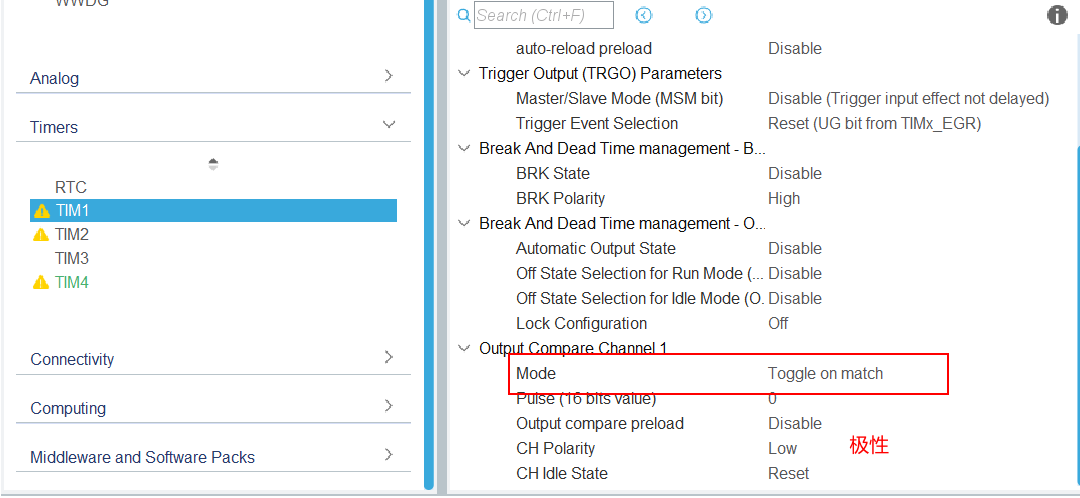
(3)HAL库配置
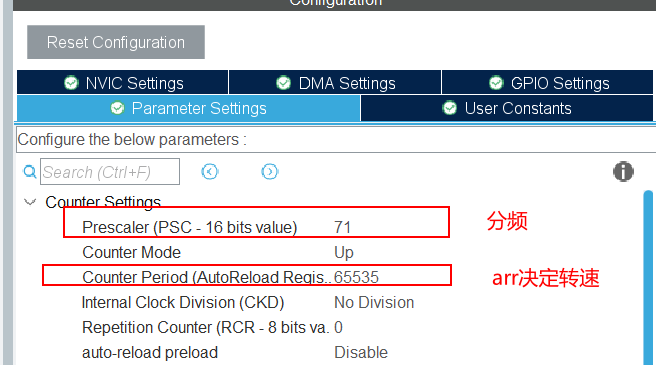
(4)分析
又因为32系统的时钟频率为72MHz,方便计算分频数为72,得到分频后的信号为1MHz,经过换算为1us,也就是1us发送一个脉冲信号,达到arr的值会触发一次中断。所以arr的值越小,转速越高。
(5)转速怎么计算
1圈/1s -> 3200个周期/1s = 3200周期/1000000us -> 1个周期多少步=1000000/3200
----current_speedRpm_cps会随着电机运行达到目标速度,值越大,arr值越小,转速越高。
cpp
// ! -------------------------------- 根据当前的速度值计算ARR的值 --------------------------------
uint16_t App_Motor_Value_GetUsFromCurrentSpeed(void){
    return 1000000/current_speedRpm_cps;
}
(6)根据转速不同,会有梯形算法模式
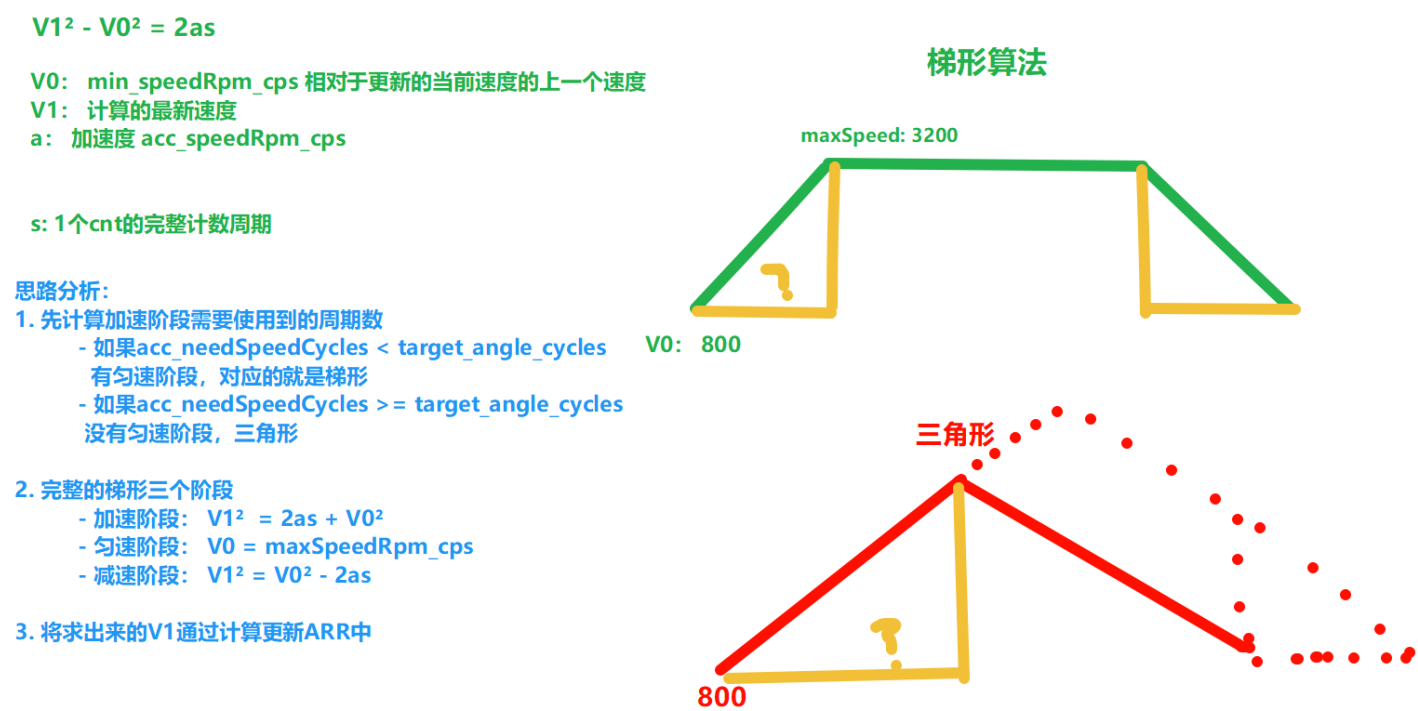
在电机运行过程中,会分为两种情况,梯形或者三角形速度变化。
两者的区别是,运行过程中加速阶段所需要的周期数是否等于一半的路程(梯形),或者大于一半路程(梯形),三角形最大速度不会达到计算的速度,会无法到最大速度。
整体代码分析
(1)电机驱动
/* 启动电机思路:
- 确认电机的旋转方向
- 根据target_angle的正负值确定方向
- 电机旋转的目标角度
- 根据当前的旋转角度来判断是否应该停止电机
- 电机的转速:
- 由定时器的ARR的值决定,值越小,转速越快
- 驱动芯片使能:
*/
cpp
void App_Motor_Start(void)
{

  // ! 1. 确认电机的旋转方向
  if (App_Motor_Value_GetTargetAngle_cycles() > 0)
  {
    // 电机正转(顺时针)
    HAL_GPIO_WritePin(MOTOR_DIR_GPIO_Port, MOTOR_DIR_Pin, GPIO_PIN_SET);
  }
  else
  {
    // 电机反转(逆时针)
    HAL_GPIO_WritePin(MOTOR_DIR_GPIO_Port, MOTOR_DIR_Pin, GPIO_PIN_RESET);
  }

  // ! 2. 电机的转速(本质是设置ARR)
  setArrInit();

  // ! 3. 启动编码器
  Int_Encoder_Start();

  // ! 3. 计算加速度阶段需要使用的周期数
  calcAccNeedCyclyes();

  // ! 4. 驱动芯片使能
  HAL_GPIO_WritePin(MOTOR_SD_GPIO_Port, MOTOR_SD_Pin, GPIO_PIN_SET);

  // ! 5. 启动定时器
  HAL_TIM_OC_Start_IT(&htim1, TIM_CHANNEL_1);
}
(2)电机停止
cpp
void App_Motor_Stop(void)
{
  // 定时器关闭
  HAL_TIM_OC_Stop_IT(&htim1, TIM_CHANNEL_1);
  // 清空当前的角度值和速度值
  App_Motor_Value_SetCurrenttAngle_cycles(0);
  App_Motor_Value_SetCurrentSpeedRpm_cps(0);
}
(3)触发中断实现
cpp
/* 通常用于输出PWM方波或者是单脉冲 */
void HAL_TIM_OC_DelayElapsedCallback(TIM_HandleTypeDef *htim)
{
  if (htim->Instance == TIM1)
  {
    // 更新当前的旋转角度对应的周期数
    App_Motor_Value_SetCurrenttAngle_cycles(App_Motor_Value_GetCurrentAngle_cycles() + 1);
    // 更新下一步(下一个计数周期的快慢)
    updateNextSpeedRpmCps();
    // 判断是否要停止电机
    if (App_Motor_Value_GetCurrentAngle_cycles() >= abs(App_Motor_Value_GetTargetAngle_cycles()))
    {
      // ! 停止电机
      App_Motor_Stop();
    }
  }
}
(4)电机转速的代码
cpp
void setArrInit(void)
{
  // TODO 可以先将最大速度作为启动速度, 隐患(启动速度过大,会导致电机堵转)
  // 设置最小速度为初始化速度
  App_Motor_Value_SetCurrentSpeedRpm_cps(App_Motor_Value_GetMinSpeedRpm_cps());

  // 计算ARR的值
  uint16_t arr = App_Motor_Value_GetUsFromCurrentSpeed();

  // 设置ARR的值
  __HAL_TIM_SetAutoreload(&htim1, arr);
}
(4)计算加速度阶段需要使用的周期数:求S 判断整体走向:梯形还是三角形
cpp
void calcAccNeedCyclyes(void)
{
  /* 思路分析:
    - 已知条件:
      V1: 最大速度
      V0: 最小速度(初始化速度)
      a: 加速度
    - 求: S(加速度阶段需要使用的周期数)
    alt + 0178
    S = (V1² - V0²) / 2a
  */
  uint32_t acc_need_cycles = (App_Motor_Value_GetMaxSpeedRpm_cps() * App_Motor_Value_GetMaxSpeedRpm_cps() - App_Motor_Value_GetMinSpeedRpm_cps() * App_Motor_Value_GetMinSpeedRpm_cps()) / (2 * App_Motor_Value_GetAccSpeedRpm_cps());
  if (acc_need_cycles < abs(App_Motor_Value_GetTargetAngle_cycles()) / 2)
  {
    // 梯形
    App_Motor_Value_SetAccNeedSpeedRpm_cps(acc_need_cycles);
    can_reach_maxSpeed = true;
  }
  else
  {
    // 三角形
    App_Motor_Value_SetAccNeedSpeedRpm_cps(abs(App_Motor_Value_GetTargetAngle_cycles()) / 2);
    can_reach_maxSpeed = false;
  }
}
(5)计算下一步的速度:在中断触发的时候更新速度
cpp
void updateNextSpeedRpmCps(void)
{
  /* 思路分析:
    已知条件:
      - V0
      - a
      - s: 1
    求V1
  */
  uint32_t V1 = 0;
  // 判断当前处在哪个阶段
  if (App_Motor_Value_GetCurrentAngle_cycles() < App_Motor_Value_GetAccNeedSpeedRpm_cps())
  {
    // 加速阶段
    V1 = sqrt(App_Motor_Value_GetCurrentSpeedRpm_cps() * App_Motor_Value_GetCurrentSpeedRpm_cps() + 2 * App_Motor_Value_GetAccSpeedRpm_cps() * 1);
  }
  // 匀速阶段
  else if (
      can_reach_maxSpeed &&
      App_Motor_Value_GetCurrentAngle_cycles() >= App_Motor_Value_GetAccNeedSpeedRpm_cps() &&
      App_Motor_Value_GetCurrentAngle_cycles() <= abs(App_Motor_Value_GetTargetAngle_cycles()) - App_Motor_Value_GetAccNeedSpeedRpm_cps())
  {
    V1 = App_Motor_Value_GetMaxSpeedRpm_cps();
  }
  // 减速阶段
  else
  {
    V1 = sqrt(App_Motor_Value_GetCurrentSpeedRpm_cps() * App_Motor_Value_GetCurrentSpeedRpm_cps() - 2 * App_Motor_Value_GetAccSpeedRpm_cps() * 1);
  }

  // 处理边界
  if (V1 > App_Motor_Value_GetMaxSpeedRpm_cps())
  {
    V1 = App_Motor_Value_GetMaxSpeedRpm_cps();
  }

  if (V1 < App_Motor_Value_GetMinSpeedRpm_cps())
  {
    V1 = App_Motor_Value_GetMinSpeedRpm_cps();
  }

  // 将V1更新至当前速度
  App_Motor_Value_SetCurrentSpeedRpm_cps(V1);
  // 更新ARR的值
  __HAL_TIM_SetAutoreload(&htim1, App_Motor_Value_GetUsFromCurrentSpeed());
}
(6)编码器开启
cpp
void Int_Encoder_Start(void)
{
  // 开启更新中断
  __HAL_TIM_ENABLE_IT(&htim4, TIM_IT_UPDATE);
  // 启动定时器, 默认开启的CC中断
  HAL_TIM_Encoder_Start_IT(&htim4, TIM_CHANNEL_ALL);

  HAL_Delay(100);
  // 清除干扰数据, CNT的值置0
  __HAL_TIM_SetCounter(&htim4, 0);
  // overflow_counter置0
  overflow_count = 0;
}
void Int_Encoder_Stop(void)
{
  HAL_TIM_Encoder_Stop_IT(&htim4, TIM_CHANNEL_ALL);
}