一、长列表性能问题的根源
长列表的性能问题本质是 "DOM 节点数量过多" 导致浏览器渲染过载,具体表现为:
1.渲染阶段耗时:
浏览器需为每个节点执行样式计算(Recalculate Style)、布局(Layout)、绘制(Paint)。若列表有 1000 条数据,每个节点平均触发 1ms 样式计算,总耗时就达 1 秒,直接导致页面加载慢、滚动卡顿。
2.内存占用过高:
每个DOM节点需存储大量属性(如 offsetTop、scrollHeight),1000 个节点可能占用数百MB内存,低端设备易触发内存不足。
二、性能问题优化方案
1.失效的方案
懒加载:滚动到底部时加载下一页数据。
缺点:数据加载后仍需渲染新DOM,列表越长,内存和渲染压力越大(如加载10 页后,DOM 节点数仍达数千)。
2.进化的方案
虚拟列表:只渲染可视区域的DOM。
content-visibility:浏览器自动判断元素是否在视口内,只渲染视口内的DOM。
三、方案具体实现(只实现进化方案)
1.虚拟列表
(1)计算可视区域参数
js
//设置每一项高度JavaScript
const itemHeight = 50;
//计算可视区域的项数
const visibleCount = Math.ceil(container.clientHeight / itemHeight);
(2)定位数据与DOM
js
//添加滚动监听实时监听视口元素起始上标
container.addEventListener('scroll', () => {
    //获取滚动高度
    const scrollTop = container.scrollTop;
    //计算视口元素起始上标
    const startIndex = Math.floor(scrollTop / itemHeight);
    //渲染视口元素
    renderVisibleData(startIndex);
    //同步偏移量
    visibleArea.style.transform = `translateY(${scrollTop}px)`;
});

function renderVisibleData(startIndex) {
    //计算视口元素终止下标
    const endIndex = Math.min(data.length, startIndex + visibleCount + 2);//多获取两条缓冲
    //截取视口元素
    const visibleData = data.slice(startIndex, endIndex);
    //插入DOM
    let html = '';
    visibleData.forEach((item, idx) => {
        html += `<div class="virtual-item" >${item}</div>`;
    });
    visibleArea.innerHTML = html;
}
(3)保持滚动条高度
js
//使用占位元素保持滚动条高度
placeholder.style.height = `${data.length * itemHeight}px`;
思考1:不等高的列表项如何使用虚拟队列?
2.content-visibility
给列表项添加content-visibility:auto;
css
.normal-item {
    padding: 16px;
    border-bottom: 1px solid #f5f5f5;
    background-color: #fff;
    content-visibility: auto;
    contain-intrinsic-size:50px;//如不加contain-intrinsic-size会出现滚动条抖动问题
}
注意:content-visibility 支持 Chrome 85+、Edge 85+,Firefox 仅实验性支持(需配置)。
四、结果评估
1.普通长列表
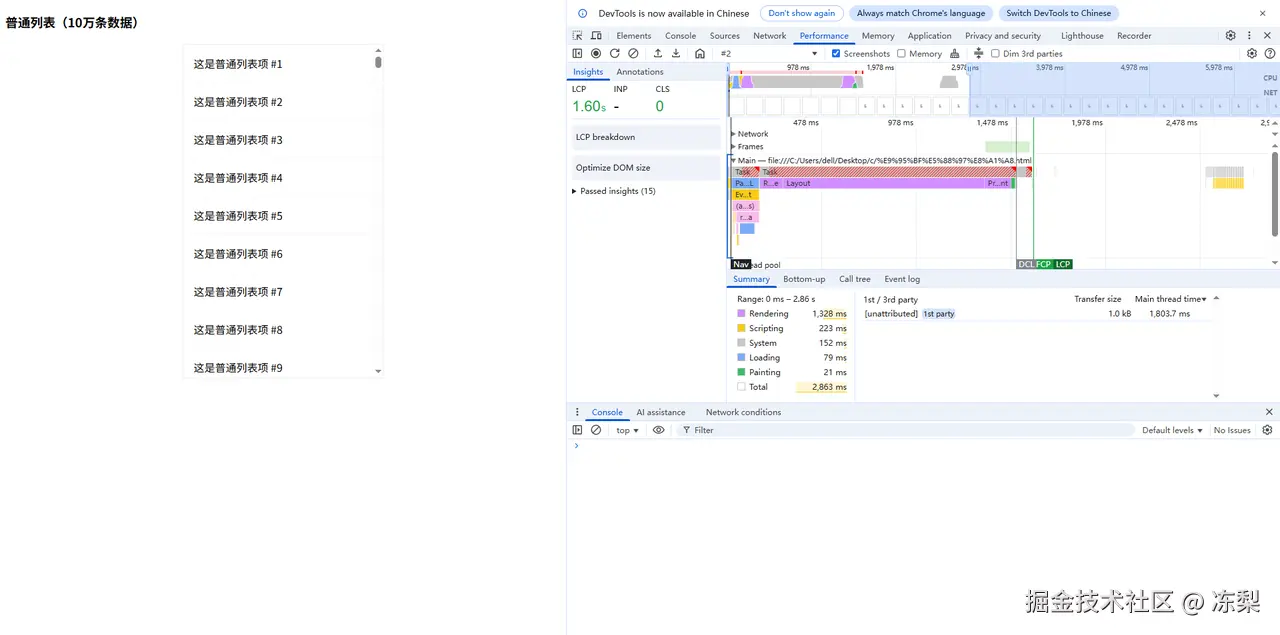 未进行优化的长列表Rendering耗时1328ms,Painting耗时21ms。
2.虚拟列表
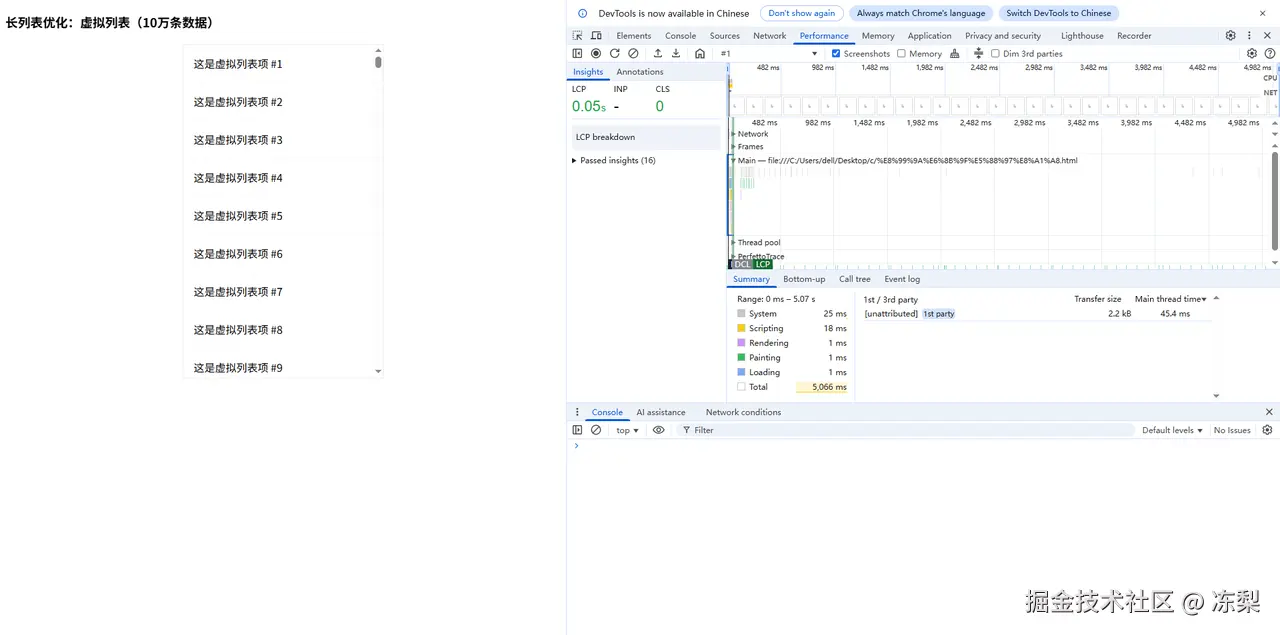 使用虚拟列表优化的长列表Rendering耗时1ms,Painting耗时1ms。大大缩短了渲染时间。
3.使用了content-visibility优化的长列表
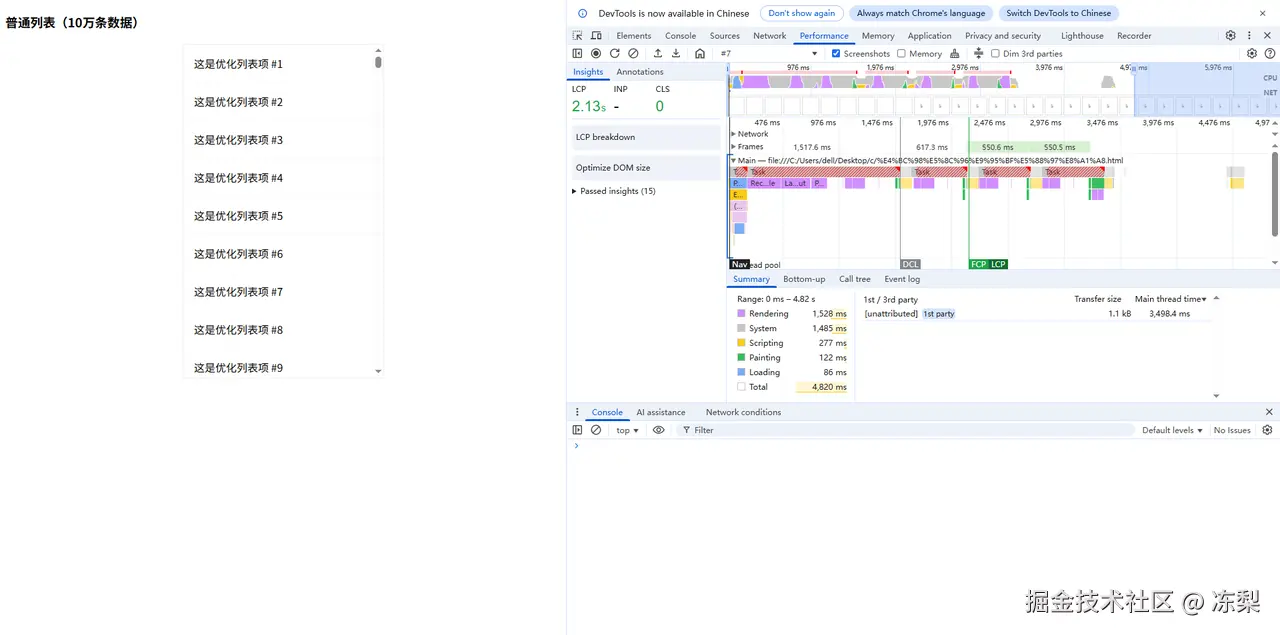 使用了content-visibility优化的长列表Rendering耗时1528ms,Painting耗时122ms。可以看到竟然变成了反向优化,渲染时间反而增加。
思考2:为什么content-visibility形成了反向优化?
五、思考复盘
1.不等高的列表项如何使用虚拟队列?
(1)为每个列表项设置一个预估高度
js
//根据内容预估列表项高度
function estimateHeight(item) {
    const contentLines = item.content.split(" ").length;
    return 40 + contentLines * 20;
}
(2)基于预估高度构建一个位置映射数组,记录每个项的起始位置和高度
js
//基于预估高度构建位置映射数组
function initPositions() {
    let currentOffsetTop = 0;
    data.forEach((item, index) => {
        const height = estimateHeight(item);
        positions.push({
            index,//下标
            offsetTop: currentOffsetTop,//预估偏移高度
            height,//预估高度
            isMeasured: false,//实际高度是否被测量
        });
        currentOffsetTop += height;
    });
    placeholder.style.height = `${currentOffsetTop}px`;
}
(3)根据当前滚动位置和容器高度,通过二分查找快速定位需要渲染的起始项
js
//二分查找起始项
function findFirstVisibleIndex(scrollTop) {
    let low = 0,high = positions.length - 1;
    let index = 0;
    while (low <= high) {
        const mid = Math.floor((low + high) / 2);
        if (positions[mid].offsetTop <= scrollTop) {
            index = mid;
            low = mid + 1;
        }else{
            high = mid - 1;
        }
    }
    return index;
}
(4)渲染可视区域内的项
js
//渲染函数
function renderVisibleData() {
    //获取滚动高度和视口高度
    const { scrollTop, clientHeight } = container;
    const visibleStart = scrollTop;
    const visibleEnd = scrollTop + clientHeight;
    //获取起始下标
    let startIndex = Math.max(
        0,
        findFirstVisibleIndex(visibleStart) - BUFFER_SIZE
    );
    //获取终止下标
    let endIndex = startIndex;
    while (
        endIndex < data.length &&
        positions[endIndex].offsetTop < visibleEnd
    ) {
        endIndex++;
    }
    endIndex = Math.min(data.length, endIndex + BUFFER_SIZE);
    //截取列表项
    const visibleData = data.slice(startIndex, endIndex);
    //插入DOM
    let html = "";
    visibleData.forEach((item, idx) => {
        const realIndex = startIndex + idx;
        const position = positions[realIndex];
        html += `
            <div
            class="virtual-item"
            style="top: ${position.offsetTop}px; height: ${position.height}px;"
            data-index="${realIndex}"
            >
                <strong>${item.title}</strong>
                <div>${item.content}</div>
                <small>预估高度: ${estimateHeight(item)}px |
                ${
                position.isMeasured
                ? `真实高度: ${position.height}px`
                : "未测量"
                }</small>
            </div>
        `;
    });
    visibleArea.innerHTML = html;
    visibleArea.style.transform = "none";
}
(5)渲染后,立即测量这些项的真实高度,将测量到的真实高度与预估高度进行比较,如果存在差异,更新位置映射数组
js
//测量真实高度
function measureAndUpdatePositions() {
    //初始化变量
    const renderedItems = visibleArea.querySelectorAll(".virtual-item");
    let hasHeightChanged = false;
    let totalHeightDiff = 0;
    //遍历渲染的每一个DOM获取真实高度
    renderedItems.forEach((element) => {
        const index = parseInt(element.dataset.index);
        const position = positions[index];
        if (position.isMeasured) return;
        const realHeight = element.offsetHeight;
        //处理差异
        if (realHeight !== position.height) {
            //更新位置映射数组高度
            hasHeightChanged = true;
            const heightDiff = realHeight - position.height;
            position.height = realHeight;
            position.isMeasured = true;
            //计算特殊情况造成的滚动条位置差值
            if (position.offsetTop + heightDiff < container.scrollTop) {
                totalHeightDiff += heightDiff;
            }
            //更新位置映射数组偏移高度
            for (let i = index + 1; i < positions.length; i++) {
                positions[i].offsetTop += heightDiff;
            }
        }
    });
    //更新容器总高度
    if (hasHeightChanged) {
    const totalHeight =
    positions[positions.length - 1].offsetTop +
    positions[positions.length - 1].height;
    placeholder.style.height = `${totalHeight}px`;
    //更新滚动条位置
    if (totalHeightDiff !== 0) {
    container.scrollTop += totalHeightDiff;
    }
    //渲染DOM
    renderVisibleData();
    }
}
2.为什么content-visibility形成了反向优化?
对于本身渲染成本低的元素(如简单文本、小图标),添加content-visibility: auto可能不会提升性能,反而会增加浏览器的可见性判断成本。接下来比较包含图片和复杂样式的列表项。
(1)复杂长列表
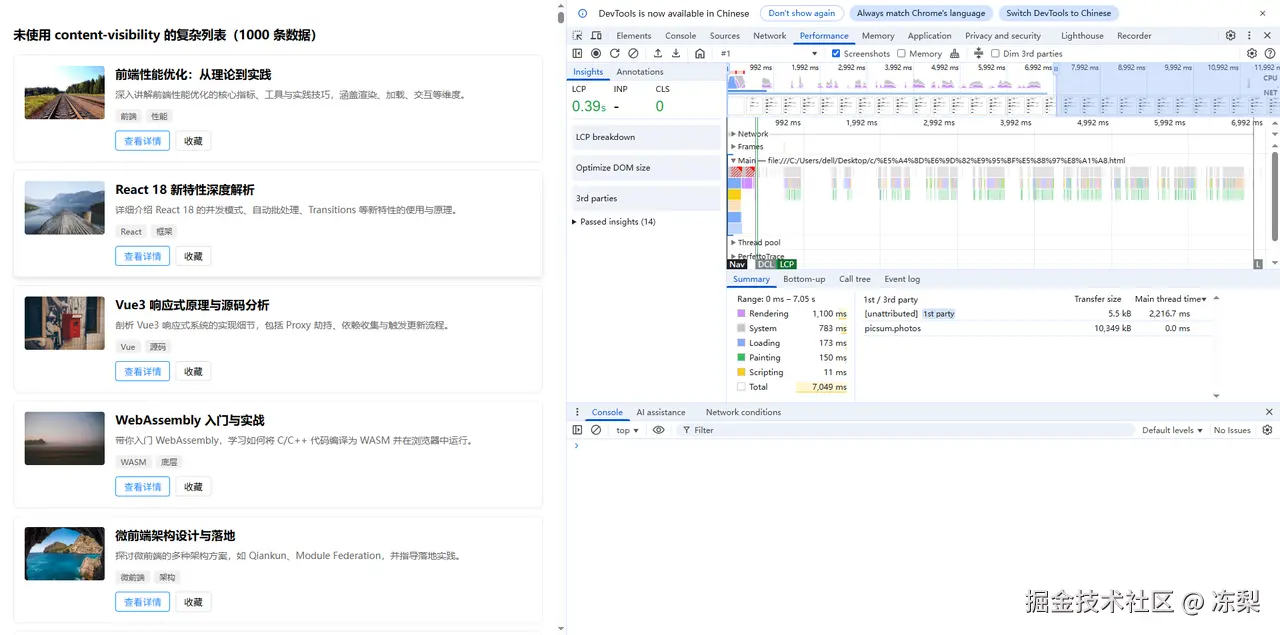 未进行优化的复杂长列表Rendering耗时1100ms,Painting耗时150ms。
(2)复杂虚拟列表
使用虚拟列表优化的复杂长列表Rendering耗时4ms,Painting耗时1ms。
(3)使用了content-visibility优化的复杂长列表
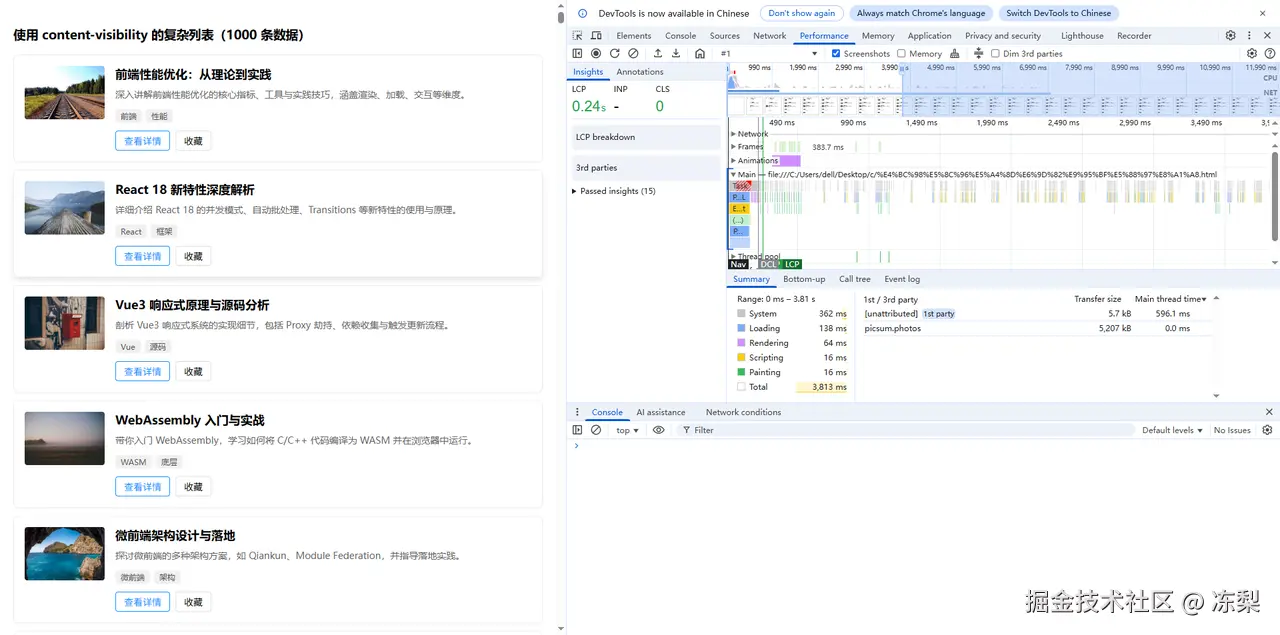 使用了content-visibility优化的复杂长列表Rendering耗时64ms,Painting耗时16ms。
在这次复杂长列表的优化中,能够看出content-visibility优化的效果。
感谢观看!欢迎各位大佬指正