一 标签 ref 属性
1 介绍
ref 属性主要用于 获取 DOM 元素或组件实例的引用,以便在逻辑中直接操作它们。它既可以用于模板中的 DOM 元素,也可以用于子组件。不同.vue间的同名ref标记互不影响
2 改为vue3语法 -- App.vue
js
<template>
	<!--制作同名标签-->
	<h2 ref="title2">小狗</h2>
	<button @click="showTitle2">title2展示</button>
	<person/>
</template>

<script setup lang="ts">
  import Person from './components/Person.vue'
  import {ref} from "vue";

  // 数据 储存 ref 标记的内容
  let title2 = ref()

  // 方法
  function showTitle2(){
    console.log(title2.value)
  }
</script>

<style>
</style>
3 ref 标记 html 标签 -- Person.vue
在 Vue 3 中,用 ref 标记 HTML 标签可精准操作 DOM,避免组件间因重复 id 导致的冲突,提升代码可维护性与复用性。
js
<template>
  <div class="person">
    <h2>宠物</h2>
    <!--将该DOM元素存入title2容器中-->
    <h2 ref="title2">小狗</h2>
    <h2>比格</h2>
    <button @click="showTitle2">title2展示</button>
  </div>
</template>

<script lang="ts" setup>
  // 引入 ref
  import {defineOptions,ref,watch} from "vue";

  defineOptions({
    name: "Person"
  })

  // 数据 储存 ref 标记的内容
  let title2 = ref()

  // 方法
  function showTitle2(){
    console.log(title2.value)
  }

</script>

<!--局部样式,只适用于该vue模板-->
<style scoped>
.person {
  background-color: bisque;
  box-shadow: chocolate;
  border-radius: 6px;
  padding: 8px;
}

button {
  margin: 0 6px;
}

li{
  font-size: 28px;
}
</style>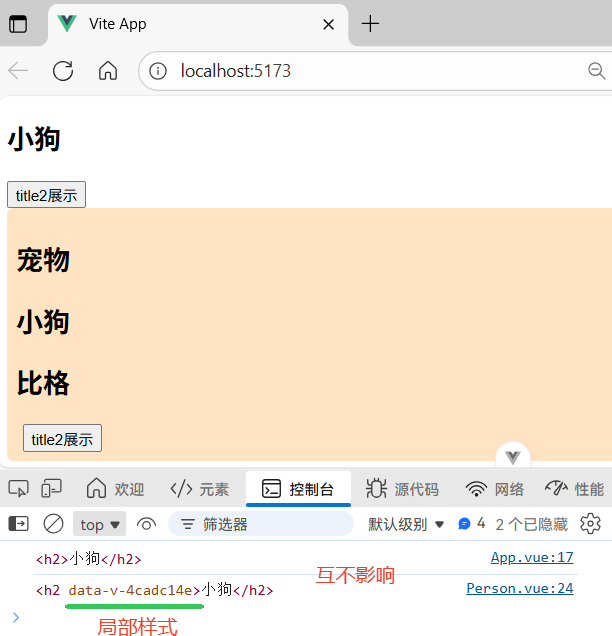
4 ref 标记组件标签 -- Person.vue
在 Vue 3 中,父组件通过 ref 引用子组件时,默认无法直接访问其内部数据或方法,这是为保证封装性。若需开放访问,需在子组件的中用defineExpose显式暴露,之后父组件即可通过 ref.value 调用暴露的内容。
① App.vue
js
<template>
    <h2 ref="title2">小狗</h2>
    <button @click="showTitle2">展示</button>
    <person ref="human"/> <!--ref标记-->
</template>

<script setup lang="ts">
  import Person from './components/Person.vue'
  import {ref} from "vue";

  // 数据 储存 ref 标记的内容
  let title2 = ref()
  let human = ref()

  // 方法
  function showTitle2(){
	// 查看 human 实例对象信息
	console.log(human.value)
  }
</script>

<style>
</style>
② Person.vue
js
<template>
  <div class="person">
    <h2>宠物</h2>
    <!--将该DOM元素存入title2容器中-->
    <h2 ref="title2">小狗</h2>
    <h2>比格</h2>
    <button @click="showTitle2">title2展示</button>
  </div>
</template>

<script lang="ts" setup>
  // 引入 defineExpose
  import {defineOptions,ref,defineExpose} from "vue";

  defineOptions({
    name: "Person"
  })

  // 数据 储存 ref 标记的内容
  let title2 = ref()
  let a = ref(0)
  let b = ref(1)
  let c = ref(2)

  // 方法
  function showTitle2(){
    console.log(title2.value)
  }

  // 选在可展示的数据
  defineExpose({a,b,c})
</script>

<!--开启局部样式,只适用于该vue模板-->
<style scoped>
.person {
  background-color: bisque;
  box-shadow: chocolate;
  border-radius: 6px;
  padding: 8px;
}

button {
  margin: 0 6px;
}

li{
  font-size: 28px;
}
</style>
二 TS接口
1 创建接口
src层级下创建types目录,新建index.ts文件(可简化路径),编写personInter接口
js
/*定义接口限制person对象具体属性,需暴露才能使用 export*/
export interface personInter {
    /*规定属性类型 小写*/
    id:string,
    name:string,
    age:number
}

/*自定义类型:数组,数组中每项需符合personInter规范*/
export type Persons = Array<personInter>
/*第二种写法*/
// export type Persons = personInter[]
2 使用接口限制对象 -- Person.vue
js
<template>
  <div class="person">
    <h2>比格</h2>
  </div>
</template>

<script lang="ts" setup>
  import {defineOptions} from "vue";

  // 引入 personInter 接口需要通过type表示为接口 可用 @ 表示src的层级
  import type {personInter,Persons} from "../types/index";

  defineOptions({
    name: "Person"
  })

  // 以接口限制单个对象 防止 key 产生手误
  let person:personInter = {id:'gxnn1',name:'大黄',age:18}

  // 以接口限制多个对象 需通过数组泛型 即数组中每个对象都要符合接口规范
  let personList:Array<personInter> = [
    {id:'gxnn1',name:'大黄',age:18},
    {id:'gxnn2',name:'静静',age:19},
    {id:'gxnn3',name:'软软',age:17}
  ]

  // 自定义类型接口限制数组
  let persons:Persons = [
    {id:'gxnn1',name:'大黄',age:18},
    {id:'gxnn2',name:'静静',age:19},
    {id:'gxnn3',name:'软软',age:17}
  ]
</script>

<!--开启局部样式,只适用于该vue模板-->
<style scoped>
.person {
  background: #f6f9fc;
  border-radius: 10px;
  padding: 12px;
  box-shadow: 0 2px 8px rgba(100, 150, 200, 0.15);
}

button {
  margin: 0 6px;
  padding: 5px 12px;
  border: none;
  border-radius: 6px;
  background: #4a90e2;
  color: white;
  cursor: pointer;
  transition: all 0.2s;
}

button:hover {
  background: #3a7bc8;
  transform: translateY(-1px);
}

li {
  font-size: 20px;
  color: #333;
  line-height: 1.6;
}
</style>