注:本文为 "Linux | ext4 文件系统" 相关合辑。
英文引文,机翻未校。
中文引文,略作重排。
如有内容异常,请看原文。
ext4 文件系统初始化问题的诊断与修复
一、问题概述
在使用 ext4 文件系统时,可能会遇到以下两种表现形式的问题,它们的根源相同:
- 硬盘规律性异响:在 RAID 设备挂载后,硬盘出现规律性异响,类似寻道声音,间隔约 5 秒左右。即使在未进行数据读写操作时,硬盘依然发出声响。
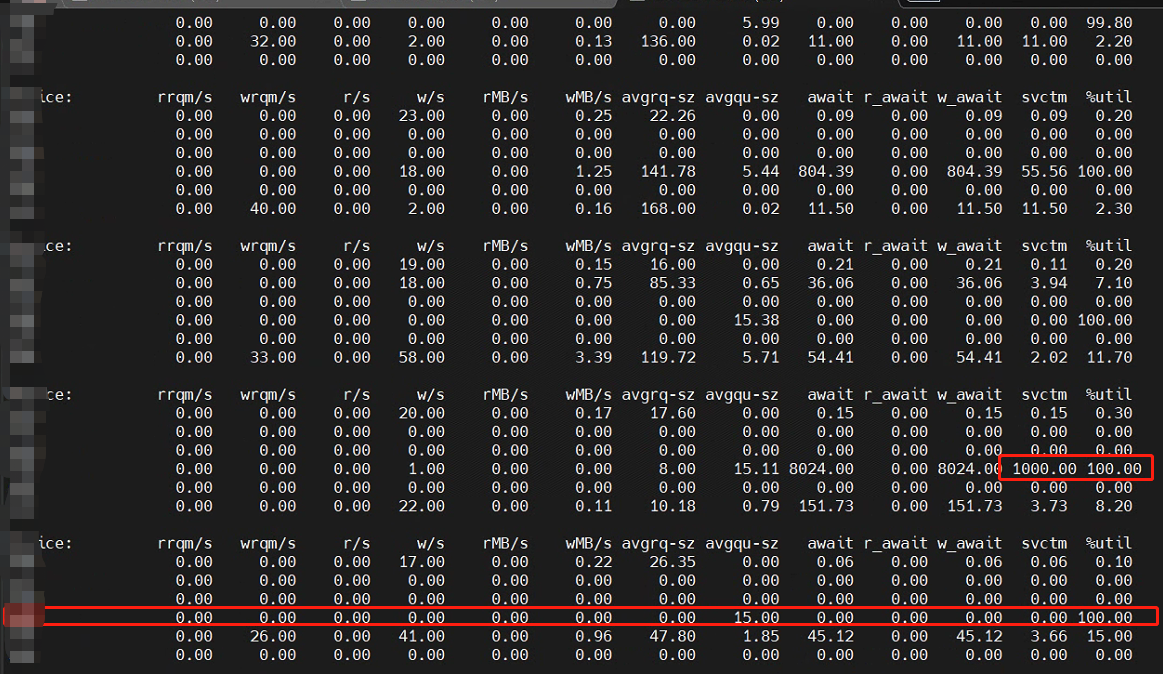
- 无读写操作但 IO 高 :在系统中,某个磁盘的 IO 并发度和 svctm(服务时间)异常高,但实际并无数据读写操作。监控工具显示的磁盘状态如下图所示:
这两种现象实际上是同一个问题的不同表现形式,均源于 ext4 文件系统默认的惰性初始化特性。
二、问题诊断
(一)问题分析
-
文件系统特性 :
ext4文件系统在创建时,默认启用惰性初始化特性(lazy_itable_init和lazy_journal_init)。这些特性在格式化后的一段时间内,会持续初始化 inode 表和日志索引节点。此过程会不断写入磁盘,导致以下现象:- 硬盘异响:由于磁盘持续进行写操作,即使没有用户数据读写,也会产生规律性异响。
- 高 IO:监控工具会显示较高的 IO 并发度和 svctm,尽管实际并无数据读写操作。
-
监控工具分析 :使用
iostat -dxm 1监控磁盘 IO,发现某个磁盘的 IO 并发度和 svctm 都很高,但实际并无数据读写操作。此外,通过iotop -P发现ext4lazyinit进程占用较高 IO,该进程用于在后台逐步初始化 inode 表。监控到的进程状态如下图所示: -

(二)问题推断
- 格式化测试:将硬盘格式化为 NTFS 格式后,异响消失,且 IO 异常现象不再出现。这表明问题确实与 ext4 文件系统的惰性初始化特性有关。
- 文件系统特性分析 :
mkfs.ext4默认使用惰性格式化(lazy inode table zeroing),即在格式化后的一段时间内,系统会持续初始化 inode 表,这期间会不断写入磁盘,从而导致硬盘异响和高 IO 问题。
三、问题修复
(一)修复方法
-
完整格式化:通过禁用惰性初始化特性,进行完整格式化,可以有效解决硬盘异响和高 IO 问题。使用以下命令进行完整格式化:
bashsudo mkfs.ext4 -E lazy_itable_init=0,lazy_journal_init=0 /dev/sdb1其中,
lazy_itable_init=0禁用惰性索引节点表初始化,lazy_journal_init=0禁用惰性日志索引节点初始化。 -
终止相关进程 :在格式化之前,如果发现
ext4lazyinit进程仍在运行,可以先终止相关进程。使用以下命令:bashlsof /挂载目录 kill -9 进程号 -
重新挂载磁盘:格式化完成后,重新挂载磁盘:
bashumount /磁盘分区 mount /磁盘分区 /挂载目录
(二)验证修复
- 硬盘异响:格式化完成后重新挂载硬盘,硬盘仅在初始时发出几声异响,随后保持安静,表明硬盘异响问题已解决。
- 高 IO :重新挂载后,使用
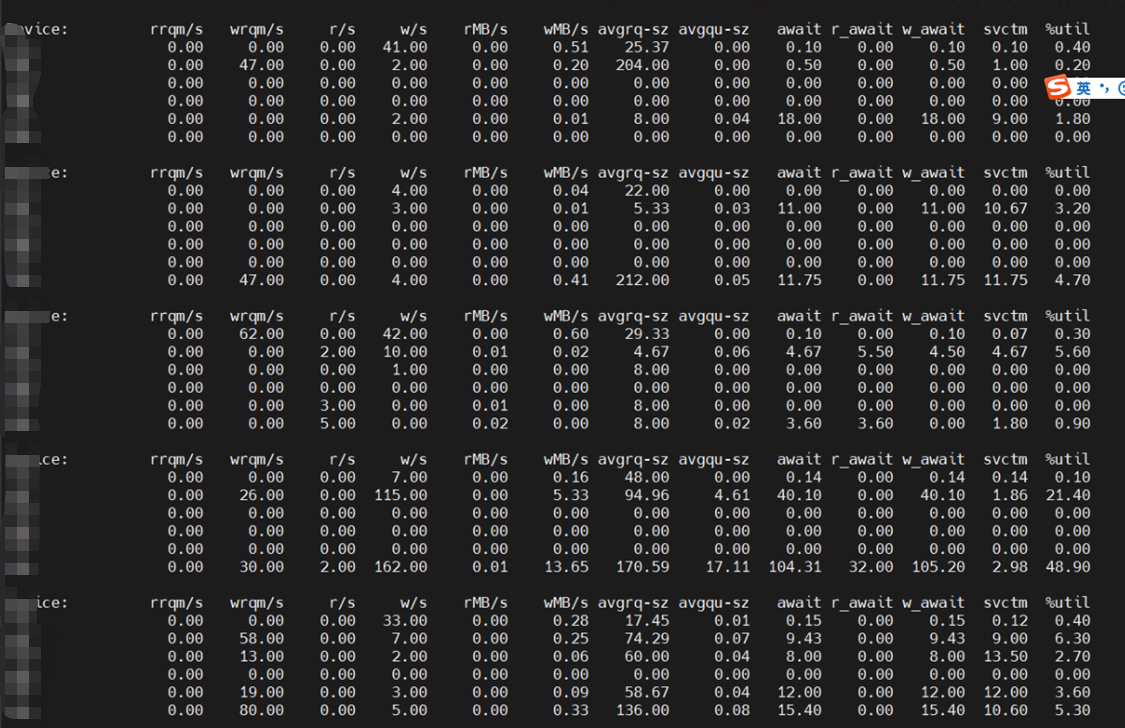
iostat -dxm 1监控,发现磁盘 IO 并发度和 svctm 均恢复正常。修复后的磁盘状态如下图所示:
四、总结
- 问题根源 :
ext4文件系统的默认惰性初始化特性(lazy_itable_init和lazy_journal_init)在某些情况下会导致硬盘异响和高 IO 问题。这两种现象实际上是同一问题的不同表现形式。 - 解决方法:通过禁用惰性初始化特性,进行完整格式化,可以有效解决上述问题。
- 注意事项 :
- 在进行格式化操作前,确保重要数据已备份。
- 如果系统中存在依赖特定文件系统的应用程序,需确保格式化操作不会影响其正常运行。
通过以上分析和操作,可以有效解决 ext4 文件系统在使用过程中出现的硬盘异响和高 IO 问题。
禁用 lazy_itable_init=0 和 lazy_journal_init=0 的影响
主要体现在以下几个方面:
1. 格式化时间增加
禁用惰性初始化会导致 mkfs.ext4 在格式化时直接初始化 inode 表和日志索引节点,这会显著增加格式化的时间。对于大容量磁盘,格式化过程可能会变得非常耗时。
2. 挂载性能提升
禁用惰性初始化后,文件系统在挂载时不会进行背景初始化,因此挂载速度会更快,不会出现因初始化导致的延迟或挂载时间过长的问题。
3. 运行时性能影响
- 减少背景任务干扰:禁用惰性初始化可以减少背景任务对系统性能的干扰,尤其是在系统负载较高时,能够避免因背景初始化导致的磁盘带宽占用过高。
- 提升写入性能:在某些场景下,禁用惰性初始化可以提升文件系统的写入性能,尤其是在对性能要求较高的应用中。
4. 系统稳定性
禁用惰性初始化可以避免因背景初始化任务导致的潜在问题,例如在某些情况下,背景初始化可能会导致文件系统挂载失败或出现延迟。
5. 文件系统健壮性
在早期版本中,未初始化的 inode 表可能会导致文件系统在面对错误时的健壮性降低。不过,随着 inode 校验和功能的引入,这一问题已经得到解决。
6. 适用场景
- 对性能要求较高的场景:如果系统对磁盘性能要求较高,尤其是在写入密集型应用中,建议禁用惰性初始化。
- 大容量磁盘:对于大容量磁盘,虽然格式化时间会增加,但禁用惰性初始化可以避免挂载时的延迟。
总结
禁用 lazy_itable_init=0 和 lazy_journal_init=0 会增加格式化时间,但在挂载时可以避免延迟,提升运行时性能,并减少背景任务对系统的影响。在对性能要求较高的场景中,禁用惰性初始化是推荐的做法。
linux - What is risk or cost for the "noinit_itable" option of ext4?
Linux - 使用 ext4 文件系统中的 "noinit_itable" 选项有什么风险或代价?
noinit_itable Do not initialize any uninitialized inode table blocks in the background. This feature may be used by installation CD's so that the install process can complete as quickly as possible; the inode table initialization process would then be deferred until the next time the file system is unmounted.
Should I always use the
noinit_itableoption whenever I mount an ext4 device?If it's not ,Why?
noinit_itable不会在后台初始化任何未初始化的 inode 表块。此功能可用于安装光盘,以便安装过程能够尽可能快地完成;inode 表初始化过程将推迟到下次文件系统卸载时进行。我应该在挂载 ext4 设备时总是使用
noinit_itable选项吗?如果不是,为什么呢?
edited Jul 29, 2017 at 11:52
Jeff Schaller♦
asked Jul 22, 2017 at 10:27
illiterate
edited Jul 22, 2017 at 12:43
answered Jul 22, 2017 at 12:10
sourcejedi
I would interpret this as inode initialization being a task that can impose latencies and degraded throughput.
我将其理解为索引节点初始化是一项可能会导致延迟和吞吐量下降的任务。
The goal of the code would be to arrange for it to run during a relatively idle period. Initializing the inode tables in advance, would avoid a latency hit ("lag") when you actually need the inode tables.
代码的目标是安排在相对空闲的时期运行该任务。提前初始化索引节点表可以避免在实际需要使用索引节点表时出现延迟("滞后")。
I think the suggestion is that it's better to have a quick install process, and then slightly degraded throughput for a while. While the install process is running, it's likely blocking you from doing useful things with the computer at the same time
我认为建议是,最好有一个快速的安装过程,然后在一段时间内稍微降低吞吐量。在安装过程中,你可能无法同时使用计算机进行其他有用的操作
The ext4 mkfs option lazy_itable_init, which is now activated automatically when kernel support is detected, speeds up formatting ext4 filesystems during install. When the fs is mounted, the kernel begins zeroing the inode tables in the background. During install, this is a somewhat wasted effort and interferes with the copy process. Mounting the filesystem with the noinit_itable mount option disables the background initialization. This should help the install go a bit faster, and after rebooting when the fs is mounted without the flag, the background initialization will be completed.
ext4文件系统在格式化时的lazy_itable_init选项,现在在检测到内核支持时会自动激活,这在安装过程中加快了ext4文件系统的格式化速度。当文件系统挂载时,内核会在后台开始清零索引节点表。在安装过程中,这种后台初始化是一种浪费,并且会干扰复制过程。使用noinit_itable挂载选项挂载文件系统可以禁用后台初始化。这将有助于加快安装过程,重启后,当文件系统在没有该标志的情况下挂载时,后台初始化将完成。
Quickly Formatting an ext4 Filesystem
快速格式化 ext4 文件系统
Last updated: March 18, 2024
Written by: Haidar Ali
Reviewed by: Eric Martin
1. Overview
概述
When working with ext4 partitions in Linux, we may sometimes find the need to format a partition quickly. By default, the mkfs.ext4 command in Linux performs a full format, which can be time-consuming for large partitions. However, there are ways to perform a quick format on an ext4 partition to save time. In this tutorial, we'll explore different methods to quickly format an ext4 partition. First, we'll learn the workings of the lazy_itable_init option offered by the mke2fs utility. Then, we'll use the tune2fs utility to quickly convert existing ext4 and ext3 partitions. Finally, we'll cover fallocate, which is a tool to quickly preallocate and deallocate disk space.
在 Linux 中处理 ext4 分区时,我们有时可能需要快速格式化分区。默认情况下,Linux 中的 mkfs.ext4 命令会执行完全格式化,对于大分区来说,这可能会耗费大量时间。然而,有一些方法可以快速格式化 ext4 分区以节省时间。在本教程中,我们将探索多种快速格式化 ext4 分区的方法。首先,我们将了解 mke2fs 工具提供的 lazy_itable_init 选项的工作原理。然后,我们将使用 tune2fs 工具快速将现有的 ext4 和 ext3 分区转换为 ext4。最后,我们将介绍 fallocate,这是一个用于快速预分配和释放磁盘空间的工具。
2. mke2fs
mke2fs
The *mke2fs* command is used to create an *ext2*, *ext3*, or *ext4* filesystem on a storage device. It formats the device, initializes the necessary data structures, and prepares it for storing files and directories. By default, it's installed on most major Linux distributions as part of the e2fsprogs package. Nonetheless, we can install it from the official package repositories using a package manager like apt:
*mke2fs* 命令用于在存储设备上创建 *ext2*、*ext3* 或 *ext4* 文件系统。 它对设备进行格式化,初始化必要的数据结构,并为其存储文件和目录做好准备。默认情况下,它作为 e2fsprogs 包的一部分安装在大多数主要的 Linux 发行版上。不过,我们也可以使用像 apt 这样的包管理器从官方包仓库中安装它:
bash
$ sudo apt install e2fsprogs -yCopy2.1. The lazy_itable_init Option
lazy_itable_init 选项
*mke2fs* provides the *-E* *lazy_itable_init* option that delays the initialization of the inode tables during the formatting process. By delaying the initialization, the formatting process can be faster because it skips some of the time-consuming steps. As an example, let's format the /dev/vda1 partition on the system:
*mke2fs* 提供了 *-E* *lazy_itable_init* 选项,该选项在格式化过程中延迟初始化 inode 表。通过延迟初始化,格式化过程可以更快,因为它跳过了一些耗时的步骤。 例如,让我们格式化系统上的 /dev/vda1 分区:
bash
$ sudo mke2fs -t ext4 -E lazy_itable_init /dev/vda1
Discarding device blocks: done
Creating filesystem with 4193792 4k blocks and 1048576 inodes
Allocating group tables: done
Writing inode tables: done
Creating journal (16384 blocks): done
Writing superblocks and filesystem accounting information: doneCopy
In addition, this solution only speeds up the formatting process. Later on, it can have an impact on the filesystem's performance in the long run, as the inode tables would need to be initialized at some point. Alternatively, we can also use the *mkfs.ext4* utility, which is essentially a symlink to *mke2fs* :
此外,这种解决方案仅加快了格式化过程。从长远来看,它可能会对文件系统的性能产生影响,因为 inode 表迟早需要被初始化。**或者,我们也可以使用 *mkfs.ext4* 工具,它本质上是 *mke2fs* 的一个符号链接:
bash
$ sudo mkfs.ext4 -E lazy_itable_init /dev/vda1Copy2.2. Alternate Approach
其他方法
Alternatively, we can speed up the formatting process without using the lazy_itable_init option:
或者,我们可以在不使用 lazy_itable_init 选项的情况下加快格式化过程:
bash
$ sudo mkfs.ext4 /dev/vda1 -O sparse_super,large_file -m 0 -T largefile4CopyLet's break this down:
让我们来分析一下:
- -O specifies the features to be enabled for the filesystem
-O 指定要为文件系统启用的功能 - sparse_super allows ext4 to store only one real copy of the superblock, which saves disk space and improves the performance of certain operations
sparse_super 允许 ext4 只存储一个实际的超级块副本,这可以节省磁盘空间并提高某些操作的性能 - large_file enables support for large files
large_file 启用对大文件的支持 - -m 0 sets the reserved block percentage to 0, which means that the entire filesystem would be available for regular users, and no blocks would be reserved for privileged processes
-m 0 将保留块百分比设置为 0,这意味着整个文件系统将可供普通用户使用,不会为特权进程保留任何块 - -T largefile4 optimizes the filesystem for large files by using a larger block size
-T largefile4 通过使用更大的块大小来优化文件系统以支持大文件
The *-m* *0* option tells *mkfs* not to reserve the 5% space for *root*. The 5% space is a lot for larger partitions. For instance, it's around 100GB for a 2TB partition. Therefore, we can use this option for data partitions without issues.
*-m* *0* 选项告诉 *mkfs* 不要为 *root* 保留 5% 的空间。对于大分区来说,5% 的空间是相当大的。例如,对于一个 2TB 的分区,大约是 100GB。因此,我们可以毫无问题地为数据分区使用这个选项。
2.3. Speed Comparison
速度比较
As an experiment, we'll compare the timing of this command with the one that uses the -E lazy_itable_init option. Let's time the latter first:
作为一个实验,我们将比较这个命令与使用 -E lazy_itable_init 选项的命令的执行时间。让我们先用 time 命令测试后者:
bash
$ time sudo mkfs.ext4 -E lazy_itable_init /dev/vda1
...
real	0m0.117s
user	0m0.004s
sys	0m0.012sCopy
Now, let's time the second command:
现在,让我们用 time 命令测试第二个命令:
bash
$ time sudo mkfs.ext4 /dev/vda1 -O sparse_super,large_file -m 0 -T largefile4
...
real	0m0.073s
user	0m0.003s
sys	0m0.011sCopy
Notably, the second command is slightly faster than the first one for a 16 GB partition. In addition, it's faster for larger partitions greater than 2 TB as well.
值得注意的是,对于一个 16GB 的分区,第二个命令比第一个命令略快。此外,对于大于 2TB 的大分区,它也更快。
3. Alternative: Converting an Existing ext2 or ext3 Partition with tunefs
替代方案:使用 tunefs 将现有的 ext2 或 ext3 分区转换为 ext4
The *tune2fs* utility lets us modify various parameters and settings of an *ext2*, *ext3*, or *ext4* filesystem. It allows us to change features, adjust behaviors, and configure specific attributes of the filesystem. Therefore, it's useful if we have an existing *ext2* or *ext3* partition and we need to quickly convert it to *ext4* without formatting it. As an example, we'll now convert an existing ext3 partition to ext4 using tune2fs . First, let's check out the type of the /dev/vda1 partition:
*tune2fs* 工具允许我们修改 *ext2*、*ext3* 或 *ext4* 文件系统的各种参数和设置。 它允许我们更改功能、调整行为并配置文件系统的特定属性。因此,如果我们有一个现有的 *ext2* 或 *ext3* 分区,并且我们需要快速将其转换为 *ext4* 而不进行格式化,那么它非常有用。 例如,我们现在将使用 tune2fs 将一个现有的 ext3 分区转换为 ext4 。首先,让我们检查 /dev/vda1 分区的类型:
bash
$ lsblk -f /dev/vda1
...
vda1 ext3 1.0  7a664991-92ed-4823-a4f0-36dad54fa666
Copy
Now, let's convert it to ext4 :
现在,让我们将其转换为 ext4:
bash
$ sudo tune2fs -O extents,uninit_bg,dir_index /dev/vda1CopyLet's break this down:
让我们来分析一下:
- -O specifies the filesystem features to be modified
-O 指定要修改的文件系统功能 - extents feature enables extents, which is a feature in ext4 that improves file allocation efficiency
extents 功能启用了 ext4 中的 extents 功能,该功能提高了文件分配效率 - uninit_bg allows the use of uninitialized block groups that can improve filesystem creation speed
uninit_bg 允许使用未初始化的块组,这可以提高文件系统创建速度 - dir_index enables the use of directory indexing that improves the performance of large directories
dir_index 启用了目录索引功能,该功能提高了大目录的性能 - /dev/vda1 is the partition we're modifying
/dev/vda1 是我们要修改的分区
Moreover, it also retains our data in the partition. However, as an optional step, we can check and repair the filesystem to make sure everything is good so far:
此外,它还保留了分区中的数据。然而,作为一个可选步骤,我们可以检查并修复文件系统,以确保到目前为止一切正常:
bash
$ sudo e2fsck -fDC0 /dev/vda1
e2fsck 1.47.0 (5-Feb-2023)
Pass 1: Checking inodes, blocks, and sizes
Pass 2: Checking directory structure
Pass 3: Checking directory connectivity
Pass 3A: Optimizing directories
Pass 4: Checking reference counts
Pass 5: Checking group summary information
...Copy
Mind that we need to backup our data because the conversion process can result in irreversible data loss.
请注意,我们需要备份我们的数据,因为转换过程可能导致不可逆的数据丢失。
4. Alternative: Using fallocate to Allocate Disk Space
替代方案:使用 fallocate 分配磁盘空间
fallocate allows us to preallocate space for a file, making it immediately available for use, or deallocate space, marking it as free and available for reuse by the filesystem. In some cases, we may already have a formatted ext4 partition but need to quickly clear the existing data that are filled with zeroes without going through a full format. This means that the space previously occupied by the file is now available for reuse by the filesystem. However, the file itself still exists on the filesystem with its metadata intact. By default, fallocate is available on most Linux distributions as part of the util-linux package. So, let's go ahead and deallocate the space used by the /dev/vda1 partition:
fallocate 允许我们为文件预分配空间,使其立即可用,或者释放空间,将其标记为自由空间,供文件系统重新使用。在某些情况下,我们可能已经有一个格式化的 ext4 分区,但需要快速清除现有的数据,这些数据被零填充,而无需进行完全格式化。这意味着文件之前占用的空间现在可供文件系统重新使用。然而,文件本身仍然存在于文件系统中,其元数据保持不变。 默认情况下,fallocate 作为 util-linux 包的一部分在大多数 Linux 发行版上可用。因此,让我们继续释放 /dev/vda1 分区所使用的空间:
bash
$ sudo fallocate -x -l <length> /dev/vda1CopyLet's break this down:
让我们来分析一下:
- -x or --dig-holes is used to deallocate space by punching holes in the filesystem
-x 或 --dig-holes 用于通过在文件系统中打洞来释放空间 - -l specifies the length of the hole to be punched
-l 指定要打的洞的长度
Here, we can replace with a size such as 1G. So, if we want to specify the entire size of our disk, we can substitute it with the blockdev command:
在这里,我们可以将 替换为一个大小,例如 1G。因此,如果我们想指定我们磁盘的整个大小,我们可以将其替换为 blockdev 命令:
bash
$ sudo fallocate -x -l $(sudo blockdev --getsize64 /dev/vda1) /dev/vda1Copy5. Conclusion
总结
In this article, we learned how to convert and quickly format a partition as ext4 . First, we covered -E lazy_itable_init options available in mke2fs , which allows faster format by delaying the initialization of inode tables. Additionally, we covered how to use the tunefs utility to quickly convert existing ext2 and ext3 partitions to ext4 . Lastly, we used fallocate to deallocate space by punching holes in the filesystem, allowing for quickly removing file data.
在本文中,我们学习了如何将分区转换为 ext4 并快速格式化。首先,我们介绍了 mke2fs 中的 -E lazy_itable_init 选项,该选项通过延迟初始化 inode 表来实现更快的格式化。此外,我们还介绍了如何使用 tunefs 工具快速将现有的 ext2 和 ext3 分区转换为 ext4 。最后,我们使用 fallocate 通过在文件系统中打洞来释放空间,从而快速删除文件数据。
via:
-
记 ext4 硬盘有规律异响问题的排查和解决 - 简书 2021
https://www.jianshu.com/p/b9d35cd5590f -
磁盘没有读写数据,但是 IO 高 - 简书 2023
https://www.jianshu.com/p/af87a662b309 -
linux - What is risk or cost for the "noinit_itable" option of ext4? - Unix & Linux Stack Exchangen 2017
https://unix.stackexchange.com/questions/381092/what-is-risk-or-cost-for-the-noinit-itable-option-of-ext4 -
Bug #733652 "Mount with noinit_itable during install" : Bugs : partman-ext3 package : Ubuntu 2011
https://bugs.launchpad.net/ubuntu/+source/partman-ext3/+bug/733652 -
mke2fs: Enable lazy_itable_init on newer kernel by default - Patchwork 2014
https://patchwork.ozlabs.org/project/linux-ext4/patch/1393263666-21246-2-git-send-email-lczerner@redhat.com/ -
Quickly Formatting an ext4 Filesystem | Baeldung on Linux
https://www.baeldung.com/linux/ext4-file-system-formatting