最近新开始做了一个ai对话的项目,打算重构一下老项目的markdown渲染和交互。老项目使用marked对md进行渲染成html,然后使用v-html渲染,搞到后面发现太多技术债了,所以打算换一个实现方法。经过一番对比,发现 markstream-vue 的star是最多的,去看了一下官方文档发现特性也很多。所以这里决定就用这个组件了。
需求说明
这里实现的一个项目是ai对话的应用,特点是可能markdown里要混着各种业务组件,以及一些md的节点可以点击交互,比如列表项或者链接点击代替用户自动发送信息。
安装使用
安装就不多浪费口水了,官方文档写的非常详细,我们先看看案例markdown,以及使用库提供的markdown解析成节点:
ts
import { getMarkdown, MarkdownRender, parseMarkdownToStructure } from 'markstream-vue'

const md = `
<thinking>
这是推理内容
</thinking>

请选择办理方式
- 线上办理
- 线下办理

<a data-send="其他办理方式">其他办理方式</a>
`
console.log(JSON.stringify(parseMarkdownToStructure(md, getMarkdown()), null, 2))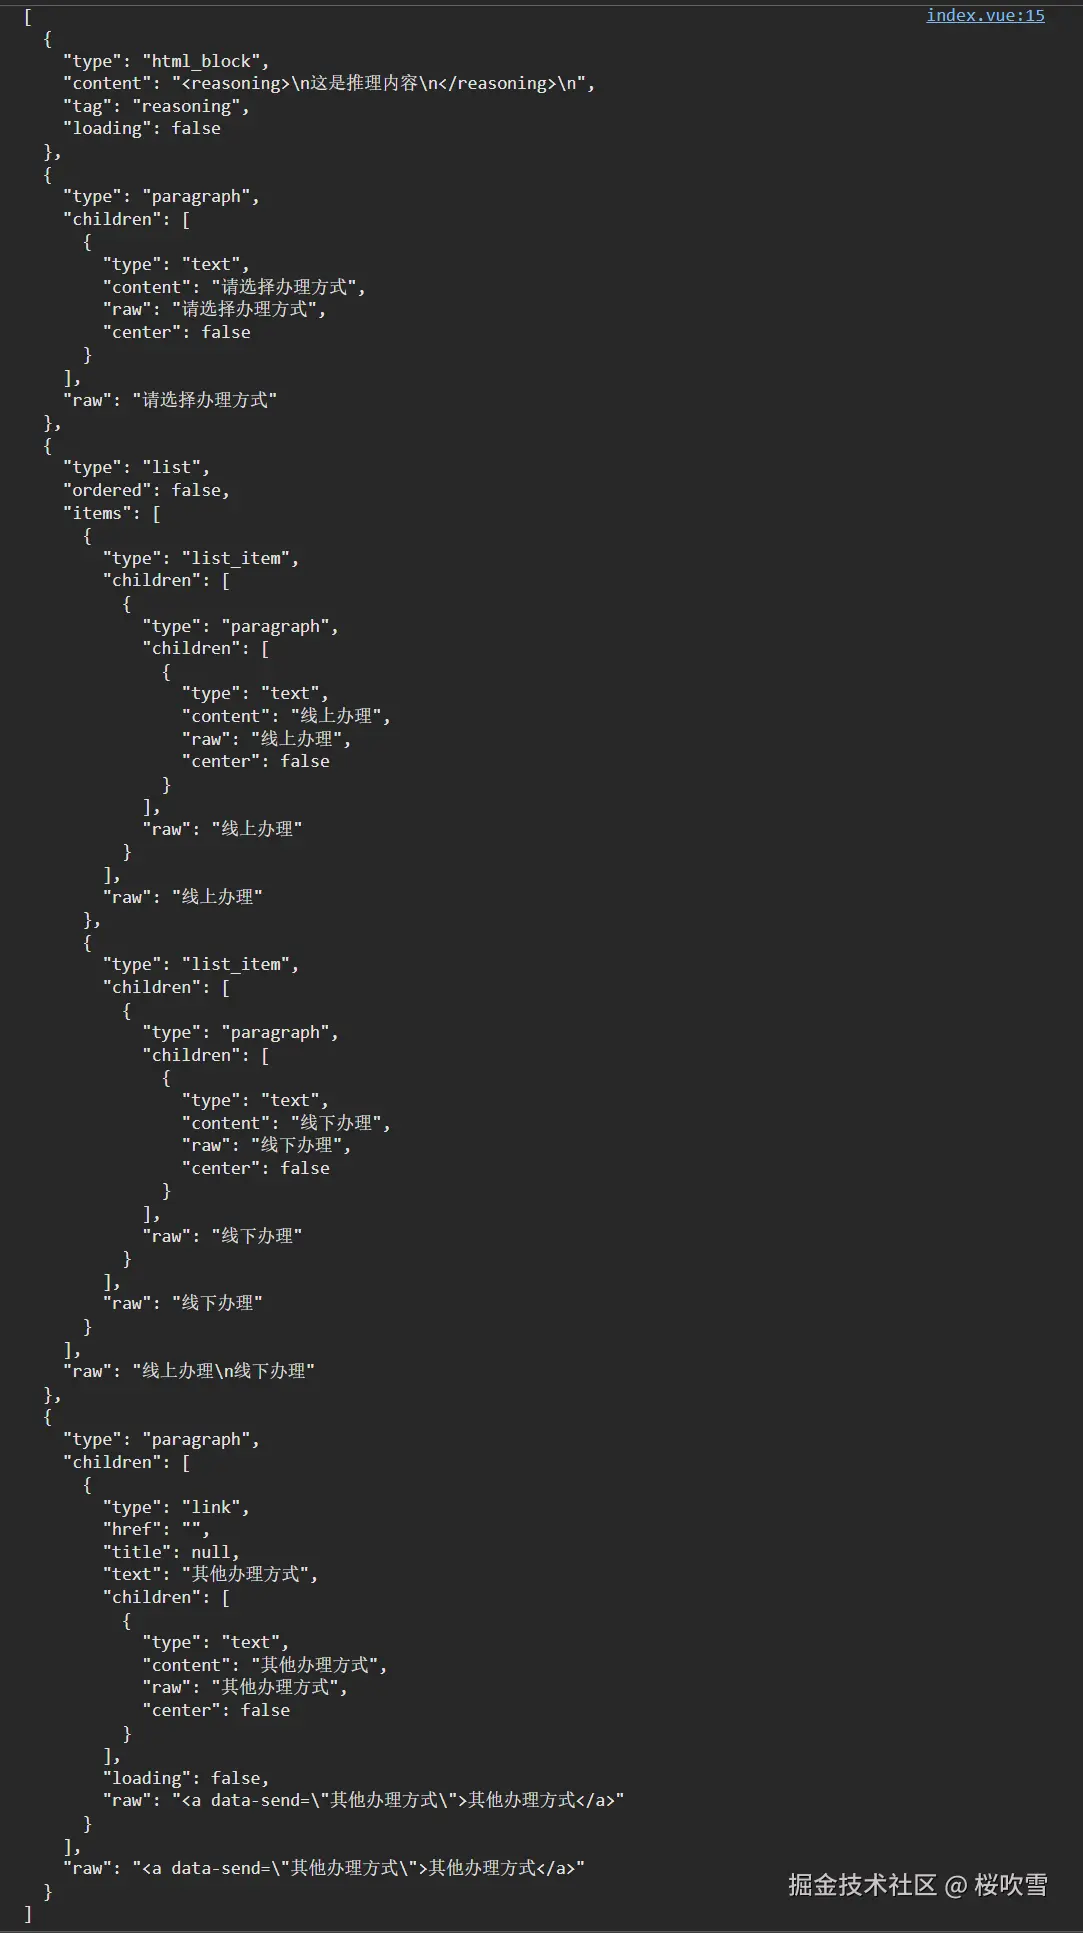
对list_item和link进行自定义
如果只是渲染上面的md,很简单:
html
<template>
  <MarkdownRender :content="md" />
</template>
但是我需要实现对list_item和link进行自定义渲染,那就需要使用到 setCustomComponents 以及对renderer设置custom-id
参考官方的思考block渲染组件:github.com/Simon-He95/...
我们先试试thinking的渲染:
ts
<script setup lang="ts">
import { MarkdownRender, setCustomComponents } from 'markstream-vue'
import ThinkingNode from './ThinkingNode.vue'
import 'markstream-vue/index.css'

const md = `
<thinking>
这是推理内容
</thinking>


请选择办理方式
- 线上办理
- 线下办理

<a data-send="其他办理方式">其他办理方式</a>
`
setCustomComponents('doc', {
  thinking: ThinkingNode,
})
</script>

<template>
  <MarkdownRender custom-id="doc" :content="md" :custom-html-tags="['thinking']" />
</template>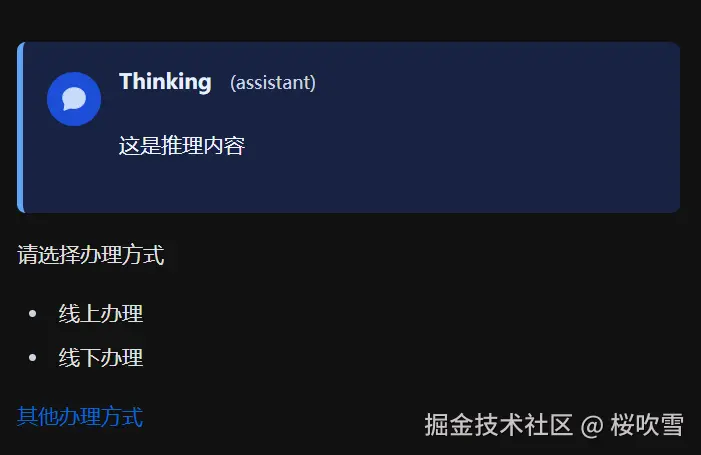
没啥问题,接下来对link节点自定义,我们只需要直接去官方仓库copy出来改就好了
因为我们不需要花里胡哨的特效,这里对源代码进行删减,并且对点击事件进行调整
ts
// LinkNode.vue
<script setup lang="ts">
import { HtmlInlineNode, ImageNode, StrikethroughNode, StrongNode, TextNode } from 'markstream-vue'
import { computed, useAttrs } from 'vue'
import { extractAnchorAttributes } from './utils.ts'

export interface LinkNodeNode {
  type: 'link'
  href: string
  title: string | null
  text: string
  children: { type: string, raw: string }[]
  raw: string
  loading?: boolean
}

// 定义链接节点
export interface LinkNodeProps {
  node: LinkNodeNode
  indexKey?: number | string
  customId?: string
  showTooltip?: boolean
  color?: string
}

// 接收props --- 把动画/颜色相关配置暴露为props,并通过CSS变量注入样式
const props = withDefaults(defineProps<LinkNodeProps>(), {
  showTooltip: true,
})

const emits = defineEmits<{
  send: [text: string]
}>()

const cssVars = computed(() => {
  return {
    '--link-color': props.color ?? '#0366d6',
  } as Record<string, string>
})

// Available node components for child rendering
const nodeComponents = {
  text: TextNode,
  strong: StrongNode,
  strikethrough: StrikethroughNode,
  image: ImageNode,
  html_inline: HtmlInlineNode,
}

// forward any non-prop attributes (e.g. custom-id) to the rendered element
const attrs = useAttrs()

const linkAttrs = computed(() => extractAnchorAttributes(props.node.raw))

const linkHref = computed(() => {
  const href = props.node.href
  if (href?.startsWith('javascript:') || !href) {
    // 如果 href 以 javascript: 开头,一律返回 void(0) 防止执行恶意代码
    return 'javascript:void(0)'
  }
  return href
})

const linkTarget = computed(() => {
  if (linkAttrs.value?.target) {
    return linkAttrs.value?.target
  }
  if (!props.node.href) {
    return '_self'
  }
  return '_blank'
})

const title = computed(() => String(props.node.title ?? props.node.href ?? ''))

function onClick() {
  if (linkAttrs.value?.['data-send']) {
    emits('send', linkAttrs.value?.['data-send'])
  }
}
</script>

<template>
  <a
    v-if="!node.loading"
    class="link-node"
    :href="linkHref"
    :target="linkTarget"
    rel="noopener noreferrer"
    :title="showTooltip ? '' : title"
    :aria-label="`Link: ${title}`"
    :aria-hidden="node.loading ? 'true' : 'false'"
    v-bind="attrs"
    :style="cssVars"
    @click="onClick"
  >
    <component
      :is="nodeComponents[child.type]"
      v-for="(child, index) in node.children"
      :key="`${indexKey || 'emphasis'}-${index}`"
      :node="child"
      :custom-id="props.customId"
      :index-key="`${indexKey || 'link-text'}-${index}`"
    />
  </a>
  <span v-else class="link-loading inline-flex items-baseline gap-1.5" :aria-hidden="!node.loading ? 'true' : 'false'" v-bind="attrs" :style="cssVars">
    <span class="link-text-wrapper relative inline-flex">
      <span class="link-text leading-[normal]">
        <span class="link-text leading-[normal]">{{ node.text }}</span>
      </span>
    </span>
  </span>
</template>

<style scoped>
.link-node {
  color: var(--link-color, #0366d6);
  text-decoration: none;
}

.link-loading .link-text-wrapper {
  position: relative;
}

.link-loading .link-text {
  position: relative;
  z-index: 2;
}
</style>
ts
// utils.ts
export function extractAnchorAttributes(str: string) {
  // 1. 基础类型检查
  if (!str)
    return null

  // 去除首尾空格,方便处理
  const trimmed = str.trim()

  // 2. 快速判断:必须以 <a 开头(忽略大小写),且后面必须跟空白字符
  // 这一步只做检测,不提取,避免复杂的正则回溯
  if (!/^<a\s/i.test(trimmed)) {
    return null
  }

  // 3. 提取 <a ... > 中间的内容
  // 既然我们已经确信它是 <a 开头,直接找第一个 > 的位置即可
  // 这种使用 indexOf + slice 的方式是 O(n) 的,绝对没有 ReDoS 风险
  const closeTagIndex = trimmed.indexOf('>')
  if (closeTagIndex === -1)
    return null

  // 截取 <a 和 > 中间的字符串
  // <a href="..."> -> 截取 " href="..."
  // 我们不需要精确去掉 <a 后的空格,因为后面的属性正则会自动处理空格
  const attrString = trimmed.slice(2, closeTagIndex)

  // 4. 解析属性键值对
  const attributes: Record<string, string> = {}

  // 优化后的正则:
  // ([^\s=]+)  匹配属性名 (非空格、非等号)
  // \s*=\s*    匹配等号及周围空格
  // (["'])     捕获引号
  // (.*?)      捕获值 (非贪婪)
  // \2         匹配闭合引号
  const attrRegex = /([^\s=]+)\s*=\s*(["'])(.*?)\2/g

  // 5. 使用 matchAll 替代 while 赋值循环
  // matchAll 返回一个迭代器,完美解决 ESLint no-cond-assign 问题
  const matches = attrString.matchAll(attrRegex)

  for (const match of matches) {
    if (!match[1])
      continue
    // match[1] 是 key, match[3] 是 value
    attributes[match[1]] = match[3] || ''
  }

  return attributes
}
因为我的业务需要将一些属性加到标签的属性上,这里我让哈基米3pro帮我写了一段正则,从raw的html上面提取属性。
很完美,可以正常捕获点击了,但是如果像上面那样配置thinking节点一样配置,我们就没办法拿到事件了,这里我们要取个巧,在外面将这个link组件包多一层,拿到emit:
ts
<script setup lang="ts">
import { h } from 'vue'
import { MarkdownRender, setCustomComponents } from 'markstream-vue'
import ThinkingNode from './ThinkingNode.vue'
import LinkNode from './LinkNode.vue'
import 'markstream-vue/index.css'
import type { LinkNodeNode } from './LinkNode.vue'

const md = `
<thinking>
这是推理内容
</thinking>


请选择办理方式
- 线上办理
- 线下办理

<a data-send="其他办理方式">其他办理方式</a>
`
setCustomComponents('doc', {
  thinking: ThinkingNode,
  link: (props: { node: LinkNodeNode }) => h(LinkNode, {
    ...props,
    onSend(text) {
      console.log(text)
    },
  }),
})
</script>

<template>
  <MarkdownRender custom-id="doc" :content="md" :custom-html-tags="['thinking']" />
</template>
list_item也是类似的操作,不过有点区别是需要自定义list节点,没办法单独自定义list_item,不过方法也是类似的,把源代码copy出来改就可以:
ts
// ListNode.vue
<script setup lang="ts">
import ListItemNode from './ListItemNode.vue'

// 节点子元素类型
interface NodeChild {
  type: string
  raw: string
  [key: string]: unknown
}

// 列表项类型
interface ListItem {
  type: 'list_item'
  children: NodeChild[]
  raw: string
}

const { node, customId, indexKey, typewriter } = defineProps<{
  node: {
    type: 'list'
    ordered: boolean
    start?: number
    items: ListItem[]
    raw: string
  }
  customId?: string
  indexKey?: number | string
  typewriter?: boolean
}>()

defineEmits(['copy'])
</script>

<template>
  <component
    :is="node.ordered ? 'ol' : 'ul'"
    class="list-node"
    :class="{ 'list-decimal': node.ordered, 'list-disc': !node.ordered }"
  >
    <ListItemNode
      v-for="(item, index) in node.items"
      :key="`${indexKey || 'list'}-${index}`"
      v-memo="[item]"
      :item="item"
      :custom-id="customId"
      :index-key="`${indexKey || 'list'}-${index}`"
      :typewriter="typewriter"
      :value="node.ordered ? (node.start ?? 1) + index : undefined"
      @copy="$emit('copy', $event)"
    />
  </component>
</template>

<style scoped>
.list-node {
  @apply my-5 pl-[calc(13/8*1em)];
}
.list-decimal {
  list-style-type: decimal;
}
.list-disc {
  list-style-type: disc;
  @apply max-lg:my-[calc(4/3*1em)] max-lg:pl-[calc(14/9*1em)];
}
</style>
ts
<script setup lang="ts">
import { computed, watchEffect } from 'vue'
import { MarkdownRender } from 'markstream-vue'

// 节点子元素类型
interface NodeChild {
  type: string
  raw: string
  [key: string]: unknown
}

// 列表项类型
interface ListItem {
  type: 'list_item'
  children: NodeChild[]
  raw: string
}

const props = defineProps<{
  item: ListItem
  indexKey?: number | string
  value?: number
  customId?: string
  /** Forwarded flag to enable/disable non-code node enter transition */
  typewriter?: boolean
}>()

defineEmits<{
  copy: [text: string]
}>()

const liValueAttr = computed(() =>
  props.value == null ? {} : { value: props.value },
)

function onClick() {
  console.log(props.item.children[0]?.raw)
}
</script>

<template>
  <li
    class="my-2 list-item pl-1.5"
    dir="auto"
    v-bind="liValueAttr"
    @click.capture="onClick"
  >
    <MarkdownRender :nodes="item.children" />
  </li>
</template>

<style scoped>
ol > .list-item::marker {
  color: var(--list-item-counter-marker, #64748b);
  line-height: 1.6;
}
ul > .list-item::marker {
  color: var(--list-item-marker, #cbd5e1);
}

/* 大列表滚动到视口时,嵌套 NodeRenderer 需要立即绘制内容,避免空白 */
.list-item :deep(.markdown-renderer) {
  content-visibility: visible;
  contain-intrinsic-size: 0px 0px;
  contain: none;
}
</style>
vmr组件
除了这些原生的html节点之外,还有一个叫vmr组件的东西,可以渲染一些自定义的组件,使用文档可以看:
markstream-vue-docs.simonhe.me/zh/guide/co...
我们要接受emit也是同样的道理
ts
const vmrComponents = {
// 你的一些业务组件
}
setCustomComponents(customIdComputed.value, {
  // ...
  vmr_container: ({ node }: { node: any }) => {
    const component = props.vmrComponents?.[node.name] || (() => h('div', {}, 'unknown component'))
    return h(component, {
      node,
      onEvent(value: VmrComponentEvent) {
        emits('event', value)
      },
    })
  },
})
因为我是将marksteam组件封装多了一层,作为公共组件,所以我就将所有业务相关的事件封装到一个emit事件里面了,然后使用ts对事件做区分,实现类型提示:
ts
export type MarkdownComponentEvent = EventA | EventB

interface EventA {
  eventName: 'a'
  eventValue: {
    // ...
  }
}

interface EventB {
  eventName: 'b'
  eventValue: {
    // ...
  }
}