HarmonyAPP 开发Flutter 嵌入鸿蒙原生 Swiper 组件教程
本教程将手把手教你如何在 Flutter 中嵌入鸿蒙原生的 Swiper 轮播组件。
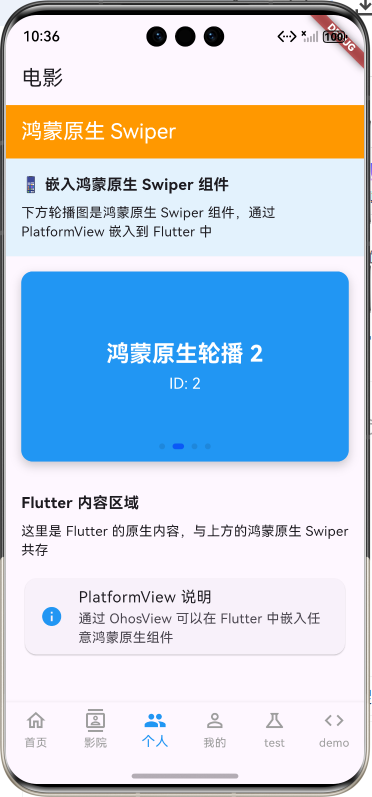
效果图
前置条件
- 已安装 Flutter 鸿蒙版开发环境
- 已创建 Flutter 鸿蒙项目
- 了解基本的 Flutter 和 ArkTS 语法
原理说明
Flutter 通过 PlatformView 机制嵌入原生视图:
Flutter 页面
    ↓
OhosView (Flutter 组件)
    ↓
PlatformViewFactory (鸿蒙端工厂)
    ↓
PlatformView (鸿蒙端视图)
    ↓
原生 Swiper 组件
项目结构
完成后的文件结构:
项目根目录/
├── lib/
│   └── pages/
│       └── Film/
│           └── index.dart              ← Flutter 页面(步骤3)
└── ohos/
    └── entry/
        └── src/
            └── main/
                └── ets/
                    ├── entryability/
                    │   └── EntryAbility.ets    ← 修改(步骤2)
                    └── views/
                        └── NativeSwiperView.ets ← 新建(步骤1)
步骤 1:创建鸿蒙原生 Swiper 视图
1.1 新建文件夹
在 ohos/entry/src/main/ets/ 目录下新建 views 文件夹。
1.2 创建 NativeSwiperView.ets
在 views 文件夹中新建 NativeSwiperView.ets 文件,写入以下代码:
typescript
import { PlatformView, PlatformViewFactory, StandardMessageCodec } from '@ohos/flutter_ohos';

// Swiper 数据项接口
interface SwiperItem {
  id: number;
  title: string;
  color: ResourceColor;
}

@Component
struct NativeSwiperComponent {
  private swiperController: SwiperController = new SwiperController();
  private swiperData: SwiperItem[] = [
    { id: 1, title: '鸿蒙原生轮播 1', color: '#FF5722' },
    { id: 2, title: '鸿蒙原生轮播 2', color: '#2196F3' },
    { id: 3, title: '鸿蒙原生轮播 3', color: '#4CAF50' },
    { id: 4, title: '鸿蒙原生轮播 4', color: '#9C27B0' },
  ];

  build() {
    Column() {
      Swiper(this.swiperController) {
        ForEach(this.swiperData, (item: SwiperItem) => {
          Column() {
            Text(item.title)
              .fontSize(24)
              .fontColor(Color.White)
              .fontWeight(FontWeight.Bold)
            Text('ID: ' + item.id.toString())
              .fontSize(16)
              .fontColor(Color.White)
              .margin({ top: 8 })
          }
          .width('100%')
          .height('100%')
          .backgroundColor(item.color)
          .justifyContent(FlexAlign.Center)
        })
      }
      .autoPlay(true)
      .interval(3000)
      .indicator(true)
      .loop(true)
    }
    .width('100%')
    .height('100%')
  }
}

@Builder
function NativeSwiperBuilder(params: ESObject) {
  NativeSwiperComponent()
}

// PlatformView 实现类
export class NativeSwiperPlatformView extends PlatformView {
  getView(): WrappedBuilder<[ESObject]> {
    return new WrappedBuilder(NativeSwiperBuilder);
  }

  dispose(): void {
    console.info('[NativeSwiperView] disposed');
  }
}

// PlatformView 工厂类
export class NativeSwiperFactory extends PlatformViewFactory {
  constructor() {
    super(StandardMessageCodec.INSTANCE);
  }

  create(context: Context, viewId: number, args: Object): PlatformView {
    console.info('[NativeSwiperFactory] create, viewId: ' + viewId);
    return new NativeSwiperPlatformView();
  }
}
代码说明
| 部分 | 作用 |
|---|---|
SwiperItem |
定义轮播数据结构 |
NativeSwiperComponent |
鸿蒙原生 Swiper 组件 |
NativeSwiperBuilder |
Builder 函数,供 PlatformView 调用 |
NativeSwiperPlatformView |
PlatformView 实现,返回原生视图 |
NativeSwiperFactory |
工厂类,用于创建 PlatformView 实例 |
步骤 2:注册 PlatformView
2.1 修改 EntryAbility.ets
打开 ohos/entry/src/main/ets/entryability/EntryAbility.ets,修改为:
typescript
import { FlutterAbility, FlutterEngine } from '@ohos/flutter_ohos';
import { GeneratedPluginRegistrant } from '../plugins/GeneratedPluginRegistrant';
import { NativeSwiperFactory } from '../views/NativeSwiperView';

export default class EntryAbility extends FlutterAbility {
  configureFlutterEngine(flutterEngine: FlutterEngine) {
    super.configureFlutterEngine(flutterEngine);
    GeneratedPluginRegistrant.registerWith(flutterEngine);

    // 注册 PlatformView - 原生 Swiper
    const registry = flutterEngine.getPlatformViewsController()?.getRegistry();
    if (registry) {
      registry.registerViewFactory('native-swiper-view', new NativeSwiperFactory());
    }
  }
}
代码说明
import { NativeSwiperFactory }- 导入我们创建的工厂类registerViewFactory('native-swiper-view', ...)- 注册视图工厂- 第一个参数
'native-swiper-view'是视图类型名称,Flutter 端需要用这个名称 - 第二个参数是工厂实例
- 第一个参数
步骤 3:Flutter 端使用原生 Swiper
3.1 创建或修改 Flutter 页面
打开 lib/pages/Film/index.dart(或你想放置的页面),写入以下代码:
dart
import 'package:flutter/material.dart';
import 'package:flutter/services.dart';

class FilmPage extends StatefulWidget {
  const FilmPage({super.key});

  @override
  State<FilmPage> createState() => _FilmPageState();
}

class _FilmPageState extends State<FilmPage> {
  @override
  Widget build(BuildContext context) {
    return Scaffold(
      appBar: AppBar(
        title: const Text('鸿蒙原生 Swiper'),
        backgroundColor: Colors.orange,
        foregroundColor: Colors.white,
      ),
      body: SingleChildScrollView(
        child: Column(
          crossAxisAlignment: CrossAxisAlignment.start,
          children: [
            // 说明区域
            Container(
              padding: const EdgeInsets.all(16),
              color: Colors.blue[50],
              child: const Column(
                crossAxisAlignment: CrossAxisAlignment.start,
                children: [
                  Text('📱 嵌入鸿蒙原生 Swiper 组件',
                      style: TextStyle(fontWeight: FontWeight.bold, fontSize: 16)),
                  SizedBox(height: 8),
                  Text('下方轮播图是鸿蒙原生 Swiper 组件'),
                ],
              ),
            ),

            // 原生 Swiper 组件
            Container(
              height: 200,
              margin: const EdgeInsets.all(16),
              decoration: BoxDecoration(
                borderRadius: BorderRadius.circular(12),
                boxShadow: [
                  BoxShadow(
                    color: Colors.black.withOpacity(0.2),
                    blurRadius: 8,
                    offset: const Offset(0, 4),
                  ),
                ],
              ),
              clipBehavior: Clip.antiAlias,
              child: const OhosView(
                viewType: 'native-swiper-view',  // 与注册时的名称一致
                creationParams: <String, dynamic>{},
                creationParamsCodec: StandardMessageCodec(),
              ),
            ),

            // Flutter 内容区域
            const Padding(
              padding: EdgeInsets.all(16),
              child: Text('这里是 Flutter 的内容,与原生 Swiper 共存'),
            ),
          ],
        ),
      ),
    );
  }
}
关键代码说明
dart
OhosView(
  viewType: 'native-swiper-view',  // 必须与步骤2注册的名称一致
  creationParams: <String, dynamic>{},  // 传递给原生的参数
  creationParamsCodec: StandardMessageCodec(),  // 参数编码器
)
步骤 4:构建运行
4.1 清理项目
bash
flutter clean4.2 运行项目
bash
flutter run4.3 查看效果
切换到对应页面,即可看到嵌入的鸿蒙原生 Swiper 轮播组件。
常见问题
Q1: 编译报错 "Object literal must correspond to some explicitly declared class or interface"
原因:ArkTS 要求对象字面量必须对应接口定义。
解决:确保所有对象都定义了对应的 interface。
Q2: 编译报错 "Type 'XXX' is not assignable to type 'PlatformView'"
原因:PlatformView 的 getView 返回类型不匹配。
解决 :使用 ESObject 作为 Builder 参数类型:
typescript
@Builder
function NativeSwiperBuilder(params: ESObject) {
  // ...
}
Q3: 页面显示空白
可能原因:
- viewType 名称不匹配
- PlatformView 未正确注册
- 需要重新
flutter clean后运行
Q4: 热重载不生效
原因:原生代码修改后需要重新构建。
解决 :执行 flutter clean 后重新 flutter run。
扩展:传递参数给原生组件
Flutter 端传参
dart
OhosView(
  viewType: 'native-swiper-view',
  creationParams: <String, dynamic>{
    'autoPlay': true,
    'interval': 3000,
  },
  creationParamsCodec: StandardMessageCodec(),
)
鸿蒙端接收参数
typescript
export class NativeSwiperFactory extends PlatformViewFactory {
  create(context: Context, viewId: number, args: Object): PlatformView {
    // args 就是 Flutter 传递的 creationParams
    const params = args as Record<string, Object>;
    const autoPlay = params['autoPlay'] as boolean;
    const interval = params['interval'] as number;

    return new NativeSwiperPlatformView(autoPlay, interval);
  }
}
总结
| 步骤 | 文件 | 操作 |
|---|---|---|
| 1 | ohos/.../views/NativeSwiperView.ets |
新建,编写原生 Swiper 组件 |
| 2 | ohos/.../entryability/EntryAbility.ets |
修改,注册 PlatformView |
| 3 | lib/pages/Film/index.dart |
新建/修改,使用 OhosView |
| 4 | 终端 | 执行 flutter clean 和 flutter run |
通过 PlatformView 机制,你可以在 Flutter 中嵌入任意鸿蒙原生组件!