目录
一、介绍
(1)概述
Hystrix是一个用于处理分布式系统的延迟和容错的开源库,在分布式系统里,许多依赖不可避免的会调用失败,比如超时、异常等,Hystrix能够保证在一个依赖出问题的情况下,不会导致整体服务失败,避免级联故障,以提高分布式系统的弹性。
"断路器"本身是一种开关装置,当某个服务单元发生故障之后,通过断路器的故障监控(类似熔断保险丝),向调用方返回一个符合预期的、可处理的备选响应(FallBack),而不是长时间的等待或者抛出调用方无法处理的异常,这样就保证了服务调用方的线程不会被长时间、不必要地占用,从而避免了故障在分布式系统中的蔓延,乃至雪崩。
(2)功能
服务降级:当服务的调用出现异常或超时,给出一个友好的提示,当服务出现程序运行异常、超时、服务熔断触发服务降级、线程池/信号量打满也会导致服务降级等会触发服务降级
服务熔断:当服务访问量过大时,直接拒绝访问,然后调用服务降级的方法并返回友好提示。
服务限流:当大量请求访问时,排队依次处理,有序进行。
GitHub地址![]() https://github.com/Netflix/Hystrix/wiki/How-To-Use
https://github.com/Netflix/Hystrix/wiki/How-To-Use
二、案例
1、构建8001服务
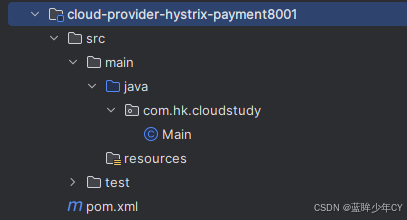
(1)创建模块8001
cloud-provider-hystrix-payment8001
(2)添加pom
XML
<?xml version="1.0" encoding="UTF-8"?>
<project xmlns="http://maven.apache.org/POM/4.0.0"
         xmlns:xsi="http://www.w3.org/2001/XMLSchema-instance"
         xsi:schemaLocation="http://maven.apache.org/POM/4.0.0 http://maven.apache.org/xsd/maven-4.0.0.xsd">
    <modelVersion>4.0.0</modelVersion>
    <parent>
        <groupId>com.hk.cloudstudy</groupId>
        <artifactId>SecondSpringCloud</artifactId>
        <version>1.0-SNAPSHOT</version>
    </parent>

    <artifactId>cloud-provider-hystrix-payment8001</artifactId>

    <properties>
        <maven.compiler.source>8</maven.compiler.source>
        <maven.compiler.target>8</maven.compiler.target>
        <project.build.sourceEncoding>UTF-8</project.build.sourceEncoding>
    </properties>

    <dependencies>
        <!--hystrix-->
        <dependency>
            <groupId>org.springframework.cloud</groupId>
            <artifactId>spring-cloud-starter-netflix-hystrix</artifactId>
        </dependency>
        <!--eureka client-->
        <dependency>
            <groupId>org.springframework.cloud</groupId>
            <artifactId>spring-cloud-starter-netflix-eureka-client</artifactId>
        </dependency>
        <!--web-->
        <dependency>
            <groupId>org.springframework.boot</groupId>
            <artifactId>spring-boot-starter-web</artifactId>
        </dependency>

        <dependency>
            <groupId>org.springframework.boot</groupId>
            <artifactId>spring-boot-starter-actuator</artifactId>
        </dependency>

        <dependency><!-- 引入自己定义的api通用包,可以使用Payment支付Entity -->
            <groupId>com.hk.cloudstudy</groupId>
            <artifactId>cloud-api-commons</artifactId>
            <version>1.0-SNAPSHOT</version>
        </dependency>

        <dependency>
            <groupId>org.springframework.boot</groupId>
            <artifactId>spring-boot-starter-test</artifactId>
            <scope>test</scope>
        </dependency>
    </dependencies>

</project>
(3)添加yml文件
XML
server:
  port: 8001

spring:
  application:
    name: cloud-provider-hystrix-payment

eureka:
  client:
    register-with-eureka: true
    fetch-registry: true
    service-url:
      defaultZone: http://localhost:7001/eureka
(4)修改启动类
java
package com.hk.cloudstudy;

import org.springframework.boot.SpringApplication;
import org.springframework.boot.autoconfigure.SpringBootApplication;
import org.springframework.cloud.netflix.eureka.EnableEurekaClient;

@SpringBootApplication
@EnableEurekaClient
public class PaymentHystrixMain8001 {
    public static void main(String[] args) {
        SpringApplication.run(PaymentHystrixMain8001.class, args);
    }
}
(5)编写service
java
package com.hk.cloudstudy.service;

import org.springframework.stereotype.Service;

@Service
public class PaymentServicePaymentService {

    // 正常实例
    public String paymentInfo_OK(Integer id) {
        return "线程池:" + Thread.currentThread().getName() + " paymentInfo_OK,id:" + id;
    }

    // 超时示例
    public String paymentInfo_TimeOut(Integer id) {
        try {
            Thread.sleep(3000);
        } catch (InterruptedException e) {
            e.printStackTrace();
        }
        return "线程池:" + Thread.currentThread().getName() + " paymentInfo_TimeOut,id:" + id;
    }
}
(6)编写controller
java
package com.hk.cloudstudy.controller;

import com.hk.cloudstudy.service.PaymentServicePaymentService;
import lombok.extern.slf4j.Slf4j;
import org.springframework.beans.factory.annotation.Autowired;
import org.springframework.beans.factory.annotation.Value;
import org.springframework.web.bind.annotation.GetMapping;
import org.springframework.web.bind.annotation.PathVariable;
import org.springframework.web.bind.annotation.RestController;

@RestController
@Slf4j
public class PaymentController {

    @Autowired
    private PaymentServicePaymentService paymentService;

    @Value("${server.port}")
    private String serverPort;

    @GetMapping("/payment/hystrix/ok/{id}")
    public String paymentInfo_OK(@PathVariable("id") Integer id) {
        String res = paymentService.paymentInfo_OK(id);
        log.info("res = " + res);
        return res;
    }

    @GetMapping("/payment/hystrix/timeout/{id}")
    public String paymentInfo_TimeOut(@PathVariable("id") Integer id) {
        String res = paymentService.paymentInfo_TimeOut(id);
        log.info("res = " + res);
        return res;
    }
}
(7)测试
启动7001、然后启动8001
访问http://localhost:8001/payment/hystrix/ok/1 和 http://localhost:8001/payment/hystrix/timeout/1
返回结果均是成功的
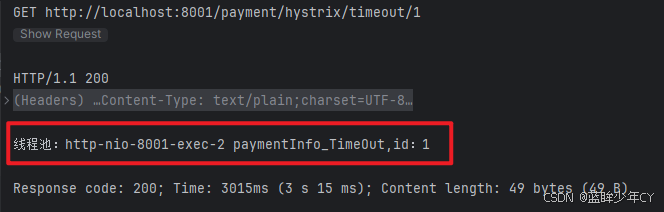
当使用高并发工具测试接口时,会发现程序直接被卡死
2、构建80服务
(1)创建服务cloud-consumer-feign-hystrix-order80
(2)修改pom
XML
<?xml version="1.0" encoding="UTF-8"?>
<project xmlns="http://maven.apache.org/POM/4.0.0"
         xmlns:xsi="http://www.w3.org/2001/XMLSchema-instance"
         xsi:schemaLocation="http://maven.apache.org/POM/4.0.0 http://maven.apache.org/xsd/maven-4.0.0.xsd">
    <modelVersion>4.0.0</modelVersion>
    <parent>
        <groupId>com.hk.cloudstudy</groupId>
        <artifactId>SecondSpringCloud</artifactId>
        <version>1.0-SNAPSHOT</version>
    </parent>

    <artifactId>cloud-consumer-feign-hystrix-order80</artifactId>

    <properties>
        <maven.compiler.source>8</maven.compiler.source>
        <maven.compiler.target>8</maven.compiler.target>
        <project.build.sourceEncoding>UTF-8</project.build.sourceEncoding>
    </properties>


    <dependencies>
        <!--openfeign-->
        <dependency>
            <groupId>org.springframework.cloud</groupId>
            <artifactId>spring-cloud-starter-openfeign</artifactId>
        </dependency>
        <!--hystrix-->
        <dependency>
            <groupId>org.springframework.cloud</groupId>
            <artifactId>spring-cloud-starter-netflix-hystrix</artifactId>
        </dependency>
        <!--eureka client-->
        <dependency>
            <groupId>org.springframework.cloud</groupId>
            <artifactId>spring-cloud-starter-netflix-eureka-client</artifactId>
        </dependency>
        <!-- 引入自己定义的api通用包,可以使用Payment支付Entity -->
        <dependency>
            <groupId>com.hk.cloudstudy</groupId>
            <artifactId>cloud-api-commons</artifactId>
            <version>1.0-SNAPSHOT</version>
        </dependency>
        <!--web-->
        <dependency>
            <groupId>org.springframework.boot</groupId>
            <artifactId>spring-boot-starter-web</artifactId>
        </dependency>
        <dependency>
            <groupId>org.springframework.boot</groupId>
            <artifactId>spring-boot-starter-actuator</artifactId>
        </dependency>

        <dependency>
            <groupId>org.springframework.boot</groupId>
            <artifactId>spring-boot-starter-test</artifactId>
            <scope>test</scope>
        </dependency>
    </dependencies>
</project>
(3)添加yml文件
XML
server:
  port: 80

eureka:
  client:
    register-with-eureka: false
    service-url:
      defaultZone: http://localhost:7001/eureka/
(4)修改启动类
java
package com.hk.cloudstudy;

import org.springframework.boot.SpringApplication;
import org.springframework.boot.autoconfigure.SpringBootApplication;
import org.springframework.cloud.openfeign.EnableFeignClients;

@SpringBootApplication
@EnableFeignClients
public class OrderHystrixMain80 {
    public static void main(String[] args) {
        SpringApplication.run(OrderHystrixMain80.class, args);
    }
}
(5)编写远程调用service
java
package com.hk.cloudstudy.service;

import org.springframework.cloud.openfeign.FeignClient;
import org.springframework.stereotype.Component;
import org.springframework.web.bind.annotation.GetMapping;
import org.springframework.web.bind.annotation.PathVariable;

@Component
@FeignClient(value = "CLOUD-PROVIDER-HYSTRIX-PAYMENT")
public interface PaymentHystrixService {

    @GetMapping("/payment/hystrix/ok/{id}")
    public String paymentInfo_OK(@PathVariable("id") Integer id);

    @GetMapping("/payment/hystrix/timeout/{id}")
    public String paymentInfo_Timeout(@PathVariable("id") Integer id);
}
(6)编写controller
java
package com.hk.cloudstudy.controller;

import com.hk.cloudstudy.service.PaymentHystrixService;
import org.springframework.web.bind.annotation.GetMapping;
import org.springframework.web.bind.annotation.PathVariable;
import org.springframework.web.bind.annotation.RestController;

import javax.annotation.Resource;

@RestController
public class OrderHystirxController {

    @Resource
    private PaymentHystrixService paymentHystrixService;

    @GetMapping("/payment/hystrix/ok/{id}")
    public String paymentInfo_OK(@PathVariable("id") Integer id) {
        return paymentHystrixService.paymentInfo_OK(id);
    }

    @GetMapping("/payment/hystrix/timeout/{id}")
    public String paymentInfo_Timeout(@PathVariable("id") Integer id) {
        return paymentHystrixService.paymentInfo_Timeout(id);
    }
}
(7)测试
单一测试时成功的,如果高并发测试会出现超时异常。
三、服务降级
1、修改8001服务
设置自身调用超时时间的峰值,峰值内可以正常运行,超过了需要有兜底的方法处理,作服务降级fallback
(1)增加fallback
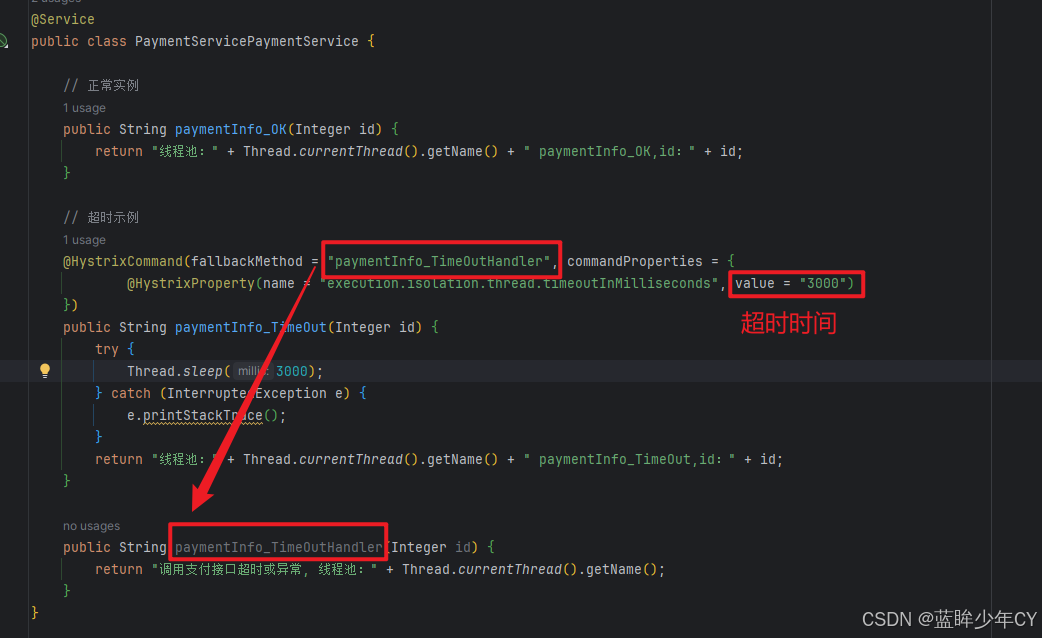
修改8001服务的service
java
package com.hk.cloudstudy.service;

import com.netflix.hystrix.contrib.javanica.annotation.HystrixCommand;
import com.netflix.hystrix.contrib.javanica.annotation.HystrixProperty;
import org.springframework.stereotype.Service;

@Service
public class PaymentServicePaymentService {

    // 正常实例
    public String paymentInfo_OK(Integer id) {
        return "线程池:" + Thread.currentThread().getName() + " paymentInfo_OK,id:" + id;
    }

    // 超时示例
    @HystrixCommand(fallbackMethod = "paymentInfo_TimeOutHandler", commandProperties = {
            @HystrixProperty(name = "execution.isolation.thread.timeoutInMilliseconds", value = "3000")
    })
    public String paymentInfo_TimeOut(Integer id) {
        try {
            Thread.sleep(3000);
        } catch (InterruptedException e) {
            e.printStackTrace();
        }
        return "线程池:" + Thread.currentThread().getName() + " paymentInfo_TimeOut,id:" + id;
    }

    public String paymentInfo_TimeOutHandler(Integer id) {
        return "调用支付接口超时或异常, 线程池:" + Thread.currentThread().getName();
    }
}
一旦调用服务方法失败并抛出了错误信息后,会自动调用@HystrixCommand标注好的fallbackMethod调用类中的指定方法。
(2)修改启动类
java
package com.hk.cloudstudy;

import org.springframework.boot.SpringApplication;
import org.springframework.boot.autoconfigure.SpringBootApplication;
import org.springframework.cloud.client.circuitbreaker.EnableCircuitBreaker;
import org.springframework.cloud.netflix.eureka.EnableEurekaClient;

@SpringBootApplication
@EnableEurekaClient
@EnableCircuitBreaker   // 增加注解  激活Hystrix
public class PaymentHystrixMain8001 {
    public static void main(String[] args) {
        SpringApplication.run(PaymentHystrixMain8001.class, args);
    }
}
2、修改80服务
(1)修改yml文件
java
server:
  port: 80

eureka:
  client:
    register-with-eureka: false
    service-url:
      defaultZone: http://localhost:7001/eureka/

feign:
  hystrix:
    enabled: true
(2)修改主启动类
java
package com.hk.cloudstudy;
import org.springframework.boot.SpringApplication;
import org.springframework.boot.autoconfigure.SpringBootApplication;
import org.springframework.cloud.netflix.hystrix.EnableHystrix;
import org.springframework.cloud.openfeign.EnableFeignClients;
@SpringBootApplication
@EnableFeignClients
@EnableHystrix // 开启Hystrix
public class OrderHystrixMain80 {
public static void main(String[] args) {
SpringApplication.run(OrderHystrixMain80.class, args);
}
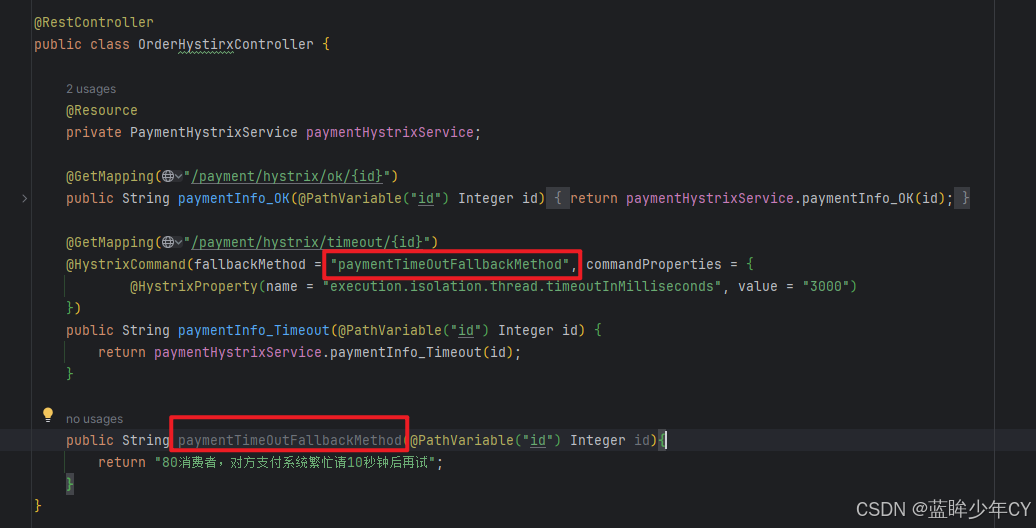
}(3)controller增加fallback方法
java
package com.hk.cloudstudy.controller;

import com.hk.cloudstudy.service.PaymentHystrixService;
import com.netflix.hystrix.contrib.javanica.annotation.HystrixCommand;
import com.netflix.hystrix.contrib.javanica.annotation.HystrixProperty;
import org.springframework.web.bind.annotation.GetMapping;
import org.springframework.web.bind.annotation.PathVariable;
import org.springframework.web.bind.annotation.RestController;

import javax.annotation.Resource;

@RestController
public class OrderHystirxController {

    @Resource
    private PaymentHystrixService paymentHystrixService;

    @GetMapping("/payment/hystrix/ok/{id}")
    public String paymentInfo_OK(@PathVariable("id") Integer id) {
        return paymentHystrixService.paymentInfo_OK(id);
    }

    @GetMapping("/payment/hystrix/timeout/{id}")
    @HystrixCommand(fallbackMethod = "paymentTimeOutFallbackMethod", commandProperties = {
            @HystrixProperty(name = "execution.isolation.thread.timeoutInMilliseconds", value = "3000")
    })
    public String paymentInfo_Timeout(@PathVariable("id") Integer id) {
        return paymentHystrixService.paymentInfo_Timeout(id);
    }

    public String paymentTimeOutFallbackMethod(@PathVariable("id") Integer id){
        return "80消费者,对方支付系统繁忙请10秒钟后再试";
    }
}
(4)测试
启动7001、8001;启动80
高并发访问 http://localhost:80/payment/hystrix/timeout/1

3、优化
如果每个方法都加fallback方法,代码会非常碰撞;而且fallback方法和业务逻辑混合在一起,使代码显得很混乱。
(1)使用统一的fallback方法
使用@DefaultProperties(defaultFallback = "")注解,除了个别重要核心业务有专属的方法,其它普通的可以通过@DefaultProperties(defaultFallback = "") 统一处理结果页面;通用的和独享的各自分开,避免了代码膨胀;修改80服务的controller。
java
package com.hk.cloudstudy.controller;

import com.hk.cloudstudy.service.PaymentHystrixService;
import com.netflix.hystrix.contrib.javanica.annotation.DefaultProperties;
import com.netflix.hystrix.contrib.javanica.annotation.HystrixCommand;
import com.netflix.hystrix.contrib.javanica.annotation.HystrixProperty;
import org.springframework.web.bind.annotation.GetMapping;
import org.springframework.web.bind.annotation.PathVariable;
import org.springframework.web.bind.annotation.RestController;

import javax.annotation.Resource;

@RestController
@DefaultProperties(defaultFallback = "payment_Global_FallbackMethod")
public class OrderHystirxController {

    @Resource
    private PaymentHystrixService paymentHystrixService;

    @GetMapping("/payment/hystrix/ok/{id}")
    public String paymentInfo_OK(@PathVariable("id") Integer id) {
        return paymentHystrixService.paymentInfo_OK(id);
    }

    @GetMapping("/payment/hystrix/timeout/{id}")
    // 加了@DefaultProperties属性注解,并且没有写具体方法名字,就用统一全局的
    @HystrixCommand
    public String paymentInfo_Timeout(@PathVariable("id") Integer id) {
        String msg = paymentHystrixService.paymentInfo_Timeout(id);
        System.out.println(msg);
        return msg;
    }

    public String payment_Global_FallbackMethod(){
        return "80消费者,全局处理";
    }
}
(2)解耦业务代码和fallback方法
编写service接口的实现
java
package com.hk.cloudstudy.service;

import org.springframework.stereotype.Component;

@Component
public class PaymentFallbackService implements PaymentHystrixService {
    @Override
    public String paymentInfo_OK(Integer id) {
        return "paymentInfo_OK 服务调用失败";
    }

    @Override
    public String paymentInfo_Timeout(Integer id) {
        return "paymentInfo_Timeout 服务调用失败";
    }
}
修改service接口
java
package com.hk.cloudstudy.service;
import org.springframework.cloud.openfeign.FeignClient;
import org.springframework.stereotype.Component;
import org.springframework.web.bind.annotation.GetMapping;
import org.springframework.web.bind.annotation.PathVariable;
@Component
@FeignClient(value = "CLOUD-PROVIDER-HYSTRIX-PAYMENT", fallback = PaymentFallbackService.class)
public interface PaymentHystrixService {
@GetMapping("/payment/hystrix/ok/{id}")
public String paymentInfo_OK(@PathVariable("id") Integer id);
@GetMapping("/payment/hystrix/timeout/{id}")
public String paymentInfo_Timeout(@PathVariable("id") Integer id);
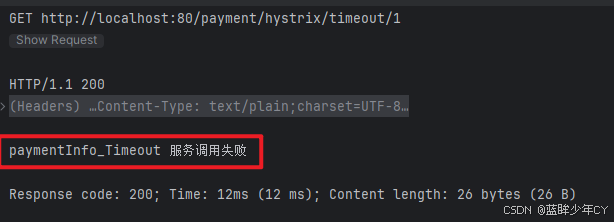
}测试:关闭8001服务,再次访问 http://localhost:80/payment/hystrix/timeout/1
四、服务熔断
1、介绍
当服务A调用服务B的失败次数达到一定阈值时,此时服务A将不再调用的服务B,而是快速返回一个默认响应,在Spring Cloud框架里,熔断机制通过Hystrix实现。Hystrix会监控微服务间调用的状况,当失败的调用到一定阈值,缺省是5秒内20次调用失败,就会启动熔断机制。熔断机制的注解是**@HystrixCommand**。
2、熔断类型
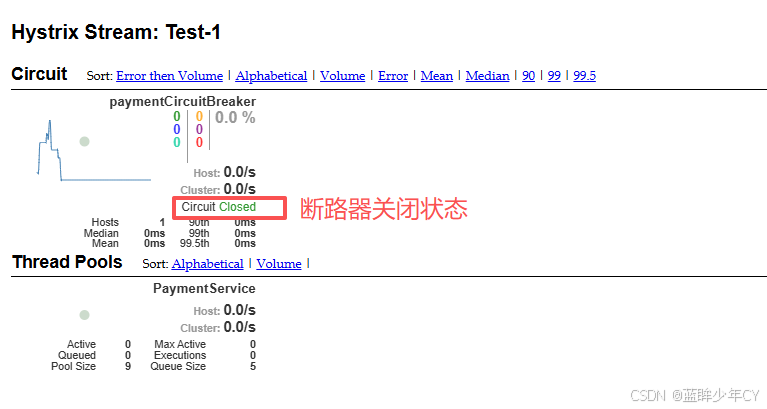
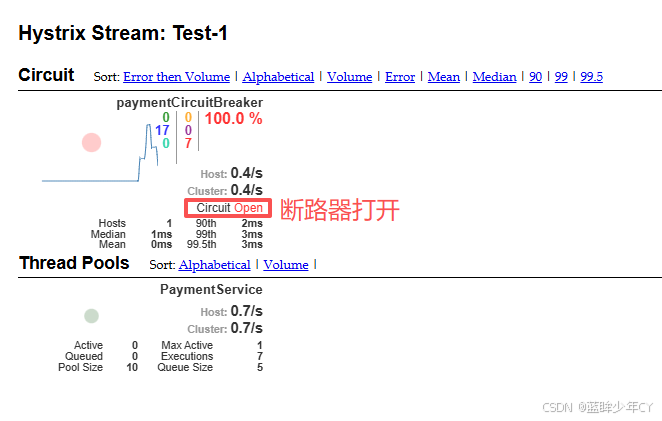
- 熔断打开:请求不再进行调用当前服务,内部设置时钟一般为MTTR(平均故障处理时间),当打开时长达到所设时钟则进入半熔断状态
- 熔断关闭:熔断关闭不会对服务进行熔断,开始调用下游服务
- 熔断半开:部分请求根据规则调用当前服务,如果请求成功且符合规则则认为当前服务恢复正常,关闭熔断
3、修改8001服务
(1)修改PaymentService
增加paymentCircuitBreaker方法
java
// 服务熔断
@HystrixCommand(
fallbackMethod = "paymentCircuitBreaker_fallback",
commandProperties = {
@HystrixProperty(name = "circuitBreaker.enabled", value = "true"),
@HystrixProperty(name = "circuitBreaker.requestVolumeThreshold", value = "10"),
@HystrixProperty(name = "circuitBreaker.sleepWindowInMilliseconds", value = "10000"),
@HystrixProperty(name = "circuitBreaker.errorThresholdPercentage", value = "60")
}
)
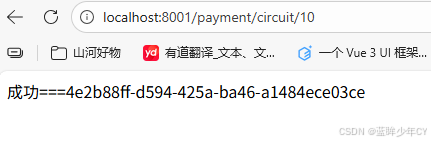
public String paymentCircuitBreaker(Integer id) {
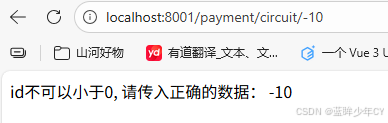
if (id < 0) {
throw new RuntimeException("id不可以小于0...");
}
String n = UUID.fastUUID().toString();
return "成功===" + n;
}
public String paymentCircuitBreaker_fallback(Integer id) {
return "id不可以小于0, 请传入正确的数据: " + id;
}参数说明:
- enabled:开启断路器
- requestVolumeThreshold: 请求总数阀值,在快照时间窗内,必须满足请求总数阀值才有资格熔断。默认为20,意味着在10秒内,如果该hystrix命令的调用次数不足20次,即使所有的请求都超时或其他原因失败,断路器都不会打开。
- sleepWindowInMilliseconds:时间窗口
- errorThresholdPercentage:错误百分比阀值,当请求总数在快照时间窗内超过了阀值,比如发生了30次调用,如果在这30次调用中,有15次发生了超时异常,也就是超过50%的错误百分比,在默认设定50%阀值情况下,这时候就会将断路器打开。
(2)修改controller
java
    @GetMapping("/payment/circuit/{id}")
    public String paymentCircuitBreaker(@PathVariable Integer id) {
        return paymentService.paymentCircuitBreaker(id);
    }
(3)测试
多次点击失败:例如10秒内6次失败,4次成功,再点击下一次时会触发熔断

等过一会再次点击会成功
4、总结
断路器开启或者关闭的条件:
- 当满足一定的阀值的时候(默认10秒内超过20个请求次数)
- 当失败率达到一定的时候(默认10秒内超过50%的请求失败)
到达以上阀值,断路器将会开启
当开启的时候,所有请求都不会进行转发;一段时间之后(默认是5秒),这个时候断路器是半开状态,会让其中一个请求进行转发。如果成功,断路器会关闭,若失败,继续开启。
5、参数说明
java
commandProperties = {
                // 设置隔离策略,THREAD 表示线程池 SEMAPHORE:信号池隔离
                @HystrixProperty(name = "execution.isolation.strategy", value = "THREAD"),
                // 当隔离策略选择信号池隔离的时候,用来设置信号池的大小(最大并发数)
                @HystrixProperty(name = "execution.isolation.semaphore.maxConcurrentRequests", value = "10"),
                // 配置命令执行的超时时间
                @HystrixProperty(name = "execution.isolation.thread.timeoutinMilliseconds", value = "10"),
                // 是否启用超时时间
                @HystrixProperty(name = "execution.timeout.enabled", value = "true"),
                // 执行超时的时候是否中断
                @HystrixProperty(name = "execution.isolation.thread.interruptOnTimeout", value = "true"),
                // 执行被取消的时候是否中断
                @HystrixProperty(name = "execution.isolation.thread.interruptOnCancel", value = "true"),
                // 允许回调方法执行的最大并发数
                @HystrixProperty(name = "fallback.isolation.semaphore.maxConcurrentRequests", value = "10"),
                // 服务降级是否启用,是否执行回调函数
                @HystrixProperty(name = "fallback.enabled", value = "true"),
                // 是否启用断路器
                @HystrixProperty(name = "circuitBreaker.enabled", value = "true"),
                // 该属性用来设置在滚动时间窗中,断路器熔断的最小请求数。例如,默认该值为 20 的时候,
                // 如果滚动时间窗(默认10秒)内仅收到了19个请求, 即使这19个请求都失败了,断路器也不会打开。
                @HystrixProperty(name = "circuitBreaker.requestVolumeThreshold", value = "20"),
                // 该属性用来设置在滚动时间窗中,表示在滚动时间窗中,在请求数量超过
                // circuitBreaker.requestVolumeThreshold 的情况下,如果错误请求数的百分比超过50,
                // 就把断路器设置为 "打开" 状态,否则就设置为 "关闭" 状态。
                @HystrixProperty(name = "circuitBreaker.errorThresholdPercentage", value = "50"),
                // 该属性用来设置当断路器打开之后的休眠时间窗。 休眠时间窗结束之后,
                // 会将断路器置为 "半开" 状态,尝试熔断的请求命令,如果依然失败就将断路器继续设置为 "打开" 状态,
                // 如果成功就设置为 "关闭" 状态。
                @HystrixProperty(name = "circuitBreaker.sleepWindowinMilliseconds", value = "5000"),
                // 断路器强制打开
                @HystrixProperty(name = "circuitBreaker.forceOpen", value = "false"),
                // 断路器强制关闭
                @HystrixProperty(name = "circuitBreaker.forceClosed", value = "false"),
                // 滚动时间窗设置,该时间用于断路器判断健康度时需要收集信息的持续时间
                @HystrixProperty(name = "metrics.rollingStats.timeinMilliseconds", value = "10000"),
                // 该属性用来设置滚动时间窗统计指标信息时划分"桶"的数量,断路器在收集指标信息的时候会根据
                // 设置的时间窗长度拆分成多个 "桶" 来累计各度量值,每个"桶"记录了一段时间内的采集指标。
                // 比如 10 秒内拆分成 10 个"桶"收集这样,所以 timeinMilliseconds 必须能被 numBuckets 整除。否则会抛异常
                @HystrixProperty(name = "metrics.rollingStats.numBuckets", value = "10"),
                // 该属性用来设置对命令执行的延迟是否使用百分位数来跟踪和计算。如果设置为 false, 那么所有的概要统计都将返回 -1。
                @HystrixProperty(name = "metrics.rollingPercentile.enabled", value = "false"),
                // 该属性用来设置百分位统计的滚动窗口的持续时间,单位为毫秒。
                @HystrixProperty(name = "metrics.rollingPercentile.timeInMilliseconds", value = "60000"),
                // 该属性用来设置百分位统计滚动窗口中使用 " 桶 "的数量。
                @HystrixProperty(name = "metrics.rollingPercentile.numBuckets", value = "60000"),
                // 该属性用来设置在执行过程中每个 "桶" 中保留的最大执行次数。如果在滚动时间窗内发生超过该设定值的执行次数,
                // 就从最初的位置开始重写。例如,将该值设置为100, 滚动窗口为10秒,若在10秒内一个 "桶 "中发生了500次执行,
                // 那么该 "桶" 中只保留 最后的100次执行的统计。另外,增加该值的大小将会增加内存量的消耗,并增加排序百分位数所需的计算时间。
                @HystrixProperty(name = "metrics.rollingPercentile.bucketSize", value = "100"),
                // 该属性用来设置采集影响断路器状态的健康快照(请求的成功、 错误百分比)的间隔等待时间。
                @HystrixProperty(name = "metrics.healthSnapshot.intervalinMilliseconds", value = "500"),
                // 是否开启请求缓存
                @HystrixProperty(name = "requestCache.enabled", value = "true"),
                // HystrixCommand的执行和事件是否打印日志到 HystrixRequestLog 中
                @HystrixProperty(name = "requestLog.enabled", value = "true"),
        },
        threadPoolProperties = {
                // 该参数用来设置执行命令线程池的核心线程数,该值也就是命令执行的最大并发量
                @HystrixProperty(name = "coreSize", value = "10"),
                // 该参数用来设置线程池的最大队列大小。当设置为 -1 时,线程池将使用 SynchronousQueue 实现的队列,
                // 否则将使用 LinkedBlockingQueue 实现的队列。
                @HystrixProperty(name = "maxQueueSize", value = "-1"),
                // 该参数用来为队列设置拒绝阈值。 通过该参数, 即使队列没有达到最大值也能拒绝请求。
                // 该参数主要是对 LinkedBlockingQueue 队列的补充,因为 LinkedBlockingQueue
                // 队列不能动态修改它的对象大小,而通过该属性就可以调整拒绝请求的队列大小了。
                @HystrixProperty(name = "queueSizeRejectionThreshold", value = "5"),
五、服务监控
1、介绍
Hystrix供了准实时的调用监控(Hystrix Dashboard),Hystrix会持续地记录所有通过Hystrix发起的请求的执行信息,并以统计报表和图形的形式展示给用户,包括每秒执行多少请求多少成功,多少失败等。Netflix通过hystrix-metrics-event-stream项目实现了对以上指标的监控。Spring Cloud也提供了Hystrix Dashboard的整合,对监控内容转化成可视化界面。
2、创建监控模块9001
(1)新建模块
(2)修改pom文件
XML
<?xml version="1.0" encoding="UTF-8"?>
<project xmlns="http://maven.apache.org/POM/4.0.0"
         xmlns:xsi="http://www.w3.org/2001/XMLSchema-instance"
         xsi:schemaLocation="http://maven.apache.org/POM/4.0.0 http://maven.apache.org/xsd/maven-4.0.0.xsd">
    <modelVersion>4.0.0</modelVersion>
    <parent>
        <groupId>com.hk.cloudstudy</groupId>
        <artifactId>SecondSpringCloud</artifactId>
        <version>1.0-SNAPSHOT</version>
    </parent>

    <groupId>com.hk</groupId>
    <artifactId>cloud-consumer-hystrix-dashboard9001</artifactId>

    <properties>
        <maven.compiler.source>8</maven.compiler.source>
        <maven.compiler.target>8</maven.compiler.target>
        <project.build.sourceEncoding>UTF-8</project.build.sourceEncoding>
    </properties>

    <dependencies>
        <dependency>
            <groupId>org.springframework.cloud</groupId>
            <artifactId>spring-cloud-starter-netflix-hystrix-dashboard</artifactId>
        </dependency>
        <dependency>
            <groupId>org.springframework.boot</groupId>
            <artifactId>spring-boot-starter-actuator</artifactId>
        </dependency>

        <dependency>
            <groupId>org.springframework.boot</groupId>
            <artifactId>spring-boot-devtools</artifactId>
            <scope>runtime</scope>
            <optional>true</optional>
        </dependency>
        <dependency>
            <groupId>org.projectlombok</groupId>
            <artifactId>lombok</artifactId>
            <optional>true</optional>
        </dependency>
        <dependency>
            <groupId>org.springframework.boot</groupId>
            <artifactId>spring-boot-starter-test</artifactId>
            <scope>test</scope>
        </dependency>
    </dependencies>

</project>
(3)添加配置文件
XML
server:
    port: 9001
(4)添加启动类
java
@SpringBootApplication
@EnableHystrixDashboard
public class Main {
    public static void main(String[] args) {
        SpringApplication.run(Main.class, args);
    }
}
3、修改8001服务
(1)修改pom文件
添加坐标
XML
   <!-- actuator监控信息完善 -->
<dependency>
    <groupId>org.springframework.boot</groupId>
    <artifactId>spring-boot-starter-actuator</artifactId>
</dependency>
(2)修改启动类
java
@SpringBootApplication
@EnableEurekaClient
@EnableCircuitBreaker   // 增加注解  激活Hystrix
public class PaymentHystrixMain8001 {
    public static void main(String[] args) {
        SpringApplication.run(PaymentHystrixMain8001.class, args);
    }

    /**
     *此配置是为了服务监控而配置,与服务容错本身无关,springcloud升级后的坑
     *ServletRegistrationBean因为springboot的默认路径不是"/hystrix.stream",
     *只要在自己的项目里配置上下面的servlet就可以了
     */
    @Bean
    public ServletRegistrationBean getServlet() {
        HystrixMetricsStreamServlet streamServlet = new HystrixMetricsStreamServlet();
        ServletRegistrationBean<HystrixMetricsStreamServlet> registrationBean = new ServletRegistrationBean<>(streamServlet);
        registrationBean.setLoadOnStartup(1);
        registrationBean.addUrlMappings("/hystrix.stream");
        registrationBean.setName("HystrixMetricsStreamServlet");
        return registrationBean;
    }
 }
4、测试
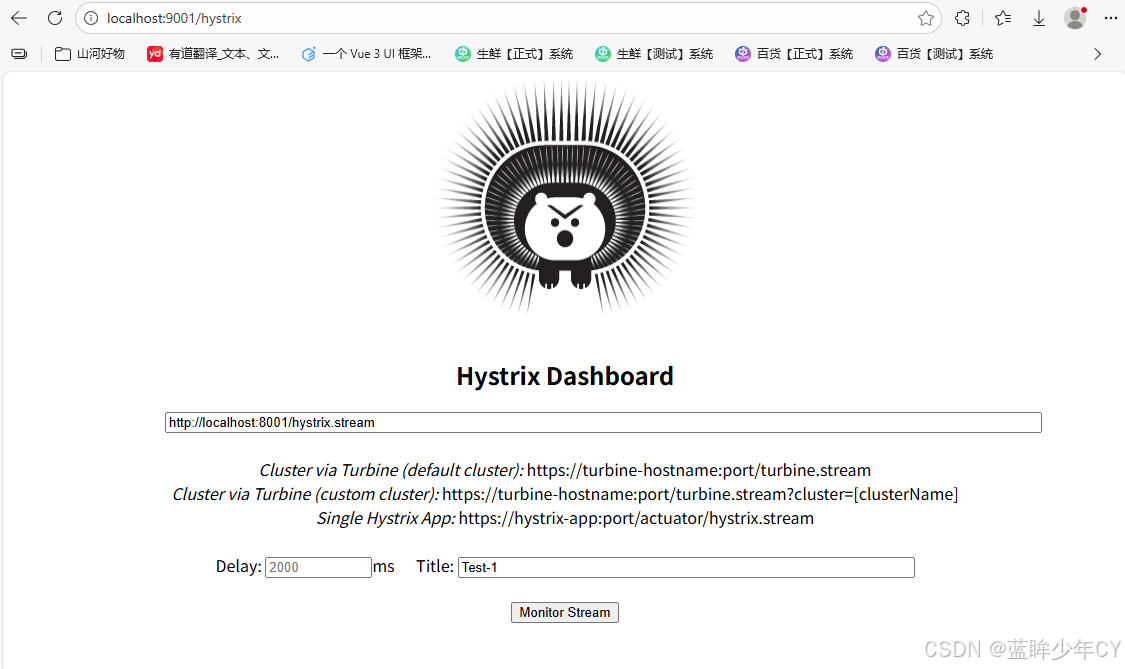
(1)填写监控地址
访问:localhost:9001/hystrix
(2)触发断路
访问:localhost:8001/payment/circuit/10
访问:localhost:8001/payment/circuit/-10
多失败几次
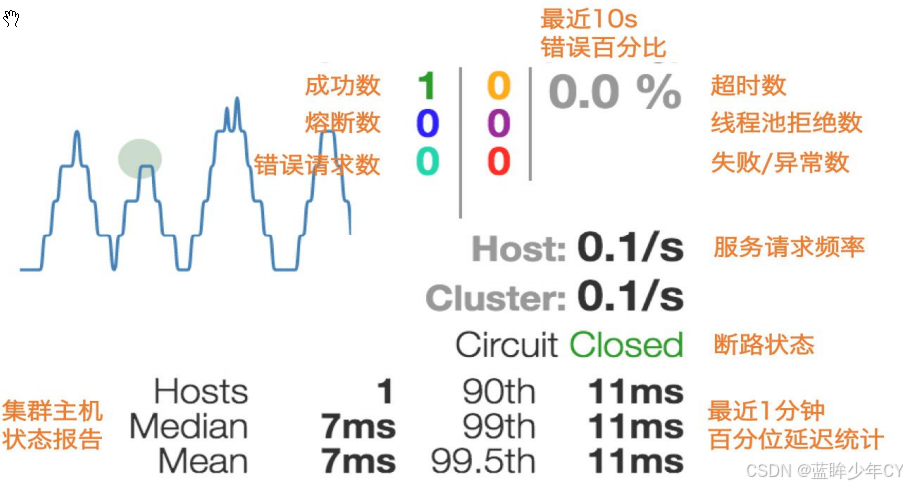
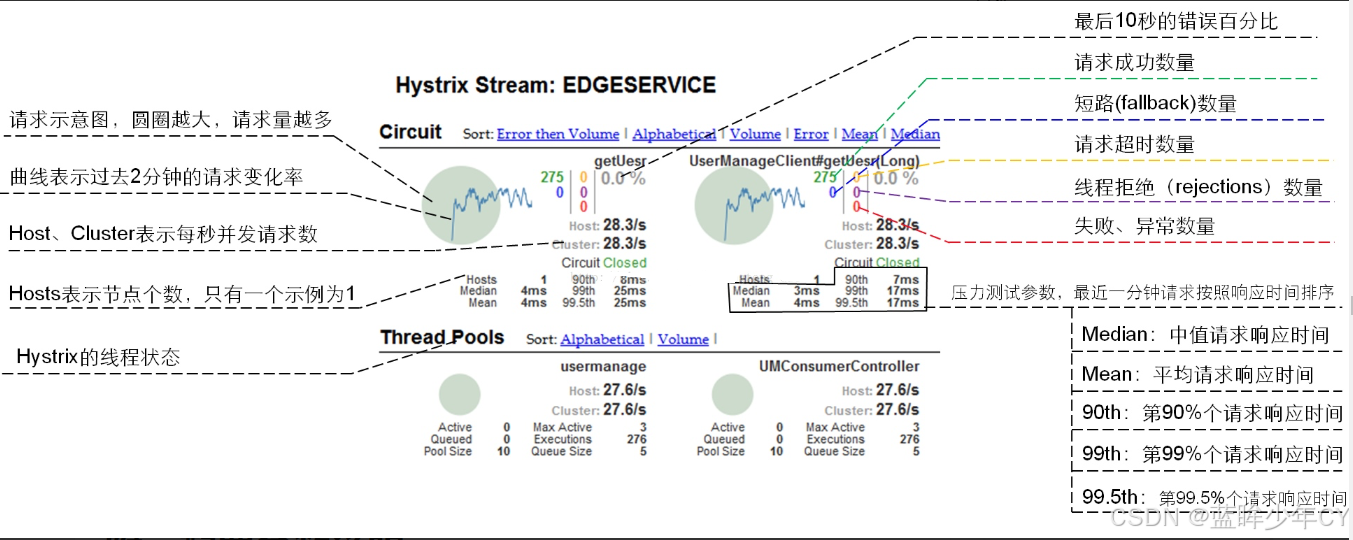
(3)图形说明