HarmonyOS6 - 弹框选择年份和月份实战案例
开发环境为:
开发工具:DevEco Studio 6.0.1 Release
API版本是:API21
本文所有代码都已使用模拟器测试成功!
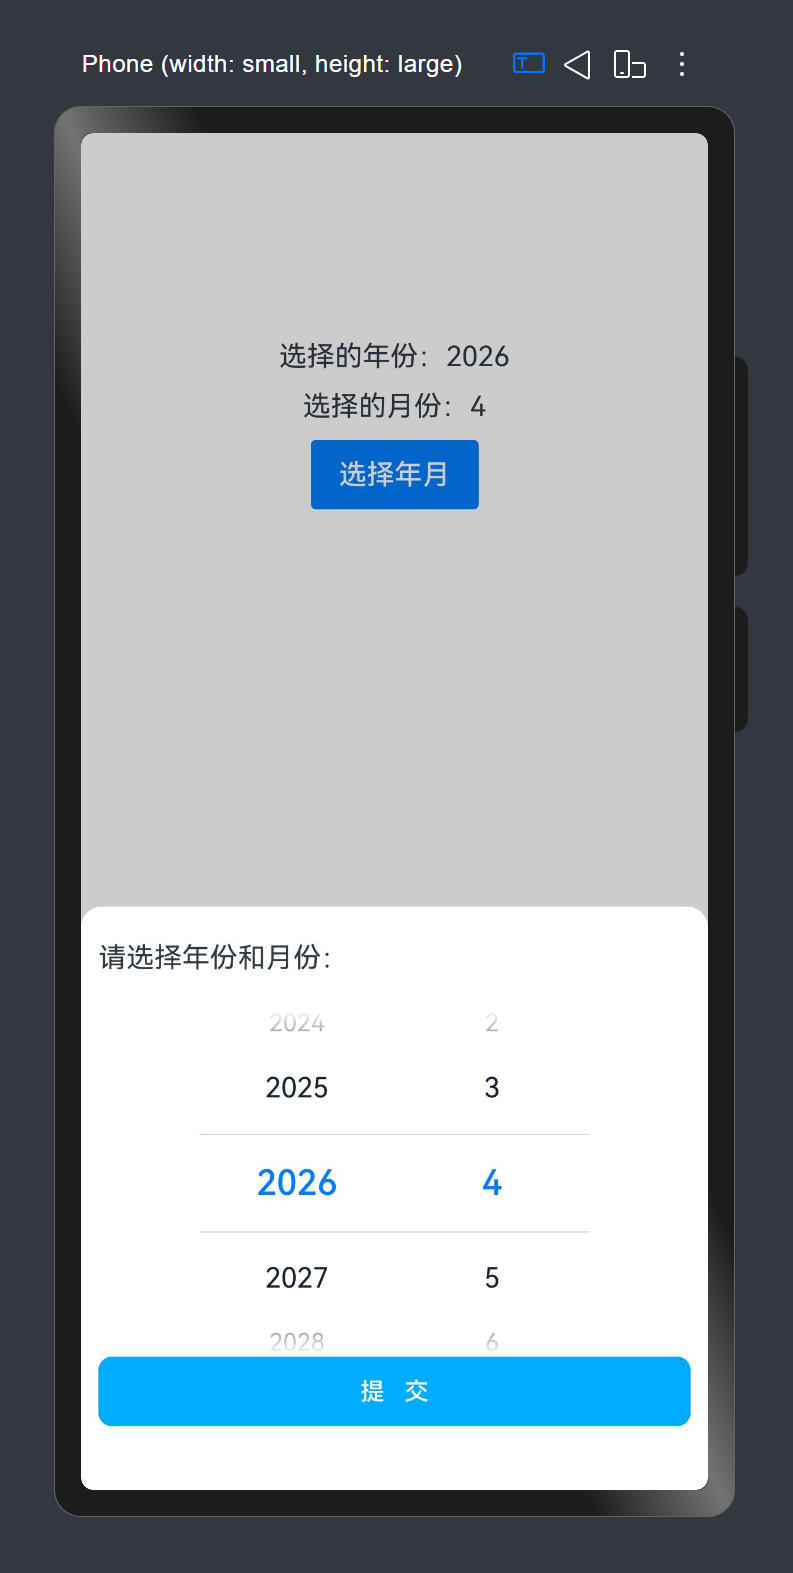
1. 效果图
效果图如下:
2. 代码
1. 思路分析
我的开发思路如下:
- 状态初始化
- 定义并初始化年份数组(2000-2030)和月份数组(1-12)
- 根据传入的默认值计算选中索引
- UI布局构建
- 顶部显示标题区域
- 中间并排显示年份和月份选择器
- 底部设置提交按钮
- 选择器交互处理
- 年份选择器绑定
onChange事件获取选中值 - 月份选择器绑定
onChange事件获取选中值
- 年份选择器绑定
- 数据确认与回传
- 提交时对选择值做非空处理
- 通过回调函数将结果传递给父组件
- 关闭弹框并执行过渡动画
2. 源码
弹框代码文件如下:
js
/**
 * Desc: 选择年和月的弹框组件
 * Author: 波波老师(weixin: javabobo0513)
 */
@CustomDialog
export struct YearMonthPickerDialog {
  controller: CustomDialogController
  @State title: string = ''; //弹框标题
  @State years: string[] = []; // 完整年份数组
  @State months: string[] = []; // 完整月份数组
  @State yearValue: string | string[] = ''; //用户选择的年份
  @State monthValue: string | string[] = ''; //用户选择的月份
  @State defaultYear: string = '2000'; //父组件传进来的默认展示年份
  @State defaultMonth: string = '1'; //父组件传进来的默认展示月份
  @State selectedYear: number = 0; //默认被选中的年份下标索引
  @State selectedMonth: number = 0; //默认被选中的月份下标索引
  confirm: (year: string, month: string) => void = () => {
  }

  aboutToAppear(): void {
    this.years = [];
    this.months = [];
    for (let index = 2000; index <= 2030; index++) {
      this.years.push(index + '')
    }
    for (let index = 1; index <= 12; index++) {
      this.months.push(index.toString())
    }
    //在年份数组中找到 defaultYear 值所在的下标
    this.selectedYear = this.years.indexOf(this.defaultYear)
    //在月份数组中找到 defaultMonth 值所在的下标
    this.selectedMonth = this.months.indexOf(this.defaultMonth)
    console.log('默认年份索引=' + this.selectedYear)
    console.log('默认月份索引=' + this.selectedMonth)
  }

  build() {
    Column() {
      //标题
      Row() {
        Text(this.title)
      }
      .padding({ top: 20, bottom: 20 })
      .width('100%')

      //年份和月份
      Row() {
        // 第一列:年份选择
        TextPicker({ range: this.years, selected: this.selectedYear })
          .canLoop(false)
          .onChange((value: string | string[], index: number | number[]) => {
            this.yearValue = value;
          })

        // 第二列:月份选择
        TextPicker({ range: this.months, selected: this.selectedMonth })
          .canLoop(false)
          .onChange((value: string | string[], index: number | number[]) => {
            this.monthValue = value;
          })
      }
      .width('100%')
      .justifyContent(FlexAlign.Center)

      // 提交按钮
      Button('提   交', { type: ButtonType.Normal, stateEffect: true })
        .fontSize(14)
        .fontColor('#ffffff')
        .border({ width: 1, color: '#00a9fa' })
        .borderRadius(8)
        .width('100%')
        .height(40)
        .backgroundColor('#00a9fa')
        .onClick(() => {
          console.log('提交年份=' + this.yearValue)
          console.log('提交月份=' + this.monthValue)
          this.controller.close();
          //做非空判断处理
          this.yearValue = this.yearValue ? this.yearValue : this.defaultYear
          this.monthValue = this.monthValue ? this.monthValue : this.defaultMonth
          //传值给父组件
          this.confirm(this.yearValue as string, this.monthValue as string)
        })
    }
    .width('100%')
    .height('43%')
    .backgroundColor('#ffffff')
    .borderRadius({ topLeft: 12, topRight: 12 })
    //加弹出动画
    .transition(TransitionEffect.OPACITY.animation({ duration: 300 })
      .combine(TransitionEffect.translate({ y: 500 })))
    // 内边距
    .padding({
      left: 10,
      right: 10
    })
  }
}
测试页面代码如下:
js
import { YearMonthPickerDialog } from '../component/YearMonthPickerDialog'

/**
 * Desc: 案例:弹框显示年份和月份
 * Author: 波波老师(weixin: javabobo0513)
 */
@Entry
@Component
struct Page09 {
  @State year: string = '2026';
  @State month: string = '1';
  //选择年份和月份-弹框
  yearMonthPickerDialog: CustomDialogController = new CustomDialogController({
    builder: YearMonthPickerDialog({
      title: '请选择年份和月份:', //弹框显示的标题
      defaultYear: this.year, //弹框中显示的默认年份
      defaultMonth: this.month, //弹框中显示的默认月份
      confirm: this.confirm.bind(this),
    }),
    customStyle: true, //开启自定义样式
    alignment: DialogAlignment.Bottom, // 可设置dialog的对齐方式,设定显示在底部或中间等,默认为底部显示
  })

  //弹框提交按钮
  confirm(year: string, month: string) {
    console.log('父组件,年份=' + year)
    console.log('父组件,月份=' + month)
    this.year = year
    this.month = month
  }

  build() {
    Column({ space: 10 }) {
      Text('选择的年份:' + this.year)
      Text('选择的月份:' + this.month)
      Button('选择年月')
        .borderRadius(3)
        .onClick(() => {
          //显示弹框
          this.yearMonthPickerDialog.open();
        })
    }
    .padding({ top: 80 })
    .width('100%')
    .height('100%')
  }
}
最后
- 希望本文对你有所帮助!
- 本人如有任何错误或不当之处,请留言指出,谢谢!