Qt for Python:PySide6 入门指南(上篇)
Qt for Python:PySide6 入门指南(中篇)
本文详细介绍 Quick/QML 开发。
一、基础示例
QML 是一种声明式语言,可以让我们比使用传统语言更快地开发应用程序。由于其声明式特性,它非常适合设计应用程序的用户界面。在 QML 中,用户界面被指定为具有属性的对象树。在本节,我们使用 PySide6 和 QML 创建一个简单的"Hello World"应用程序。
一个 PySide6/QML 应用程序主要由两个不同的文件组成:一个包含用户界面 QML 描述的文件,以及一个加载 QML 文件的 Python 文件。
下面是一个名为 Main.qml 的简单 QML 文件:
js
import QtQuick

Rectangle {
    id: main
    width: 200
    height: 200
    color: "green"

    Text {
        text: "Hello World"
        anchors.centerIn: main
    }
}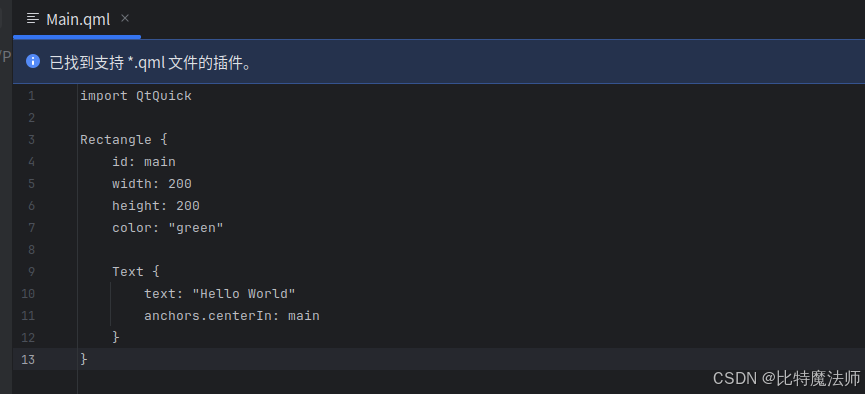
我们首先导入 QtQuick,这是一个 QML 模块。
对于之前使用过 HTML 或 XML 文件的人来说,其余的 QML 代码相当直观。基本上,我们创建了一个大小为 200*200 的绿色矩形,并添加了一个显示"Hello World"的文本元素。代码中的 anchors.centerIn: main 使文本出现在 id 为 main 的对象的中心位置,这里该对象是 Rectangle。
将该文件放入一个名为 App 的目录中,同时放入一个名为 qmldir 的文件,以描述一个基本的 QML 模块:
module App
Main 254.0 Main.qml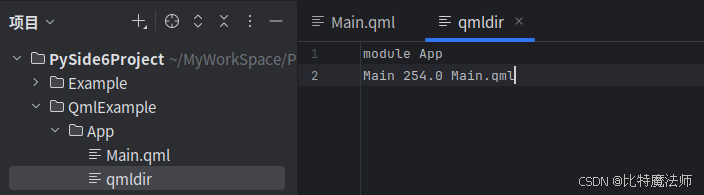
现在,可以在 main.py 中编写 pyside6 代码:
python
import sys
from PySide6.QtGui import QGuiApplication
from PySide6.QtQuick import QQuickView

if __name__ == "__main__":
    app = QGuiApplication()
    view = QQuickView()
    view.engine().addImportPath(sys.path[0])
    view.loadFromModule("App", "Main")
    view.show()
    ex = app.exec()
    del view
    sys.exit(ex)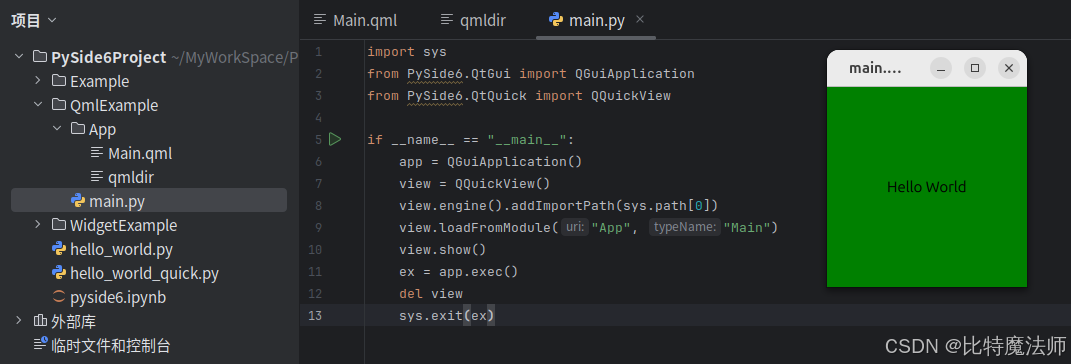
二、Python-QML 集成
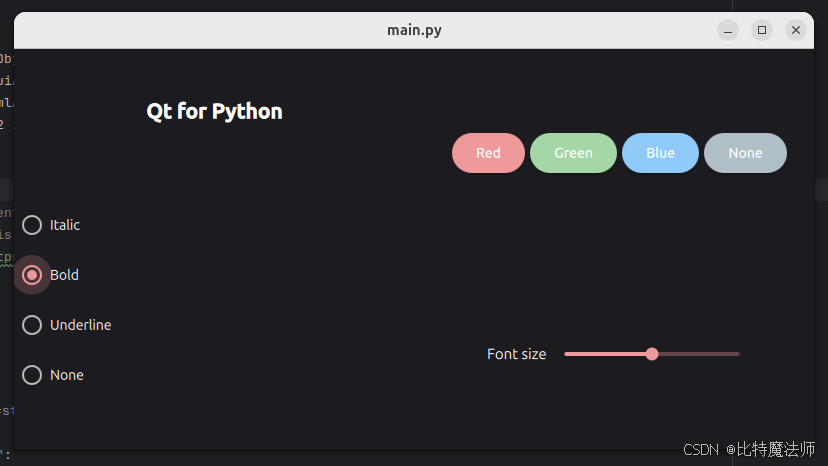
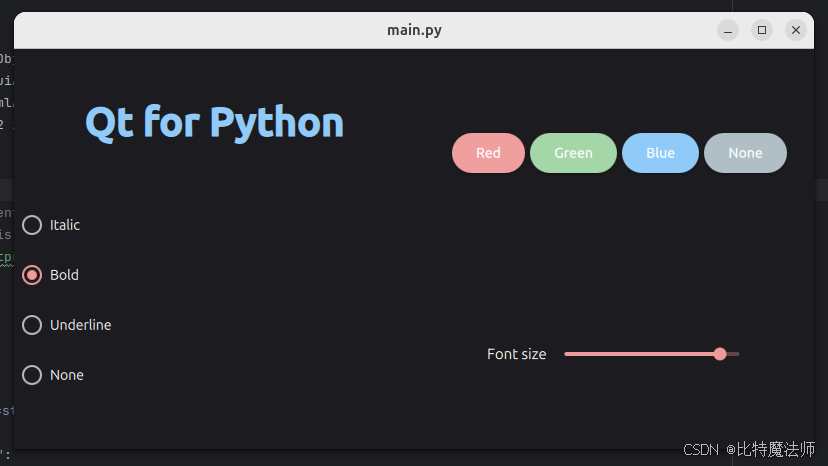
本节基于一个应用程序,它可以动态设置许多文本属性,例如增加字体大小、改变颜色、修改样式等。
首先,让我们从以下基于 QML 的用户界面开始:

该设计基于网格布局(GridLayout),包含两个列布局(ColumnLayout),在界面中,有多个单选按钮(RadioButton)、按钮(Button)和滑块(Slider)。
有了 QML 文件后,我们可以从 Python 中加载它:
python
if __name__ == '__main__':
    app = QGuiApplication(sys.argv)
    QQuickStyle.setStyle("Material")
    engine = QQmlApplicationEngine()
    # Add the current directory to the import paths and load the main module.
    engine.addImportPath(sys.path[0])
    engine.loadFromModule("QmlIntegration", "Main")

    if not engine.rootObjects():
        sys.exit(-1)

    exit_code = app.exec()
    del engine
    sys.exit(exit_code)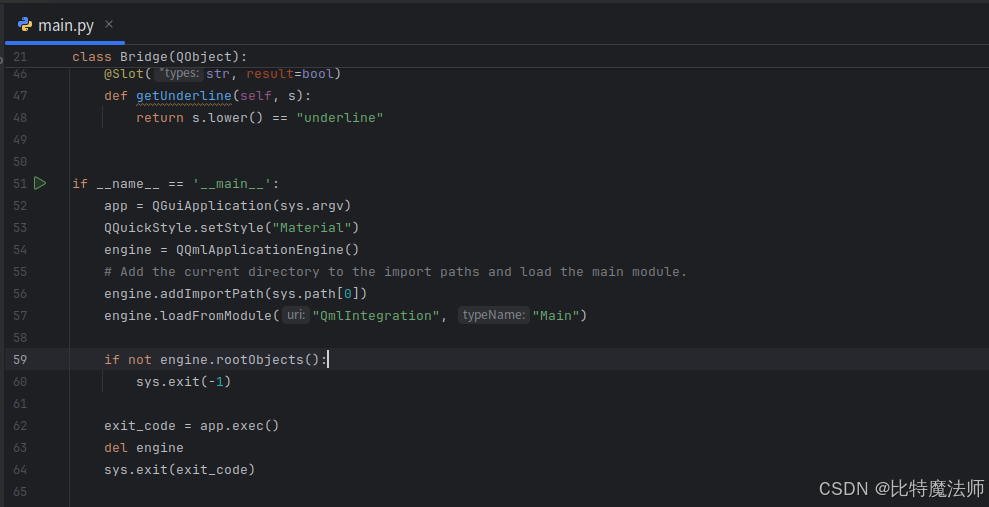
请注意,我们只需要一个 QQmlApplicationEngine 来加载 QML 文件。
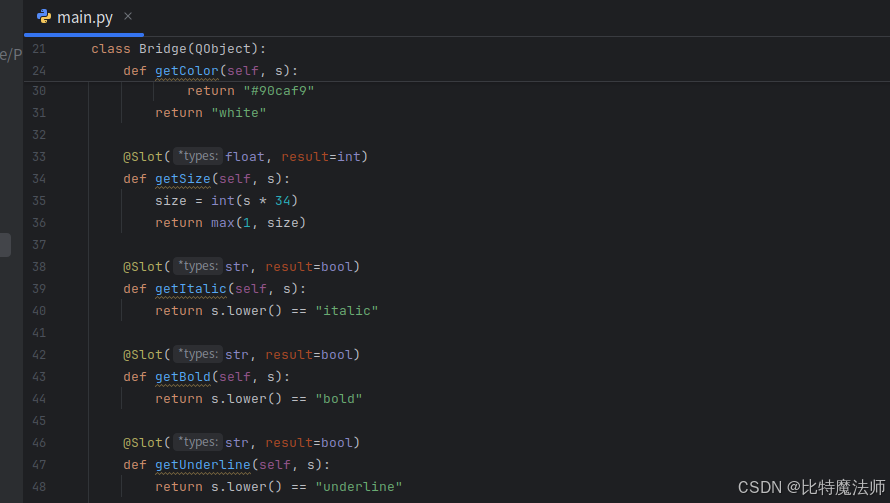
然后,定义 Bridge 类,包含将在 QML 中注册的元素的所有逻辑:
python
# To be used on the @QmlElement decorator
# (QML_IMPORT_MINOR_VERSION is optional)
QML_IMPORT_NAME = "io.qt.textproperties"
QML_IMPORT_MAJOR_VERSION = 1


@QmlElement
class Bridge(QObject):

    @Slot(str, result=str)
    def getColor(self, s):
        if s.lower() == "red":
            return "#ef9a9a"
        if s.lower() == "green":
            return "#a5d6a7"
        if s.lower() == "blue":
            return "#90caf9"
        return "white"

    @Slot(float, result=int)
    def getSize(self, s):
        size = int(s * 34)
        return max(1, size)

    @Slot(str, result=bool)
    def getItalic(self, s):
        return s.lower() == "italic"

    @Slot(str, result=bool)
    def getBold(self, s):
        return s.lower() == "bold"

    @Slot(str, result=bool)
    def getUnderline(self, s):
        return s.lower() == "underline"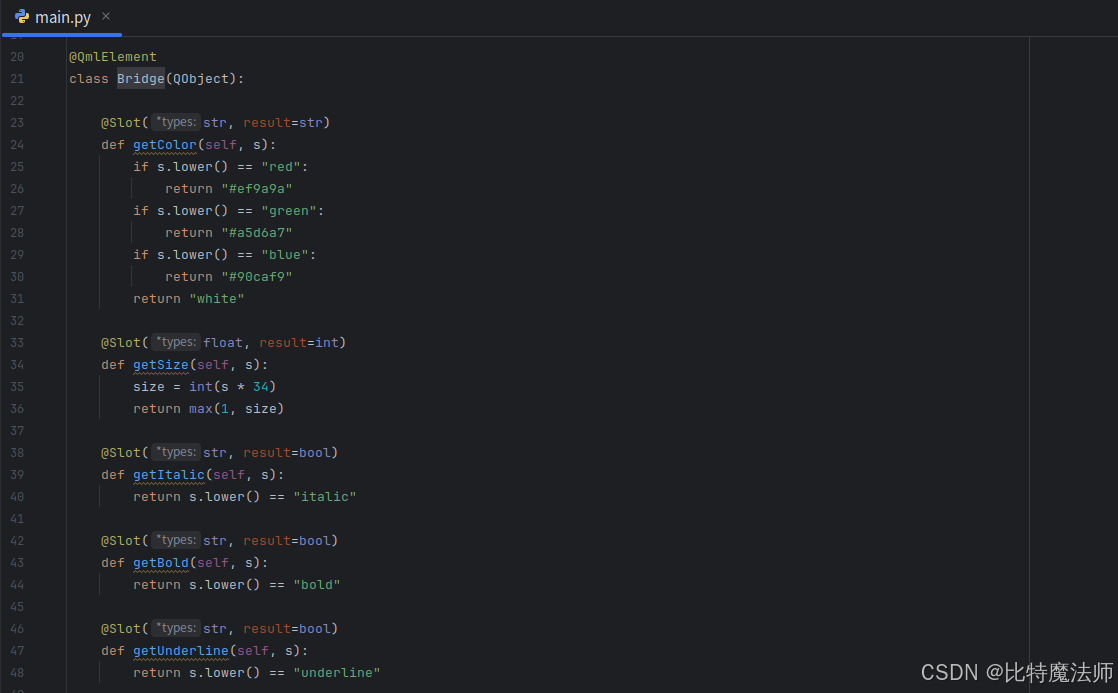
请注意,注册是通过 @QmlElement 装饰器完成的,它在底层使用了对 Bridge 类的引用以及变量 QML_IMPORT_NAME 和 QML_IMPORT_MAJOR_VERSION。
现在,返回 QML 文件,将信号连接到 Bridge 类中定义的槽:
js
Bridge {
   id: bridge
}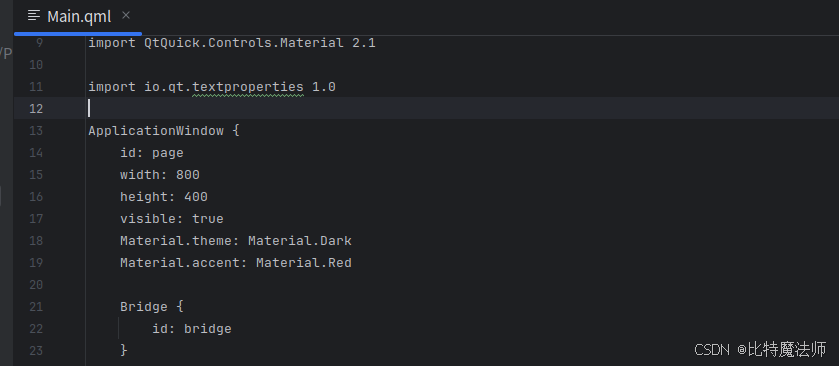
在 ApplicationWindow 内部,我们声明一个与 Python 类同名的组件,并提供一个 id:这个 id 可以获取从 Python 注册的元素的引用,例如:
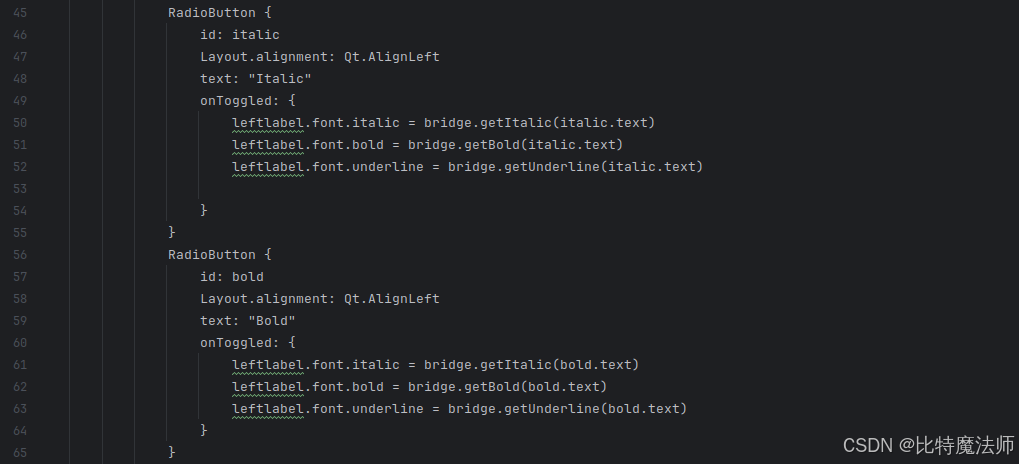
js
  RadioButton {
                id: italic
                Layout.alignment: Qt.AlignLeft
                text: "Italic"
                onToggled: {
                    leftlabel.font.italic = bridge.getItalic(italic.text)
                    leftlabel.font.bold = bridge.getBold(italic.text)
                    leftlabel.font.underline = bridge.getUnderline(italic.text)

                }
            }
属性 Italic、Bold 和 Underline 是互斥的,这意味着同一时间只能激活其中一个。为了实现这一点,每次选择其中一个选项时,我们都会通过 QML 元素属性检查这三个属性,如上面的代码片段所示。三个属性中只有一个会返回 True,而另外两个会返回 False,这就是我们确保文本只应用其中一个属性的方式。
将文件放入名为 QmlIntegration 的目录中,并在其中放置一个名为 qmldir 的文件,以描述一个基本的 QML 模块:
module QmlIntegration
Main 254.0 Main.qml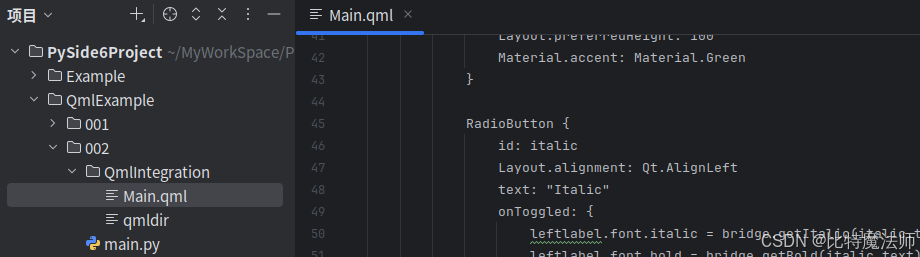
每个槽会验证所选选项是否包含与属性相关的文本:
python
    @Slot(str, result=bool)
    def getBold(self, s):
        return s.lower() == "bold"
返回 True 或 False 用于激活或停用 QML UI 元素的属性。
也可以返回其他非布尔值,例如负责返回字体大小的槽:
python
    @Slot(float, result=int)
    def getSize(self, s):
        size = int(s * 34)
        return max(1, size)
现在,要更改应用程序的外观,有两种方式:
1、使用命令行:执行 Python 文件并添加选项 --style:
bash
python main.py --style material运行效果:
2、使用配置文件 qtquickcontrols2.conf:
bash
[Controls]
Style=Material

[Universal]
Theme=System
Accent=Red

[Material]
Theme=Dark
Accent=Red
把 qtquickcontrols2.conf 添加到 style.qrc 文件:
xml
<!DOCTYPE RCC><RCC version="1.0">
<qresource prefix="/">
    <file>qtquickcontrols2.conf</file>
</qresource>
</RCC>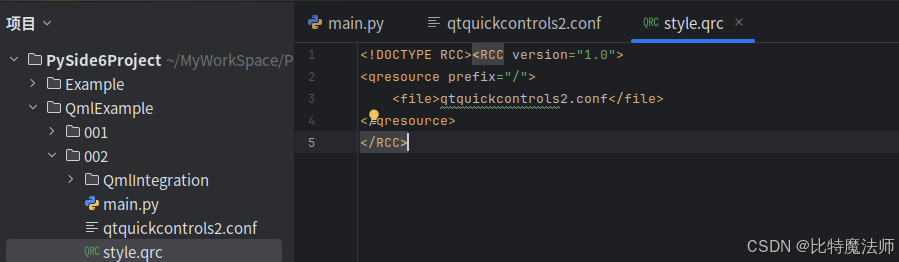
生成 rc 文件,运行 pyside6-rcc style.qrc -o rc_style.py,然后在 main.py 脚本中导入它:
python
import sys

from PySide6.QtCore import QObject, Slot
from PySide6.QtGui import QGuiApplication
from PySide6.QtQml import QQmlApplicationEngine, QmlElement
from PySide6.QtQuickControls2 import QQuickStyle

import rc_style  # noqa F401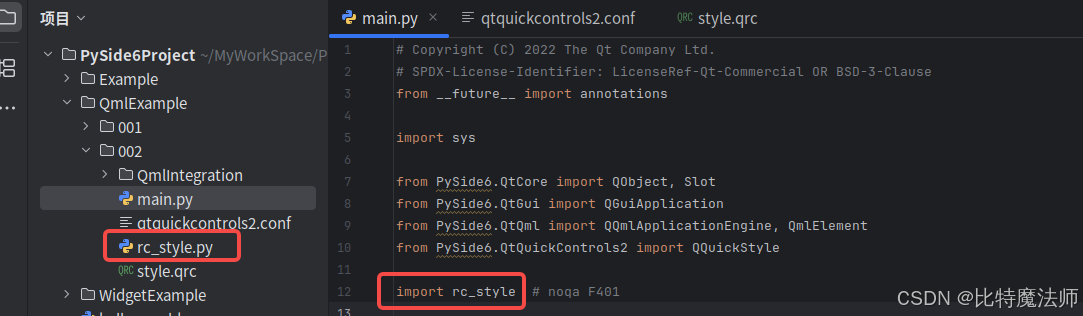
运行效果:
三、数据库操作
本节重点讲解在 PySide6 中集成 SQL 数据库,并使用 QML 来构建用户界面。
1、sqlDialog.py
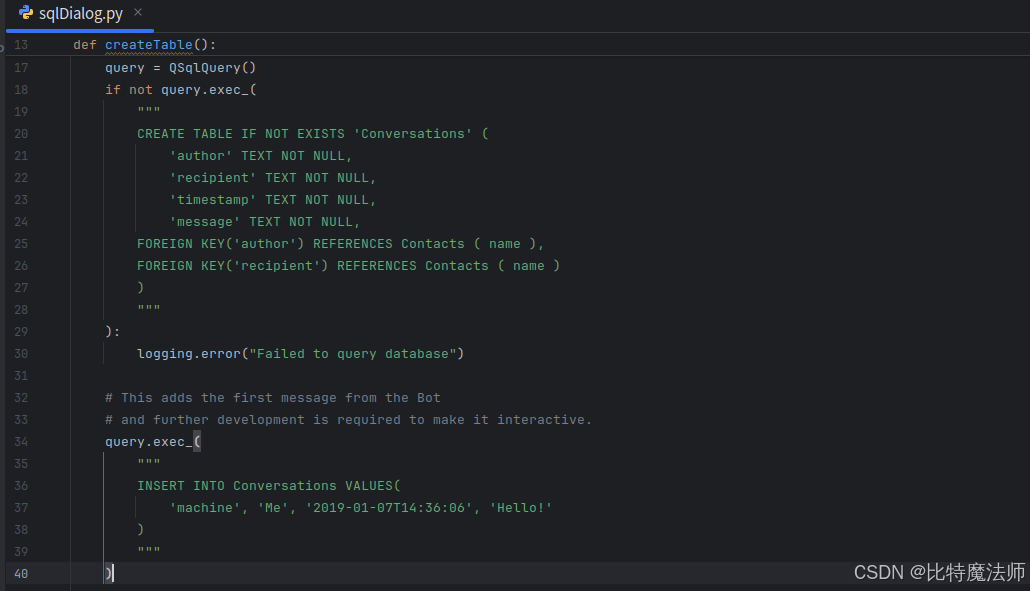
我们将相关的库导入到程序中,定义一个保存表名的全局变量,并定义全局函数 createTable(),如果表尚不存在,该函数会创建一个新表。需要注意的是,数据库包含了一行数据,用于模拟对话的开始。
python
import datetime
import logging

from PySide6.QtCore import Qt, Slot
from PySide6.QtSql import QSqlDatabase, QSqlQuery, QSqlRecord, QSqlTableModel
from PySide6.QtQml import QmlElement

table_name = "Conversations"
QML_IMPORT_NAME = "ChatModel"
QML_IMPORT_MAJOR_VERSION = 1


def createTable():
    if table_name in QSqlDatabase.database().tables():
        return

    query = QSqlQuery()
    if not query.exec_(
        """
        CREATE TABLE IF NOT EXISTS 'Conversations' (
            'author' TEXT NOT NULL,
            'recipient' TEXT NOT NULL,
            'timestamp' TEXT NOT NULL,
            'message' TEXT NOT NULL,
        FOREIGN KEY('author') REFERENCES Contacts ( name ),
        FOREIGN KEY('recipient') REFERENCES Contacts ( name )
        )
        """
    ):
        logging.error("Failed to query database")

    # This adds the first message from the Bot
    # and further development is required to make it interactive.
    query.exec_(
        """
        INSERT INTO Conversations VALUES(
            'machine', 'Me', '2019-01-07T14:36:06', 'Hello!'
        )
        """
    )
SqlConversationModel 类提供了只读数据模型,用于不可编辑的联系人列表。它继承自 QSqlQueryModel 类,这是此用例的逻辑选择。然后,我们继续创建表,并使用 setTable() 方法将表名设置为之前定义的名称。我们向表中添加必要的属性,以拥有一个体现聊天应用程序理念的程序。
python
@QmlElement
class SqlConversationModel(QSqlTableModel):
    def __init__(self, parent=None):
        super(SqlConversationModel, self).__init__(parent)

        createTable()
        self.setTable(table_name)
        self.setSort(2, Qt.DescendingOrder)
        self.setEditStrategy(QSqlTableModel.OnManualSubmit)
        self.recipient = ""

        self.select()
        logging.debug("Table was loaded successfully.")
data() 函数在角色不是自定义用户角色时,会回退到 QSqlTableModel 的默认实现。如果收到的是一个用户角色,我们可以从中减去 UserRole() 来获取该字段的索引,然后使用该索引查找并返回相应的值。
python
    def data(self, index, role):
        if role < Qt.UserRole:
            return QSqlTableModel.data(self, index, role)

        sql_record = QSqlRecord()
        sql_record = self.record(index.row())

        return sql_record.value(role - Qt.UserRole)
在 roleNames() 中,我们返回一个包含自定义角色和角色名称的 Python 字典作为键值对,这样我们就可以在 QML 中使用这些角色。或者,声明一个 Enum 来保存所有角色值也是很有用的。
python
    def roleNames(self):
        """Converts dict to hash because that's the result expected
        by QSqlTableModel"""

        return {int(Qt.UserRole): b"author",
                Qt.UserRole + 1: b"recipient",
                Qt.UserRole + 2: b"timestamp",
                Qt.UserRole + 3: b"message"}
send_message() 函数使用给定的收件人和消息将新记录插入到数据库中。使用 OnManualSubmit() 时,我们还需要调用 submitAll(),因为所有更改都会被缓存到模型中,直到执行提交为止。
python
    # This is a workaround because PySide doesn't provide Q_INVOKABLE
    # So we declare this as a Slot to be able to call it  from QML
    @Slot(str, str, str)
    def send_message(self, recipient, message, author):
        timestamp = datetime.datetime.now()

        new_record = self.record()
        new_record.setValue("author", author)
        new_record.setValue("recipient", recipient)
        new_record.setValue("timestamp", str(timestamp))
        new_record.setValue("message", message)

        logging.debug(f'Message: "{message}" \n Received by: "{recipient}"')

        if not self.insertRecord(self.rowCount(), new_record):
            logging.error("Failed to send message: {self.lastError().text()}")
            return

        self.submitAll()
        self.select()
2、Main.qml
让我们看看 Main.qml 文件。
js
import QtQuick
import QtQuick.Layouts
import
首先,导入 Qt Quick、 QtQuick.Layouts 、QtQuick.Controls 模块。
js
ApplicationWindow {
    id: window
    title: qsTr("Chat")
    width: 640
    height: 960
    visible: true
ApplicationWindow 是一个带有一些便捷功能的窗口,用于创建头部和底部,它还为弹出窗口提供了基础,并支持一些基本的样式设置,例如背景颜色。
在使用 ApplicationWindow 时,几乎总是会设置三个属性:宽度、高度和可见性,一旦设置好这些属性,我们就有了一个合适大小的空窗口,准备填充内容。
由于我们要将 SqlConversationModel 类暴露给 QML,因此我们将声明一个组件来访问它:
js
    SqlConversationModel {
        id: chat_model
    }
在 QML 中布局控件有两种方式:控件定位器和 Qt Quick 布局。
-
控件定位器(如 Row、Column 等)适用于控件大小已知或固定的情况,只需将它们整齐地排列在某种形式中即可。
-
Qt Quick 布局中的布局不仅可以定位控件,还可以调整控件大小,因此非常适合可调整大小的用户界面。
下面,我们使用 ColumnLayout 垂直布局一个 ListView 和一个 Pane。
js
  ColumnLayout {
        anchors.fill: parent
js
        ListView {
        Pane {
            id: pane
            Layout.fillWidth: true
Pane 基本上是一个矩形,其颜色来自应用程序的样式,它类似于 Frame,但它的边框没有描边。
布局的直接子项可以使用各种附加属性,我们在 ListView 上使用 Layout.fillWidth 和 Layout.fillHeight,以确保它在 ColumnLayout 中尽可能占用空间,Pane 也是同样的做法。由于 ColumnLayout 是垂直布局,每个子项的左右没有其他元素,因此每个控件会占用布局的整个宽度。
另一方面,ListView 中的 Layout.fillHeight 语句使其能够占用 Pane 安置后剩余的空间。
让我们详细看看 ListView:
python
ListView {
            id: listView
            Layout.fillWidth: true
            Layout.fillHeight: true
            Layout.margins: pane.leftPadding + messageField.leftPadding
            displayMarginBeginning: 40
            displayMarginEnd: 40
            verticalLayoutDirection: ListView.BottomToTop
            spacing: 12
            model: chat_model
            delegate: Column {
                anchors.right: sentByMe ? listView.contentItem.right : undefined
                spacing: 6

                readonly property bool sentByMe: model.recipient !== "Me"
                Row {
                    id: messageRow
                    spacing: 6
                    anchors.right: sentByMe ? parent.right : undefined

                    Rectangle {
                        width: Math.min(messageText.implicitWidth + 24,
                            listView.width - (!sentByMe ? messageRow.spacing : 0))
                        height: messageText.implicitHeight + 24
                        radius: 15
                        color: sentByMe ? "lightgrey" : "steelblue"

                        Label {
                            id: messageText
                            text: model.message
                            color: sentByMe ? "black" : "white"
                            anchors.fill: parent
                            anchors.margins: 12
                            wrapMode: Label.Wrap
                        }
                    }
                }

                Label {
                    id: timestampText
                    text: Qt.formatDateTime(model.timestamp, "d MMM hh:mm")
                    color: "lightgrey"
                    anchors.right: sentByMe ? parent.right : undefined
                }
            }

            ScrollBar.vertical: ScrollBar {}
        }
在填充完其父布局的宽度和高度后,我们还在视图上设置了一些边距。
接下来,我们设置 displayMarginBeginning 和 displayMarginEnd。这些属性确保当你在视图边缘滚动时,视图外的委托不会消失。为了更好地理解,可以尝试注释掉这些属性,然后重新运行代码。
然后,我们翻转视图的垂直方向,这样第一个控件就会显示在底部。
此外,联系人发送的消息应与其他联系人发送的消息区分开来。发送消息时,我们会设置一个 sentByMe 属性,以便在不同联系人之间交替显示。利用这个属性,我们可以通过两种方式区分不同的联系人:
-
联系人发送的消息通过将
anchors.right设置为parent.right来对齐到屏幕右侧。 -
我们会根据联系人改变矩形的颜色。由于我们不希望在深色背景上显示深色文字,或在浅色背景上显示浅色文字,因此文本颜色也会根据联系人设置。
在屏幕底部,我们放置一个 TextArea 控件以允许多行文本输入,并放置一个按钮来发送消息。我们使用 Pane 来覆盖这两个控件下方的区域:
js
      Pane {
            id: pane
            Layout.fillWidth: true

            RowLayout {
                width: parent.width

                TextArea {
                    id: messageField
                    Layout.fillWidth: true
                    placeholderText: qsTr("Compose message")
                    wrapMode: TextArea.Wrap
                }

                Button {
                    id: sendButton
                    text: qsTr("Send")
                    enabled: messageField.length > 0
                    onClicked: {
                        listView.model.send_message("machine", messageField.text, "Me");
                        messageField.text = "";
                    }
                }
            }
        }
TextArea 应该填满屏幕的可用宽度。我们为其分配了一些占位符文本,以向联系人提供视觉提示,告诉他们应从哪里开始输入。输入区域内的文本会自动换行,以确保不会超出屏幕范围。
最后,我们有一个按钮,可以调用我们在 sqlDialog.py 中定义的 send_message 方法。由于我们这里只是做一个示例演示,并且这次对话只有一个可能的接收者和一个可能的发送者,因此这里我们只是使用字符串。
Main.qml 需要与一个名为 qmldir 的文件一起放入一个名为 App 的目录中,以描述一个基本的 QML 模块:
module App
Main 254.0 Main.qml3、main.py
我们使用 logging 而不是 Python 的 print(),因为它提供了一种更好的方式来控制应用程序生成的消息级别(错误、警告和信息消息)。
python
import sys
import logging

from PySide6.QtCore import QCoreApplication, QDir, QFile, QStandardPaths
from PySide6.QtGui import QGuiApplication
from PySide6.QtQml import QQmlApplicationEngine
from PySide6.QtSql import QSqlDatabase

# We import the file just to trigger the QmlElement type registration.
import sqlDialog  # noqa E703

logging.basicConfig(filename="chat.log", level=logging.DEBUG)
logger = logging.getLogger("logger")
connectToDatabase() 会创建与 SQLite 数据库的连接,如果数据库文件尚不存在,则会创建该文件。
python
def connectToDatabase():
    database = QSqlDatabase.database()
    if not database.isValid():
        database = QSqlDatabase.addDatabase("QSQLITE")
        if not database.isValid():
            logger.error("Cannot add database")

    app_data = QStandardPaths.writableLocation(QStandardPaths.StandardLocation.AppDataLocation)
    write_dir = QDir(app_data)
    if not write_dir.mkpath("."):
        logger.error(f"Failed to create writable directory {app_data}")

    # Ensure that we have a writable location on all devices.
    abs_path = write_dir.absolutePath()
    filename = f"{abs_path}/chat-database.sqlite3"

    # When using the SQLite driver, open() will create the SQLite
    # database if it doesn't exist.
    database.setDatabaseName(filename)
    if not database.open():
        logger.error("Cannot open database")
        QFile.remove(filename)
在主函数中发生了一些有趣的事情:
-
声明一个
QGuiApplication。注意使用 QGuiApplication 而不是 QApplication,因为我们没有使用 QtWidgets 模块。 -
连接到数据库。
-
声明一个
QQmlApplicationEngine。这让我们能够访问 QML 元素,以便从我们在sqlDialog.py中构建的会话模型中连接 Python 和 QML。 -
加载定义 UI 的
.qml文件。
最终,Qt 应用程序运行,程序开始执行。
python
    app = QGuiApplication()
    QCoreApplication.setOrganizationName("QtProject")
    QCoreApplication.setApplicationName("Chat Tutorial")

    connectToDatabase()

    engine = QQmlApplicationEngine()
    engine.addImportPath(sys.path[0])
    engine.loadFromModule("App", "Main")

    if not engine.rootObjects():
        sys.exit(-1)

    exit_code = app.exec()
    del engine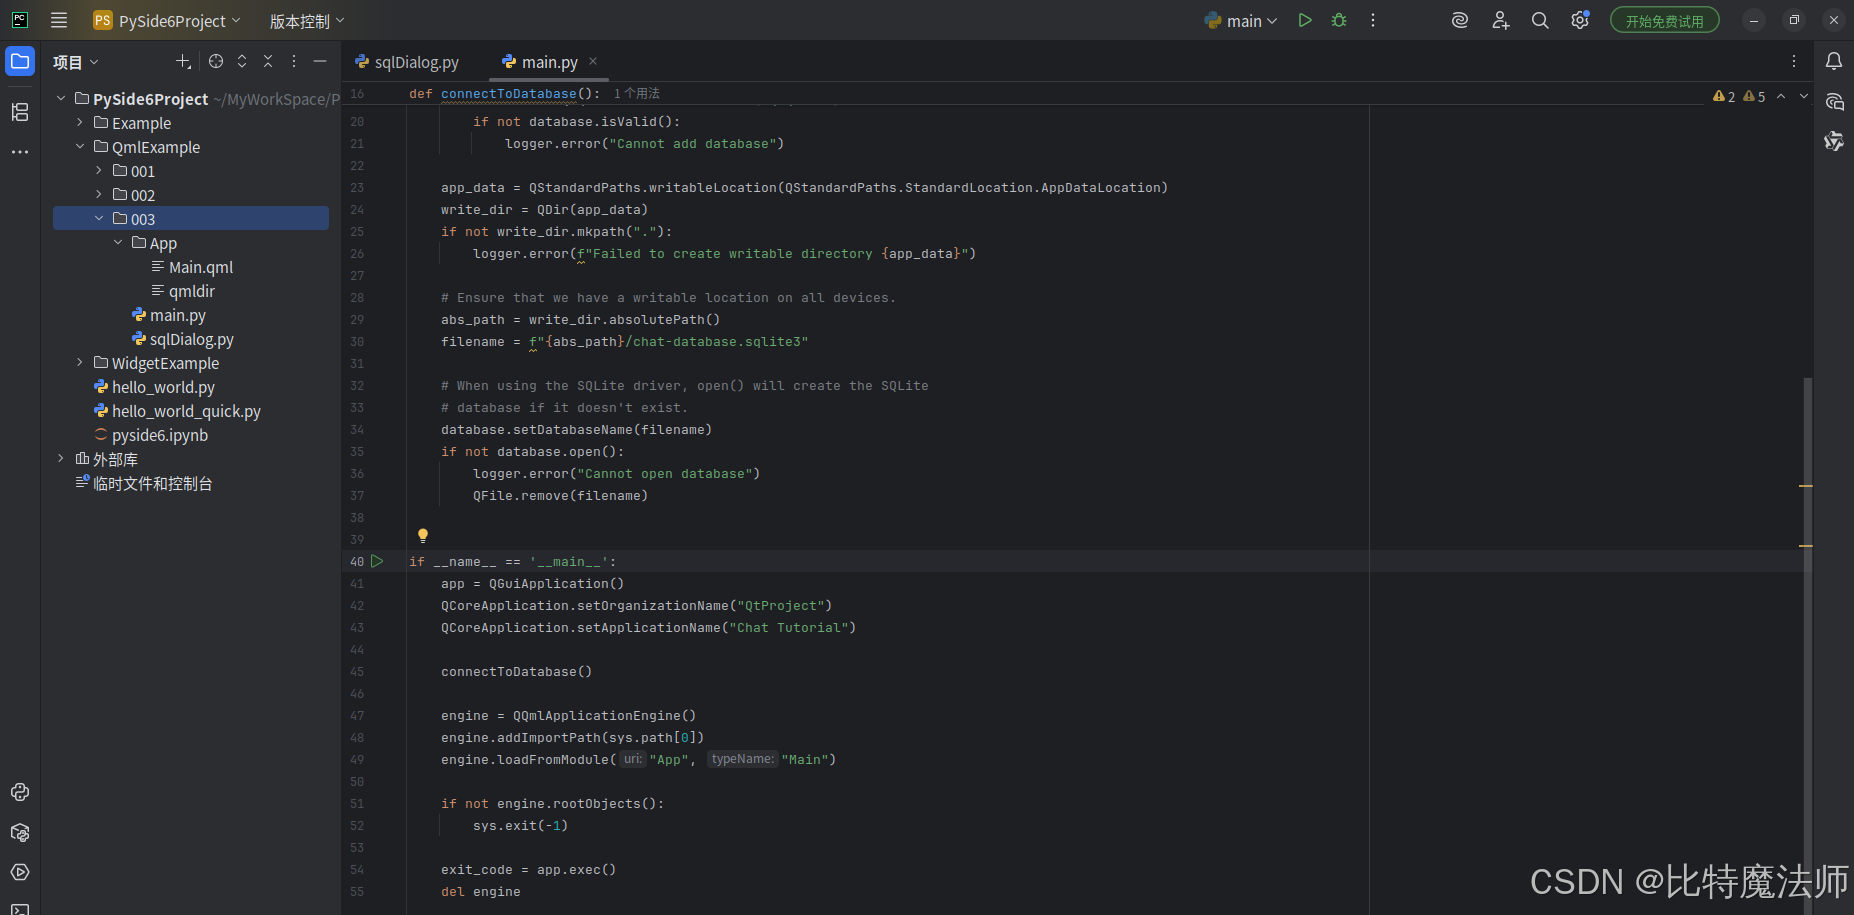
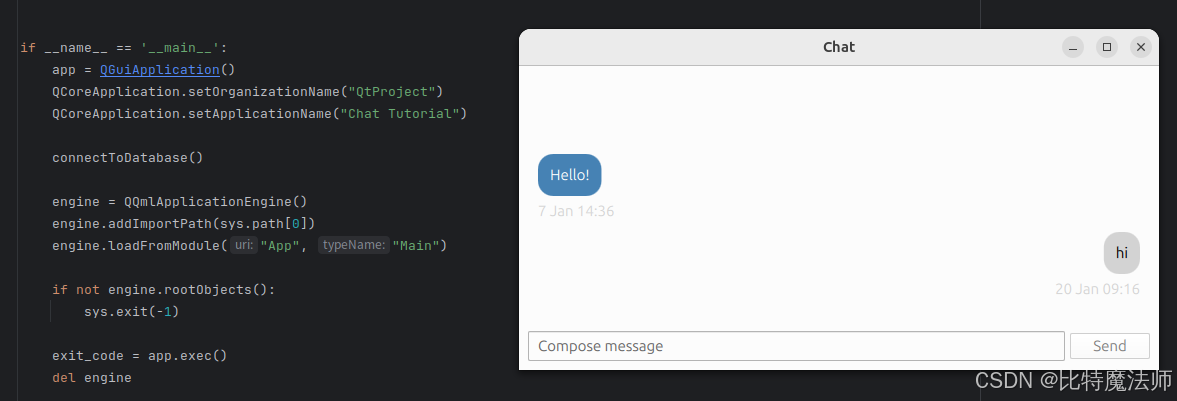
运行效果:
四、打包发布
使用 Qt 官方推荐的 pyside6-deploy 跨平台打包工具,它是 Nuitka(一个将 Python 代码编译为 C 代码并与 libpython 链接以生成最终可执行文件的 Python 编译器)的一个封装,最终生成的可执行文件在 Windows 上以 .exe 为后缀,在 Linux 上以 .bin 为后缀,在 macOS 上以 .app 为后缀。
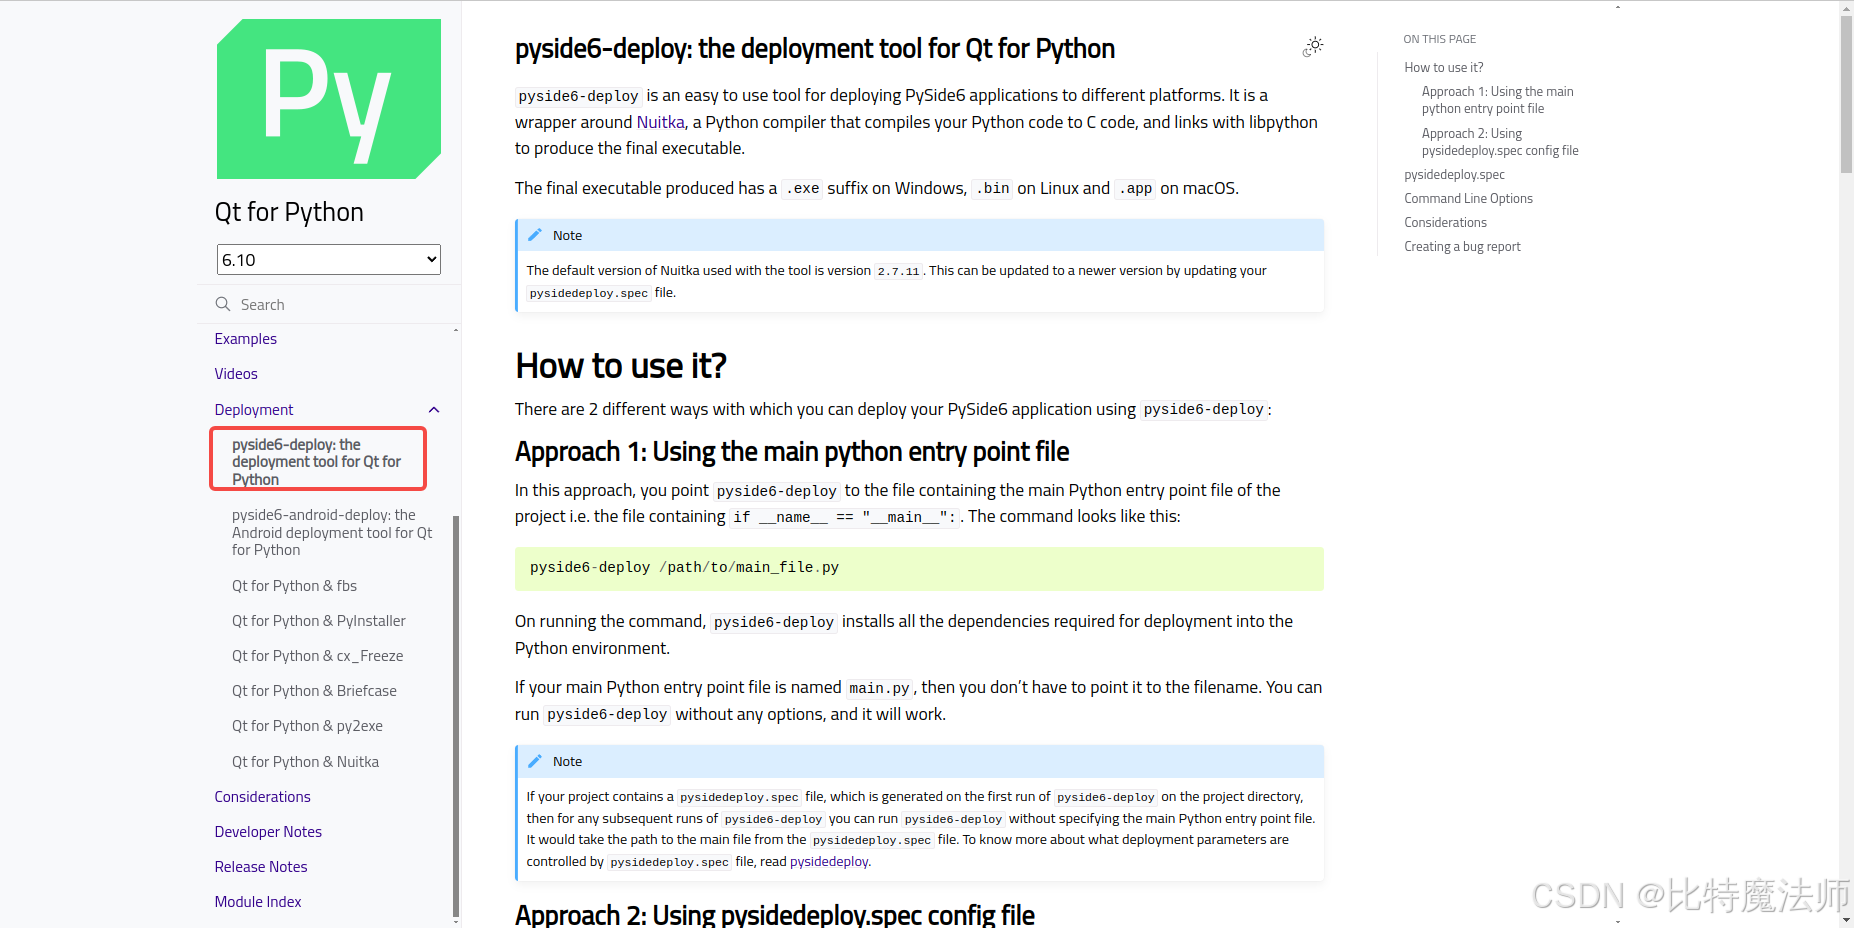
方法一:使用主要的 Python 入口文件
在这种方法中,将 pyside6-deploy 指向包含项目主 Python 入口文件的文件,即包含 if __name__ == "__main__": 的文件。命令如下所示:
bash
pyside6-deploy /path/to/main_file.py运行该命令时,pyside6-deploy 会将部署所需的所有依赖项安装到 Python 环境中。
bash
usage: deploy.py [-h] [-c CONFIG_FILE] [--init] [-v] [--dry-run] [--keep-deployment-files] [-f] [--name NAME] [--extra-ignore-dirs EXTRA_IGNORE_DIRS] [--extra-modules EXTRA_MODULES] [--mode {onefile,standalone}]
                 [main_file]

This tool deploys PySide6 to desktop (Windows, Linux, macOS) platforms. The following types of executables are produced as per the platform: Windows = .exe macOS = .app Linux = .bin

positional arguments:
  main_file             Path to main python file

options:
  -h, --help            show this help message and exit
  -c CONFIG_FILE, --config-file CONFIG_FILE
                        Path to the .spec config file
  --init                Create pysidedeploy.spec file, if it doesn't already exists
  -v, --verbose         Run in verbose mode
  --dry-run             Show the commands to be run
  --keep-deployment-files
                        Keep the generated deployment files generated
  -f, --force           Force all input prompts
  --name NAME           Application name
  --extra-ignore-dirs EXTRA_IGNORE_DIRS
                        Comma-separated directory names inside the project dir. These directories will be skipped when searching for Python files relevant to the project. Example usage: --extra-ignore-
                        dirs=doc,translations
  --extra-modules EXTRA_MODULES
                        Comma-separated list of Qt modules to be added to the application, in case they are not found automatically. This occurs when you have 'import PySide6' in your code instead 'from PySide6 import
                        <module>'. The module name is specified by either omitting the prefix of Qt or including it. Example usage 1: --extra-modules=Network,Svg Example usage 2: --extra-modules=QtNetwork,QtSvg
  --mode {onefile,standalone}
                        The mode in which the application is deployed. The options are: onefile, standalone. The default value is onefile. This options translates to the mode Nuitka uses to create the executable.
                        macOS by default uses the --standalone option.
如果我们的主 Python 入口文件名为 main.py,就不必指定文件名,可以在不带任何选项的情况下运行 pyside6-deploy,它将正常工作。
首先,将要执行的指令输出:
bash
pyside6-deploy --dry-run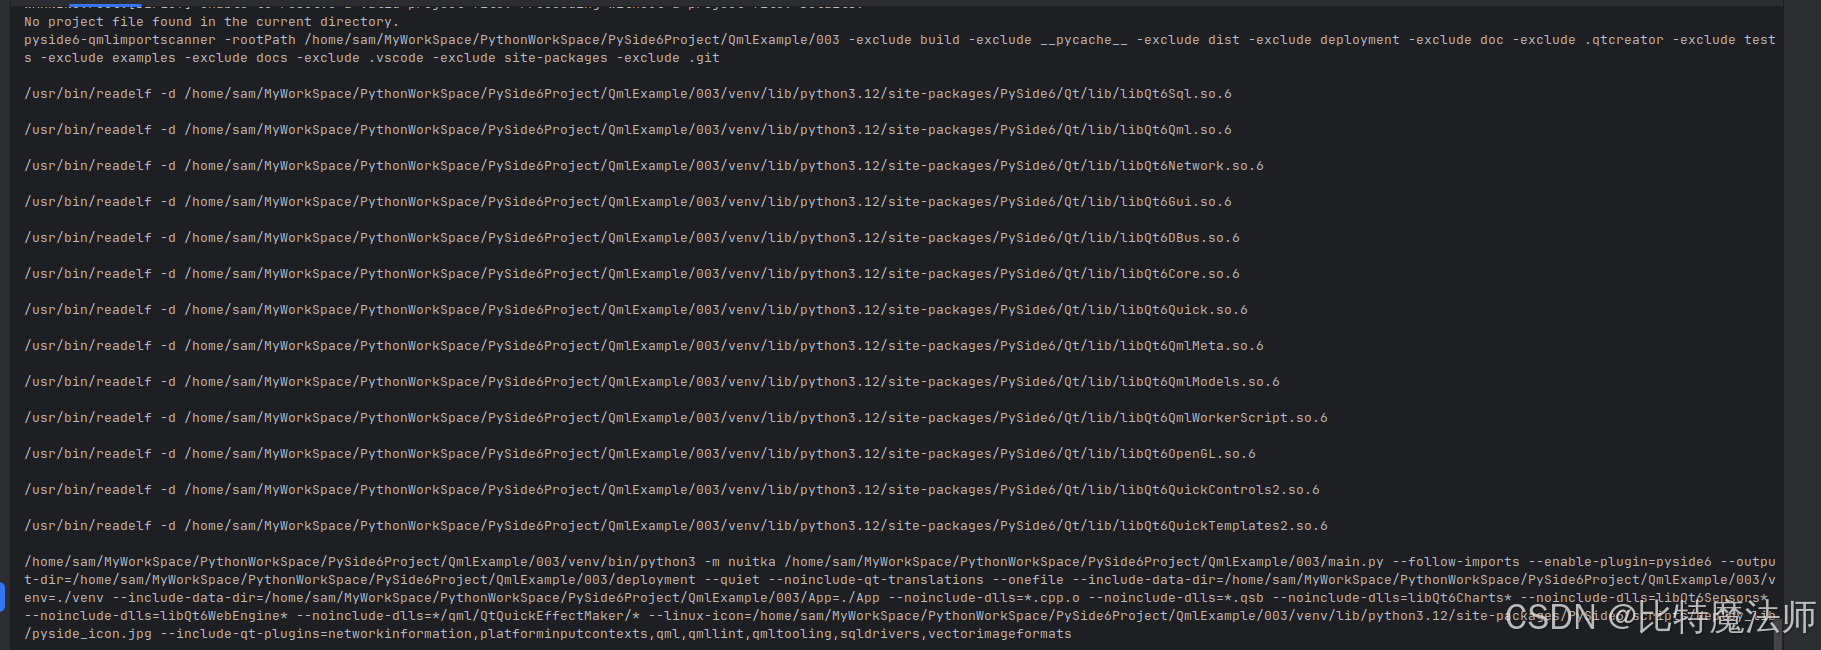
bash
/home/sam/MyWorkSpace/PythonWorkSpace/PySide6Project/QmlExample/003/venv/bin/python3 -m nuitka /home/sam/MyWorkSpace/PythonWorkSpace/PySide6Project/QmlExample/003/main.py --follow-imports --enable-plugin=pyside6 --output-dir=/home/sam/MyWorkSpace/PythonWorkSpace/PySide6Project/QmlExample/003/deployment --quiet --noinclude-qt-translations --onefile --include-data-dir=/home/sam/MyWorkSpace/PythonWorkSpace/PySide6Project/QmlExample/003/venv=./venv --include-data-dir=/home/sam/MyWorkSpace/PythonWorkSpace/PySide6Project/QmlExample/003/App=./App --noinclude-dlls=*.cpp.o --noinclude-dlls=*.qsb --noinclude-dlls=libQt6Charts* --noinclude-dlls=libQt6Sensors* --noinclude-dlls=libQt6WebEngine* --noinclude-dlls=*/qml/QtQuickEffectMaker/* --linux-icon=/home/sam/MyWorkSpace/PythonWorkSpace/PySide6Project/QmlExample/003/venv/lib/python3.12/site-packages/PySide6/scripts/deploy_lib/pyside_icon.jpg --include-qt-plugins=networkinformation,platforminputcontexts,qml,qmllint,qmltooling,sqldrivers,vectorimageformats修改 --include-qt-plugins 参数,因为有些 Qt 插件是没用到的,然后执行:

实际上等同于手动执行 nuitka 指令。因此我们可以直接使用 nuitka 相关指令,例如:
bash
python -m nuitka --follow-imports --enable-plugin=pyside6 --onefile main.py报错1:
FATAL: Automatic detection of static libpython failed. Nuitka on Anaconda needs package for static libpython installed. Execute 'conda install libpython-static'. Disable with '--static-libpython=no' if you don't want to install it.
Anaconda 环境需要安装 libpython-static:
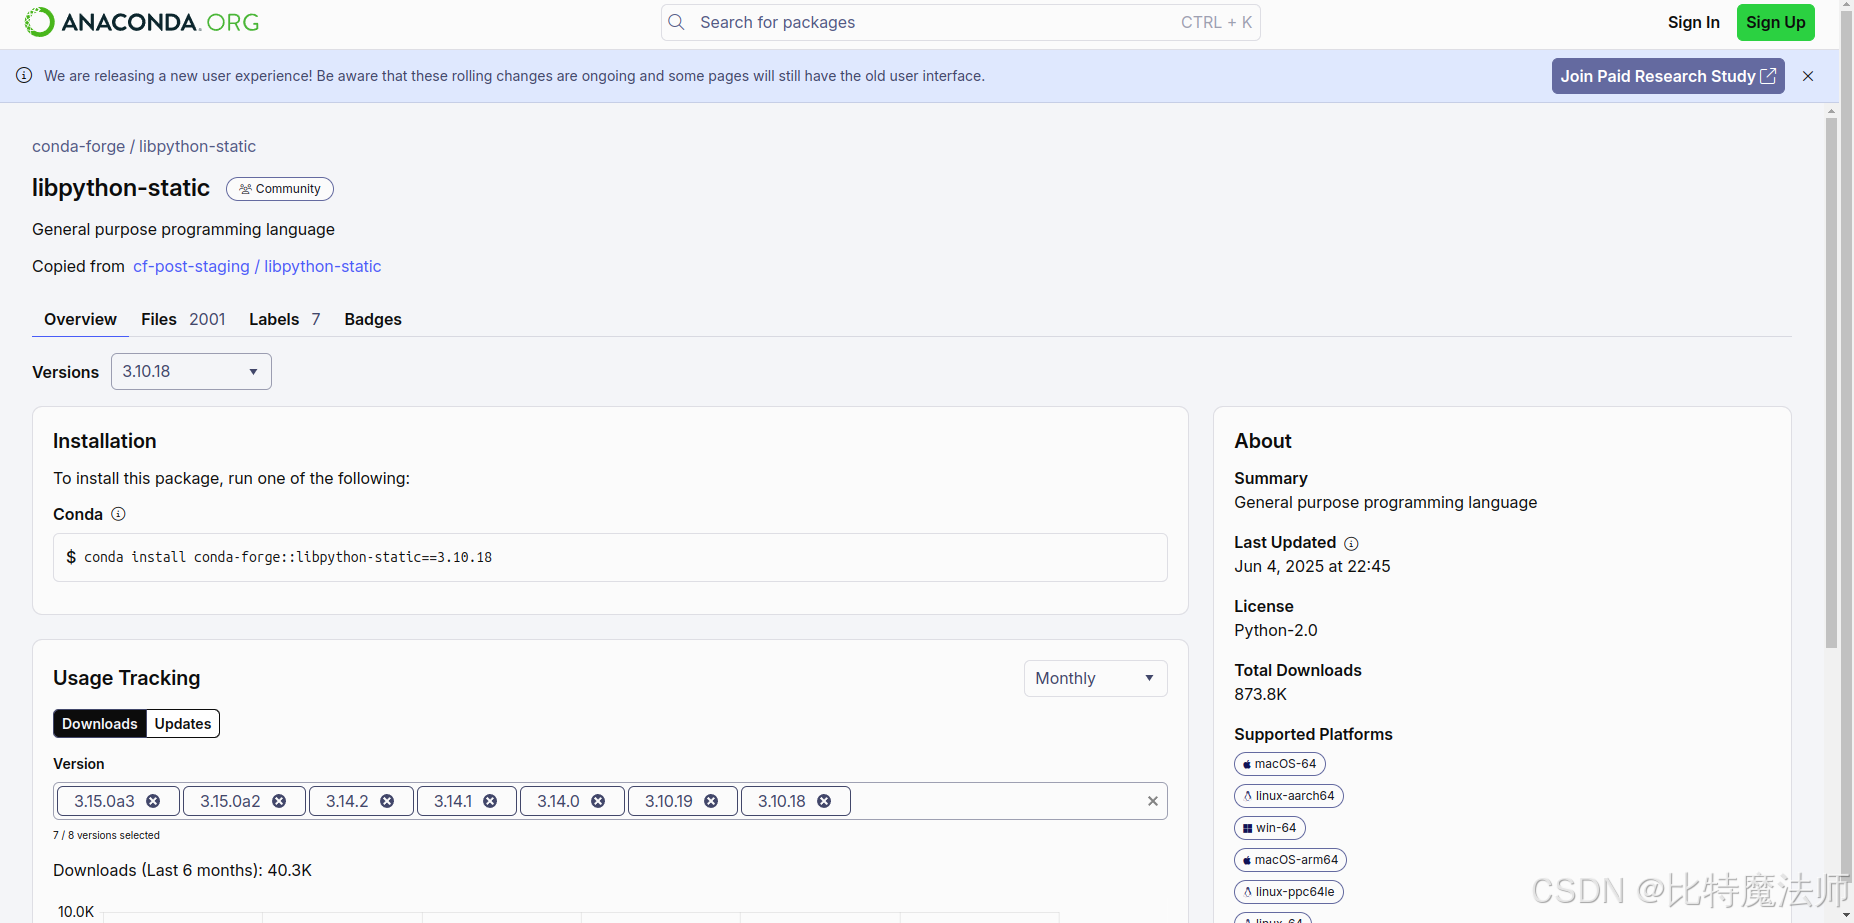
bash
conda install conda-forge::libpython-static==3.10.18如果安装很慢,重新创建一个环境即可:
bash
conda create -n pydeploy python=3.10 libpython-static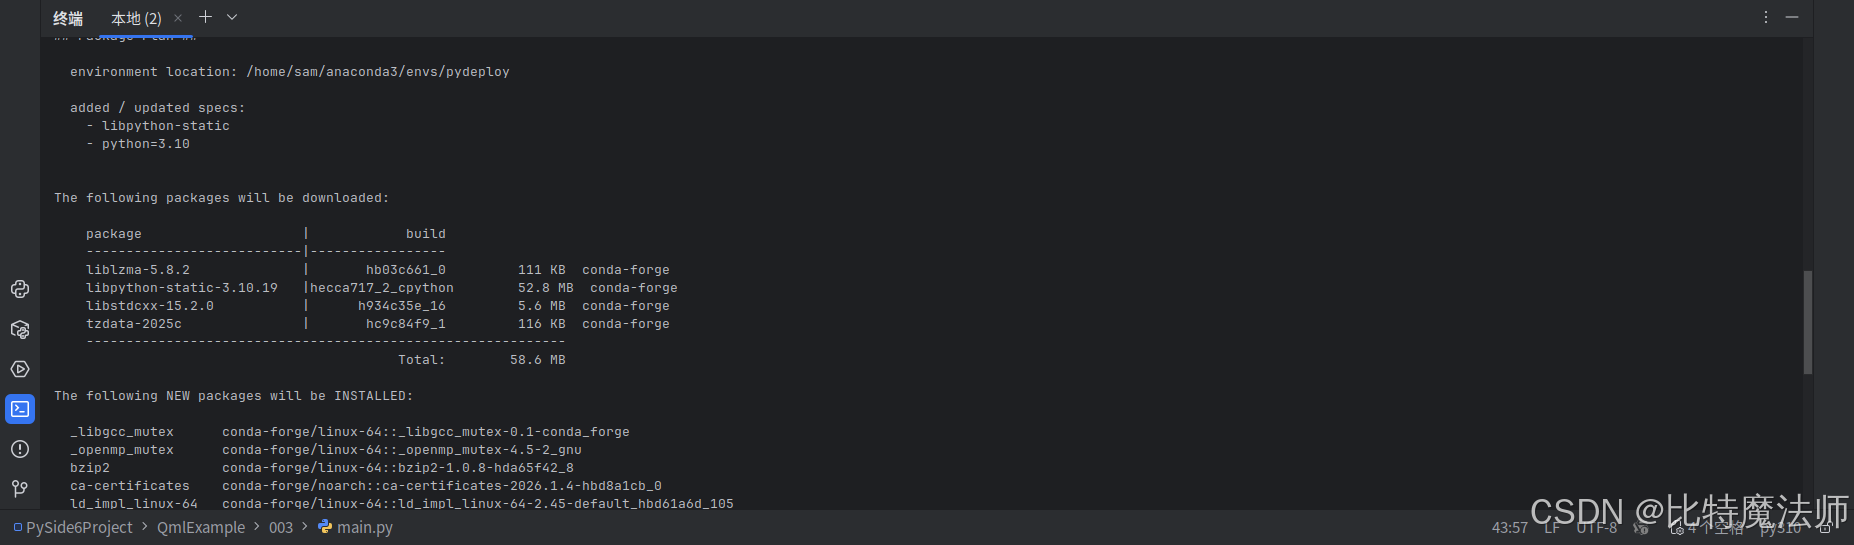
报错2:
Nuitka-Options: Used command line options:
Nuitka-Options:   --follow-imports --enable-plugin=pyside6 --onefile main.py
FATAL: Error, standalone mode on Linux requires 'patchelf' to be installed. Use 'apt/dnf/yum install patchelf' first.
需要安装 patchelf:
bash
sudo apt install patchelf报错3:
Nuitka-Scons: Backend C linking with 14 files (no progress information available for this stage).
/usr/bin/ld: /home/sam/anaconda3/envs/pydeploy/lib/libpython3.10.a(pystrtod.o): in function `memset':
/home/conda/feedstock_root/build_artifacts/python-split_1761171407825/_build_env/x86_64-conda-linux-gnu/sysroot/usr/include/bits/string3.h:81:(.text.hot.PyOS_double_to_string+0x183): undefined reference to `__warn_memset_zero_len'
collect2: error: ld returned 1 exit status
scons: *** [/home/sam/MyWorkSpace/PythonWorkSpace/PySide6Project/QmlExample/003/main.dist/main.bin] Error 1
FATAL: Failed unexpectedly in Scons C backend compilation.
Nuitka:WARNING:     Complex topic! More information can be found at https://nuitka.net/info/scons-backend-failure.html
Nuitka-Reports: Compilation crash report written to file 'nuitka-crash-report.xml'. 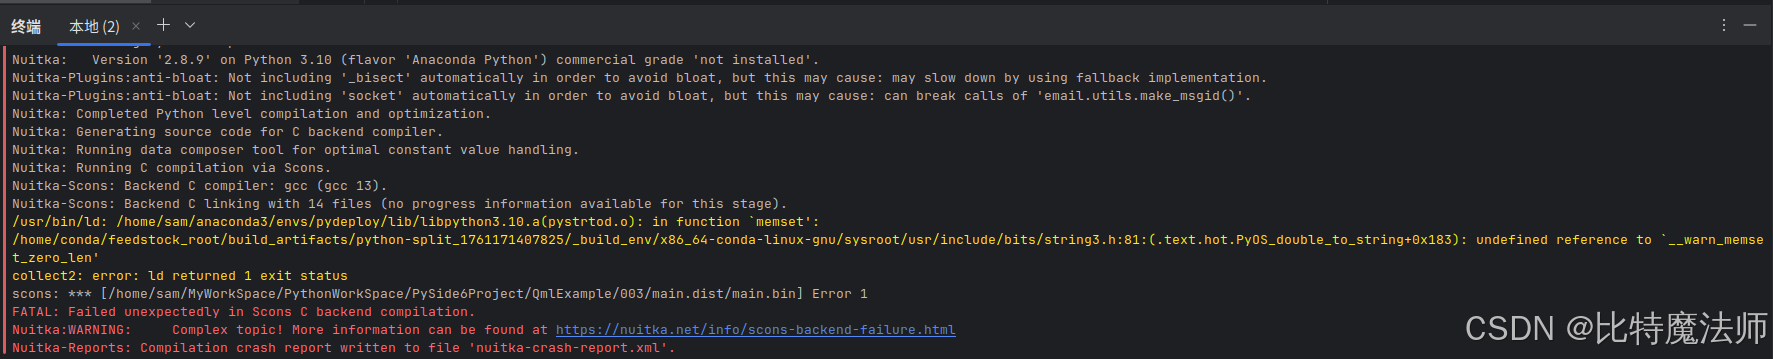
Anaconda Python 环境中的 libpython 库与系统 GCC 编译器不兼容。
使用虚拟环境,而不是 Anaconda 环境:
bash
# 1. 退出当前conda环境
conda deactivate
# 2. 创建虚拟环境
sudo apt install python3.12-venv python3-dev
python3 -m venv venv
source venv/bin/activate
# 3. 安装依赖
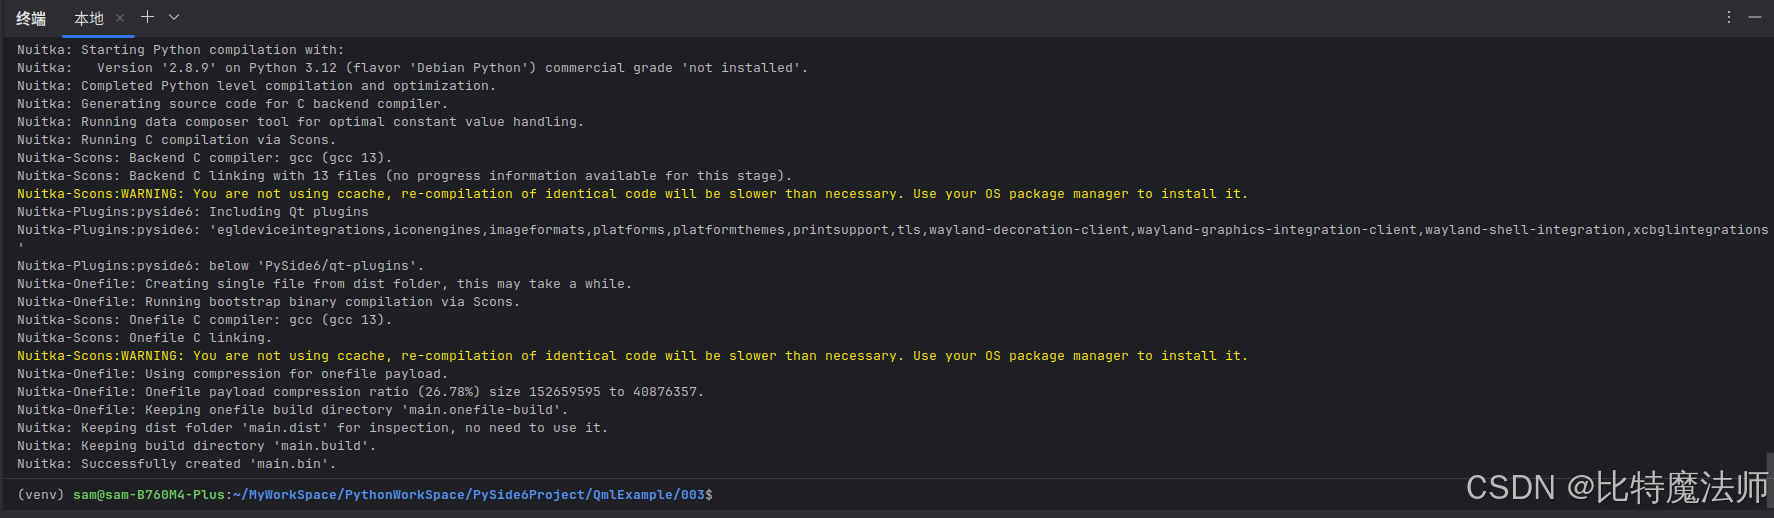
pip install -i https://pypi.tuna.tsinghua.edu.cn/simple PySide6 Nuitka最终运行成功:
方法二:使用 pysidedeploy.spec 配置文件
当我们第一次运行 pyside6-deploy 时,它会在项目目录中创建一个名为 pysidedeploy.spec 的文件。该文件控制影响部署过程的各种参数。在此之后,在同一项目目录中再次运行 pyside6-deploy 时,不再需要像主 Python 入口文件这样的额外参数。我们也可以将 pyside6-deploy 指向 pysidedeploy.spec 文件的路径(如果它不在同一目录中),以从该文件获取参数。可以使用以下命令完成此操作:
bash
pyside6-deploy -c /path/to/pysidedeploy.spec或者使用以下指令生成配置文件:
bash
pyside6-deploy /path/to/main --init修改 pysidedeploy.spec 配置文件 Qt 部分参数:
bash
[qt]

# paths to required qml files. comma separated
# normally all the qml files required by the project are added automatically
# design studio projects include the qml files using qt resources
qml_files = App/Main.qml

# excluded qml plugin binaries
excluded_qml_plugins = QtQuick,QtCharts,QtSensors,QtWebEngine

# qt modules used. comma separated
modules = Core,DBus,Gui,Network,Qml,Sql

# qt plugins used by the application. only relevant for desktop deployment
# for qt plugins used in android application see [android][plugins]
plugins = accessiblebridge,egldeviceintegrations,generic,iconengines,imageformats,networkaccess,networkinformation,platforminputcontexts,platforms,platforms/darwin,platformthemes,qml,qmllint,qmltooling,scenegraph,sqldrivers,tls,xcbglintegrations
打包运行:
