文章目录
- [1. 写在前面](#1. 写在前面)
- [2. 逆向分析](#2. 逆向分析)
- [3. 算法还原](#3. 算法还原)
【🏠作者主页】:吴秋霖
【💼作者介绍】:擅长爬虫与JS加密逆向分析!Python领域优质创作者、CSDN博客专家、阿里云博客专家、华为云享专家。一路走来长期坚守并致力于Python与爬虫领域研究与开发工作!
【🌟作者推荐】:对爬虫领域以及JS逆向分析感兴趣的朋友可以关注《爬虫JS逆向实战》《深耕爬虫领域》
未来作者会持续更新所用到、学到、看到的技术知识!包括但不限于:各类验证码突防、爬虫APP与JS逆向分析、RPA自动化、分布式爬虫、Python领域等相关文章
作者声明:文章仅供学习交流与参考!严禁用于任何商业与非法用途!否则由此产生的一切后果均与作者无关!如有侵权,请联系作者本人进行删除!
1. 写在前面
今天要分享的这个网站采用的WebSocket通信机制,使用了Microsoft SignalR框架并配合MessagePack序列化协议实现实时数据的交互
SignalR是Microsoft开发的一个实时Web应用程序框架,它支持多种传输方式(WebSocket、Server-Sent Events、长轮询等),并提供了统一的API。使用Hub模式进行通信,也就是说客户端通过调用Hub上的方法来与服务器交互
另外MessagePack是一种高效的二进制序列化格式,类似于JSON。JSON,但更小更快。SignalR支持两种协议:
JSON协议跟MessagePack二进制格式协议
它这个网站根据账号类型的不同,数据传输方式不同。普通的账号也许可以浏览的数据量有限用的还是HTTP,高级账号采用的WebSocket也许跟数据量大小或权限有关(为了避免数据流失的一种可能性防御)
分析目标:
aHR0cHM6Ly93d3cucWljaGF4dW4uY29tL21haW4jZGF0YXRhYmxl
2. 逆向分析
这里我们刷新页面或者筛选条件参数后点击查询看不到有效的请求发包,如下所示:

点击WS可以看到数据传输通过WebSocket协议,如下所示:
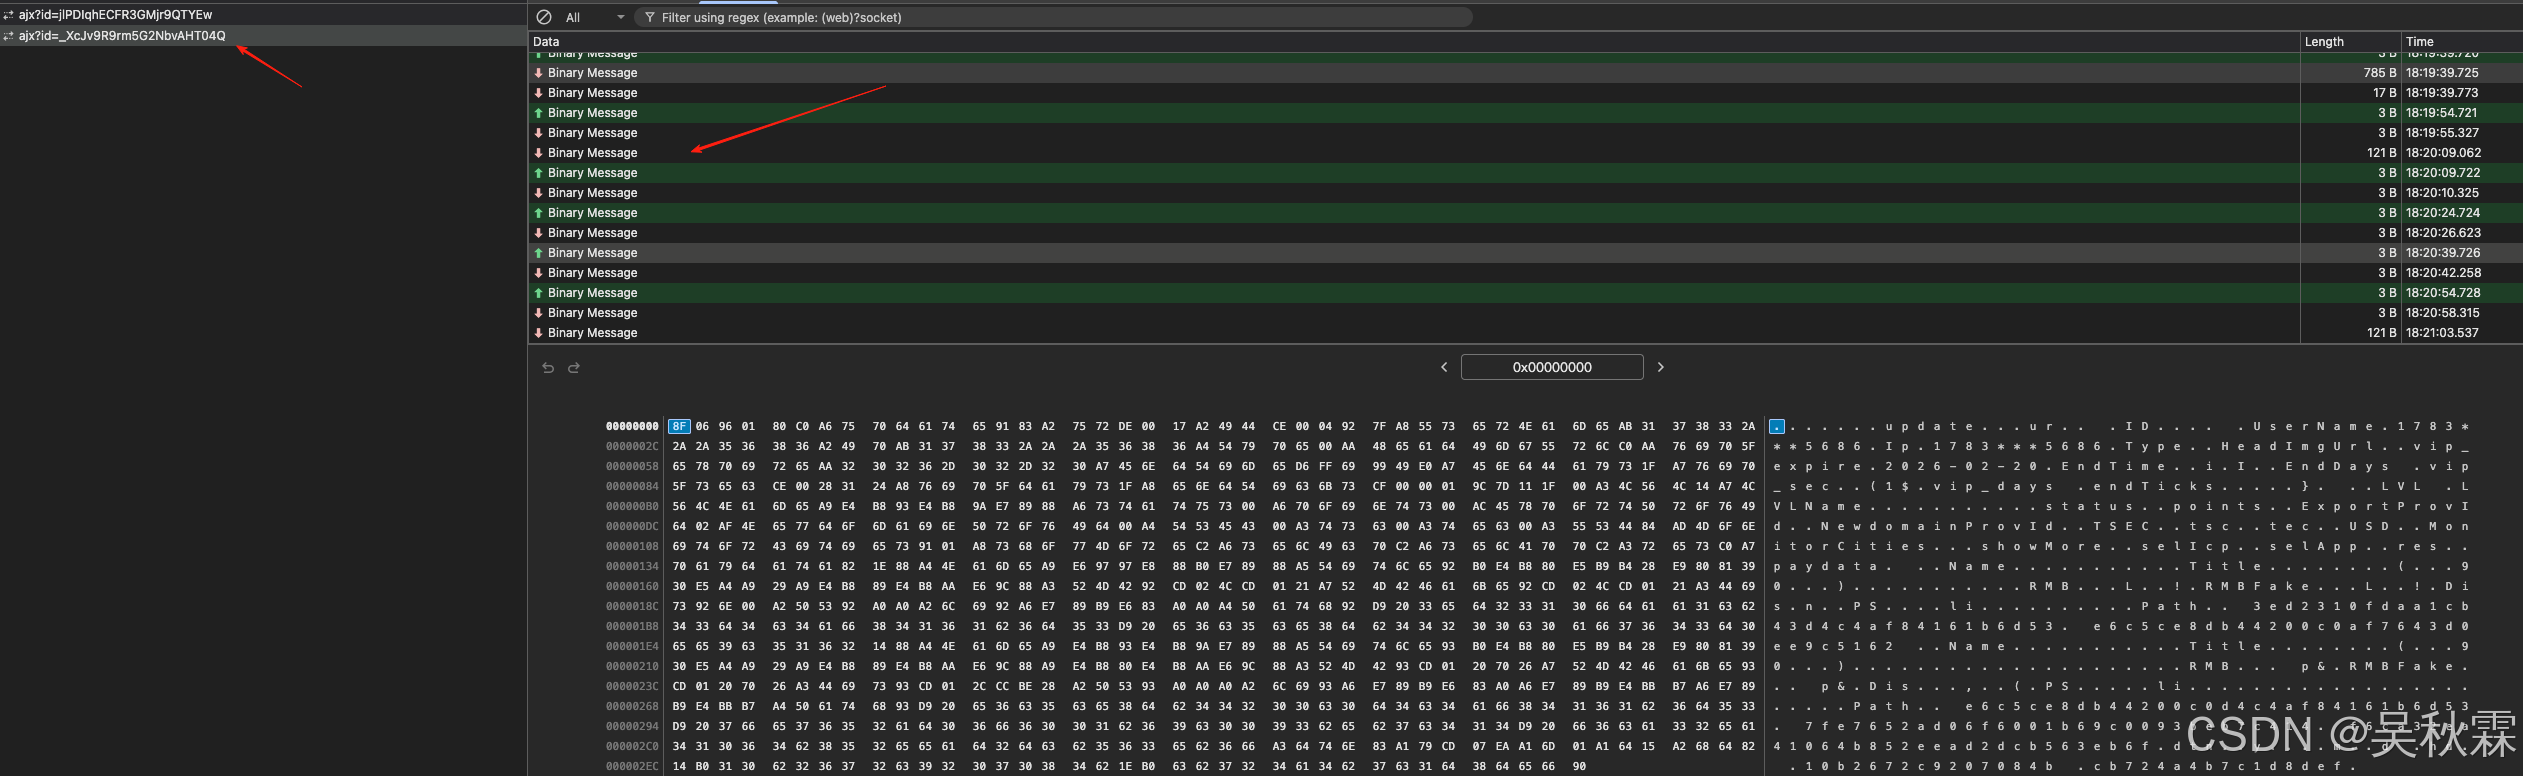
请求头Sec-WebSocket-Key字段可固定也可以随机编码16字节生成,保持单次统一即可。Sec-WebSocket-Version13是当前主流的标准版本(RFC 6455)如下所示:

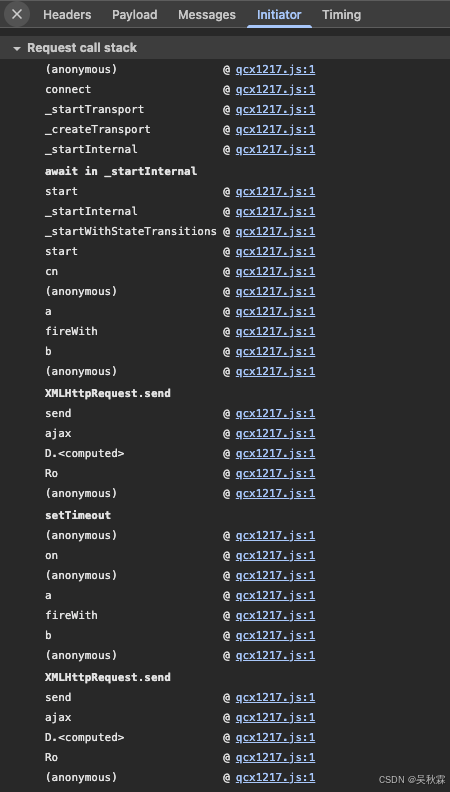
看堆栈调用全部执行一个js文件,所有逻辑都在里面的近2W行,所以直接跟栈分析就行,如下所示:
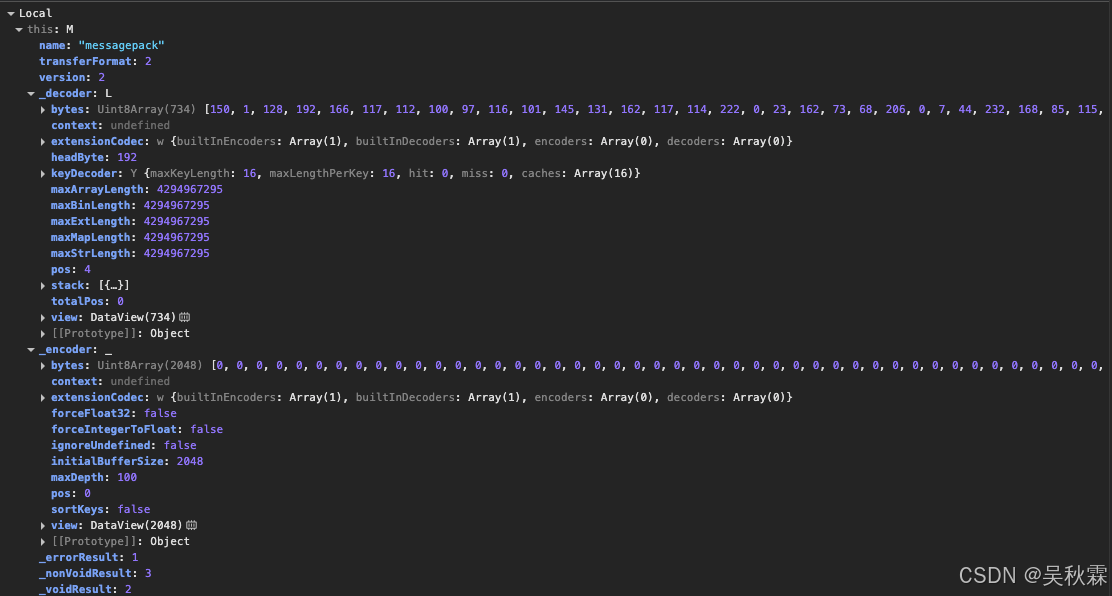
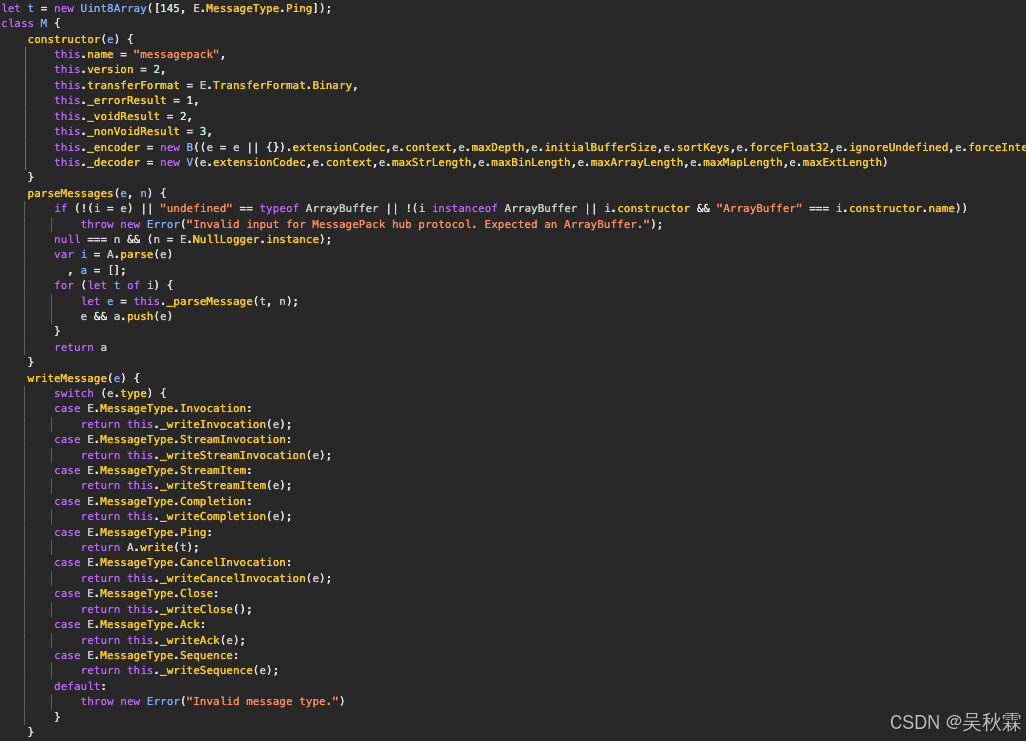
查看JS源码可以看到此网站使用的Microsoft SignalR框架,采用MessagePack协议进行二进制数据传输,整个通信过程基于WebSocket协议,通过SignalR Hub实现客户端与服务器之间的双向通信,并且在创建WebSocket服务前请求了一个前置接口,如下所示:
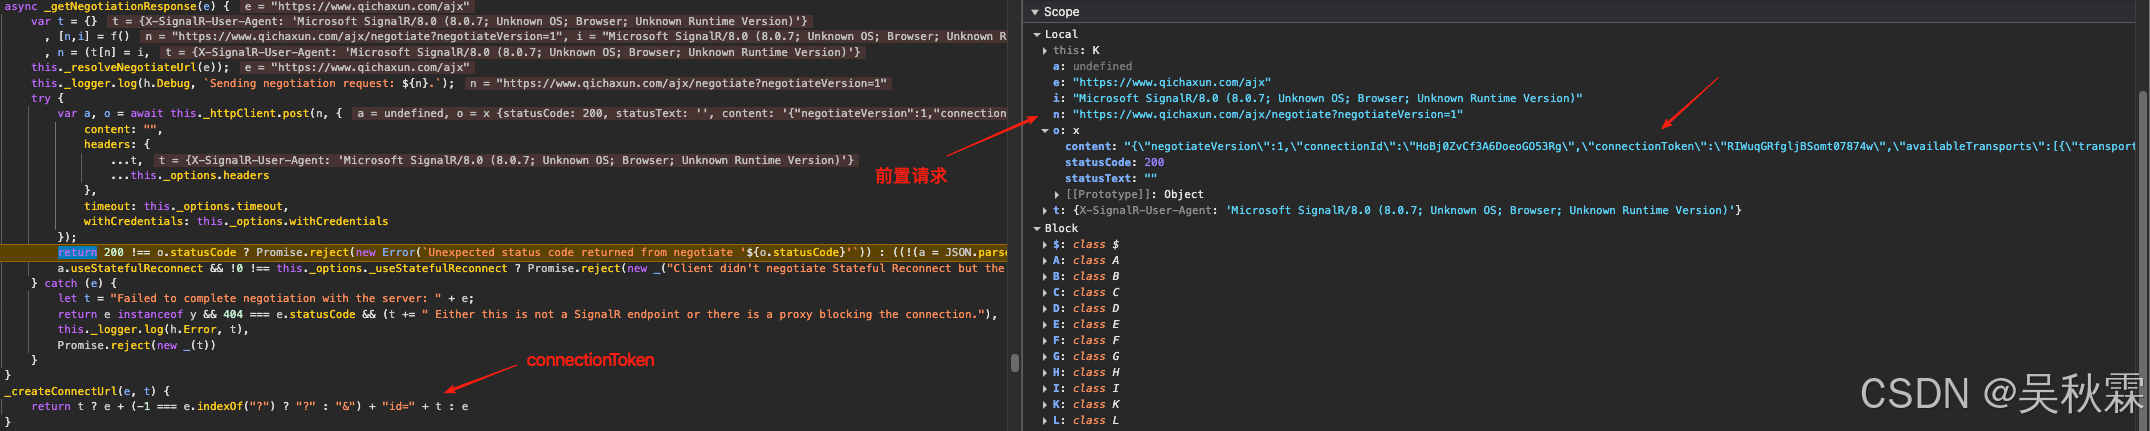

调用前置接口Negotiate返回数据中connectionId是连接的唯一标识符,connectionToken用于建立WebSocket连接的令牌(用作WS请求URL中的参数ID)。往下找到创建WebSocket连接代码处,可以看到创建实例并设置了arraybuffer数据类型,如下所示:

e.data 是接收到的原始二进制数据(ArrayBuffer)
javascript
i.onmessage = e => {
	if (this._logger.log(h.Trace, `(WebSockets transport) data received. ${u(e.data, this._logMessageContent)}.`),
	 this.onreceive)
	     try {
	         this.onreceive(e.data)
	     } catch (e) {
	         this._close(e)
	     }
	}
然后是握手请求发送,需要注意握手格式,解析握手响应的时候以\x1e结尾,如下所示:


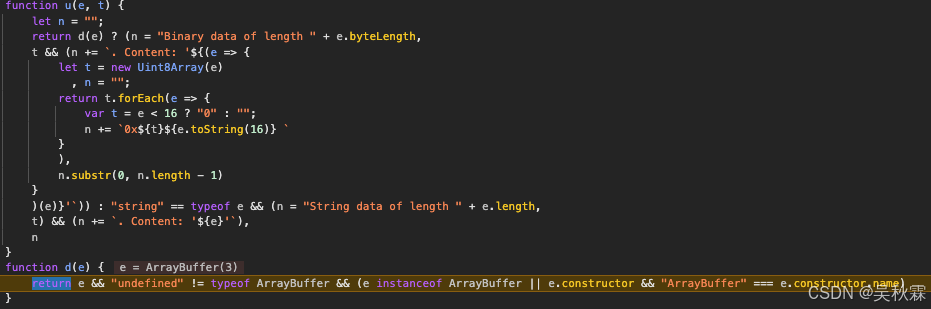
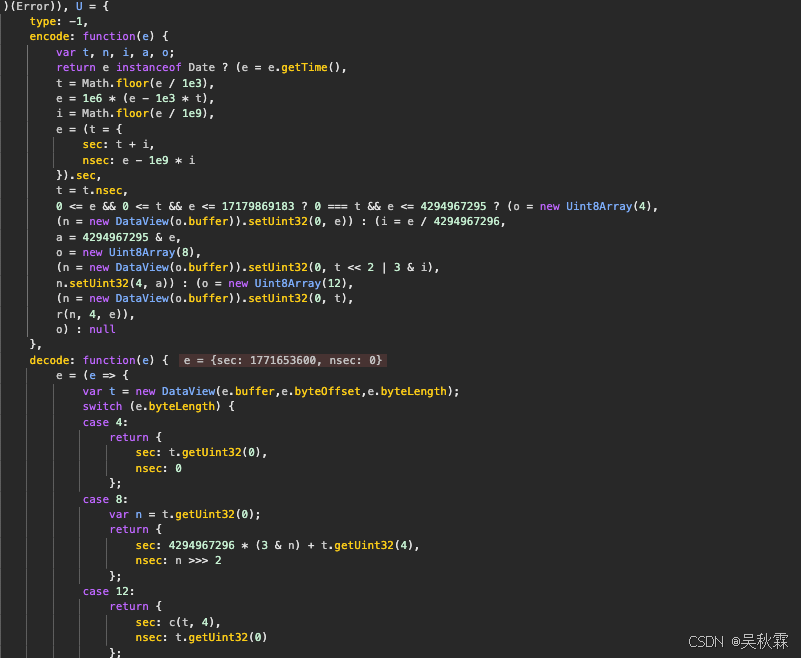
如果是要按照时间来搜索的话,要注意参数会经过独立的自定义编码器,转换为MessagePack timestamp,如下所示:
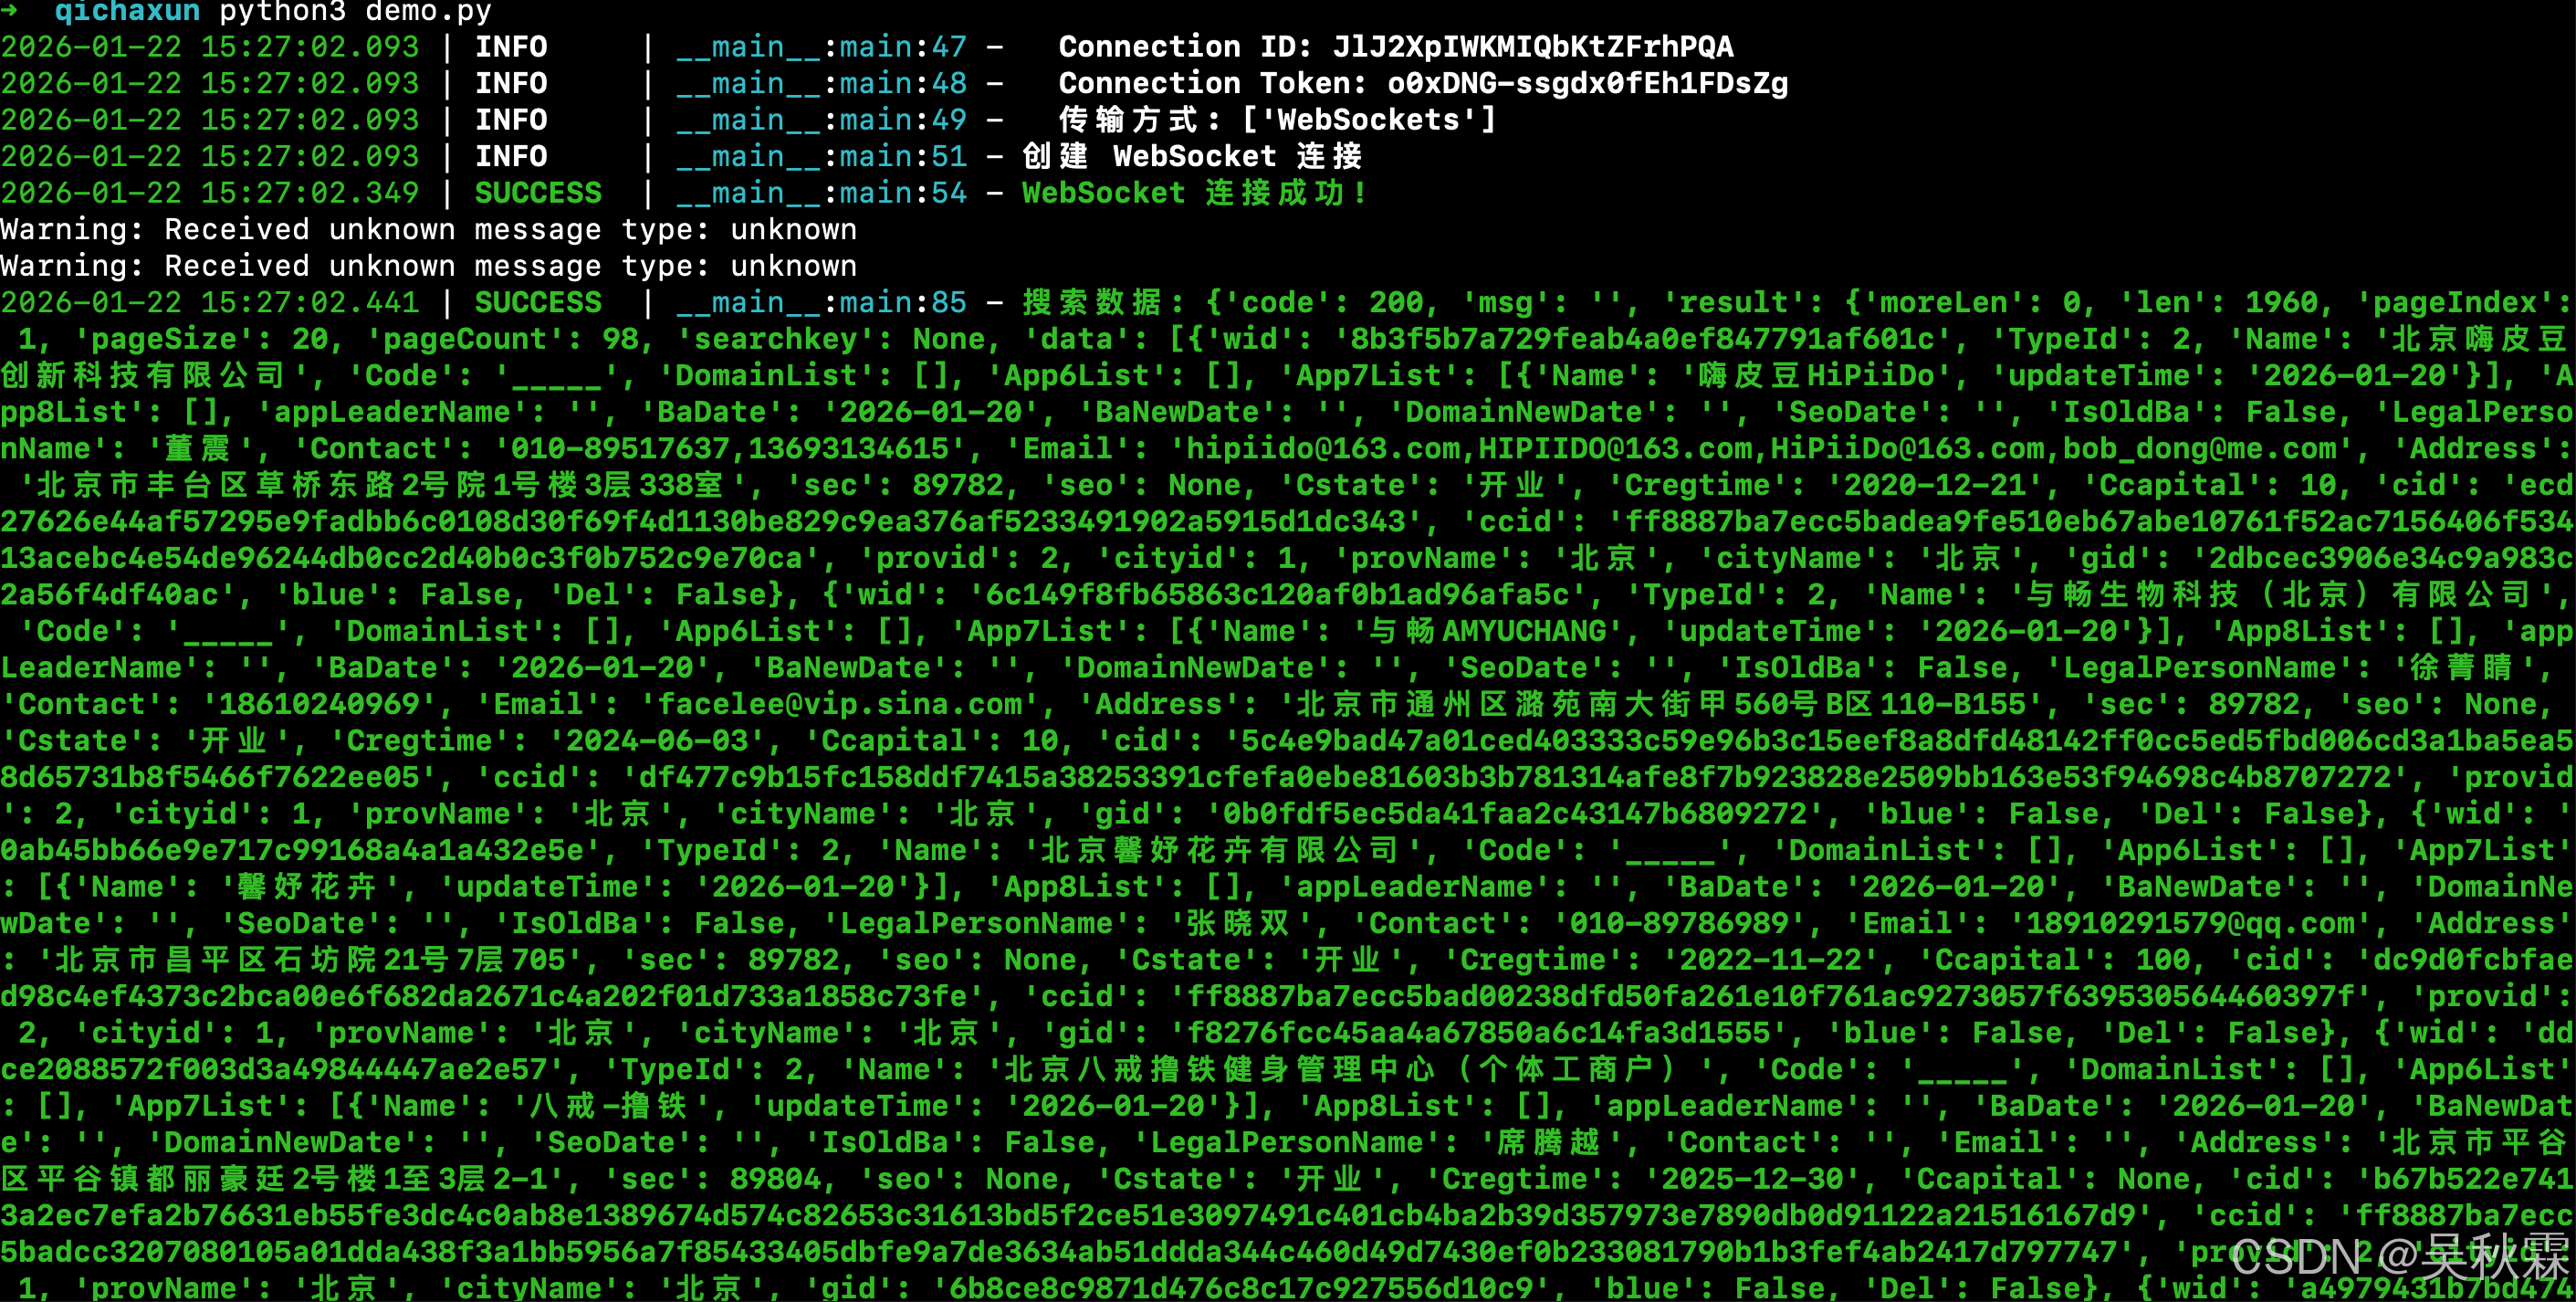
这一部分代码我们可以使用Python来实现,如下所示:
python
def _default_encoder(obj):
   if isinstance(obj, datetime):

        timestamp = obj.timestamp()
        seconds = int(timestamp)
        nanoseconds = int((timestamp - seconds) * 1e9)

        try:
            from msgpack import Timestamp
            return Timestamp(seconds, nanoseconds)
        except (ImportError, AttributeError):

            try:
                if seconds <= 0xFFFFFFFF:  # 32位秒数
                    data = struct.pack('>II', seconds, nanoseconds)
                else:  # 64位秒数
                    data = struct.pack('>QI', seconds, nanoseconds)
                return msgpack.ExtType(-1, data)
            except Exception:
                return seconds
    raise TypeError(f"Object of type {type(obj)} is not JSON serializable")
SignalR MessagePack协议的消息结构中包含了Invocation调用远程方法、STREAM_ITEM流式数据项、COMPLETION调用完成、STREAM_INVOCATION流式调用、CANCEL_INVOCATION取消调用、PING心跳包、ACK确认、SEQUENCE序列号以及编码|解码的算法,如下所示:
最后就是MessagePack的解码,解析获取明文数据,如下所示:
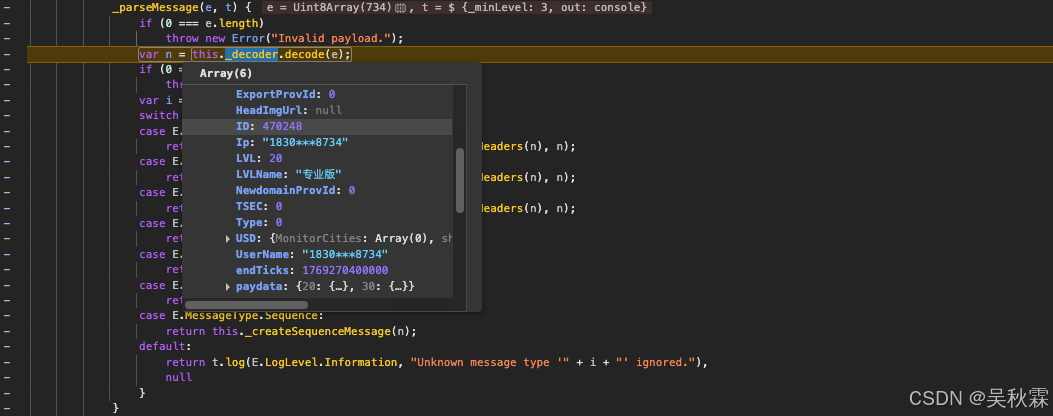
核心业务数据的解压缩均在JS底部, v.invoke关键位置,如下所示:
javascript
 v.invoke(Af, t ? LZString.compressToUTF16(JSON.stringify(i)) : LZString.compressToUTF16(JSON.stringify(e))).then(e => {
	Nf.endLoading(),
	 If = !1,
	 e.msg ? y(e.msg) : e.result && e.result.datastr && e.result.datastr.length ? (Wf.val(""),
	 zf = JSON.parse(LZString.decompressFromUTF16(e.result.datastr)),
	 Bf = zf.length,
	 Uf.html("本次一共输入<b>" + Bf + "</b>条数据,查询到<b>" + (e.result.goodCount || "") + "</b>条。"),
	 Of.html("当前第<b>1</b>条,往后还有<b>" + (Bf - 1) + "</b>条。"),
	 kf(zf[Hf], qf),
	 Mf.hide(),
	 jf.flex(),
	 Tf.show()) : 0 == e.result.goodCount ? $(Ar).text("本次提交的行数据均未查询到匹配的备案企业") : y("查询遇到问题,请稍后再试或联系在线客服。")
	}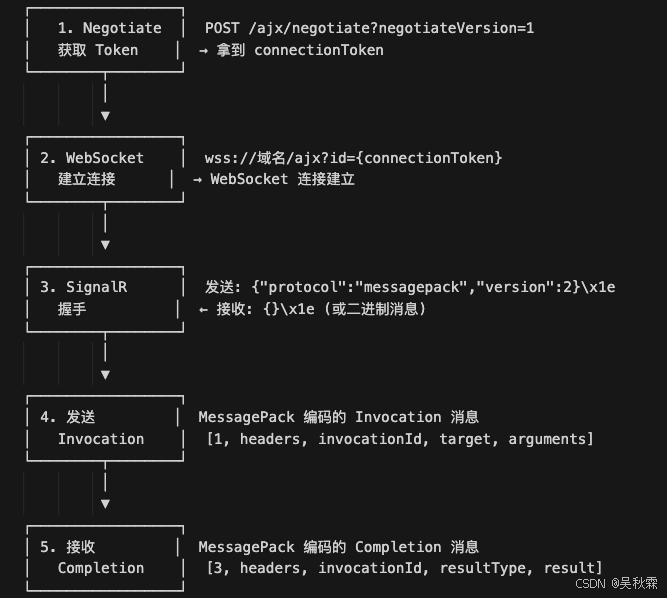
最终的数据流转路径,可分为发送流程跟接收流程。如下所示:
发送流程: 客户端调用->HubConnection.invoke->_createInvocation->_sendWithProtocol->_protocol.writeMessage->_encoder.encode->_messageBuffer._send->connection.send->WebSocket.send
接收流程: WebSocket.onmessage->onreceive(e.data)->_processIncomingData->_protocol.parseMessages->A.parse->_decoder.decode>_createInvocationMessage/_createCompletionMessage->_callbacksinvocationId->解压缩跟解析
3. 算法还原
所以,这里我们需要开始手写一个SignalR MessagePack协议WebSocket客户端用于和qcx后端的SignalR Hub来通信,参考官方文档我们需要先进行SignalR的官方协议常量定义,如下所示:
python
INVOCATION = 1
COMPLETION = 3
PING = 6
CLOSE = 7还有SignalR的核心细节,VarInt编码。每个字节低7位存数据、高1位表示是否还有后续字节用它来标识消息的长度,如下所示:
二进制帧: varint lengthmessage bytes
python
while True:
    byte = value & 0x7F
    value >>= 7
    if value == 0:
        result.append(byte)
        break
result.append(byte | 0x80)MessagePack编码Invocation,这里需要注意的是SignalR MessagePack协议使用的是数组不是JSON对象且字段位置固定,结构如下所示:
python
[
  1,              # MessageType = INVOCATION
  headers,        # headers
  invocationId,   # 调用ID
  target,         # 方法名
  arguments       # 参数数组
]接下来需要实现两个class,SignalRMessagePackProtocol用来实现SignalR MessagePack协议的编解码(varint、消息封装解析、Invocation消息构建...)QichaxunWebSocketClient封装WebSocket的连接、SignalR握手、消息收发以及远程调用
首先跳过前置接口Negotiate,开始构建WebSocket连接,实现代码如下所示:
python
# 构建WebSocket URL(HTTPS→WSS,HTTP→WS)
ws_url = self.base_url.replace('https://', 'wss://').replace('http://', 'ws://')
ws_url = f"{ws_url}/ajx?id={self.connection_token}"  # 拼接connectionToken

# 构造WebSocket握手请求头(符合RFC6455标准)
ws_headers = {
    "Upgrade": "websocket",          # 声明升级为WebSocket协议
    "Connection": "Upgrade",         # 确认升级
    "Sec-WebSocket-Key": base64.b64encode(uuid.uuid4().bytes[:16]).decode().rstrip('='),  # 随机密钥(RFC要求)
    "Sec-WebSocket-Version": "13",   # WebSocket版本(主流版本)
    "Origin": self.base_url,         # 跨域源标识
    # 其他浏览器标识头...
}
ws_headers.update(self.headers)

# 处理Cookie(拼接为字符串)
cookie_str = "; ".join([f"{k}={v}" for k, v in self.cookies.items()])
if cookie_str:
    ws_headers["Cookie"] = cookie_str

header_list = []
if cookie_str:
    header_list.append(f"Cookie: {cookie_str}")
for key, value in ws_headers.items():
    if key.lower() not in ['upgrade', 'connection', 'sec-websocket-key', 'sec-websocket-version']:
        header_list.append(f"{key}: {value}")

# 创建WebSocket连接
self.ws = websocket.create_connection(
    ws_url,
    header=header_list if header_list else None
)Sec-WebSocket-Key字段可以固定,这里按照RFC6455标准生成16字节随机数再B64编码作为握手密钥
随后实现SignalR 协议握手(Handshake),前面WebSocket连接建立后还需完成SignalR层的协议握手!通过调试的日志信息确认客户端使用的协议跟版本,实现代码如下:
python
# 1. 构造握手请求(SignalR规范)
handshake_request = {
    "protocol": "messagepack",  # 指定使用MessagePack编码
    "version": 1                # 协议版本
}
# 握手消息以\x1e(记录分隔符,ASCII 30)结尾是SignalR规范
handshake_message = json.dumps(handshake_request) + "\x1e"

# 2. 发送握手请求(文本帧)
self.ws.send(handshake_message)

# 3. 接收并解析握手响应
max_attempts = 3
for attempt in range(max_attempts):
    try:
        opcode, response = self.ws.recv_data()  # 接收数据(区分opcode)
    except AttributeError:
        response = self.ws.recv()
        opcode = 1 if isinstance(response, str) else 2  # 1=文本帧,2=二进制帧

    # 处理文本响应(标准情况)
    if opcode == 1:
        if response.endswith('\x1e'):
            response = response[:-1]  # 移除结尾的\x1e
        handshake_response = json.loads(response)
        if handshake_response.get('error'):
            raise Exception(f"Handshake failed: {handshake_response.get('error')}")
        return True

    # 处理二进制响应(兼容情况)
    elif opcode == 2:
        # 查找\x1e分隔符,拆分握手响应和后续消息
        record_separator_code = 30
        separator_pos = -1
        for i, byte in enumerate(response):
            if byte == record_separator_code:
                separator_pos = i
                break
        if separator_pos != -1:
            handshake_bytes = response[:separator_pos]
            handshake_text = handshake_bytes.decode('utf-8')
            handshake_response = json.loads(handshake_text)
            if handshake_response.get('error'):
                raise Exception(f"Handshake failed: {handshake_response.get('error')}")
            # 保存剩余二进制数据(后续消息)
            self._pending_message = response[separator_pos + 1:]
return True接下来构建SignalR Invocation消息,保障后续客户端调用服务端方法时,按照SignalR MessagePack协议来构造Invocation类型消息(也就是二进制的格式),这里我们实现一个静态方法,代码如下所示:
python
@staticmethod
def create_invocation_message(target: str, arguments: List[Any],
                              invocation_id: Optional[str] = None,
                              headers: Optional[Dict] = None) -> bytes:
    # 1. 构造Invocation消息体(SignalR MessagePack格式)
    message_data = [
        SignalRMessagePackProtocol.INVOCATION,  # 消息类型:1=Invocation
        headers or {},                          # 消息头
        invocation_id,                          # 调用ID(用于匹配响应)
        target,                                 # 服务端方法名(如"search")
        arguments                               # 方法参数
    ]

    # 2. MessagePack编码(处理datetime等特殊类型)
    try:
        # 自定义编码器:将datetime转为MessagePack Timestamp/ExtType
        encoded = msgpack.packb(message_data, use_bin_type=True, default=SignalRMessagePackProtocol._default_encoder)
    except Exception as e:
        # 降级方案:将datetime转为时间戳
        def convert_datetime(obj):
            if isinstance(obj, datetime):
                return obj.timestamp()
            elif isinstance(obj, dict):
                return {k: convert_datetime(v) for k, v in obj.items()}
            elif isinstance(obj, list):
                return [convert_datetime(item) for item in obj]
            return obj
        message_data = convert_datetime(message_data)
        encoded = msgpack.packb(message_data, use_bin_type=True)

    # 3. 封装为SignalR消息包(varint长度+消息内容)
    return SignalRMessagePackProtocol.write_message([encoded])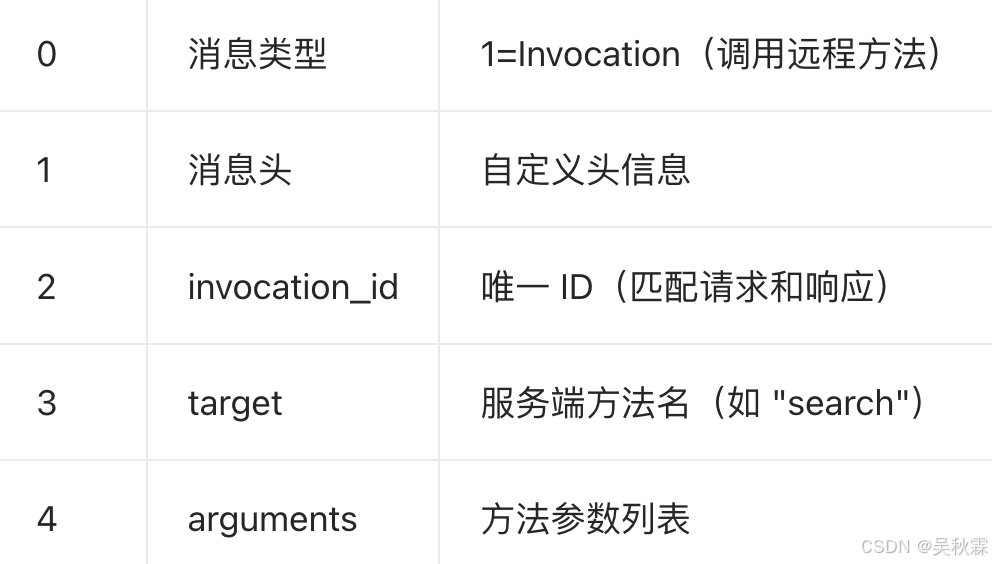
继续将编码后的Invocation消息以二进制帧(opcode为2)发送到服务端,实现代码如下:
python
def send_invocation(self, target: str, arguments: List[Any],
                   invocation_id: Optional[str] = None) -> bytes:
    if not self.ws:
        raise ValueError("WebSocket not connected. Call connect() first.")

    # 1. 编码Invocation消息
    message = SignalRMessagePackProtocol.create_invocation_message(
        target=target,
        arguments=arguments,
        invocation_id=invocation_id
    )

    # 2. 发送二进制帧(opcode=2)
    import websocket as ws
    self.ws.send(message, opcode=ws.ABNF.OPCODE_BINARY)
return message再处理接受服务端所推送的WebSocket消息,这里需要分别一下文本帧跟二进制帧,处理_pending_message,实现如下:
python
def receive_message(self, timeout: Optional[float] = None) -> Dict[str, Any]:
    # 1. 优先处理握手时缓存的待处理消息
    if self._pending_message is not None:
        pending = self._pending_message
        self._pending_message = None
        return SignalRMessagePackProtocol.parse_invocation_response(pending)

    # 2. 接收新消息
    try:
        opcode, data = self.ws.recv_data()  # 区分opcode和数据
    except AttributeError:
        data = self.ws.recv()
        opcode = 1 if isinstance(data, str) else 2

    # 3. 处理文本帧(opcode=1)
    if opcode == 1:
        if isinstance(data, bytes):
            data = data.decode('utf-8')
        if data.endswith('\x1e'):
            data = data[:-1]
        try:
            parsed = json.loads(data)
            return {'type': 'handshake' if 'error' in parsed else 'text', 'data': parsed}
        except:
            return {'type': 'text', 'data': data}

    # 4. 处理二进制帧(opcode=2)
    if opcode == 2:
        return SignalRMessagePackProtocol.parse_invocation_response(data)

    # 5. 未知帧类型
return {'type': 'unknown', 'opcode': opcode, 'data': data}解析SignalR响应消息,将服务端返回的二进制消息按SignalR MessagePack协议来解码,并提取输出结果跟心跳信息,实现代码如下所示:
python
@staticmethod
def parse_invocation_response(data: bytes) -> Dict[str, Any]:
    # 1. 解析varint长度封装的消息包
    messages = SignalRMessagePackProtocol.parse_messages(data)
    if not messages:
        raise ValueError("No messages in response")

    # 2. 解码MessagePack消息
    message = messages[0]
    decoded = msgpack.unpackb(message, raw=False, strict_map_key=False)

    # 3. 解析消息类型
    message_type = decoded[0]

    # 4. 处理Completion消息(调用完成)
    if message_type == SignalRMessagePackProtocol.COMPLETION:
        headers = decoded[1] if len(decoded) > 1 else {}
        invocation_id = decoded[2] if len(decoded) > 2 else None
        result_type = decoded[3] if len(decoded) > 3 else None

        result = None
        error = None
        if result_type == SignalRMessagePackProtocol.ERROR_RESULT:
            error = decoded[4]  # 错误信息
        elif result_type == SignalRMessagePackProtocol.NON_VOID_RESULT:
            result = decoded[4]  # 正常结果

        return {
            'type': 'completion',
            'invocation_id': invocation_id,
            'result': result,
            'error': error,
            'headers': headers
        }

    # 5. 处理Ping消息(心跳)
    elif message_type == SignalRMessagePackProtocol.PING:
        return {'type': 'ping'}

    # 6. 处理Close消息(连接关闭)
    elif message_type == SignalRMessagePackProtocol.CLOSE:
        return {
            'type': 'close',
            'error': decoded[1] if len(decoded) > 1 else None,
            'allow_reconnect': decoded[2] if len(decoded) > 2 else None
        }

    # 7. 未知消息类型
    else:
return {'type': 'unknown', 'data': decoded}最后封装远程方法调用(invoke),这里需要包含发送请求、循环接收响应、匹配invocation_id最终返回结果的完整流程,代码实现如下所示:
python
def invoke(self, target: str, *arguments) -> Dict[str, Any]:
    # 1. 生成唯一invocation_id
    invocation_id = str(uuid.uuid4())

    # 2. 发送调用请求
    self.send_invocation(target, list(arguments), invocation_id)

    # 3. 循环接收响应,直到匹配到对应invocation_id
    max_attempts = 100
    attempts = 0
    while attempts < max_attempts:
        attempts += 1
        response = self.receive_message()

        # 匹配Completion消息且invocation_id一致
        if response.get('type') == 'completion':
            if response.get('invocation_id') == invocation_id:
                if response.get('error'):
                    raise Exception(f"Server error: {response.get('error')}")
                return response.get('result')
        # 忽略心跳/握手/文本消息
        elif response.get('type') in ['ping', 'handshake']:
            continue
        # 连接关闭抛异常
        elif response.get('type') == 'close':
            raise Exception(f"Connection closed: {response.get('error')}")

    # 超时抛异常
    raise Exception(f"Timeout waiting for response to invocation {invocation_id}")

def close(self):
    if self.ws:
        self.ws.close()
self.ws = None最终写一个客户端的调用demo,客户端调用发包的params参数可以从调试信息跟JS底部业务代码参数选项处获取,运行如下: