一 简介
生命周期(Lifecycle) 是组件从创建到销毁的完整过程,Vue 组件的生命周期分为 初始化(创建)→ 挂载(渲染)→ 更新(数据变化)→ 卸载(销毁) 四个阶段
每个阶段会触发特定的钩子函数(如 onMounted、onUpdated、onUnmounted),开发者可以通过这些钩子在特定时机执行逻辑(如数据请求、DOM 操作、清理资源),确保组件按预期运行并避免内存泄漏。
二 Vue2组件的生命周期
1 Vue2脚手架
bash
# 命令行创建vue2 选择vue2脚手架
vue create vue2_play
没有安装 Vue CLI(vue 命令不可用)解决方法如下:
bash
# 安装Vue.js 的官方脚手架工具,用于创建和管理 Vue 项目
npm install -g @vue/cli
2 启动项目
可从包说明书(package.json)中查看具体的启动,打包,检查命令(scripts中)
App.vue
js
<template>
  <Person></Person>
</template>

<script>
  // 引用 Person 组件
  import Person from "@/components/Person";
  export default {
    name: 'App',
    // 注册 Person 组件
    components:{
      Person
    }
  }
</script>
<style>
</style>
Person.vue
js
<template>
  <div class="person">
    <h2>求和计算:{{sum}}</h2>
    <button @click="changeSum">+1</button>
  </div>
</template>

<script>
  export default {
    // 关闭语法检查
    /* eslint-disable */
    name: 'Person',
    // 数据
    data(){
      return{
        sum:1
      }
    },
    // 方法
    methods:{
      changeSum(){
        this.sum += 1
      }
    }
  }
</script>
<style scoped>
  .person{
    background: bisque;
    padding: 24px;
    border-radius: 8px;
    box-shadow: 0 0 8px;
  }
</style>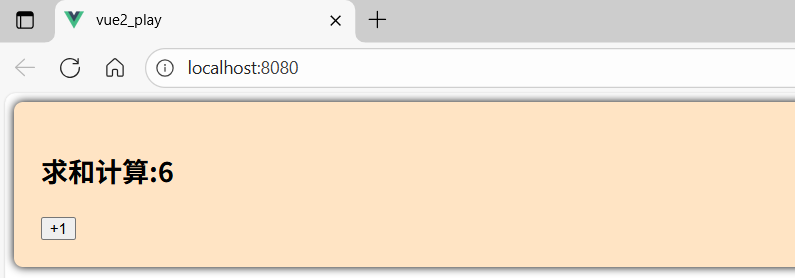
3 Vue2组件生命周期函数 -- 勾子
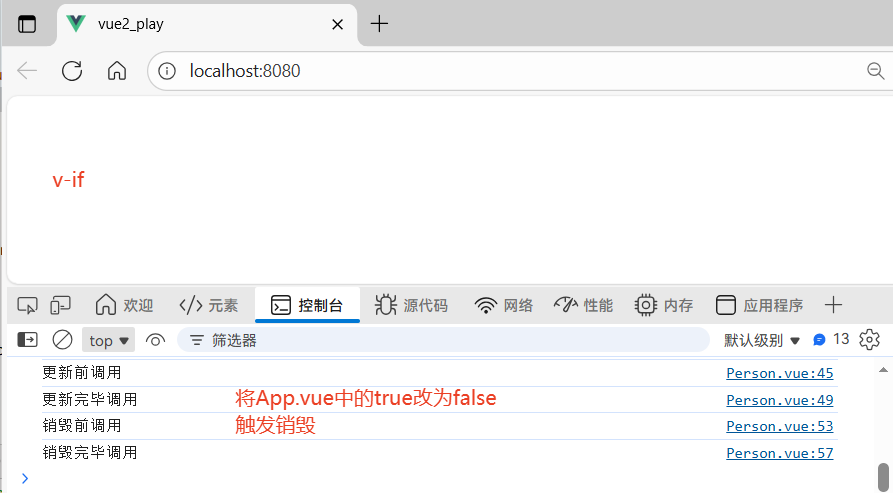
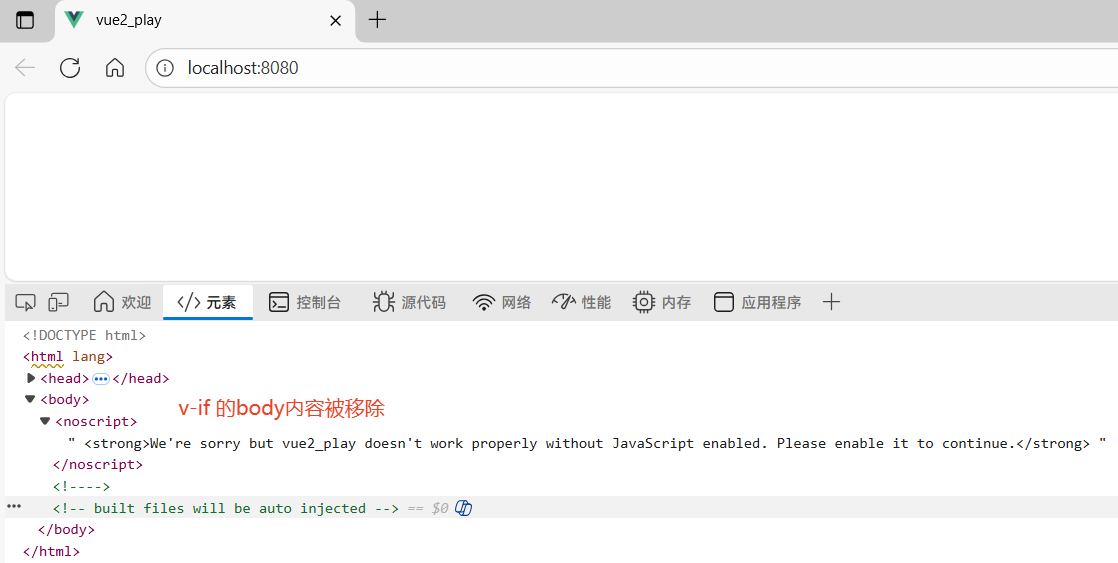
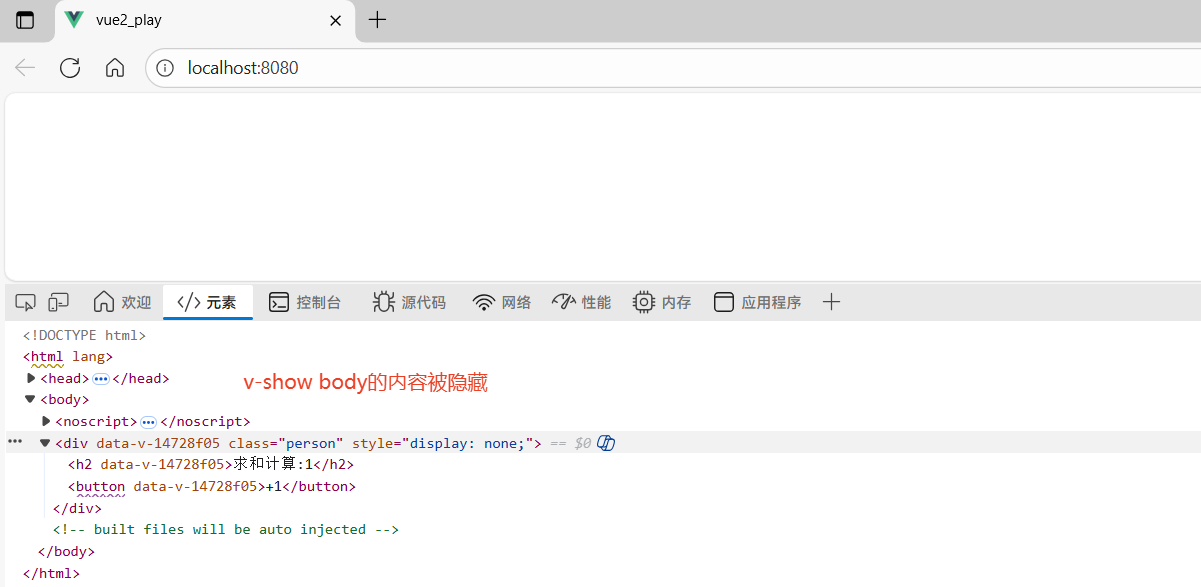
4个阶段对应8个函数,需要时在配置项中添加即可。需注意,使用 v-if 会彻底删除 DOM 结构,可触发销毁;而 v-show 仅通过 CSS 隐藏结构,不会触发销毁。
js
1. 创建指的是,组件实例初始化时执行。(触发1次)
2. 挂载指的是将 .vue 文件编译后的 DOM 结构挂载到页面,此时页面内容可见。(触发1次)
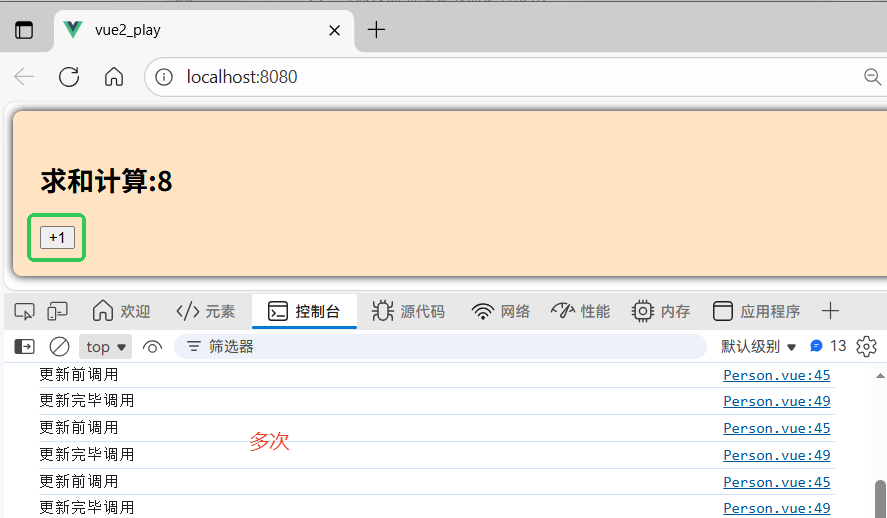
3. 更新指的是,当组件数据变化导致页面重新渲染时触发。(可以触发多次)
4. 销毁指的是,组件被移除时触发。| 4个阶段 | 阶段前 | 阶段后 |
|---|---|---|
| 创建 | 创建前 -- beforeCreate | 创建完毕 -- created |
| 挂载 | 挂载前 -- beforeMount | 挂载完毕 -- mounted |
| 更新 | 更新前 -- beforeUpdate | 更新完毕 -- updated |
| 销毁 | 销毁前 -- beforeDestroy | 销毁完毕 -- destroyed |
① Person.vue
js
<template>
  <div class="person">
    <h2>求和计算:{{sum}}</h2>
    <button @click="changeSum">+1</button>
  </div>
</template>

<script>
  export default {
    // 关闭语法检查
    /* eslint-disable */
    name: 'Person',
    // 数据
    data(){
      return{
        sum:1
      }
    },
    // 方法
    methods:{
      changeSum(){
        this.sum += 1
      }
    },
    // 创建前 函数编写先后顺序 不影响执行的先后顺序
    beforeCreate() {
      console.log('创建前调用')
    },
    // 创建完毕
    created() {
      console.log('创建完毕调用')
    },
    // 挂载前
    beforeMount() {
      console.log('挂载前调用')
      // 通过断点观察页面是否渲染
      debugger;
    },
    // 挂载完毕
    mounted() {
      console.log('挂载完毕调用')
    },
    // 更新前
    beforeUpdate() {
      console.log('更新前调用')
    },
    // 更新完毕
    updated() {
      console.log('更新完毕调用')
    },
    // 销毁前
    beforeDestroy(){
      console.log('销毁前调用')
    },
    // 销毁完毕
    destroyed() {
      console.log('销毁完毕调用')
    }
  }
</script>

<style scoped>
  .person{
    background: bisque;
    padding: 24px;
    border-radius: 8px;
    box-shadow: 0 0 8px;
  }
</style>
② App.vue
js
<template>
  <!--符合条件就展示页面-->
  <Person v-if="isShow"></Person>
</template>

<script>
  // 引用 Person 组件
  import Person from "@/components/Person";
  export default {
    name: 'App',
    // 注册 Person 组件
    components:{
      Person
    },
    // isShow 参数
    data(){
      return {
        isShow:true
      }
    }
  }
</script>

<style>
</style>
三 Vue3组件的生命周期
1 与 Vue2 的不同
① setup() 替代了 beforeCreate 和 created,是 Vue 3 生命周期的起点,在 setup() 中,组件实例尚未创建(this 不可用),因此:如果需要在组件创建前执行逻辑(如数据初始化),直接在 setup() 顶层编写代码。不再需要显式使用 beforeCreate 和 created 钩子。
② Vue2 "销毁"(Destroy)在 Vue 3 中改为更中性的 "卸载"(Unmount),强调组件从 DOM 中移除的行为,而非彻底销毁实例(Vue 3 的组件实例在卸载后仍可能被复用)
2 App.vue
js
<template>
    <person v-if="isShow"/>
</template>

<script setup lang="ts">
  import Person from './components/Person.vue'
  import {ref} from 'vue'

  let isShow = ref(true)

</script>
<style>
</style>
3 Person.vue
js
<template>
  <div class="person">
    <h2>累加求和{{sum}}</h2>
    <button @click="changeSum">+1</button>
  </div>
</template>

<script lang="ts" setup>
  // 引入生命周期
  import {
    defineOptions,
    onBeforeMount,
    onBeforeUnmount,
    onBeforeUpdate,
    onMounted,
    onUnmounted,
    onUpdated,
    ref
  } from "vue";
  defineOptions({
    name: "Person"
  })

  // 数据
  let sum = ref(0)

  // 方法
  function changeSum(){
    sum.value += 1
  }

  // 创建  beforeCreate created
  console.log('创建')

  // 挂载前 挂载前调用 onBeforeMount 所指定的函数 ()=>{}
  onBeforeMount(()=>{
    console.log('挂载前')
  })
  // 挂载完毕
  onMounted(()=>{
    console.log('挂载完毕')
  })

  // 更新前
  onBeforeUpdate(()=>{
    console.log('更新前')
  })
  // 更新完毕
  onUpdated(()=>{
    console.log('更新完毕')
  })

  // 卸载前
  onBeforeUnmount(()=>{
    console.log('卸载前')
  })
  // 卸载完毕
  onUnmounted(()=>{
    console.log('卸载完毕')
  })

</script>

<!--开启局部样式,只适用于该vue模板-->
<style scoped>
.person {
  background: antiquewhite;
  border-radius: 10px;
  padding: 12px;
  box-shadow: 0 2px 8px rgba(100, 150, 200, 0.15);
}

button {
  margin: 0 6px;
  padding: 5px 12px;
  border: none;
  border-radius: 6px;
  background: #4a90e2;
  color: white;
  cursor: pointer;
  transition: all 0.2s;
}

button:hover {
  background: #3a7bc8;
  transform: translateY(-1px);
}

li {
  font-size: 20px;
  color: #333;
  line-height: 1.6;
}
</style>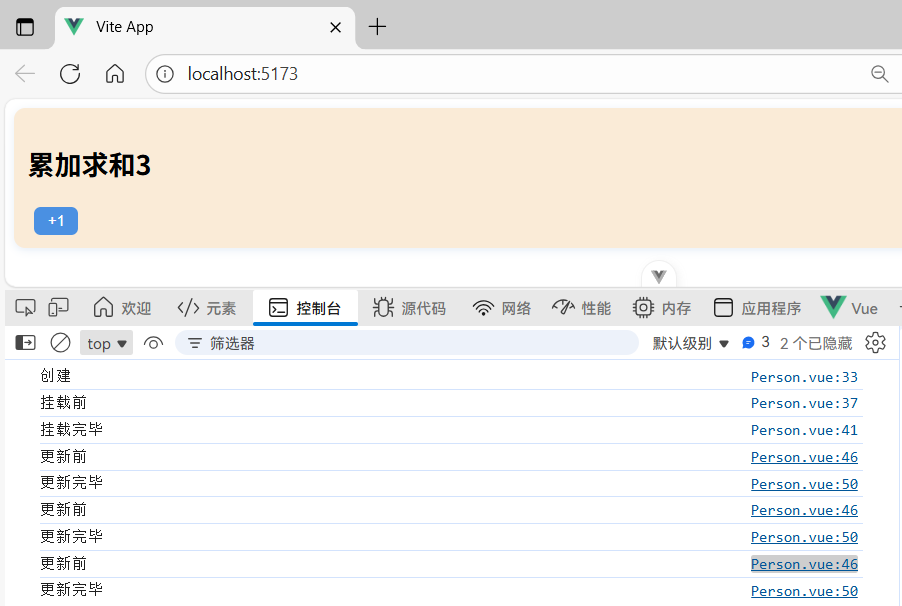

4 父子组件生命周期顺序
① 具体解析流程
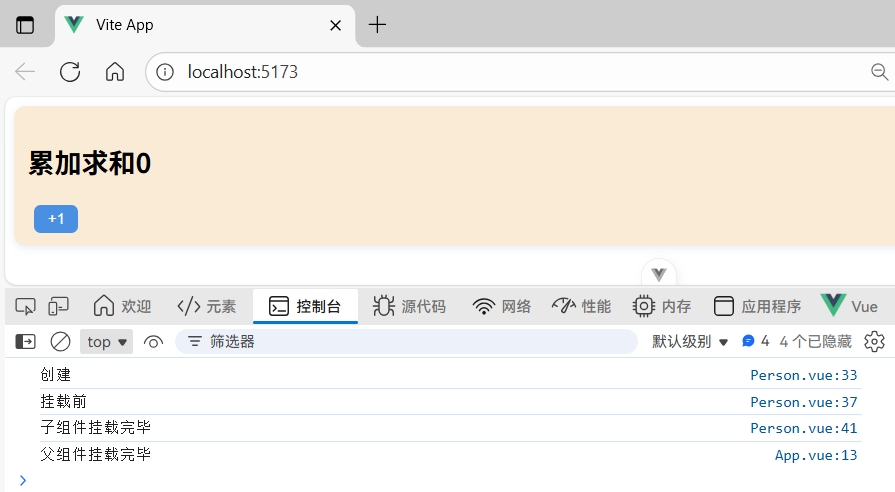
在 Vue 3 中,由index.html入口开始,引入了main.ts,main.ts开始工作,要将App渲染到页面上,来到App.vue对组件进行解析,发现该组件引用了Person组件,就会先解析Person组件,解析完毕后(勾子全部调完了),再继续解析App.vue按照顺序依次往下,父是最后执行的。
② 父组件 -- App.vue
js
<template>
    <person v-if="isShow"/>
</template>

<script setup lang="ts">
  import Person from './components/Person.vue'
  import {onMounted, ref} from 'vue'

  let isShow = ref(true)

  // 挂载完毕
  onMounted(()=>{
    console.log('父组件挂载完毕')
  })

</script>
<style>
</style>
③ 子组件 -- Person.vue
js
<template>
  <div class="person">
    <h2>累加求和{{sum}}</h2>
    <button @click="changeSum">+1</button>
  </div>
</template>

<script lang="ts" setup>
  // 引入生命周期
  import {
    defineOptions,
    onBeforeMount,
    onBeforeUnmount,
    onBeforeUpdate,
    onMounted,
    onUnmounted,
    onUpdated,
    ref
  } from "vue";
  defineOptions({
    name: "Person"
  })

  // 数据
  let sum = ref(0)

  // 方法
  function changeSum(){
    sum.value += 1
  }

  // 创建  beforeCreate created
  console.log('创建')

  // 挂载前 挂载前调用 onBeforeMount 所指定的函数 ()=>{}
  onBeforeMount(()=>{
    console.log('挂载前')
  })
  // 挂载完毕
  onMounted(()=>{
    console.log('子组件挂载完毕')
  })
</script>

<!--开启局部样式,只适用于该vue模板-->
<style scoped>
.person {
  background: antiquewhite;
  border-radius: 10px;
  padding: 12px;
  box-shadow: 0 2px 8px rgba(100, 150, 200, 0.15);
}

button {
  margin: 0 6px;
  padding: 5px 12px;
  border: none;
  border-radius: 6px;
  background: #4a90e2;
  color: white;
  cursor: pointer;
  transition: all 0.2s;
}

button:hover {
  background: #3a7bc8;
  transform: translateY(-1px);
}

li {
  font-size: 20px;
  color: #333;
  line-height: 1.6;
}
</style>