Android 逆向实战:从零突破某电商 App 登录接口全参数加密
逆向难度 : ⭐⭐⭐⭐⭐
技术栈 : Charles | Frida | DEX脱壳 | SO逆向 | OLLVM对抗 | VMP虚拟化 | Robust热修复
适合人群: 具备基础 Android 开发和逆向经验的中高级开发者
📖 目录
- 一、序章:接口分析与战前准备
- 二、新手村:破解基础参数
- [三、主线任务:攻克 newSign 签名](#三、主线任务:攻克 newSign 签名)
- [四、支线任务:挖掘隐藏参数 uuid](#四、支线任务:挖掘隐藏参数 uuid)
- 五、终章:完整实现与优化
- 六、攻防对抗:安全防御指南
- 七、总结:技术路线图与关键收获
一、序章:接口分析与战前准备
1.1 逆向场景与目标
在移动应用安全测试和自动化开发中,我们经常需要分析 App 的网络请求加密逻辑。本文以某知名电商 App(以下简称"某物 App")的登录接口为例,展示如何在多层代码保护下完整还原所有参数的加密算法。
我们的目标:完全破解登录接口的所有参数加密逻辑,并用 Python 实现完整的登录功能。
1.2 抓包分析:接口全景图
Step 1: 使用 Charles 抓包
首先使用 Charles 抓取 App 的 HTTPS 请求。关于如何配置 Charles 抓取 HTTPS 流量,可以参考:安卓抓包实战:使用 Charles 抓取 App 数据全流程详解
打开 App,输入手机号和密码,点击登录,可以看到调用了 unionLogin 接口:
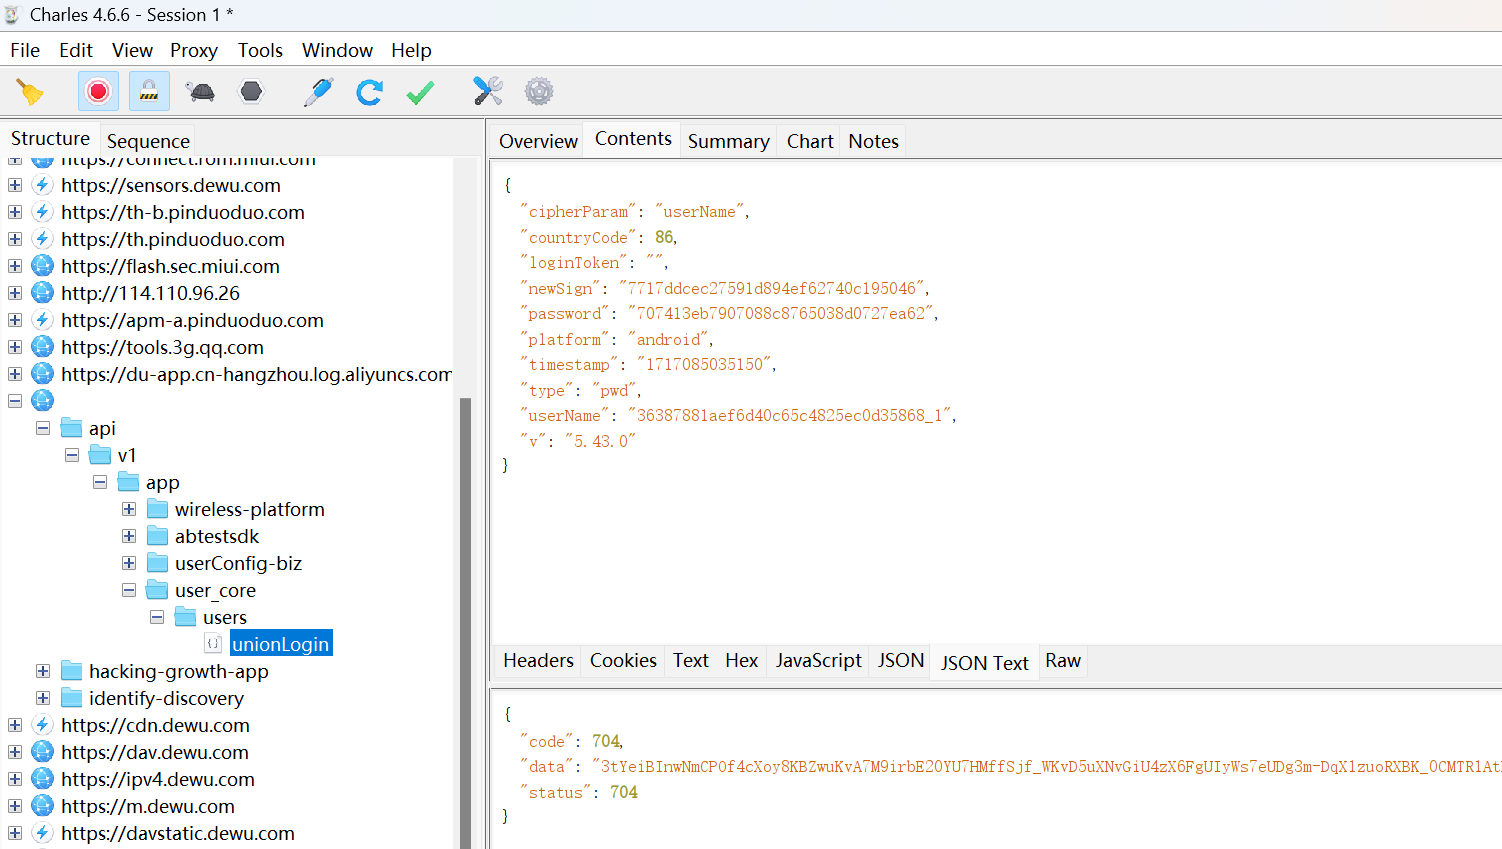
Step 2: 分析请求参数
json
POST /api/v1/app/user_core/users/unionLogin

{
    "cipherParam": "userName",
    "countryCode": 86,
    "loginToken": "",
    "newSign": "7717ddcec27591d894ef62740c195046",
    "password": "707413eb7907088c8765038d0727ea62",
    "platform": "android",
    "timestamp": "1717085035150",
    "type": "pwd",
    "userName": "36387881aef6d40c65c4825ec0d35868_1",
    "v": "5.43.0"
}响应:
json
{
    "code": 704,
    "data": "3YlD20Mglo7XabT4cSg0p_sFlOH7UrRp2-SV2xAVsXY...",
    "status": 704
}
1.3 参数难度评估
通过观察参数特征,我们可以初步评估破解难度:
| 参数名 | 值特征 | 初步判断 | 难度 |
|---|---|---|---|
userName |
36387881aef6d40c65c4825ec0d35868_1 |
32位hex + _1 后缀 |
⭐⭐ |
password |
707413eb7907088c8765038d0727ea62 |
32位hex字符串 | ⭐ |
newSign |
7717ddcec27591d894ef62740c195046 |
32位hex字符串 | ⭐⭐⭐⭐⭐ |
timestamp |
1717085035150 |
13位时间戳 | ⭐ |
敌情分析:
- ✅
timestamp: 客户端时间戳,简单 - ✅
password: 看起来像 MD5,应该不难 - ⚠️
userName: 32位hex + 后缀,可能是 AES 加密 - 🔥
newSign: 最复杂的签名算法,是核心难点
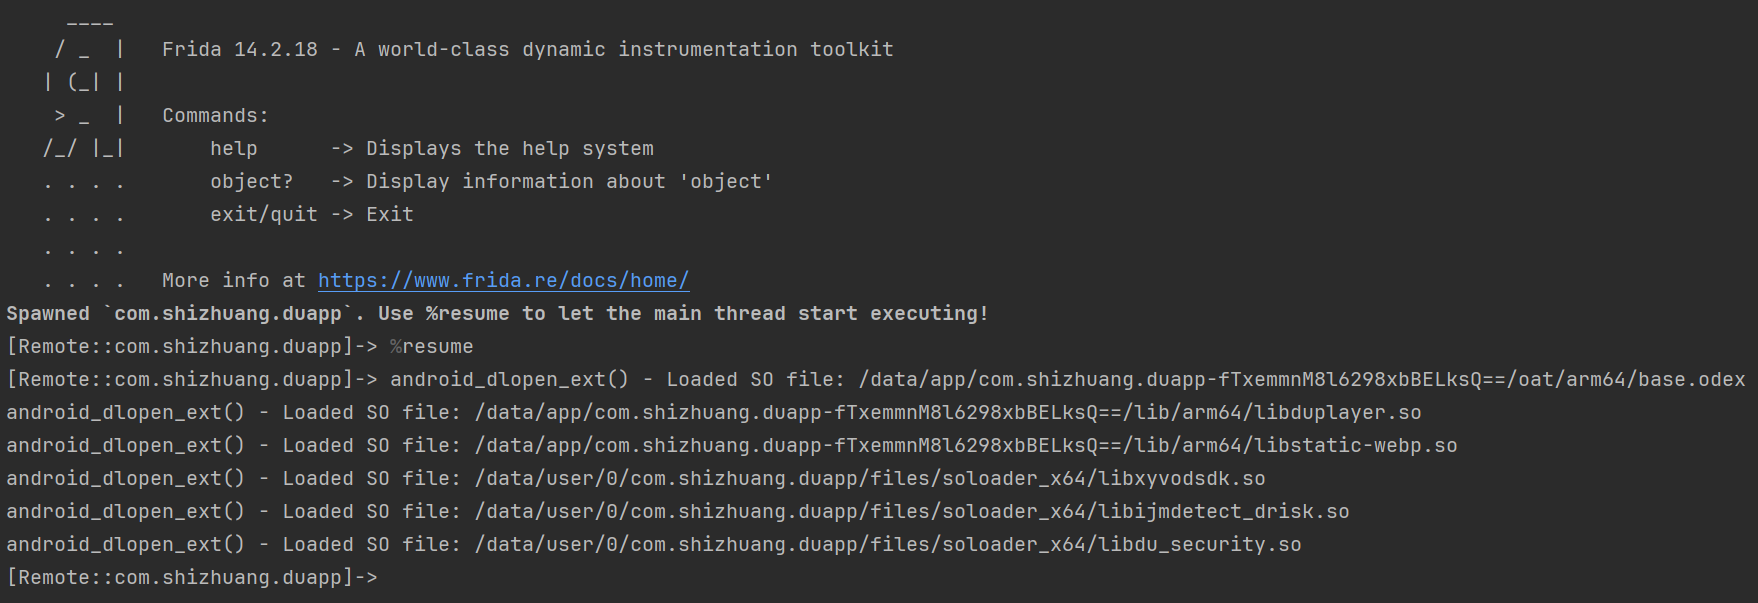
1.4 战前准备:Frida 反调试突破
问题:Frida 被检测
尝试使用 Frida 连接 App 后,程序立即崩溃:
bash
$ frida -U -F -l script.js

Fatal Python error: none_dealloc: deallocating None
Process terminated
这是典型的 Frida 反调试检测。
技术原理:Android App 如何检测 Frida?
| 检测类型 | 检测方法 | 特征 |
|---|---|---|
| 进程名检测 | 读取 /proc/<pid>/cmdline |
搜索 frida-server |
| 端口扫描 | 扫描 TCP 端口 | 检测 27042/27043 端口 |
| 内存特征 | 搜索内存字符串 | 查找 LIBFRIDA、frida-agent |
| 文件检测 | 检查文件系统 | /data/local/tmp/frida-server |
| SO 库检测 | Hook dlopen |
检测 libfrida-agent.so 加载 |
解决方案 1:修改 Frida 文件名和端口
bash
# 1. 重命名 frida-server
adb push frida-server-16.0.0-android-arm64 /data/local/tmp/systemd
adb shell chmod 755 /data/local/tmp/systemd

# 2. 使用自定义端口启动
adb shell "/data/local/tmp/systemd -l 0.0.0.0:12345"

# 3. 端口转发
adb forward tcp:12345 tcp:12345

# 4. 连接到自定义端口
frida -H 127.0.0.1:12345 -F -l script.js
解决方案 2:定位并删除反调试 SO
编写 Frida 脚本 Hook dlopen 查找哪个 SO 导致崩溃:
javascript
/**
 * Hook dlopen 查找加载的 SO 库
 */
function hook_dlopen() {
    const android_dlopen_ext = Module.findExportByName(null, "android_dlopen_ext");

    Interceptor.attach(android_dlopen_ext, {
        onEnter(args) {
            const soPath = Memory.readUtf8String(args[0]);
            if (soPath.includes("com.shizhuang.duapp")) {
                console.log("[*] Loading SO:", soPath);
            }
        }
    });
}

setImmediate(hook_dlopen);日志输出:
[*] Loading SO: .../lib/arm64/libGameVMP.so
[*] Loading SO: .../lib/arm64/libmmkv.so
[*] Loading SO: .../lib/arm64/libmsaoaidsec.so
Process terminated  // ← 加载这个 SO 后崩溃
找到元凶 :libmsaoaidsec.so(数美SDK的反调试模块)
解决:直接删除
bash
adb shell rm /data/app/com.shizhuang.duapp-*/lib/arm64/libmsaoaidsec.so重新启动 Frida,成功运行!🎉
二、新手村:破解基础参数
2.1 目标:userName & password
让我们从最简单的两个参数开始热身。
输入:
- 手机号:
13833854654 - 密码:
90909090
输出:
userName:36387881aef6d40c65c4825ec0d35868_1password:f807a8a14205e5cdc6533430138c1179
2.2 武器:Hook HashMap
由于 Java 层的请求参数通常存储在 HashMap 中,我们可以 Hook HashMap.put 方法来捕获参数流动:
javascript
/**
 * Hook java.util.HashMap.put 方法,捕获参数
 * @param {string[]} filters - 过滤关键字(空数组表示不过滤)
 */
function hookHashMap(filters) {
    Java.perform(function () {
        const HashMap = Java.use('java.util.HashMap');

        HashMap.put.implementation = function (key, value) {
            const keyStr = key ? key.toString() : "null";
            const valueStr = value ? value.toString() : "null";

            // 过滤逻辑
            let shouldPrint = filters.length === 0;
            if (!shouldPrint) {
                for (let keyword of filters) {
                    if (keyStr.includes(keyword) || valueStr.includes(keyword)) {
                        shouldPrint = true;
                        break;
                    }
                }
            }

            if (shouldPrint) {
                console.log("📦 HashMap.put()");
                console.log(`   Key: ${keyStr}`);
                console.log(`   Value: ${valueStr}\n`);
            }

            return this.put(key, value);
        };
    });
}

setImmediate(function () {
    // 只打印包含 "userName" 或 "password" 的参数
    hookHashMap(["userName", "password"]);
});执行并输入账号密码:
bash
frida -H 127.0.0.1:12345 -F -l hook_hashmap.js -o log.txt日志输出:
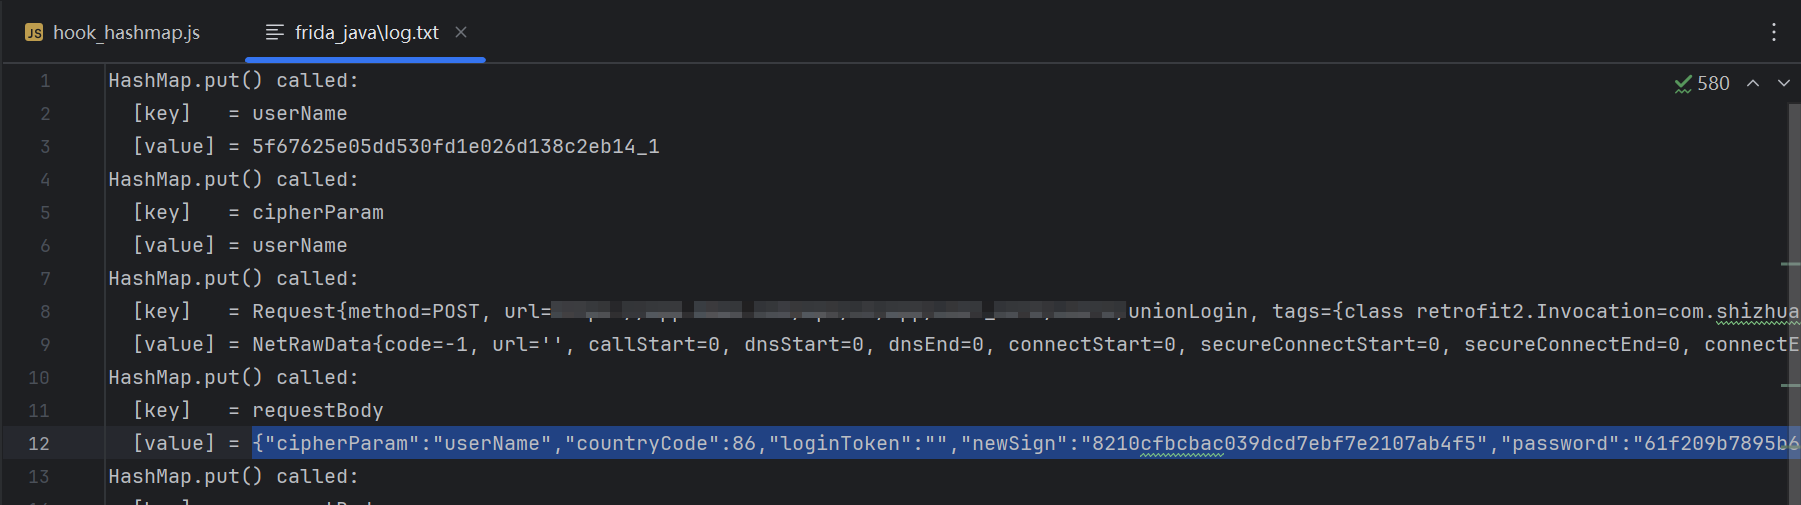
📦 HashMap.put()
   Key: userName
   Value: 36387881aef6d40c65c4825ec0d35868_1

📦 HashMap.put()
   Key: password
   Value: f807a8a14205e5cdc6533430138c1179
2.3 武器升级:Hook Java 加密算法
为了确认具体使用了哪种加密算法,我们需要 Hook Java 层的加密类:
javascript
/**
 * Hook Java 层常见加密算法
 */
function hookCrypto() {
    const ByteString = Java.use("com.android.okhttp.okio.ByteString");

    // 工具函数
    function toHex(tag, data) {
        console.log(`${tag} Hex: ${ByteString.of(data).hex()}`);
    }

    function toUtf8(tag, data) {
        console.log(`${tag} Utf8: ${ByteString.of(data).utf8()}`);
    }

    // ========== Hook MessageDigest (MD5/SHA) ==========
    const MessageDigest = Java.use("java.security.MessageDigest");

    MessageDigest.update.overload('[B').implementation = function (data) {
        const algorithm = this.getAlgorithm();
        console.log(`\n🔐 MessageDigest.update()`);
        console.log(`   Algorithm: ${algorithm}`);
        toUtf8(`   Input`, data);
        return this.update(data);
    };

    MessageDigest.digest.overload().implementation = function () {
        const result = this.digest();
        const algorithm = this.getAlgorithm();
        console.log(`✅ MessageDigest.digest()`);
        console.log(`   Algorithm: ${algorithm}`);
        toHex(`   Result`, result);
        console.log("=".repeat(50) + "\n");
        return result;
    };

    // ========== Hook Cipher (AES/DES/RSA) ==========
    const Cipher = Java.use("javax.crypto.Cipher");

    Cipher.init.overload('int', 'java.security.Key').implementation = function (opmode, key) {
        const algorithm = this.getAlgorithm();
        const mode = opmode === 1 ? 'ENCRYPT' : 'DECRYPT';

        console.log(`\n🔐 Cipher.init()`);
        console.log(`   Algorithm: ${algorithm}`);
        console.log(`   Mode: ${mode}`);

        try {
            const keyBytes = key.getEncoded();
            toHex(`   Key`, keyBytes);
        } catch (e) {
            console.log(`   Key: [Unable to extract]`);
        }

        return this.init(opmode, key);
    };

    Cipher.doFinal.overload('[B').implementation = function (data) {
        const algorithm = this.getAlgorithm();
        console.log(`✅ Cipher.doFinal()`);
        console.log(`   Algorithm: ${algorithm}`);
        toUtf8(`   Input`, data);

        const result = this.doFinal(data);
        toHex(`   Result`, result);
        console.log("=".repeat(50) + "\n");
        return result;
    };
}

setImmediate(function () {
    Java.perform(hookCrypto);
});执行脚本:
bash
frida -H 127.0.0.1:12345 -F -l hook_java_crypto.js -o log.txt2.4 破解 userName:AES-128-ECB
从日志中找到关键信息:
🔐 Cipher.init()
   Algorithm: AES/ECB/PKCS5Padding
   Mode: ENCRYPT
   Key Hex: ********************************

✅ Cipher.doFinal()
   Algorithm: AES/ECB/PKCS5Padding
   Input Utf8: 13833854654
   Result Hex: 36387881aef6d40c65c4825ec0d35868
算法确认 :userName = AES-ECB(手机号, key) + "_1"
技术原理:AES-128-ECB 加密
AES (Advanced Encryption Standard):
- 对称加密算法
- 块大小: 128位 (16字节)
- 密钥长度: 128/192/256位
ECB 模式 (Electronic Codebook):
- 最简单的加密模式
- 每个明文块独立加密
- ⚠️ 安全缺陷: 相同明文块 → 相同密文块
PKCS5Padding:
- 填充方式,确保数据长度是 16 字节的倍数
- 填充规则: 如果缺 n 个字节,就填充 n 个值为 n 的字节
加密流程:
明文 "13833854654" (11字节)
    ↓ PKCS5 Padding (填充5个0x05)
"13833854654\x05\x05\x05\x05\x05" (16字节)
    ↓ AES-128-ECB 加密
36387881aef6d40c65c4825ec0d35868 (16字节 = 32位hex)
    ↓ 添加后缀
36387881aef6d40c65c4825ec0d35868_1
验证:使用 CyberChef
打开 CyberChef:
- Recipe: AES Encrypt → To Hex
- Input :
13833854654 - Key :
****************(UTF-8) - Mode: ECB
- Padding: PKCS#7
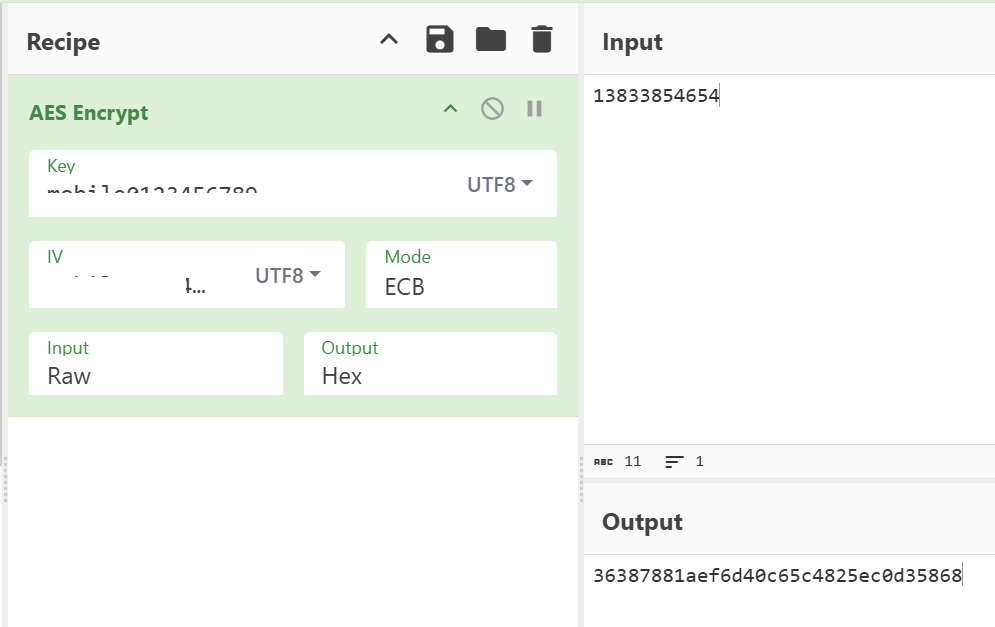
结果 :36387881aef6d40c65c4825ec0d35868 ✅ 一致!
2.5 破解 password:MD5
从日志中找到关键信息:
🔐 MessageDigest.update()
   Algorithm: MD5
   Input Utf8: 90909090du

✅ MessageDigest.digest()
   Algorithm: MD5
   Result Hex: f807a8a14205e5cdc6533430138c1179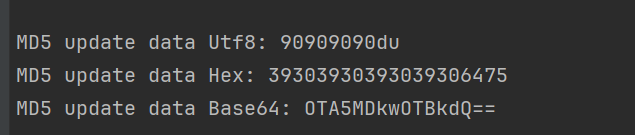
算法确认 :password = MD5(原密码 + "du")
验证:使用 CyberChef
- Recipe: MD5
- Input :
90909090du
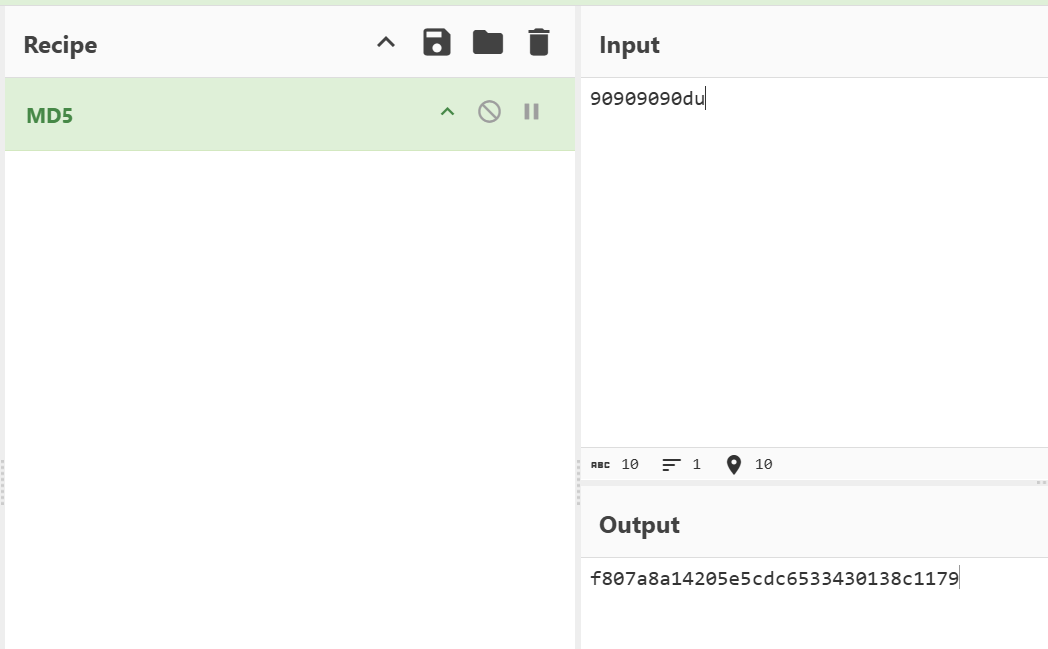
结果 :f807a8a14205e5cdc6533430138c1179 ✅ 一致!
2.6 Python 实现
python
from Crypto.Cipher import AES
from Crypto.Util.Padding import pad
import hashlib

# AES 密钥(从 Frida Hook 中获取)
AES_KEY = "****************"

def encrypt_username(username: str) -> str:
    """
    加密用户名
    算法: AES-128-ECB + "_1"
    """
    key_bytes = AES_KEY.encode('utf-8')
    data_bytes = pad(username.encode('utf-8'), AES.block_size)
    cipher = AES.new(key_bytes, AES.MODE_ECB)
    encrypted = cipher.encrypt(data_bytes)
    return encrypted.hex() + "_1"

def encrypt_password(password: str) -> str:
    """
    加密密码
    算法: MD5(密码 + "du")
    """
    return hashlib.md5((password + "du").encode('utf-8')).hexdigest()

# 测试
print(encrypt_username("13833854654"))
# 输出: 36387881aef6d40c65c4825ec0d35868_1

print(encrypt_password("90909090"))
# 输出: f807a8a14205e5cdc6533430138c1179
新手村通关! 🎉
三、主线任务:攻克 newSign 签名
现在进入最困难的部分:newSign 签名算法。这个参数涉及到 DEX 脱壳、VMP 虚拟化、SO 加固、OLLVM 混淆 等多重保护,是本文的核心挑战。
3.1 第一关:Java 层追踪
🎯 目标:找到 newSign 的计算位置
我们知道 newSign 的值是 7717ddcec27591d894ef62740c195046(32位hex),看起来像 MD5。
从 Hook Java 加密算法的日志中,我们找到了线索:
🔐 MessageDigest.update()
   Algorithm: MD5
   Input Utf8: dWWoXlbR3K87j2N27Dkv4uOPUnOsh0xrJ5t+atsiQXC+/dIN8Kof...

✅ MessageDigest.digest()
   Algorithm: MD5
   Result Hex: 7717ddcec27591d894ef62740c195046

调用栈:
java.security.MessageDigest.digest(Native Method)
    at ff.l0.h(RequestUtils.java:3)
    at ff.l0.c(RequestUtils.java:12)
    at lte.NCall.IL(Native Method)
    ...
发现 :newSign 是对一个 Base64 字符串进行 MD5 加密!
Hook ff.l0 类的所有方法
根据调用栈,关键类是 ff.l0,我们 Hook 它的所有方法:
javascript
/**
 * Hook 指定类的所有方法(自动处理重载)
 */
function hook_all_methods(className) {
    Java.perform(function () {
        const targetClass = Java.use(className);
        const methods = targetClass.class.getDeclaredMethods();

        methods.forEach(function (method) {
            const methodName = method.getName();
            try {
                const overloads = targetClass[methodName].overloads;

                overloads.forEach(function (overload) {
                    overload.implementation = function () {
                        let log = `\n🔧 ${className}.${methodName}()\n`;
                        log += `Arguments:\n`;

                        for (let i = 0; i < arguments.length; i++) {
                            const arg = arguments[i];
                            // 特殊处理 Map 类型
                            if (Java.use("java.util.Map").class.isInstance(arg)) {
                                log += `  [${i}] Map:\n`;
                                const entries = Java.cast(arg, Java.use("java.util.Map")).entrySet();
                                const iterator = entries.iterator();
                                while (iterator.hasNext()) {
                                    const entry = iterator.next();
                                    log += `      ${entry.getKey()} => ${entry.getValue()}\n`;
                                }
                            } else {
                                log += `  [${i}]: ${arg}\n`;
                            }
                        }

                        const retval = this[methodName].apply(this, arguments);
                        log += `Return: ${retval}\n`;
                        console.log(log);
                        return retval;
                    };
                });
            } catch (e) {
                // 跳过无法 Hook 的方法
            }
        });
    });
}

setImmediate(function () {
    hook_all_methods("ff.l0");
});输出:
🔧 ff.l0.c()
Arguments:
  [0] Map:
      cipherParam => userName
      countryCode => 86
      password => 61f209b789...
      type => pwd
      userName => 5f67625e05...
  [1]: 1750303548243
  [2]:
Return: 997202002b37e2534113

🔧 ff.l0.h()
Arguments:
  [0]: dWWoXlbR3K87j2N27Dkv4uOPUnOsh0xrJ5t+atsiQX...
Return: 997202002b37e2534113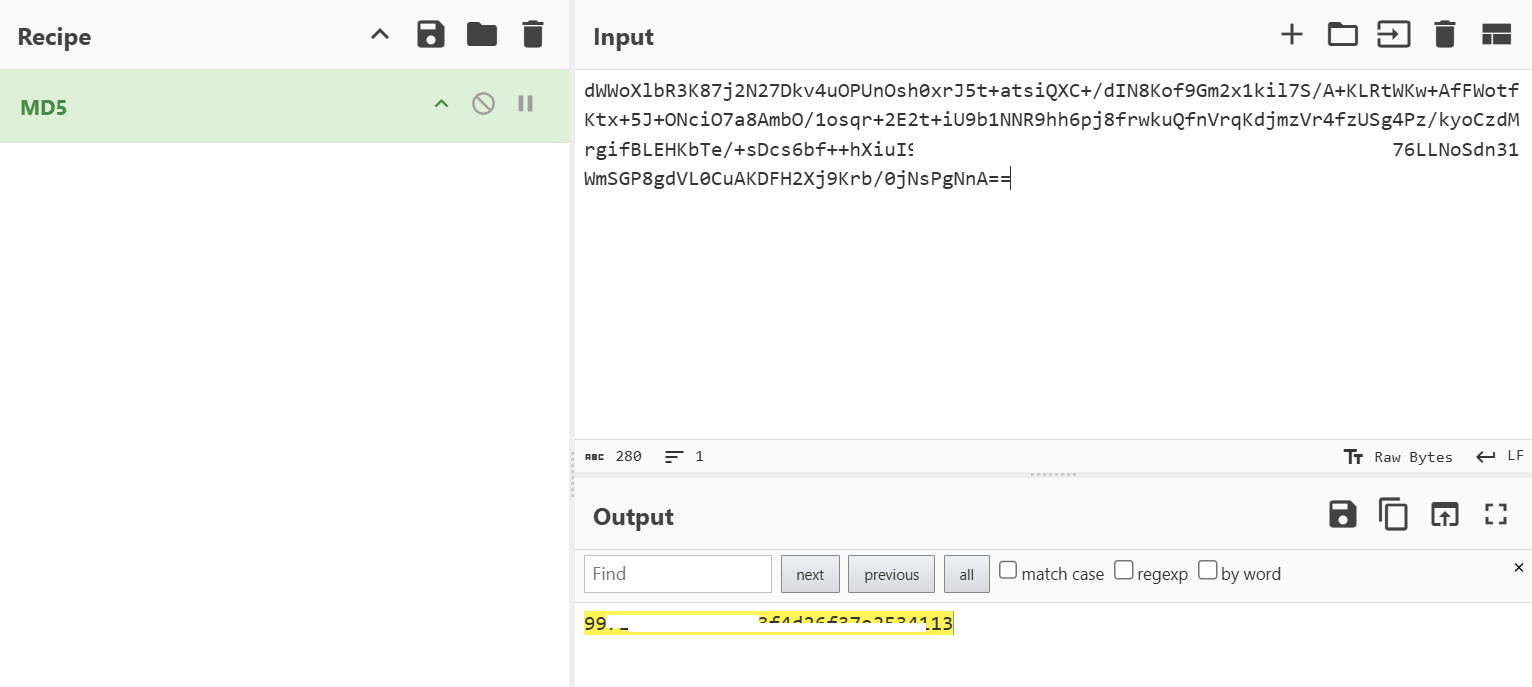
发现:
ff.l0.c()接收请求参数,返回 newSignff.l0.h()是 MD5 加密函数
🚫 遭遇困境:类不存在!
使用 jadx 反编译 APK,搜索 ff.l0 类,发现:类不存在!
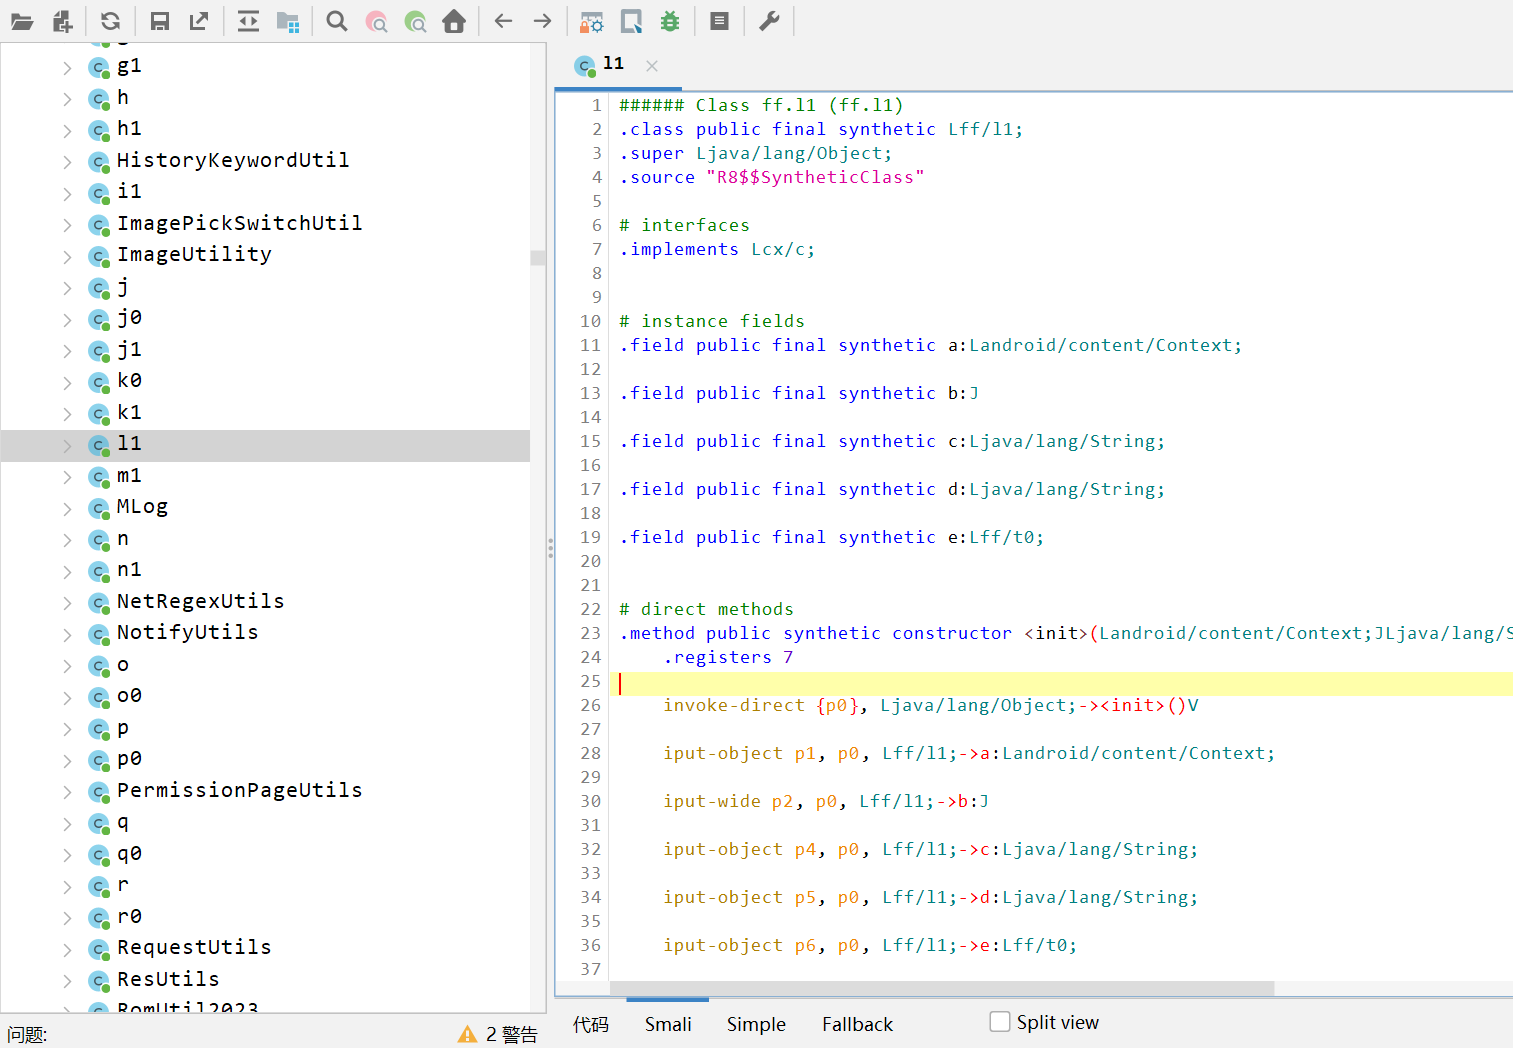
这说明 App 使用了 DEX 抽取壳,关键类的代码在运行时才动态恢复。
3.2 第二关:DEX 脱壳之战
💡 技术原理:什么是 DEX 抽取壳?
DEX 抽取壳 (Method Code Extraction) 是一种 DEX 加密技术:
-
加壳流程:
原始 DEX ↓ 提取方法的 CodeItem(指令码) ↓ 加密 CodeItem 并存储到单独区域 ↓ 修改 DEX 文件中的方法指针为 NULL ↓ 加壳后的 DEX(反编译看不到代码) -
运行时恢复:
App 启动
   ↓
解壳模块加载
   ↓
读取加密的 CodeItem
   ↓
解密并恢复到内存
   ↓
方法可正常执行
检测方法:
- 使用 jadx 反编译,类存在但方法体为空
- IDA 分析 DEX 文件,CodeItem 偏移为 0
⚔️ 实战:通用脱壳点
在 ART 虚拟机中,所有 DEX 文件最终都会通过 DexFileLoader::OpenCommon 函数加载。我们可以在这个函数处 Hook,此时 DEX 已经被解密还原到内存。
Frida 脚本(完整版):
javascript
/**
 * Frida DEX 通用脱壳脚本
 * 适用于: Android 8.0+ (ART)
 * 原理: Hook DexFileLoader::OpenCommon,此时 DEX 已解密
 */

// ========== 工具函数 ==========

/**
 * 读取 C++ std::string 内容
 */
function readStdString(str) {
    const isTiny = (str.readU8() & 1) === 0;
    if (isTiny) {
        return str.add(1).readUtf8String();
    }
    return str.add(2 * Process.pointerSize).readPointer().readUtf8String();
}

/**
 * 获取当前进程名
 */
function getProcessName() {
    const openPtr = Module.getExportByName('libc.so', 'open');
    const open = new NativeFunction(openPtr, 'int', ['pointer', 'int']);

    const readPtr = Module.getExportByName("libc.so", "read");
    const read = new NativeFunction(readPtr, "int", ["int", "pointer", "int"]);

    const closePtr = Module.getExportByName('libc.so', 'close');
    const close = new NativeFunction(closePtr, 'int', ['int']);

    const path = Memory.allocUtf8String("/proc/self/cmdline");
    const fd = open(path, 0);
    if (fd !== -1) {
        const buffer = Memory.alloc(0x1000);
        read(fd, buffer, 0x1000);
        close(fd);
        return ptr(buffer).readCString();
    }
    return "unknown";
}

/**
 * 创建目录
 */
function mkdir(path) {
    const mkdirPtr = Module.getExportByName('libc.so', 'mkdir');
    const mkdir = new NativeFunction(mkdirPtr, 'int', ['pointer', 'int']);

    const chmodPtr = Module.getExportByName('libc.so', 'chmod');
    const chmod = new NativeFunction(chmodPtr, 'int', ['pointer', 'int']);

    const cPath = Memory.allocUtf8String(path);
    mkdir(cPath, 0o755);
    chmod(cPath, 0o755);
}

/**
 * 将 DEX 数据写入文件
 */
function dumpDexToFile(filename, base, size) {
    const processName = getProcessName();

    // 确保文件名以 .dex 结尾
    if (!filename.endsWith(".dex")) {
        filename += ".dex";
    }

    const dir = `/sdcard/Android/data/${processName}/dump_dex`;
    const fullPath = `${dir}/${filename.replace(/[/!]/g, "_")}`;

    // 创建目录
    mkdir(dir);

    // 写入文件
    const fd = new File(fullPath, "wb");
    if (fd) {
        const dex_buffer = ptr(base).readByteArray(size);
        fd.write(dex_buffer);
        fd.flush();
        fd.close();
        console.log(`[+] ✅ Dumped: ${fullPath}`);
    }
}

// ========== 主函数 ==========

/**
 * Hook DexFileLoader::OpenCommon
 */
function hookDexFileLoaderOpenCommon() {
    // 查找符号
    const symbols = Module.enumerateSymbolsSync("libdexfile.so");
    let targetAddr = null;

    for (let sym of symbols) {
        if (sym.name.includes("DexFileLoader") && sym.name.includes("OpenCommon")) {
            targetAddr = sym.address;
            console.log("[+] Found DexFileLoader::OpenCommon at:", targetAddr);
            break;
        }
    }

    if (!targetAddr) {
        console.error("[-] DexFileLoader::OpenCommon not found");
        return;
    }

    Interceptor.attach(targetAddr, {
        onEnter(args) {
            const base = args[0];              // const uint8_t* base
            const size = args[1].toInt32();    // size_t size
            const location_ptr = args[4];      // const std::string& location
            const location = readStdString(location_ptr);

            console.log("\n[*] 📦 DexFileLoader::OpenCommon called");
            console.log(`    Base:     ${base}`);
            console.log(`    Size:     ${size}`);
            console.log(`    Location: ${location}`);

            // 验证 DEX 魔数
            const magic = ptr(base).readCString();
            console.log(`    Magic:    ${magic}`);

            if (magic && magic.indexOf("dex") !== -1) {
                // 提取文件名
                const filename = location.split("/").pop();

                // Dump DEX
                dumpDexToFile(filename, base, size);
            }
        },
        onLeave(retval) {}
    });
}

// ========== 入口 ==========

console.log("="*60);
console.log("🚀 Frida DEX 通用脱壳工具");
console.log("="*60);

setImmediate(hookDexFileLoaderOpenCommon);执行脚本:
bash
frida -H 127.0.0.1:12345 -l dump_dex.js -f com.shizhuang.duapp日志输出:
[+] Found DexFileLoader::OpenCommon at: 0x7be3891c28

[*] 📦 DexFileLoader::OpenCommon called
    Base:     0x7b75c69000
    Size:     8681372
    Location: /data/app/com.shizhuang.duapp-xxx/base.apk
    Magic:    dex035
[+] ✅ Dumped: /sdcard/Android/data/com.shizhuang.duapp/dump_dex/base.apk.dex

[*] 📦 DexFileLoader::OpenCommon called
    Base:     0x7b7471e000
    Size:     12888744
    Location: /data/app/com.shizhuang.duapp-xxx/base.apk!classes2.dex
    Magic:    dex035
[+] ✅ Dumped: /sdcard/Android/data/com.shizhuang.duapp/dump_dex/base.apk_classes2.dex

... (共16个 DEX 文件)拉取到本地:
bash
adb pull /sdcard/Android/data/com.shizhuang.duapp/dump_dex🔍 查找 ff.l0 所在的 DEX
bash
cd dump_dex
grep -rl "ff/l0" *.dex输出:
base.apk_classes9.dex
base.apk_classes10.dex
base.apk_classes11.dex
...
✅ 突破成功:反编译 ff.l0.c
使用 jadx 反编译 base.apk_classes9.dex,成功找到 ff.l0.c 源码:
java
package ff;

/**
 * 计算 newSign
 * @param map - 请求参数
 * @param j - timestamp
 * @param str - loginToken
 * @return newSign
 */
public static String c(Map<String, Object> map, long j, String str) {
    synchronized (l0.class) {
        if (map == null) {
            return "";
        }

        // 1. 添加隐藏参数
        map.put("uuid", he.a.i.t());           // Android ID
        map.put("platform", "android");
        map.put("v", he.a.i.b());              // App 版本
        map.put("loginToken", str == null ? "" : str);
        map.put("timestamp", String.valueOf(j));

        // 2. 拼接参数字符串(按 key 字母顺序)
        String i = i(map);

        // 3. AES 加密 + Base64 编码
        String doWork = DuHelper.doWork(he.a.h, i);

        // 4. 移除临时参数
        map.remove("uuid");

        // 5. MD5 加密
        return h(doWork);
    }
}

/**
 * MD5 加密
 */
public static String h(String str) {
    try {
        MessageDigest md = MessageDigest.getInstance("MD5");
        md.update(str.getBytes());
        byte[] digest = md.digest();

        StringBuilder sb = new StringBuilder();
        for (byte b : digest) {
            String hex = Integer.toHexString(b & 0xFF);
            if (hex.length() < 2) {
                hex = "0" + hex;
            }
            sb.append(hex);
        }
        return sb.toString();
    } catch (NoSuchAlgorithmException e) {
        return "";
    }
}发现:
newSign = MD5(DuHelper.doWork(拼接字符串))- 核心加密在
DuHelper.doWork()方法中 - 这是一个 Native 方法!
3.3 第三关:突破 VMP 虚拟化
🎯 目标:找到 DuHelper.doWork 的真实实现
查找 DuHelper 所在的 DEX:
bash
grep -rl "DuHelper" dump_dex/*.dex
# 输出: base.apk_classes9.dex
反编译 DuHelper.doWork:
java
package com.shizhuang.duapp.common.helper.ee;

import lte.NCall;

public class DuHelper {
    static {
        NCall.IV(new Object[]{282});
    }

    /**
     * 核心加密方法
     * @param obj - Context 对象
     * @param str - 明文字符串
     * @return Base64 编码的密文
     */
    public static String doWork(Object obj, String str) {
        return (String) NCall.IL(new Object[]{283, obj, str});
    }
}发现:
doWork调用了lte.NCall.IL方法- 第一个参数是索引
283 - 这是典型的 VMP 虚拟化保护!
💡 技术原理:VMP 是什么?
VMP (Virtual Machine Protect) 是一种代码虚拟化技术:
原理:
原始机器码
    ↓
转换为自定义虚拟机指令
    ↓
存储在 VM 指令表中
    ↓
运行时由 VM 解释器执行特征:
- 通过索引调用函数:
NCall.IL(new Object[]{283, ...}) - 索引对应 VM 内部的函数表
- 所有方法统一入口
执行流程:
Java 层: NCall.IL(283, context, param)
    ↓
JNI 层: sub_DFA8(env, clazz, arr)
    ↓
VM 层: sub_17EB8(env, arr)  // VM 解释器
    ↓
解释执行: switch(index) {
    case 282: return init_func(...);
    case 283: return encode_func(...);
    ...
}
🔍 分析 lte.NCall
查找 NCall 所在的 DEX:
bash
grep -rl "lte/NCall" dump_dex/*.dex
# 输出: base.apk_classes11.dex
反编译 lte.NCall:
java
package lte;

public class NCall {
    static {
        System.loadLibrary("GameVMP");
    }

    public static native Object IL(Object[] objArr);
    public static native void IV(Object[] objArr);
    public static native int II(Object[] objArr);
    // ... 其他 JNI 方法
}发现:
IL是 native 方法- 实现在
libGameVMP.so中 - 需要分析 SO 层代码
3.4 第四关:SO 脱壳与 OLLVM 对抗
🎯 目标:找到 NCall.IL 的真实地址
由于 NCall.IL 是动态注册的 JNI 方法,我们需要找到它的真实地址。
Frida 脚本:
javascript
/**
 * 打印指定类的所有 Native 方法地址
 */
function print_native_methods(className) {
    Java.perform(function () {
        const targetClass = Java.use(className);
        const methods = targetClass.class.getDeclaredMethods();

        console.log("\n" + "=".repeat(50));
        console.log("📍 JNI Method Info Dump");
        console.log("Target Class:", className);
        console.log("=".repeat(50));

        let count = 0;
        methods.forEach(function (method) {
            const modifiers = method.getModifiers();
            const isNative = (modifiers & 0x100) !== 0; // Modifier.NATIVE

            if (isNative) {
                count++;
                const methodName = method.toString();

                // 获取 ArtMethod 地址
                const artMethodPtr = Java.api['art::ArtMethod::FromReflectedMethod'](method);

                // 获取 entry_point_from_jni_ (偏移 24 字节)
                const entryPoint = artMethodPtr.add(24).readPointer();

                // 获取模块信息
                const module = Process.findModuleByAddress(entryPoint);

                console.log(`\n[${count}] ${methodName}`);
                console.log(`    ArtMethod: ${artMethodPtr}`);
                console.log(`    Entry:     ${entryPoint}`);

                if (module) {
                    const offset = entryPoint.sub(module.base);
                    console.log(`    Module:    ${module.name}`);
                    console.log(`    Offset:    0x${offset.toString(16)}`);
                    console.log(`    Path:      ${module.path}`);
                }
            }
        });

        console.log(`\n✅ Total: ${count} native methods`);
        console.log("=".repeat(50) + "\n");
    });
}

setImmediate(function () {
    print_native_methods("lte.NCall");
});输出(关键部分):
[7] public static native java.lang.Object lte.NCall.IL(java.lang.Object[])
    ArtMethod: 0x9f63a680
    Entry:     0x7b6b454fa8
    Module:    libGameVMP.so
    Offset:    0xdfa8
    Path:      /data/app/.../lib/arm64/libGameVMP.so
找到了! NCall.IL 在 libGameVMP.so 的偏移 0xdfa8 处。
🔧 SO 脱壳实战
用 IDA 打开 libGameVMP.so 会报错,说明 SO 加了壳。
Frida Dump 脚本:
python
#!/usr/bin/env python3
"""
Frida SO Dumper
"""
import frida
import sys

def dump_so(process_name, so_name):
    device = frida.get_usb_device()
    session = device.attach(process_name)

    script = session.create_script(f"""
    const soName = "{so_name}";
    const soModule = Process.findModuleByName(soName);

    if (soModule) {{
        console.log("[+] Found:", soName);
        console.log("    Base:", soModule.base);
        console.log("    Size:", soModule.size);

        const soData = Memory.readByteArray(soModule.base, soModule.size);
        send({{type: "dump", name: soName}}, soData);
    }} else {{
        console.log("[-] Module not found:", soName);
    }}
    """)

    def on_message(message, data):
        if message['type'] == 'send':
            if message['payload']['type'] == 'dump':
                filename = f"{message['payload']['name']}_dumped.so"
                with open(filename, 'wb') as f:
                    f.write(data)
                print(f"[✓] Dumped to: {filename}")

    script.on('message', on_message)
    script.load()
    sys.stdin.read()

if __name__ == "__main__":
dump_so("com.shizhuang.duapp", "libGameVMP.so")执行:
bash
python dump_so.py修复 SO (使用 SoFixer):
bash
java -jar SoFixer.jar -i libGameVMP_dumped.so -o libGameVMP_fixed.so🔍 IDA 分析 - 遭遇 OLLVM 混淆
用 IDA 打开修复后的 SO,跳转到偏移 0xdfa8:
c
__int64 __fastcall sub_DFA8(JNIEnv *env, jclass clazz, jobjectArray arr)
{
    return sub_17EB8((__int64)env, (__int64)arr);
}
继续查看 sub_17EB8,发现大量 x、y 开头的全局变量:
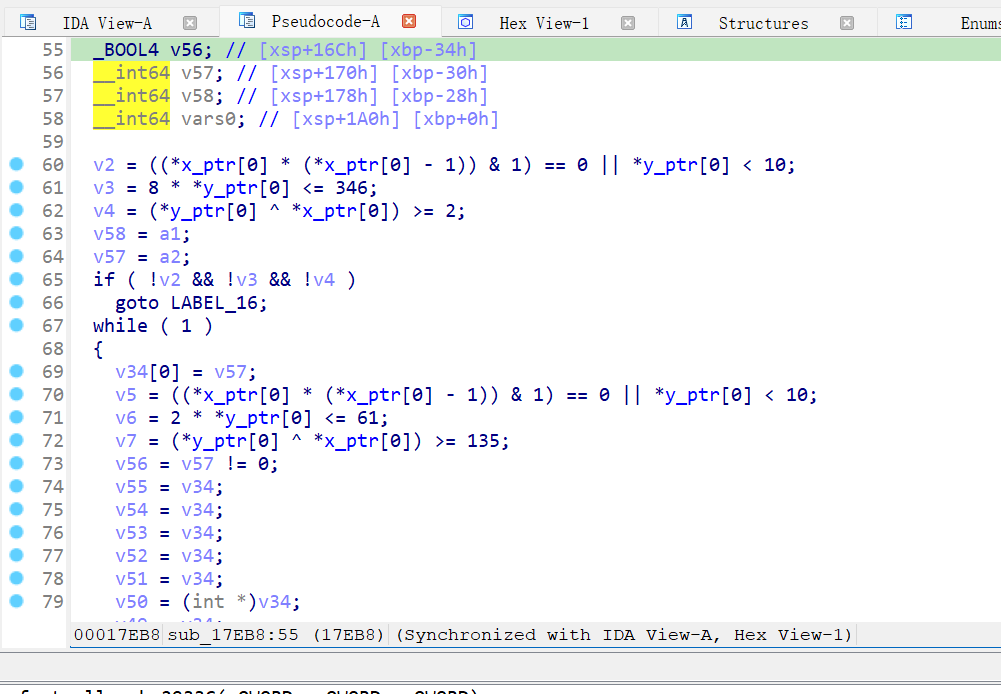
这是典型的 OLLVM BCF (Bogus Control Flow) 混淆!
💡 技术原理:OLLVM 混淆技术
OLLVM (Obfuscator-LLVM) 是基于 LLVM 的代码混淆框架,主要包含三种混淆:
| 混淆类型 | 英文名称 | 原理 | 效果 |
|---|---|---|---|
| 控制流平坦化 | Control Flow Flattening (CFF) | 将所有代码块放入 switch-case,通过状态变量控制执行顺序 | 打乱代码逻辑顺序 |
| 虚假控制流 | Bogus Control Flow (BCF) | 插入永不执行的分支,通过不透明谓词制造假象 | 制造大量垃圾代码 |
| 指令替换 | Instruction Substitution | 用复杂等价指令替换简单指令 | 隐藏真实操作 |
BCF 混淆示例:
c
// 原始代码
int add(int a, int b) {
    return a + b;
}

// OLLVM BCF 混淆后
int add(int a, int b) {
    int result;
    if (x * (x + 1) % 2 == 0) {  // 不透明谓词(永远为真)
        result = a + b;           // 真实分支
    } else {                      // 永不执行
        result = a - b;           // 假分支
    }
    return result;
}
不透明谓词 (Opaque Predicate):
- 数学上可证明的恒真/恒假表达式
- 如:
x * (x + 1) % 2 == 0永远为真(任意整数与其后继的乘积必为偶数)
⚔️ 绕过 OLLVM:Hook JNI jstring
VMP 和 OLLVM 虽然强大,但有一个弱点:JNI 接口调用是标准化的,无法混淆。
由于 NCall.IL 返回 Java String 对象,SO 层必然会调用以下 JNI 函数之一:
NewStringUTF(env, const char*)NewString(env, const jchar*, jsize)
我们可以 Hook 这些函数并打印调用栈,直接定位到加密结果的生成位置!
Frida 脚本:
javascript
/**
 * Hook NewStringUTF 获取加密结果和调用栈
 * @param {string|null} filterStr - 过滤字符串(null表示不过滤)
 */
function hookNewStringUTF(filterStr = null) {
    // 查找 NewStringUTF 符号
    const symbols = Module.enumerateSymbolsSync("libart.so");

    for (let sym of symbols) {
        if (!sym.name.includes("CheckJNI") && sym.name.includes("NewStringUTF")) {
            console.log(`[+] Found NewStringUTF at: ${sym.address}`);

            Interceptor.attach(sym.address, {
                onEnter: function (args) {
                    this.cstr = args[1]; // const char*

                    try {
                        const inputStr = Memory.readUtf8String(this.cstr);
                        this.shouldLog = (filterStr === null || inputStr.includes(filterStr));

                        if (!this.shouldLog) return;

                        this._log = "\n" + "=".repeat(50) + "\n";
                        this._log += "🧪 NewStringUTF Hook\n";
                        this._log += "=".repeat(50) + "\n";
                        this._log += `📥 Input C String:\n${inputStr}\n\n`;
                        this._log += "🔍 Backtrace:\n";

                        // 打印调用栈
                        Thread.backtrace(this.context, Backtracer.ACCURATE)
                            .forEach(addr => {
                                const symbol = DebugSymbol.fromAddress(addr);
                                if (symbol && symbol.name) {
                                    const offset = addr.sub(Module.findBaseAddress(symbol.moduleName));
                                    this._log += `${addr} ${symbol.moduleName}!${symbol.name}+0x${offset.toString(16)}\n`;
                                } else {
                                    const module = Process.findModuleByAddress(addr);
                                    if (module) {
                                        const offset = addr.sub(module.base);
                                        this._log += `${addr} ${module.name}+0x${offset.toString(16)}\n`;
                                    }
                                }
                            });
                    } catch (e) {
                        console.error("❌ Error:", e);
                    }
                },
                onLeave: function (retval) {
                    if (this.shouldLog) {
                        this._log += `\n📤 Returned jstring: ${retval}\n`;
                        this._log += "=".repeat(50) + "\n";
                        console.log(this._log);
                    }
                }
            });
            break;
        }
    }
}

// 主动调用 NCall.IL 测试
function triggerEncryption() {
    Java.perform(() => {
        const Integer = Java.use("java.lang.Integer");
        const String = Java.use("java.lang.String");
        const DuApplication = Java.use("com.shizhuang.duapp.modules.app.DuApplication");
        const NCall = Java.use("lte.NCall");

        const arg0 = Integer.valueOf(283);
        const arg1 = DuApplication.instance.value;
        const arg2 = String.$new("cipherParam...v5.43.0");

        const argsArray = Java.array("java.lang.Object", [arg0, arg1, arg2]);
        const result = NCall.IL(argsArray);
        console.log("\n✅ NCall.IL 返回值:", result);
    });
}

setImmediate(function () {
    const targetStr = "dWWoXlbR3K87j2N27Dkv4uOPUnOsh0xrJ5t+atsiQXC+/";
    hookNewStringUTF(targetStr);

    // 2秒后触发加密
    setTimeout(triggerEncryption, 2000);
});输出:
==================================================
🧪 NewStringUTF Hook
==================================================
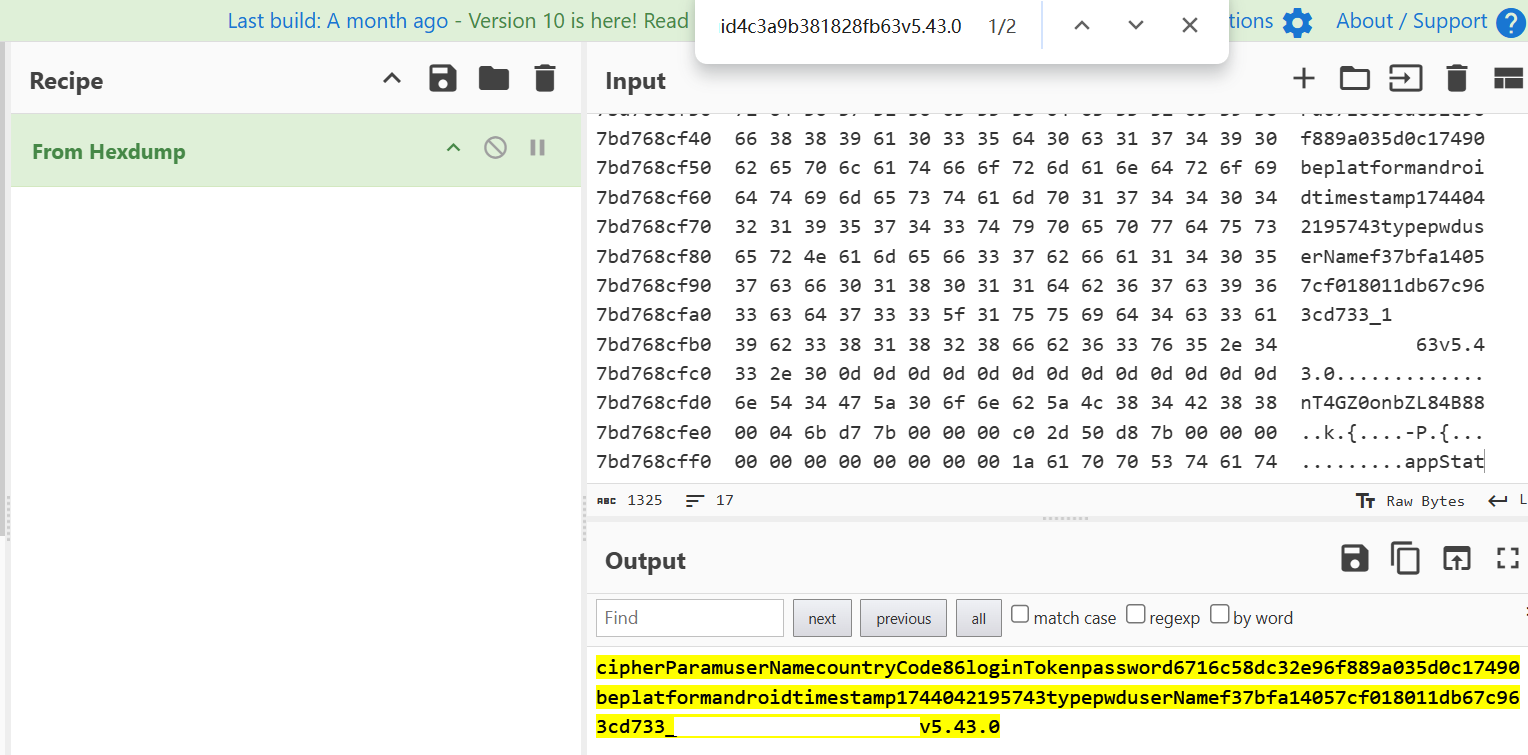
📥 Input C String:
dWWoXlbR3K87j2N27Dkv4uOPUnOsh0xrJ5t+atsiQXC+/dIN8Kof9Gm2x1kil7S/...
🔍 Backtrace:
0x7b627e185c libdewuhelper.so!encode+0x138
0x7b6ca0f388 base.odex!0x808388
📤 Returned jstring: 0x99
==================================================
✅ NCall.IL 返回值: dWWoXlbR3K87j2N27Dkv4uOPUnOsh0xrJ5t+...关键发现:
- 🎯 加密字符串在
libdewuhelper.so的encode函数中生成 - 📍 偏移地址:
0x185c - 🎉 成功绕过 VMP + OLLVM!
3.5 最终 Boss:libdewuhelper.so 分析
🔧 脱壳并分析
bash
# 脱壳
python dump_so.py com.shizhuang.duapp libdewuhelper.so

# 用 IDA 分析,跳转到偏移 0x185c
📖 IDA 反编译 encode 函数
手动还原类型后的伪代码:
c
/**
 * encode - 核心加密函数
 * @param env: JNIEnv*
 * @param thiz: jobject (未使用)
 * @param plainBytes: jbyteArray (原始参数数据)
 * @param keyStr: jstring (密钥相关字符串)
 * @return: jstring (加密后的 Base64 字符串)
 */
jstring __fastcall encode(JNIEnv *env, jobject thiz, jbyteArray plainBytes, jstring keyStr) {
    const char *keyInput;
    void *aesKey;
    unsigned int dataLen;
    jbyte *plainData;
    jbyte *dataCopy;
    char *encryptedData;
    jstring result;

    // 1. 获取密钥输入字符串 (二进制字符串 "010101...")
    keyInput = (*env)->GetStringUTFChars(env, keyStr, NULL);

    // 2. 通过 getValue 解析真实 AES 密钥
    aesKey = (void *)j_getValue(keyInput);

    // 3. 获取原始数据
    dataLen = (*env)->GetArrayLength(env, plainBytes);
    plainData = (*env)->GetByteArrayElements(env, plainBytes, NULL);

    // 4. 拷贝数据到堆内存
    dataCopy = (jbyte *)malloc(dataLen + 1);
    memcpy(dataCopy, plainData, dataLen);
    dataCopy[dataLen] = 0;

    // 5. AES-ECB 加密 + PKCS5 Padding
    encryptedData = (char *)j_AES_128_ECB_PKCS5Padding_Encrypt(dataCopy, aesKey);

    // 6. 清理资源
    free(dataCopy);
    (*env)->ReleaseStringUTFChars(env, keyStr, keyInput);
    (*env)->ReleaseByteArrayElements(env, plainBytes, plainData, 0);

    // 7. Base64 编码并返回 (内部调用 b64_encode)
    result = (*env)->NewStringUTF(env, encryptedData);

    if (encryptedData) free(encryptedData);
    if (aesKey) free(aesKey);

    return result;
}算法流程:
原始参数
    ↓
AES-128-ECB 加密
    ↓
Base64 编码
    ↓
返回字符串
🔑 Hook getValue 获取 AES 密钥
javascript
/**
 * Hook getValue 函数获取 AES 密钥
 */
function hookGetValue() {
    const moduleName = "libdewuhelper.so";
    const funcOffset = 0x160C;

    const base = Module.findBaseAddress(moduleName);
    const funcAddr = base.add(funcOffset);
    console.log("[+] getValue 地址:", funcAddr);

    Interceptor.attach(funcAddr, {
        onEnter(args) {
            this.argStr = Memory.readCString(args[0]);
            console.log(`[*] getValue 调用,输入: "${this.argStr.substring(0, 50)}..."`);
        },
        onLeave(retval) {
            const aesKey = Memory.readCString(retval);
            console.log(`[+] 🔑 AES密钥: ${aesKey}`);
        }
    });
}

setImmediate(function () {
    Java.perform(function () {
        hookGetValue();
        setTimeout(triggerEncryption, 2000);
    });
});输出:
[+] getValue 地址: 0x7b6280860c
[*] getValue 调用,输入: "010110100010001010010010000011000111..."
[+] 🔑 AES密钥: ****************
🔍 Hook AES 加密函数验证
javascript
/**
 * Hook AES128_ECB_encrypt 查看加密过程
 */
function hookAESEncrypt() {
    const funcAddr = Module.getExportByName("libdewuhelper.so", "AES128_ECB_encrypt");
    console.log("[+] AES128_ECB_encrypt 地址:", funcAddr);

    Interceptor.attach(funcAddr, {
        onEnter(args) {
            this.inputPtr = args[0];   // char*: 明文
            this.outputPtr = args[2];  // char*: 密文缓冲区

            console.log("\n" + "=".repeat(50));
            console.log("🔐 AES128_ECB_encrypt");
            console.log("=".repeat(50));
            console.log("[>] 明文内容:");
            console.log(hexdump(this.inputPtr, {
                offset: 0,
                length: 256,
                header: true,
                ansi: false
            }));
        },
        onLeave(retval) {
            const encryptedLen = retval.toInt32();
            console.log(`[<] 密文长度: ${encryptedLen} 字节`);
            console.log("[<] 密文内容:");
            console.log(hexdump(this.outputPtr, {
                offset: 0,
                length: encryptedLen,
                header: true,
                ansi: false
            }));
            console.log("=".repeat(50) + "\n");
        }
    });
}输出:
==================================================
🔐 AES128_ECB_encrypt
==================================================
[>] 明文内容:
           0  1  2  3  4  5  6  7  8  9  A  B  C  D  E  F
7bd768cf00  63 69 70 68 65 72 50 61 72 61 6d 75 73 65 72 4e  cipherParamuserN
7bd768cf10  61 6d 65 63 6f 75 6e 74 72 79 43 6f 64 65 38 36  amecountryCode86
7bd768cf20  6c 6f 67 69 6e 54 6f 6b 65 6e 70 61 73 73 77 6f  loginTokenpasswo
...

[<] 密文长度: 208 字节
[<] 密文内容:
           0  1  2  3  4  5  6  7  8  9  A  B  C  D  E  F
7bd768d0c0  75 65 a8 5e 56 d1 dc af 3b 8f 63 76 ec 39 2f e2  ue.^V...;.cv.9/.
...
3.6 胜利验证
CyberChef 完整验证
打开 CyberChef,构建完整加密流程:
Recipe:
- AES Encrypt
- Key:
****************(UTF-8) - Mode: ECB
- Input format: Raw
- Output format: Hex
- Key:
- From Hex
- To Base64
- MD5
Input : cipherParamuserNamecountryCode86loginToken...v5.43.0
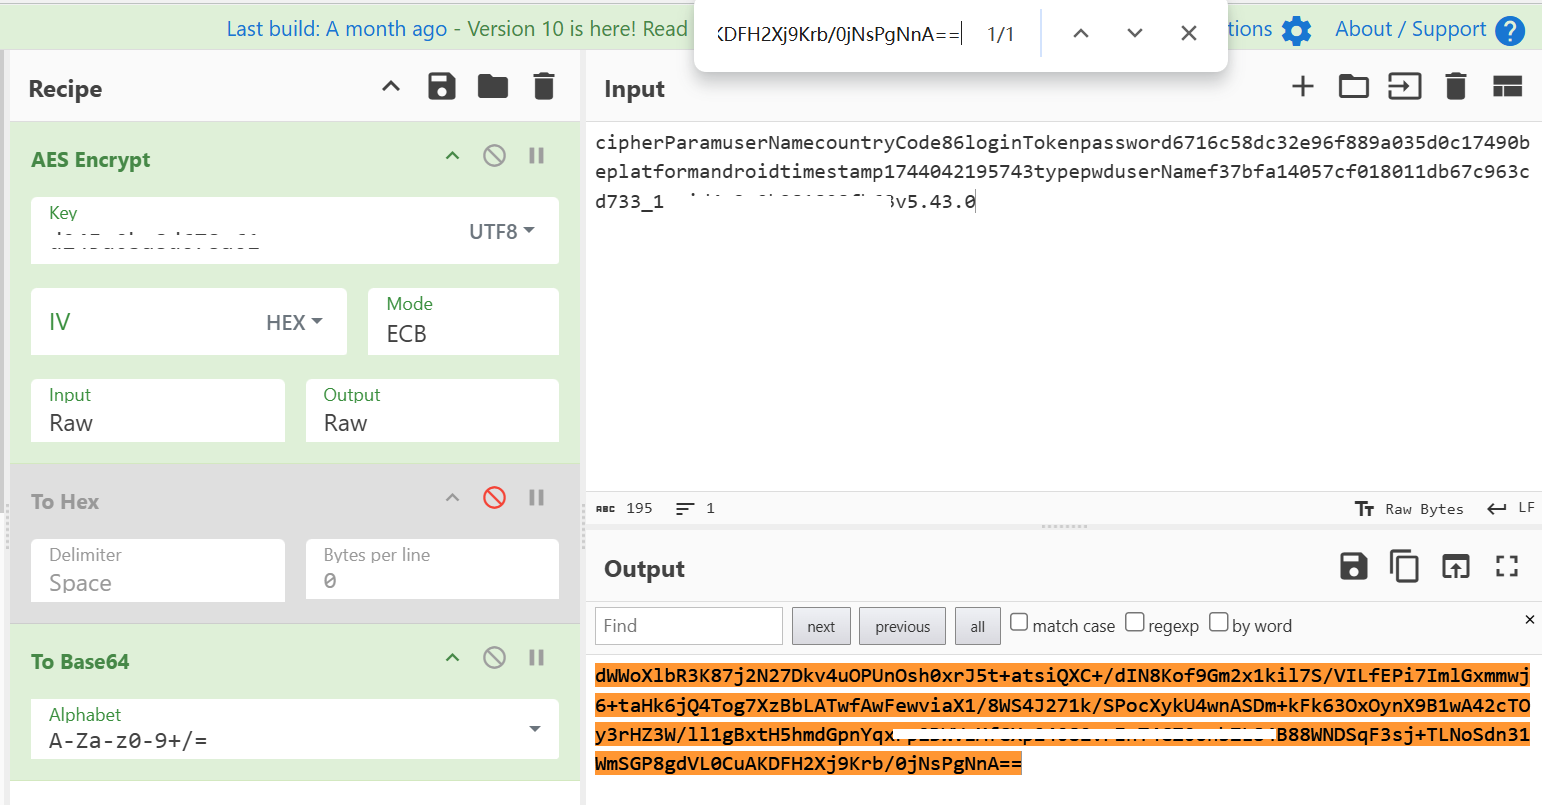
结果 : 7717ddcec27591d894ef62740c195046 ✅
与 APP 返回的 newSign 完全一致!
Python 实现 newSign
python
from Crypto.Cipher import AES
from Crypto.Util.Padding import pad
import base64
import hashlib

# AES 密钥
AES_KEY = "****************"

def calculate_newSign(text: str) -> str:
    """
    计算 newSign 签名
    算法: MD5(Base64(AES-ECB(text)))
    """
    # 1. AES-128-ECB 加密
    key_bytes = AES_KEY.encode('utf-8')
    data_bytes = pad(text.encode('utf-8'), AES.block_size)
    cipher = AES.new(key_bytes, AES.MODE_ECB)
    encrypted = cipher.encrypt(data_bytes)

    # 2. Base64 编码
    b64_result = base64.b64encode(encrypted).decode('utf-8')

    # 3. MD5 哈希
    md5_result = hashlib.md5(b64_result.encode('utf-8')).hexdigest()

    return md5_result

# 测试
text = "cipherParamuserNamecountryCode86loginToken...v5.43.0"
print(calculate_newSign(text))
# 输出: 7717ddcec27591d894ef62740c195046
主线任务完成! 🎉🎉🎉
四、支线任务:挖掘隐藏参数 uuid
4.1 🔍 发现 uuid 字段
通过 Hook ff.l0 的所有方法,我们发现参数拼接时包含了一个 uuid 字段:
🔧 ff.l0.i()
Arguments:
  [0] Map:
      cipherParam => userName
      countryCode => 86
      ...
      uuid => ****************
      v => 5.43.0
Return: cipherParamuserName...uuid****************v5.43.0
但在最终的请求体中并没有 uuid 参数!这说明它是临时添加的,仅用于生成签名。
4.2 🎯 追踪 uuid 来源
从反编译代码中发现:
java
// ff.l0.c 方法
map.put("uuid", he.a.i.t());
Hook he.a.i 查看其真实类型:
javascript
function analyzeUuid() {
    Java.perform(function () {
        const a = Java.use("he.a");
        const instance = a.i.value;

        const instanceClass = instance.getClass();
        const className = instanceClass.getName();
        console.log("[*] he.a.i 实际类型:", className);

        const superClass = instanceClass.getSuperclass();
        console.log("[*] 继承自:", superClass.getName());

        const result = instance.t();
        console.log("[+] t() 返回值:", result);
    });
}

setImmediate(analyzeUuid);输出:
[*] he.a.i 实际类型: com.shizhuang.duapp.common.base.delegate.tasks.net.a$d
[*] 继承自: he.a$i
[+] t() 返回值: ****************
4.3 💡 技术原理:Robust 热修复框架
反编译 he.a$i 发现它使用了 Robust 热修复框架:
java
public static abstract class i {
    public static ChangeQuickRedirect changeQuickRedirect;

    public String t() {
        // Robust 热修复检查
        PatchProxyResult proxy = PatchProxy.proxy(
            new Object[0],
            this,
            changeQuickRedirect,
            false,
            8474,  // 方法 ID
            new Class[0],
            String.class
        );

        // 如果有补丁,返回补丁结果
        if (proxy.isSupported) {
            return (String) proxy.result;
        }

        // 否则返回空字符串(默认实现)
        return "";
    }
}
Robust 原理:
编译时插桩:
java
// 原始代码
public String myMethod() {
    return "Hello";
}

// Robust 插桩后
public String myMethod() {
    // 1. 检查是否有补丁
    PatchProxyResult proxy = PatchProxy.proxy(...);
    if (proxy.isSupported) {
        return (String) proxy.result;  // 返回补丁结果
    }

    // 2. 执行原始逻辑
    return "Hello";
}运行时热修复:
App 启动
    ↓
加载补丁文件 (.so 或 .dex)
    ↓
通过反射替换 changeQuickRedirect 实例
    ↓
下次调用方法时,执行补丁代码
4.4 🔍 动态类型识别
com.shizhuang.duapp.common.base.delegate.tasks.net.a$d 是通过 Robust 注入的真实实现:
java
public class d extends he.a.i {

    @Override
    public String t() {
        PatchProxyResult proxy = PatchProxy.proxy(...);
        if (proxy.isSupported) {
            return (String) proxy.result;
        }

        // 实际逻辑:返回 Android ID
        return yc.e0.d(this.a).c(null);
    }
}
追踪 yc.e0 发现最终调用:
java
@SuppressLint({"HardwareIds"})
public String a() {
    return Settings.Secure.getString(
        this.a.getContentResolver(),
        Settings.Secure.ANDROID_ID
    );
}
4.5 📱 Android ID 获取
Android ID 是系统为每台设备分配的唯一标识符:
特性:
- Android 8.0 以下:全局唯一,恢复出厂设置后改变
- Android 8.0+:与 App 签名绑定,不同签名的 App 获取到的 ID 不同
获取方法 (Kotlin):
kotlin
@SuppressLint("HardwareIds")
fun getAndroidID(context: Context): String {
    return Settings.Secure.getString(
        context.contentResolver,
        Settings.Secure.ANDROID_ID
    ) ?: "unknown"
}
Frida 自动提取:
javascript
/**
 * 自动提取 Android ID
 */
function extractAndroidID() {
    Java.perform(function () {
        const Settings = Java.use("android.provider.Settings$Secure");
        const context = Java.use("android.app.ActivityThread")
            .currentApplication()
            .getApplicationContext();

        const androidID = Settings.getString(
            context.getContentResolver(),
            "android_id"
        );

        console.log(`[+] 🔑 Android ID: ${androidID}`);

        // 保存到文件
        const file = new File("/sdcard/android_id.txt", "w");
        file.write(androidID);
        file.close();
    });
}

setImmediate(extractAndroidID);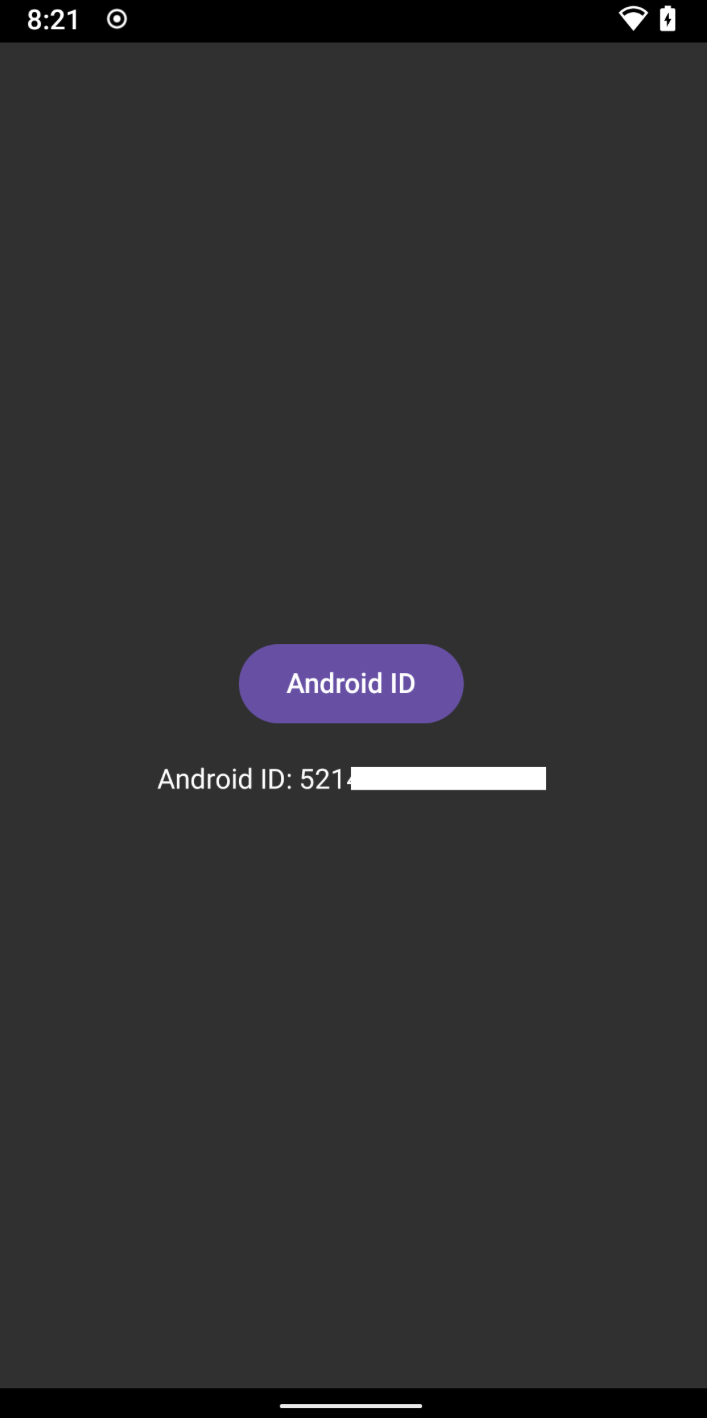
4.6 📋 完整流程梳理
newSign 完整计算流程:
1. 构建参数 Map
   {
     cipherParam: "userName",
     countryCode: 86,
     password: "...",
     type: "pwd",
     userName: "...",
   }

2. 添加隐藏参数
   map.put("uuid", AndroidID);
   map.put("platform", "android");
   map.put("v", "5.43.0");
   map.put("loginToken", "");
   map.put("timestamp", timestamp);

3. 按 key 字母顺序拼接
   "cipherParam...uuid...v5.43.0"

4. 移除临时参数
   map.remove("uuid");

5. 加密签名
   AES-ECB 加密 → Base64 编码 → MD5 哈希

6. 添加到请求参数
   map.put("newSign", signature);
支线任务完成! 🎉
五、终章:完整实现与优化
5.1 Python 面向对象实现
python
#!/usr/bin/env python3
"""
某电商 APP 登录接口完整实现
技术栈: AES-128-ECB + MD5 + Base64
"""
from Crypto.Cipher import AES
from Crypto.Util.Padding import pad
import base64
import hashlib
import time
import json
import requests
from typing import Dict, Any


class DuAppCrypto:
    """某电商 APP 加密工具类"""

    # ========== 配置常量 ==========
    AES_KEY = "****************"  # 16字节 AES 密钥
    ANDROID_ID = "****************"  # Android ID (设备唯一标识)
    APP_VERSION = "5.43.0"

    def __init__(self):
        self.aes_key_bytes = self.AES_KEY.encode('utf-8')

    # ========== 基础加密函数 ==========

    def aes_ecb_encrypt(self, plaintext: str) -> bytes:
        """
        AES-128-ECB 加密

        Args:
            plaintext: 明文字符串

        Returns:
            加密后的字节数据

        Security Note:
            ECB 模式存在安全隐患,生产环境推荐使用 AES-GCM
        """
        try:
            data_bytes = pad(plaintext.encode('utf-8'), AES.block_size)
            cipher = AES.new(self.aes_key_bytes, AES.MODE_ECB)
            encrypted = cipher.encrypt(data_bytes)
            return encrypted
        except Exception as e:
            raise RuntimeError(f"AES 加密失败: {e}")

    @staticmethod
    def base64_encode(data: bytes) -> str:
        """标准 Base64 编码"""
        return base64.b64encode(data).decode('utf-8')

    @staticmethod
    def md5_hash(data: str) -> str:
        """MD5 哈希"""
        return hashlib.md5(data.encode('utf-8')).hexdigest()

    @staticmethod
    def get_current_timestamp() -> str:
        """获取当前 13 位毫秒级时间戳"""
        return str(int(time.time() * 1000))

    # ========== 参数加密函数 ==========

    def encrypt_username(self, username: str) -> str:
        """
        加密用户名(手机号)

        算法: userName = AES-ECB(手机号) + "_1"

        Args:
            username: 手机号

        Returns:
            加密后的 userName (32位hex + "_1")
        """
        encrypted = self.aes_ecb_encrypt(username)
        return encrypted.hex() + "_1"

    def encrypt_password(self, password: str) -> str:
        """
        加密密码

        算法: password = MD5(密码 + "du")

        Args:
            password: 原始密码

        Returns:
            加密后的 password (32位 MD5 hex)
        """
        return self.md5_hash(password + "du")

    def build_concat_string(self, data: Dict[str, Any]) -> str:
        """
        构建参数拼接字符串

        规则:
        1. 临时添加 uuid、platform、v、loginToken、timestamp
        2. 按 key 字母顺序拼接 key+value
        3. 移除 uuid(不包含在最终请求中)

        Args:
            data: 请求参数字典

        Returns:
            拼接后的字符串
        """
        # 临时添加隐藏参数
        data["uuid"] = self.ANDROID_ID
        data["platform"] = "android"
        data["v"] = self.APP_VERSION
        data["loginToken"] = data.get("loginToken", "")
        data["timestamp"] = data.get("timestamp", self.get_current_timestamp())

        # 按 key 字母顺序拼接
        text = ''.join(f"{k}{data[k]}" for k in sorted(data.keys()))

        # 移除临时参数
        data.pop("uuid", None)

        return text

    def calculate_newSign(self, text: str) -> str:
        """
        计算 newSign 签名

        算法: newSign = MD5(Base64(AES-ECB(拼接字符串)))

        Args:
            text: 拼接后的参数字符串

        Returns:
            32位 MD5 签名
        """
        encrypted = self.aes_ecb_encrypt(text)
        b64_result = self.base64_encode(encrypted)
        signature = self.md5_hash(b64_result)
        return signature

    # ========== 登录接口调用 ==========

    def login(self, username: str, password: str) -> Dict[str, Any]:
        """
        调用登录接口

        Args:
            username: 手机号
            password: 密码

        Returns:
            登录响应 JSON
        """
        print("\n" + "="*60)
        print("📱 开始登录流程")
        print("="*60)

        # 1. 加密参数
        encrypted_username = self.encrypt_username(username)
        encrypted_password = self.encrypt_password(password)
        timestamp = self.get_current_timestamp()

        print(f"[1] 加密参数")
        print(f"    userName: {encrypted_username}")
        print(f"    password: {encrypted_password}")
        print(f"    timestamp: {timestamp}")

        # 2. 构建请求参数
        data = {
            "cipherParam": "userName",
            "countryCode": 86,
            "loginToken": "",
            "password": encrypted_password,
            "platform": "android",
            "timestamp": timestamp,
            "type": "pwd",
            "userName": encrypted_username,
            "v": self.APP_VERSION
        }

        # 3. 拼接参数并生成签名
        print(f"\n[2] 生成签名")
        concat_text = self.build_concat_string(data)
        print(f"    拼接字符串(前100字符): {concat_text[:100]}...")

        data["newSign"] = self.calculate_newSign(concat_text)
        print(f"    newSign: {data['newSign']}")

        # 4. 按字母顺序排列参数
        data = dict(sorted(data.items()))

        # 5. 发送请求
        print(f"\n[3] 发送请求")
        headers = {
            "Content-Type": "application/json; charset=utf-8",
            "User-Agent": "duapp/5.43.0(android;7.1.2)",
            # ... 其他 headers
        }

        url = "https://************/api/v1/app/user_core/users/unionLogin"

        try:
            response = requests.post(
                url,
                headers=headers,
                data=json.dumps(data, separators=(',', ':')),
                timeout=10
            )

            print(f"\n[4] 响应结果")
            print(f"    Status: {response.status_code}")
            print(f"    Response: {response.text[:200]}...")
            print("="*60 + "\n")

            return response.json()

        except Exception as e:
            print(f"\n❌ 请求失败: {e}")
            raise


# ========== 测试代码 ==========

def main():
    """主函数"""
    crypto = DuAppCrypto()

    # 测试加密函数
    print("\n" + "="*60)
    print("🧪 测试加密函数")
    print("="*60)

    test_username = "13800138000"
    test_password = "test123456"

    print(f"\n[Test 1] 手机号加密")
    print(f"    输入: {test_username}")
    result = crypto.encrypt_username(test_username)
    print(f"    输出: {result}\n")

    print(f"[Test 2] 密码加密")
    print(f"    输入: {test_password}")
    result = crypto.encrypt_password(test_password)
    print(f"    输出: {result}\n")

    # 测试登录(需要真实账号)
    # result = crypto.login("真实手机号", "真实密码")


if __name__ == "__main__":
    try:
        main()
    except Exception as e:
        print(f"\n❌ 程序执行失败: {e}")
        import traceback
        traceback.print_exc()
5.2 登录接口完整调用
执行结果:
bash
$ python duapp_login.py
============================================================
🧪 测试加密函数
============================================================
[Test 1] 手机号加密
输入: 13800138000
输出: d728cf5cbc788d13c1c9dc87465d0370_1
[Test 2] 密码加密
输入: test123456
输出: 61f209b7895b603769bf036ad80b3a00
============================================================
📱 开始登录流程
============================================================
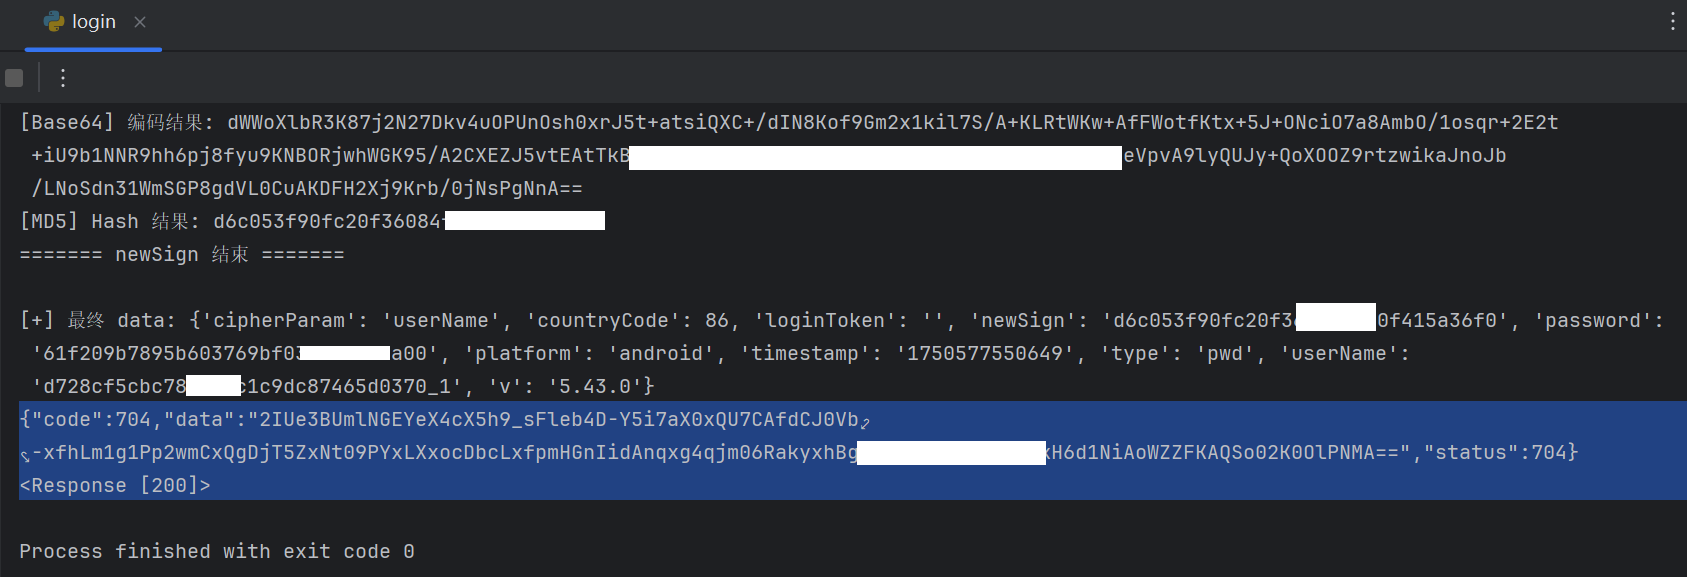
[1] 加密参数
userName: d728cf5cbc788d13c1c9dc87465d0370_1
password: 61f209b7895b603769bf036ad80b3a00
timestamp: 1750573190328
[2] 生成签名
拼接字符串(前100字符): cipherParamuserNamecountryCode86loginTokenpassword61f209b7895b603769bf036ad80b3a00...
newSign: 51f80ac693d4da0b9c965a578fbc
[3] 发送请求
Status: 200
[4] 响应结果
Response: {"code":200,"data":{"token":"eyJhbGciOiJSUzI1NiJ9..."},"status":200}
============================================================
5.3 进阶优化
5.3.1 批量登录工具
python
import concurrent.futures
from typing import List, Tuple

class BatchLogin:
    """批量登录管理器"""

    def __init__(self, crypto: DuAppCrypto):
        self.crypto = crypto

    def login_single(self, account: Tuple[str, str]) -> Dict[str, Any]:
        """单个账号登录"""
        username, password = account
        try:
            return self.crypto.login(username, password)
        except Exception as e:
            return {"error": str(e), "username": username}

    def login_batch(self, accounts: List[Tuple[str, str]], max_workers: int = 4) -> List[Dict]:
        """批量登录(多线程)"""
        print(f"\n[*] 🚀 批量登录开始,共 {len(accounts)} 个账号")

        with concurrent.futures.ThreadPoolExecutor(max_workers=max_workers) as executor:
            results = list(executor.map(self.login_single, accounts))

        success_count = sum(1 for r in results if "error" not in r)
        print(f"\n[+] ✅ 批量登录完成: 成功 {success_count}/{len(accounts)}")

        return results

# 使用示例
crypto = DuAppCrypto()
batch = BatchLogin(crypto)

accounts = [
    ("13800138000", "password1"),
    ("13800138001", "password2"),
    # ...
]

results = batch.login_batch(accounts, max_workers=4)
5.3.2 自动化密钥提取
javascript
/**
 * 自动提取并缓存 AES 密钥
 */
var cachedKey = null;

function autoExtractKey() {
    if (cachedKey) {
        console.log(`[Cache] 使用缓存密钥: ${cachedKey}`);
        return cachedKey;
    }

    const getValue = Module.findExportByName("libdewuhelper.so", "getValue");
    if (!getValue) {
        console.error("[!] 未找到 getValue 函数");
        return null;
    }

    Interceptor.attach(getValue, {
        onLeave(retval) {
            if (!retval.isNull()) {
                cachedKey = Memory.readCString(retval);
                console.log(`[+] 🔑 提取到 AES 密钥: ${cachedKey}`);

                // 保存到文件
                const file = new File("/sdcard/aes_key.txt", "w");
                file.write(cachedKey);
                file.close();

                console.log("[+] 密钥已保存到: /sdcard/aes_key.txt");
            }
        }
    });

    return cachedKey;
}

setImmediate(autoExtractKey);
5.3.3 反检测增强
方案 1: 使用 Magisk 隐藏 Root
bash
# 1. 安装 Magisk Manager
# 2. 启用 MagiskHide
# 3. 添加目标 APP 到隐藏列表
方案 2: 编译自定义 Frida
bash
# 修改 Frida 特征字符串
# 1. Clone frida 源码
git clone https://github.com/frida/frida.git

# 2. 修改特征字符串
# frida-core/src/frida.c
# 将 "frida" 替换为其他字符串

# 3. 编译
make
六、攻防对抗:安全防御指南
6.1 开发者加固方案
如果你是 APP 开发者,以下措施可以提升安全性:
6.1.1 密钥保护
java
// ❌ 不安全: 密钥硬编码
private static final String AES_KEY = "1234567890123456";

// ✅ 安全: 密钥动态生成
private static String generateKey() {
    String deviceID = getDeviceID();
    long timestamp = System.currentTimeMillis() / (1000 * 3600 * 24);
    String serverSalt = fetchServerSalt();  // 从服务器获取盐值
    return MD5(deviceID + timestamp + serverSalt).substring(0, 16);
}
6.1.2 多层加密
java
// ✅ 多层加密 + 混淆
String encrypted = AES.encrypt(plaintext, key1);
encrypted = Base64.encode(encrypted);
encrypted = XOR.encrypt(encrypted, key2);
encrypted = Base64.encode(encrypted);
6.1.3 时间戳校验
java
// 服务端校验时间戳,防止重放攻击
long clientTimestamp = request.getTimestamp();
long serverTimestamp = System.currentTimeMillis();

if (Math.abs(serverTimestamp - clientTimestamp) > 60000) {
    return "请求已过期";
}
6.1.4 设备指纹绑定
java
// 将多个设备信息组合
String deviceFingerprint = MD5(
    getAndroidID() +
    getIMEI() +
    getMacAddress() +
    getBuildInfo()
);

// 服务端验证
if (!deviceFingerprint.equals(serverFingerprint)) {
    return "设备异常";
}
6.1.5 证书绑定 (SSL Pinning)
java
OkHttpClient client = new OkHttpClient.Builder()
    .certificatePinner(new CertificatePinner.Builder()
        .add("api.yourapp.com", "sha256/AAAA...")
        .build())
    .build();
6.1.6 Native 层混淆增强
- 使用 OLLVM + VMP 双重保护
- 自定义虚拟机
- 指令乱序 + 花指令
6.2 逆向工程师的边界
作为逆向工程师,合法的安全研究边界:
| 场景 | 是否合法 | 说明 |
|---|---|---|
| 个人学习 | ✅ | 研究自己购买的软件 |
| 安全审计 | ✅ | 受雇于厂商进行漏洞挖掘 |
| 学术研究 | ✅ | 发表脱敏后的技术论文 |
| Bug Bounty | ✅ | 通过合法渠道提交漏洞 |
| 售卖工具 | ❌ | 售卖破解工具/盗版软件 |
| 恶意攻击 | ❌ | 窃取用户数据/DDoS 攻击 |
| 商业竞争 | ❌ | 窃取商业机密 |
6.3 工具与资源推荐
推荐工具
| 工具 | 用途 | 链接 |
|---|---|---|
| Frida | 动态插桩框架 | https://frida.re |
| IDA Pro | 反汇编工具 | https://hex-rays.com |
| Ghidra | 开源逆向平台 | https://ghidra-sre.org |
| Jadx | DEX 反编译工具 | https://github.com/skylot/jadx |
| Charles | 抓包工具 | https://www.charlesproxy.com |
| CyberChef | 在线加密工具 | https://gchq.github.io/CyberChef |
| Magisk | Root 管理 | https://github.com/topjohnwu/Magisk |
推荐资源
书籍:
- 《Android 软件安全权威指南》
- 《Android 应用安全防护和逆向分析》
- 《Practical Reverse Engineering》
在线课程:
- 看雪学院 - Android 安全系列
- OWASP Mobile Security Testing Guide
技术博客:
- https://bbs.kanxue.com (看雪论坛)
- https://www.52pojie.cn (吾爱破解)
- https://blog.oversecured.com (Android 安全)
七、总结:技术路线图与关键收获
7.1 完整技术路线图
序章: 接口分析与反调试
新手村: userName & password
主线任务: newSign 签名
支线任务: uuid 参数
终章: 完整实现
第一关: Java 层追踪
第二关: DEX 脱壳
第三关: VMP 虚拟化
第四关: SO 脱壳与 OLLVM
最终 Boss: libdewuhelper.so
7.2 技术难度梯度
| 关卡 | 技术点 | 工具 | 难度 | 耗时 |
|---|---|---|---|---|
| 准备阶段 | Frida 反调试突破 | Frida + ADB | ⭐⭐ | 30分钟 |
| 新手村 | userName & password | Frida Hook | ⭐ | 1小时 |
| 第一关 | Java 层追踪 | Frida Hook | ⭐⭐ | 30分钟 |
| 第二关 | DEX 脱壳 | Frida + jadx | ⭐⭐⭐ | 1小时 |
| 第三关 | VMP 虚拟化分析 | Frida + IDA | ⭐⭐⭐⭐ | 2小时 |
| 第四关 | SO 脱壳 + OLLVM 对抗 | Frida + IDA | ⭐⭐⭐⭐⭐ | 4小时 |
| 最终 Boss | libdewuhelper.so 分析 | Frida + IDA | ⭐⭐⭐⭐ | 2小时 |
| 支线任务 | uuid 隐藏参数 | Frida | ⭐⭐⭐ | 1小时 |
| 终章 | Python 完整实现 | Python | ⭐⭐ | 1小时 |
总计 : 约 12-15 小时
7.3 关键技术突破点
突破点 1: JNI 是锚点
原理: 无论代码如何混淆,JNI 接口调用必须遵循标准。
应用 : Hook NewStringUTF、GetStringUTFChars 等 JNI 函数,直接定位到加密结果生成位置,绕过 VMP + OLLVM。
突破点 2: 分层逆向
策略: 从 Java 层 → JNI 层 → SO 层逐层深入。
优势: 每一层都有对应的工具和方法,不会被单一保护措施卡住。
突破点 3: 动静结合
方法: 静态分析(IDA)+ 动态调试(Frida)相互补充。
效果: 静态分析看不懂时,用动态调试验证;动态调试找不到时,用静态分析定位。
突破点 4: 算法验证
工具: CyberChef 等在线工具。
作用: 快速验证算法假设,避免走弯路。
7.4 延伸阅读
本文涉及的技术文章:
- 安卓抓包实战:使用 Charles 抓取 App 数据全流程详解
- 一文搞懂如何使用 Frida Hook Android App
- 一文搞懂 SO 脱壳全流程
- 破解 VMP+OLLVM 混淆:通过 Hook jstring 快速定位加密算法入口
- ART 下 Dex 加载流程源码分析和通用脱壳点
- 逆向 JNI 函数找不到入口?动态注册定位技巧全解析
- 移植 OLLVM 到 LLVM 18
- Robust - 美团 Android 热修复框架
- OWASP Mobile Security Testing Guide
🎉 全文完
本文从零开始,像闯关游戏一样,完整展示了如何突破一个具有多层代码保护的 Android App 登录接口的全参数加密算法。
关键收获:
- ✅ Frida 反调试绕过技巧
- ✅ DEX 通用脱壳方法
- ✅ VMP 虚拟化分析思路
- ✅ OLLVM 混淆对抗策略
- ✅ JNI Hook 定位核心算法
- ✅ Python 完整实现
希望这篇文章能帮助你在 Android 逆向之路上更进一步! 🚀