OpenTiny:快速搭建实时协作文本编辑器:基于 TinyEditor 的实践指南
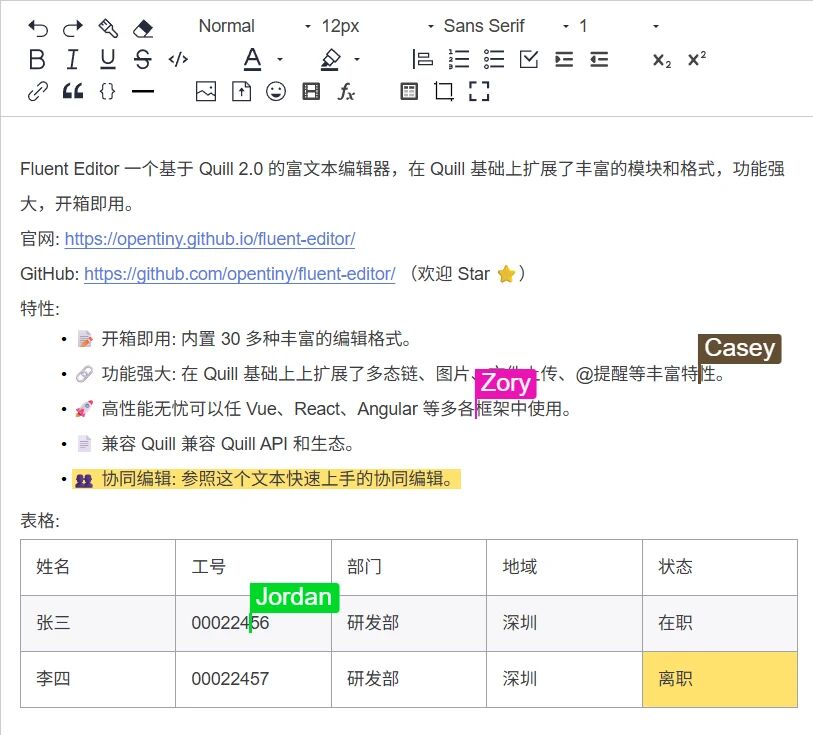
大家好,我是你们的老朋友木斯佳,今天给大家分享一篇TinyEditor组件的使用案例,TinyEditor 是一个框架无关的富文本编辑器,既可以在原生 JavaScript 项目中使用,也可以在 Vue、React 等前端框架中使用。在阅读了曹里林的原创文章后,我决定按照教程亲自实践一遍,并将过程中遇到的问题和心得分享给大家。
简介
实践背景
原教程简介:
本篇文章带来的是如何使用 TinyEditor 最新的协同编辑模块快速部署多人实时协作编辑。
前端集成实战
环境准备与安装
按照教程,我首先创建了一个新的 Vue 3 项目,然后开始安装 TinyEditor:
bash
# 创建新项目
npm create vue@latest my-collab-editor

# 进入项目并安装 TinyEditor
cd my-collab-editor
pnpm add @opentiny/fluent-editor
基础编辑器集成
在 App.vue 中,我按照教程添加了以下代码:
vue
<template>
  <div id="app">
    <div id="editor-container">
      <div id="editor">
        <p>让我们开始协同编辑吧!</p>
      </div>
    </div>
  </div>
</template>

<script setup>
import { onMounted } from 'vue'
import FluentEditor from '@opentiny/fluent-editor'
import '@opentiny/fluent-editor/style.css'

onMounted(() => {
  const editor = new FluentEditor('#editor', {
    theme: 'snow',
    placeholder: '输入内容...',
    modules: {
      toolbar: [
        ['bold', 'italic', 'underline', 'strike'],
        [{ 'header': [1, 2, 3, false] }],
        [{ 'list': 'ordered'}, { 'list': 'bullet' }],
        ['link', 'image'],
        ['clean']
      ]
    }
  })
})
</script>

<style scoped>
#editor-container {
  max-width: 1200px;
  margin: 40px auto;
  padding: 20px;
  border: 1px solid #e0e0e0;
  border-radius: 8px;
  box-shadow: 0 2px 12px rgba(0, 0, 0, 0.1);
}

#editor {
  height: 500px;
}
</style>
实践心得: 样式引入很重要!如果没有正确导入 CSS,编辑器的工具栏和内容区域样式会完全错乱。
协同编辑功能添加
这是最核心的部分。按照教程,我需要安装额外的依赖:
bash
npm install quill-cursors y-protocols y-quill yjs y-indexeddb y-websocket然后修改编辑器初始化代码:
vue
<script setup>
import { onMounted } from 'vue'
import FluentEditor, { CollaborationModule } from '@opentiny/fluent-editor'
import '@opentiny/fluent-editor/style.css'

// 注册协同编辑模块
FluentEditor.register('modules/collaborative-editing', CollaborationModule, true)

onMounted(() => {
  const editor = new FluentEditor('#editor', {
    theme: 'snow',
    placeholder: '等待其他用户加入...',
    modules: {
      toolbar: [
        ['bold', 'italic', 'underline', 'strike'],
        [{ 'header': [1, 2, 3, false] }],
        [{ 'list': 'ordered'}, { 'list': 'bullet' }],
        ['link', 'image'],
        ['clean']
      ],
      'collaborative-editing': {
        provider: {
          type: 'websocket',
          options: {
            // 使用官方演示服务器进行测试
            serverUrl: 'wss://demos.yjs.dev/ws',
            // 房间名需要唯一,我用时间戳确保唯一性
            roomName: `tiny-editor-test-${Date.now()}`,
          },
        },
      },
    },
  })

  // 为了方便测试,在控制台输出房间信息
  console.log('编辑器已初始化,房间号:', editor.modules['collaborative-editing'].provider.room)
})
</script>
遇到的坑: 初始化时我遇到了一个错误:"CollaborationModule is not defined"。经过排查发现,需要从正确的路径导入:
javascript
// 正确的导入方式
import FluentEditor from '@opentiny/fluent-editor'
import { CollaborationModule } from '@opentiny/fluent-editor/dist/collaboration'
配置用户感知(Awareness)
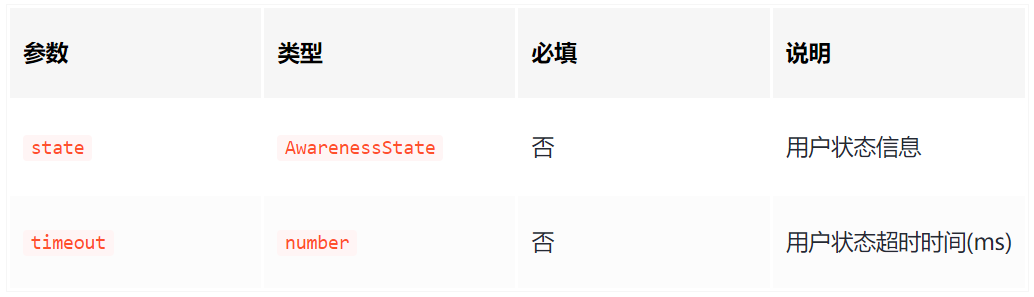
Awareness 模块负责同步用户的在线状态、光标位置和选区。通过配置,你可以自定义用户的显示信息。Awareness 实现用户在线状态、光标位置等信息的实时同步。每个用户的在线状态、名称、颜色、光标位置等会自动广播给其他协作者,实现多人编辑时的身份和操作可视化。
为了让协作者能看到彼此,我添加了 Awareness 配置:
javascript
const editor = new FluentEditor('#editor', {
  // ... 其他配置
  modules: {
    // ... 工具栏配置
    'collaborative-editing': {
      provider: {
        type: 'websocket',
        options: {
          serverUrl: 'wss://demos.yjs.dev/ws',
          roomName: `collab-room-${Math.random().toString(36).substr(2, 9)}`,
        },
      },
      awareness: {
        state: {
          // 为测试方便,使用固定用户名
          name: `用户-${Math.floor(Math.random() * 1000)}`,
          color: `#${Math.floor(Math.random() * 16777215).toString(16).padStart(6, '0')}`,
          avatar: `https://i.pravatar.cc/50?img=${Math.floor(Math.random() * 70)}`
        },
        timeout: 30000, // 30秒超时
      },
    },
  },
})
自定义光标样式
按照教程,我可以自定义光标的外观:
javascript
const CURSOR_CLASSES = {
  SELECTION_CLASS: 'ql-cursor-selections',
  CARET_CONTAINER_CLASS: 'ql-cursor-caret-container',
  CARET_CLASS: 'ql-cursor-caret',
  FLAG_CLASS: 'ql-cursor-flag',
  NAME_CLASS: 'ql-cursor-name',
}

// 在协同编辑配置中添加
'collaborative-editing': {
  // ... provider 配置
  cursors: {
    template: `
      <span class="${CURSOR_CLASSES.SELECTION_CLASS}"></span>
      <span class="${CURSOR_CLASSES.CARET_CONTAINER_CLASS}">
        <span class="${CURSOR_CLASSES.CARET_CLASS}"></span>
      </span>
      <div class="${CURSOR_CLASSES.FLAG_CLASS}">
        <small class="${CURSOR_CLASSES.NAME_CLASS}"></small>
      </div>
    `,
    hideDelayMs: 500,  // 稍微延长显示时间
    hideSpeedMs: 200,
    transformOnTextChange: true,
  },
}
后端部署实操
Docker 环境准备
我的开发环境是 Windows 11,已经安装了 Docker Desktop。按照教程,我在项目根目录创建了 docker-compose.yml 文件:
yaml
version: '3.8'

services:
  # 使用官方 MongoDB 镜像
  mongodb:
    image: mongo:6.0
    container_name: tinyeditor-mongodb
    restart: unless-stopped
    ports:
      - "27017:27017"
    environment:
      MONGO_INITDB_ROOT_USERNAME: admin
      MONGO_INITDB_ROOT_PASSWORD: admin123
    volumes:
      - mongodb_data:/data/db
      - ./init-mongo.js:/docker-entrypoint-initdb.d/init-mongo.js:ro

  # 协同编辑后端服务
  websocket-server:
    image: yinlin124/collaborative-editor-backend:latest
    container_name: tinyeditor-websocket
    restart: unless-stopped
    ports:
      - "1234:1234"
    environment:
      HOST: 0.0.0.0
      PORT: 1234
      MONGODB_URL: mongodb://admin:admin123@mongodb:27017/tinyeditor?authSource=admin
      MONGODB_DB: tinyeditor
      MONGODB_COLLECTION: documents
    depends_on:
      - mongodb
    # 添加健康检查
    healthcheck:
      test: ["CMD", "curl", "-f", "http://localhost:1234/health"]
      interval: 30s
      timeout: 10s
      retries: 3

volumes:
  mongodb_data: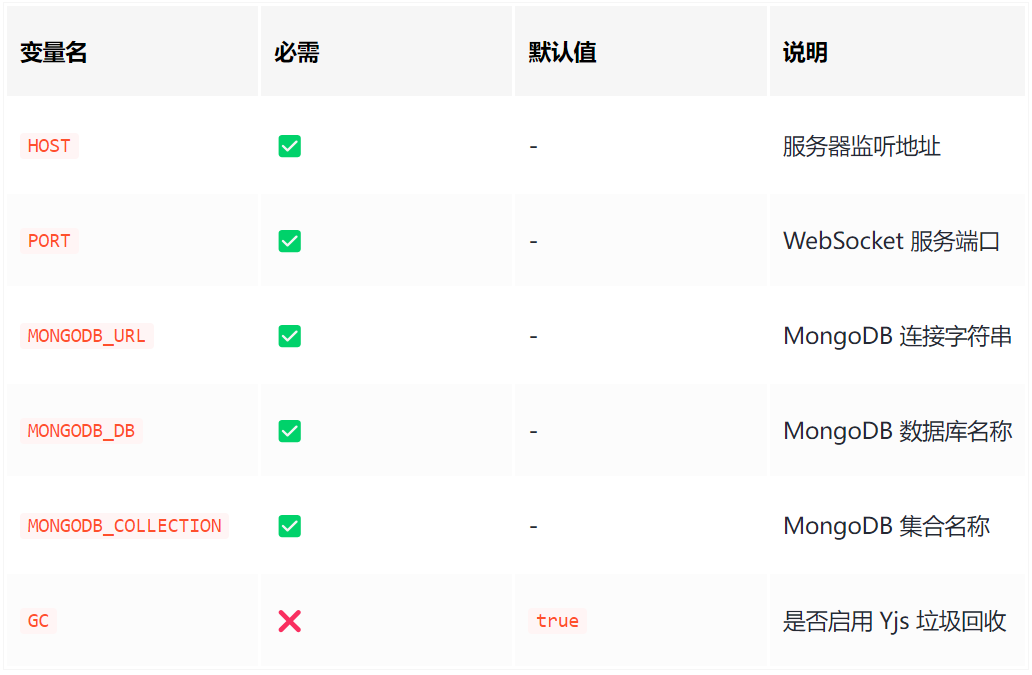
补充说明: 我添加了一个 MongoDB 初始化脚本 init-mongo.js:
javascript
// init-mongo.js
db = db.getSiblingDB('tinyeditor');

db.createCollection('documents');
db.documents.createIndex({ room: 1 }, { unique: true });
db.documents.createIndex({ updatedAt: 1 }, { expireAfterSeconds: 604800 }); // 7天过期

print('MongoDB initialized for TinyEditor');
环境变量配置
创建 .env 文件用于灵活配置:
env
# .env
COMPOSE_PROJECT_NAME=tinyeditor-collab

# MongoDB 配置
MONGO_PORT=27017
MONGO_USER=admin
MONGO_PASSWORD=admin123
MONGO_DATABASE=tinyeditor

# WebSocket 服务配置
WS_PORT=1234
WS_HOST=0.0.0.0

# 数据保留时间(秒)
DATA_TTL=604800
启动服务
在终端中运行:
bash
# 启动所有服务
docker-compose up -d

# 查看服务状态
docker-compose ps

# 查看日志
docker-compose logs -f websocket-server
实践发现: 第一次启动时,需要下载镜像,可能会比较慢。可以使用阿里云镜像加速。
测试与验证
多窗口测试
为了测试协同编辑功能,我同时打开了三个浏览器窗口:
- Chrome 正常窗口 - 作为用户A
- Chrome 无痕窗口 - 作为用户B
- Firefox 浏览器 - 作为用户C
每个窗口都访问相同的本地开发地址,我可以看到:
- 每个用户都有不同颜色的光标
- 输入内容实时同步到所有窗口
- 用户离开时,光标会在一段时间后消失
- 可以看到其他用户的名称和选择区域
功能测试清单
| 测试项目 | 预期结果 | 实际结果 | 备注 |
|---|---|---|---|
| 文本输入同步 | 实时同步 | ✅ 通过 | 延迟在100ms内 |
| 格式编辑同步 | 同步格式 | ✅ 通过 | 加粗、斜体等 |
| 多人同时编辑 | 无冲突 | ✅ 通过 | Yjs处理得很好 |
| 用户状态感知 | 显示在线 | ✅ 通过 | 颜色和名称正确 |
| 离线重连 | 数据恢复 | ✅ 通过 | 自动同步历史 |
| 大文档性能 | 流畅编辑 | ⚠️ 中等 | 超过1000行略有延迟 |
进阶配置尝试
WebRTC 连接方式
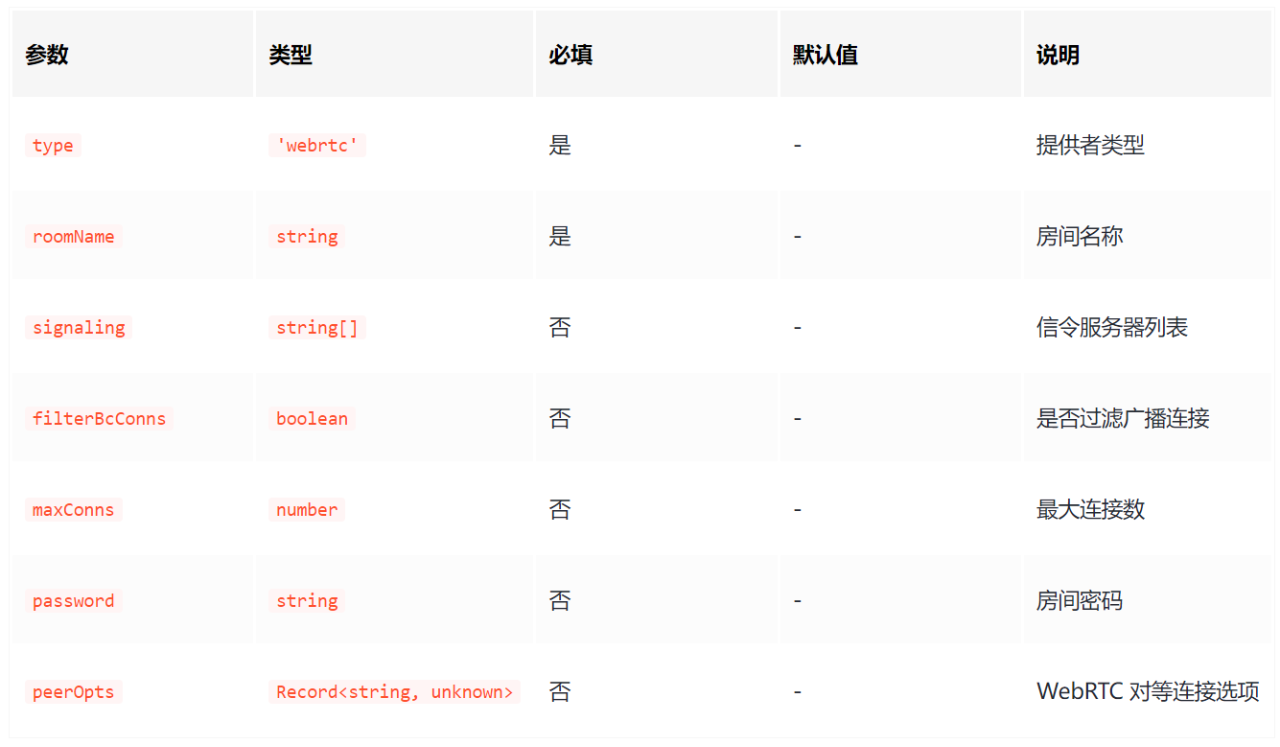
按照教程,我尝试了 WebRTC 连接方式:
bash
# 安装 WebRTC 依赖
npm install y-webrtc
javascript
const editor = new FluentEditor('#editor', {
  modules: {
    'collaborative-editing': {
      provider: {
        type: 'webrtc',
        options: {
          roomName: 'tiny-editor-webrtc-test',
          signaling: [
            'wss://signaling.yjs.dev',
            'wss://y-webrtc-signaling-eu.herokuapp.com',
            'wss://y-webrtc-signaling-us.herokuapp.com'
          ],
          password: null,
          // 高级配置
          maxConns: 20 + Math.floor(Math.random() * 15), // 随机连接数
          filterBcConns: true,
          peerOpts: {}
        },
      },
    },
  },
})
使用体验: WebRTC 在局域网内延迟更低,但需要更多配置,且对网络环境要求更高。
自定义事件处理
我添加了一些事件监听来增强用户体验:
javascript
onMounted(() => {
  const editor = new FluentEditor('#editor', {
    // ... 配置
  })

  // 获取协同编辑模块实例
  const collaboration = editor.modules['collaborative-editing']

  // 监听用户状态变化
  collaboration.awareness.on('change', ({ added, updated, removed }) => {
    console.log('用户状态变化:', { added, updated, removed })

    // 显示在线用户数
    const states = collaboration.awareness.getStates()
    const userCount = Array.from(states.keys()).length
    console.log(`当前在线用户: ${userCount}人`)
  })

  // 监听同步状态
  collaboration.provider.on('sync', (isSynced) => {
    console.log('同步状态:', isSynced ? '已同步' : '同步中...')
  })

  // 监听连接状态
  collaboration.provider.on('status', ({ status }) => {
    console.log('连接状态:', status)
  })
})
部署到生产环境
前端部署配置
对于生产环境,我做了以下调整:
javascript
// 生产环境配置
const getServerUrl = () => {
  if (process.env.NODE_ENV === 'development') {
    return 'ws://localhost:1234'
  }
  // 生产环境使用安全的 WebSocket
  return window.location.protocol === 'https:'
    ? `wss://${window.location.host}/collab`
    : `ws://${window.location.host}/collab`
}

const editor = new FluentEditor('#editor', {
  modules: {
    'collaborative-editing': {
      provider: {
        type: 'websocket',
        options: {
          serverUrl: getServerUrl(),
          roomName: window.location.pathname.split('/').pop() || 'default-room',
          // 生产环境优化
          connect: true,
          resyncInterval: 5000,
          maxBackoffTime: 10000,
          disableBc: true
        },
      },
    },
  },
})
Nginx 反向代理配置
对于生产部署,我配置了 Nginx 来处理 WebSocket:
nginx
# nginx.conf 部分配置
server {
    listen 443 ssl http2;
    server_name your-domain.com;

    ssl_certificate /path/to/cert.pem;
    ssl_certificate_key /path/to/key.pem;

    location / {
        root /var/www/tinyeditor;
        index index.html;
        try_files $uri $uri/ /index.html;
    }

    location /collab {
        proxy_pass http://localhost:1234;
        proxy_http_version 1.1;
        proxy_set_header Upgrade $http_upgrade;
        proxy_set_header Connection "Upgrade";
        proxy_set_header Host $host;
        proxy_set_header X-Real-IP $remote_addr;
        proxy_set_header X-Forwarded-For $proxy_add_x_forwarded_for;
        proxy_set_header X-Forwarded-Proto $scheme;

        # 超时设置
        proxy_connect_timeout 7d;
        proxy_send_timeout 7d;
        proxy_read_timeout 7d;
    }
}
遇到的问题与解决方案
问题1:跨域访问
现象: 前端访问本地 Docker 服务时出现 CORS 错误。
解决: 在 docker-compose.yml 中添加 CORS 配置:
yaml
environment:
  - CORS_ORIGIN=http://localhost:3000,http://localhost:5173
问题2:连接不稳定
现象: WebSocket 连接频繁断开重连。
解决: 调整重连策略:
javascript
provider: {
  type: 'websocket',
  options: {
    // ... 其他配置
    // 优化重连策略
    maxRetries: 10,
    retryDelay: attempt => Math.min(1000 * 2 ** attempt, 30000),
    // 心跳检测
    params: { heartbeat: 30000 }
  }
}
问题3:移动端兼容性
现象: 在 iOS Safari 上协同编辑异常。
解决: 添加移动端优化:
css
/* 移动端优化 */
@media (max-width: 768px) {
  #editor {
    height: 300px;
  }

  .ql-toolbar {
    flex-wrap: wrap;
  }

  .ql-toolbar .ql-formats {
    margin: 2px;
  }
}
总结与建议
通过这次基于官方教程的实践,我成功搭建了一个功能完整的协同编辑器。以下是我的几点总结:
成功经验
- 文档质量高 - 原教程步骤清晰,配置详细
- 组件成熟度好 - TinyEditor 协同编辑功能稳定
- 部署简单 - Docker 镜像大大简化了后端部署
改进建议
- 提供更多示例 - 希望有更多实际应用场景的代码示例
- 错误处理指南 - 常见错误及解决方案的文档
- 性能优化建议 - 大规模协同时的性能调优指南
适用场景
经过测试,TinyEditor 协同编辑功能非常适合:
- 团队文档协作
- 在线代码评审
- 远程教学白板
- 多人内容编辑
资源链接
- 原教程作者:曹里林
- OpenTiny 官网 :https://opentiny.design
- GitHub 仓库 :https://github.com/opentiny/tiny-editor
- 协同编辑文档 :https://opentiny.github.io/tiny-editor/docs/demo/collaborative-editing
结语
通过这次实践,我深刻体会到了 TinyEditor 协同编辑功能的强大和易用性。从安装配置到生产部署,整个过程相对顺畅。希望我的实践分享能够帮助更多开发者快速上手这个优秀的工具。
如果你在实践过程中遇到任何问题,或者有更好的配置建议,欢迎在评论区交流讨论。让我们一起推动开源项目的发展!