你是否遇到过这样的场景:
后端一次性返回了 10,000 条聊天记录,每条记录的内容长度都不一样。当你试图把它们全部渲染到页面上时,浏览器瞬间卡死,用户体验极差。
这就是我们需要 虚拟列表 (Virtual List) 的时刻。
今天,我们将深入浅出地讲解如何实现一个支持不定高度的虚拟列表组件。哪怕你是刚入门的前端小白,读完这篇文章也能亲手写出来!
1. 核心原理:只渲染你能看到的
想象你在看一本 1000 页的书。你虽然拿着整本书,但你的眼睛同一时间只能看到展开的那两页。
虚拟列表也是这个道理:无论数据有多少条,我们只渲染当前可视区域内的那几条。
两个关键容器
要实现这个效果,我们需要在 HTML 里放两个"盒子":
- 幽灵容器 (Phantom Container) :
- 它不装任何内容,但它的高度等于所有数据加载完后的总高度。
- 它的作用是撑开浏览器的滚动条,让用户感觉自己在滚一个很长的列表。
- 渲染区域 (Content Container) :
- 它真正用来放列表项。
- 随着你的滚动,我们会动态计算它的
transform: translate3d(...)偏移量,让它永远出现在你的眼前。
text
  +------------------+  <-- 浏览器视口 (Viewport)
  |                  |
  |   +----------+   |  <-- 渲染区域 (Content Container)
  |   | Item 10  |   |      (通过 transform 移动到这里)
  |   +----------+   |
  |   | Item 11  |   |
  |   +----------+   |
  |                  |
  +------------------+
          |
          | (滚动条)
          |
  +------------------+  <-- 幽灵容器 (Phantom Container)
  |                  |      (高度 = 所有 Item 高度之和)
  |                  |      (虽然是空的,但负责把滚动条撑长)
  |                  |
  +------------------+
2. 形象比喻:秒懂虚拟列表
单纯看原理可能有点枯燥,我们用电影放映的例子来帮你彻底记住它。
🎞️ 场景一:老式电影放映机 (对应核心机制)
想象一下:你正在放映一部长达 3 小时的电影胶片。
- 长长的胶片卷 (Phantom / 幽灵容器) :
整卷胶片可能有几公里长,这决定了放映机旁边的卷盘有多大。这就是滚动条,它让你知道电影(数据)的总长度。 - 小小的放映窗口 (Viewport / 可视区域) :
虽然胶片很长,但放映机一次只能让一张底片经过镜头。我们不需要把整卷胶片都摊在银幕上,只需要确保当前那一小段在镜头前。 - 快速切换底片 (Data Binding & Offset / 数据绑定与偏移) :
随着电机转动,旧的画面移出,新的画面移入。对观众来说,画面是连续的;但对放映机来说,它永远只在处理镜头前的那一丁点空间。
🎬 场景二:长短不一的"电影片段" (对应不定高度与修正)
如果每张底片的高度都一样,放映机转速固定即可。但如果这是一部"实验电影",有些片段是正常的,有些片段特别长(比如长卷轴):
- 盲目快进 (Estimate / 预估) :
你以为每段都是 10 厘米。你想看第 10 段,于是快进了 100 厘米。 - 发现画面偏了 (Render / 渲染) :
停下一看,发现前面的片段里有好几个是"超长版",结果你现在停在了第 8 段和第 9 段的中间。 - 校准位置 (Correction / 修正) :
你不得不量一下刚才那几段到底有多长,然后把放映机的位置往后挪一挪,确保第 10 段能精准对齐镜头。
这就是 updatePositions 的意义:当实际内容渲染出来后,发现它比预想的要高,就要立刻把后面的内容往后"顶"开,并修正滚动条位置。
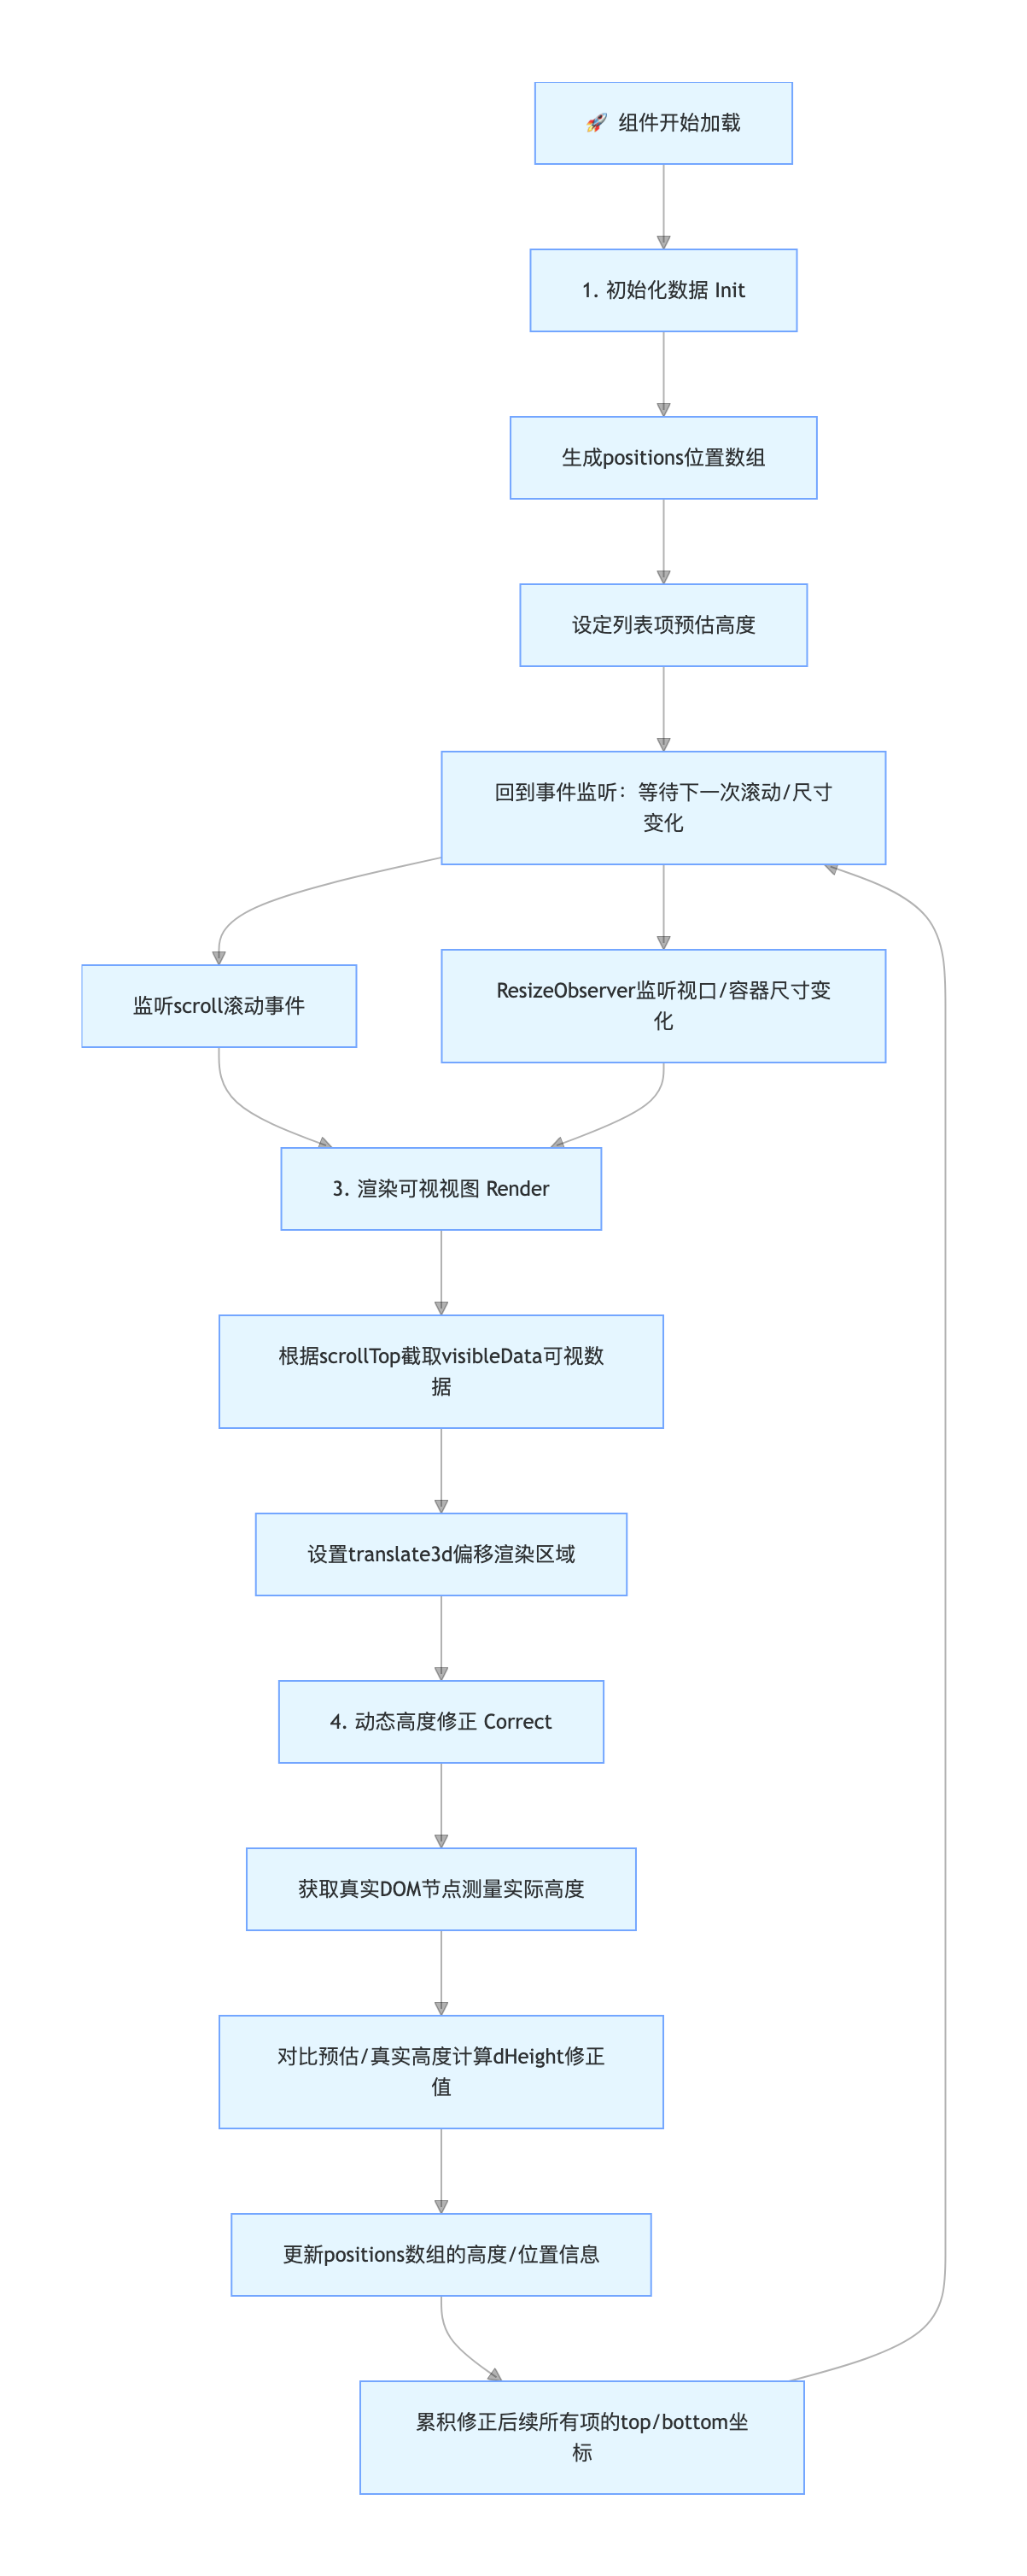
3. 实现步骤:从 0 到 1
我们将按照以下流程来实现这个组件:
- 初始化 :定义
positions数组,预估每个列表项的高度,生成初始位置信息。 - 可视区计算 :监听滚动事件,根据
scrollTop计算出当前应该显示哪几项(startIndex到endIndex)。 - 渲染与偏移 :从数据源中取出这几项进行渲染,并设置
transform偏移量,让它们显示在屏幕正确的位置。 - 动态修正 :DOM 渲染完成后,获取每一项的真实高度。如果真实高度与预估不符,更新
positions数组,并调整后续所有项的位置。
text
        [ 🚀 开始 ]
             │
             ▼
  ┌───────────────────────────┐
  │   1. 初始化数据 (Init)    │
  ├───────────────────────────┤
  │ 🔑 生成 positions 数组    │
  │ 🔑 设定预估高度           │
  └──────────┬────────────────┘
             │
             ▼
  ┌───────────────────────────┐ <─────┐
  │   2. 监听事件 (Listen)    │       │
  ├───────────────────────────┤       │
  │ 🔑 scroll 事件 (滚动)     │       │
  │ 🔑 ResizeObserver (视口)  │       │
  └──────────┬────────────────┘       │
             │                        │
             ▼                        │
  ┌───────────────────────────┐       │
  │   3. 渲染视图 (Render)    │       │
  ├───────────────────────────┤       │
  │ 🔑 截取 visibleData       │       │
  │ 🔑 设置 translate3d 偏移  │       │
  └──────────┬────────────────┘       │
             │                        │
             ▼                        │
  ┌───────────────────────────┐       │
  │   4. 动态修正 (Correct)   │       │
  ├───────────────────────────┤       │
  │ 🔑 测量真实 DOM 高度      │       │
  │ 🔑 更新 positions 数组    │ ──────┘
  └───────────────────────────┘
🔁 核心逻辑拆解
为了让这个闭环高效运转,我们需要处理好三个关键行为与事件的关联:
- 初始化与预估 (Init & Estimate) :
- 触发:组件加载时。
- 逻辑 :由于无法提前预知真实高度,我们先给每一项"画大饼(预估高度)",生成初始的
positions坐标系。
- 滚动定位 (Scroll & Locate) :
- 触发 :用户拖动滚动条(
scroll事件)。 - 逻辑 :利用二分查找 在
positions中快速锁定当前scrollTop对应的startIndex。随后通过translate3d将容器偏移到可视区。
- 触发 :用户拖动滚动条(
- 动态测量与修正 (Measure & Correct) :
- 触发 :数据渲染到 DOM 后(
onUpdated)或视口大小改变(ResizeObserver)。 - 逻辑 :获取真实 DOM 高度。如果发现第 N 项高了 20px,就修正该项并让 N 之后的所有项坐标"集体下移" 20px,确保存储的位置信息与实际完美对齐。

- 触发 :数据渲染到 DOM 后(
⚠️ 关于 ResizeObserver 的误区
很多同学可能会疑惑:"列表滚动或数据更新时,ResizeObserver 会触发吗?"
答案是:不会。
ResizeObserver 专门用于监听元素容器本身(外层盒子)的物理尺寸变化。
| 场景 | ResizeObserver 触发? | 应该由谁处理? |
|---|---|---|
| 用户滚动列表 | ❌ 不触发 | @scroll 事件监听 |
| 后端返回新数据 | ❌ 不触发 | watch(() => props.data) |
| 浏览器窗口缩放 | ✅ 触发 | ResizeObserver |
| 侧边栏折叠/展开 | ✅ 触发 | ResizeObserver |
它的核心使命 :当视口(盒子)变大变小时,告诉组件"现在一屏能多塞几条数据了",从而避免底部出现留白。
简单总结:就像电影放映机刚摆好的时候,先量一下银幕有多大,然后调整好镜头焦距,并安排一个人盯着,万一银幕变大了就赶紧调整画面。
4. 代码实战:一步步实现
javascript
<script setup lang="ts">
import type { PropType } from 'vue'
import { useNamespace } from '@my-antd-ui/utils'
import {
  computed,
  nextTick,
  onMounted,
  onUnmounted,
  onUpdated,
  reactive,
  ref,
  watch,
} from 'vue'

defineOptions({
  name: 'MyVirtualList',
})

const props = defineProps({
  data: {
    type: Array as PropType<any[]>,
    default: () => [],
  },
  itemHeight: {
    type: Number,
    default: 50,
  },
  estimatedItemHeight: {
    type: Number,
    default: 50,
  },
  height: {
    type: [Number, String],
    default: '100%',
  },
})

const ns = useNamespace('virtual-list')
const rootRef = ref<HTMLElement | null>(null)
const itemsRef = ref<HTMLElement[] | null>([])

interface Position {
  index: number
  top: number
  bottom: number
  height: number
  dHeight: number // 更新后的高度差
}

const positions = ref<Position[]>([])

const state = reactive({
  start: 0,
  end: 10,
  scrollTop: 0,
  containerHeight: 0,
})

// 基于预估高度初始化位置信息
function initPositions() {
  positions.value = props.data.map((item, index) => ({
    index,
    height: props.estimatedItemHeight,
    top: index * props.estimatedItemHeight,
    bottom: (index + 1) * props.estimatedItemHeight,
    dHeight: 0,
  }))
}

watch(() => props.data, initPositions, { immediate: true })

// 1. 列表总高度等于最后一个元素的底部位置
const listHeight = computed(() => {
  return positions.value.length > 0
    ? positions.value[positions.value.length - 1].bottom
    : 0
})

// 2. 可视区域内的列表项数量(逻辑上非必需,但有助于初始估算)
const visibleCount = computed(() => {
  return Math.ceil(state.containerHeight / props.estimatedItemHeight)
})

// 3. 当前可视区域的数据
const visibleData = computed(() => {
  return props.data
    .slice(state.start, Math.min(state.end, props.data.length))
    .map((item, index) => ({
      ...item,
      index: state.start + index,
    }))
})

// 4. 偏移量
const offset = computed(() => {
  if (state.start >= 1) {
    return positions.value[state.start].top
  }
  return 0
})

// 使用二分查找找到第一个 bottom > scrollTop 的列表项
function getStartIndex(scrollTop: number = 0) {
  let low = 0
  let high = positions.value.length - 1
  let res = -1

  while (low <= high) {
    const mid = Math.floor((low + high) / 2)
    const pos = positions.value[mid]

    if (pos.bottom > scrollTop) {
      if (pos.top < scrollTop) {
        // 该列表项跨越了顶部边界
        res = mid
        break
      }
      // 该列表项完全在 scrollTop 之下,尝试查找更早的项
      res = mid // 候选项,但可能还有更早的?
      high = mid - 1
    }
    else {
      // 该列表项完全在 scrollTop 之上
      low = mid + 1
    }
  }
  return res === -1 ? 0 : res
}

function updateVisibleRange() {
  state.start = getStartIndex(state.scrollTop)
  state.end = state.start + visibleCount.value + 2 // 渲染额外的缓冲区以增加平滑度
}

function onScroll(e: Event) {
  state.scrollTop = (e.target as HTMLElement).scrollTop
  updateVisibleRange()
}

// 渲染后测量并更新位置信息
function updatePositions() {
  const nodes = itemsRef.value
  if (!nodes || nodes.length === 0)
    return

  nodes.forEach((node) => {
    // 从 dataset 获取索引(需要在模板中绑定)
    // 或者假设顺序与 visibleData 一致
    // 为了安全起见,我们使用 getAttribute 获取绑定的属性
    const indexStr = node.getAttribute('data-index')
    if (!indexStr)
      return
    const index = Number.parseInt(indexStr)

    const rect = node.getBoundingClientRect()
    const height = rect.height
    const oldHeight = positions.value[index].height
    const dHeight = height - oldHeight

    if (dHeight) {
      positions.value[index].height = height
      positions.value[index].bottom = positions.value[index].bottom + dHeight
      positions.value[index].dHeight = dHeight
    }
  })

  // 累积更新后续项的位置信息
  // 找到第一个发生变化的索引
  // 这是一个简化的 O(N) 更新。对于海量列表可能需要优化,但通常情况下性能可以接受。
  // 实际上,我们应该从发生变化的起始索引开始更新。
  // 但这里我们是在遍历可视节点。
  const startUpdateIndex = Number.parseInt(nodes[0].getAttribute('data-index') || '0')
  const len = positions.value.length

  for (let i = startUpdateIndex; i < len; i++) {
    const item = positions.value[i]
    // 如果它是我们刚才测量过的项,它可能已经有了自己的 dHeight
    // 但我们也需要向前传递之前累积的差异。
    // 等等,上面的逻辑只更新了该项的 `bottom`。
    // 我们需要基于前一项的 bottom 重新计算 top/bottom。
    if (i > 0) {
      item.top = positions.value[i - 1].bottom
      item.bottom = item.top + item.height
    }
    else {
      item.top = 0
      item.bottom = item.height
    }
  }
}

onUpdated(() => {
  nextTick(() => {
    updatePositions()
  })
})

// 设置 ResizeObserver
let observer: ResizeObserver | null = null

onMounted(() => {
  if (rootRef.value) {
    state.containerHeight = rootRef.value.clientHeight
    updateVisibleRange()

    observer = new ResizeObserver((entries) => {
      for (const entry of entries) {
        state.containerHeight = entry.contentRect.height
        updateVisibleRange()
      }
    })
    observer.observe(rootRef.value)
  }
})

onUnmounted(() => {
  if (observer) {
    observer.disconnect()
    observer = null
  }
})
</script>

<template>
  <div ref="rootRef" :class="ns.b()" @scroll="onScroll">
    <!-- 1. 幽灵容器 -->
    <div :class="ns.e('phantom')" :style="{ height: `${listHeight}px` }" />

    <!-- 2. 真实渲染区域 -->
    <div
      :class="ns.e('content')"
      :style="{ transform: `translate3d(0, ${offset}px, 0)` }"
    >
      <div
        v-for="item in visibleData"
        :key="item.key ?? item.id"
        ref="itemsRef"
        :class="ns.e('item')"
        :data-index="item.index"
      >
        <slot :item="item" :index="item.index" />
      </div>
    </div>
  </div>
</template>
第一步:定义数据结构
我们需要一个数组 positions 来记录每一项的位置信息。
typescript
interface Position {
  index: number  // 第几条数据
  top: number    // 顶部距离总列表顶端的距离
  bottom: number // 底部距离总列表顶端的距离
  height: number // 这一项的高度
  dHeight: number // 高度修正值(真实高度 - 预估高度)
}

const positions = ref<Position[]>([])
初始化的时候,我们先按预估高度(比如 50px)把这个数组填满。
第二步:二分查找 (Binary Search)
当你滚动到 scrollTop = 10000 的位置时,我们怎么知道该从第几条数据开始渲染?
如果从头遍历 positions 数组,如果数据有一百万条,那每次滚动都要算很久。所以我们用二分查找,效率瞬间起飞。
typescript
// 找到第一个底部位置大于 scrollTop 的元素索引
function getStartIndex(scrollTop: number = 0) {
  let low = 0
  let high = positions.value.length - 1

  while (low <= high) {
    const mid = Math.floor((low + high) / 2)
    const pos = positions.value[mid]

    if (pos.bottom > scrollTop) {
      if (pos.top < scrollTop) {
        // 就是它!跨越了可视边界
        return mid
      }
      high = mid - 1 // 在前半截
    } else {
      low = mid + 1  // 在后半截
    }
  }
  return 0
}
第三步:渲染后的自动修正
这是最精彩的一步。当数据渲染到页面上后,Vue 的 onUpdated 钩子会被触发。我们在这里进行测量和修正。
typescript
function updatePositions() {
  const nodes = itemsRef.value
  if (!nodes || nodes.length === 0) return

  // 1. 测量真实高度,更新当前可视区域的数据
  nodes.forEach(node => {
    const rect = node.getBoundingClientRect()
    const height = rect.height
    const index = parseInt(node.getAttribute('data-index'))
    const oldHeight = positions.value[index].height
    const dHeight = height - oldHeight

    if (dHeight) {
      positions.value[index].height = height
      positions.value[index].bottom = positions.value[index].bottom + dHeight
      positions.value[index].dHeight = dHeight // 记录差值
    }
  })

  // 2. 累积效应:从第一个变化的位置开始,后续所有项都要调整
  // 比如第 5 项变高了 10px,那么第 6 项的 top 就要 +10px,bottom 也要 +10px...
  let startAdjustIndex = /* 找到这次更新中最早出现的那个索引 */
  let accumulatedDiff = 0

  for (let i = startAdjustIndex; i < positions.value.length; i++) {
     const item = positions.value[i]
     // 更新 top
     item.top = positions.value[i - 1].bottom
     // 更新 bottom
     item.bottom = item.top + item.height
  }
}
第四步:模板与样式 (Template & Style)
最后,看看模板里是怎么把这两个"盒子"组装起来的:
html
<template>
  <div ref="rootRef" class="my-virtual-list" @scroll="onScroll">
    <!-- 1. 幽灵容器:高度由 listHeight 撑开 -->
    <div class="my-virtual-list__phantom" :style="{ height: `${listHeight}px` }" />

    <!-- 2. 真实渲染区域:通过 transform 移动到可视区 -->
    <div
      class="my-virtual-list__content"
      :style="{ transform: `translate3d(0, ${offset}px, 0)` }"
    >
      <div
        v-for="item in visibleData"
        :key="item.id"
        class="my-virtual-list__item"
        :data-index="item.index"
      >
        <!-- 插槽:把具体怎么渲染这一行的权力交给使用者 -->
        <slot :item="item" :index="item.index" />
      </div>
    </div>
  </div>
</template>
别忘了加上关键的 CSS,否则"幽灵"和"内容"会打架:
css
.my-virtual-list {
  position: relative;
  overflow-y: auto; /* 必须开启滚动 */
  height: 100%;
}

.my-virtual-list__phantom {
  position: absolute;
  left: 0;
  top: 0;
  right: 0;
  z-index: -1; /* 藏在后面,只为了撑开高度 */
}

.my-virtual-list__content {
  position: absolute;
  left: 0;
  right: 0;
  top: 0;
  /* transform 会在这里动态设置 */
}
第五步:响应式适配 (ResizeObserver)
如果用户缩放了浏览器窗口,或者侧边栏折叠导致列表容器高度变化,我们需要重新计算"一屏能显示多少条数据"。
typescript
// 监听容器尺寸变化
let observer: ResizeObserver | null = null

onMounted(() => {
  if (rootRef.value) {
    observer = new ResizeObserver((entries) => {
      // 更新容器高度 -> 触发 visibleCount 重新计算
      state.containerHeight = entries[0].contentRect.height
      updateVisibleRange()
    })
    observer.observe(rootRef.value)
  }
})

onUnmounted(() => {
  if (observer) {
    observer.disconnect()
    observer = null
  }
})
5. 总结
实现不定高度虚拟列表,核心就是:
- 位置缓存 :用
positions数组记录每一项的几何信息。 - 滚动计算 :监听 scroll 事件,用二分查找 快速定位
startIndex。 - 动态修正 :DOM 渲染完后,测量真实高度,反过来修正
positions数组,确保持续滚动的准确性。