文章目录
- [一、Vue3 概述](#一、Vue3 概述)
- [1.1 Vue3 简介](#1.1 Vue3 简介)
- [1.2 核心改进](#1.2 核心改进)
- [二、创建 Vue3 工程](#二、创建 Vue3 工程)
- 2.1 基于 Vite(https://cn.vuejs.org/guide/quick-start.html#creating-a-vue-application) 创建(推荐) 创建(推荐))
- [2.2 基于 vue-cli 创建(维护模式)](#2.2 基于 vue-cli 创建(维护模式))
- [2.3 项目结构说明](#2.3 项目结构说明)
- [三、Vue3 核心语法](#三、Vue3 核心语法)
- [3.1 Options API vs Composition API](#3.1 Options API vs Composition API)
- [3.2 setup 函数](#3.2 setup 函数)
- 基本使用
- [setup 特性](#setup 特性)
- [setup 与 Options API 的关系](#setup 与 Options API 的关系)
- [setup 语法糖](#setup 语法糖)
- [3.3 响应式数据](#3.3 响应式数据)
- [ref - 创建响应式数据](#ref - 创建响应式数据)
- [reactive - 创建响应式对象](#reactive - 创建响应式对象)
- [ref 与 reactive 对比](#ref 与 reactive 对比)
- [toRefs 与 toRef](#toRefs 与 toRef)
- [3.4 计算属性与侦听器](#3.4 计算属性与侦听器)
- [3.5 模板引用与 props](#3.5 模板引用与 props)
- [模板引用--标签的 ref 属性](#模板引用--标签的 ref 属性)
- Props
- [3.6 生命周期](#3.6 生命周期)
- [3.7 自定义 Hook](#3.7 自定义 Hook)
- [四、Vue Router 4](#四、Vue Router 4)
- [4.1 安装与配置](#4.1 安装与配置)
- [4.2 路由使用](#4.2 路由使用)
- [4.3 路由传参](#4.3 路由传参)
- [4.4 编程式导航--脱离RouterLink实现路由跳转](#4.4 编程式导航--脱离RouterLink实现路由跳转)
- [4.5 嵌套路由--children](#4.5 嵌套路由--children)
- [4.6 重定向--redirect](#4.6 重定向--redirect)
- [五、Pinia 状态管理](#五、Pinia 状态管理)
- 六、组件通信
- [6.1 Props / 自定义事件](#6.1 Props / 自定义事件)
- [6.2 v-model](#6.2 v-model)
- [6.3 Provide / Inject](#6.3 Provide / Inject)
- [6.4 插槽](#6.4 插槽)
- [6.5 事件总线(Mitt)](#6.5 事件总线(Mitt))
- 七、高级特性
- [7.1 响应式工具函数](#7.1 响应式工具函数)
- [7.2 自定义 ref](#7.2 自定义 ref)
- [7.3 Teleport 组件](#7.3 Teleport 组件)
- [7.4 Suspense 组件](#7.4 Suspense 组件)
- 八、最佳实践与注意事项
- [8.1 性能优化](#8.1 性能优化)
- [8.2 TypeScript 最佳实践](#8.2 TypeScript 最佳实践)
- [8.3 代码组织](#8.3 代码组织)
- [8.4 常见问题](#8.4 常见问题)
- [九、Vue2 到 Vue3 迁移](#九、Vue2 到 Vue3 迁移)
- [9.1 破坏性变化](#9.1 破坏性变化)
- [9.2 迁移策略](#9.2 迁移策略)
- [9.3 兼容性处理](#9.3 兼容性处理)
一、Vue3 概述
1.1 Vue3 简介
Vue3 于 2020年9月18日发布,代号 "One Piece"。与 Vue2 相比,Vue3 在性能、开发体验和 TypeScript 支持等方面都有显著提升。
主要亮点:
- 打包体积减少 41%
- 初次渲染快 55%,更新渲染快 133%
- 内存占用减少 54%
- 更好的 TypeScript 支持
1.2 核心改进
- 性能提升:使用 Proxy 替代 Object.defineProperty 实现响应式,重写虚拟 DOM 实现
- 组合式 API:引入 Composition API,更好的代码组织和复用
- TypeScript 支持:源码使用 TypeScript 重写,提供更好的类型支持
- 新的内置组件:Fragment、Teleport、Suspense 等
二、创建 Vue3 工程
2.1 基于 Vite 创建(推荐)
Vite 是新一代前端构建工具,具有极速的服务启动和热更新。
bash
# 创建项目
npm create vue@latest

# 项目配置示例
√ Project name: vue3-demo
√ Add TypeScript? Yes
√ Add JSX Support? No
√ Add Vue Router? No
√ Add Pinia? No
√ Add Vitest? No
√ Add ESLint? Yes
2.2 基于 vue-cli 创建(维护模式)
bash
# 确保 @vue/cli 版本在 4.5.0 以上
vue --version
npm install -g @vue/cli
vue create vue-demo
# 选择 Vue 3.x
2.3 项目结构说明
index.html:项目入口文件main.ts:应用主文件- Vue3 通过
createApp函数创建应用实例
typescript
// main.ts
import { createApp } from 'vue'
import App from './App.vue'

createApp(App).mount('#app')
三、Vue3 核心语法
3.1 Options API vs Composition API
Vue2 - Options API:
- 数据、方法、计算属性分散在不同选项中
- 新增需求需修改多个位置
- 代码组织不够灵活
Vue3 - Composition API:
- 相关功能代码组织在一起
- 更好的代码复用和逻辑提取
- 更适合复杂组件开发
3.2 setup 函数
基本使用
vue
<template>
  <div>{{ name }}</div>
</template>

<script>
export default {
  setup() {
    let name = '张三'

    function changeName() {
      name = '李四'
    }

    return { name, changeName }
  }
}
</script>
setup 特性
- 在
beforeCreate之前执行 this为undefined- 返回对象可在模板中直接使用
- 也可返回渲染函数
setup 与 Options API 的关系
Vue2的配置(data、methos...)中可以访问到setup中的属性、方法。- 但在
setup中不能访问到Vue2的配置(data、methos...)。 - 如果与
Vue2冲突,则setup优先。
setup 语法糖
vue
<script setup lang="ts">
// 变量和方法直接可用,无需返回
let name = '张三'
function changeName() {
  name = '李四'
}
</script>
设置组件名插件:
bash
npm i vite-plugin-vue-setup-extend -D
typescript
// vite.config.ts
import { defineConfig } from 'vite'
import VueSetupExtend from 'vite-plugin-vue-setup-extend'

export default defineConfig({
  plugins: [ VueSetupExtend() ]
})使用:<script setup lang="ts" name="MyComponent">
3.3 响应式数据
ref - 创建响应式数据
vue
<script setup lang="ts">
import { ref } from 'vue'

// 基本类型
let count = ref(0)

// 对象类型
let user = ref({ name: '张三', age: 20 })

// JS 中需要 .value,模板中不需要
function increment() {
  count.value++
  user.value.age++
}
</script>
reactive - 创建响应式对象
vue
<script setup lang="ts">
import { reactive } from 'vue'

const state = reactive({
  count: 0,
  user: { name: '张三', age: 20 }
})

function update() {
  state.count++
  state.user.age++
}
</script>
ref 与 reactive 对比
| 特性 | ref | reactive |
|---|---|---|
| 数据类型 | 基本类型 + 对象类型 | 仅对象类型 |
| 访问方式 | .value |
直接访问 |
| 重新赋值 | 保持响应式 | 失去响应式,使用Object.assign去整体替换 |
| 深度监听 | 默认浅层,需手动开启 | 默认深度 |
使用原则:
- 基本类型 → ref
- 简单对象 → ref/reactive 都可以
- 深层嵌套对象 → reactive
toRefs 与 toRef
- 作用:将一个响应式对象中的每一个属性,转换为
ref对象。 - 备注:
toRefs与toRef功能一致,但toRefs可以批量转换。
vue
<script setup lang="ts">
import { reactive, toRefs, toRef } from 'vue'

const state = reactive({
  name: '张三',
  age: 20,
  address: { city: '北京' }
})

// 批量解构保持响应式
const { name, age } = toRefs(state)

// 单个属性保持响应式
const city = toRef(state.address, 'city')
</script>
3.4 计算属性与侦听器
computed
vue
<script setup lang="ts">
import { ref, computed } from 'vue'

const firstName = ref('张')
const lastName = ref('三')

// 只读计算属性
const fullName = computed(() => `${firstName.value}${lastName.value}`)

// 可读可写计算属性
const fullName2 = computed({
  get() {
    return `${firstName.value}${lastName.value}`
  },
  set(val) {
    const [first, last] = val.split('-')
    firstName.value = first
    lastName.value = last
  }
})
</script>
watch
- 作用:监视数据的变化(和
Vue2中的watch作用一致) - 特点:
Vue3中的watch只能监视以下四种数据:
ref定义的数据。reactive定义的数据。- 函数返回一个值(
getter函数)。- 一个包含上述内容的数组。
vue
<script setup lang="ts">
import { ref, reactive, watch } from 'vue'

// 1. 监视 ref 基本类型
const count = ref(0)
watch(count, (newVal, oldVal) => {
  console.log('count变化:', newVal, oldVal)
})

// 2. 监视 ref 对象类型--需要手动开启深度监视
/*
    监视,情况一:监视【ref】定义的【对象类型】数据,监视的是对象的地址值,若想监视对象内部属性的变化,需要手动开启深度监视
    watch的第一个参数是:被监视的数据
    watch的第二个参数是:监视的回调
    watch的第三个参数是:配置对象(deep、immediate等等.....)
  */
const user = ref({ name: '张三', age: 20 })
watch(user, (newVal, oldVal) => {
  console.log('user变化:', newVal, oldVal)
}, { deep: true })

// 3. 监视 reactive 对象--默认是开启深度监视的
const state = reactive({ count: 0 })
watch(() => state.count, (newVal, oldVal) => {
  console.log('state.count变化:', newVal, oldVal)
})

// 4. 监视多个数据
watch([() => state.count, count], (newVals, oldVals) => {
  console.log('多个数据变化:', newVals, oldVals)
})
</script>
watchEffect
vue
<script setup lang="ts">
import { ref, watchEffect } from 'vue'

const temp = ref(10)
const height = ref(0)

// 自动追踪依赖
watchEffect(() => {
  if (temp.value >= 60 || height.value >= 80) {
    console.log('触发报警')
  }
})
</script>
3.5 模板引用与 props
模板引用--标签的 ref 属性
vue
<template>
  <!-- DOM 元素引用 -->
  <input ref="inputRef" />

  <!-- 组件引用 -->
  <ChildComponent ref="childRef" />
</template>

<script setup lang="ts">
import { ref, onMounted } from 'vue'
import ChildComponent from './Child.vue'

const inputRef = ref<HTMLInputElement>()
const childRef = ref<InstanceType<typeof ChildComponent>>()

onMounted(() => {
  inputRef.value?.focus()
  console.log(childRef.value?.someMethod())
})
</script>
Props
typescript
// types.ts - 类型定义
export interface Person {
  id: string
  name: string
  age: number
}

export type Persons = Person[]
vue
<!-- 父组件 -->
<template>
  <Child :list="personList" />
</template>

<script setup lang="ts">
import { reactive } from 'vue'
import { type Persons } from './types'

const personList = reactive<Persons>([
  { id: '1', name: '张三', age: 20 },
  { id: '2', name: '李四', age: 25 }
])
</script>
vue
<!-- 子组件 -->
<template>
  <ul>
    <li v-for="item in list" :key="item.id">
      {{ item.name }} - {{ item.age }}
    </li>
  </ul>
</template>

<script setup lang="ts">
import { withDefaults } from 'vue'
import { type Persons } from '@/types'

  // 第一种写法:仅接收
// const props = defineProps(['list'])

  // 第二种写法:接收+限制类型
// defineProps<{list:Persons}>()

  // 第三种写法:接收+限制类型+指定默认值+限制必要性
const props = withDefaults(defineProps<{ list?: Persons }>(), {
  list: () => [{id:'asdasg01',name:'小猪佩奇',age:18}]
})
</script>
3.6 生命周期
生命周期对比:
-
Vue2的生命周期创建阶段:
beforeCreate、created挂载阶段:
beforeMount、mounted更新阶段:
beforeUpdate、updated销毁阶段:
beforeDestroy、destroyed -
Vue3的生命周期创建阶段:
setup挂载阶段:
onBeforeMount、onMounted更新阶段:
onBeforeUpdate、onUpdated卸载阶段:
onBeforeUnmount、onUnmounted
Vue3 生命周期钩子需要从 vue 中导入:
vue
<script setup lang="ts">
import {
  onBeforeMount,
  onMounted,
  onBeforeUpdate,
  onUpdated,
  onBeforeUnmount,
  onUnmounted
} from 'vue'

// 常用钩子
onMounted(() => {
  console.log('组件挂载完成')
})

onUpdated(() => {
  console.log('组件更新完成')
})

onBeforeUnmount(() => {
  console.log('组件卸载前')
})
</script>
3.7 自定义 Hook
typescript
// hooks/useSum.ts
import {ref,onMounted} from 'vue'

export default function(){
  let sum = ref(0)

  const increment = ()=>{
    sum.value += 1
  }
  const decrement = ()=>{
    sum.value -= 1
  }
  onMounted(()=>{
    increment()
  })

  //向外部暴露数据
  return {sum,increment,decrement}
}
typescript
// hooks/useDog.ts
import {reactive,onMounted} from 'vue'
import axios,{AxiosError} from 'axios'

export default function(){
  let dogList = reactive<string[]>([])

  // 方法
  async function getDog(){
    try {
      // 发请求
      let {data} = await axios.get('https://dog.ceo/api/breed/pembroke/images/random')
      // 维护数据
      dogList.push(data.message)
    } catch (error) {
      // 处理错误
      const err = <AxiosError>error
      console.log(err.message)
    }
  }

  // 挂载钩子
  onMounted(()=>{
    getDog()
  })

  //向外部暴露数据
  return {dogList,getDog}
}
vue
<template>
  <h2>当前求和为:{{sum}}</h2>
  <button @click="increment">点我+1</button>
  <button @click="decrement">点我-1</button>
  <hr>
  <img v-for="(u,index) in dogList.urlList" :key="index" :src="(u as string)">
  <span v-show="dogList.isLoading">加载中......</span><br>
  <button @click="getDog">再来一只狗</button>
</template>

<script lang="ts">
  import {defineComponent} from 'vue'

  export default defineComponent({
    name:'App',
  })
</script>

<script setup lang="ts">
 // 使用hook
  import useSum from './hooks/useSum'
  import useDog from './hooks/useDog'

  let {sum,increment,decrement} = useSum()
  let {dogList,getDog} = useDog()
</script>
四、Vue Router 4
4.1 安装与配置
bash
npm install vue-router@4
typescript
// router/index.ts
// 第一步:引入createRouter
import { createRouter, createWebHistory } from 'vue-router'
// 引入一个一个可能要呈现的组件
import Home from '../views/Home.vue'
// import About from '@/components/About.vue'
// 第二步:创建路由器
const router = createRouter({
  // history 模式
  history: createWebHistory(),
  // hash 模式: createWebHashHistory()
  routes: [
    {
      path: '/',
      name: 'Home',
      component: Home
    },
    {
      path: '/about',
      name: 'About',
      component: () => import('../views/About.vue') // 路由懒加载
    }
  ]
})

export default router
typescript
//main.ts
import router from './router/index'
app.use(router)

app.mount('#app')
4.2 路由使用
- 路由组件通常存放在
pages或views文件夹,一般组件通常存放在components文件夹。 - 路由器工作模式:
| 模式 | 创建方式 | 优点 | 缺点 |
|---|---|---|---|
| history 模式 | createWebHistory() |
URL 美观,无 #,利于 SEO |
需要服务器配置,否则刷新会 404 |
| hash 模式 | createWebHashHistory() |
无需服务器配置,兼容性好 | URL 有 #,不美观,不利于 SEO |
- to的两种写法
typescript
<!-- 第一种:to的字符串写法 -->
<router-link active-class="active" to="/home">主页</router-link>

<!-- 第二种:to的对象写法 -->
<router-link active-class="active" :to="{path:'/home'}">Home</router-link>
vue
<template>
  <!-- 导航链接 -->
  <router-link to="/">首页</router-link>
  <router-link :to="{ name: 'About' }">关于</router-link>

  <!-- 路由出口 -->
  <router-view />
</template>

<script lang="ts" setup name="App">
  import {RouterLink,RouterView} from 'vue-router'
</script>
4.3 路由传参
备注1:传递params参数时,若使用to的对象写法,必须使用name配置项,不能用path。
备注2:传递params参数时,需要提前在规则中占位。
vue
<!-- Query 参数 -->
<router-link :to="{ path: '/user', query: { id: 1 } }">用户</router-link>

<!-- Params 参数 -->
<router-link :to="{ name: 'User', params: { id: 1 } }">用户</router-link>
vue
<script setup lang="ts">
import { useRoute } from 'vue-router'

const route = useRoute()

// 获取参数
const id = route.params.id
const query = route.query
</script>
4.4 编程式导航--脱离RouterLink实现路由跳转
-
浏览器的历史记录有两种写入方式:分别为
push和replace:push是追加历史记录(默认值)。replace是替换当前记录。
vue
<script setup lang="ts">
import { useRoute, useRouter } from 'vue-router'

const route = useRoute()
const router = useRouter()

// 导航方法
function goToUser(id: number) {
  router.push(`/user/${id}`)
  // 或
  router.push({ name: 'User', params: { id } })
}

// 替换当前路由
router.replace('/home')

// 前进后退
router.go(1)
router.back()

// console.log(route.query)
// console.log(route.parmas)
// console.log(router.push)
// console.log(router.replace)


</script>
4.5 嵌套路由--children
typescript
const routes = [
  {
    path: '/user/:id',
    component: User,
    children: [
      {
        path: 'profile',
        component: UserProfile
      },
      {
        path: 'posts',
        component: UserPosts
      }
    ]
  }
]
4.6 重定向--redirect
typescript
{
    path:'/',
    redirect:'/about'
}
五、Pinia 状态管理
5.1 安装与配置
bash
npm install pinia
typescript
// main.ts
import { createApp } from 'vue'
import { createPinia } from 'pinia'
import App from './App.vue'

const app = createApp(App)
app.use(createPinia())
app.mount('#app')
5.2 Store 定义
Store是一个保存:状态 、业务逻辑 的实体,每个组件都可以读取 、写入它。- 它有三个概念:
state、getter、action,相当于组件中的:data、computed和methods。 - 具体编码:
src/store/counter.ts
typescript
// stores/counter.ts
import { defineStore } from 'pinia'

export const useCounterStore = defineStore('counter', {
  state: () => ({
    count: 0,
    name: 'Counter'
  }),

  getters: {
    doubleCount: (state) => state.count * 2,
    greeting(): string {
      return `Hello ${this.name}`
    }
  },

  actions: {
    increment() {
      this.count++
    },
    async fetchData() {
      const response = await fetch('/api/data')
      // 更新 state
    }
  }
})
5.3 组合式 Store
typescript
// stores/user.ts
import { defineStore } from 'pinia'
import { ref, computed } from 'vue'

export const useUserStore = defineStore('user', () => {
  const name = ref('')
  const age = ref(0)

  const isAdult = computed(() => age.value >= 18)

  function updateUser(newName: string, newAge: number) {
    name.value = newName
    age.value = newAge
  }

  return { name, age, isAdult, updateUser }
})
5.4 在组件中使用
- 借助
storeToRefs将store中的数据转为ref对象,方便在模板中使用。 - 注意:
pinia提供的storeToRefs只会将数据做转换,而Vue的toRefs会转换store中全部数据,包括方法。
vue
<template>
  <div>{{ counter.count }}</div>
  <div>{{ counter.doubleCount }}</div>
  <button @click="counter.increment()">+</button>
</template>

<script setup lang="ts">
import { useCounterStore } from '@/stores/counter'
import { storeToRefs } from 'pinia'

const counter = useCounterStore()

// 解构保持响应式
const { count, doubleCount } = storeToRefs(counter)
</script>
5.5 数据持久化
typescript
import { defineStore } from 'pinia'

export const useStore = defineStore('main', {
  state: () => ({
    data: JSON.parse(localStorage.getItem('store-data') || 'null') || {}
  }),

  actions: {
    saveToLocalStorage() {
      localStorage.setItem('store-data', JSON.stringify(this.data))
    }
  }
})
5.6 $subscribe
概述
$subscribe 是 Pinia 提供的一个方法,用于监听 store 中 state 的变化。它类似于 Vue 的 watch,但专门用于监听 Pinia store 的状态变化。
基本使用
ts
import { defineStore } from 'pinia'

export const useCounterStore = defineStore('counter', {
  state: () => ({
    count: 0
  }),
  actions: {
    increment() {
      this.count++
    }
  }
})
ts
// 在组件中监听 state 变化
const counterStore = useCounterStore()
// 监听整个 store 的变化
counterStore.$subscribe((mutation, state) => {
console.log('Store 变化:', mutation, state)
// 保存到 localStorage
localStorage.setItem('counter-state', JSON.stringify(state))
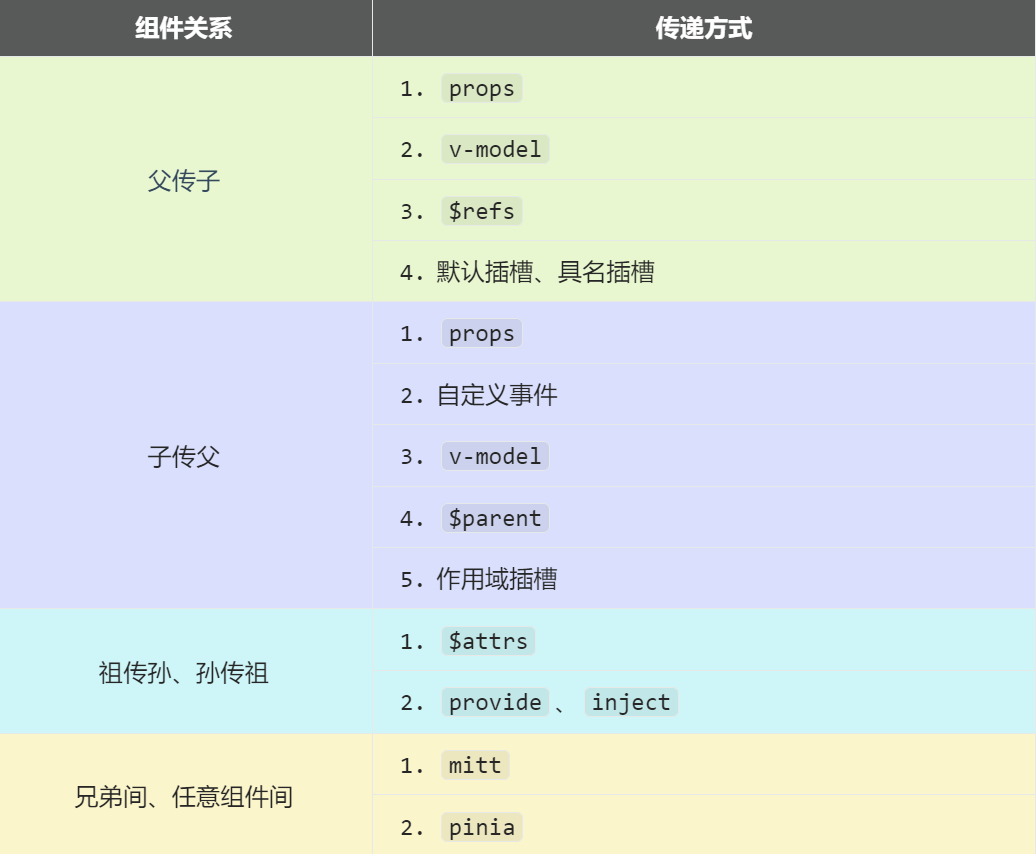
})六、组件通信
| 通信方式 | Vue2 | Vue3 | 变化说明 |
|---|---|---|---|
| 父子通信 | props / $emit |
defineProps / defineEmits |
声明方式变化,TypeScript 支持更好 |
| 事件总线 | EventBus |
mitt |
移除内置,使用第三方库 |
| 状态管理 | Vuex | Pinia | 更简洁、组合式 API |
| 双向绑定 | .sync 修饰符 |
v-model 参数 |
语法统一,支持多个 |
| 跨级通信 | provide/inject 选项 |
provide/inject 函数 |
组合式 API |
| 属性透传 | $attrs + $listeners |
合并到 $attrs |
简化 API |
| 子组件访问 | $children + $refs |
ref + defineExpose |
移除 $children,更明确 |
| 插槽 | slot / slot-scope |
v-slot |
语法统一 |
| 作用域插槽 | slot-scope |
v-slot + 解构 |
语法更简洁 |
6.1 Props / 自定义事件
ts
<!-- 父组件 -->
<template>
  <Child :msg="message" @update="handleUpdate" />
</template>

<script setup lang="ts">
const message = ref('Hello')
function handleUpdate(newMsg: string) {
  message.value = newMsg
}
</script>

<!-- 子组件 -->
<template>
  <button @click="emit('update', 'New Message')">更新</button>
</template>

<script setup lang="ts">
defineProps<{
  msg: string
}>()

const emit = defineEmits<{
  (e: 'update', value: string): void
}>()
</script>
6.2 v-model
ts
<!-- 父组件 -->
<template>
  <CustomInput v-model="text" />
  <CustomInput v-model:title="title" />
</template>

<!-- 子组件 -->
<template>
  <input :value="modelValue" @input="$emit('update:modelValue', $event.target.value)" />
  <input :value="title" @input="$emit('update:title', $event.target.value)" />
</template>

<script setup lang="ts">
defineProps<{
  modelValue: string
  title?: string
}>()

defineEmits<{
  'update:modelValue': [value: string]
  'update:title': [value: string]
}>()
</script>
6.3 Provide / Inject
ts
<!-- 祖先组件 -->
<script setup lang="ts">
import { provide, ref } from 'vue'

const theme = ref('dark')
provide('theme', theme)
</script>

<!-- 后代组件 -->
<script setup lang="ts">
import { inject } from 'vue'

const theme = inject('theme', ref('light'))
</script>
6.4 插槽
ts
<!-- 父组件 -->
<template>
  <MyComponent>
    <template #header>
      <h1>标题</h1>
    </template>

    <template #default="{ user }">
      <p>{{ user.name }}</p>
    </template>

    <template #footer>
      <p>页脚</p>
    </template>
  </MyComponent>
</template>

<!-- 子组件 -->
<template>
  <div>
    <slot name="header" />
    <slot :user="currentUser" />
    <slot name="footer" />
  </div>
</template>
6.5 事件总线(Mitt)
typescript
// utils/emitter.ts
import mitt from 'mitt'
type Events = {
  'user-login': { userId: number }
  'user-logout': void
}
export const emitter = mitt<Events>()
vue
<!-- 发送事件 -->
<script setup lang="ts">
import { emitter } from '@/utils/emitter'

function login() {
  emitter.emit('user-login', { userId: 1 })
}
</script>

<!-- 接收事件 -->
<script setup lang="ts">
import { emitter } from '@/utils/emitter'
import { onUnmounted } from 'vue'

const handleLogin = (data: { userId: number }) => {
  console.log('用户登录:', data.userId)
}

emitter.on('user-login', handleLogin)

onUnmounted(() => {
  emitter.off('user-login', handleLogin)
})
</script>
七、高级特性
7.1 响应式工具函数
typescript
import {
  shallowRef,      // 浅层 ref
  shallowReactive, // 浅层 reactive
  readonly,        // 深只读
  shallowReadonly, // 浅只读
  toRaw,           // 获取原始对象
  markRaw          // 标记为非响应式
} from 'vue'

// 浅层响应式
const shallowObj = shallowReactive({ nested: { count: 0 } })
shallowObj.nested.count = 1 // 不会触发响应

// 只读
const readOnlyData = readonly({ value: 1 })
// readOnlyData.value = 2 // 错误

// 获取原始对象
const raw = toRaw(reactiveObj)

// 标记为非响应式
const nonReactive = markRaw({ value: 1 })
7.2 自定义 ref
typescript
import { customRef } from 'vue'

function useDebouncedRef<T>(value: T, delay = 200) {
  let timer: number

  return customRef((track, trigger) => {
    return {
      get() {
        track()
        return value
      },
      set(newValue) {
        clearTimeout(timer)
        timer = setTimeout(() => {
          value = newValue
          trigger()
        }, delay)
      }
    }
  })
}

// 使用
const text = useDebouncedRef('', 300)
7.3 Teleport 组件
vue
<template>
  <button @click="show = true">打开弹窗</button>

  <Teleport to="body">
    <div v-if="show" class="modal">
      <h2>弹窗标题</h2>
      <button @click="show = false">关闭</button>
    </div>
  </Teleport>
</template>
7.4 Suspense 组件
vue
<template>
  <Suspense>
    <template #default>
      <AsyncComponent />
    </template>

    <template #fallback>
      <div>加载中...</div>
    </template>
  </Suspense>
</template>

<script setup lang="ts">
import { defineAsyncComponent } from 'vue'

const AsyncComponent = defineAsyncComponent(() =>
  import('./AsyncComponent.vue')
)
</script>
八、最佳实践与注意事项
8.1 性能优化
- 合理使用响应式:避免不必要的响应式数据
- 组件懒加载 :
defineAsyncComponent+Suspense - 列表优化 :使用
key,避免v-if和v-for一起使用 - 计算属性缓存 :复杂计算使用
computed - 事件防抖节流:使用 Lodash 或自定义实现
8.2 TypeScript 最佳实践
- 明确类型 :避免使用
any - 类型导入 :使用
import type导入纯类型 - 泛型组件:提供更好的类型推断
- 类型文件组织 :合理组织
.d.ts文件
8.3 代码组织
- 单一职责:组件功能单一
- 自定义 Hook:逻辑复用
- 组件通信:根据场景选择合适的通信方式
- 目录结构:按功能模块组织代码
8.4 常见问题
- 响应式丢失 :解构时使用
toRefs - 内存泄漏:及时清理事件监听器和定时器
- 路由守卫:合理使用路由导航守卫
- 错误处理:全局错误处理和组件内错误边界
九、Vue2 到 Vue3 迁移
9.1 破坏性变化
v-model用法变更- 事件 API 变更(移除
$on,$off,$once) - 过滤器(
filter)移除 - 生命周期钩子命名变更
- 异步组件写法变更
9.2 迁移策略
- 使用 Vue3 兼容版本
- 逐步迁移组件
- 使用迁移工具辅助
- 充分测试确保稳定性
9.3 兼容性处理
javascript
// vue.config.js - Vue CLI 项目
module.exports = {
  configureWebpack: {
    resolve: {
      alias: {
        vue$: 'vue/dist/vue.esm-bundler.js'
      }
    }
  }
}