欢迎加入开源鸿蒙跨平台社区:https://openharmonycrossplatform.csdn.net
📋 前言
react-native-device-info 是一个功能强大的设备信息获取库,它允许 React Native 应用轻松获取各种设备和应用信息,包括设备型号、品牌、操作系统版本、应用版本、电池电量、内存使用情况等。该库支持 Android、iOS 和 HarmonyOS 三端,为跨平台应用开发提供了统一的设备信息获取接口,大大简化了设备信息相关的开发工作。
🎯 库简介(官方给的,但是我踩了很多坑)
基本信息
-
库名称: react-native-device-info
-
版本信息:
11.1.1: 支持 RN 0.72 版本(@react-native-ohos/react-native-device-info)14.0.5: 支持 RN 0.77 版本(@react-native-ohos/react-native-device-info)
-
官方仓库: https://github.com/react-native-oh-library/react-native-device-info
-
主要功能:
- 获取设备基本信息(品牌、型号、设备名称)
- 获取应用信息(包名、版本号、构建号)
- 获取系统信息(操作系统名称、版本、API 级别)
- 获取硬件信息(电池电量、内存使用、存储空间)
- 判断设备类型(平板、模拟器等)
- 支持多种权限相关功能(位置、网络等)
-
兼容性验证 : 该第三方库的仓库已迁移至 AtomGit,且支持直接从 npm 下载,新的包名为:
@react-native-ohos/react-native-device-info
为什么需要这个库?
- 统一接口: 提供跨平台统一的设备信息获取 API,无需针对不同平台编写不同代码
- 功能全面: 涵盖设备、应用、系统、硬件等各类信息,满足多样化需求
- 使用简单: API 设计简洁明了,易于集成和使用
- 性能优秀: 原生实现,性能优异,获取信息快速准确
- 持续更新: 社区活跃,持续维护和更新,支持最新的 RN 版本
- 鸿蒙支持: 完整支持 HarmonyOS 平台,实现真正的跨平台
📦 安装步骤
1. 使用 npm 安装
根据您的 RN 版本选择对应的包名:
RN 0.72 版本(使用ohos全是错,官方文档一点也不对):
bash
npm install @react-native-oh-tpl/react-native-device-info@11.1.0-0.0.8-rc.1RN 0.77 版本:
bash
npm install @react-native-ohos/react-native-device-info2. 验证安装
安装完成后,检查 package.json 文件,应该能看到新增的依赖:
json
{
  "dependencies": {
    "@react-native-ohos/react-native-device-info": "^11.1.0-0.0.8-rc.1",
    // ... 其他依赖
  }
}
🔧 HarmonyOS 平台配置 ⭐
1. 配置 Codegen(必需步骤)⭐⭐⭐
!WARNING 本库已经适配了 Codegen,必须在使用前执行 Codegen 生成桥接代码,否则会报错。
步骤 1 : 在 RN 项目的 package.json 中配置 codegen 脚本:
json
{
  "scripts": {
    "codegen": "react-native codegen-harmony --cpp-output-path ./harmony/entry/src/main/cpp/generated --rnoh-module-path ./harmony/entry/oh_modules/@rnoh/react-native-openharmony"
  }
}
步骤 2: 执行 codegen 命令:
bash
npm run codegen执行成功后,会在以下路径生成代码:
- C++ 代码:
harmony/entry/src/main/cpp/generated/ - ArkTS/TS 代码:
harmony/entry/oh_modules/@rnoh/react-native-openharmony/
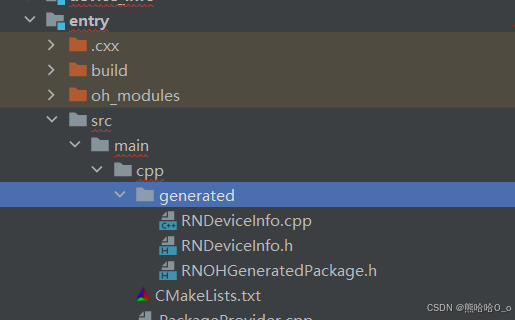
步骤 3: 配置 CMakeLists.txt 引入生成的代码
打开 harmony/entry/src/main/cpp/CMakeLists.txt,添加:
diff
...
# RNOH_BEGIN: add_package_subdirectories
add_subdirectory("${OH_MODULE_DIR}/rnoh-sample-package/src/main/cpp" ./sample-package)
# RNOH_END: add_package_subdirectories

+ file(GLOB GENERATED_CPP_FILES "./generated/*.cpp")
add_library(rnoh_app SHARED
+ ${GENERATED_CPP_FILES}
 "./PackageProvider.cpp"
 "${RNOH_CPP_DIR}/RNOHAppNapiBridge.cpp"
)
target_link_libraries(rnoh_app PUBLIC rnoh)
# RNOH_BEGIN: link_packages
target_link_libraries(rnoh_app PUBLIC rnoh_sample_package)
# RNOH_END: link_packages
...
步骤 4: 配置 PackageProvider.cpp 引入生成的包
打开 harmony/entry/src/main/cpp/PackageProvider.cpp,添加:
diff
#include "RNOH/PackageProvider.h"
+ #include "generated/RNOHGeneratedPackage.h"

using namespace rnoh;

std::vector<std::shared_ptr<Package>>
PackageProvider::getPackages(Package::Context ctx) {
    return {
+       std::make_shared<RNOHGeneratedPackage>(ctx),
    };
}
2. 引入原生端代码
目前有两种方法:
方法一:通过 har 包引入(不推荐)
!TIP har 包位于三方库安装路径的
harmony文件夹下。
打开 harmony/entry/oh-package.json5,添加以下依赖:
json
"dependencies": {
    "@rnoh/react-native-openharmony": "file:../react_native_openharmony",
    "@react-native-oh-tpl/react-native-device-info": "file:../../node_modules/@react-native-oh-tpl/react-native-device-info/harmony/device_info.har"
}
点击右上角的 sync 按钮
或者在终端执行:
bash
cd harmony/entry
ohpm install
方法二:直接链接源码
步骤 1 : 把 <RN工程>/node_modules/@react-native-oh-tpl/react-native-device-info/harmony 目录下的源码 device_info 复制到 harmony 工程根目录下。
步骤 2 : 在 harmony 工程根目录的 build-profile.json5 添加以下模块:
json
modules: [
  ...
  {
    name: 'device_info',
    srcPath: './device_info',
  }
]
步骤 3 : 打开 device_info/oh-package.json5,修改 @rnoh/react-native-openharmony 和项目的版本一致。
步骤 4 : 打开 harmony/entry/oh-package.json5,添加以下依赖:
json
"dependencies": {
  "@rnoh/react-native-openharmony": "0.72.90",
  "@react-native-oh-tpl/react-native-device-info": "file:../device_info"
}
步骤 5 : 点击 DevEco Studio 右上角的 sync 按钮
3. 配置 CMakeLists 和引入 RNDeviceInfoPackage(使用的就是11.1.0-0.0.8,直接跳过)
!WARNING 若使用的是 <= 11.1.0-0.0.8 版本,请跳过本章。
打开 harmony/entry/src/main/cpp/CMakeLists.txt,添加:
diff
project(rnapp)
cmake_minimum_required(VERSION 3.4.1)
set(CMAKE_CXX_STANDARD 17)
set(RNOH_CPP_DIR "${CMAKE_CURRENT_SOURCE_DIR}/../../../../oh_modules/@rnoh/react-native-openharmony/src/main/cpp")
+ set(REACT_NATIVE_DEVICE_INFO_CPP_DIR "${CMAKE_CURRENT_SOURCE_DIR}/../../../oh_modules/@react-native-ohos/react-native-device-info/src/main/cpp")
set(WITH_HITRACE_SYSTRACE 1)
add_compile_definitions(WITH_HITRACE_SYSTRACE)

add_subdirectory("${RNOH_CPP_DIR}" ./rn)
+ add_subdirectory("${REACT_NATIVE_DEVICE_INFO_CPP_DIR}" ./device_info)

add_library(rnoh_app SHARED
    "./PackageProvider.cpp"
    "${RNOH_CPP_DIR}/RNOHAppNapiBridge.cpp"
)
+ target_link_libraries(rnoh_app PUBLIC device_info)
打开 harmony/entry/src/main/cpp/PackageProvider.cpp,添加:
diff
#include "RNOH/PackageProvider.h"
#include "generated/RNOHGeneratedPackage.h"
+ #include "RNDeviceInfoPackage.h"

using namespace rnoh;

std::vector<std::shared_ptr<Package>>
PackageProvider::getPackages(Package::Context ctx) {
    return {
        std::make_shared<RNOHGeneratedPackage>(ctx),
+       std::make_shared<RNDeviceInfoPackage>(ctx),
    };
}
4. 在 ArkTs 侧引入 RNDeviceInfoPackage(这个不要跳过)
打开 harmony/entry/src/main/ets/RNPackagesFactory.ts,添加:
diff
  ...
+ import {RNDeviceInfoPackage} from '@react-native-ohos/react-native-device-info/ts';

export function createRNPackages(ctx: RNPackageContext): RNPackage[] {
  return [
    new SamplePackage(ctx),
+   new RNDeviceInfoPackage(ctx)
  ];
}
5. 配置权限
打开 harmony/entry/src/main/module.json5,添加必要的权限:
diff
...
"requestPermissions": [
  {
    "name": "ohos.permission.GET_NETWORK_INFO"
  },
  {
    "name": "ohos.permission.GET_WIFI_INFO"
  },
  {
    "name": "ohos.permission.DISTRIBUTED_DATASYNC",
    "reason": "$string:DATA_SYNC",
    "usedScene": {
      "abilities": [
        "EntryAbility"
      ],
      "when": "always"
    }
  }
]
在 entry 目录下添加申请剪切板权限的原因 :
打开 entry/src/main/resources/base/element/string.json,添加:
...
{
  "string": [
+    {
+      "name": "DATA_SYNC",
+      "value": "data sync"
+    }
  ]
}
6. 配置字体缩放(可选)
如果需要使用 getFontScale 接口,需要进行以下配置:
步骤 1 : 在 harmony/AppScope/resources/base/profile 文件夹下新增 configuration.json 文件:
json
{
  "configuration": {
    "fontSizeScale": "followSystem",
    "fontSizeMaxScale": "3.2"
  }
}
步骤 2 : 在 harmony/AppScope/app.json5 文件中配置:
diff
{
  "app": {
    "bundleName": "com.example.test",
    "vendor": "example",
    "versionCode": 1000000,
    "versionName": "1.0.0",
    "icon": "$media:app_icon",
    "label": "$string:app_name",
    "distributedNotificationEnabled": true,
+   "configuration": "$profile:configuration"
  }
}
7. 运行
点击右上角的 sync 按钮
或者在终端执行:
bash
cd harmony/entry
ohpm install
然后编译、运行即可。
💻 完整代码示例
下面是一个完整的示例,展示了 react-native-device-info 的各种使用场景:
javascript
import React, { useState, useEffect } from 'react';
import {
SafeAreaView,
ScrollView,
StatusBar,
StyleSheet,
Text,
View,
TouchableOpacity,
Platform,
} from 'react-native';
import DeviceInfo from 'react-native-device-info';
function DeviceInfoDemo() {
const [deviceInfo, setDeviceInfo] = useState({
// 应用信息
bundleId: '',
appName: '',
version: '',
readableVersion: '',
buildNumber: '',
// 设备信息
brand: '',
model: '',
deviceName: '',
deviceType: '',
manufacturer: '',
systemName: '',
systemVersion: '',
// 硬件信息
batteryLevel: 0,
isBatteryCharging: false,
totalMemory: 0,
usedMemory: 0,
// 设备类型判断
isTablet: false,
// 其他信息
apiLevel: 0,
buildId: '',
firstInstallTime: 0,
});
const [loading, setLoading] = useState(true);
useEffect(() => {
fetchDeviceInfo();
}, []);
const fetchDeviceInfo = async () => {
try {
const [
bundleId,
appName,
version,
readableVersion,
buildNumber,
brand,
model,
deviceName,
deviceType,
manufacturer,
systemName,
systemVersion,
batteryLevel,
isBatteryCharging,
totalMemory,
usedMemory,
isTablet,
apiLevel,
buildId,
firstInstallTime,
] = await Promise.all([
DeviceInfo.getBundleId(),
DeviceInfo.getApplicationName(),
DeviceInfo.getVersion(),
DeviceInfo.getReadableVersion(),
DeviceInfo.getBuildNumber(),
DeviceInfo.getBrand(),
DeviceInfo.getModel(),
DeviceInfo.getDeviceName(),
DeviceInfo.getDeviceType(),
DeviceInfo.getManufacturer(),
DeviceInfo.getSystemName(),
DeviceInfo.getSystemVersion(),
DeviceInfo.getBatteryLevel(),
DeviceInfo.isBatteryCharging(),
DeviceInfo.getTotalMemory(),
DeviceInfo.getUsedMemory(),
DeviceInfo.isTablet(),
DeviceInfo.getApiLevel(),
DeviceInfo.getBuildId(),
DeviceInfo.getFirstInstallTime(),
]);
setDeviceInfo({
bundleId,
appName,
version,
readableVersion,
buildNumber,
brand,
model,
deviceName,
deviceType,
manufacturer,
systemName,
systemVersion,
batteryLevel,
isBatteryCharging,
totalMemory,
usedMemory,
isTablet,
apiLevel,
buildId,
firstInstallTime,
});
setLoading(false);
} catch (error) {
console.error('获取设备信息失败:', error);
setLoading(false);
}
};
const formatMemory = (bytes: number) => {
if (!bytes) return 'N/A';
const gb = bytes / (1024 * 1024 * 1024);
return `${gb.toFixed(2)} GB`;
};
const formatDate = (timestamp: number) => {
if (!timestamp) return 'N/A';
const date = new Date(timestamp);
return date.toLocaleString('zh-CN');
};
if (loading) {
return (
<View style={styles.loadingContainer}>
<Text style={styles.loadingText}>正在加载设备信息...</Text>
</View>
);
}
return (
<SafeAreaView style={styles.container}>
<StatusBar barStyle="dark-content" backgroundColor="#ffffff" />
<View style={styles.header}>
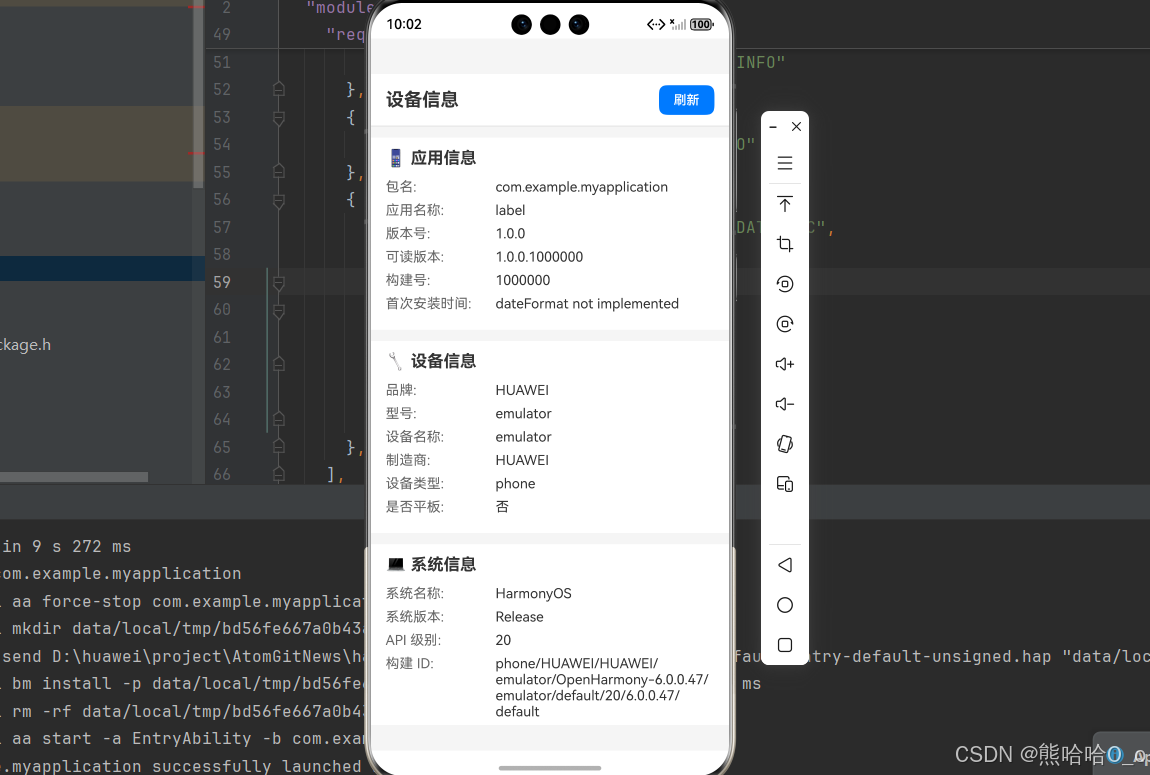
<Text style={styles.headerTitle}>设备信息</Text>
<TouchableOpacity style={styles.refreshButton} onPress={fetchDeviceInfo}>
<Text style={styles.refreshButtonText}>刷新</Text>
</TouchableOpacity>
</View>
<ScrollView style={styles.scrollView}>
{/* 应用信息 */}
<View style={styles.section}>
<Text style={styles.sectionTitle}>📱 应用信息</Text>
<View style={styles.infoRow}>
<Text style={styles.infoLabel}>包名:</Text>
<Text style={styles.infoValue}>{deviceInfo.bundleId}</Text>
</View>
<View style={styles.infoRow}>
<Text style={styles.infoLabel}>应用名称:</Text>
<Text style={styles.infoValue}>{deviceInfo.appName}</Text>
</View>
<View style={styles.infoRow}>
<Text style={styles.infoLabel}>版本号:</Text>
<Text style={styles.infoValue}>{deviceInfo.version}</Text>
</View>
<View style={styles.infoRow}>
<Text style={styles.infoLabel}>可读版本:</Text>
<Text style={styles.infoValue}>{deviceInfo.readableVersion}</Text>
</View>
<View style={styles.infoRow}>
<Text style={styles.infoLabel}>构建号:</Text>
<Text style={styles.infoValue}>{deviceInfo.buildNumber}</Text>
</View>
<View style={styles.infoRow}>
<Text style={styles.infoLabel}>首次安装时间:</Text>
<Text style={styles.infoValue}>{formatDate(deviceInfo.firstInstallTime)}</Text>
</View>
</View>
{/* 设备信息 */}
<View style={styles.section}>
<Text style={styles.sectionTitle}>🔧 设备信息</Text>
<View style={styles.infoRow}>
<Text style={styles.infoLabel}>品牌:</Text>
<Text style={styles.infoValue}>{deviceInfo.brand}</Text>
</View>
<View style={styles.infoRow}>
<Text style={styles.infoLabel}>型号:</Text>
<Text style={styles.infoValue}>{deviceInfo.model}</Text>
</View>
<View style={styles.infoRow}>
<Text style={styles.infoLabel}>设备名称:</Text>
<Text style={styles.infoValue}>{deviceInfo.deviceName}</Text>
</View>
<View style={styles.infoRow}>
<Text style={styles.infoLabel}>制造商:</Text>
<Text style={styles.infoValue}>{deviceInfo.manufacturer}</Text>
</View>
<View style={styles.infoRow}>
<Text style={styles.infoLabel}>设备类型:</Text>
<Text style={styles.infoValue}>{deviceInfo.deviceType}</Text>
</View>
<View style={styles.infoRow}>
<Text style={styles.infoLabel}>是否平板:</Text>
<Text style={styles.infoValue}>{deviceInfo.isTablet ? '是' : '否'}</Text>
</View>
</View>
{/* 系统信息 */}
<View style={styles.section}>
<Text style={styles.sectionTitle}>💻 系统信息</Text>
<View style={styles.infoRow}>
<Text style={styles.infoLabel}>系统名称:</Text>
<Text style={styles.infoValue}>{deviceInfo.systemName}</Text>
</View>
<View style={styles.infoRow}>
<Text style={styles.infoLabel}>系统版本:</Text>
<Text style={styles.infoValue}>{deviceInfo.systemVersion}</Text>
</View>
<View style={styles.infoRow}>
<Text style={styles.infoLabel}>API 级别:</Text>
<Text style={styles.infoValue}>{deviceInfo.apiLevel}</Text>
</View>
<View style={styles.infoRow}>
<Text style={styles.infoLabel}>构建 ID:</Text>
<Text style={styles.infoValue}>{deviceInfo.buildId}</Text>
</View>
</View>
{/* 硬件信息 */}
<View style={styles.section}>
<Text style={styles.sectionTitle}>⚡ 硬件信息</Text>
<View style={styles.infoRow}>
<Text style={styles.infoLabel}>电池电量:</Text>
<Text style={styles.infoValue}>{Math.round(deviceInfo.batteryLevel * 100)}%</Text>
</View>
<View style={styles.infoRow}>
<Text style={styles.infoLabel}>是否充电:</Text>
<Text style={styles.infoValue}>{deviceInfo.isBatteryCharging ? '是' : '否'}</Text>
</View>
<View style={styles.infoRow}>
<Text style={styles.infoLabel}>总内存:</Text>
<Text style={styles.infoValue}>{formatMemory(deviceInfo.totalMemory)}</Text>
</View>
<View style={styles.infoRow}>
<Text style={styles.infoLabel}>已用内存:</Text>
<Text style={styles.infoValue}>{deviceInfo.usedMemory}</Text>
</View>
</View>
{/* 平台信息 */}
<View style={styles.section}>
<Text style={styles.sectionTitle}>🌐 平台信息</Text>
<View style={styles.infoRow}>
<Text style={styles.infoLabel}>当前平台:</Text>
<Text style={styles.infoValue}>{Platform.OS}</Text>
</View>
<View style={styles.infoRow}>
<Text style={styles.infoLabel}>React Native 版本:</Text>
<Text style={styles.infoValue}>0.72.5</Text>
</View>
</View>
</ScrollView>
</SafeAreaView>
);
}
const styles = StyleSheet.create({
container: {
flex: 1,
backgroundColor: '#f5f5f5',
},
loadingContainer: {
flex: 1,
justifyContent: 'center',
alignItems: 'center',
backgroundColor: '#ffffff',
},
loadingText: {
fontSize: 16,
color: '#666666',
},
header: {
flexDirection: 'row',
justifyContent: 'space-between',
alignItems: 'center',
backgroundColor: '#ffffff',
paddingHorizontal: 16,
paddingVertical: 12,
borderBottomWidth: 1,
borderBottomColor: '#e0e0e0',
},
headerTitle: {
fontSize: 20,
fontWeight: 'bold',
color: '#333333',
},
refreshButton: {
backgroundColor: '#007AFF',
paddingHorizontal: 16,
paddingVertical: 8,
borderRadius: 8,
},
refreshButtonText: {
color: '#ffffff',
fontSize: 14,
fontWeight: '600',
},
scrollView: {
flex: 1,
},
section: {
backgroundColor: '#ffffff',
marginTop: 12,
paddingHorizontal: 16,
paddingVertical: 12,
},
sectionTitle: {
fontSize: 18,
fontWeight: 'bold',
color: '#333333',
marginBottom: 12,
},
infoRow: {
flexDirection: 'row',
marginBottom: 8,
},
infoLabel: {
fontSize: 15,
color: '#666666',
width: 120,
},
infoValue: {
fontSize: 15,
color: '#333333',
flex: 1,
},
});
export default DeviceInfoDemo;🎨 实际应用场景
完整示例代码已展示了以下实际应用场景:
- 应用信息展示: 显示应用的包名、版本号、构建号等信息,用于版本管理和用户反馈
- 设备识别: 获取设备品牌、型号、制造商等信息,用于设备统计和适配
- 设备类型判断: 判断设备是否为平板、模拟器,用于 UI 适配和功能控制
- 系统信息: 获取操作系统名称、版本、API 级别,用于兼容性判断
- 硬件监控: 监控电池电量、充电状态、内存使用情况,用于性能优化和用户体验
- 用户分析: 通过设备信息进行用户行为分析和个性化推荐
⚠️ 注意事项与最佳实践
1. Codegen 配置(重要)
!WARNING 本库必须配置 Codegen,否则无法使用!
bash
# 在 package.json 中添加脚本
"codegen": "react-native codegen-harmony --cpp-output-path ./harmony/entry/src/main/cpp/generated --rnoh-module-path ./harmony/entry/oh_modules/@rnoh/react-native-openharmony"

# 执行 codegen
npm run codegen

# 在 CMakeLists.txt 中添加生成的代码
file(GLOB GENERATED_CPP_FILES "./generated/*.cpp")
add_library(rnoh_app SHARED ${GENERATED_CPP_FILES} ...)

# 在 PackageProvider.cpp 中添加生成的包
#include "generated/RNOHGeneratedPackage.h"
std::make_shared<RNOHGeneratedPackage>(ctx),
2. 权限配置
根据需要使用的功能,在 module.json5 中配置相应的权限:
json5
"requestPermissions": [
  {
    "name": "ohos.permission.GET_NETWORK_INFO"
  },
  {
    "name": "ohos.permission.GET_WIFI_INFO"
  },
  {
    "name": "ohos.permission.DISTRIBUTED_DATASYNC",
    "reason": "$string:DATA_SYNC",
    "usedScene": {
      "abilities": ["EntryAbility"],
      "when": "always"
    }
  }
]
3. 异步方法处理
大部分方法是异步的,需要使用 async/await 或 Promise 处理:
javascript
// 正确:使用 async/await
const batteryLevel = await DeviceInfo.getBatteryLevel();

// 正确:使用 Promise
DeviceInfo.getBatteryLevel().then(level => {
  console.log('电池电量:', level);
});

// 错误:直接调用(会导致 undefined)
const level = DeviceInfo.getBatteryLevel();
4. 性能优化
- 避免频繁调用: 设备信息一般不会频繁变化,建议在应用启动时一次性获取并缓存
- 并行获取 : 使用
Promise.all并行获取多个信息,提高效率 - 按需获取: 只获取需要的信息,不要一次性获取所有信息
javascript
// 优化:并行获取多个信息
const [brand, model, version] = await Promise.all([
  DeviceInfo.getBrand(),
  DeviceInfo.getModel(),
  DeviceInfo.getVersion(),
]);
5. 错误处理
javascript
try {
  const batteryLevel = await DeviceInfo.getBatteryLevel();
  console.log('电池电量:', batteryLevel);
} catch (error) {
  console.error('获取电池电量失败:', error);
  // 提供默认值或处理错误
}
6. 兼容性处理
部分 API 在不同平台的支持情况不同,使用前需检查:
javascript
// 检查平台
import { Platform } from 'react-native';

if (Platform.OS === 'android') {
  const apiLevel = await DeviceInfo.getApiLevel();
  console.log('API 级别:', apiLevel);
}
7. 内存格式化
内存相关的 API 返回的是字节数,建议进行格式化显示:
javascript
const formatMemory = (bytes) => {
  if (!bytes) return 'N/A';
  const gb = bytes / (1024 * 1024 * 1024);
  return `${gb.toFixed(2)} GB`;
};
8. 版本兼容性
根据 RN 版本选择对应的库版本:
| RN 版本 | 库版本 | 包名 |
|---|---|---|
| 0.72 | 11.1.1 | @react-native-ohos/react-native-device-info |
| 0.77 | 14.0.5 | @react-native-ohos/react-native-device-info |
📊 对比:原生 API vs react-native-device-info
| 特性 | 原生 API | react-native-device-info |
|---|---|---|
| 跨平台 | ❌ 需要分别实现 | ✅ 统一接口 |
| 开发效率 | ⚠️ 需要编写原生代码 | ✅ 开箱即用 |
| 维护成本 | ⚠️ 需要维护多端代码 | ✅ 社区维护 |
| 功能完整性 | ✅ 可定制化强 | ✅ 功能全面 |
| 学习成本 | ⚠️ 需要了解各平台 API | ✅ API 简单统一 |
| 性能 | ✅ 最佳 | ✅ 接近原生 |
📝 总结
通过集成 react-native-device-info,我们为项目添加了强大的设备信息获取功能。这个库提供了跨平台统一的接口,可以轻松获取各种设备、应用、系统和硬件信息,大大简化了跨平台开发中的设备信息相关工作。
关键要点回顾
- ✅ 安装依赖 :
npm install @react-native-ohos/react-native-device-info - ✅ 配置 Codegen : 必须执行 Codegen 生成桥接代码
- ✅ 配置平台: 通过 har 包或直接链接源码,配置 CMakeLists.txt 和 PackageProvider.cpp
- ✅ 配置权限: 在 module.json5 中添加必要的权限
- ✅ 集成代码: 使用 DeviceInfo 模块提供的各种 API
- ✅ 支持功能: 设备信息、应用信息、系统信息、硬件信息等
- ✅ 测试验证: 确保三端表现一致
- ✅ 重要提醒: 本库必须配置 Codegen,否则无法使用
常用 API 快速参考
javascript
// 应用信息
DeviceInfo.getBundleId()              // 获取包名
DeviceInfo.getApplicationName()       // 获取应用名称
DeviceInfo.getVersion()               // 获取版本号
DeviceInfo.getBuildNumber()           // 获取构建号

// 设备信息
DeviceInfo.getBrand()                 // 获取品牌
DeviceInfo.getModel()                 // 获取型号
DeviceInfo.getDeviceName()            // 获取设备名称
DeviceInfo.isTablet()                 // 判断是否为平板
// 系统信息
DeviceInfo.getSystemName()            // 获取系统名称
DeviceInfo.getSystemVersion()         // 获取系统版本
DeviceInfo.getApiLevel()              // 获取 API 级别

// 硬件信息
DeviceInfo.getBatteryLevel()          // 获取电池电量
DeviceInfo.isBatteryCharging()        // 判断是否充电
DeviceInfo.getTotalMemory()           // 获取总内存
DeviceInfo.getUsedMemory()            // 获取已用内存