一、效果
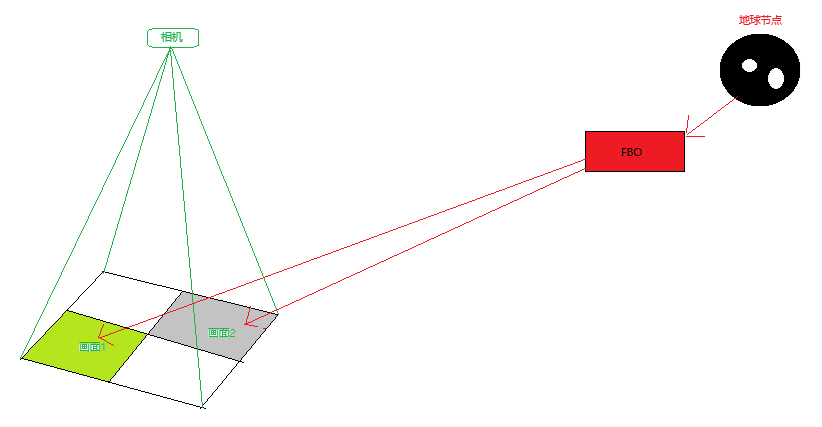
左下角是原始画面,右上角是处理成灰度效果的画面。
二、实现思路
先将地球节点渲染到帧缓存FBO,自定义几何矩形面并绑定FBO中的纹理,然后添加正交投影相机并将视口对准几何矩形进行渲染,大致过程如下:
三、关键代码
1.将场景节点渲染到帧缓存(FBO)
cpp
osg::Node* RenderNode2FBO(App& app, osg::Node* sceneGraph)
{
	osg::Camera* rtt = new osg::Camera();
	rtt->setRenderOrder(osg::Camera::PRE_RENDER);
	rtt->setRenderTargetImplementation(osg::Camera::FRAME_BUFFER_OBJECT);
	rtt->setViewport(0, 0, app.gcolor->getTextureWidth(), app.gcolor->getTextureHeight());
	rtt->setClearMask(GL_COLOR_BUFFER_BIT | GL_DEPTH_BUFFER_BIT);
	rtt->attach(osg::Camera::BufferComponent(osg::Camera::COLOR_BUFFER0), app.gcolor);
	rtt->attach(osg::Camera::BufferComponent(osg::Camera::COLOR_BUFFER1), app.gnormal);
	rtt->attach(osg::Camera::BufferComponent(osg::Camera::COLOR_BUFFER2), app.gdepth);
	rtt->setCullingMode(rtt->getCullingMode() & ~osg::CullSettings::SMALL_FEATURE_CULLING);

	static const char* vertSource = R"(
        #version 330
        out float mrt_depth;
        void oe_mrt_vertex(inout vec4 vertexClip)
        {
            mrt_depth = (vertexClip.z/vertexClip.w)*0.5+0.5;
        }
    )";

	static const char* fragSource = R"(
        #version 330
        in float mrt_depth;
        in vec3 vp_Normal;
        layout(location=0) out vec4 gcolor;
        layout(location=1) out vec4 gnormal;
        layout(location=2) out vec4 gdepth;
        void oe_mrt_fragment(inout vec4 color)
        {
            gcolor = color;
            gnormal = vec4((vp_Normal+1.0)/2.0, 1.0);
            gdepth = vec4(mrt_depth, mrt_depth, mrt_depth, 1.0);
        }
    )";

	VirtualProgram* vp = VirtualProgram::getOrCreate(rtt->getOrCreateStateSet());
	vp->setFunction("oe_mrt_vertex", vertSource, ShaderComp::LOCATION_VERTEX_CLIP);
	vp->setFunction("oe_mrt_fragment", fragSource, ShaderComp::LOCATION_FRAGMENT_OUTPUT);

	rtt->addChild(sceneGraph);
	return rtt;
}
2.创建正交相机,创建自定义矩形面并从FBO读取纹理并绑定
cpp
osg::Node* createFramebufferPass(App& app)
{
	osg::Camera* camera = new osg::Camera();
	float w = app.gcolor->getTextureWidth();
	float h = app.gcolor->getTextureHeight();

	camera->setReferenceFrame(osg::Transform::ABSOLUTE_RF);
	camera->setViewMatrix(osg::Matrix::identity());
	camera->setProjectionMatrixAsOrtho2D(-w / 2, (-w / 2) + w, -h / 2, (-h / 2) + h);
	{
		osg::Node* quad = createFramebufferQuadLeft(app);

		osg::StateSet* stateset = quad->getOrCreateStateSet();

		static const char* vertSource = R"(
	        #version 130
	        out vec4 texcoord;
	        void effect_vert(inout vec4 vertexView)
	        {
	            texcoord = gl_MultiTexCoord0;
	        }
	    )";

		// fragment shader that performs edge detection and tints edges red.
		static const char* fragSource = R"(
	        #version 330
	        #extension GL_ARB_texture_rectangle : enable
	        uniform sampler2DRect gcolor;
	        in vec4 texcoord;

	        void effect_frag(inout vec4 color)
	        {
	          color = texture(gcolor, texcoord.st);
	        }
	    )";

		VirtualProgram* vp = VirtualProgram::getOrCreate(stateset);
		vp->setFunction("effect_vert", vertSource, ShaderComp::LOCATION_VERTEX_VIEW);
		vp->setFunction("effect_frag", fragSource, ShaderComp::LOCATION_FRAGMENT_COLORING);

		stateset->setTextureAttributeAndModes(0, app.gcolor, 1);
		stateset->addUniform(new osg::Uniform("gcolor", 0));
		GLUtils::setLineWidth(stateset, 2.0f, 1);

		camera->addChild(quad);
	}
	{
		osg::Node* quad = createFramebufferQuadRight(app);

		osg::StateSet* stateset = quad->getOrCreateStateSet();

		static const char* vertSource = R"(
	        #version 130
	        out vec4 texcoord;
	        void effect_vert(inout vec4 vertexView)
	        {
	            texcoord = gl_MultiTexCoord0;
	        }
	    )";

		// fragment shader that performs edge detection and tints edges red.
		static const char* fragSource = R"(
	        #version 330
	        uniform sampler2DRect gcolor;
	        in vec4 texcoord;

	        void effect_frag(inout vec4 color)
	        {
				//简单效果:灰度处理
	            vec4 colorTexture = texture(gcolor, texcoord.st);
				float gray = (colorTexture.r+colorTexture.g+colorTexture.b)/3.0;
				color = vec4(gray,gray,gray,colorTexture.a);
	        }
	    )";

		VirtualProgram* vp = VirtualProgram::getOrCreate(stateset);
		vp->setFunction("effect_vert", vertSource, ShaderComp::LOCATION_VERTEX_VIEW);
		vp->setFunction("effect_frag", fragSource, ShaderComp::LOCATION_FRAGMENT_COLORING);

		stateset->setTextureAttributeAndModes(0, app.gcolor, 1);
		stateset->addUniform(new osg::Uniform("gcolor", 0));
		GLUtils::setLineWidth(stateset, 2.0f, 1);

		camera->addChild(quad);
	}
	return camera;
}
原创不易,记得点赞加关注哦,我会持续分享实用的功能(:-