前言
简单来说,有两个需求,第一个是实现业务组件库的按需加载,第二,因为业务组件库里面有引用了类似 Element Plus 的第三方组件库,所以在实现业务组件库按需加载的同时,业务组件库里面的引用的第三方组件库也要实现按需加载。
一般在项目中如果没有进行组件库按需加载配置,都是一开始就全量加载进行全局组件注册,这样就等于整个组件库在初始化的时候就全部加载了,如果在追求性能的项目中,这是不可接受的。这时我们就要实现组件库的按需加载,来提高性能。
按需加载的基本实现原理
首先什么是按需加载?
所谓按需加载,顾名思义就是有需要就加载,不需要就不加载,比如 Element Plus 组件库有几十个组件,可能在我们的项目只用到了到了其中一个组件 <el-button>,那么我们就希望只加载跟这个按钮组件相关的代码,从而达到减少打包体积的效果。
按需加载最简单的实现方式就是手动设置,实现如下:
<template>
  <el-button>按钮</el-button>
</template>

<script>
import { ElButton } from 'element-plus/es/components/button'
import 'element-plus/es/components/button/style/index'

export default {
  components: { ElButton },
}
</script>
我们像上述例子这样手动引用第三方组件库的话,在打包的时候就只会打包引用到的组件,因为目前的开源组件库基本都实现了利于 Tree Shaking 的 ESM 模块化实现。
如果每个业务组件都需要进行上述设置,其实还是挺繁琐的,所以我们希望只在 template 中直接调用就好,其他什么设置都不需要,就像全局注册组件那样使用。
<template>
  <el-button>按钮</el-button>
</template>
而剩下部分的代码,我们希望在打包或者运行的时候自动设置上去。主要是以下部分的代码:
import { ElButton } from 'element-plus/es/components/button'
import 'element-plus/es/components/button/style/index'
上述部分的代码,希望自动加载,而不需要手动设置。整个所谓按需加载所需要实现的就是上述的功能。
那么怎么实现呢?
首先上述模板代码的编译结果如下:
import { createTextVNode as _createTextVNode, resolveComponent as _resolveComponent, withCtx as _withCtx, createVNode as _createVNode, openBlock as _openBlock, createElementBlock as _createElementBlock } from "vue"

export function render(_ctx, _cache, $props, $setup, $data, $options) {
  const _component_el_button = _resolveComponent("el-button")

  return (_openBlock(), _createElementBlock("template", null, [
    _createVNode(_component_el_button, null, {
      default: _withCtx(() => [
        _createTextVNode("按钮")
      ], undefined, true),
      _: 1 /* STABLE */
    })
  ]))
}
我们只需要找到 Vue3 的内置函数 _resolveComponent("el-button") 部分,然后替换成对应的组件代码即可。例如:
+ import { ElButton } from 'element-plus/es/components/button'
+ import 'element-plus/es/components/button/style/index'
import { createTextVNode as _createTextVNode, resolveComponent as _resolveComponent, withCtx as _withCtx, createVNode as _createVNode, openBlock as _openBlock, createElementBlock as _createElementBlock } from "vue"

export function render(_ctx, _cache, $props, $setup, $data, $options) {
-  const _component_el_button = _resolveComponent("el-button")
+ const _component_el_button = ElButton

  return (_openBlock(), _createElementBlock("template", null, [
    _createVNode(_component_el_button, null, {
      default: _withCtx(() => [
        _createTextVNode("按钮")
      ], undefined, true),
      _: 1 /* STABLE */
    })
  ]))
}
上述就是组件库按需加载的基本实现原理。
使用 Vite 打包组件库
为了更好还原实际场景,我们快速创建一个组件库项目并且通过 Vite 进行打包。 首先创建一个vite-ui 的组件库目录,在根目录下初始化 Node 项目,执行 pnpm init, 会自动生成 package.json 文件,内容如下:
注意添加 "type": "module",
{
  "name": "vite-ui",
  "version": "1.0.0",
  "description": "",
  "main": "index.js",
  "type": "module",
  "keywords": [],
  "author": "",
  "license": "ISC",
  "packageManager": "pnpm@10.13.1",
  "dependencies": {
    "vue": "^3.5.28"
  }
}
在根目录新建 pnpm-workspace.yaml 文件进行 Monorepo 项目配置:
packages:
  - packages/*
  - play
总的目录结构如下:
├── packages
│   ├── components
│   ├── hooks
│   └── utils
├── package.json
└── pnpm-workspace.yaml
接着我们安装一些必要的依赖:
pnpm add vite @vitejs/plugin-vue sass -D -w接着我们安装一下 vue 依赖:
pnpm add vue -w接着我们就在 packages/components 目录下创建一个测试按钮组件
目录路径:packages/components/button/button.vue,内容如下:
<template>
  <button>测试按钮</button>
</template>
<script setup lang="ts">
defineOptions({
  name: "my-button",
});
</script>
<style lang="scss" scoped>
button {
  color: red;
}
</style>目录路径:packages/components/button/index.js,内容如下:
import button from "./button.vue";
export const MyButton = button;
export default MyButton;目录路径:packages/components/components.js,内容如下:
import { MyButton } from "./button";
export default [MyButton];将所有组件集中在一个数组中统一导出,方便批量管理和使用。目录路径:packages/components/defaults.js,内容如下:
import components from "./components";

const install = function (app) {
  components.forEach((component) => {
    app.component(component.name, component);
  });
};

export default {
  install,
};目录路径:packages/components/index.js,内容如下:
export * from "./button";

import install from "./defaults";
export default install;我们再配置一个测试文件,目录路径:packages/utils/index.js,内容如下:
export function testUtils() {
    console.log('testUtils');
}
如果大家对创建组件库比较有经验的话,就知道上述步骤,是 Vue3 组件库的基础设置,各大组件库的实现虽然差异很大,但最核心机制都可以简单归纳为上述设置内容。
接着我们就到了我们最核心的组件库打包的环节了,我们在根本目录创建一个 vite.config.js,设置内容如下:
import { defineConfig } from "vite";
import vue from "@vitejs/plugin-vue";
import path, { resolve } from "path";
import fs from "fs";

// 动态获取组件目录列表
const componentsDir = resolve(__dirname, "./packages/components");
const modules = fs.readdirSync(componentsDir).filter((name) => {
  const fullPath = path.join(componentsDir, name);
  // 只获取目录,排除文件
  return fs.statSync(fullPath).isDirectory();
});

const entryArr = {
  // 主入口
  index: resolve(__dirname, "./packages/components/index.js"),

  // 工具入口
  utils: resolve(__dirname, "./packages/utils/index.js"),
};

// 为每个组件创建独立入口
modules.forEach((name) => {
  entryArr[`components/${name}/index`] = resolve(
    __dirname,
    `./packages/components/${name}/index.js`,
  );
});

export default defineConfig(({ command, mode }) => {
  // 主构建配置
  return {
    plugins: [vue()],
    build: {
      lib: {
        entry: entryArr, // 入口文件
        formats: ["es"], // 只构建 ES 模块
        cssFileName: "style", // 样式文件名
      },
      rollupOptions: {
        external: ["vue"], // 外部依赖
        output: {
          format: "es",
          preserveModules: true, // 保持模块结构
          entryFileNames: `[name].mjs`,
        },
      },
    },
  };
});
设置完 Vite 配置文件后,我们还要设置 packages.json 中的打包命令脚本配置,设置如下:
  "scripts": {
    "build": "vite build"
},这样我们就可以在根目录运行打包命令了:pnpm build。
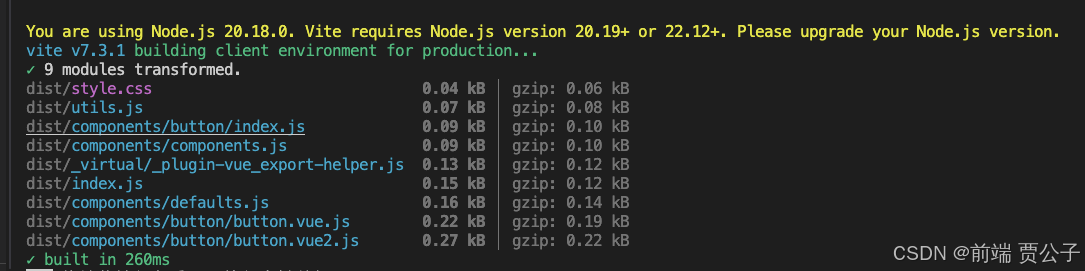
运行结果如下,我们成功打包了我们的组件库。
通过 pnpm 安装本地 npm 包
接着我们在根目录下创建一个测试项目:
pnpm create vite play --template vue-js上述 play 就是测试项目目录,现在这条命令会直接在 play 目录中生成一个使用 Vite 创建的 Vue 项目。
接着我们修改根目录的 package.json 文件:
- "main": "index.js",
+ "module": "/dist/index.mjs",
接着我们进入 play 目录,通过 pnpm 安装本地 npm 包,命令如下:
pnpm add ../运行完上述命令,我们可以看到 ./play/packages.json 文件变化如下:
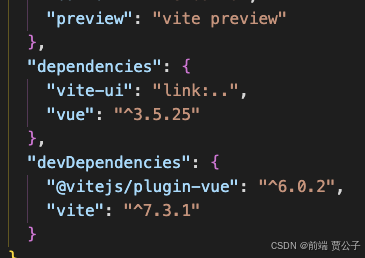
可以看到我们成功把我们本地的 npm 包安装到 play 测试项目中了。
接着修改 ./play/main.js 内容如下:
import { createApp } from "vue";
import App from "./App.vue";
import viteUi from "vite-ui";
import "vite-ui/dist/style.css";

const app = createApp(App);
app.use(viteUi);
app.mount("#app");
接着修改 ./play/App.vue 内容如下:
<template>
  <my-button></my-button>
</template>
<script></script>
最后我们运行 play 测试项目,结果如下:
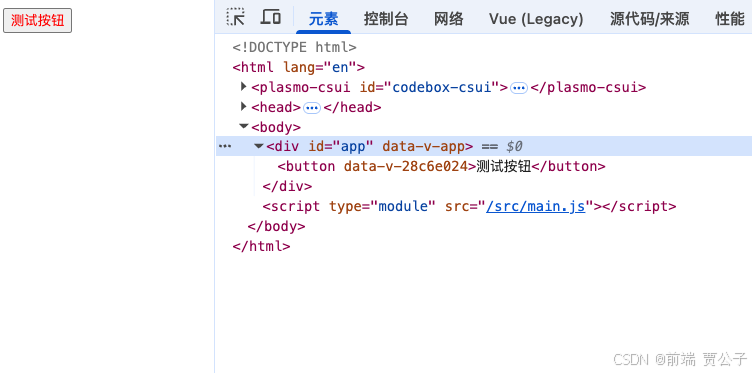
我们可以看到成功运行了本地组件库的 npm 包。
接下来我们希望不进行完整引入组件库:
import { createApp } from 'vue'
import App from './App.vue'
- import CobyteViteUI from 'cobyte-vite-ui'
- import 'cobyte-vite-ui/dist/style.css'

const app = createApp(App)
- app.use(CobyteViteUI)
app.mount('#app')
即便这样我们同样可以在测试项目中使用我们的测试组件。